Ingest Data from AWS S3 to Analytics Environment
If you have data in an AWS S3 bucket that you want to access in your Analytics Environment instance, you can now use a self-service process in LiveRamp Connect to connect to that bucket and create a table from that data. That table will then appear in your Analytics Environment instance in the form of a BigQuery table.
Note
This workflow is available for alpha testers only and currently only supports connecting AWS S3 buckets.
Once your table is in the Analytics Environment, you can use it to build segments, send segments to Customer Profiles for Data Collaboration, gain customer insights, and conduct measurement.
As you add files to the file path you specify for the S3 bucket, the table will be updated based on the update method you specify during the table creation process.
Note
For more information on BigQuery tables, see this Google article.
Overall Steps
The process to get your data from your S3 bucket to your Analytics Environment instance consists of the following overall steps:
Confirm that you have access to the self-service table creation UI in Connect.
Create a data source that connects your AWS S3 bucket to LiveRamp.
Create a table from the file you specified and send it to your Analytics Environment instance.
See the sections below for information on the specific steps to perform, as well as information on key table creation concepts.
Confirm Access to the Table Creation UI
Before you connect your AWS S3 data source to LiveRamp, confirm that you’ve been granted access to the self-service table creation UI:
From the navigation pane, select Data Assets → Tables and Views to navigate to the Tables and Views page.
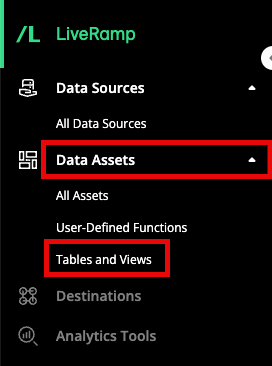
Confirm that you see a green button on the right-hand side of the Tables and Views page.
If you don’t see the button, contact your account team for assistance.
Once you’ve confirmed that you have access, you can connect your AWS S3 data source to LiveRamp.
Create a Data Source to Connect your AWS S3 Bucket
To connect your AWS S3 bucket to LiveRamp, you need to create a data source in Connect.
Note
These are the same data sources (also referred to as “connectors”) that LiveRamp has set up for you in the past, but this time you can set them up yourself (without support assistance).
To create a new data source, follow the steps below:
Perform the steps listed in “Allow LiveRamp to Access Your AWS S3 Bucket” to create an Identity and Access Management (IAM) user so that LiveRamp can retrieve your S3 bucket data for processing.
Note
For the alpha period, we do not support the method where you authorize LiveRamp’s user.
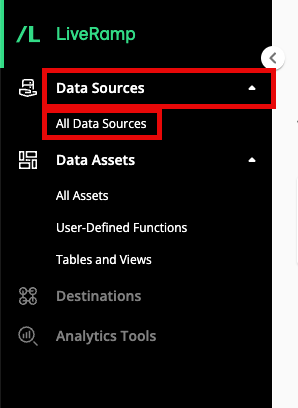
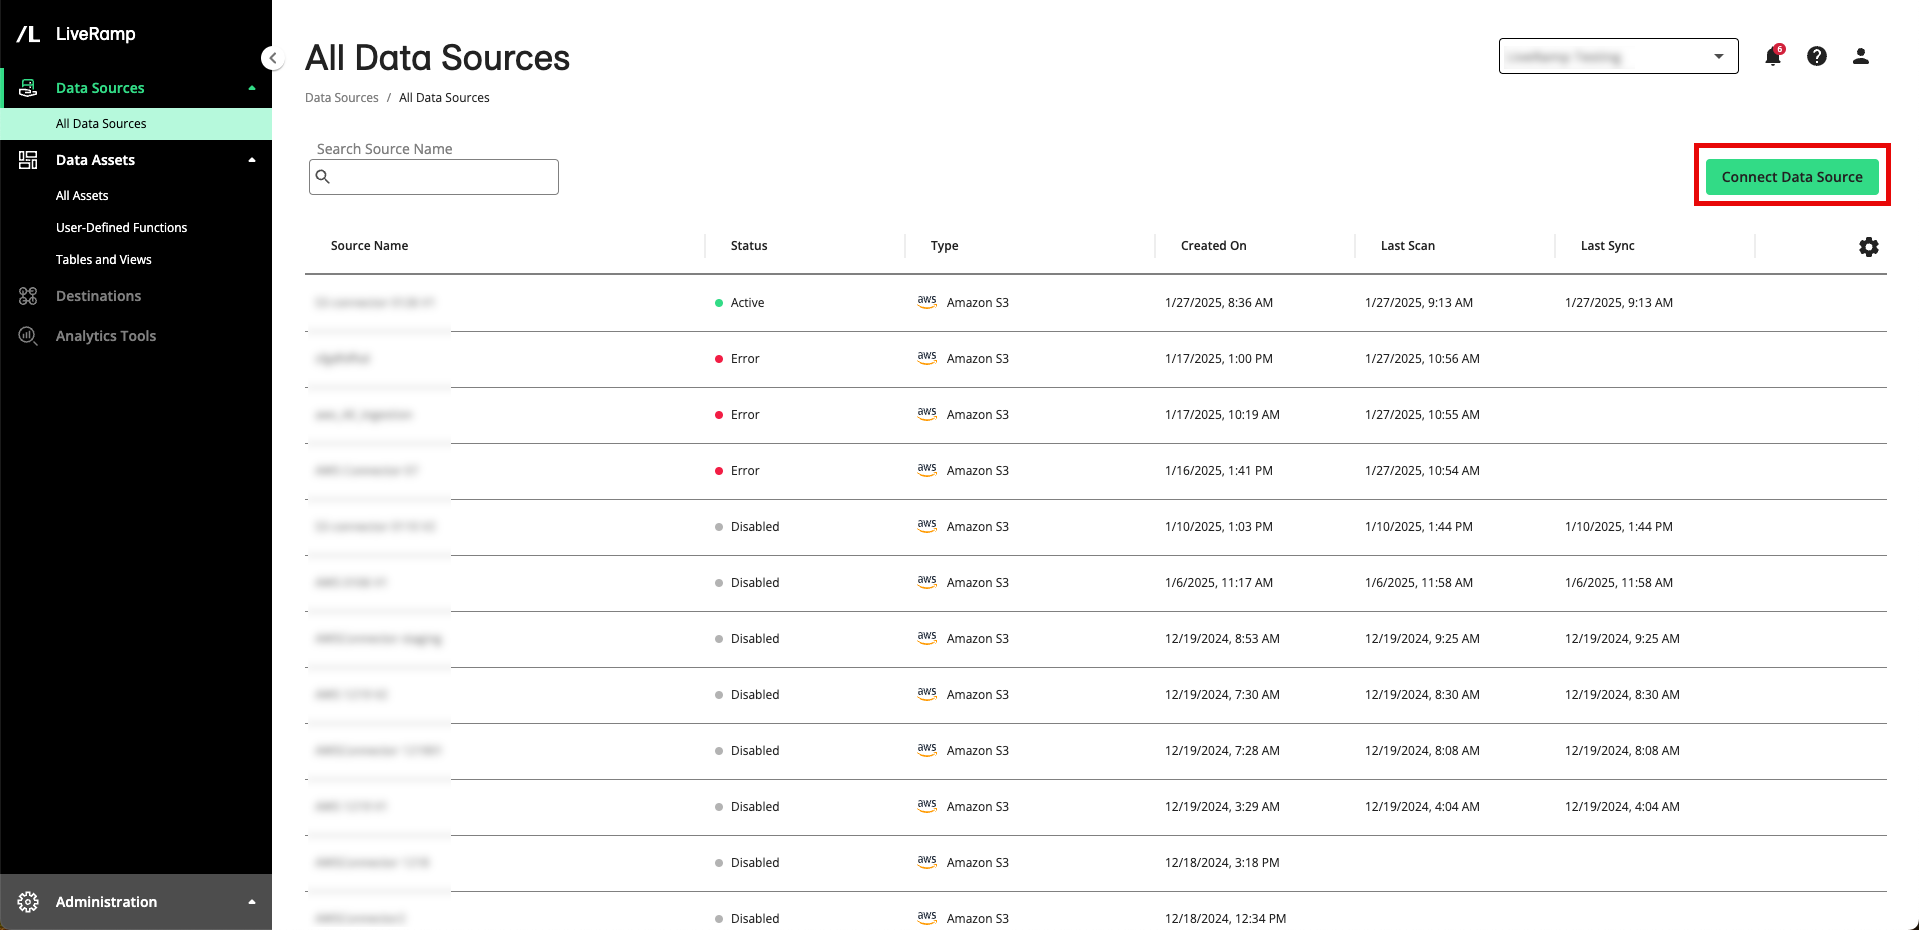
From the navigation menu, select Data Sources → All Data Sources to navigate to the All Data Sources page (which lists all existing data sources in your account, including sources created for you previously by LiveRamp).
Click .
From the Select Source Type step, select AWS S3 and then click .
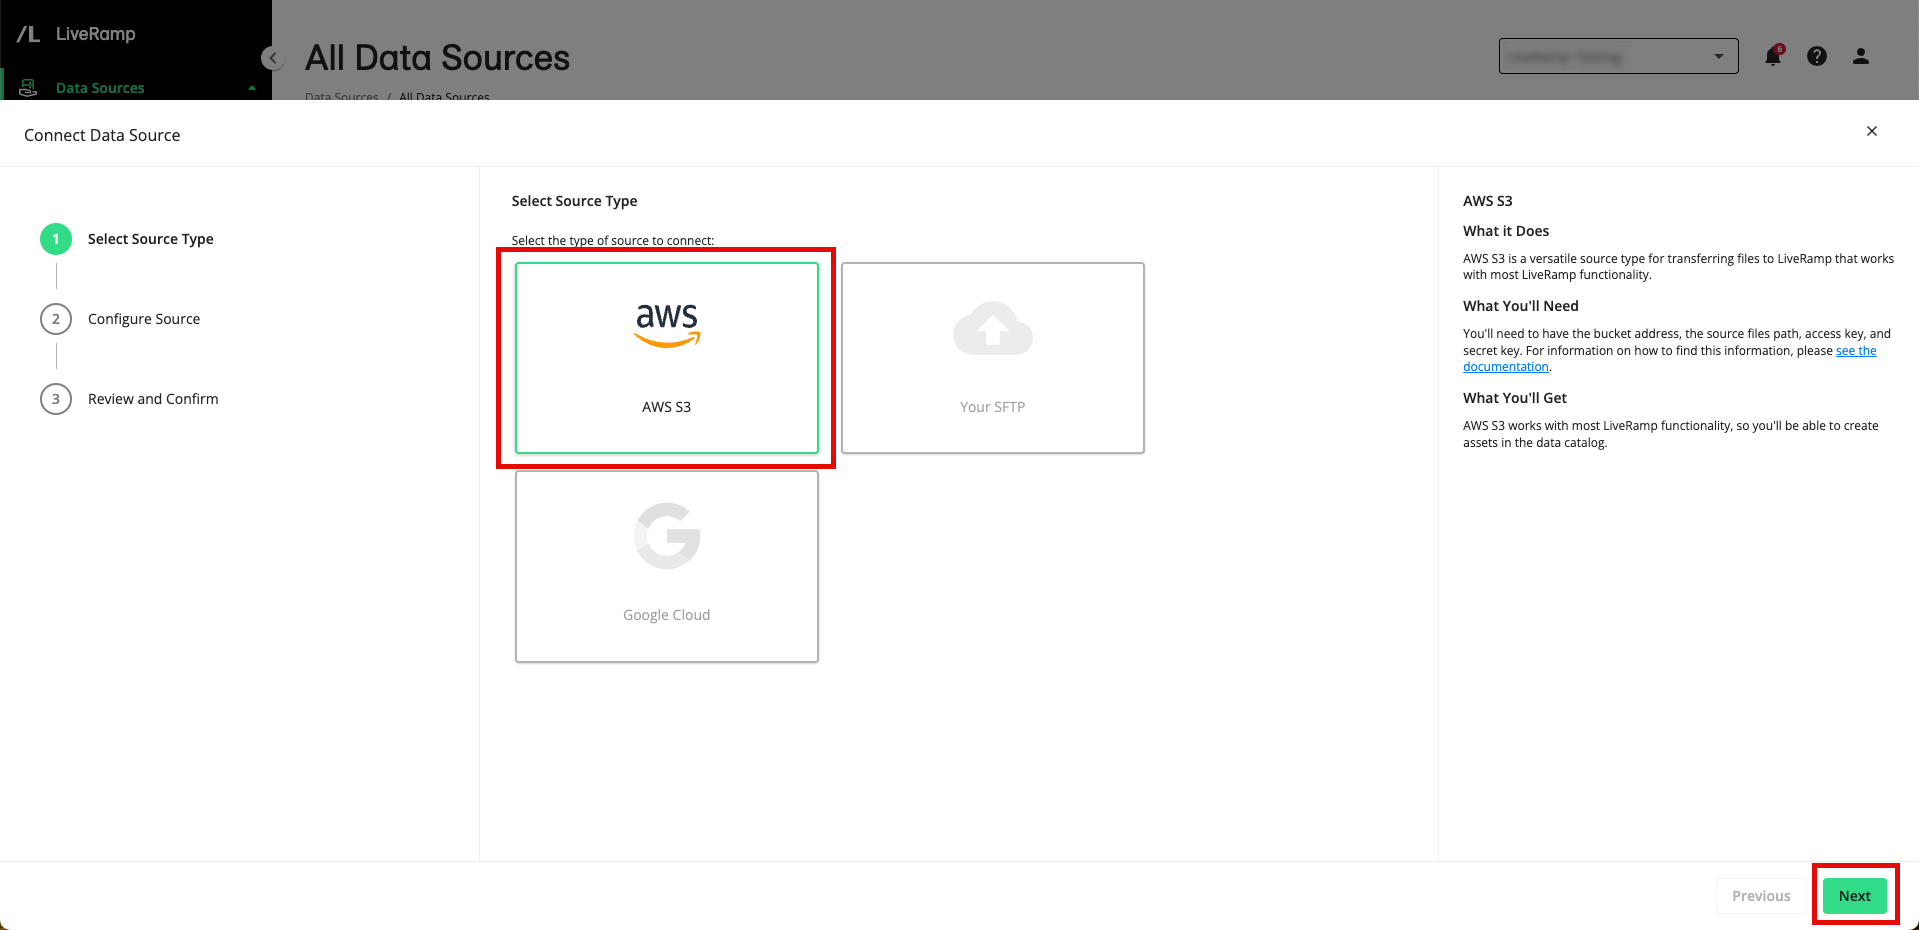
From the Source Configuration step, fill out the following fields and then click :

Source Name: Enter a data source name that will appear for users in LiveRamp for this source.
Source Description (optional): If desired, enter a description for this source and what it represents for your workflow. This description will be displayed in the details panel for this data source.
Bucket: Enter the name of the AWS bucket that contains your data (such as “"sample-bucket-useast").
Note
Make sure that the bucket name is entered exactly as it appears in your AWS instance to ensure data is pulled in from the correct location.
Source Files Path: Enter the path for the file within the bucket you have provided in the previous step. This is the file that will be used to create the table in the Analytics Environment (such as "/liveramp/manual/liveramp/sx5r0i/”).
Note
If you use multiple files to create the table, you can include a wildcard (*) to pull in all files under a common naming convention (all files must have the same headers and use the same format).
Access Key: Enter the access key for your S3 bucket (the access key is 20 characters long and usually formatted like “ASPNDFJAKUDTCHAGSQOZ”). For information on how to find this access key, see this AWS article.
Secret Key: Enter the secret key for your S3 bucket. The secret key is usually formatted like “+27KMXA5r8VTPy M1+GZpJHVLCFYBGP4RJsQKHTF”. For information on how to generate the secret key, see this AWS article.
Note
LiveRamp will never store your private information. It will be validated and recycled in a secure manner.
From the Review and Confirm step, review all the information you entered previously and click Finalize.
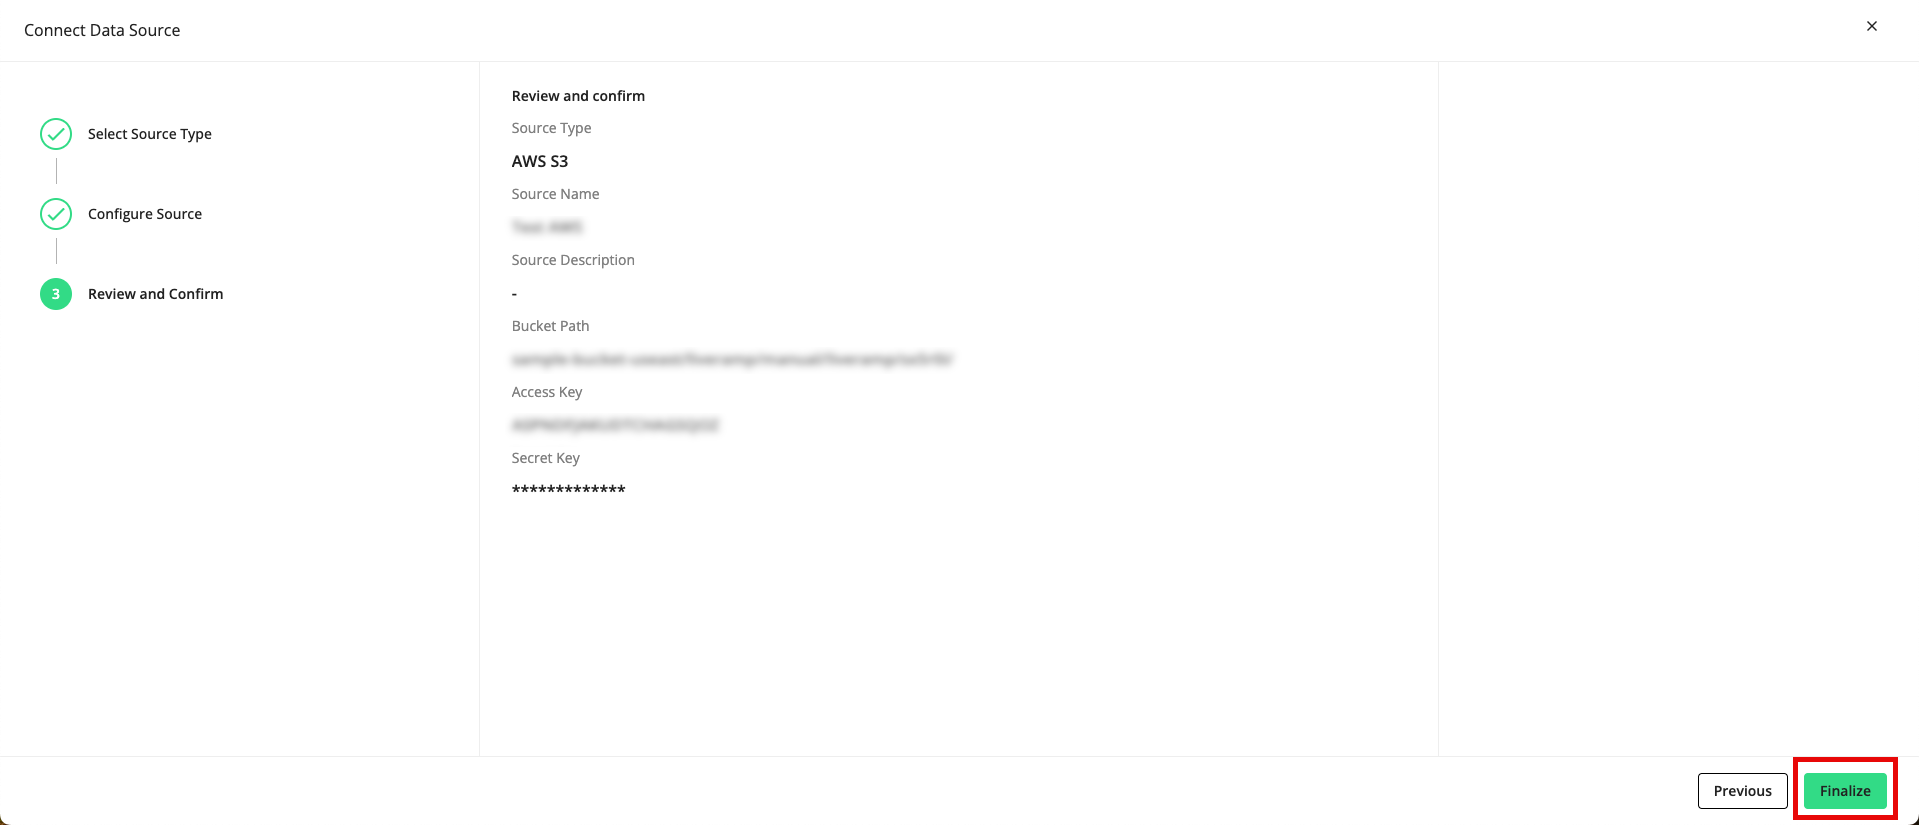
A success message appears.

Within an hour, you should see the name of the data source on the All Data Sources page. If you click on the row for the data source, a details panel opens where you can check to see if the file(s) have been successfully transferred (they should have a status of “Transferred”).
Note
If after three hours you do not see any files in the details panel or if the files have not successfully transferred, contact your LiveRamp representative for assistance.
Once the file(s) from this data source have been successfully transferred, you can create tables from those files and send them to your Analytics Environment instance.
Create a Table and Send It to the Analytics Environment
Once your files have been successfully transferred to LiveRamp, you can use these files to create tables to send to your Analytics Environment (LiveRamp Safe Haven) instance:
Note
For more information on some of the concepts used during the table creation process, see the “Table Creation Concepts” section below.
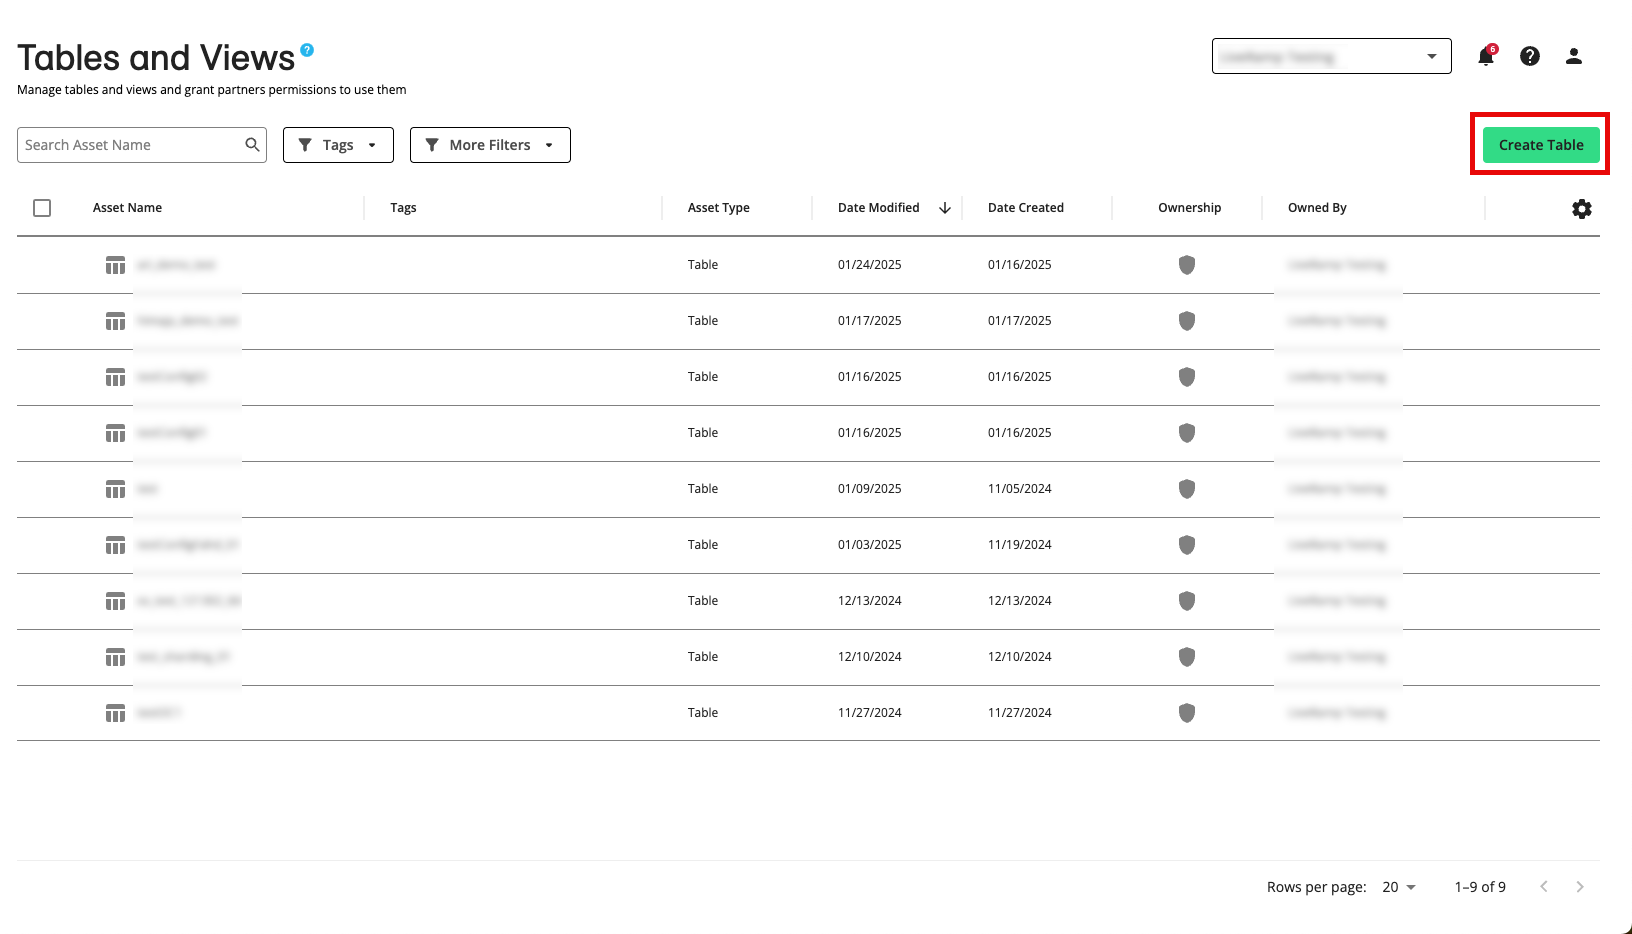
From the navigation pane, select Data Assets → Tables and Views to navigate to the Tables and Views page.
Click .
From the Selected Intended Use step, select Use for measurement in LiveRamp Analytics Environment and then click .
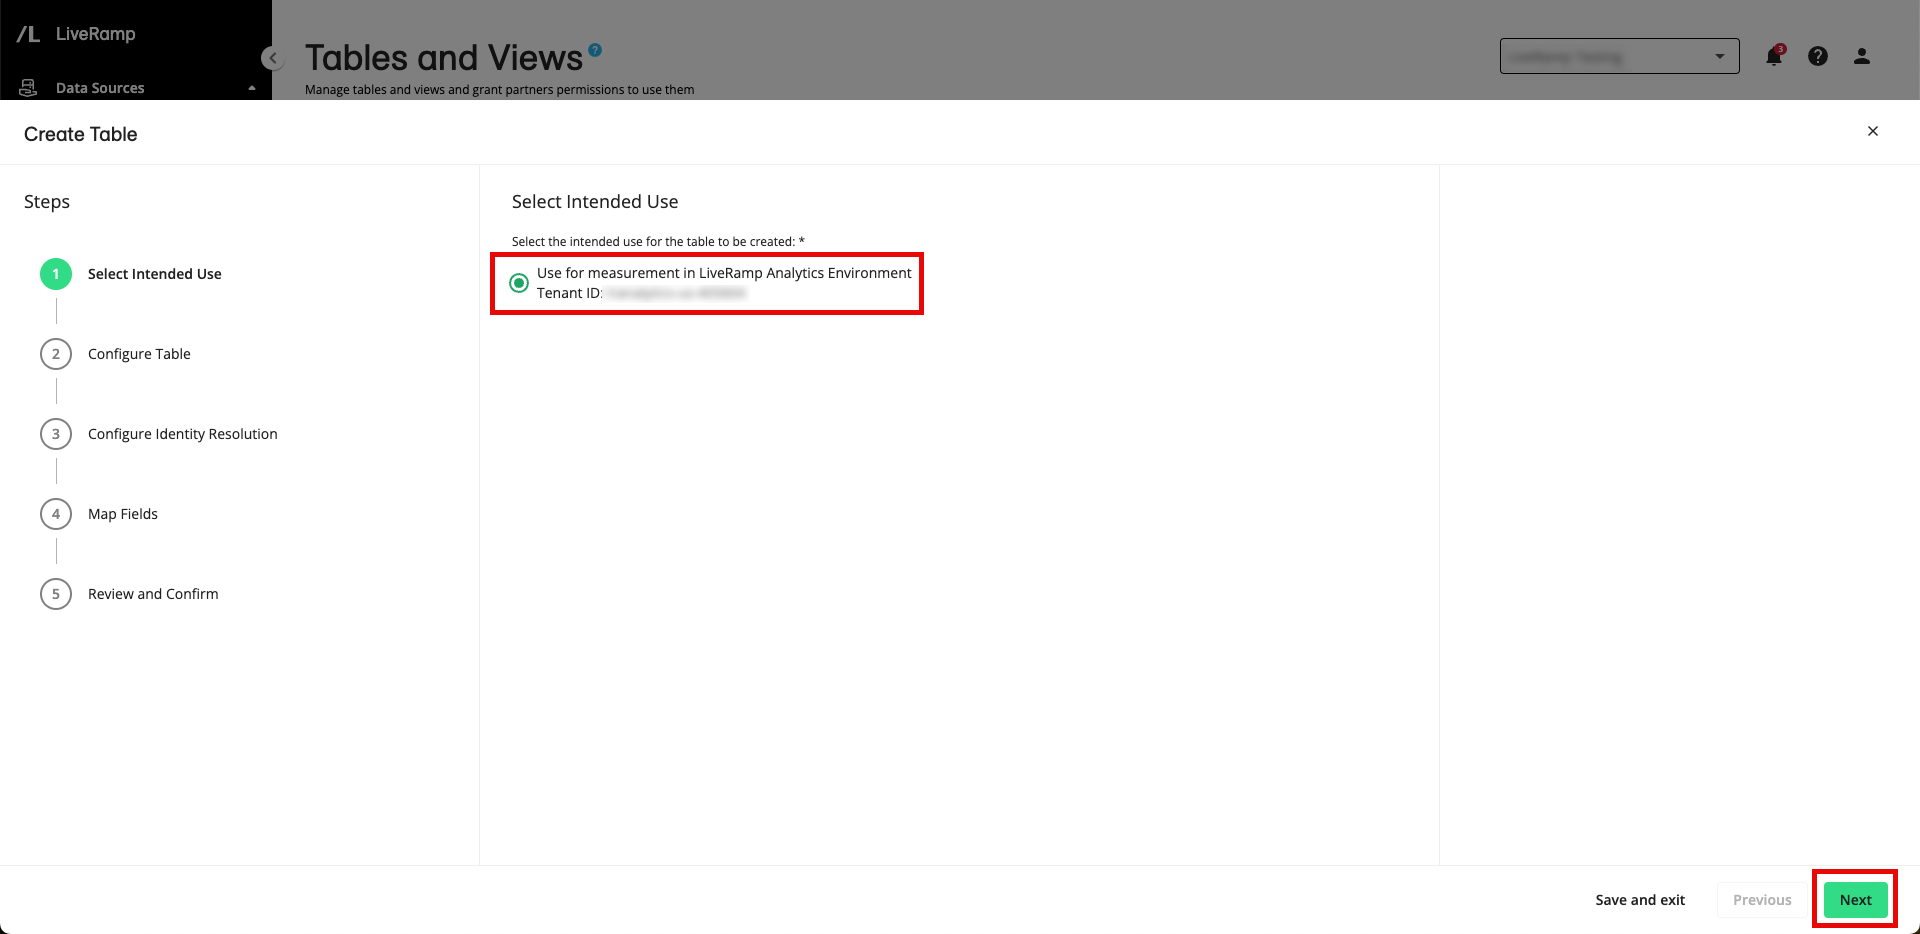
Note
This is the only option for this alpha testing period.
Your Analytics Environment tenant ID will be displayed.
From the Configure Table step, fill out the following fields and then click :
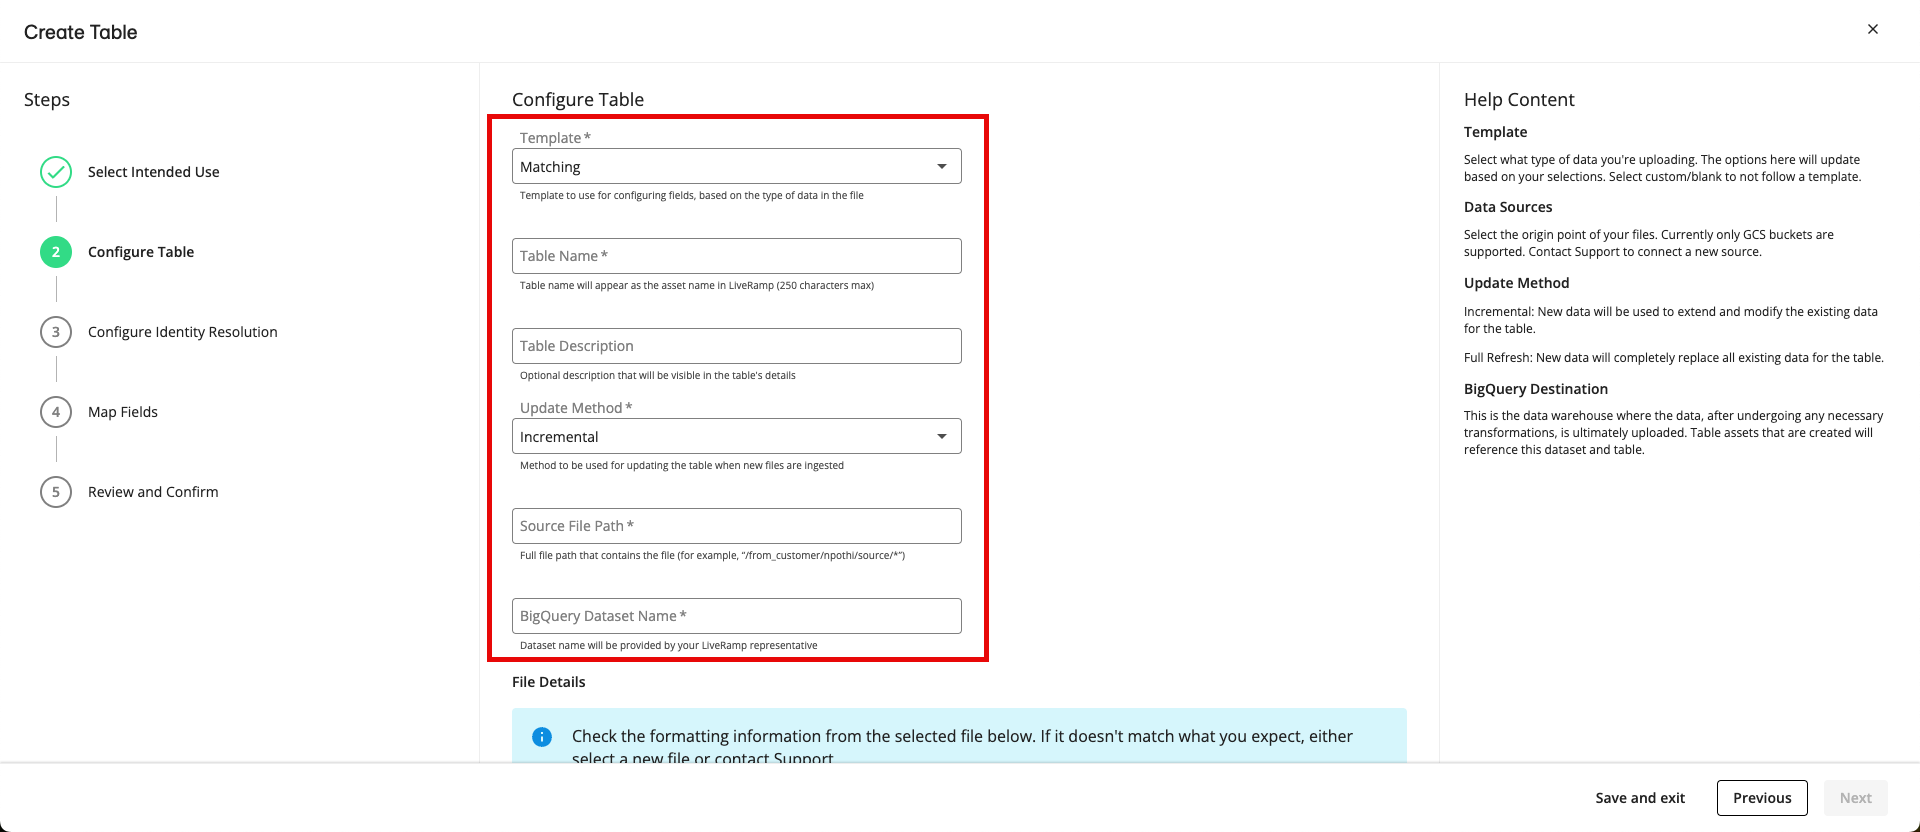
Template: Select the appropriate template for your use case, which will determine the remaining steps in the process (for more information, see the "Templates" below):
Matching: Select this template if you want to resolve your online identifiers to a RampID.
Non-Matching (Passthrough): Select this template if you do not want to resolve your online identifiers to RampID.
Transcoding: Select this template if RampIDs are the identifiers of your input column and you want to transcode those RampIDs into a different partner encoding.
Table Name: Enter a name for your table that will appear for users in LiveRamp on the Tables and Views page.
Note
Do not enter spaces or special characters (other than underscores).
Table Description (optional): If desired, enter a description for this table. This description will be displayed in the details panel for this table.
Update Method: Select the method to be used for refreshing and updating this table in BigQuery if you choose to send new files through this path (for more information on these methods, see the “Update Methods” section below):
Incremental: An incremental update (the most common update method) adds the data from a new file to the table. No previous data for the table is removed.
Full Refresh: A full "refresh" uses the data in a new file to completely replace all of the previous data for the entire table. No previous data remains.
Source File Path: Enter the full path of your file (for example, “/input/liveramp-test-file.csv”).
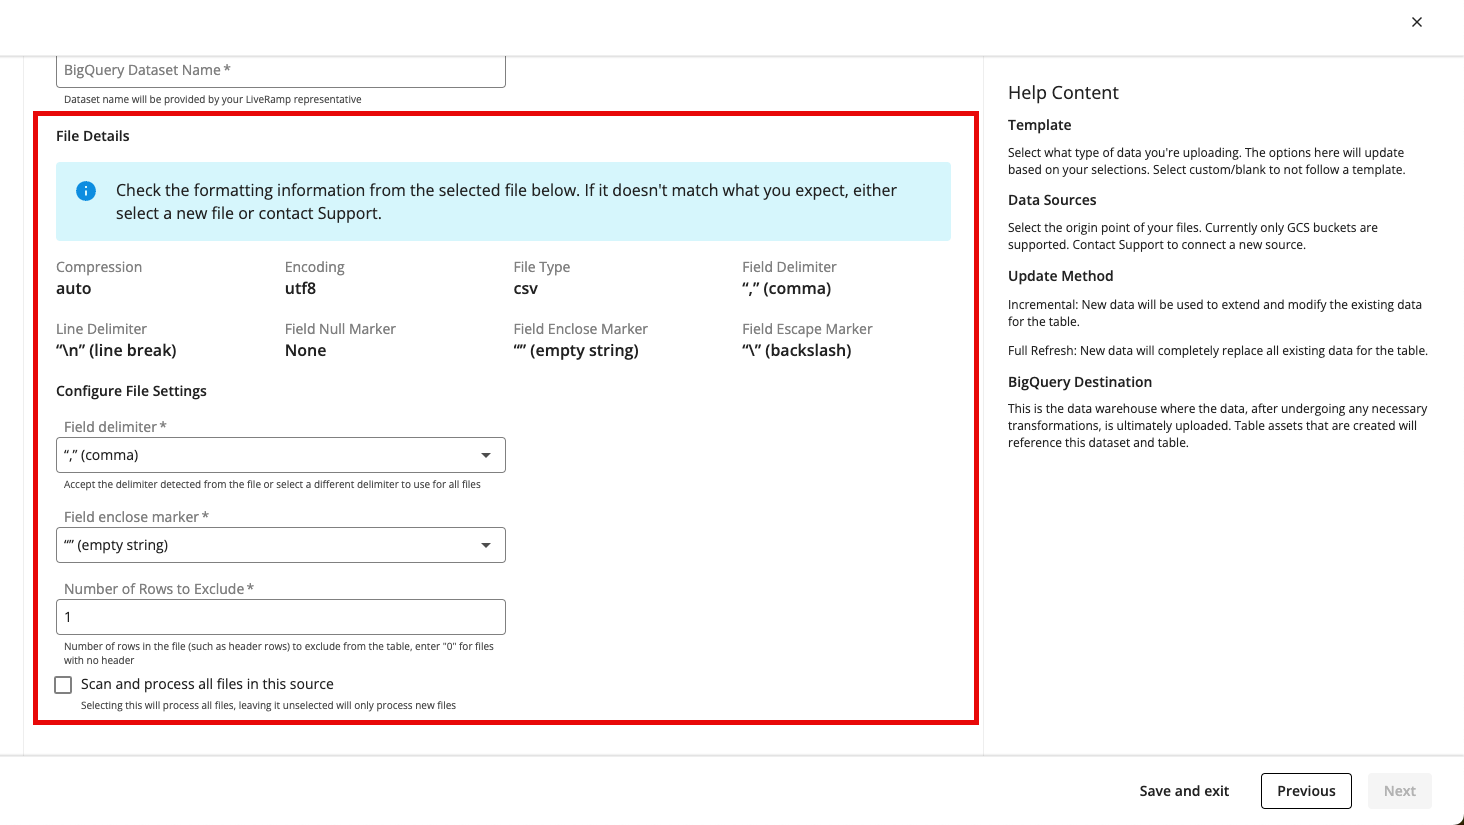
Note
Once you enter the file, information in the File Details and Configure File Settings sections populates so that you can check the formatting information that was detected from that file. For the fields in the Configure File Settings section, most customers do not need to change these values unless there is a specific custom need or if you've been instructed to change them by your LiveRamp representative.
BigQuery Dataset Name: Enter the name of the Analytics Environment data warehouse that you want to send this table to.
Field delimiter: Accept or adjust the delimiter character that appears between each field in the tables.
Field enclose marker: Accept or adjust the marker that encloses each field.
Number of Rows to Exclude: Select the number of rows in the file that you wish to exclude from processing. If the file has a header row, select “1 (default).” If the file has no header, select “0.”
Scan and process all files in this source: Check this check box if you want to use all files that are currently located at this file path (you will probably need to use this option if you are using a wildcard (*) at the end of your file path). If you want only the specified file and future files to be used, do not check this check box.
If you selected the "Matching" template in the Configure Table step, the Configure Identity Resolution step appears after you click and after we validate that there is a file at the path you entered. Follow the instructions in the next step.
If you selected the “Non-Matching (Passthrough)” template or the “Transcoding” template, the Map Fields step appears after you click and after we validate that there is a file at the path you entered. Skip the next step and follow the instructions in step 7.
Note
If no file is found at the file path you entered, a validation error appears and you will need to correct the entered information before proceeding.
From the Configure Identity Resolution step, fill out the following fields and then click :
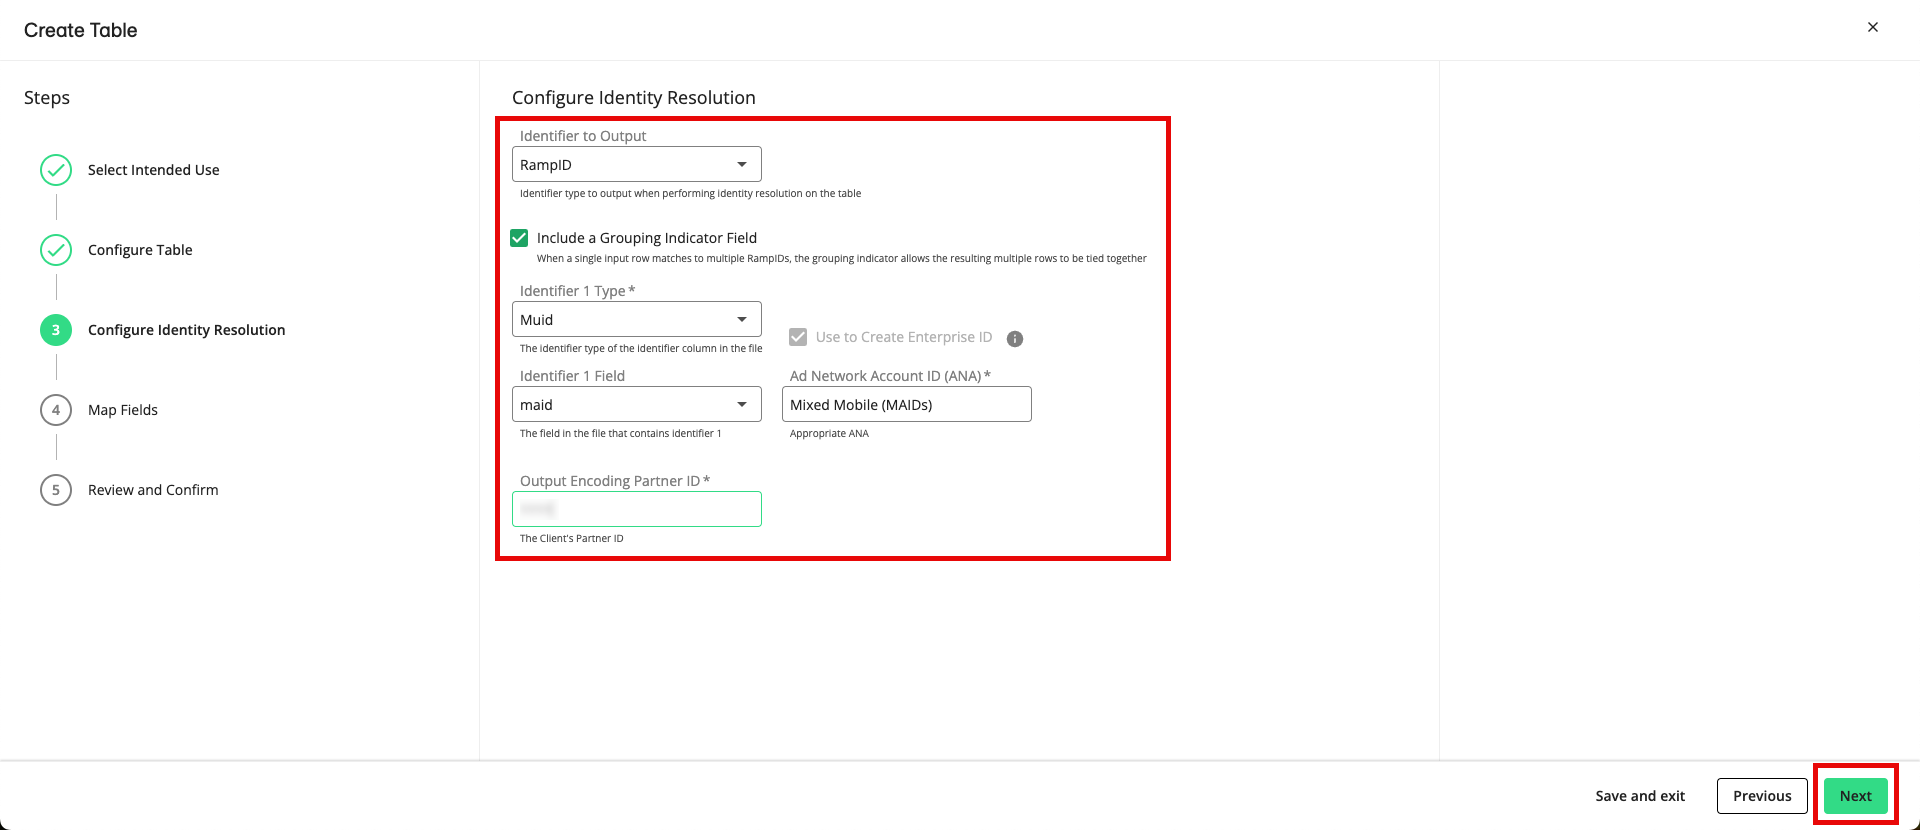
Output identifier type: Confirm that "RampID" is selected (this is the only option at this time).
Include a Grouping indicator FIeld: To add a grouping indicator column to your table, check this check box (when a single input row matches to multiple RampIDs, the grouping indicator allows the resulting multiple rows to be tied together). For more information on grouping indicators, see the “Grouping Indicators” section below.
Identifier 1 Type: Select the type of identifier the file contains:
Note
This alpha testing period only supports the resolution of online identifiers.
Cookies
Custom IDs (CIDs)
CTV IDs
Mobile Device IDs
RampIDs
Identifier 1 Field: Select the field in the file that contains the input identifier 1.
Ad Network Account ID (ANA): Select the identity space you want to map to these identifiers to from the list of the identity spaces associated with your account. For more information, see the “Ad Network Accounts” section below. Contact your account team if you feel that any identity spaces are missing.
Output Encoding Partner ID: If you selected “RampID” as the input identifier type, you need to enter your partner encoding. This is the 4-digit encoding ID of your organization that appears after the first two letters of your RampIDs. For more information, see the “Partner Encodings” section below. Contact your LiveRamp representative if you do not know your partner encoding.
From the Map Fields step, perform the following actions and then click :
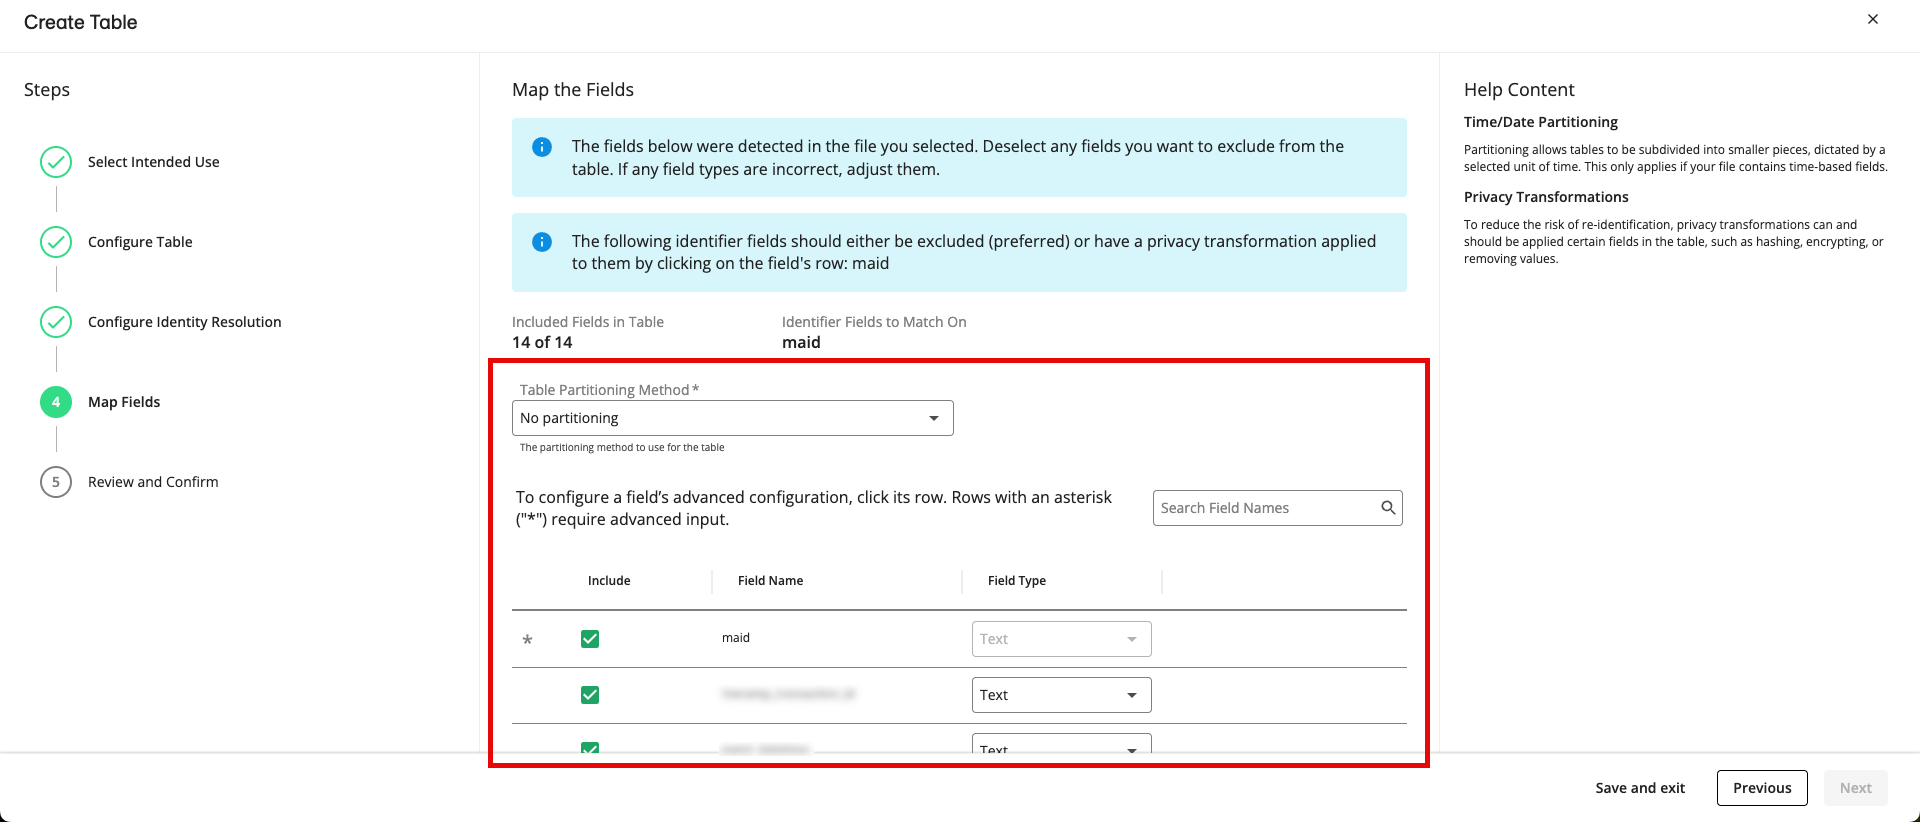
Table Partitioning Method: Select a table partitioning method (based on any Date/Time fields) or select no partitioning (for more information, see the “Table Partitioning” section below).
Configure the fields in the file by performing the appropriate steps listed below:
Note
If a field has an asterisk at the beginning of its row, you must configure certain advanced settings by clicking on the row and then completing the applicable steps below. Once the required configurations have been completed, the asterisk will no longer display.
Include the field: To include a field in the table, make sure the “Include” check box is checked for that field. If needed, you can use the search bar to find the desired field.
Note
If you specified one or more identifier fields in the Configure Identity Resolution step, those fields will be excluded by default and cannot be included unless you apply a privacy transformation to those fields.
Adjust the field type: For each field, confirm or adjust the field type that was detected from the file (for more information, see the "Field Types" section below).
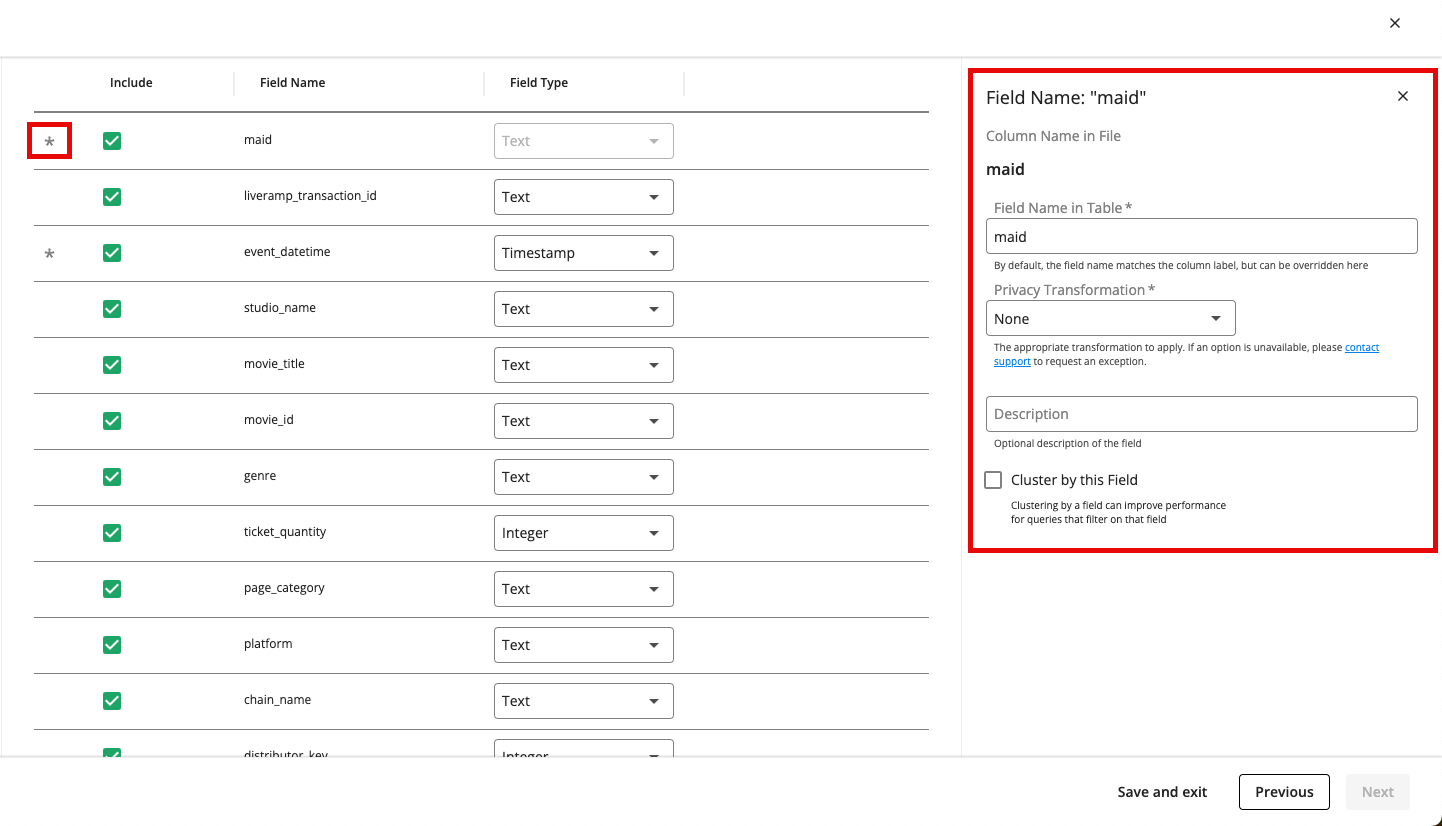
Rename the field: If necessary, click the field’s row and then enter a new field name in the FIeld Name in Table field.
Note
Because BigQuery does not support spaces in field names, we will automatically convert any spaces to underscores.
Specify the timestamp format: For any date or time-related fields in your file, you must click the field’s row and then specify the timestamp format to use (for more information, see the “Specify Date or Time Format” section below).

Apply privacy transformations: For any identifier fields that you’re including in the table, click the field’s row and then select a privacy transformation from the Privacy Transformation dropdown (MD5 Hash - No Salt, MD5 Hash - LiveRamp Default Salt, or MD5 Hash - Custom Salt).
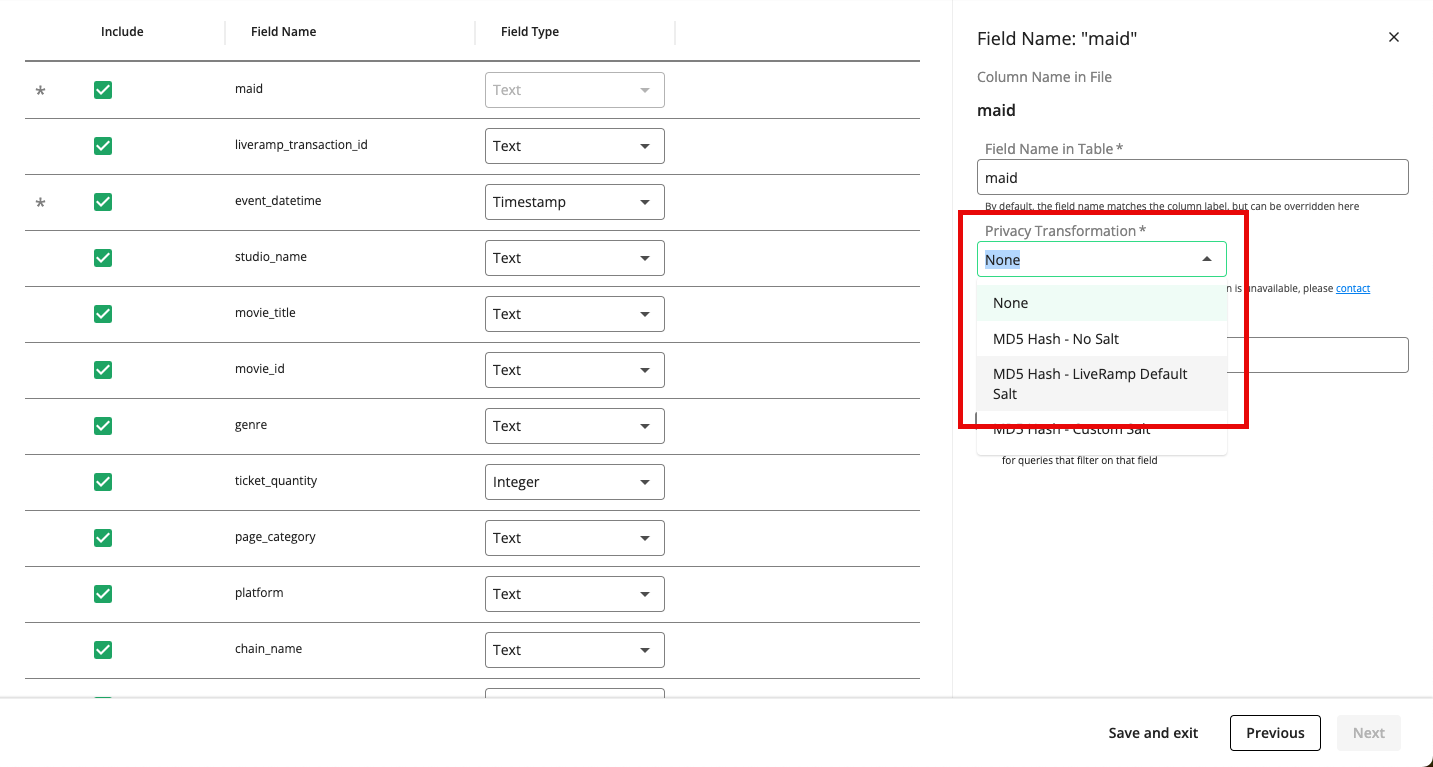
Note
If you select MD5 Hash - Custom Salt, you will then need to enter the custom salt value.
Add a field description: To add a field description, click the field’s row and enter a description in the Description field.
Cluster by a field: To cluster by a field, click the field’s row and then check the check box for Cluster by this Field (for more information on clustering, see the “Field Clustering” section below).
Note
You can only select one field in the file to cluster. If you’ve already selected a field, this option will be greyed out.
From the Review and Confirm step, check all of your configurations and settings to ensure they are correct and then click .
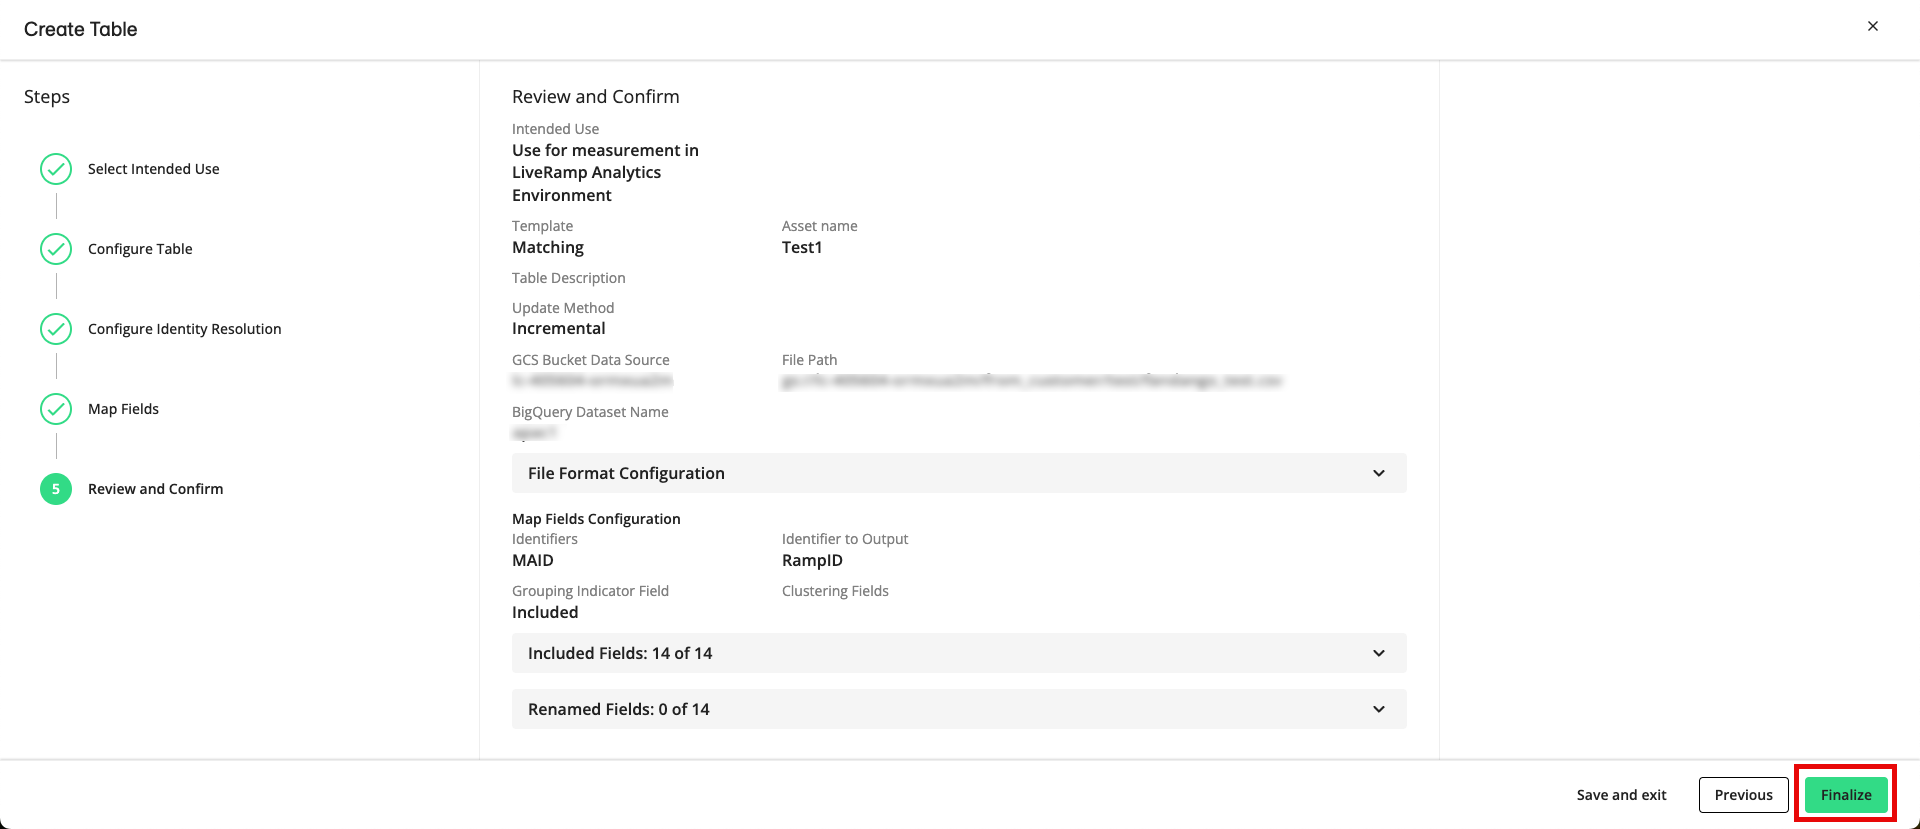
Note
If you need to correct any information, click on the bottom right corner of your screen to go back to any previous step.
Once your table is finalized, you will be redirected to the Tables and Views page and your table will appear at the top of the list.
To see more details on the table, click the More Options menu (the three dots) that appear to the right of the row for the table and then select either View Details or Open Full Details Page.

Note
If anything looks incorrect, contact your LiveRamp representative.
Table Creation Concepts
For more information on the concepts involved in table creation, see the sections below.
Templates
During the Configure Table step, you first select a template to use that determines the rest of the steps to follow in the table creation process. These templates are based on the type of data you’re uploading and what you want to accomplish.
For the alpha testing period, three options are available:
Matching: Matching workflows are various types of actions on files that resolve/match identifiers to a RampID.
Non-Matching( Passthrough): The input identifiers will not be matched or transcoded.
Transcoding: The input RampIDs in the file will be transcoded to a different partner encoding. Transcoding allows for RampIDs to move between partner encodings and client spaces while preventing re-identification.
Update Methods
When you upload additional files to the file path you specified, LiveRamp can update the table in either of the two ways listed below (which you select during the Configure Table step):
Incremental: An incremental update (the most common configuration), in which data from a new file is used to extend and modify the previously onboarded data for that table. In this type of update, if you upload data for a previously-onboarded field, any new members will be added to that field. If you upload data for a new field, that field will be created in the table. No previously onboarded data would be removed.
Full Refresh: A full "refresh", in which a new file completely replaces all of the previously onboarded data for that entire table.
For more information on these update options, see “Ways to Update an Existing Audience”.
Output Identifiers
For this alpha testing period, we support matching the online identifiers in your file to RampIDs, which will be included as an additional field in your BigQuery table in the Analytics Environment.
RampIDs are LiveRamp's universal, pseudonymous identifiers that are tied to devices in the LiveRamp Identity Graph.
There are several types of RampIDs, but for this workflow you will receive maintained, individual RampIDs, which represent an individual. If a record in your file matches to more than one RampID, that record will be broken out into multiple rows (one for each matching RampID) in your BigQuery table in the Analytics Environment.
For more information, see “RampID”.
Grouping Indicators
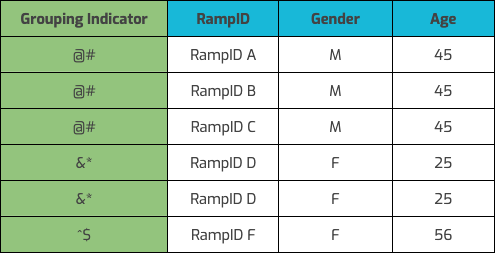
Once we match the records in your file to all the RampIDs we associate with each particular record, we create one row per associated RampID in the table and randomize the row order. To enable you or a partner to tie together all the RampIDs associated with each input record, you need a way to group those associated rows.
Our preferred method to accomplish this is through a LiveRamp grouping indicator that we generate and add as a field to the table. The LiveRamp grouping indicator is a hashed number that corresponds to an input row. For privacy reasons, it cannot be tied back to the actual input row number, but it allows you or a partner to group the RampIDs by input row. Here’s an example of what a table would look like when using a LiveRamp grouping indicator.
You specify whether to include a grouping indicator in the Configure Identity Resolution step.
Input Identifiers
For the alpha testing period, we only support including certain online identifiers (also referred to as pseudonymous identifiers) in input files. Online identifiers include device identifiers and known identifiers that have been pseudonymized, that can't be directly tied back to an individual.
The following online identifiers are supported and can be selected in the Configure Identity Resolution step:
Cookies: Identifier that is set by a website when a particular user’s browser visits that site.
CTV IDs: Device identifiers associated with Connected TVs.
Custom IDs (CIDs): Identifiers that are assigned to users by a specific platform, such as Google or Facebook.
Mobile device IDs: Identifiers that identify a particular mobile device, such as Identifier for Advertisers (IDFAs) for iOS (Apple) devices and Android Advertising IDs (AAIDs) for Android devices. These can be plaintext or SHA-1 hashed, but if you hash the mobile device IDs, you’ll need to put the IDFAs and the AAIDs in separate files.
RampIDs: LiveRamp’s universal identifier that is tied to devices in the LiveRamp Identity Graph.
For more information, see “Identity and Identifier Terms and Concepts” and “Formatting Identifiers.”
Ad Network Accounts
An Ad Network Account (ANA) is a device pool we share with our partners for shared cookies, mobile IDs, and custom IDs. Each device pool is specific to one identifier type. During the Configure Identity Resolution step, you map the identifier column in your file to the ANA that best suits your use case.
Partner Encodings
All RampIDs are given a “partner encoding” so that they are unique to the partner using them (this encoding is a 4-digit number that appears as part of each RampID’s value after the two-character prefix). For example, in the RampID "XY1005wXyWPB1SgpMUKIpzA0I3UaLEz-2lg0wFAr1PWK7FMhs", the partner encoding is “1005”.
Transcoding between different encodings for each partner ensures seamless interoperability and reduces the risk of re-identification.
During the Configure Identity Resolution step, you'll enter your partner encoding.
When using this workflow to transcode RampIDs from one partner encoding to another, you’ll need to enter both your partner encoding and the partner encoding for the LiveRamp partner.
Table Partitioning
A partition is a column-level subset (a shard) of a database’s data. This feature allows you to choose how you’d like that data to be separated out. For example, once a time-based column is chosen, you can partition by month, day, or year.
More information on partitioned tables can be found here.
During the Map Fields step, we allow you to partition your table based on any date or time fields that are present in your file. You can partition by day or hour.
Best Practices for Partitioning: If your table is set to an incremental update method, this means that the dataset will grow larger over time. Partitioning by Date/Time can make the querying experience more efficient.
Fields
In the context of this workflow, a field represents a column in your file that contains individual values. For example, a field named “MAIDs” might hold individual values for the mobile device IDs for each user in the file and a field named “Number_of_purchases” might hold individual values for the number of purchases each user has made.
The fields (columns) in your input file will become fields in the BigQuery table in the Analytics Environment.
Field Types
After the Configure Table step, the field type for each field is automatically detected and is displayed in the Map Fields step. Most customers will only need to verify that each field type is correct before proceeding.
Note
You can change the field type, but you first need to consider any possible impacts to queries once the table is in BigQuery.
The following field types are used:
String: String fields (sometimes referred to as “text fields”) can contain letters, numbers, and special characters.
Integer: A numeric value (whole number) that represents a 64-bit integer.
Float: A data type used to store approximate numerical values with a floating-point representation. It is suitable for storing numbers with decimal places, such as prices and measurements.
Boolean: A value that can be either TRUE or FALSE
Date: A Gregorian calendar date, independent of time zone.
DateTime: A Gregorian date and a time, as might be displayed on a watch, independent of time zone.
Timestamp: A timestamp value that represents an absolute point in time, independent of any time zone or convention, such as daylight saving time (DST)
Time: A time of day, as might be displayed on a clock, independent of specific data and time zone.
Numeric: A numerical value that can be a non-whole number (it can contain decimal places).
Specify Date or Time Format
If you have date- or time-related fields in your file, you must choose one of these advanced settings to complete your configuration during the Map FIelds step:
Date:
Select “Custom” to input a specific format found in your file
Select “YYYY-MM-DD” if that format suits your needs
Time:
Select “Custom” to input a specific format found in your file
Select “hh:mm:ss” if that format suits your needs
Field Clustering
Clustered tables in BigQuery are tables that have a user-defined field sort order using a clustered field. More info found in Google documentation here.
During the Map Fields step, you might want to use clustering in tables to improve query performance and reduce query costs. Only one field per file can be selected to use for clustering.
Examples of clustered tables can be found in Google's documentation.
The following field types can be clustered:
String
Integer
Boolean
Date
DateTime
TimeStamp
Time