Connect to Data in Azure
If you have data in Microsoft Azure and want to be able to use that data in questions in LiveRamp Clean Room, you can create an Azure data connection.
An Azure data connection can be used in the following clean room types:
Hybrid
Confidential Computing
Note
For Confidential Computing clean rooms, clean room partners should use these instructions for this data connection type. Clean room owners of Confidential Computing clean rooms need to use the CSV Catalog data connection type (contact your LiveRamp account team for more information).
Note
For more information on clean room types, see "Configure Clean Rooms".
To view an interactive walkthrough demo of the process of connecting to your cloud-based data by creating a data connection, click here.
After you’ve created the data connection and Clean Room has validated the connection by connecting to the data in your cloud account, you will then need to map the fields before the data connection is ready to use. This is where you specify which fields can be queryable across any clean rooms, which fields contain identifiers to be used in matching, and any columns by which you wish to partition the dataset for questions.
Note
To utilize partitioning for cloud storage data connections, you need to organize your data into folders that reflect the partition columns. LiveRamp encourages users to use Hive-style partitioning, typically by date (such as s3://bucket/path/date=YYYY-MM-DD/). For more information, see "Partition a Dataset in LiveRamp Clean Rooms".
After fields have been mapped, you can set default dataset analysis rules for the dataset associated with the data connection and provision the dataset to your desired clean rooms. Within each clean room, you’ll be able to set dataset analysis rules (and modify any default analysis rules), exclude or include columns, filter for specific values, and set permission levels.
To configure an Azure data connection, see the instructions below.
Overall Steps
After you've completed the prerequisites, perform the following overall steps to configure an Azure data connection in LiveRamp Clean Room:
Choose the credential type you want to use (Azure SAS Token or Azure SAS User Delegation).
If you’re using this data connection for a Confidential Computing clean room, allow the LiveRamp virtual network to access your Azure storage account.
For information on performing these steps, see the sections below.
Prerequisites
The following information is needed to configure your Azure data connection in LiveRamp Clean Room:
Azure Storage Account Name
Container Name
Path to the blob directory where your data files are stored
If you're going to use partitioning for use in optimizing question performance, decide which columns will be partitioned.
Guidelines
Review the following guidelines before starting the setup process:
If data is at the container level and there is no blob directory under the container, the path to the blob directory should be empty. If the raw data files are under a blob directory, the blob path should point to top level directory where all the data files reside. There should not be a mix of data files and sub-directories.
LiveRamp Clean Room supports CSV and Parquet files, as well as Delta tables and multi-part files. All files should have a file extension. All CSV files must have a header in the first row. Headers should not have any spaces or special characters and should not exceed 50 characters. An underscore can be used in place of a space.
The folder where the data files are dropped should include hive-style date formatting: "date=yyyy-MM-dd".
Choose a Credential Type
LiveRamp Clean Room supports both Azure SAS Token and Azure SAS User Delegation credential types for Azure data connections.
Azure SAS Token
Use Azure SAS Token if your organization uses a manually generated SAS token and can manage its expiration and rotation.
Azure SAS Token can be a good option if your organization wants a familiar, straightforward setup and prefers to generate the token directly in Azure without setting up an Azure Function or Azure AD-protected token-brokering flow.
The main benefit is simplicity, but the tradeoff is that a standard Azure SAS token is signed with the storage account key and functions as a long-lived shared secret, which means your team is responsible for storing it securely, monitoring expiration, and replacing it if it is rotated or exposed.
Azure SAS User Delegation
Azure User Delegation SAS uses a temporary key tied to an Azure AD identity, generates short-lived tokens on demand, and can be revoked without rotating the storage account key, which may be a better fit for organizations with stricter security requirements.
Complete Set Up Steps for the Credential
Before you add credentials in LiveRamp Clean Room, determine which Azure credential type your organization will use for the data connection, and then prepare the required values for that credential type.
Set Up for an Azure SAS Token Credential
To set up for an Azure SAS Token credential, generate an Azure SAS Token in the Microsoft Azure UI at either the container or account level. Each follows a slightly different process outlined below.
Generate an SAS token at the container level:
Navigate to the storage account, select the container, and then select "Shared access tokens" under "Settings" in the left navigation pane.
Under the Permissions dropdown, check the check boxes for "Read" and "List" (both permission levels are required).
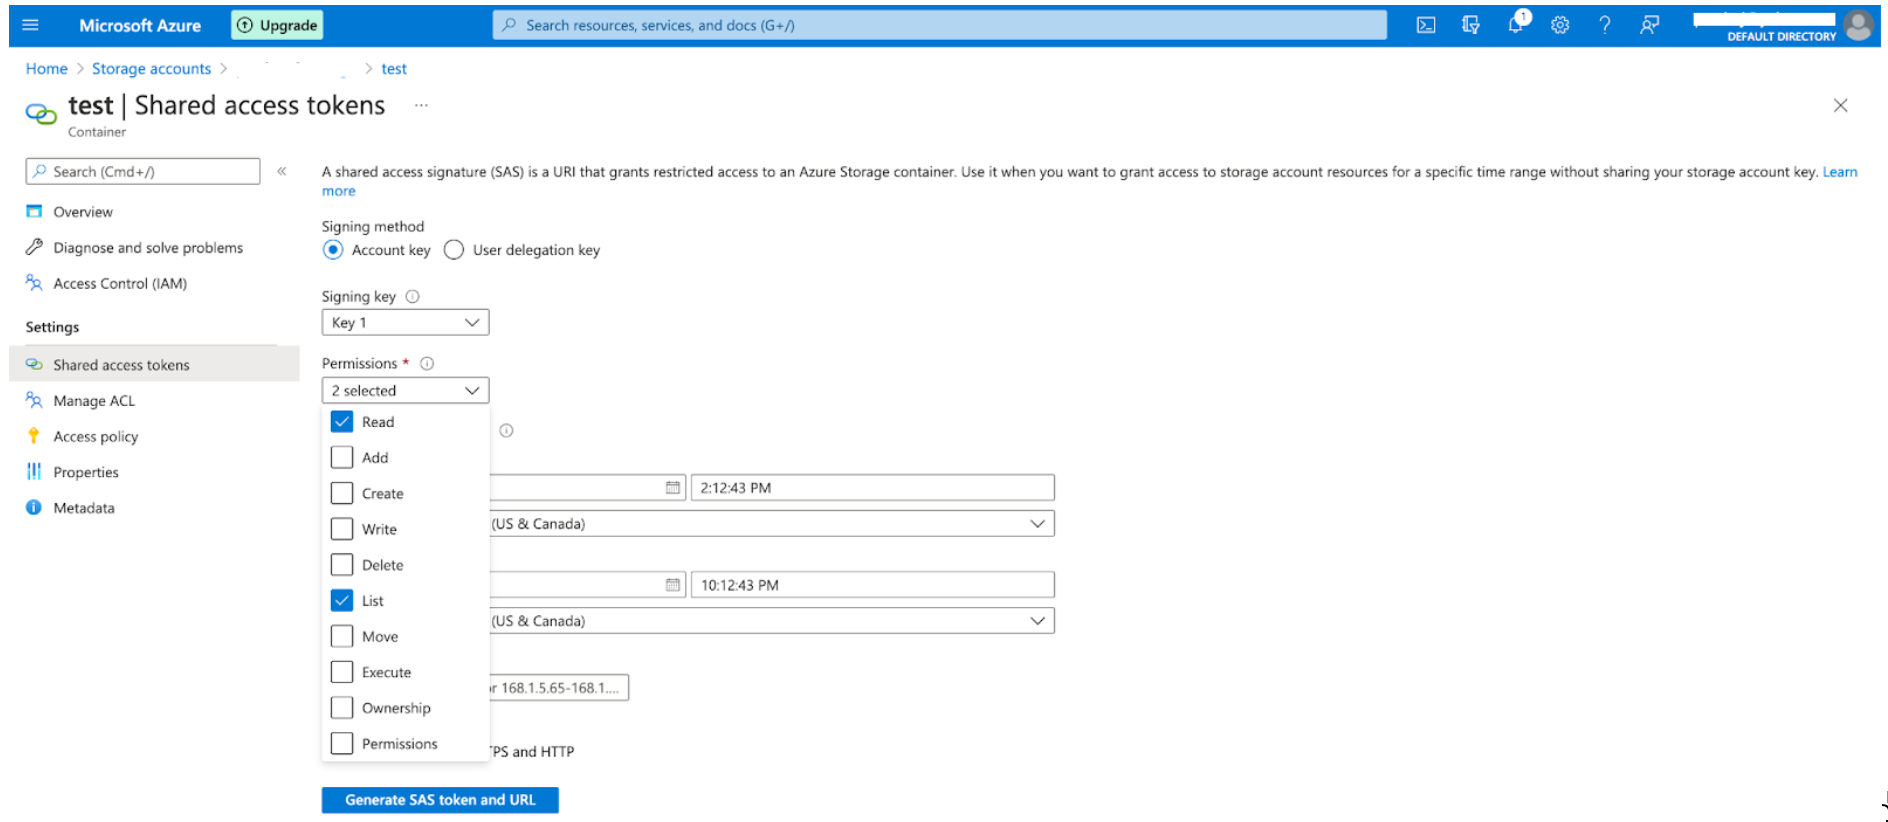
Specify the expiration of the token.
Note
The SAS token must be created as a long-lived token to prevent it from expiring.
Click .
Record the Blob SAS token generated.
Generate an SAS token at the account level:
Navigate to the storage account, select the container, and then select "Shared access signature" under "Security + Networking" in the left navigation pane.
The shared access signature screen displays.
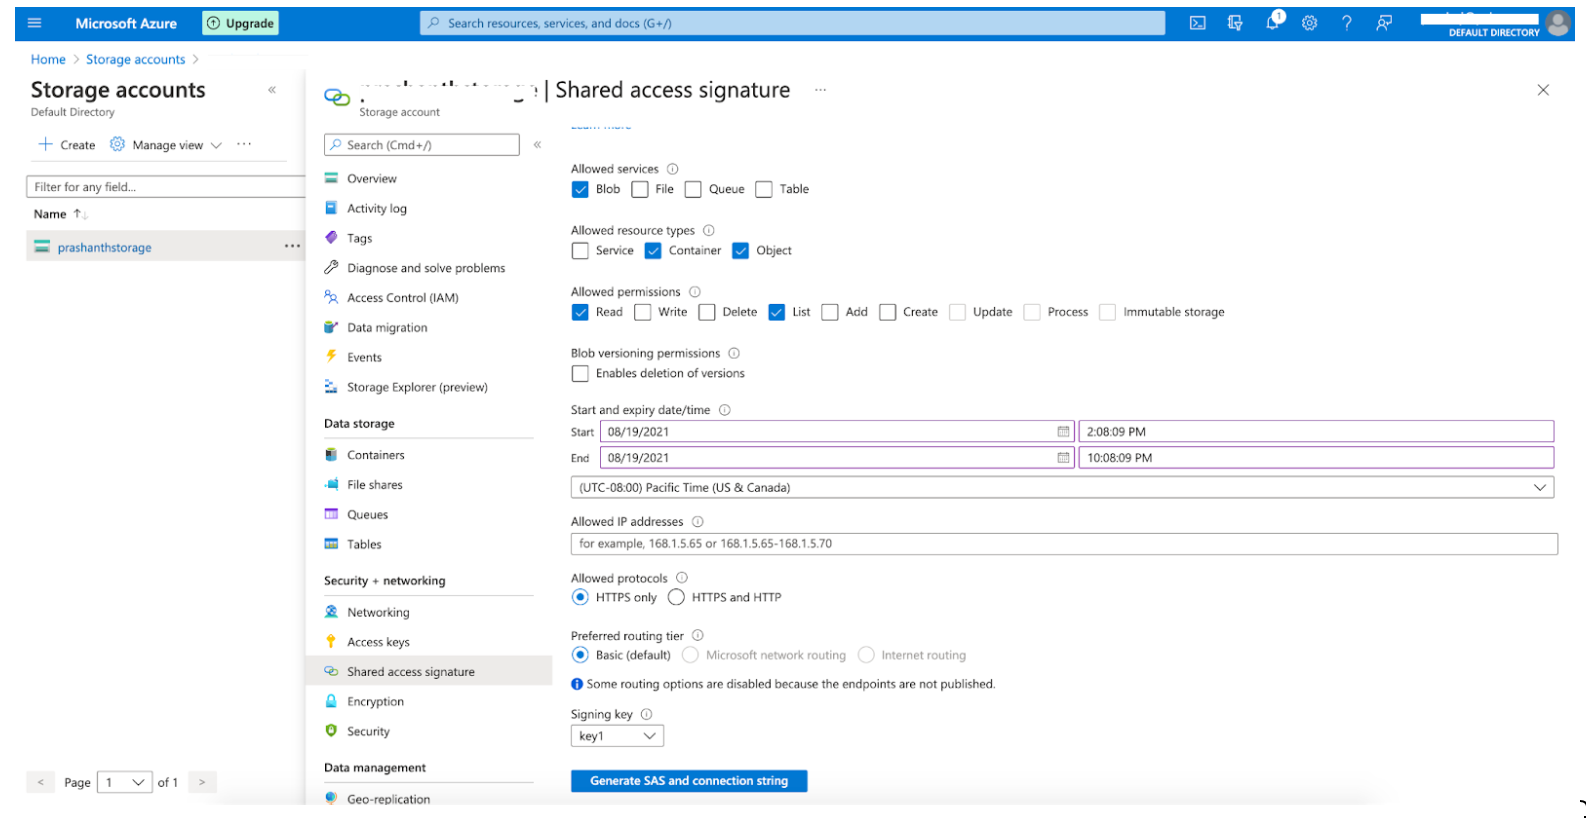
Under "Allowed Services", check the check box for "Blob".
Under "Allowed resource types", check the check boxes for "Container" and "Object" (both resource types are required).
Under "Allowed permissions", check the check boxes for "Read" and "List" (both permission levels are required).
Click .
Record the SAS token generated.
Set Up for an Azure SAS User Delegation Credential
Before you create an Azure User Delegation SAS credential in LiveRamp Clean Room, complete the following setup in Azure and share the required values with LiveRamp:
Host an Azure Function that issues the SAS token for the target storage account and container.
Register an Azure AD app that protects that function.
Share the following with LiveRamp over a secure channel:
App ID for the Azure AD app protecting the function
Function URL
Scope or audience URL
Storage account name
Container name
If required by your security policy, allowlist LiveRamp outbound IP ranges so the function accepts calls from LiveRamp. LiveRamp will provide the IP range to allowlist.
Note
Azure User Delegation SAS currently supports container-level access only, not individual blob-level access.
Allow the LiveRamp Virtual Network to Access Your Azure Storage Account
If you’re going to use this Azure data connection in a Confidential Computing clean room, you’ll need to allow LiveRamp’s virtual network (VNet) to securely access your Azure Storage Account. This is done by adding a network rule at the storage account level using the Azure CLI.
Note
If you’re using this data connection for other clean room types, you do not need to perform these steps.
Run the following command in your Azure environment, replacing the placeholders with your own values:
az storage account network-rule add \
 --resource-group "" \
 --account-name "" \
 --subnet ""
Note
Contact your LiveRamp representative to obtain the correct subnet resource ID. Even with valid credentials (such as a SAS token), access to your storage account will be blocked at the network level without this rule.
Add the Credentials
To add credentials:
Note
Credentials can also be configured when creating the data connection.
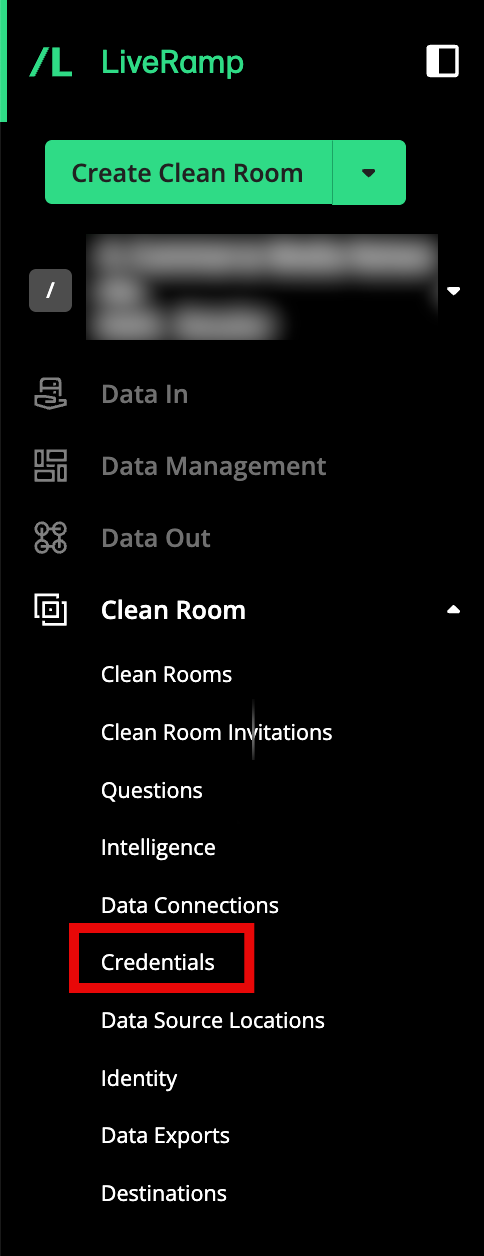
From the navigation menu, select Clean Room → Credentials to open the Credentials page.
Click .
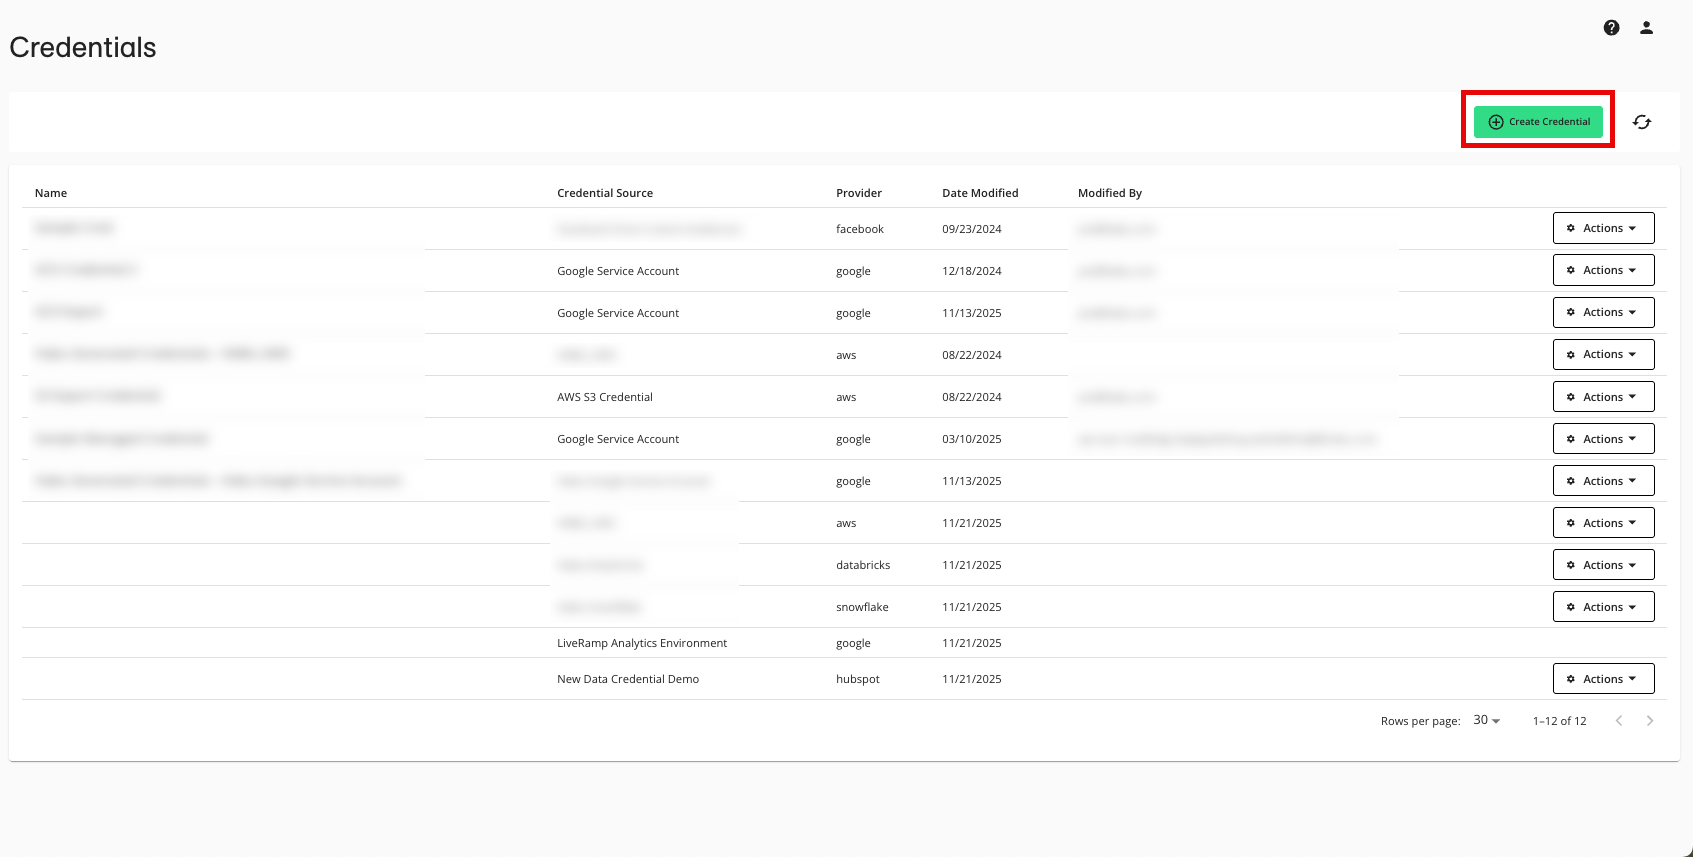
Enter a descriptive name for the credential.
For the Credentials Type, select either "Azure SAS Token" or “Azure SAS User Delegation”.
Note
Make sure you've performed the appropriate steps in the "Complete Set Up Steps for the Credential" section above.
Enter the required information, depending on your credential type:
For an Azure SAS Token credential, enter your SAS token generated in the previous procedure.
For an Azure SAS User Delegation credential, enter the appropriate information in the required fields:
Tenant ID: Enter the Azure tenant ID.
Client ID: Enter the application or client ID.
Client Secret: Enter the client secret associated with the Azure AD application.
Azure Function URL: Enter the URL of the Azure Function that brokers generation of the short-lived SAS token.
Scope URL: Enter the scope URL used to obtain the Azure AD access token for the Azure Function call.
If needed, adjust the selection for whether your organization's cloud security policy requires an allowlist for IP addresses and Google Project IDs for this credential (this is not common).
Note
Allowlists only need to be utilized for credentials used in Hybrid and Confidential Computing clean rooms, where the processing of question runs might need to be load-balanced across different data planes. You do not need to require an allowlist for other clean room types.
For more information on credential allowlists, see "Create and Manage Credential Allowlists".
If your organization requires an allowlist, we recommend that you talk to your LiveRamp representative before creating the credential.
Click .
Create the Data Connection
After you've added the credentials to LiveRamp Clean Room, create the data connection:
Note
if your cloud security limits access to only approved IP addresses, talk to your LiveRamp representative before creating the data connection to coordinate any necessary allowlisting of LiveRamp IP addresses.
When you create the data connection, the dataset type is set to Generic by default.
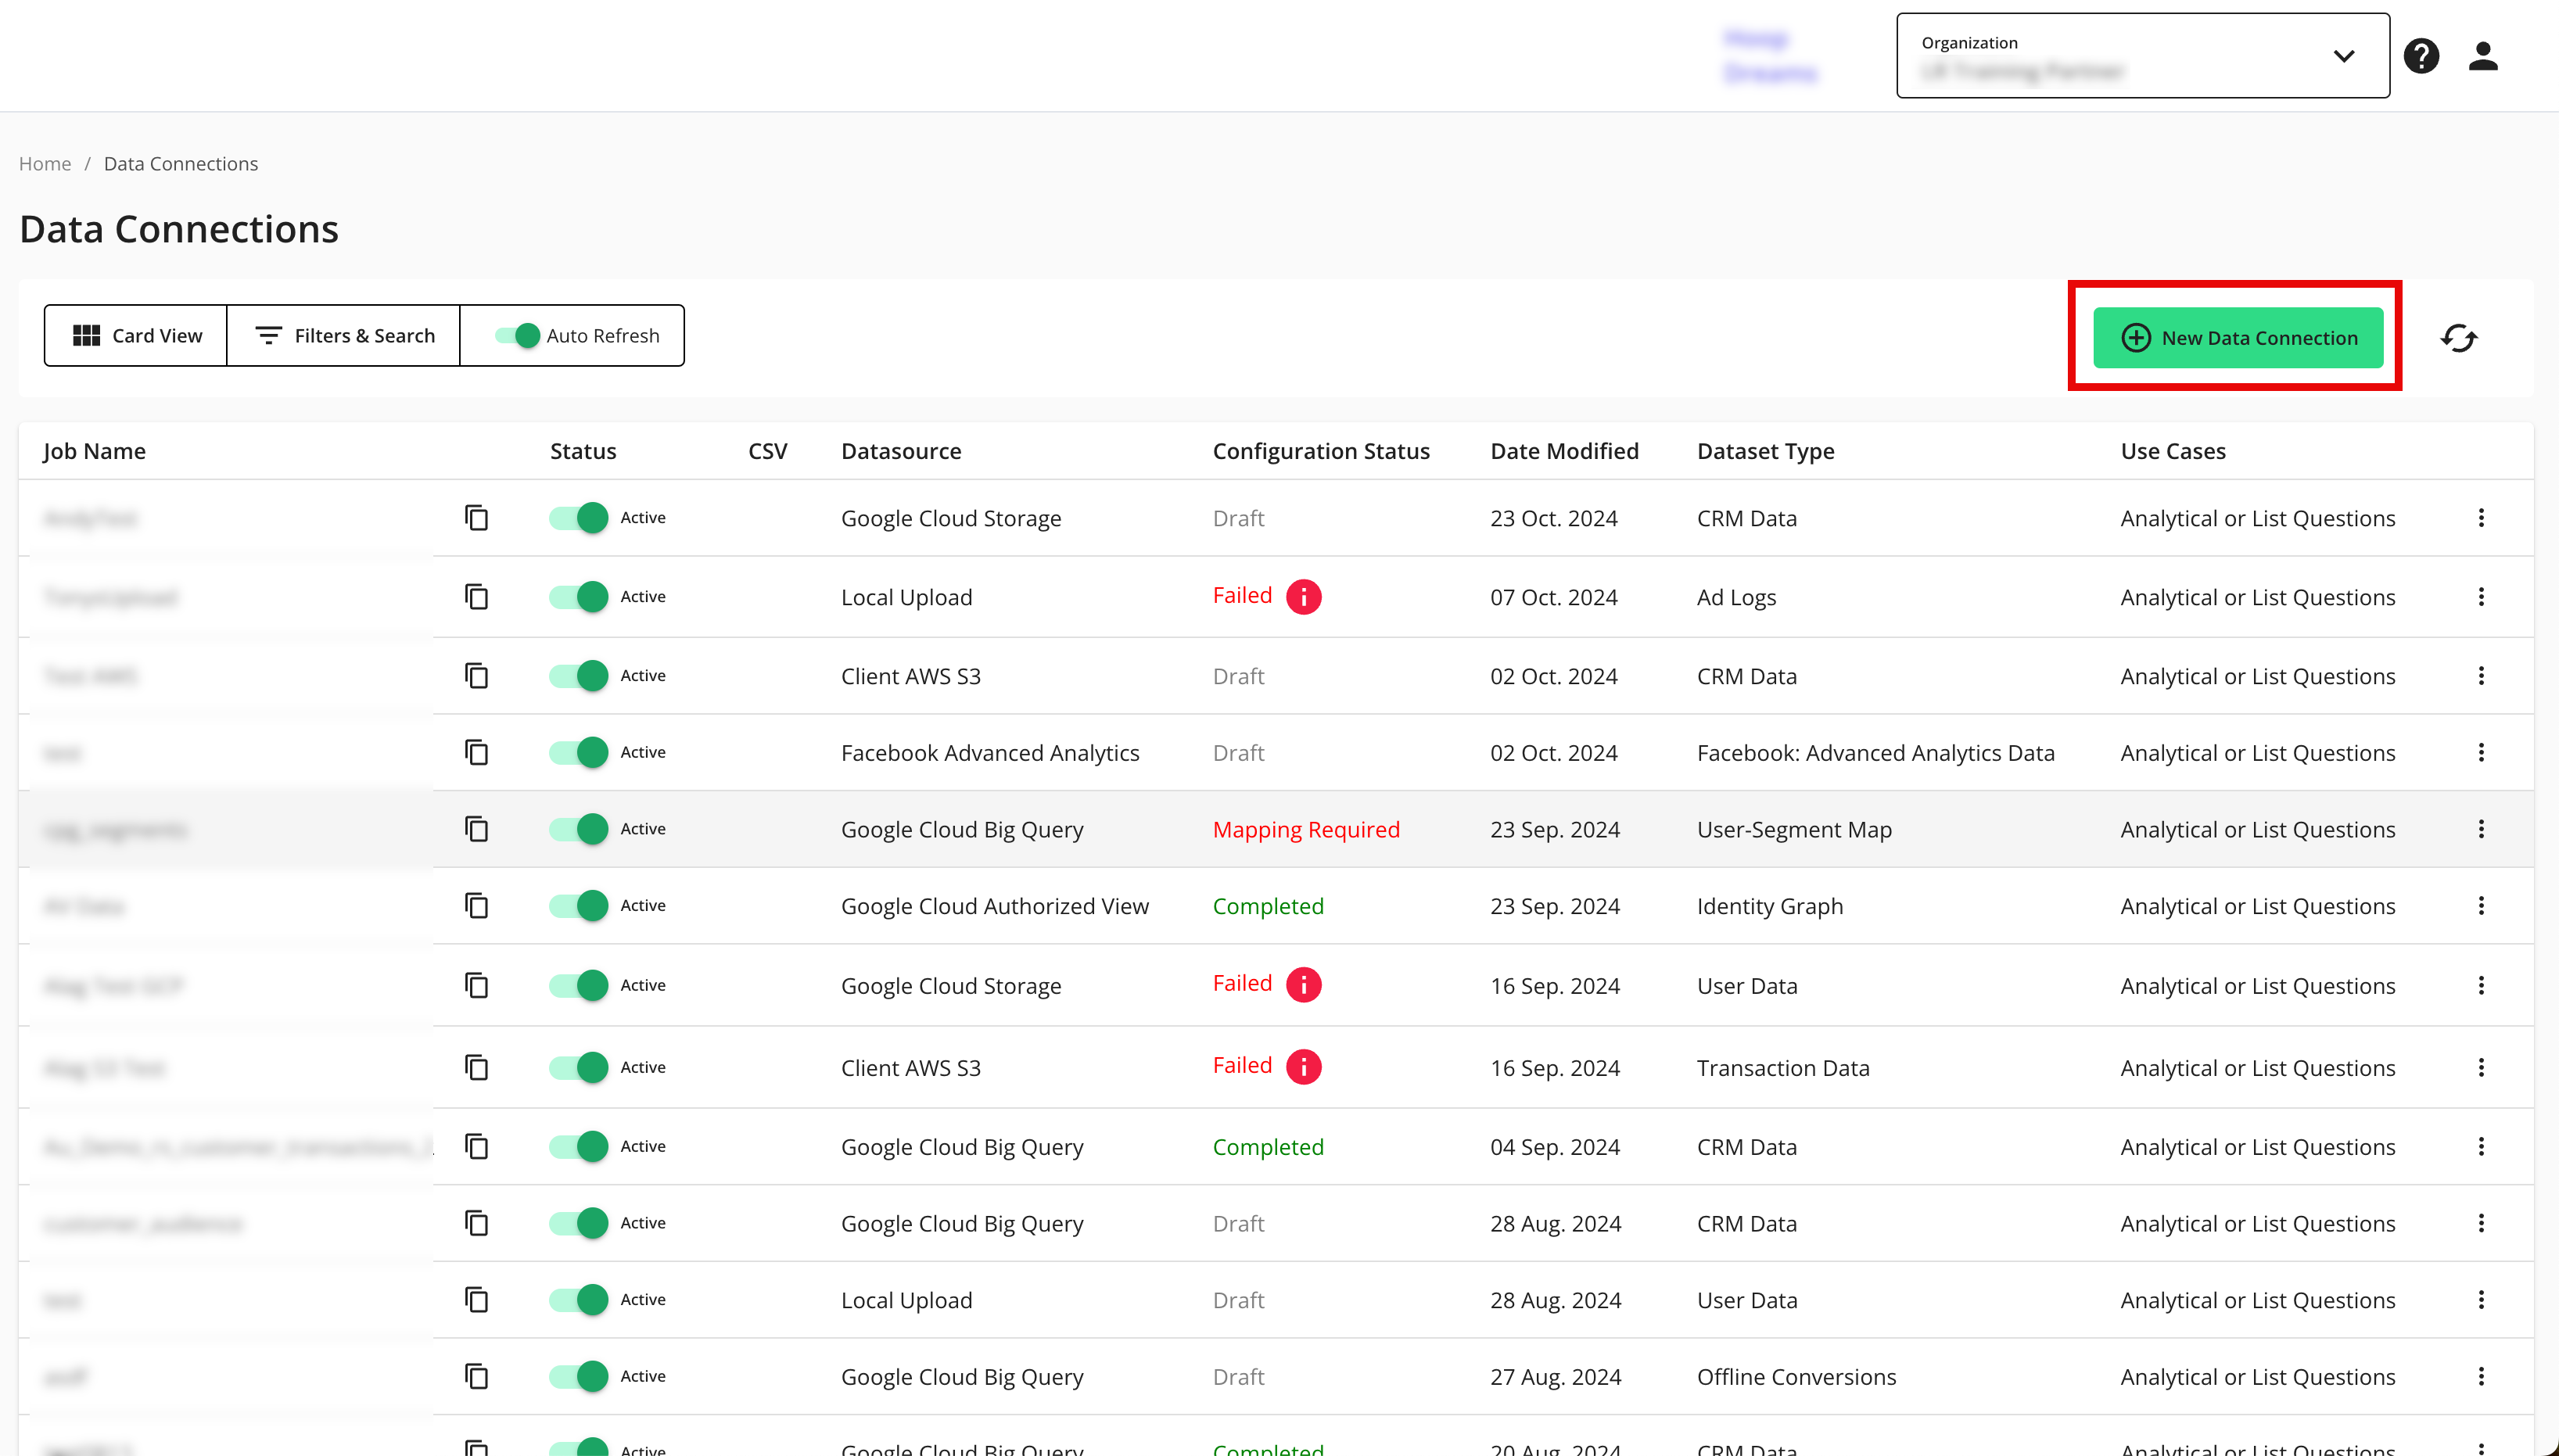
From the navigation menu, select Clean Room → Data Connections to open the Data Connections page.
From the Data Connections page, click .
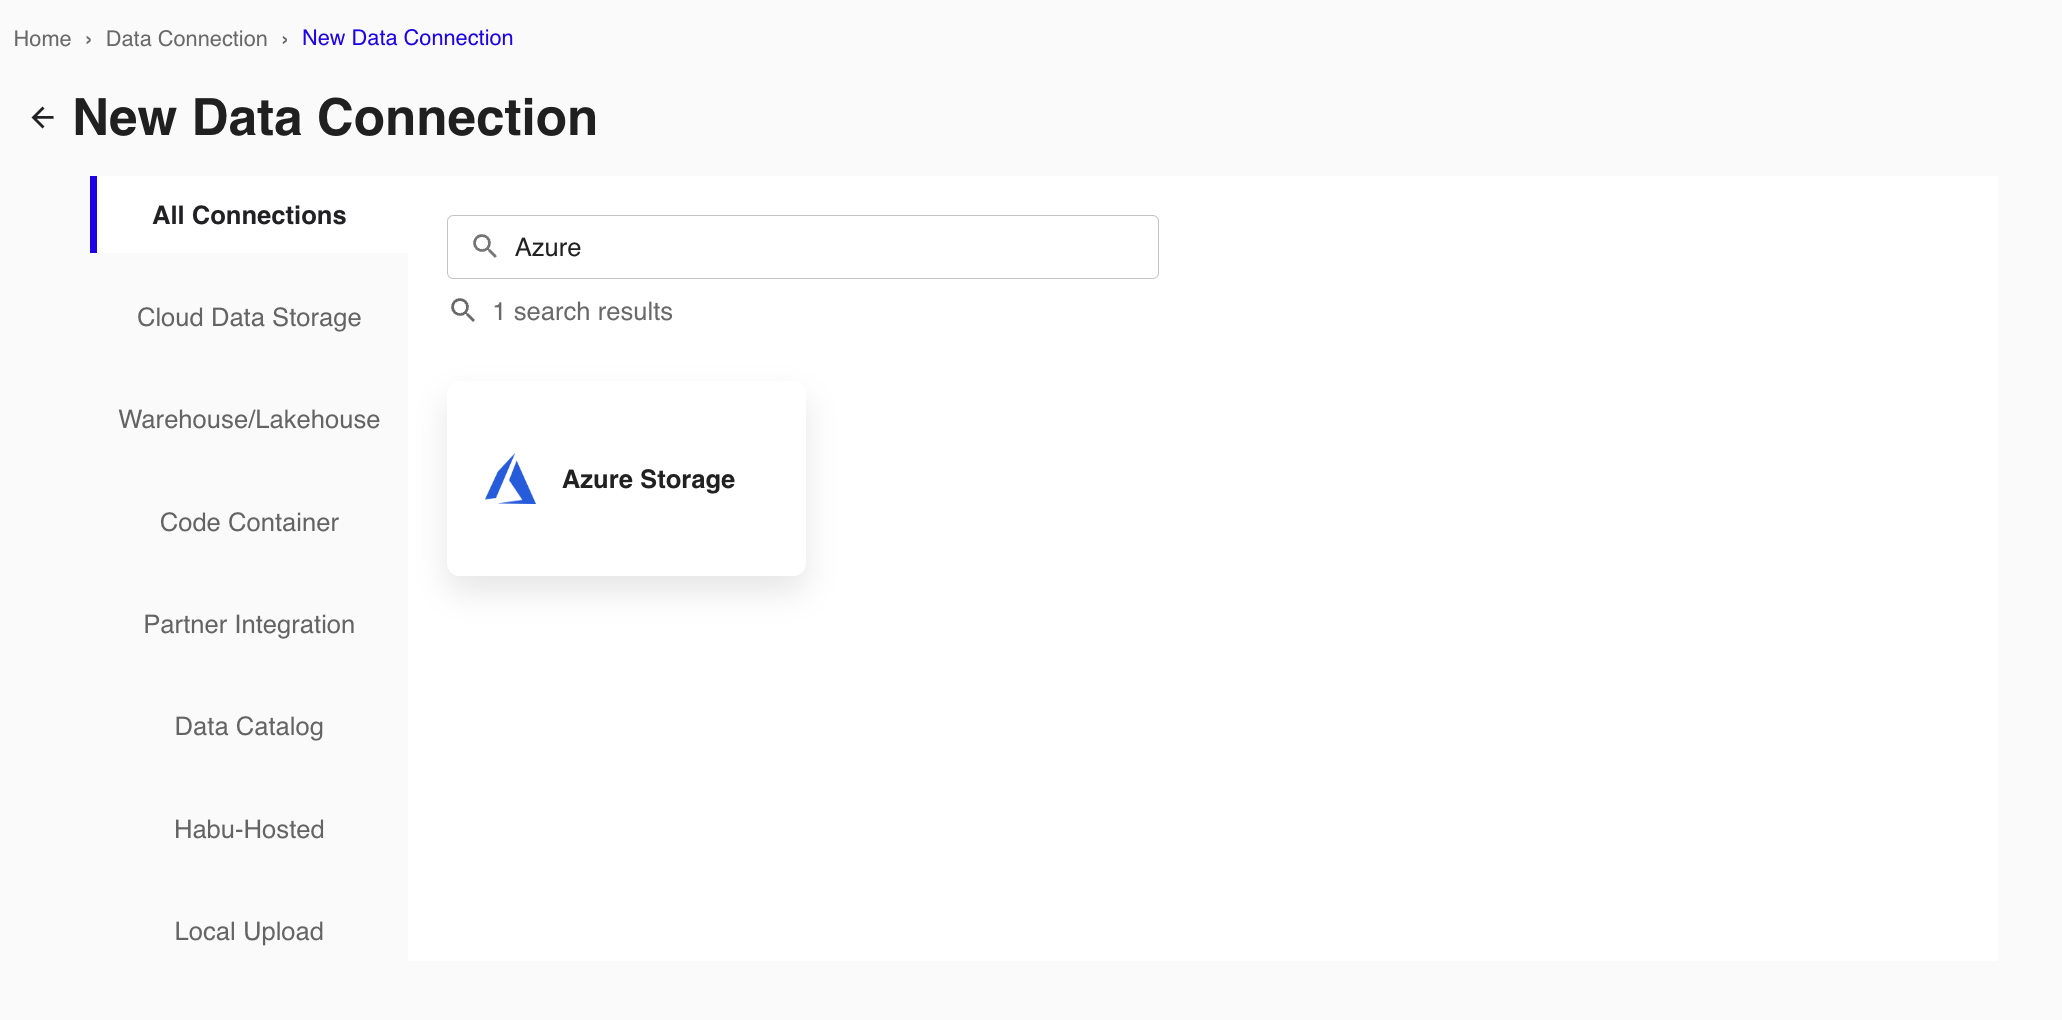
From the New Data Connection screen, select "Azure Storage".
From the New Data Connections screen, select the credentials you created in the previous procedure from the dropdown.
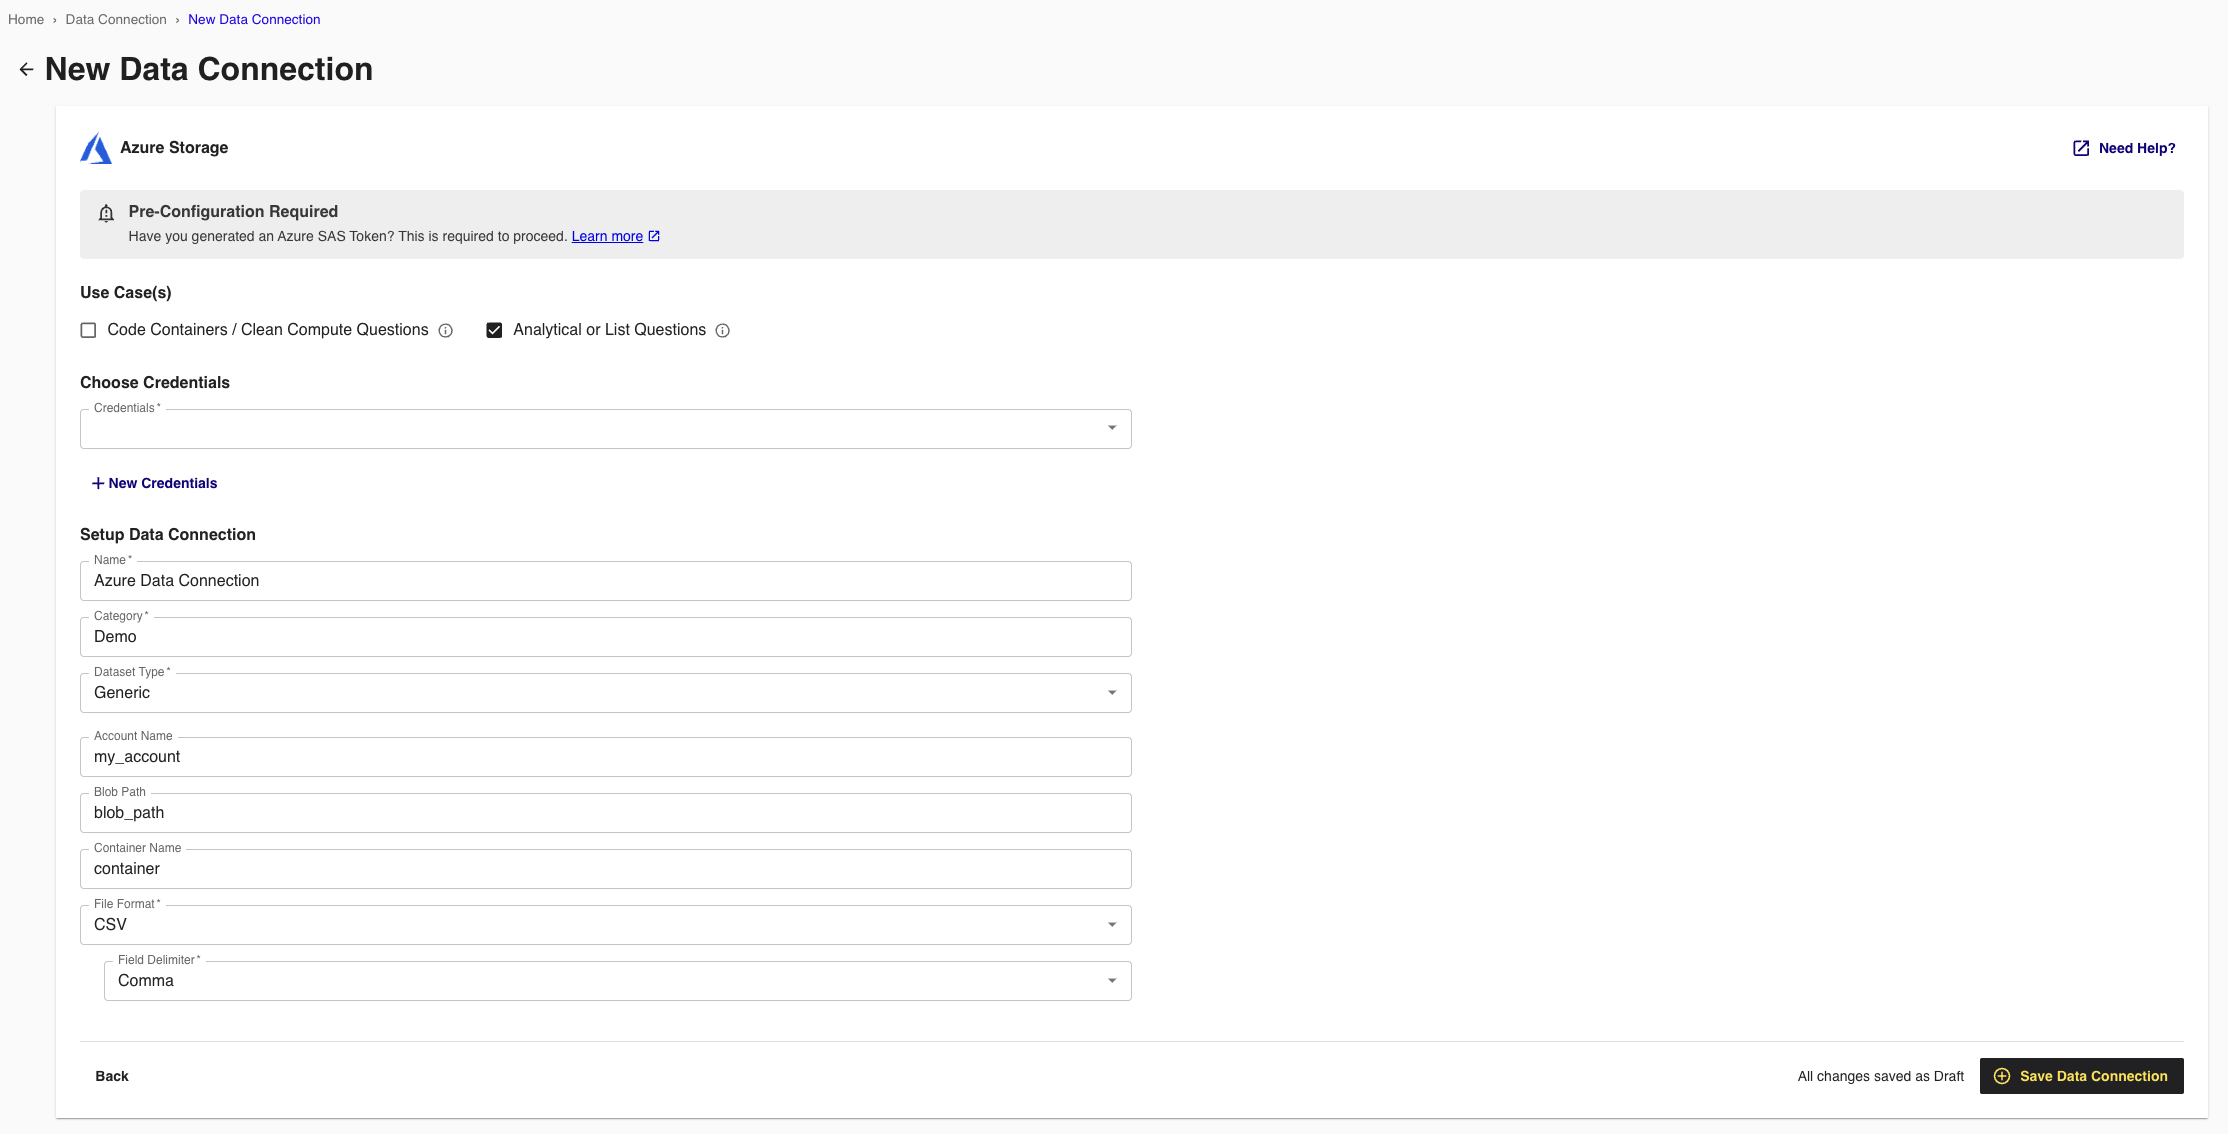
Complete the following fields in the Set up Data Connection section:
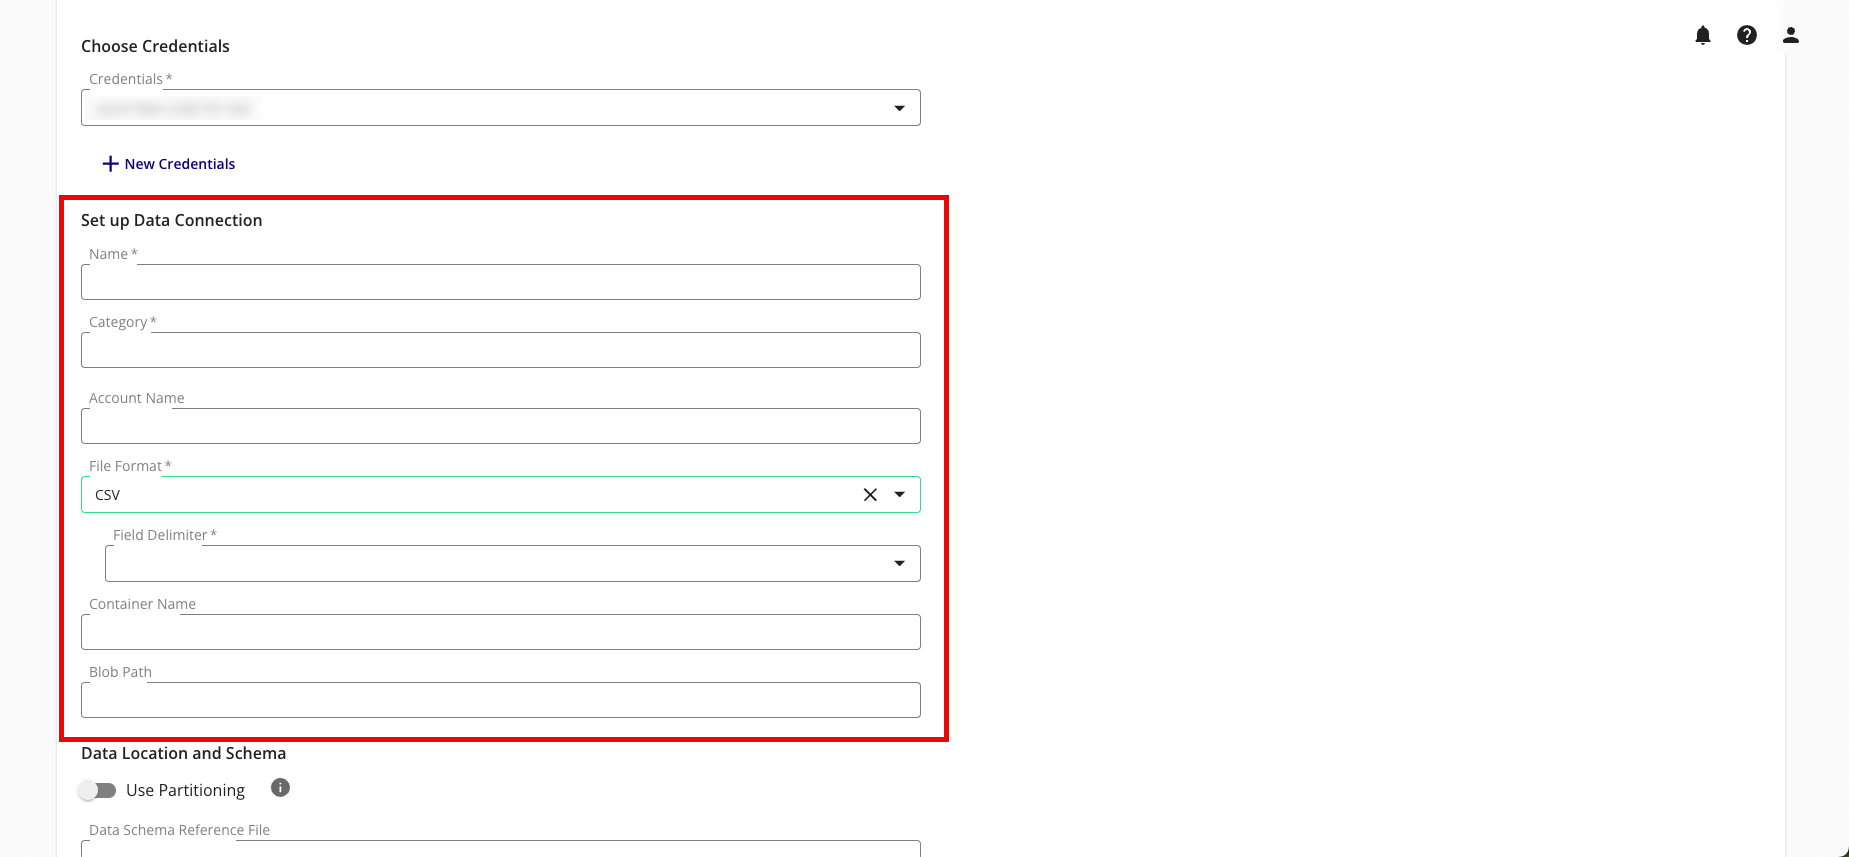
Name: Enter a name for the data connection (this will be the name for the dataset that you'll provision to clean rooms).
Category: Enter a category of your choice.
Account Name: Enter your Azure Blob account name.
File Format: Select CSV, Parquet, or Delta.
Note
All files must have a header in the first row. Headers should not have any spaces or special characters and should not exceed 50 characters. An underscore can be used in place of a space.
If you are uploading a CSV file, avoid double quotes in your data (such as "First Name" or "Country").
Field Delimiter: If you're uploading CSV files, select the delimiter to use (comma, semicolon, pipe, or tab).
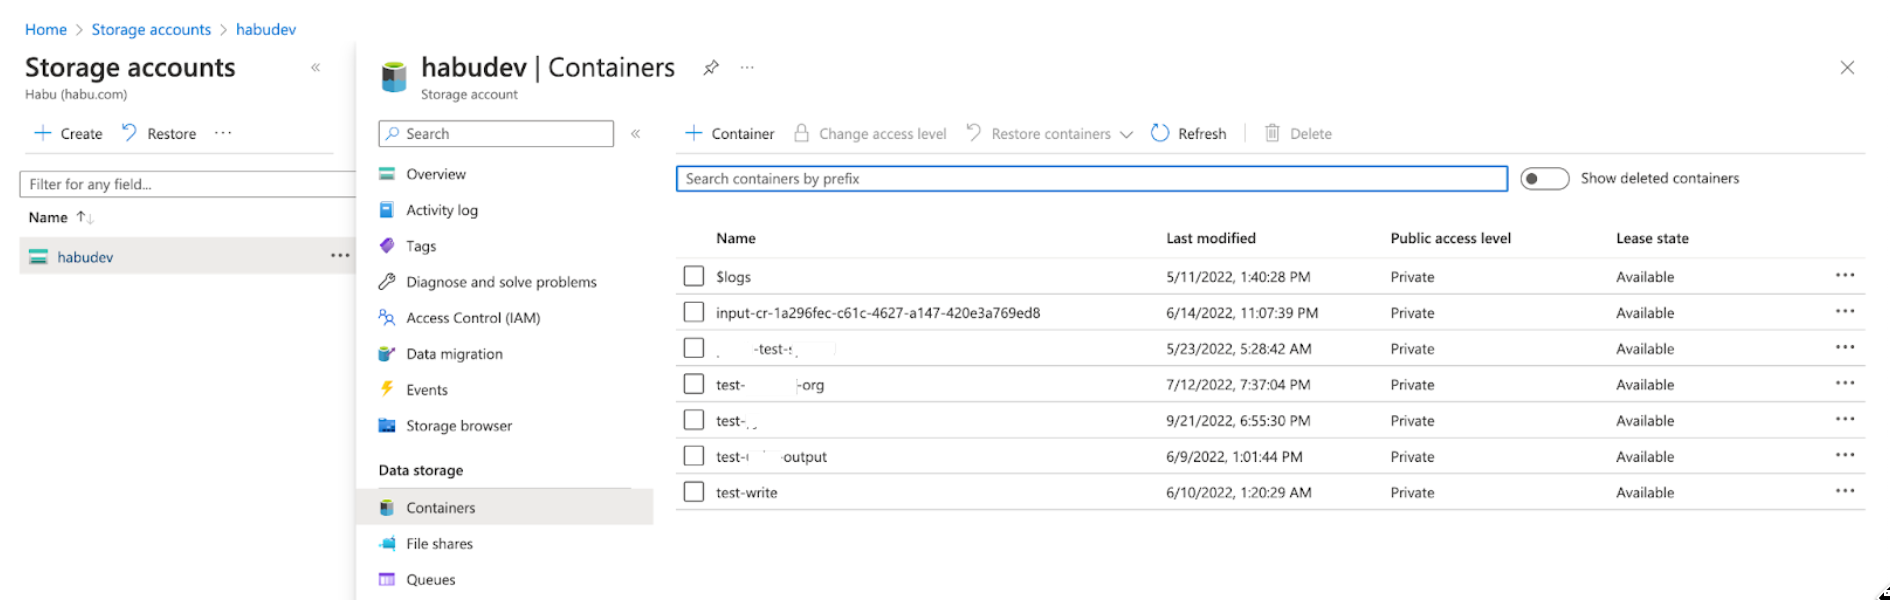
Container Name: Enter the container name found in your storage account, under Data Storage > Containers (for example, ""https://account-name.blob.core.windows.net/container-name/").
Blob Path: Enter the path to the folder containing the data files (the Blob Path follows the container name). For example, using the sample path "https://account-name.blob.core.windows.net/container-name/blob-path", the blob path would be "blob-path".
Note
If the data files are at the container level, the Blob Path field should be left empty.
Do not include a forward slash at the end of the Blob Path.
Do not include the raw data file name.
Complete the following tasks and fields in the Data Location and Schema section:
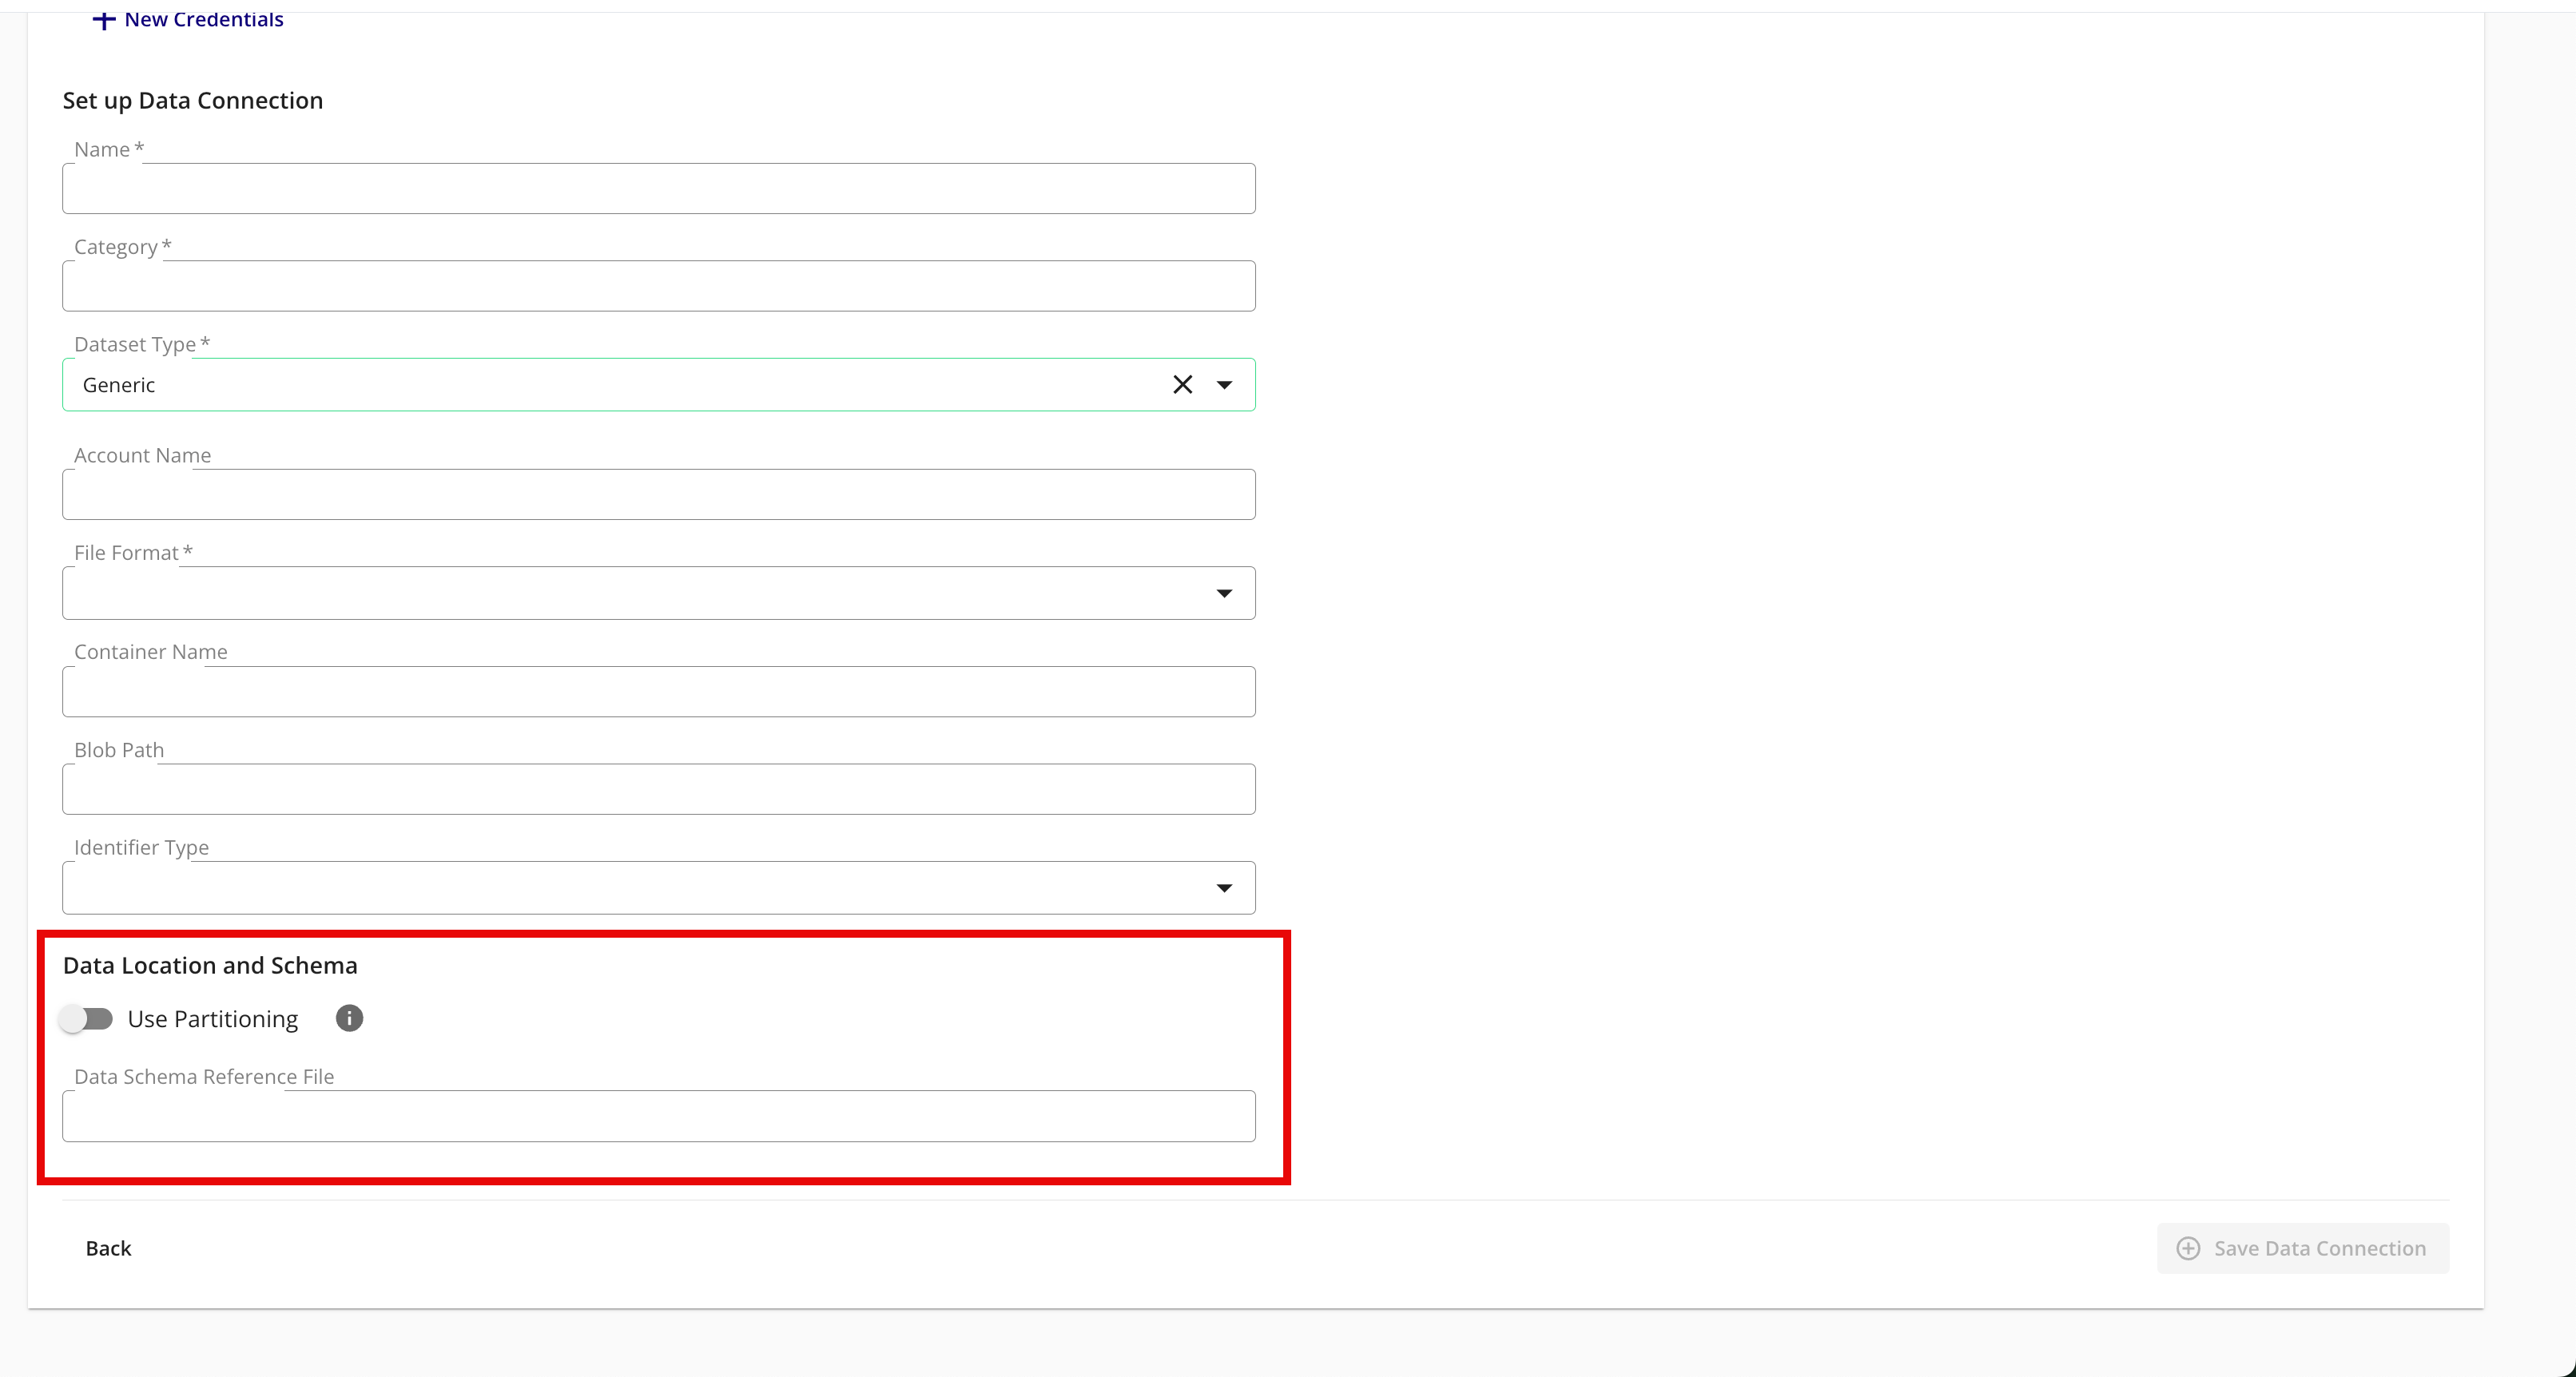
To use partitioning on the dataset associated with the data connection, slide the Use Partitioning toggle to the right.
Note
If the dataset uses partitioning, the dataset can be divided into subsets so that data processing occurs only on relevant data during question runs, which results in faster processing times. When using partitioning for a cloud storage data connection, a data schema reference file is required to be entered below. For more information, see "Partition a Dataset in LiveRamp Clean Rooms".
Data Schema Reference File: If you enabled partitioning above, enter the location of a data schema reference file, where the headers in the file show LiveRamp how your folders are structured with the partition values.
Note
The data schema reference file name must start with "https://" and end with a valid file extension (such as ".csv").
The data schema reference file must be hosted in a static location and must have been uploaded within the last seven days.
Review the data connection details and click .
Note
All configured data connections can be seen on the Data Connections page.
If you haven't already, upload your data files to your specified location.
When a connection is initially configured, it will show "Verifying Access" as the configuration status. Once the connection is confirmed and the status has changed to "Mapping Required", map the table's fields.
You will receive file processing notifications via email.
Map the Fields
Once the above steps have been performed in Google Cloud Platform, perform the overall steps in the sections below in LiveRamp Clean Room.
Note
Before mapping the fields, we recommend confirming any expectations your partners might have for field types for any specific fields that will be used in questions.
From the row for the newly created data connection, click the More Options menu (the three dots) and then click .
The Map Fields screen opens, and the file column names auto-populate.

For any columns that you do not want to be queryable, slide the Include toggle to the left.
Note
Ignore the field delimiter fields because this was defined in a previous step.
Click .
The Add Metadata screen opens.
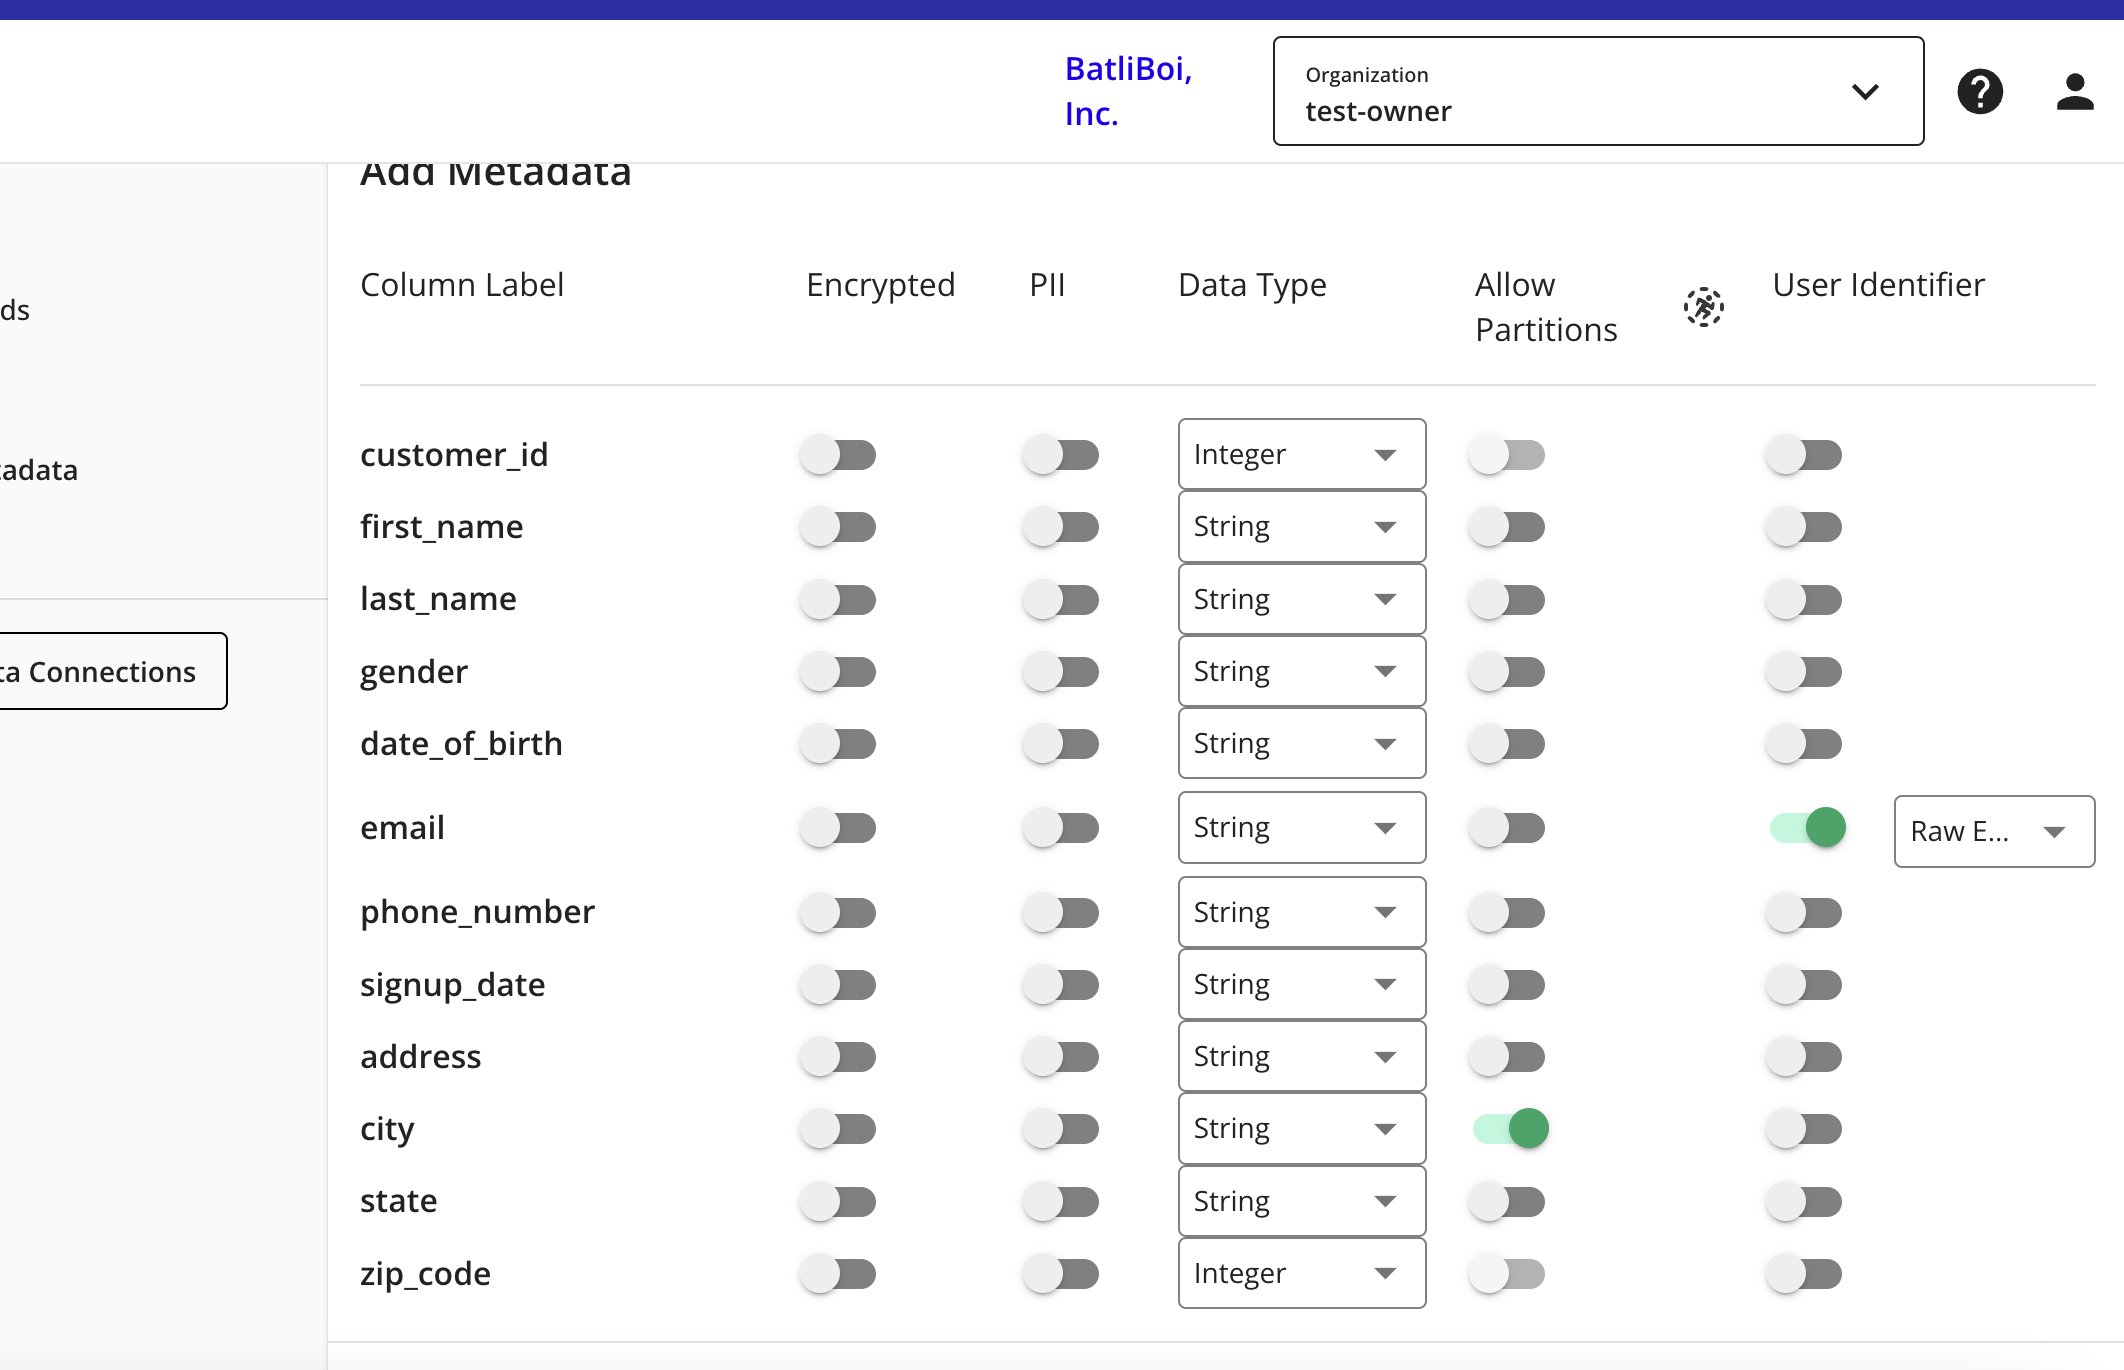
For any column that contains PII data, slide the PII toggle to the right.
Note
If your data contains a column with RampIDs, do not slide the PII toggle for that column. Mark the RampID column as a User Identifier and select "RampID" as the identifier type. If the data contains a RampID column, no other columns can be enabled as PII.
Select the data type (field type) for each column (for more information on supported field types, see "Field Types for Data Connections").
For any partition columns, slide the Allow Partitions toggle to the right.
If a column contains PII, slide the User Identifiers toggle to the right and then select the user identifier that defines the PII data.
Note
When you select "Raw Email" as the user identifier for an email column, those email addresses will be automatically SHA256 hashed. The resulting hashed emails are then available for querying in your clean rooms.
Click .
Your data connection configuration is now complete and the status changes to "Completed".
You can now provision the resulting dataset to your desired Hybrid or Confidential Computing clean room.
FAQs
When Should I Use Azure User Delegation SAS Instead of Azure SAS Token?
Use Azure User Delegation SAS if your organization requires Azure AD-based, short-lived access instead of a manually generated SAS token. This option is useful when your security requirements do not allow long-lived SAS tokens and when your Azure administrators want access to be controlled through Azure AD application credentials and RBAC.
Does Azure User Delegation SAS Replace Azure SAS Token Credentials?
No. Azure SAS Token and Azure AD Service Principal credentials still exist. Azure User Delegation SAS is an additional credential option for supported scenarios.