Flow Builder
The Flow Builder page offers a visual canvas for configuring workflows (flows) using nodes that represent selected Clean Room questions. This allows users to arrange and connect the inputs and outputs of multiple questions, enhancing analytical insights by combining them in parent-child relationships. Additionally, the Flow Builder page lets users configure a flow's runtime parameters, clone an existing flow, save a new version of a flow, and update a flow.
To access the Flow Builder page, do one of the following:
For viewing a flow: On the Flows page, click the desired flow’s More Options (
 ) menu and select .
For creating a new flow: On the Flows page, click , provide a name for the flow (required) and a description (optional), and click . For more information, see “Flows” and “Create a Flow”.
For editing an existing flow: On the Flows page, click the desired flow’s More Options (
) menu and select . For more information, see “Flows” and “Create a Flow”.
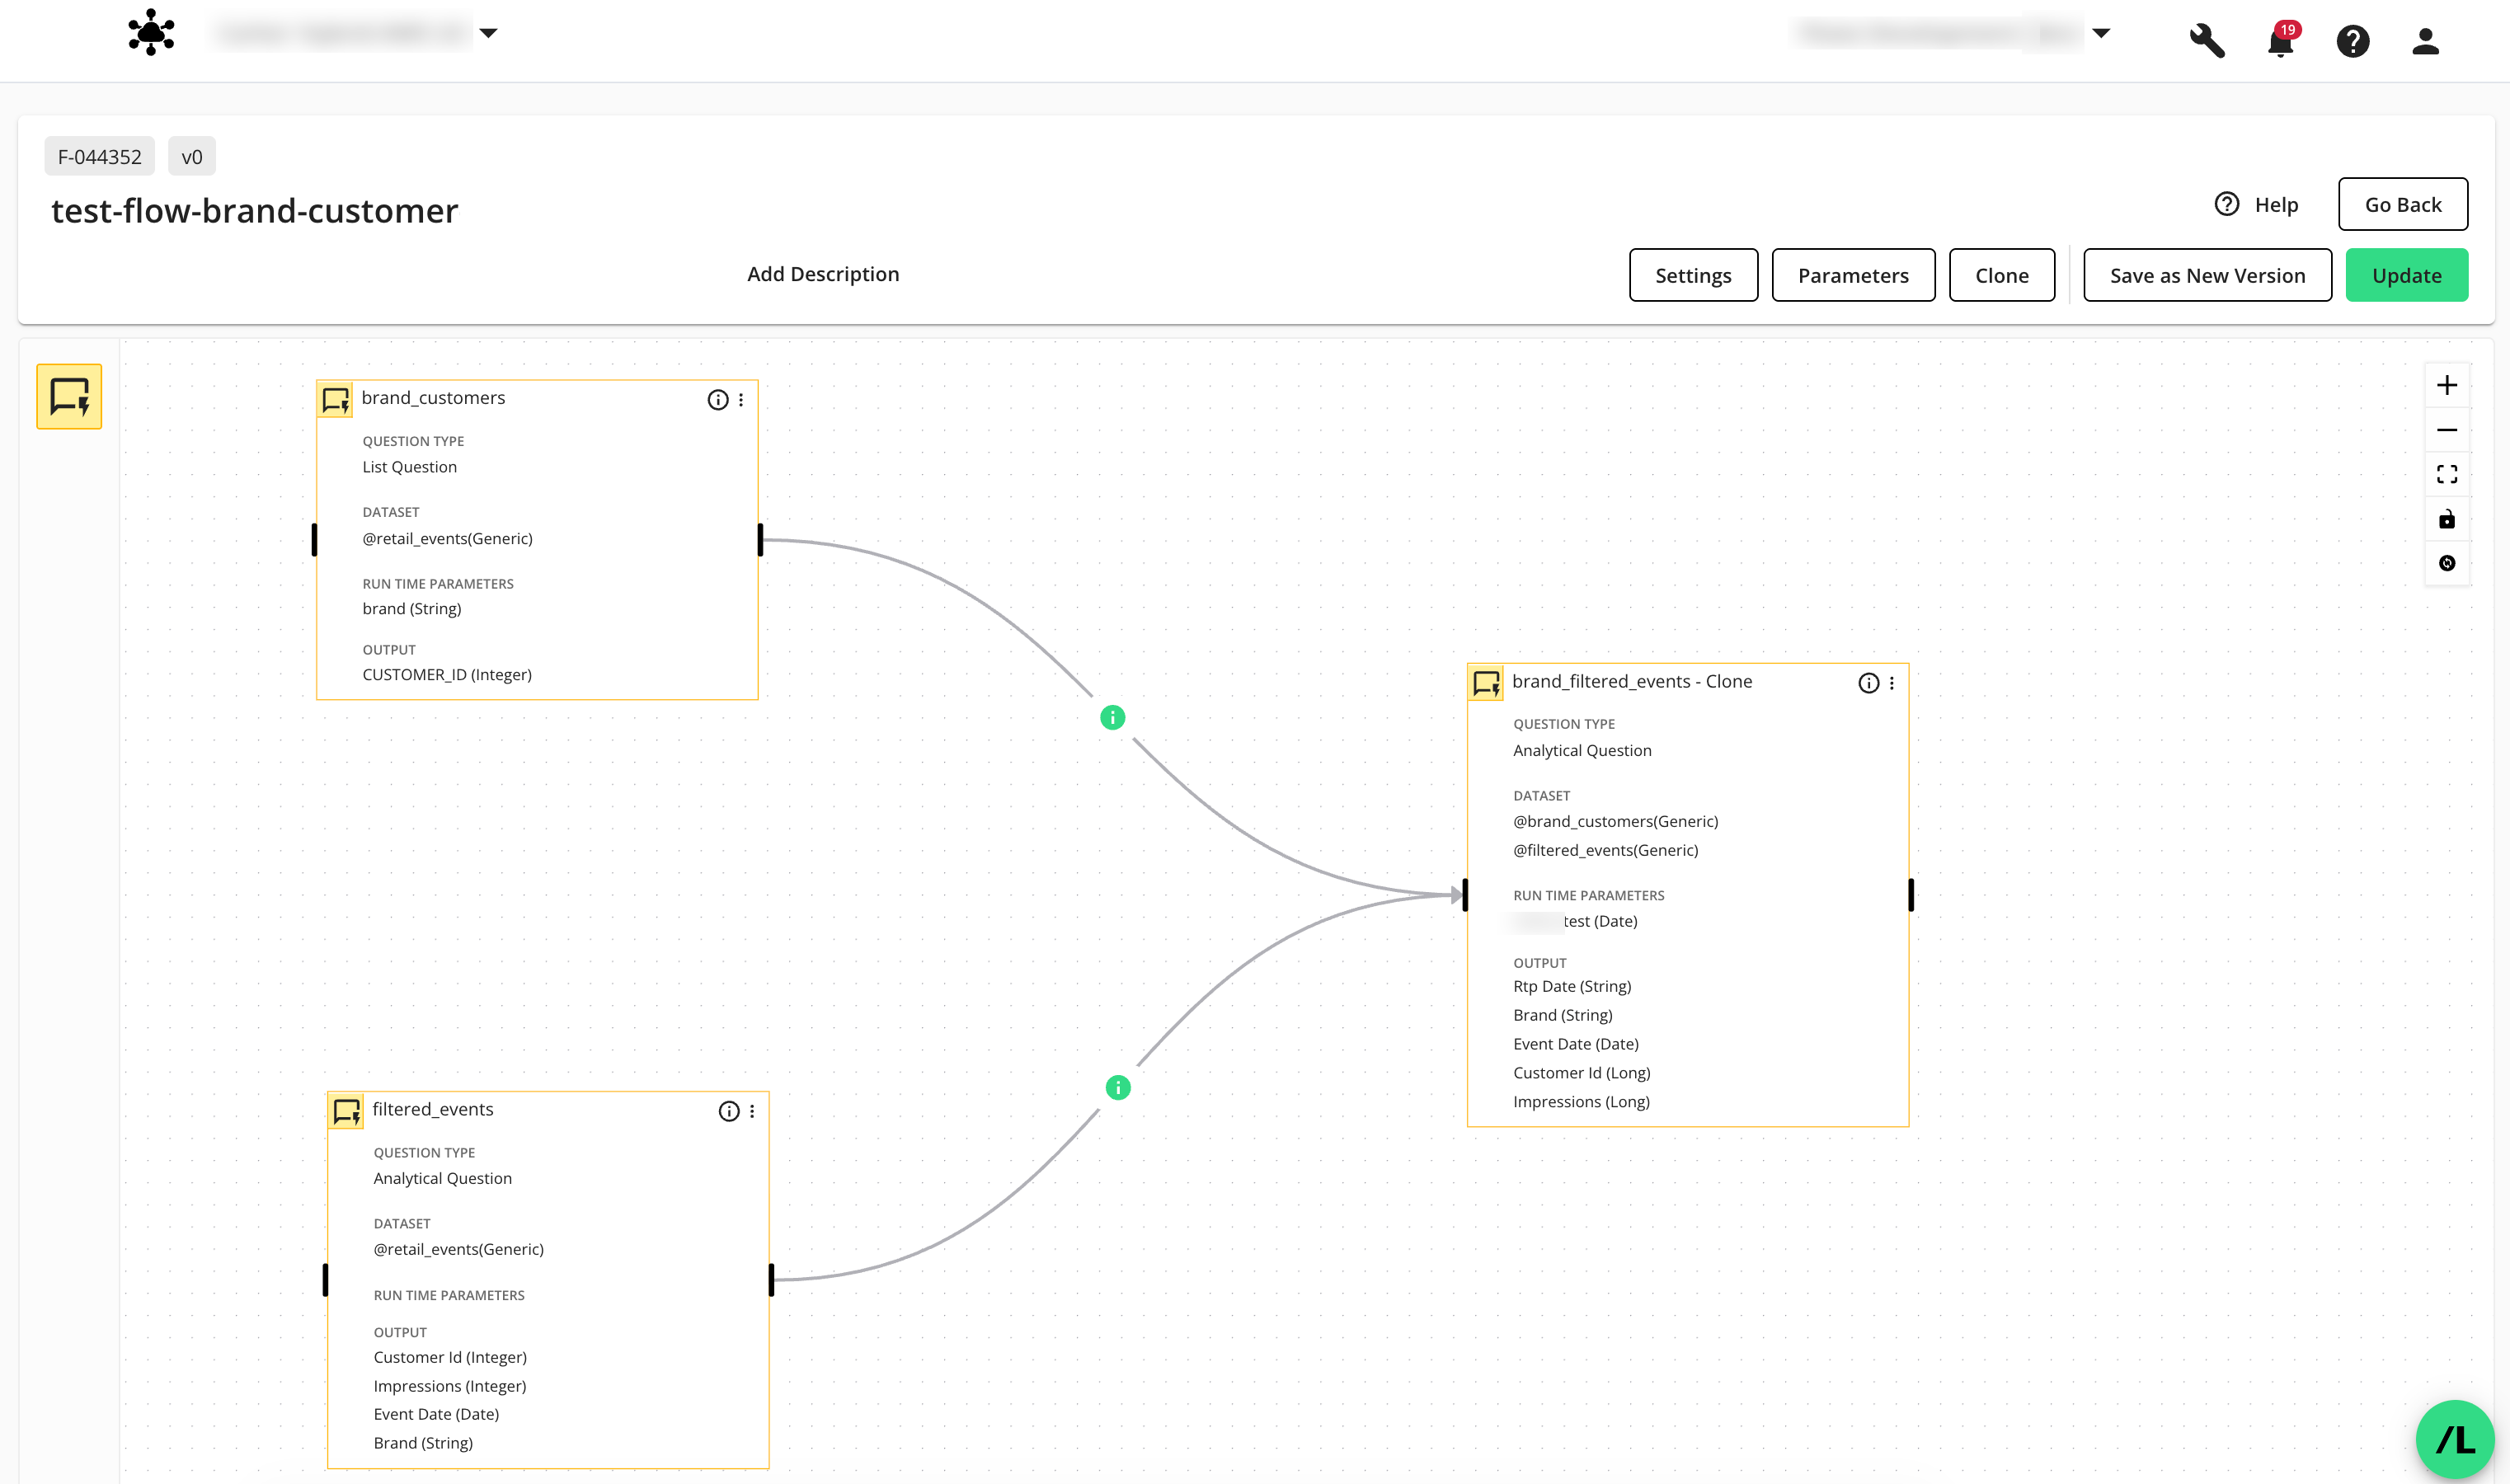
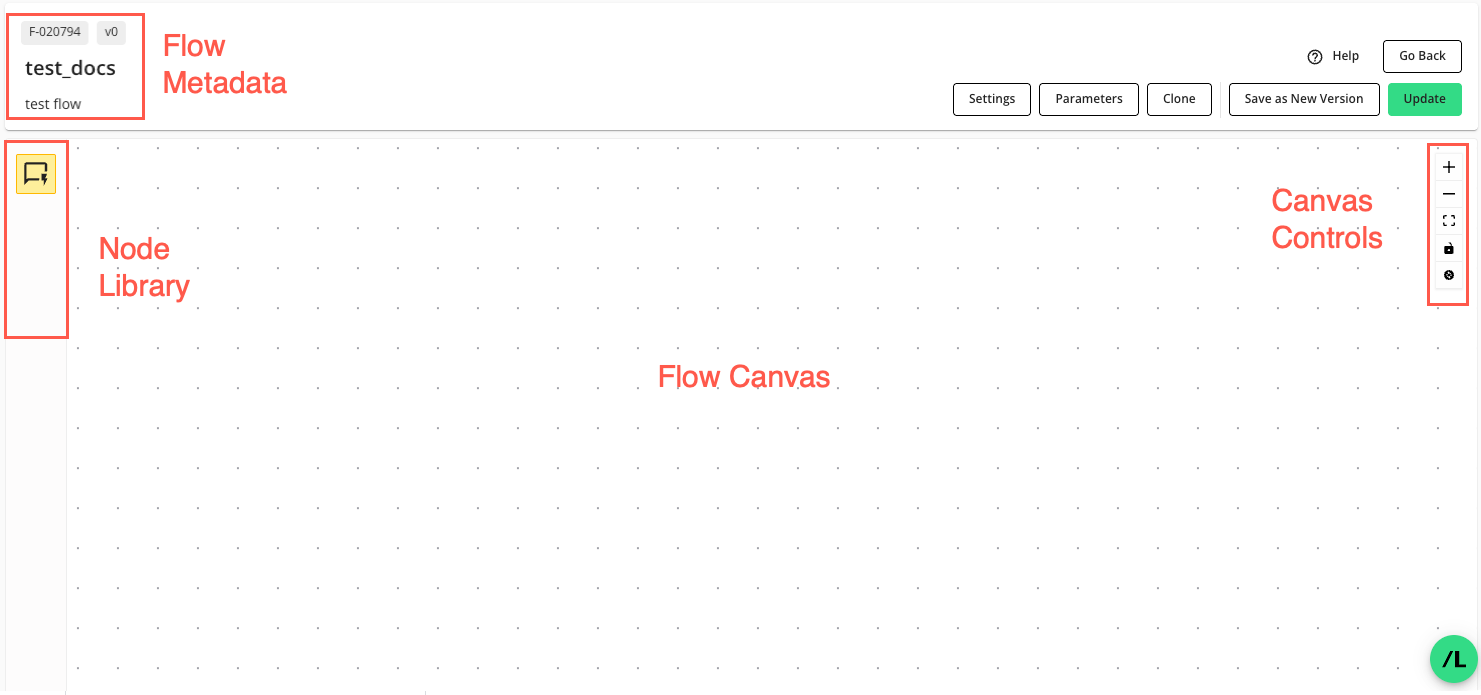
The Flow Canvas
The Flow Builder page has a central canvas with the following areas:
Flow Metadata: Displays read-only information such as the flow ID, version number, name, and description. When you create a new flow, you provide a name and can optionally add a description for the flow that displays here. To learn more, see “Create a Flow”.
Node Library: Contains nodes that can be used in the flow. Currently, the only node type available is a “question node”, which represents a Clean Room question in the flow. Users add nodes to the flow by clicking and dragging icons from this library onto the canvas. To learn more, see “Create a Flow”.
Flow Canvas: Provides the primary area where you lay out and connect your workflow steps. It's a grid-like space users can use to arrange, connect, and configure nodes. To learn more, see “Create a Flow”.
Canvas Controls: Lets users manage the view of the flow, including options to zoom in and out, fit all nodes onto the screen, and lock node positions.
Actions You Can Perform on the Flow Builder Page
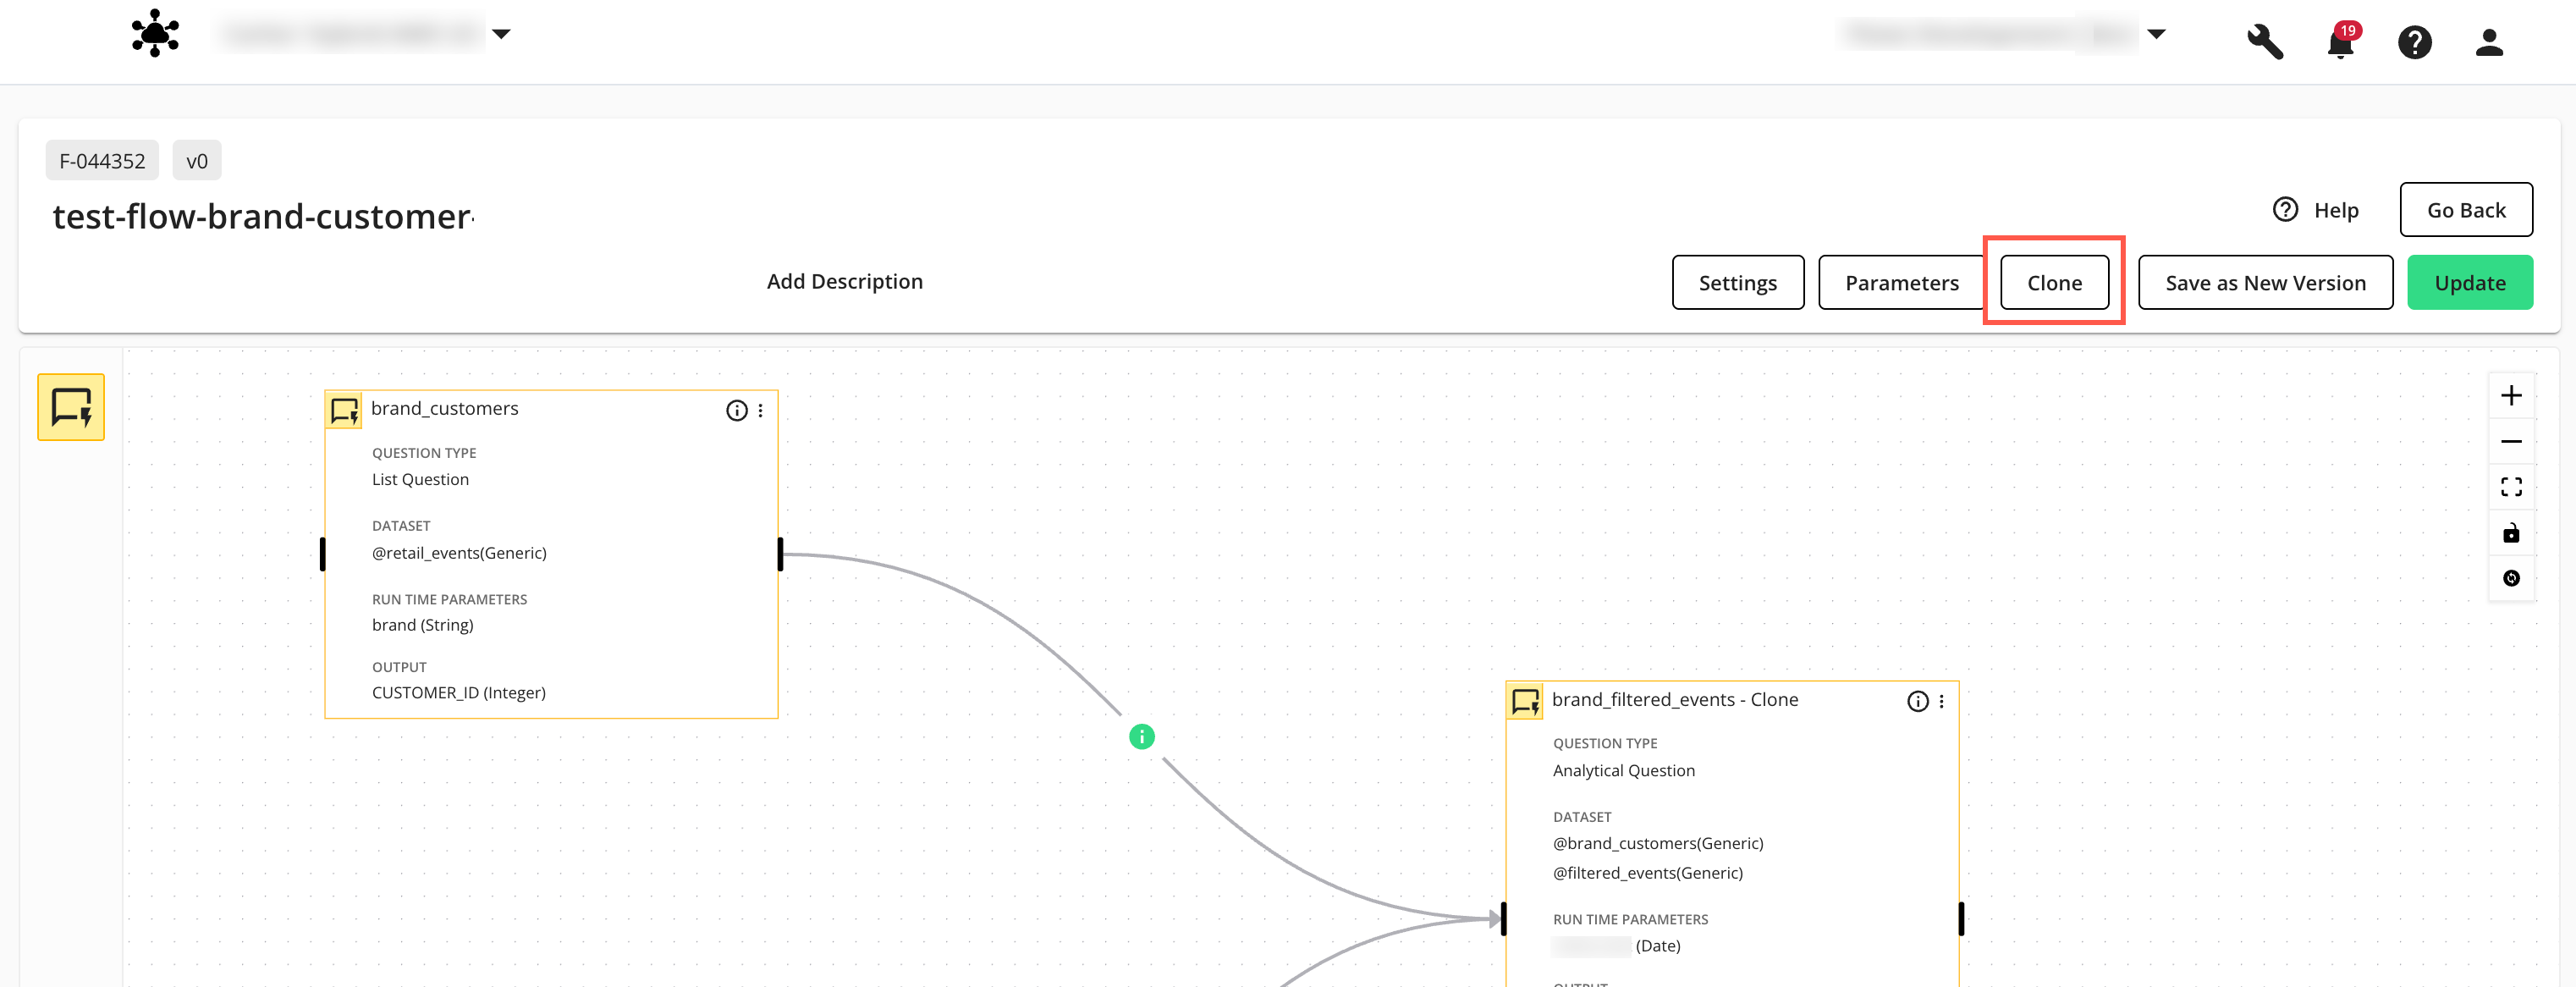
Clone a flow: Click to open the “Clone Flow” dialog. For more information, see “Clone a Flow” below.
Configure a newly created flow: The Flow Builder page displays after you click on the Flows page. You can then arrange, connect, and configure the nodes on the Flow Builder canvas. For more information, see “Create a Flow”.
Edit an existing flow: The Flow Builder page displays after you click a flow’s More Options (
) menu on the Flows page and select . For more information, see “Edit a Flow” below.Bulk edit node settings in an existing flow: The Flow Builder page displays after you click a flow’s More Options (
) menu on the Flows page and select Edit. Click Settings to open the "Bulk Edit Node Settings" configuration page. For more information, see “Bulk Edit Node Settings in a Flow” below.Manage the runtime parameters for the flow: Click to access the flow’s available parameters and configure its runtime parameters. For more information, see “Configure Flow Parameters” below.
Save a flow as a new version: Click to create a new version of the flow with all your current changes.This will increment the version number of the flow. For more information, see “Save a New Version of a Flow” below.
Tag nodes for flow run branching: You can tag nodes in a flow to control what branches of a flow execute in a new or reused flow run. For more information, See “Tag Nodes for Flow Run Branching” below.
Update the current flow: Click to save the current flow and return to the Flows page. The Update option checks if the flow is ready to run or still requires additional configuration. The “Stage” of the updated flow in the Flows page will indicate a stage of “Ready”, “Unassigned Owner Data”, or “Unassigned Dataset”. For more information, see “Flows” and “Create a Flow”.
Clone a Flow
You can clone a particular version of a flow from the Flow Builder page. The cloned flow will retain the complete version history of the flow being cloned, including the flow’s versions, nodes, and connections between the nodes.
Note
The flow’s assigned datasets are not copied in the cloning process. You will need to assign datasets to the newly cloned flow before you can run it.
On the Flows page, click the flow’s More Options (
) menu and select .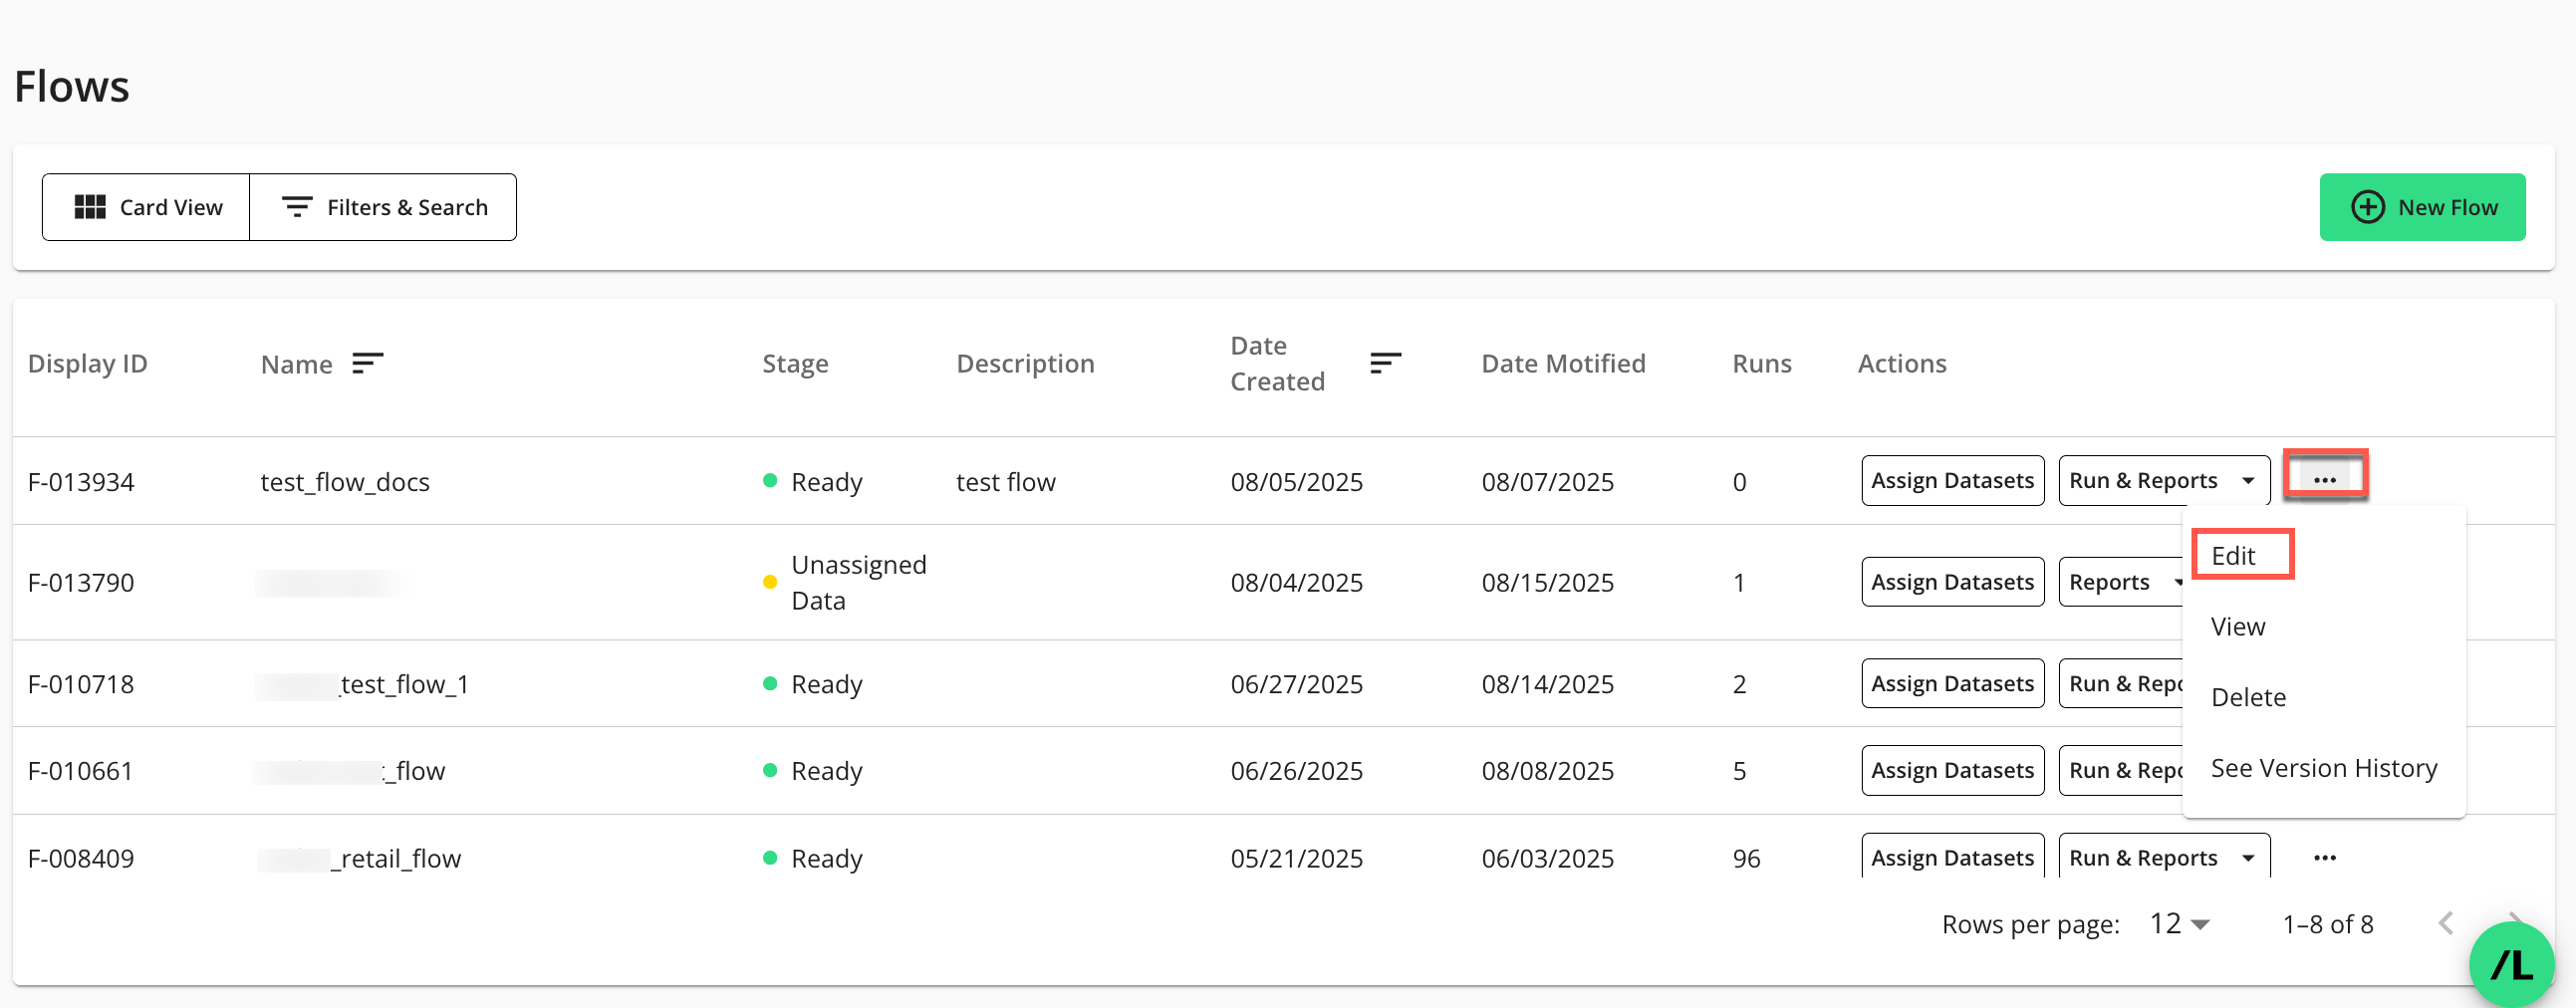
The Flow Builder page in edit mode displays:
On the Flow Builder page, click .
The “Clone Flow” dialog displays:
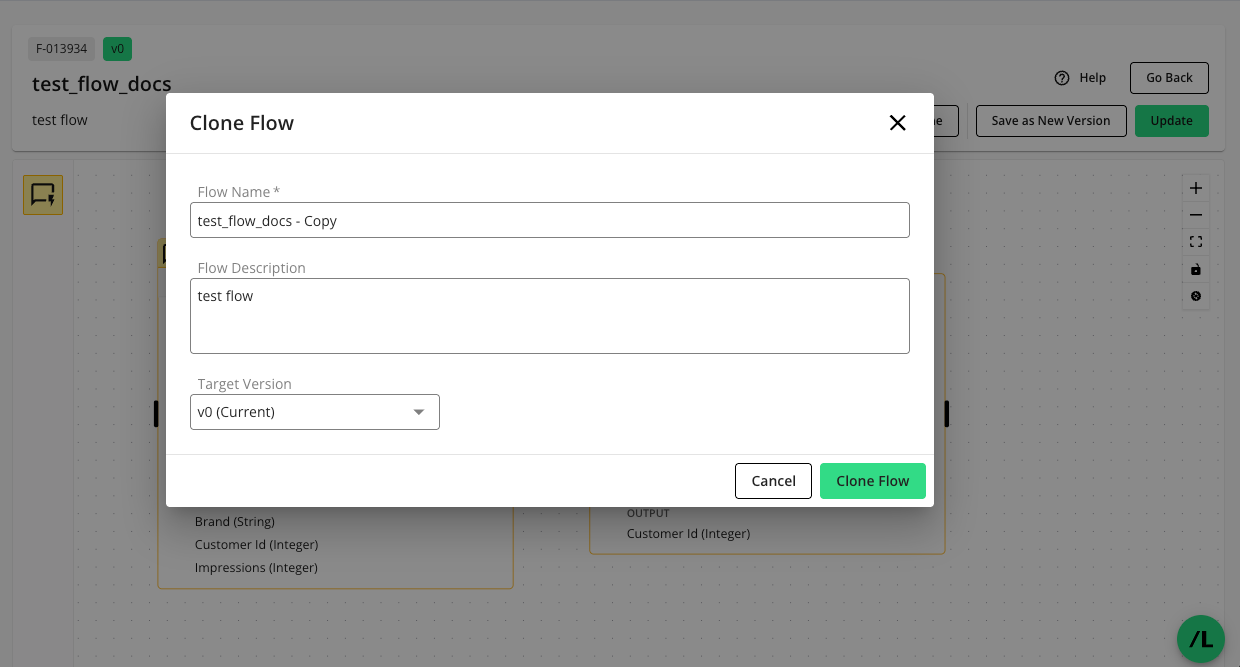
Enter the following information:
Flow Name: This field is pre-populated with the name of the current flow and “ - Copy” appended to it, but you can modify it. The name of the flow must be unique for the clean room it belongs to.
Flow Description: This field is pre-populated with the description of the current flow, but you can modify it.
Target Version: The dropdown list defaults to the current flow's version. You can choose a different version from the list if you want to clone an earlier version of the flow. For instance, if your flow has five versions, you could select version 3 (v3) to exclude versions 4 and 5 from the cloned flow.
Click .
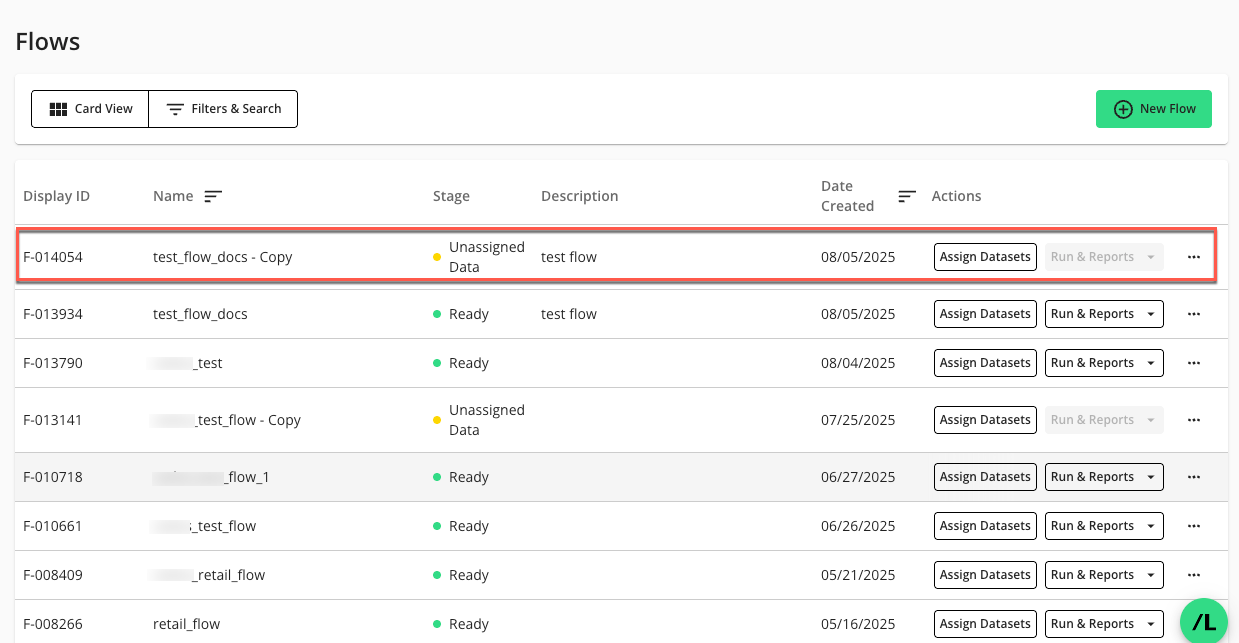
The newly cloned flow will display in the Flows page with a “Stage” of “Unassigned Data”.
Edit a Flow
On the Flows page, click the flow’s More Options (
) menu and select .The Flow Builder page in edit mode displays:
Make any edits to the flow. For more information, see “Create a Flow”.
Warning
When you edit a flow and remove a node or node connection from a version that has associated flow runs, a confirmation warning will appear. This is because such changes can result in data loss in reports from previous runs using that version.
The warning dialog offers three options:
Cancel: Discard your changes and return to the flow.
Continue: Proceed with your changes, understanding that data related to removed nodes or edges may be lost in existing run reports.
Save as New Version (Recommended if you don’t want to lose data in reports from previous runs): Create a new version of the flow with your edits, preserving historical data in reports from previous runs.
A check box in the dialog allows you to bypass future warnings during your current browser session when you select "Continue."
Click to save your changes.
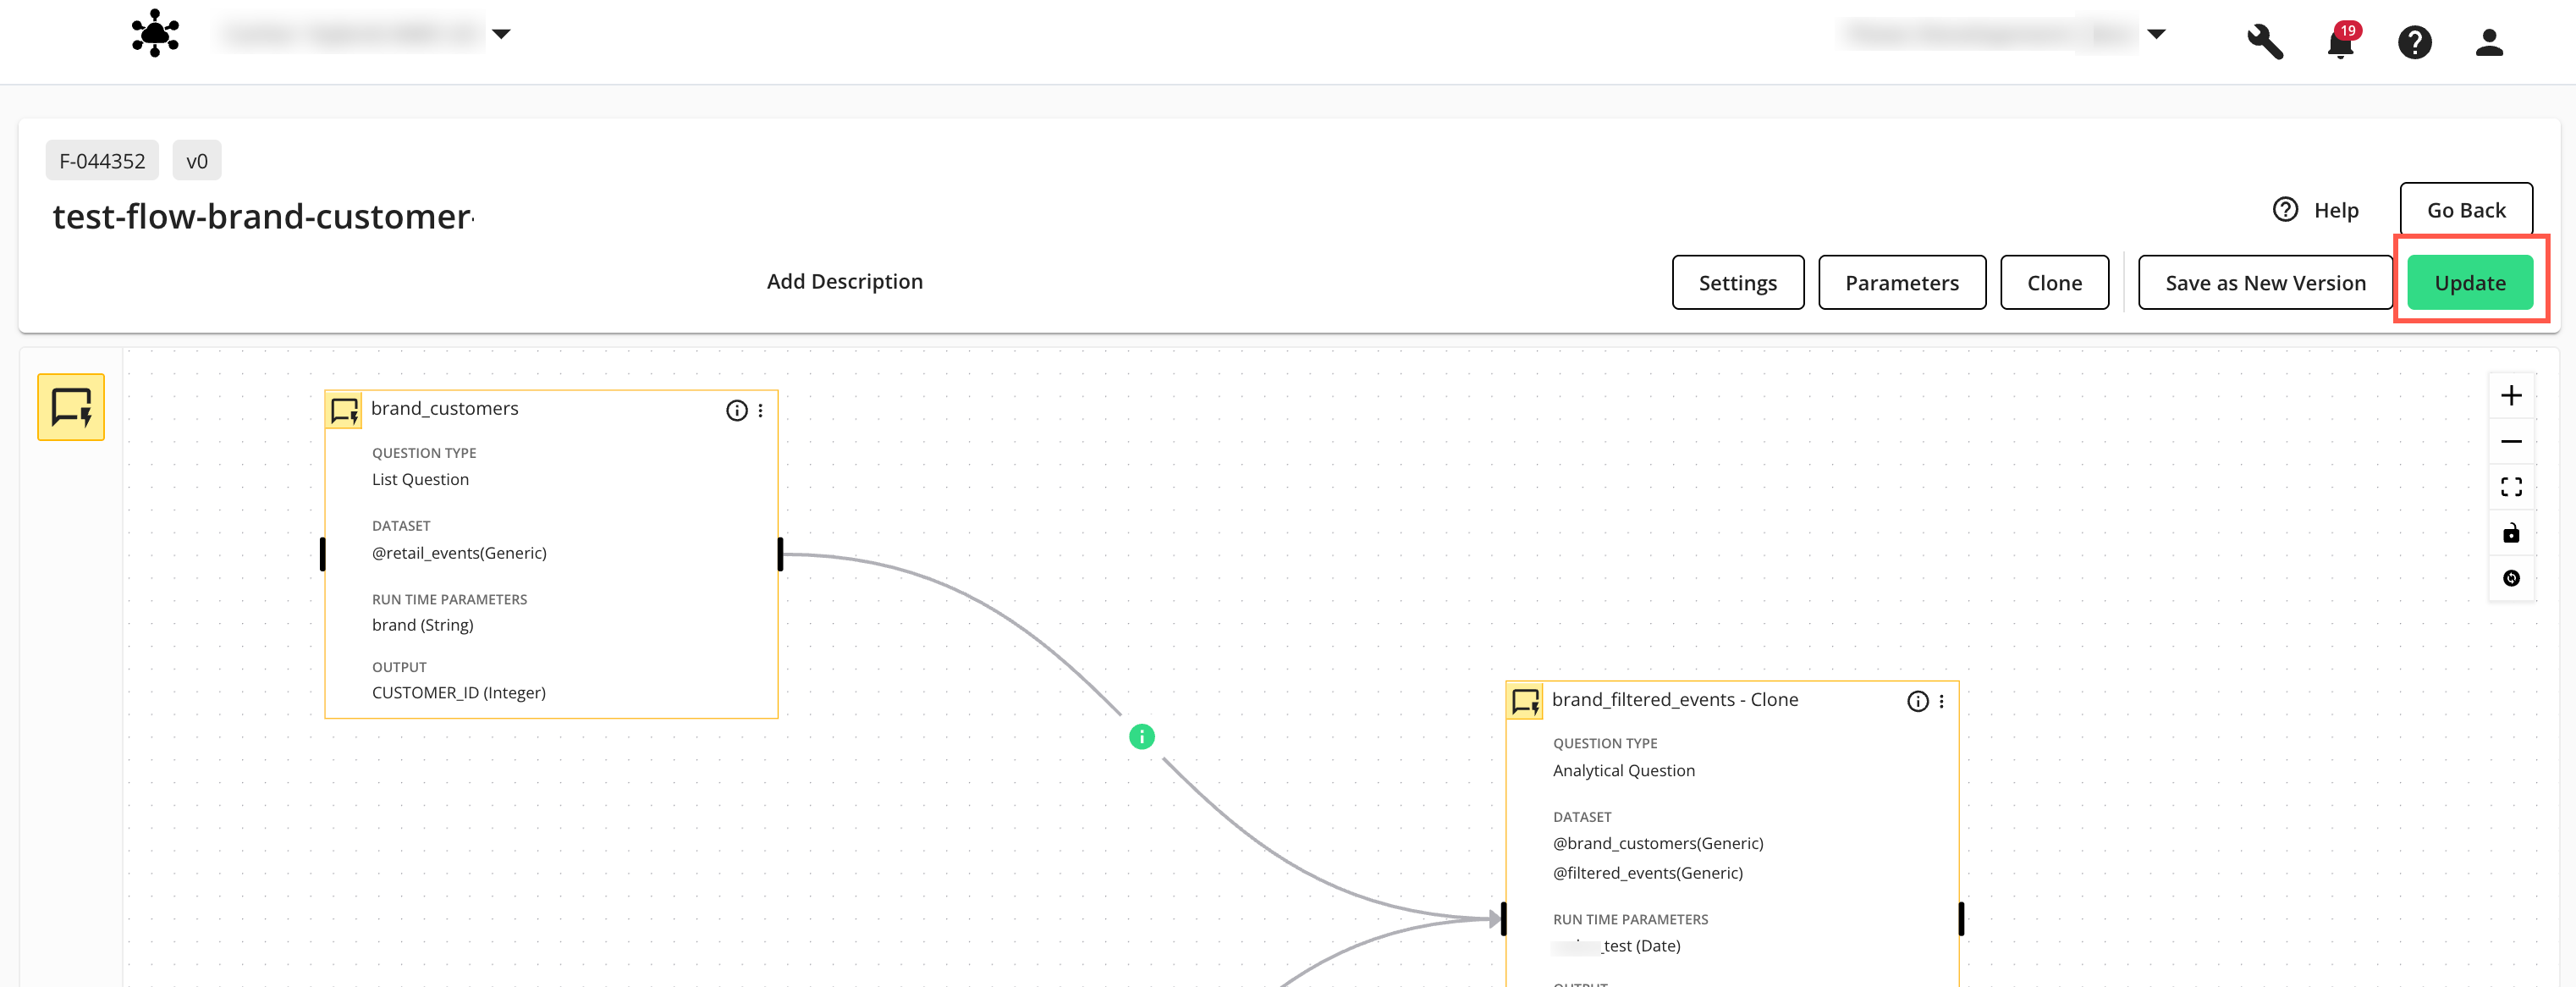
The “Update” option saves the flow and returns you to the Flows page, where you’ll find the edited flow listed.
Bulk Edit Node Settings in a Flow
The Bulk Edit Node Settings for Flows feature lets you configure common settings (e.g., report access, processing capacity, and tags) for multiple nodes in a flow in a single configuration page, instead of editing each node one at a time. This streamlines managing large flows, reduces repetitive configuration, and helps keep node settings consistent across your workflow.
On the Flows page, click the flow’s More Options (
) menu and select .The Flow Builder page in edit mode displays:
Select Settings to open the “Bulk Edit Node Settings” configuration page.
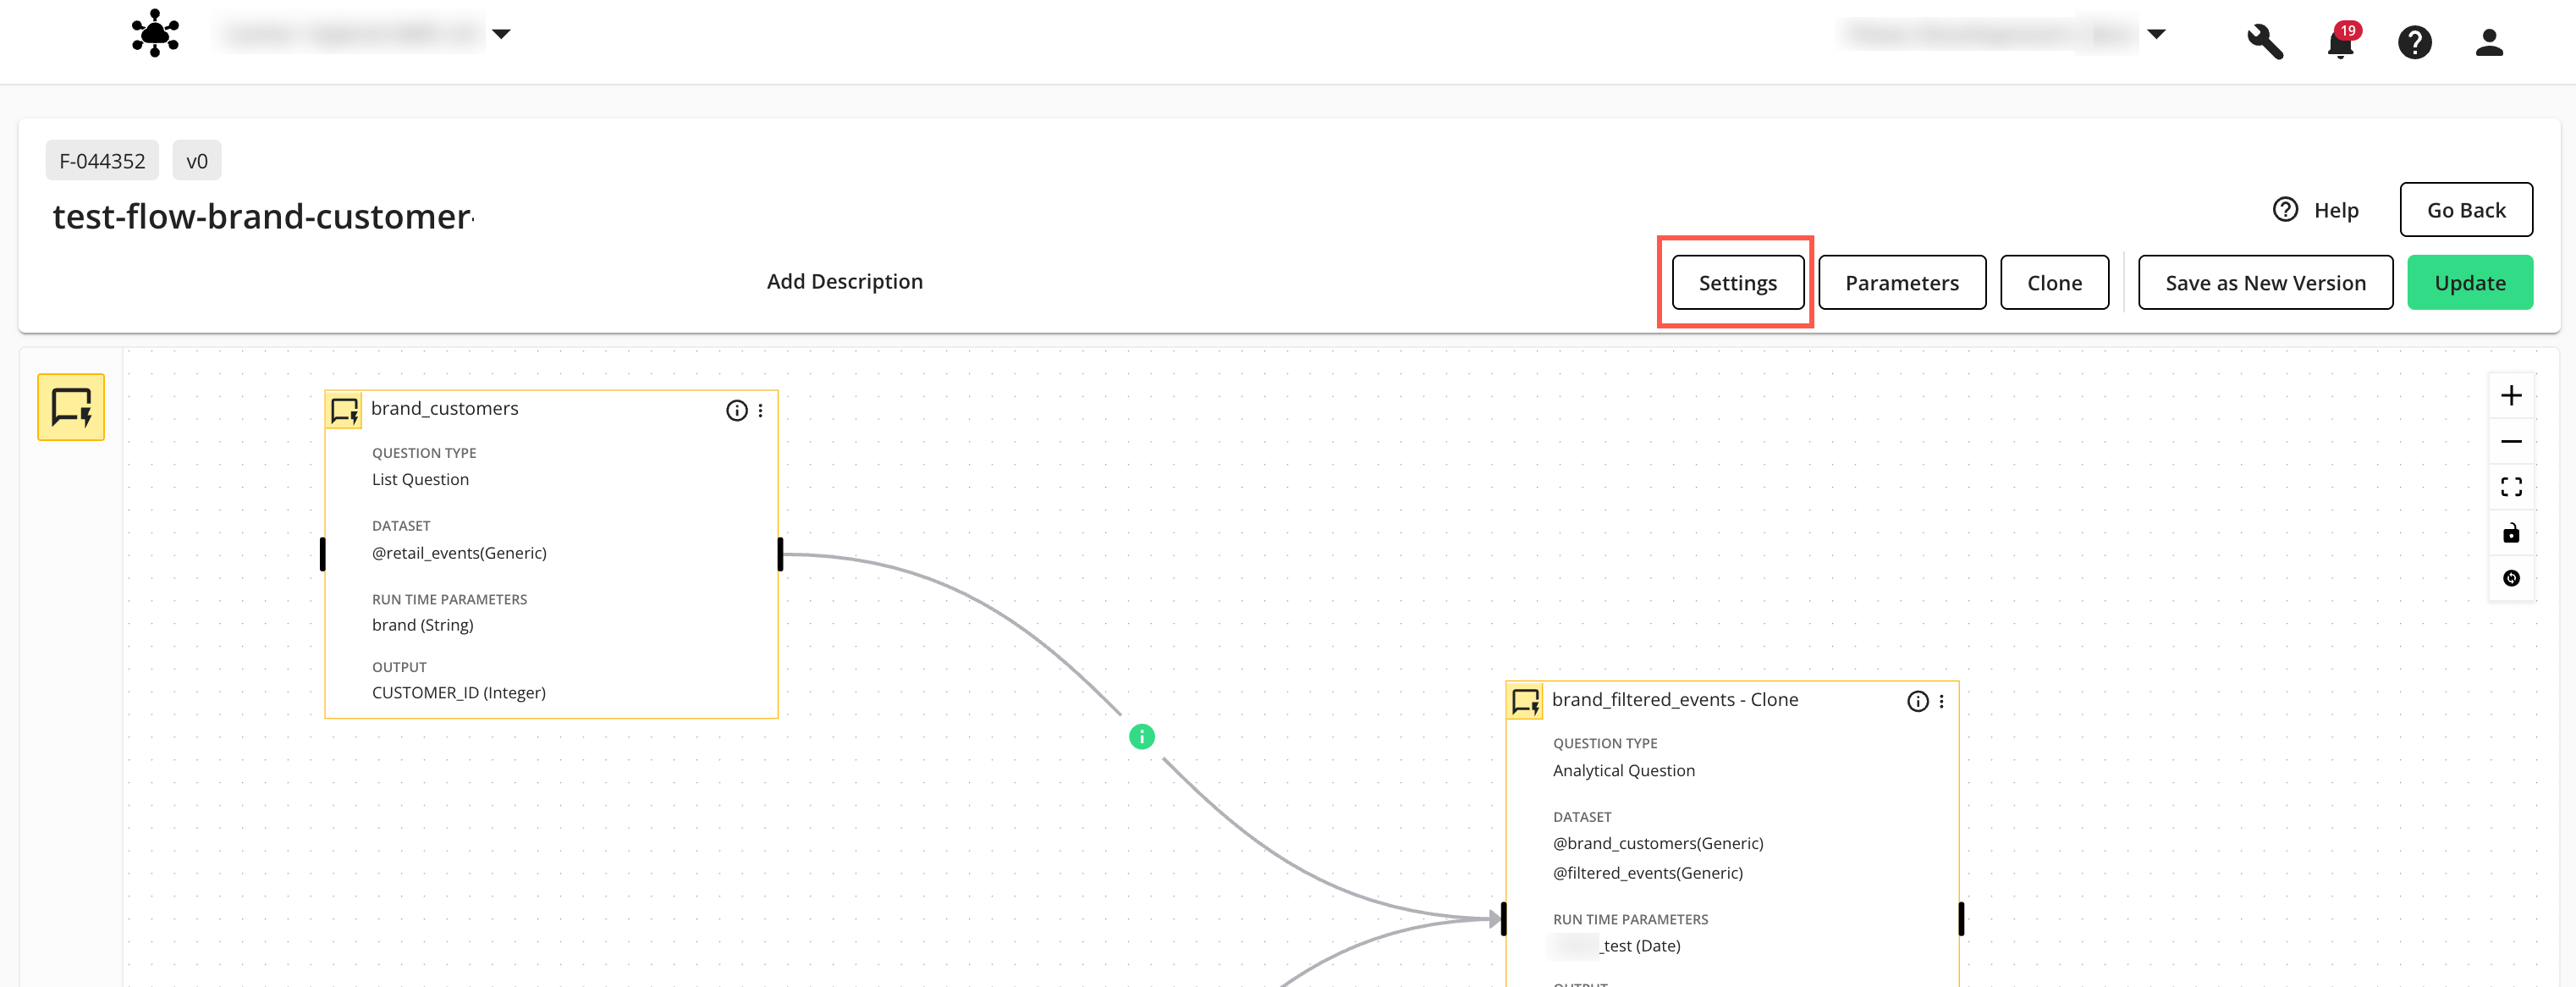
The “Bulk Edit Node Settings” configuration page displays.

Select one or more nodes on the left to apply bulk changes to their settings:
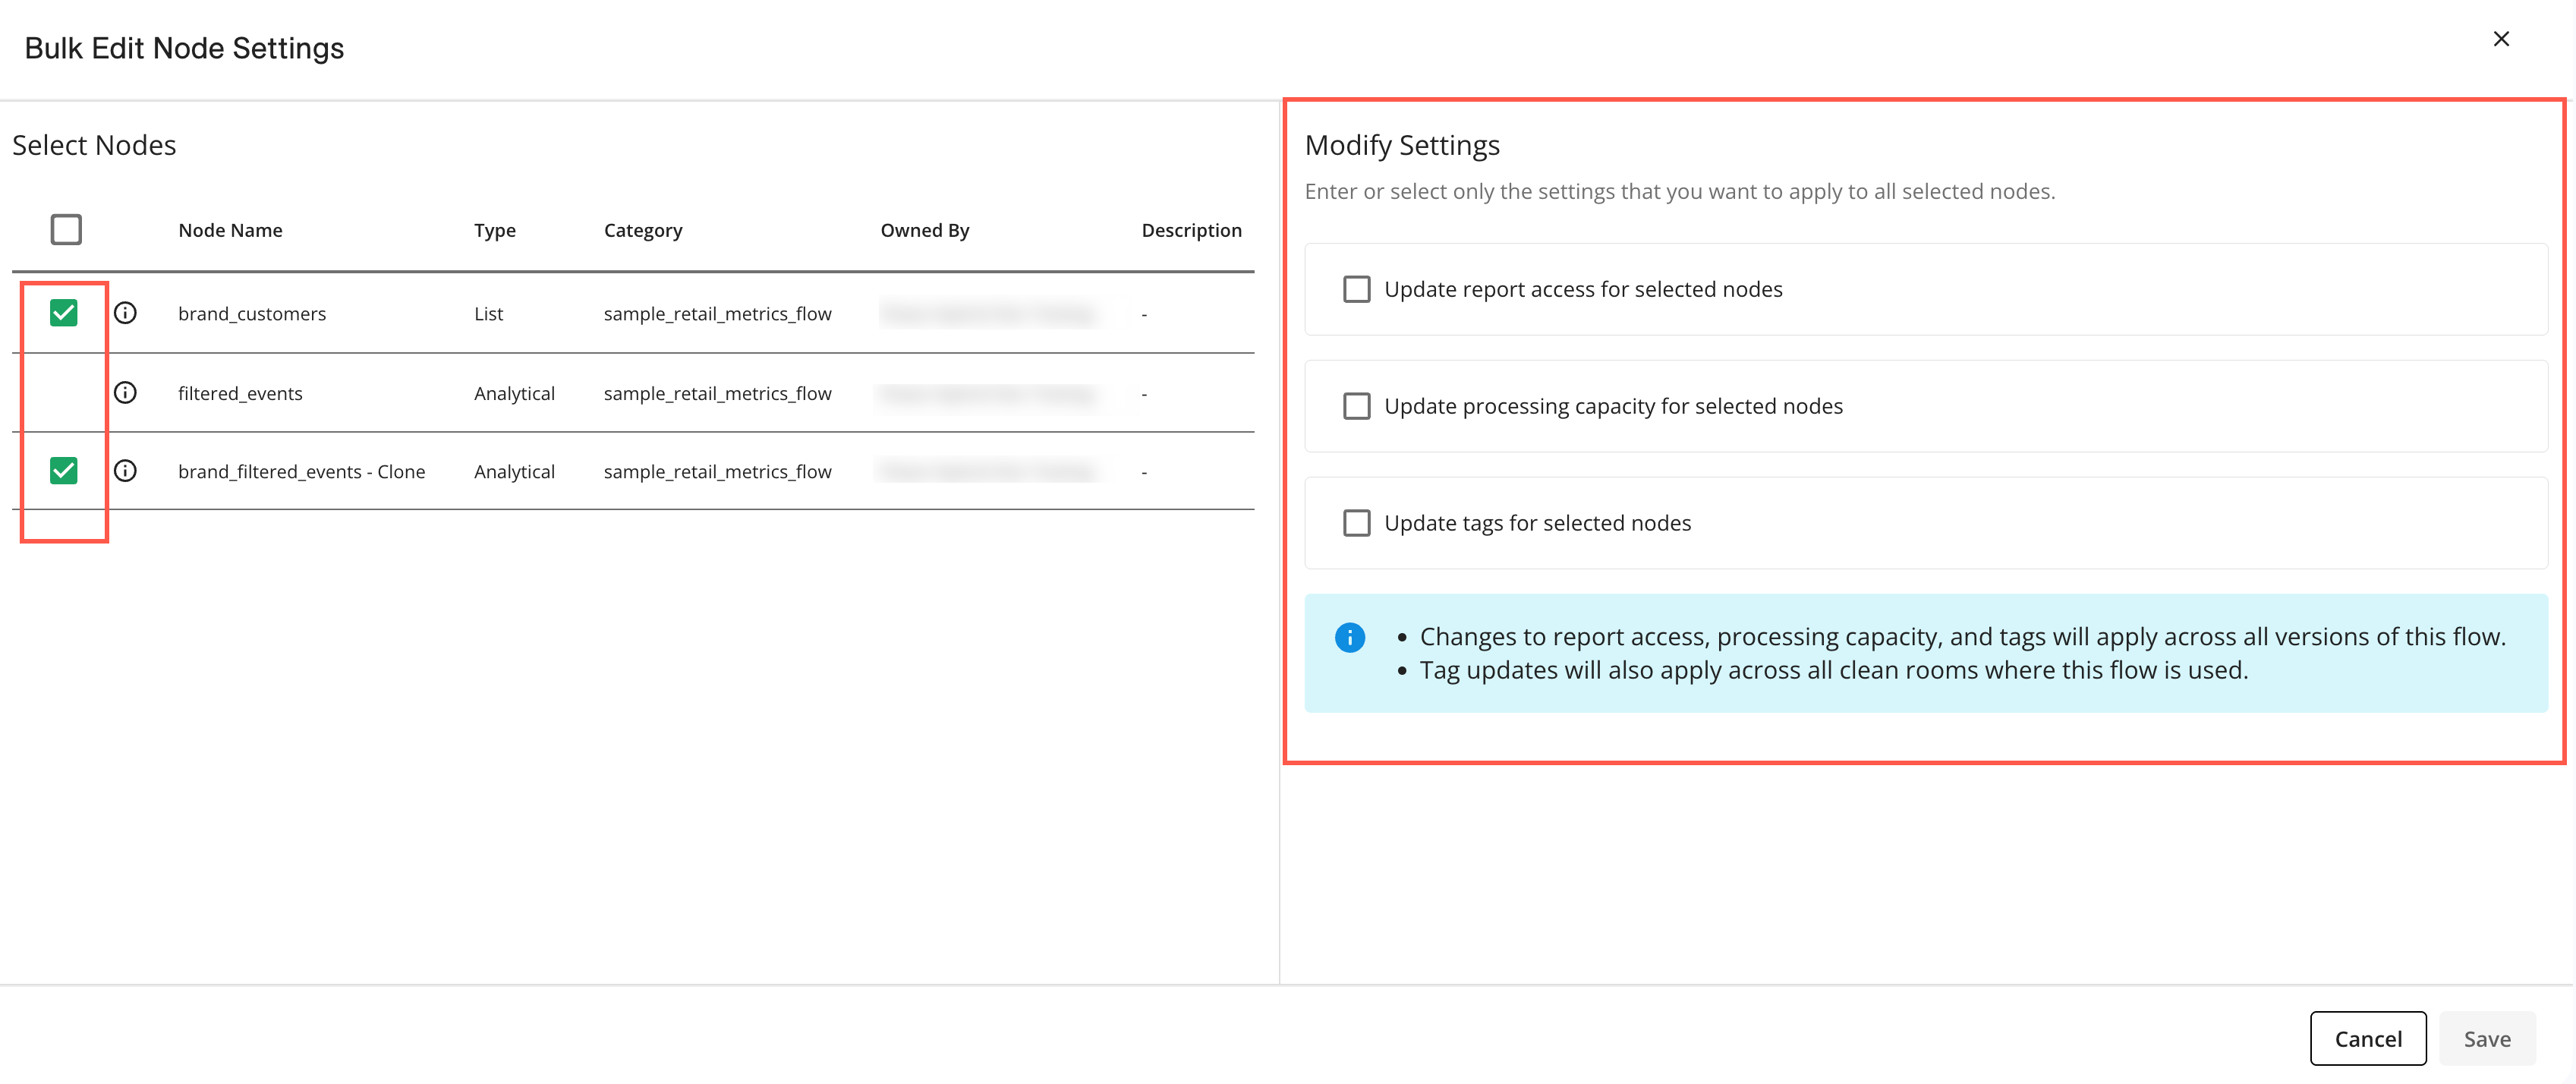
Click one or more check boxes in the “Modify Settings” panel to expand the configuration section, where you can view and select options to apply to the selected nodes.
Note
The selected settings will be applied to all selected nodes. You can still modify individual node settings at any time by editing the desired node.
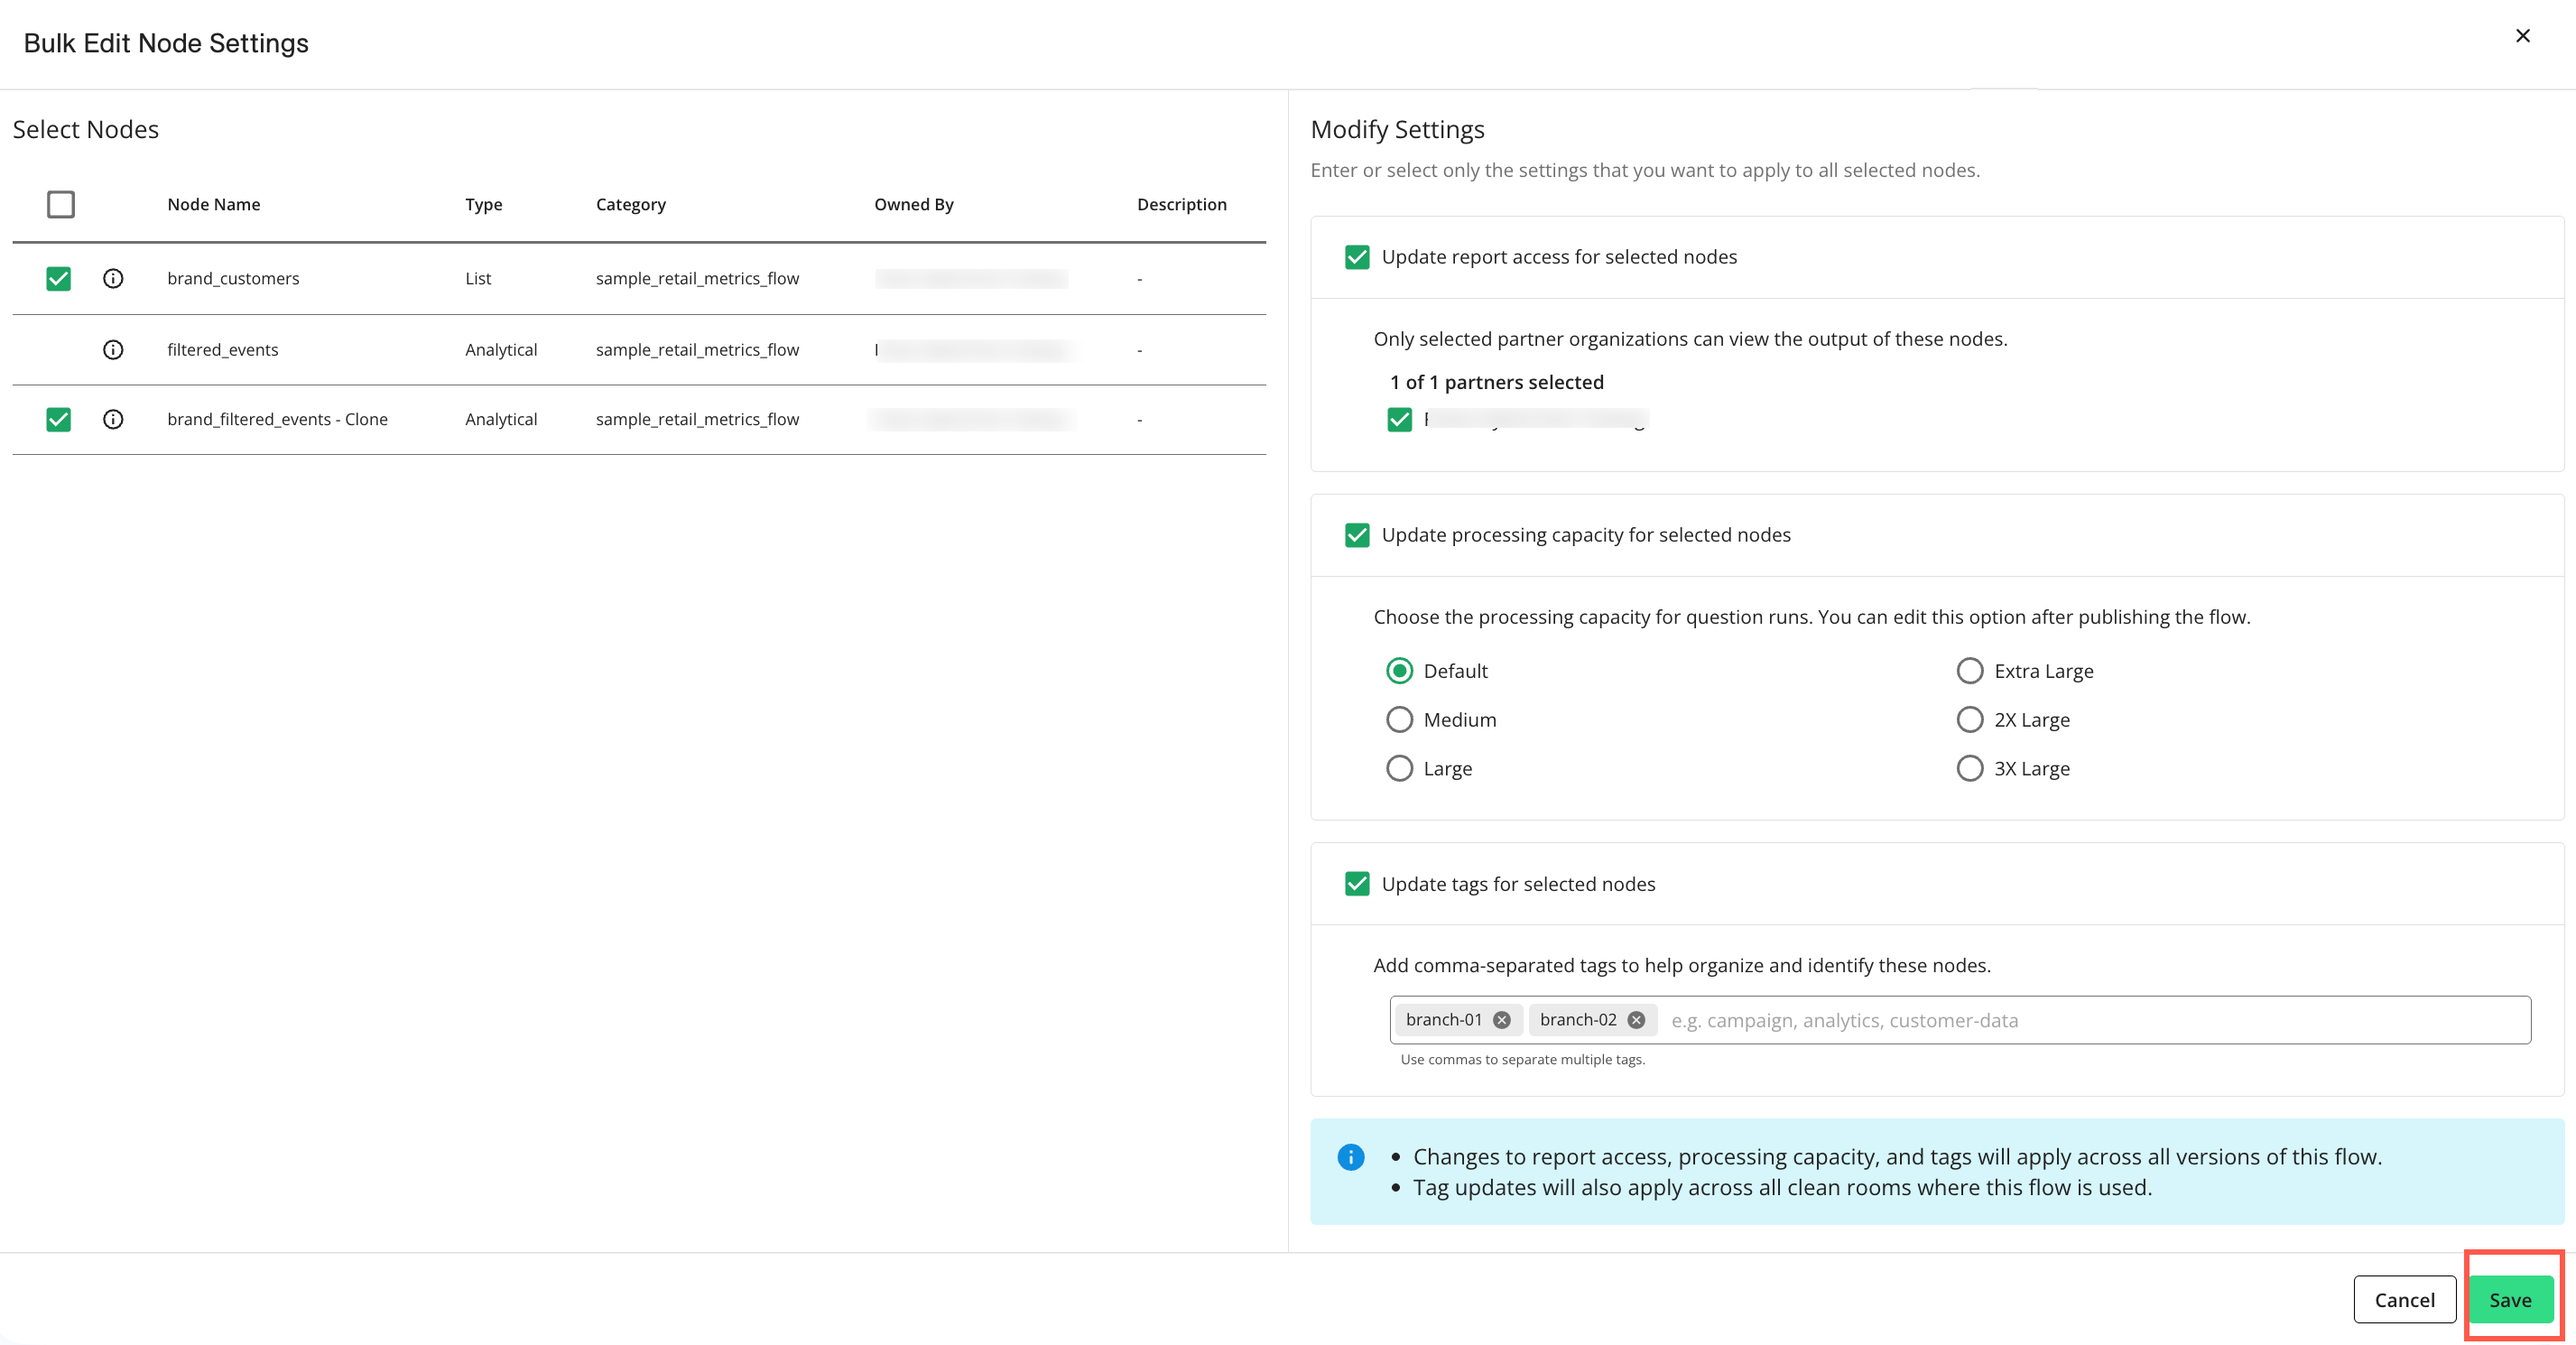
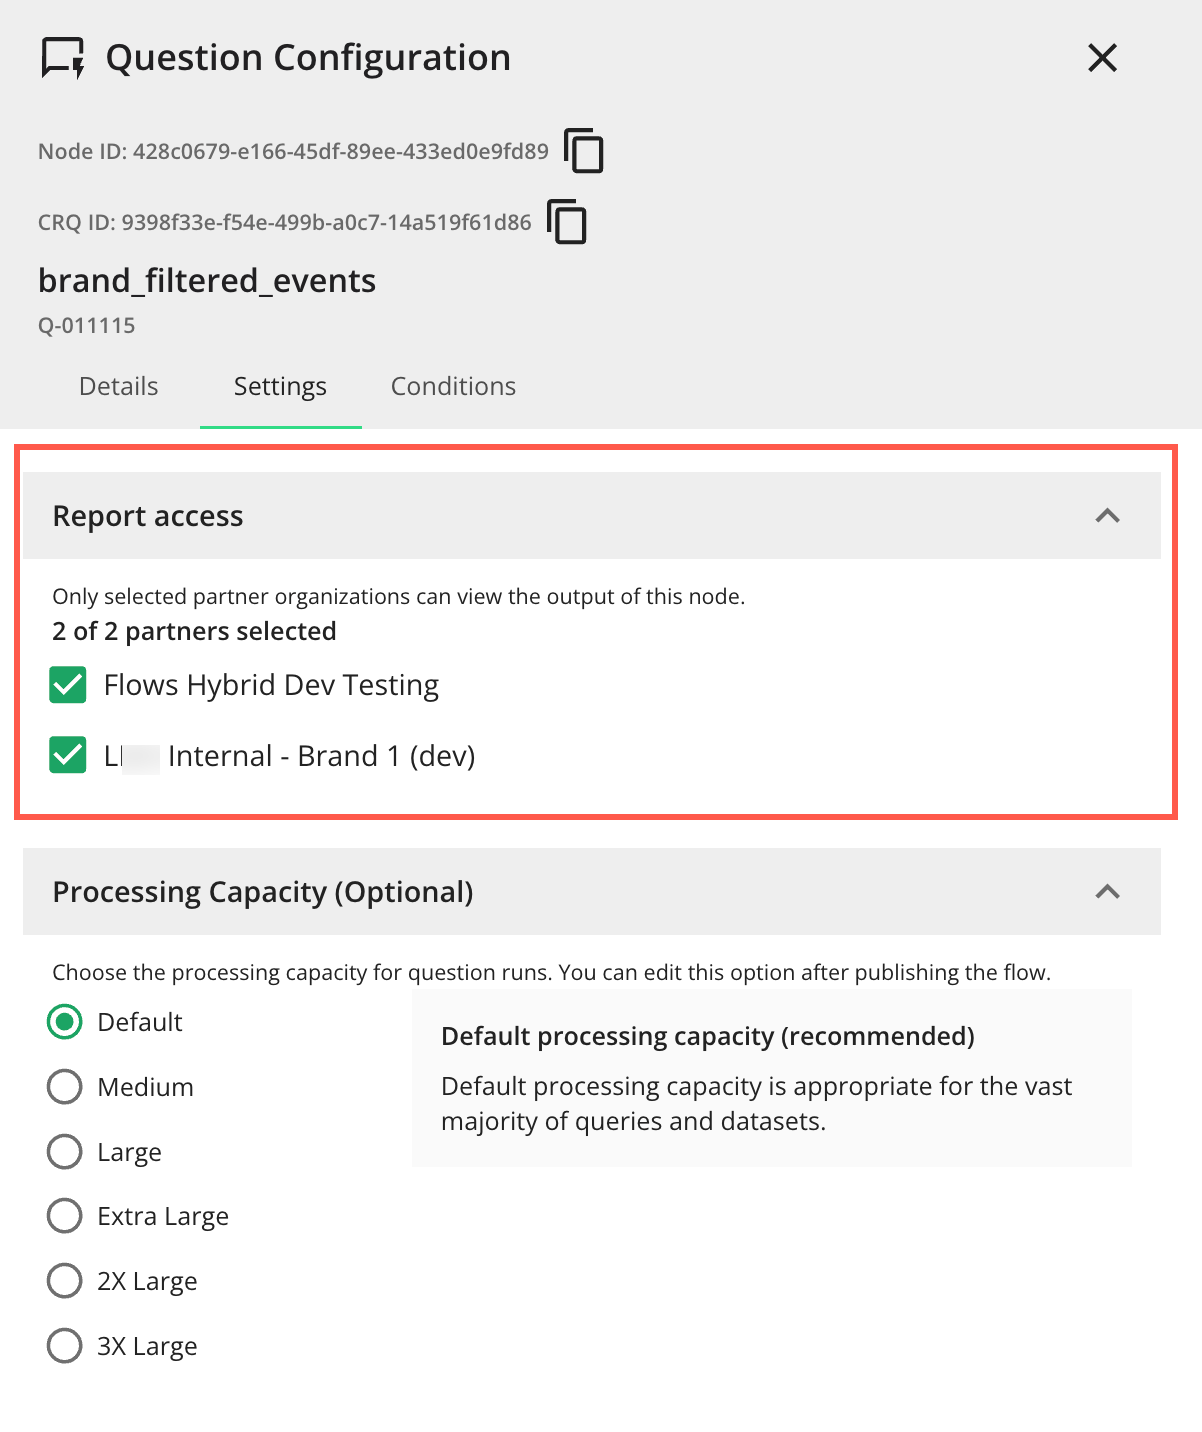
Update report access for selected nodes: The permission access for the output of this question node. Select or unselect partner organizations who can view the output of this question node. Only the selected partner organizations can view the output.
Note
You must have the "View Reports and Outputs" permission to access the reports. To learn more, see "Managing Clean Room Permissions".
Update processing capacity for selected nodes: Choose the processing capacity for question runs. You can edit this option after updating the flow. The Default option is recommended and is appropriate for the vast majority of queries and datasets. The available processing capacities are as follows:
Default: Recommended and appropriate for the vast majority of queries and datasets.
Medium: Only required for questions that are not satisfied by the default setting or for complex queries.
Large: Only required for questions that are not satisfied by the default setting or exceptionally complex queries and large record counts (e.g., 1+ billion).
Extra Large: Only required for questions that are not satisfied by the “Large” setting or exceptionally complex queries and very large record counts (10+ billion).
2X Large: Only required for extremely complex questions and very large datasets. Use only when “Extra Large” capacity is insufficient.
3X Large: Only required for exceptionally high-complexity questions and massive-scale datasets. Requires pre-approval from LiveRamp due to significant resource consumption.
Update tags for selected nodes: You can add comma-separated tags in the field to help you organize and identify this node.
Tip
You can use tags to identify which branch a node belongs to. This can be helpful when you only want to run the nodes in specific branches of a flow. For more information, see "Understanding Flow Run Branching."

Click Save to save your changes.
Note
Changes to report access, processing capacity, and tags will apply across all versions of this flow.
Tag updates will also apply across all clean rooms where this flow is used.
Click Update to save your changes to the flow.
Flow Versioning
Flow versioning lets you create distinct configurations or snapshots of the same flow. Each version can contain its own unique set of nodes and node connections (edges). These versions are independent, meaning changes to one version do not impact other versions of the flow.
The current version of a flow in Flow Builder is indicated above the flow name as shown below:
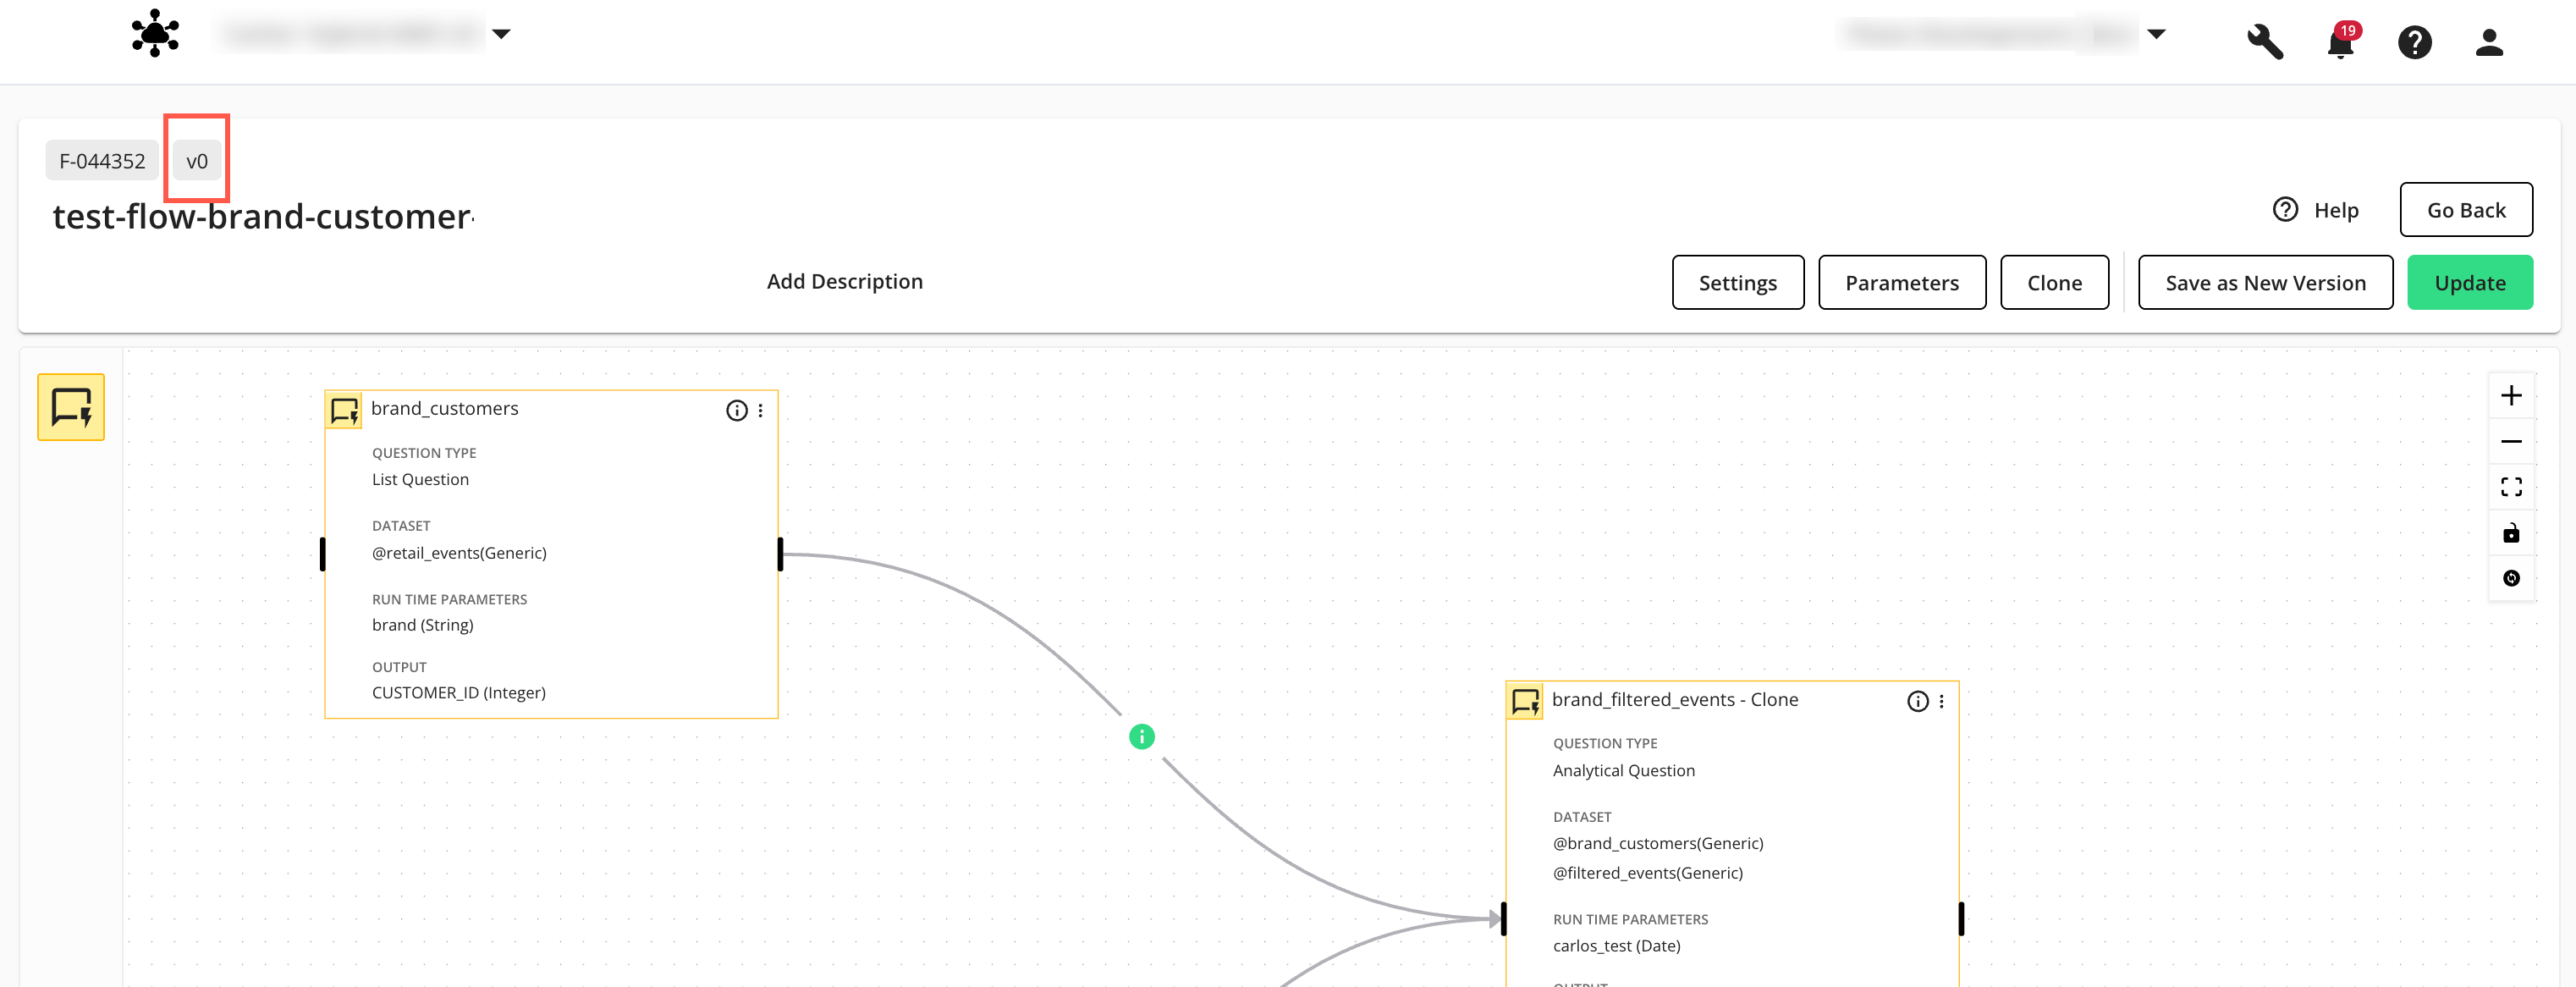
The current version of a flow is automatically used when you select a flow from the Flows page.
Flow versioning lets you do the following:
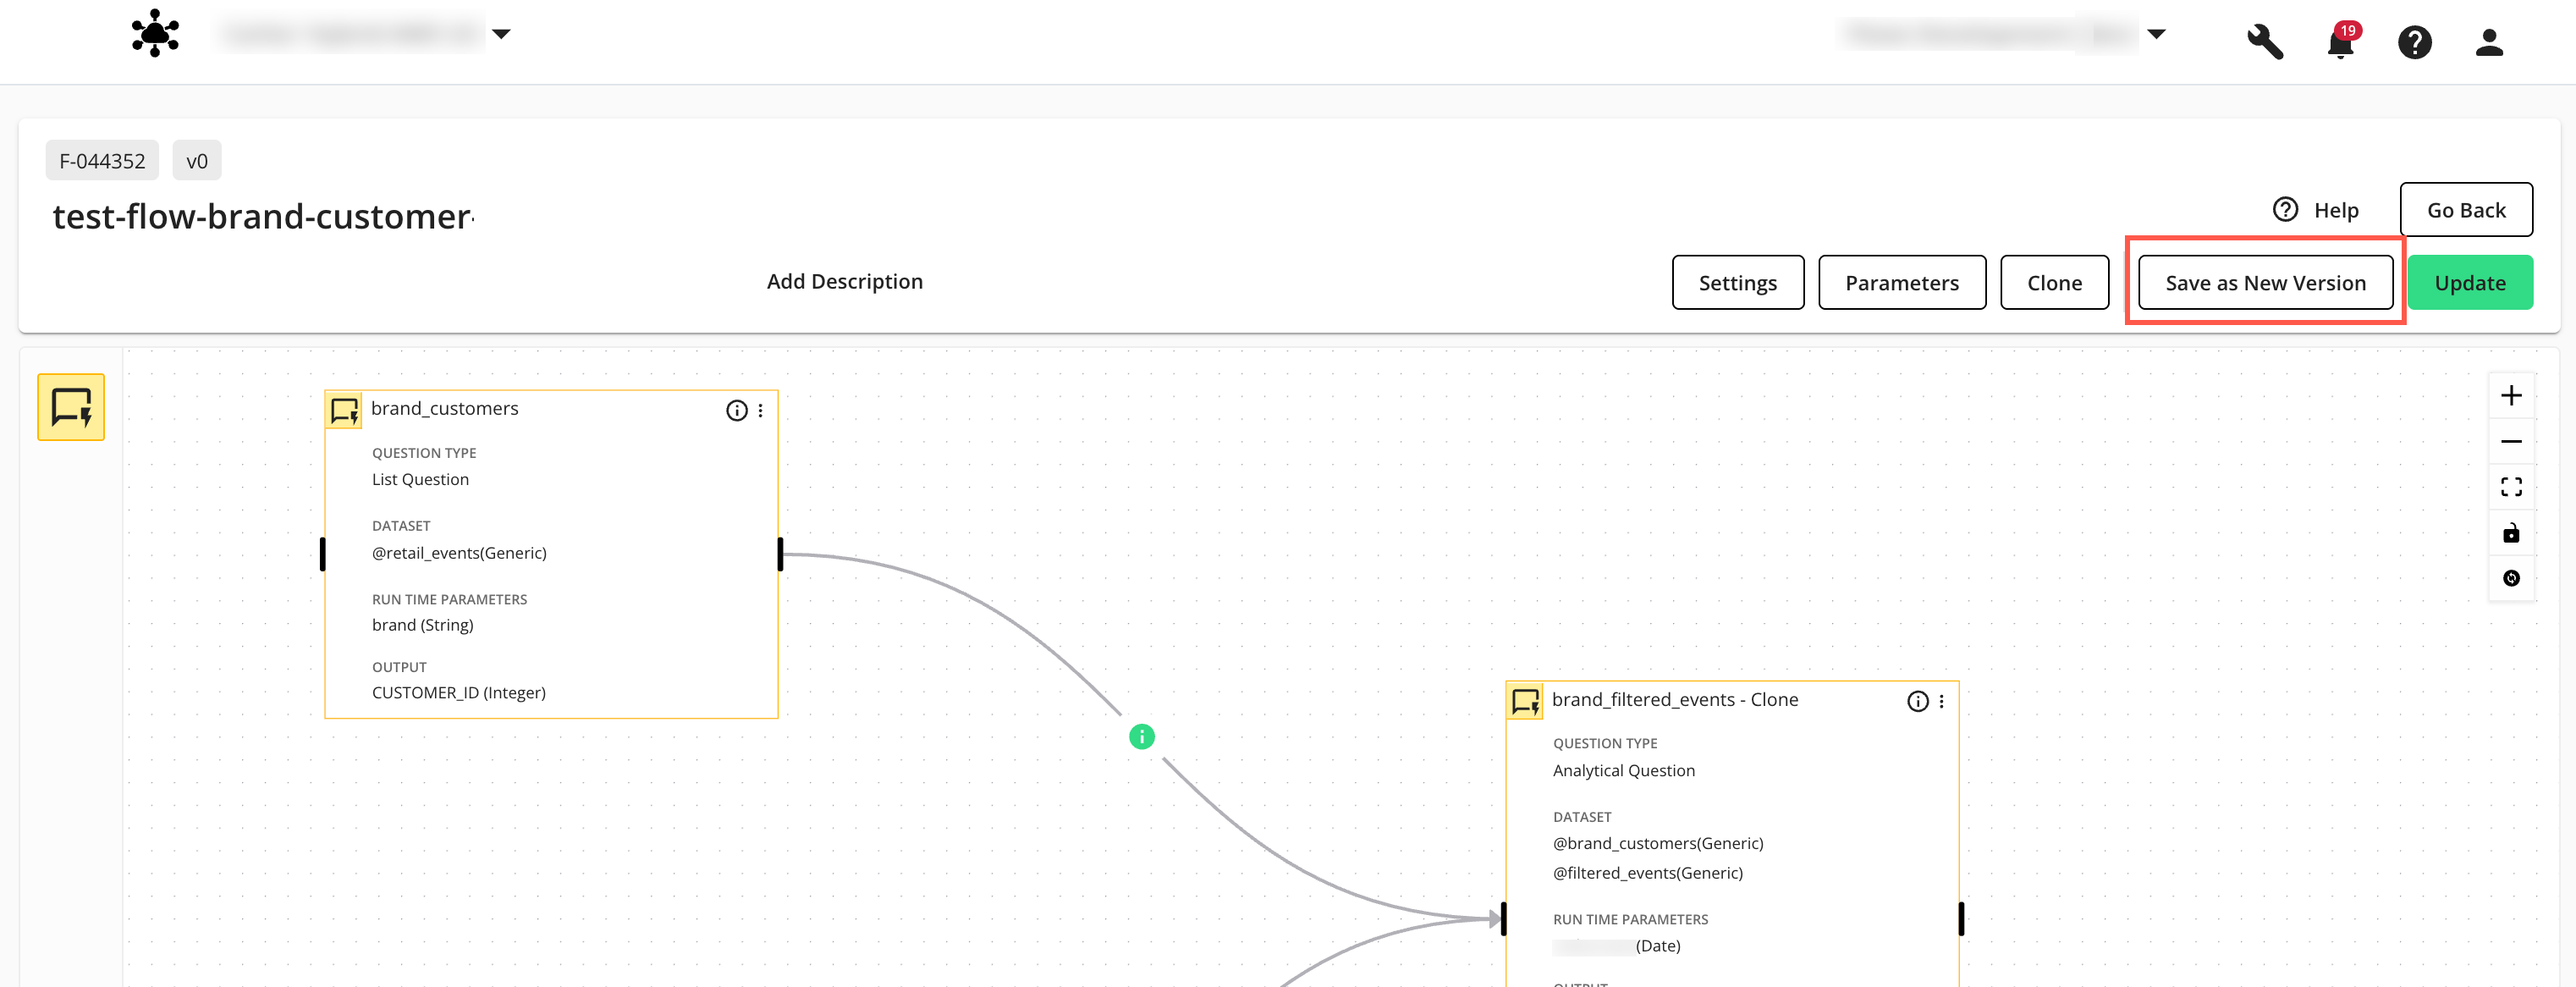
Save a New Version of a Flow
On the Flows page, click the flow’s More Options (
) menu and select .The Flow Builder page in edit mode displays:
On the Flow Builder page, click .
The “Name your new version” dialog displays:
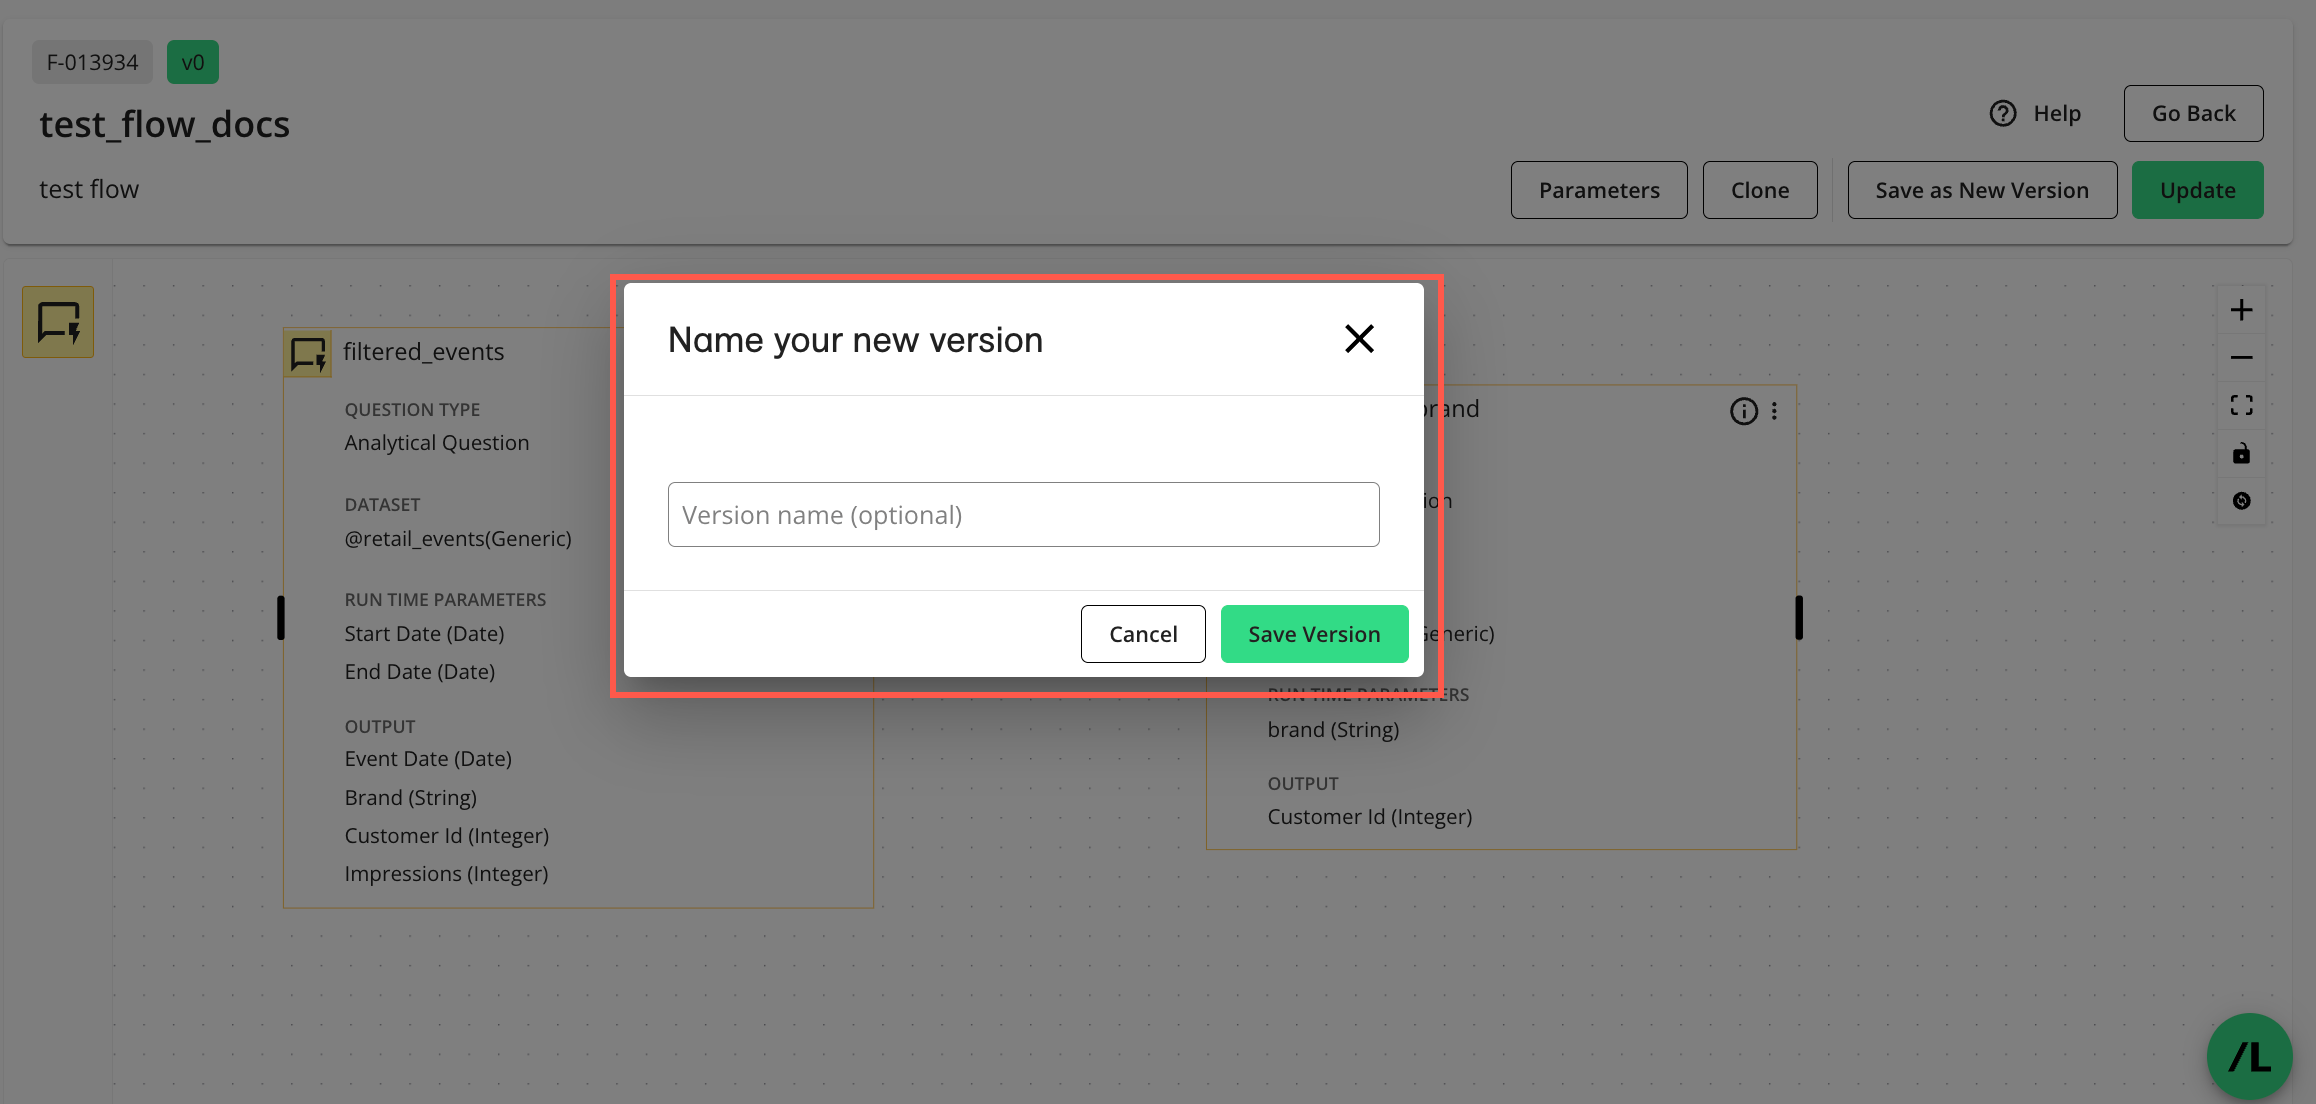
Enter an optional description of the new version and click .
The new version of the flow is saved and the Flows page is displayed.
Note
The current (active) version remains current after you save a new version. To make the new version current, see “Change the Current Version of a Flow” below.
Change the Current Version of a Flow
On the Flows page, click the flow’s More Options (
) menu and select .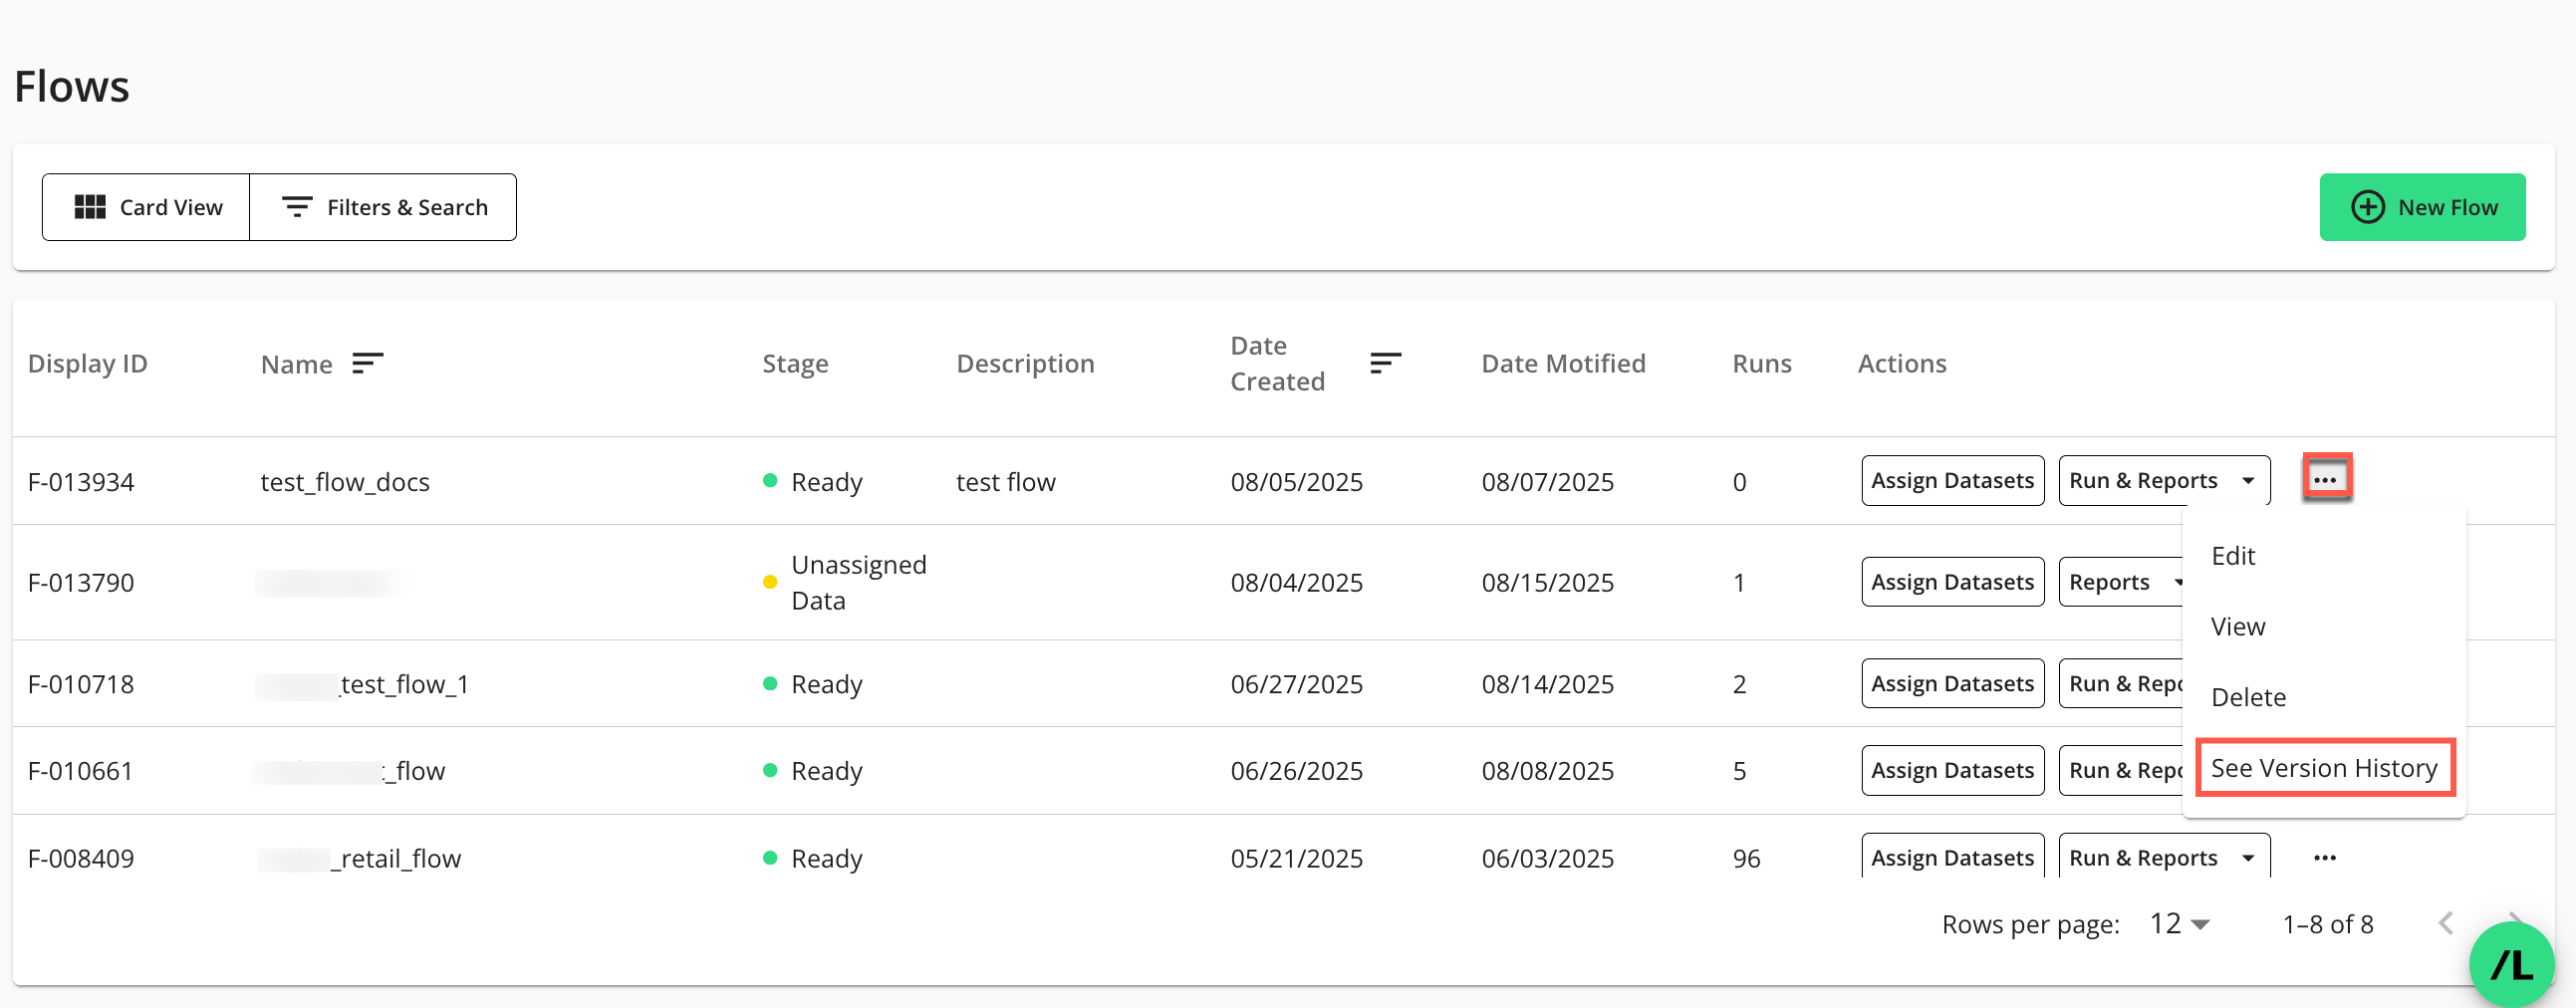
The Flow Version History page displays:
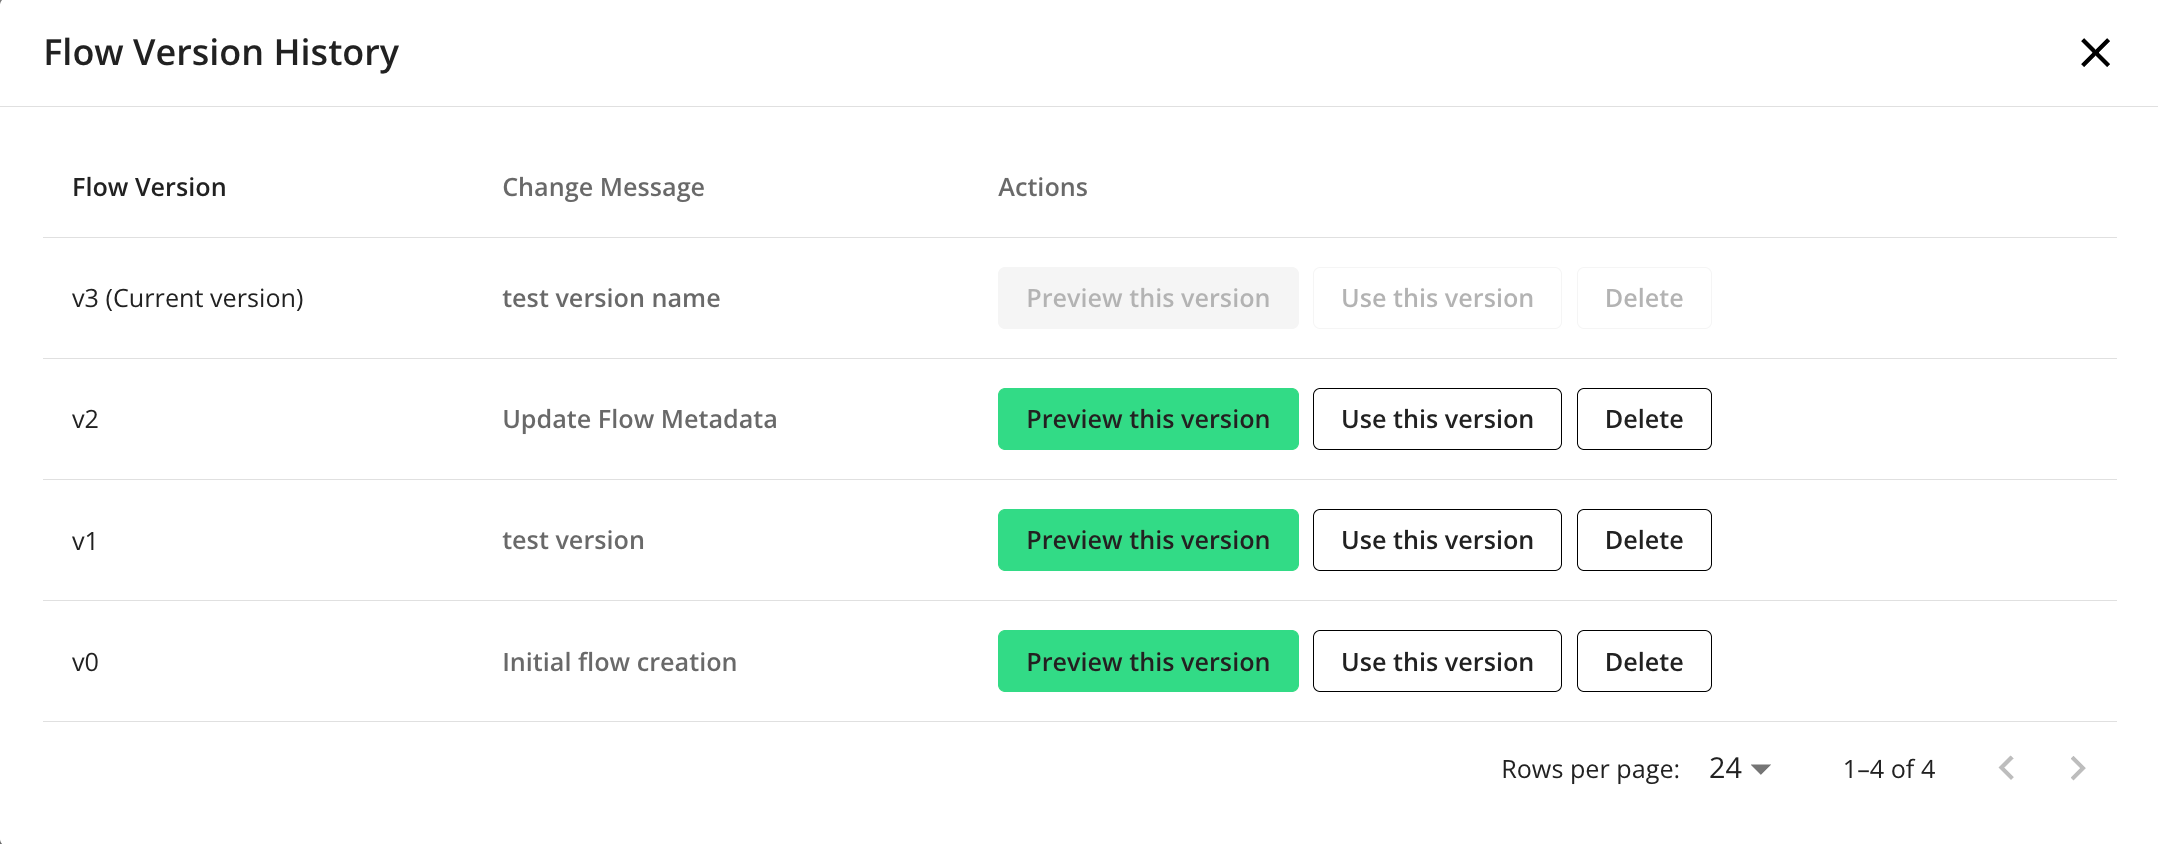
In the row of the desired flow version, select .
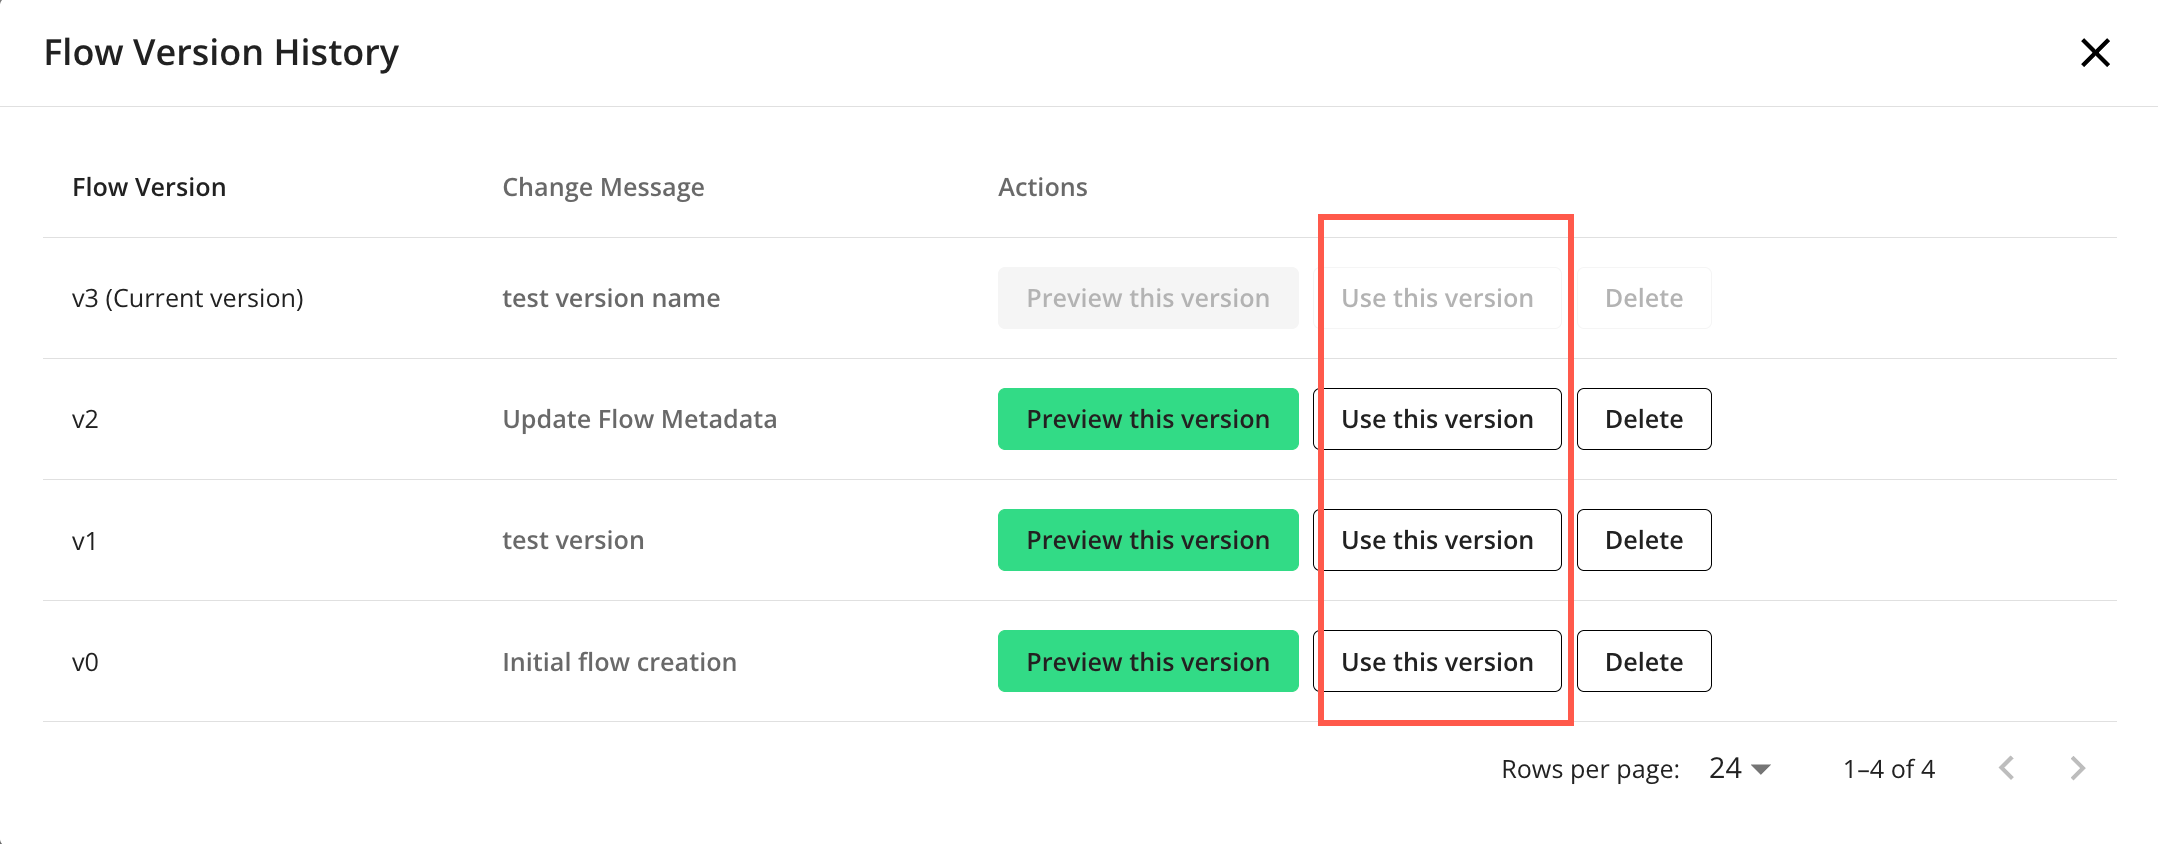
The selected version will now be the current (active) version and the Flows page will display.
Preview a Version of a Flow
On the Flows page, click the flow’s More Options (
) menu and select .The Flow Version History page displays:
In the row of the desired flow version, select .
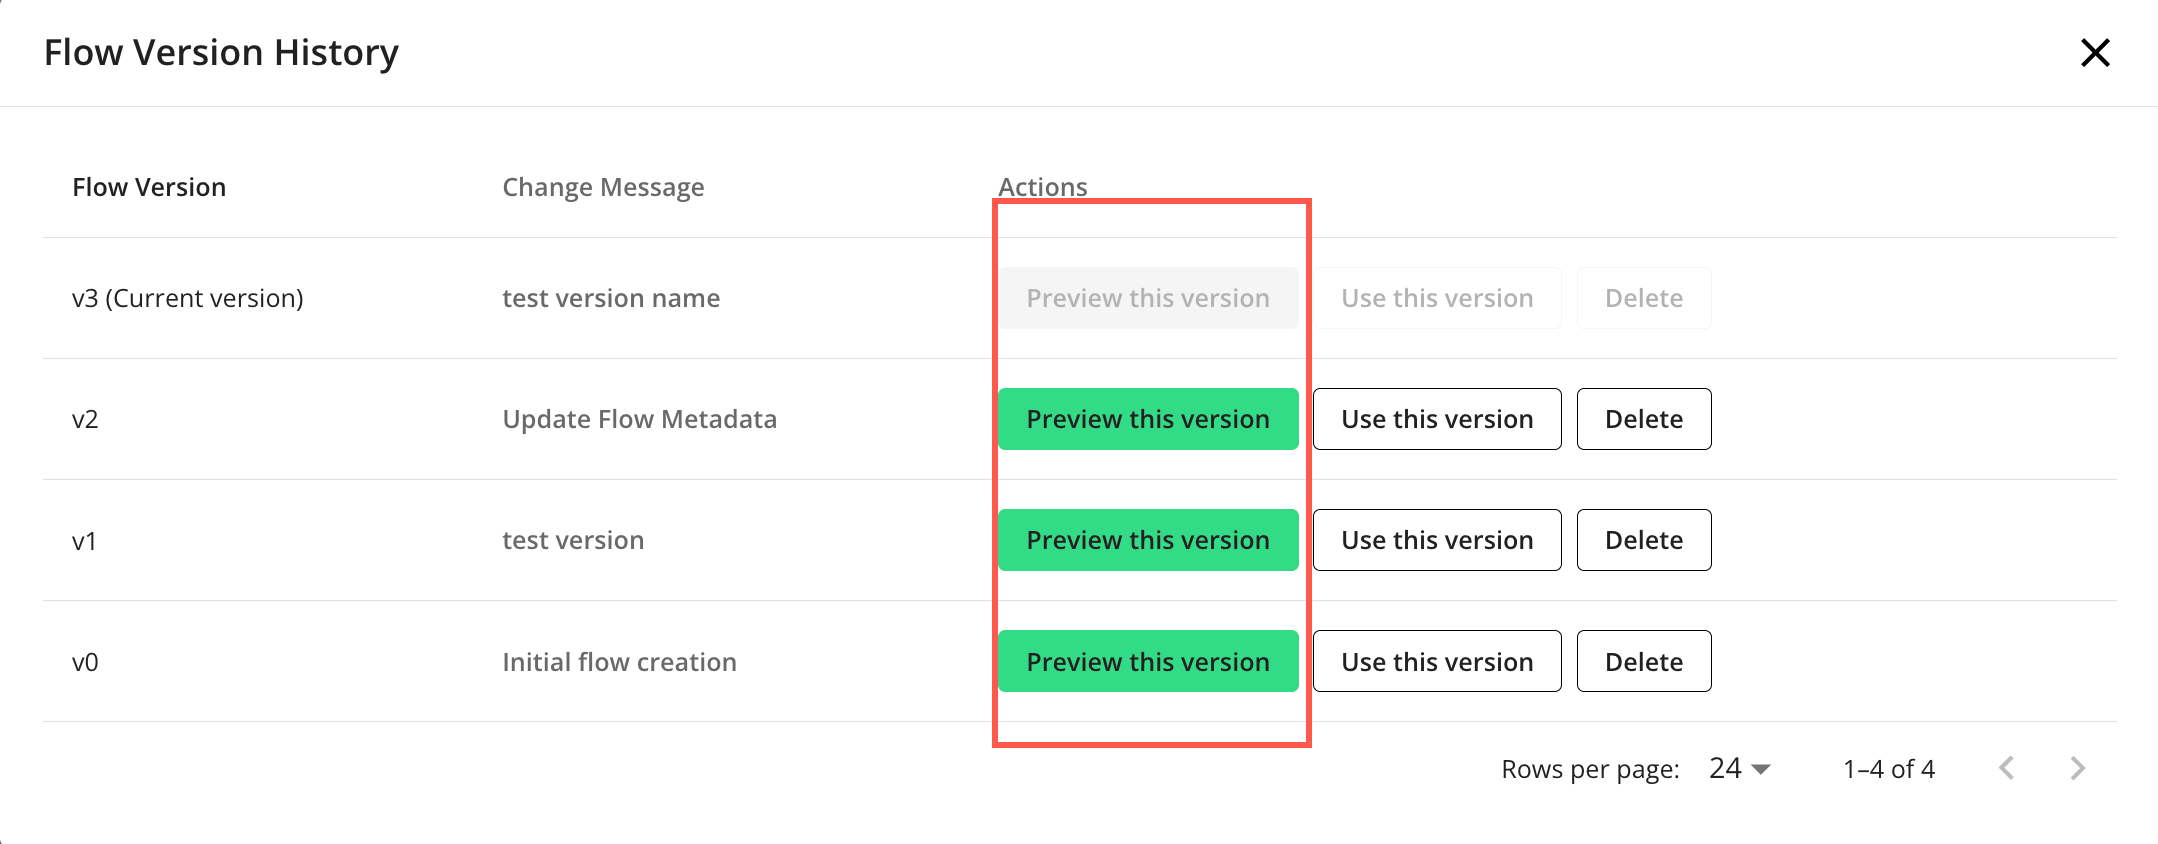
The selected version of the flow displays in preview-mode. The version number of the displayed flow is indicated above the flow name, along with the version number of the current (active) flow.
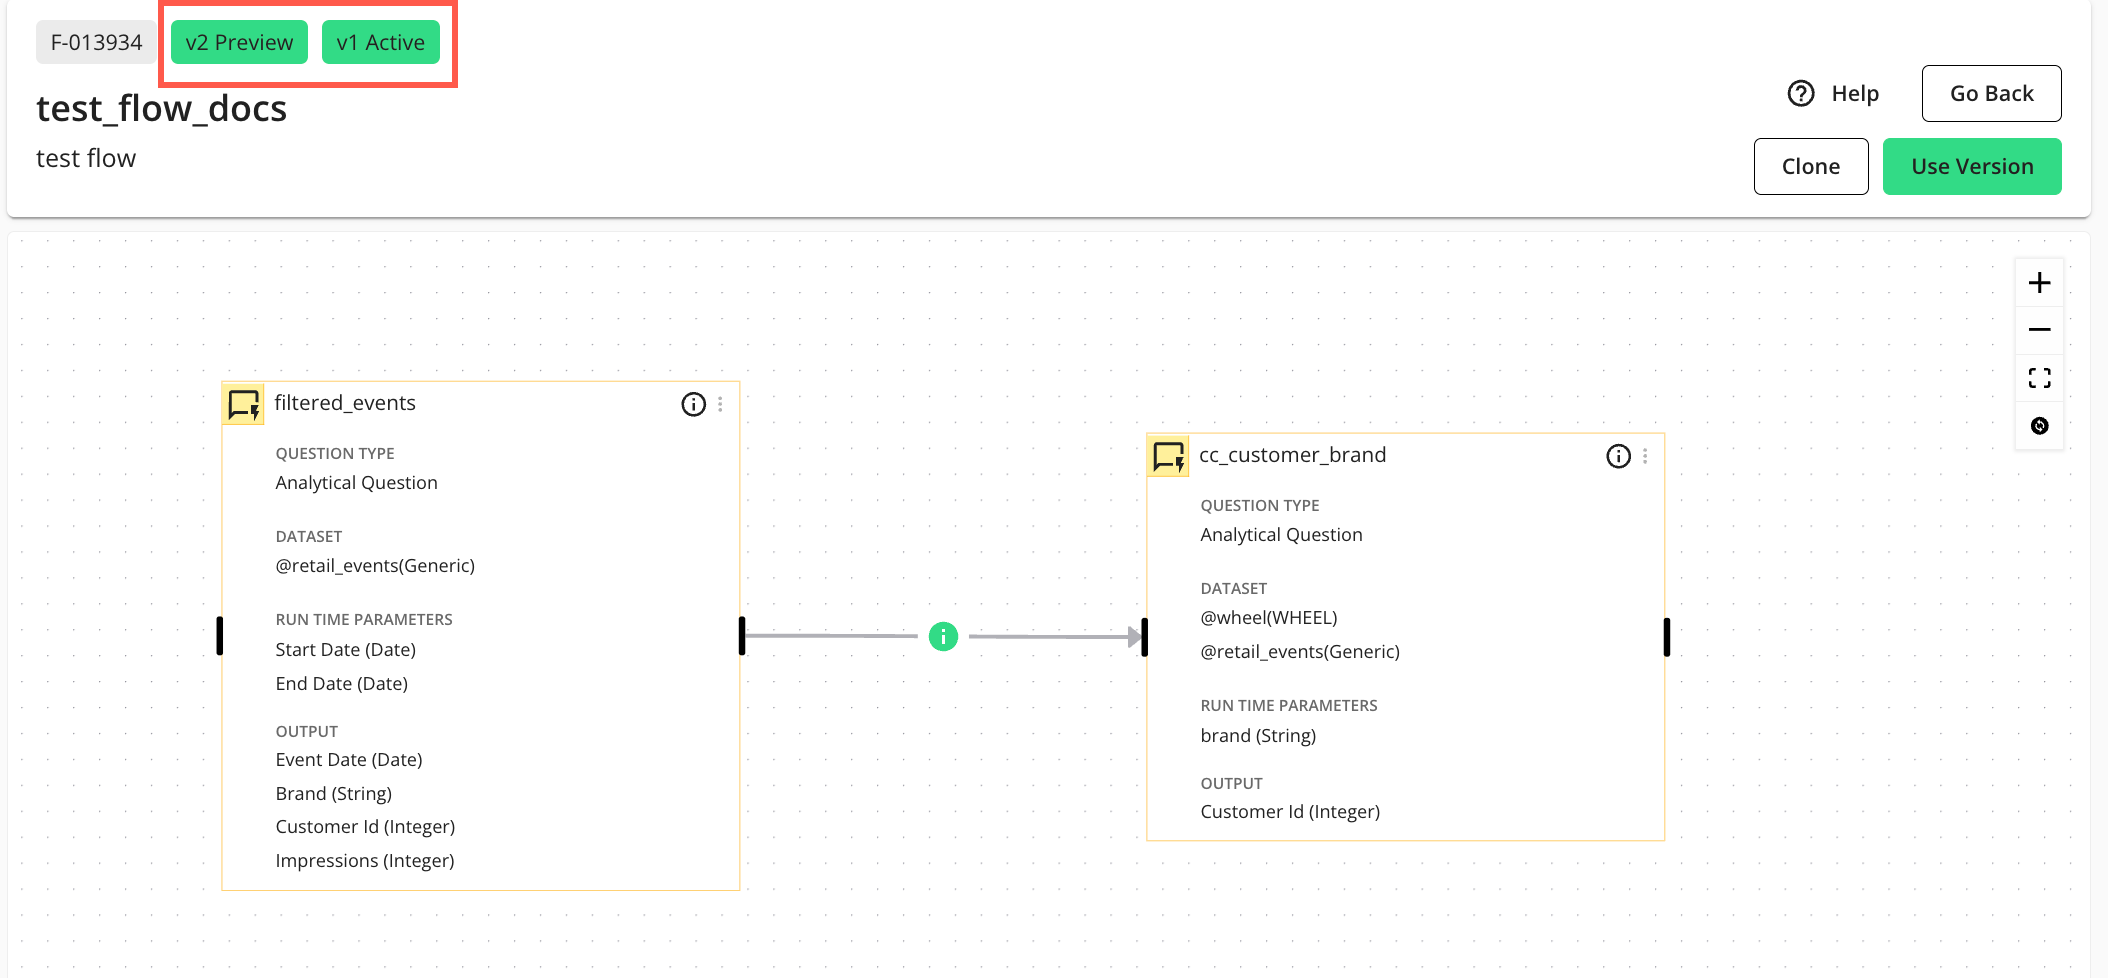
To set this preview-mode flow to the current (active) flow, select .
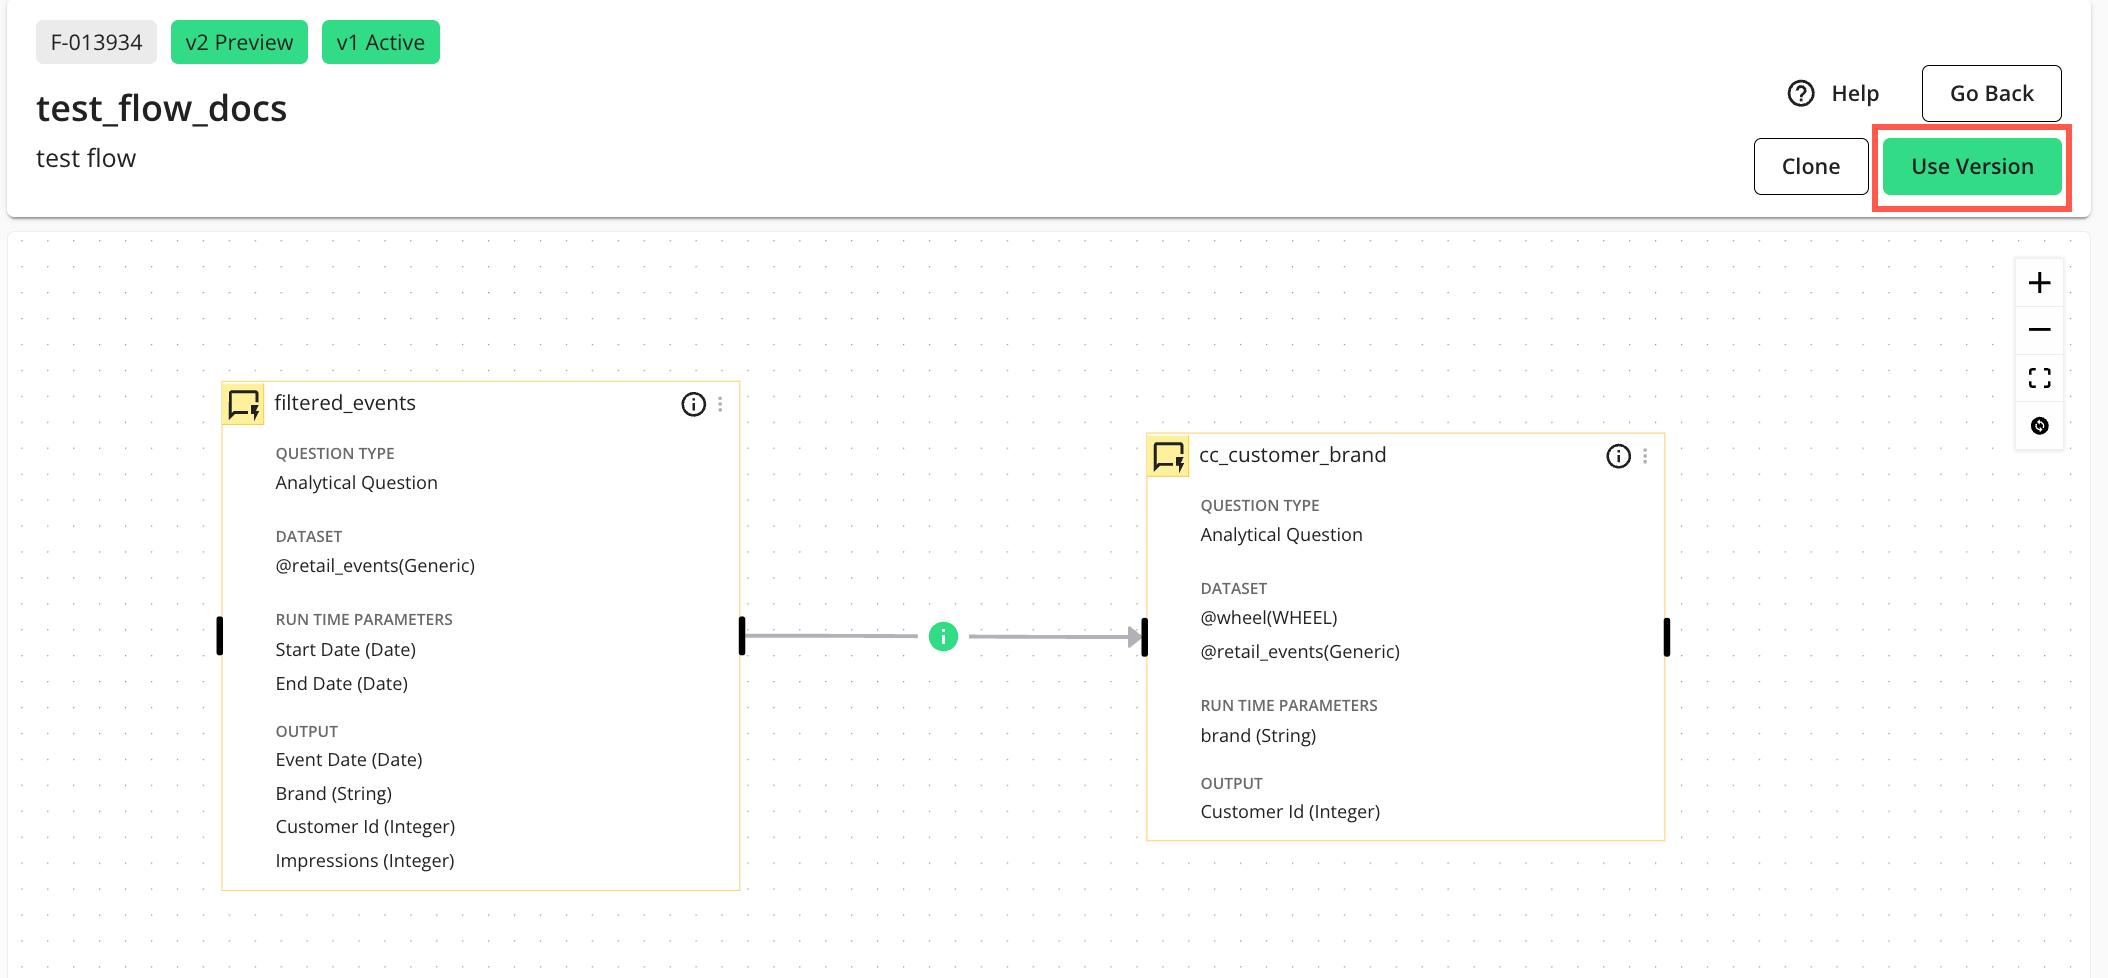
The preview-mode version will now be the current (active) version and the Flows page will display.
Configure Flow Parameters
In LiveRamp Clean Room, a "parameter" is a dynamic variable or placeholder used in a question's logic or a flow's configuration. This allows for flexible, reusable, and dynamic reporting and analytics. Flow parameters combine all parameters from individual question nodes within a flow. By configuring these flow parameters, all necessary parameters are collected and presented in a unified manner when you execute or schedule a flow run. This ensures that parameters with the same label use the same value throughout the flow's execution.
When you are creating a new scheduled flow run, for example, the "Runtime Parameters" section in the "New Scheduled Run" window will display these flow-level parameters. There, you can specify the actual values for each flow-level parameter, such as start and end dates or other custom attributes, which will then be applied when the flow runs. These specific values chosen at the time of a flow run are called "flow run-level parameters".
On the Flows page, click the flow’s More Options (
) menu and select .The Flow Builder page in edit mode displays:
On the Flow Builder page, click .
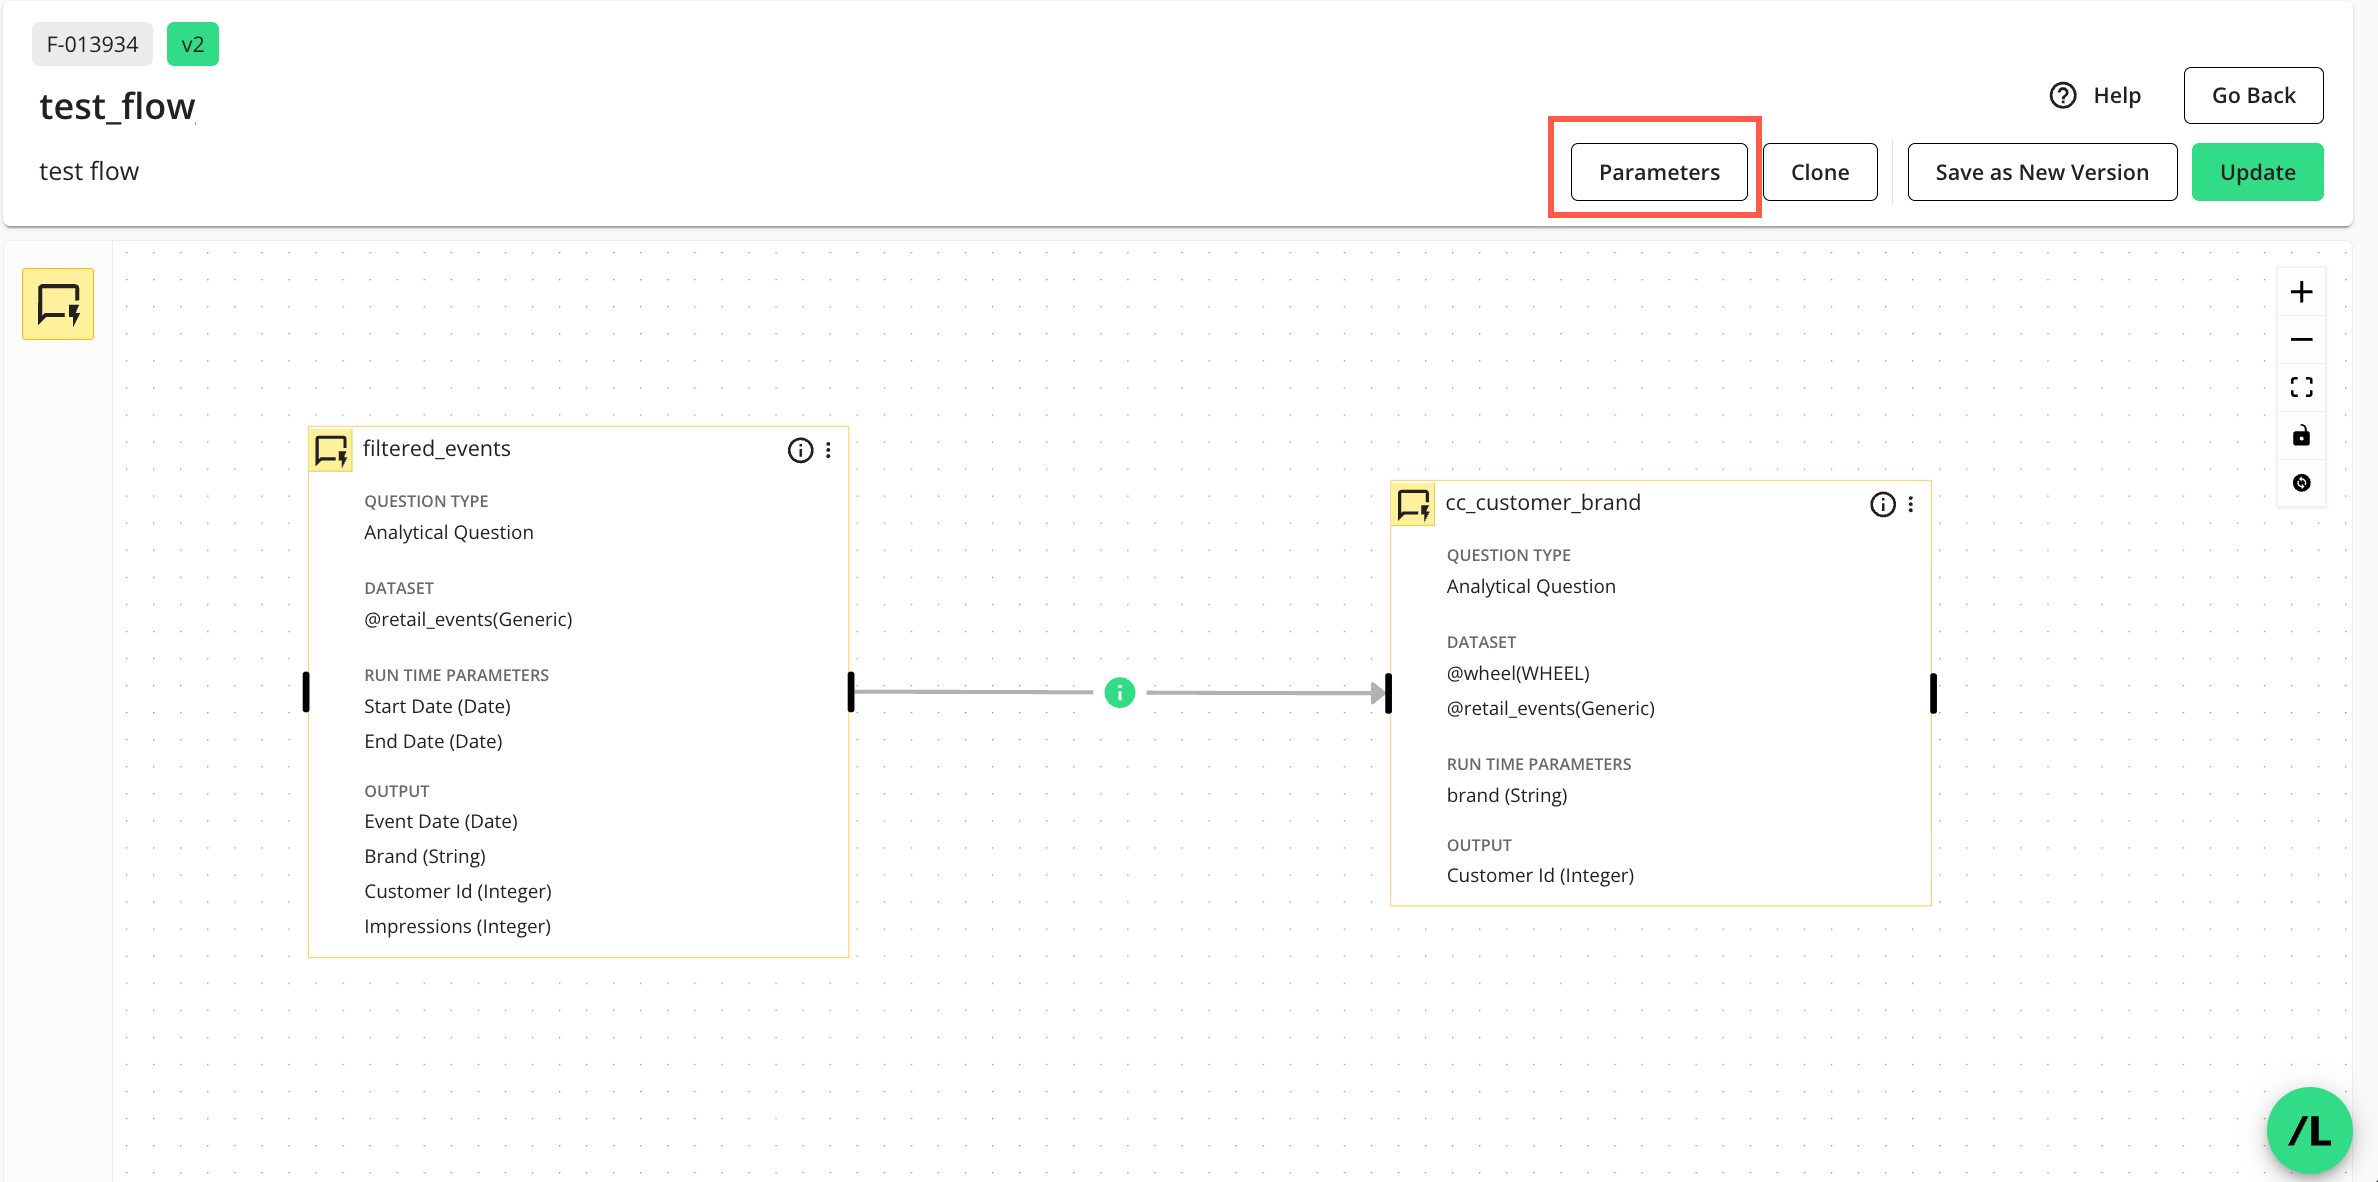
The Parameters side panel displays:
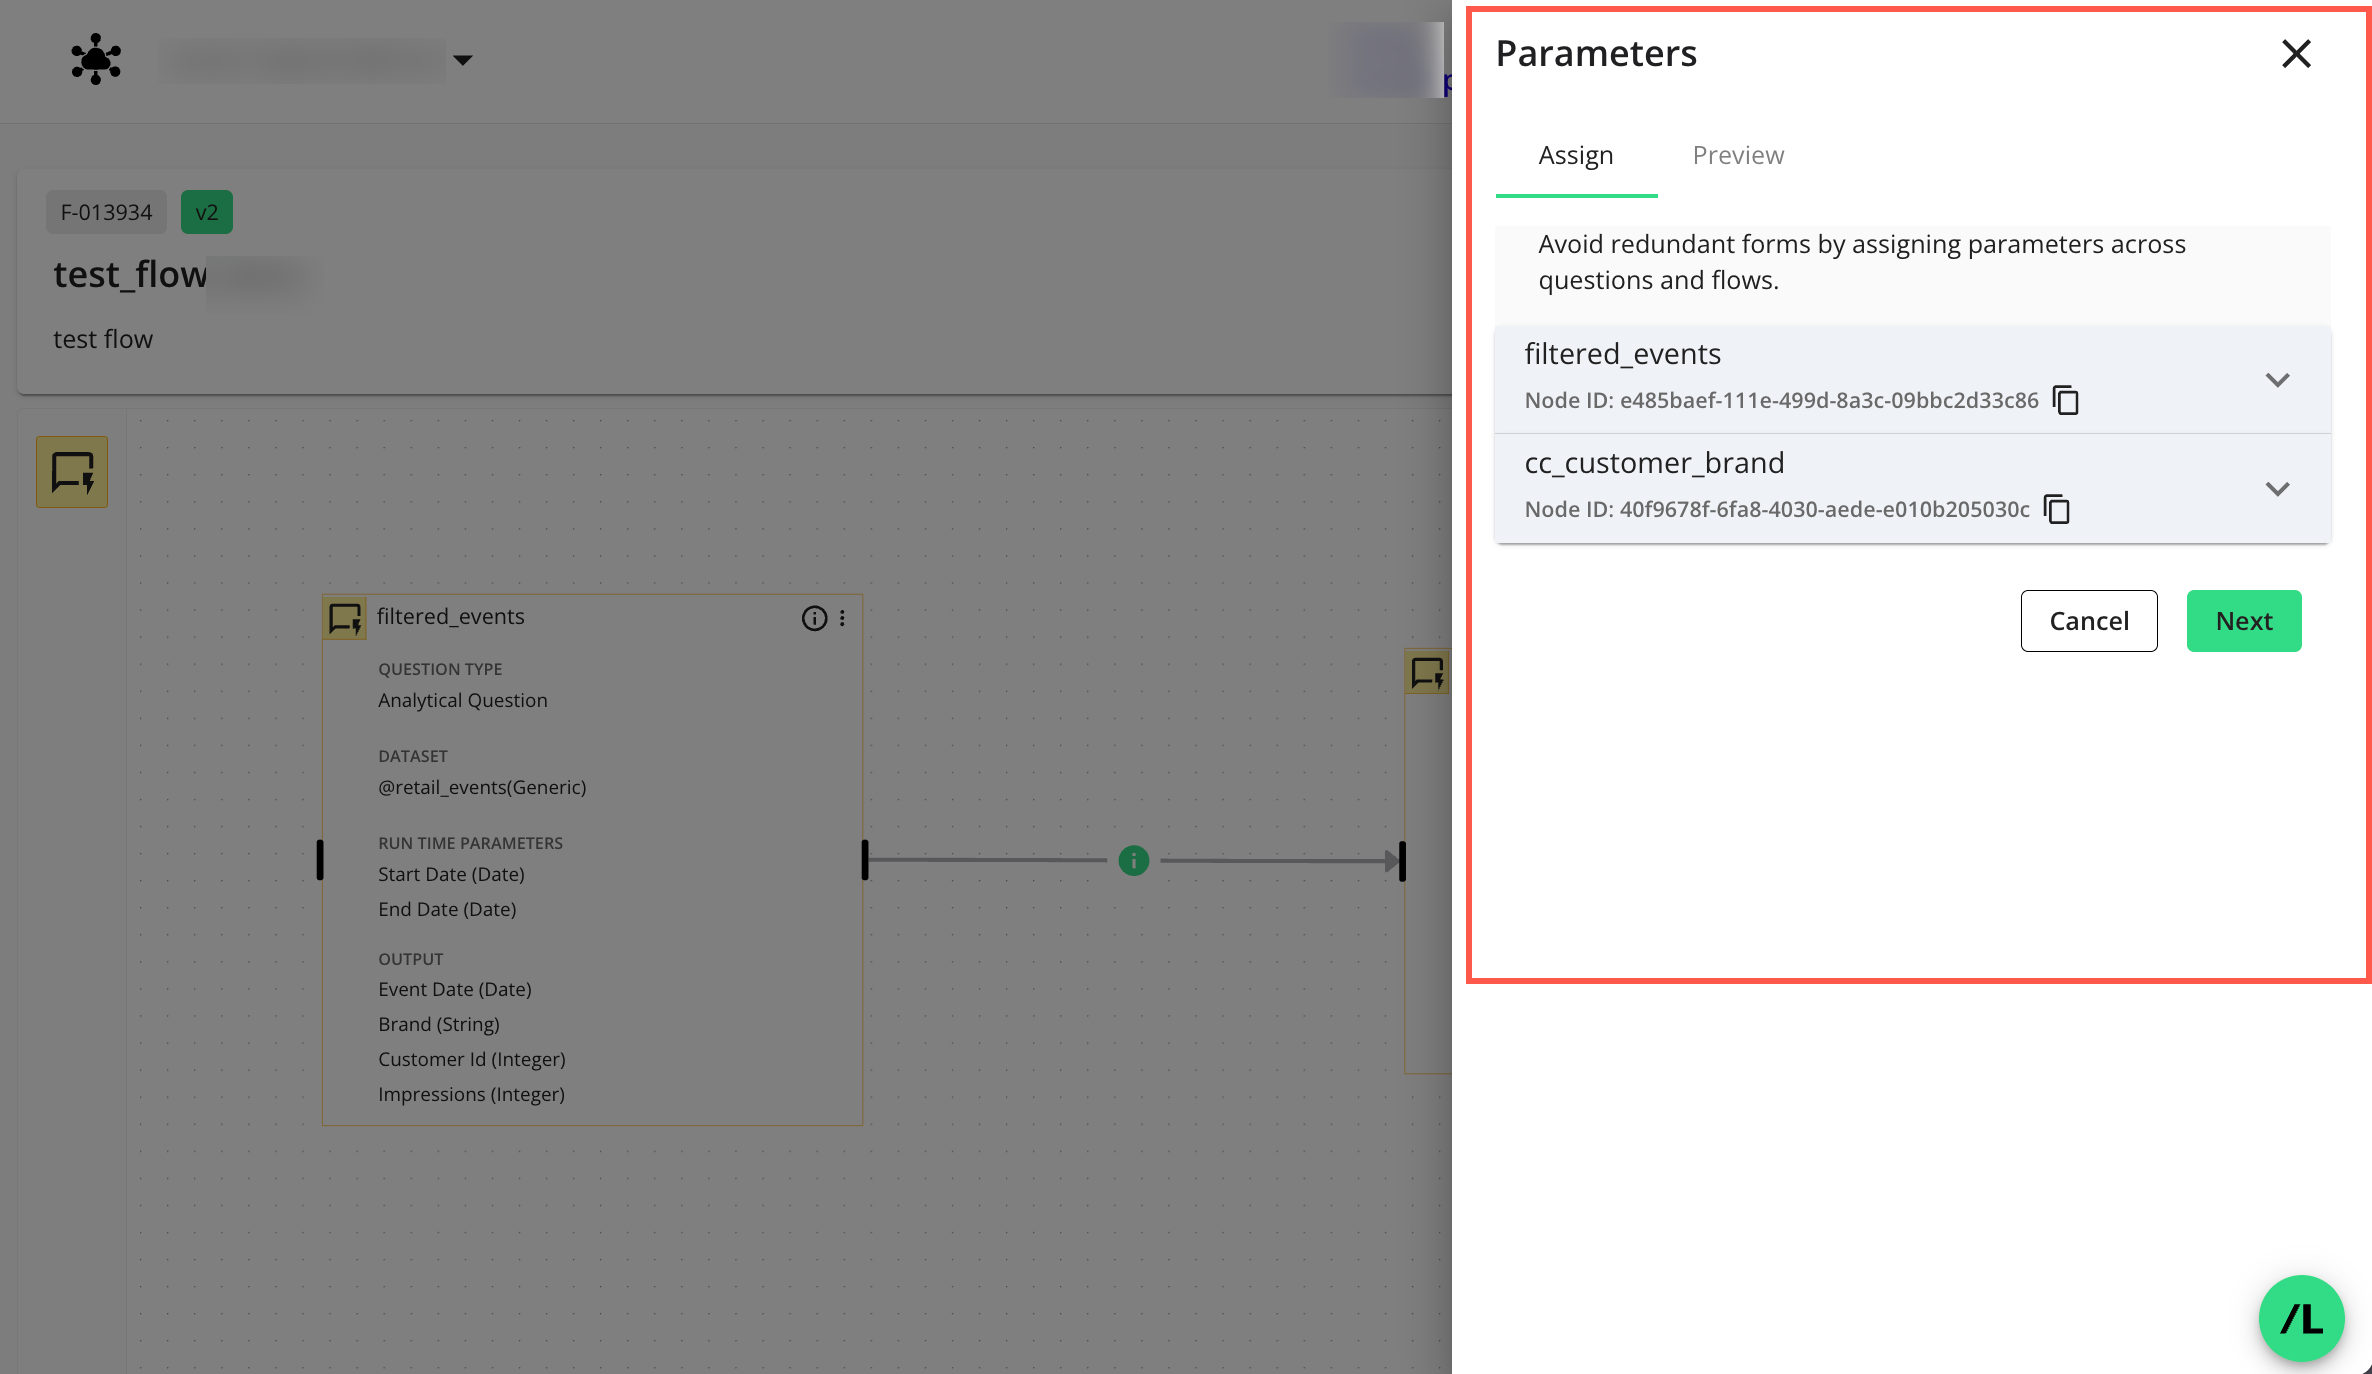
On the Parameters side panel, select the tab and assign appropriate macro names (variables) to each node in the dropdown(s) by entering a name and clicking
 to add it.
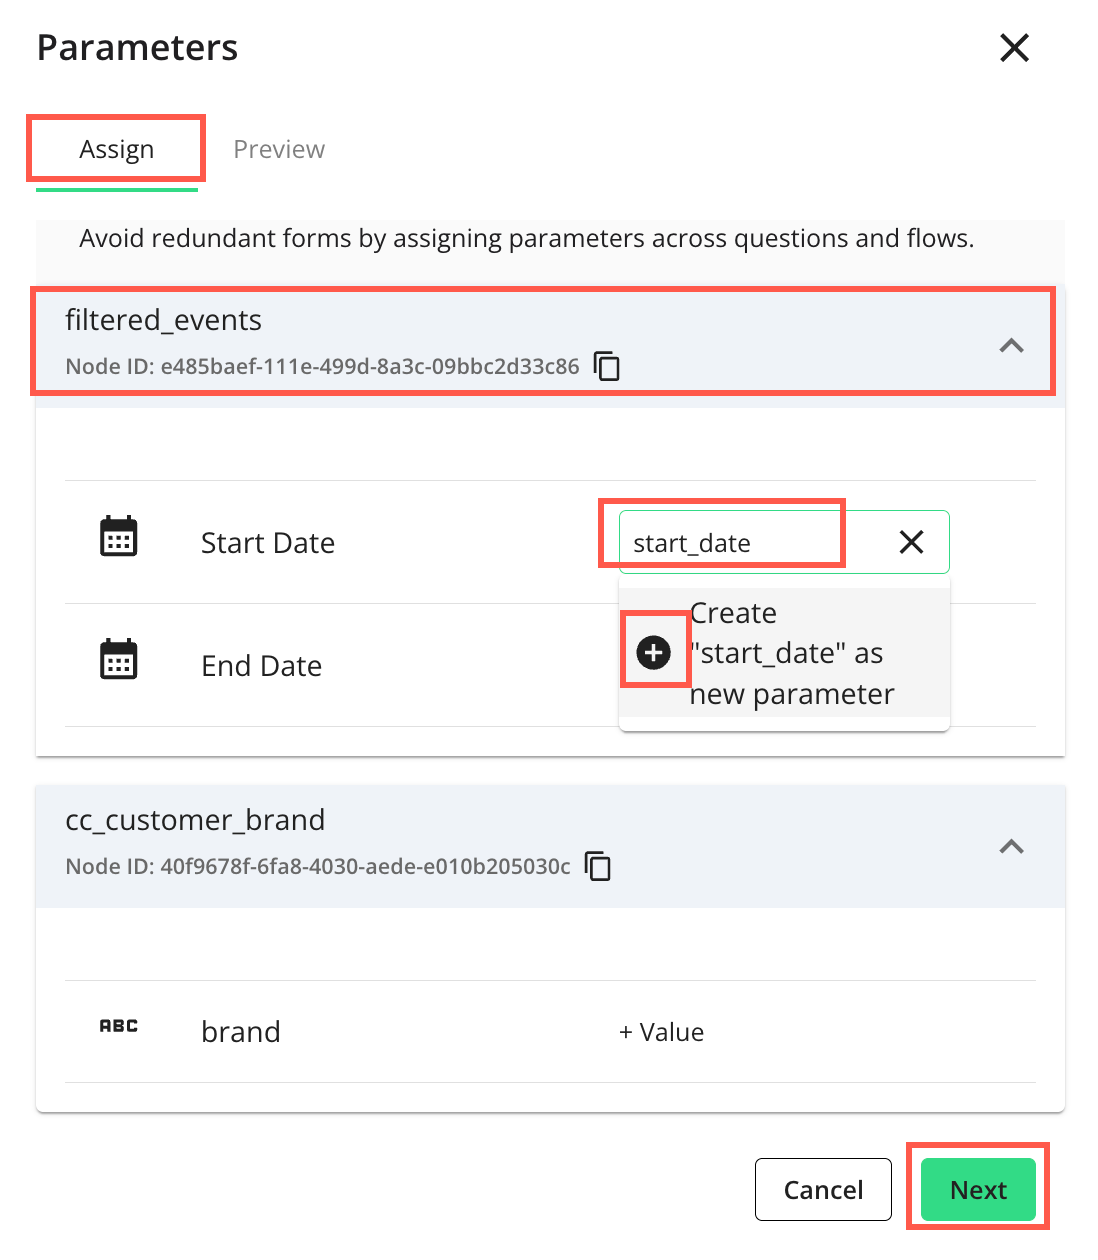
Click to preview and add descriptions to parameters (if any) your partners will need to enter values for before they can run the flow.
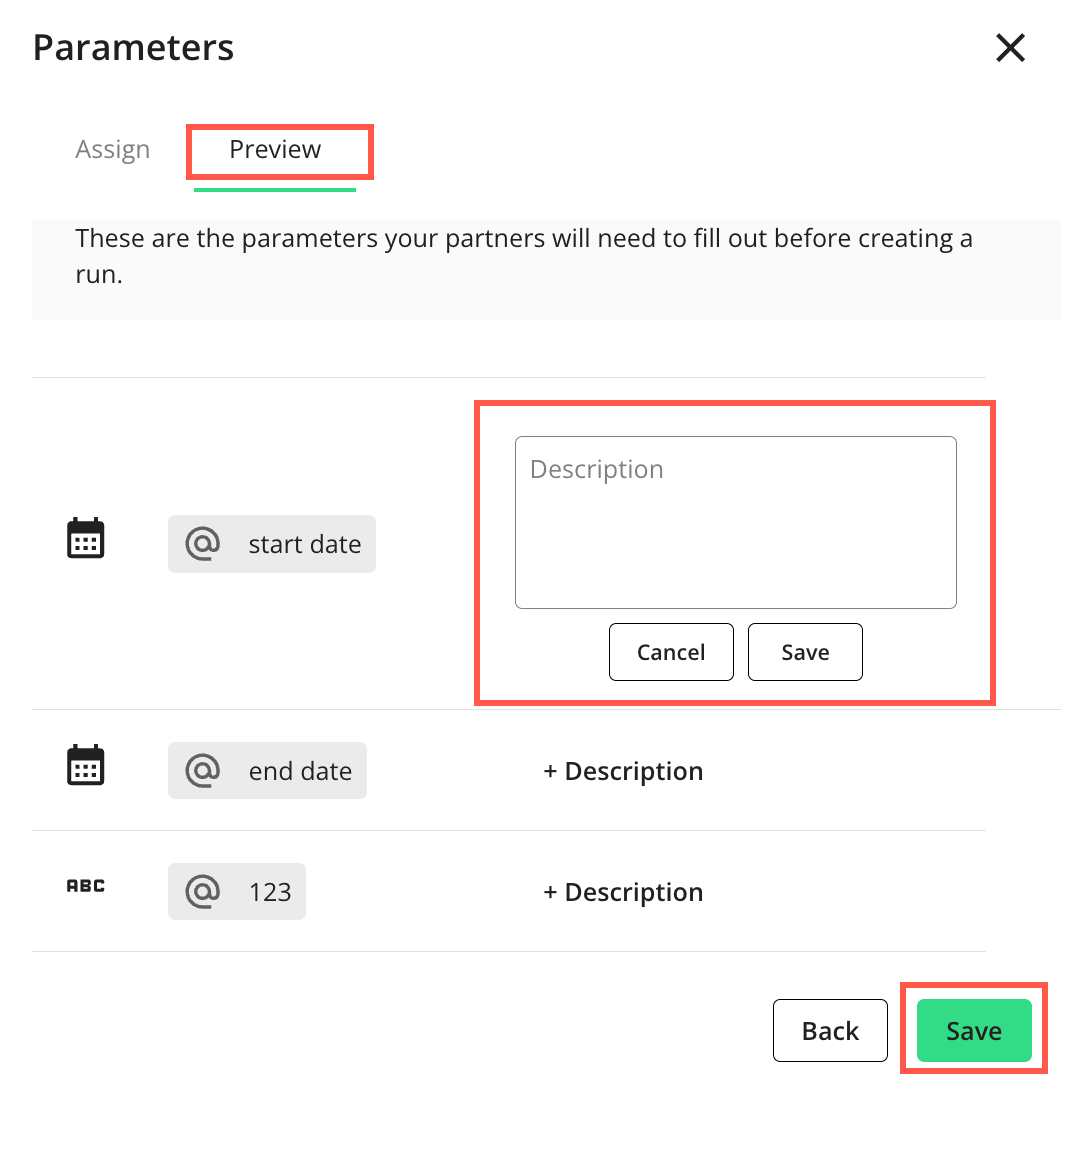
Click to save the parameter(s).
Tag Nodes for Flow Run Branching
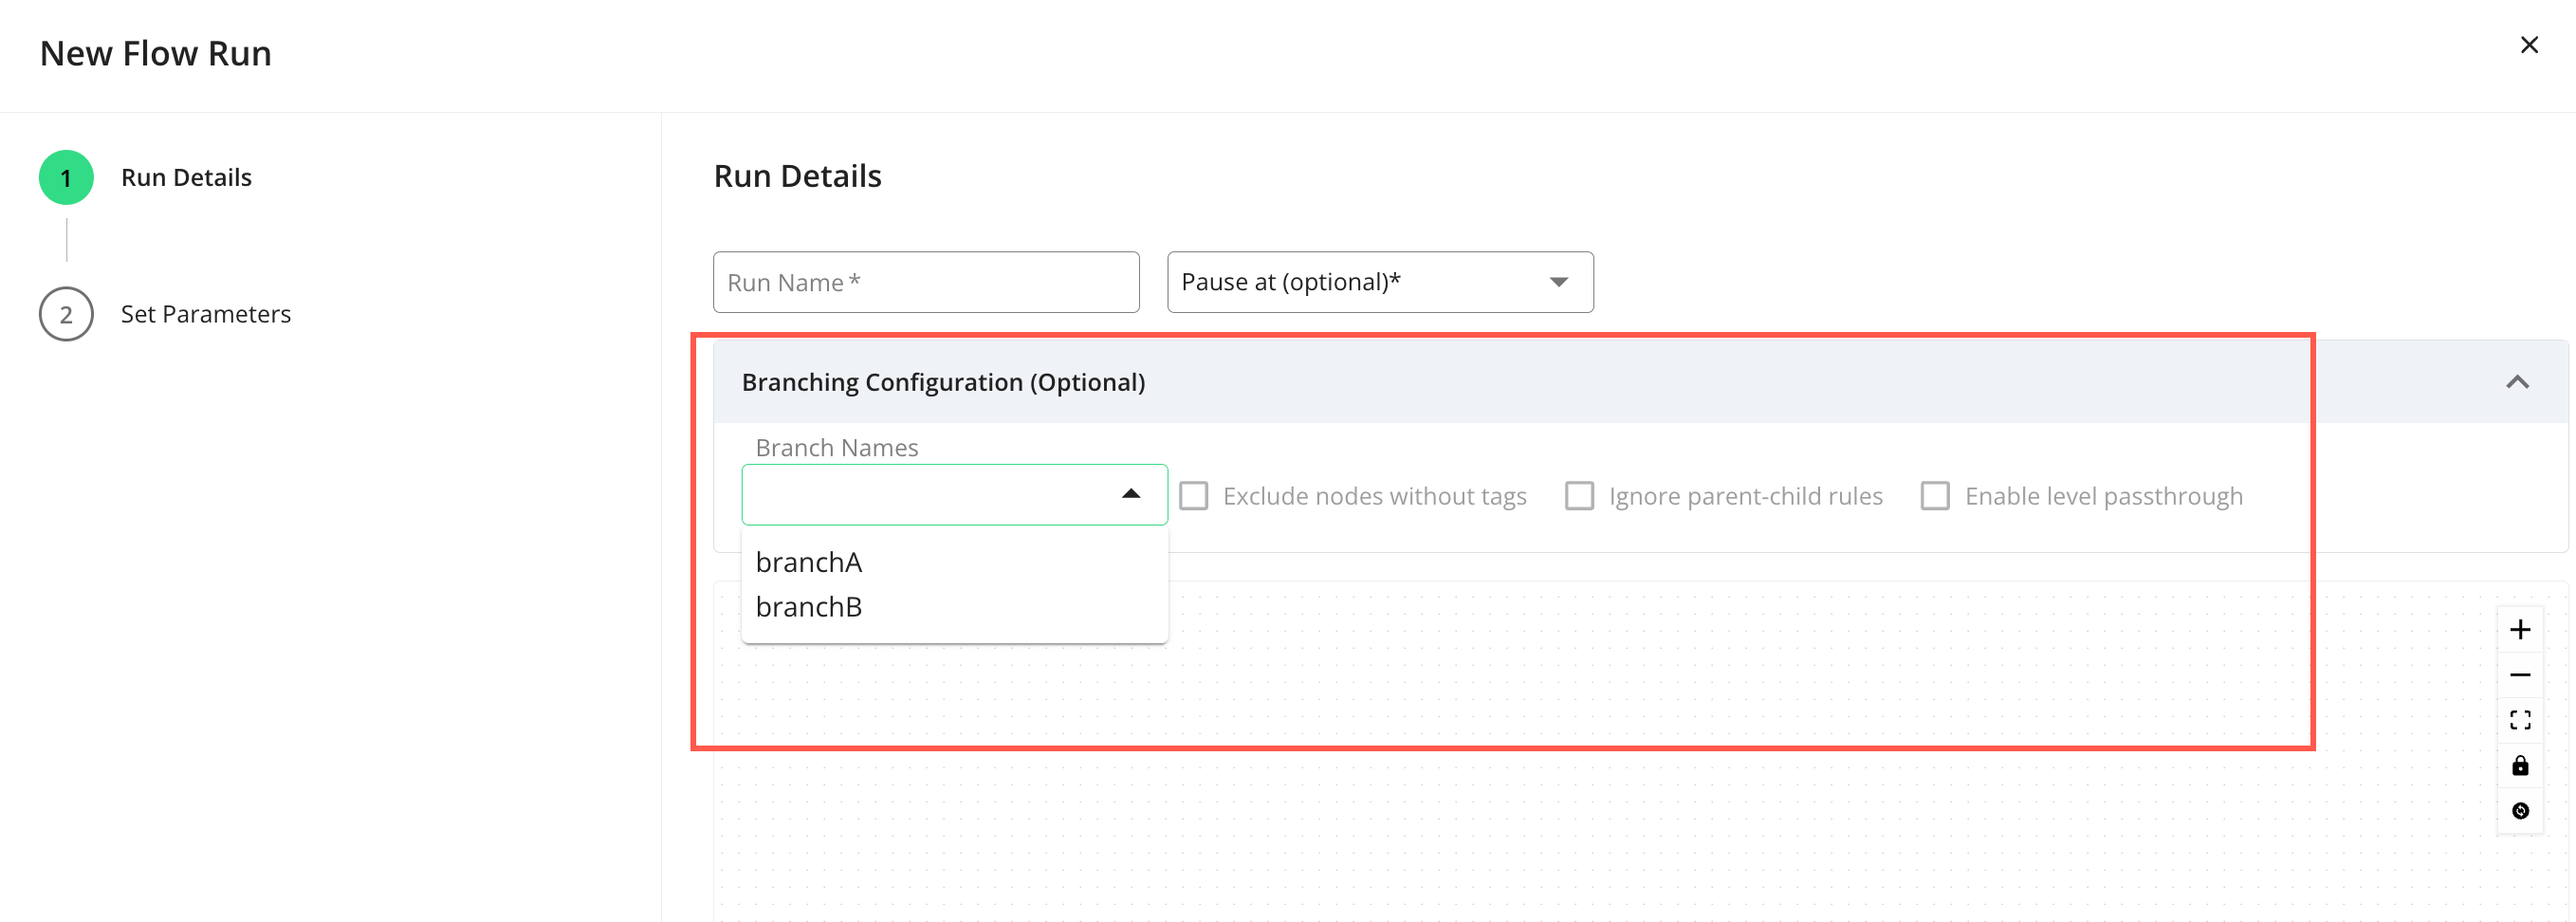
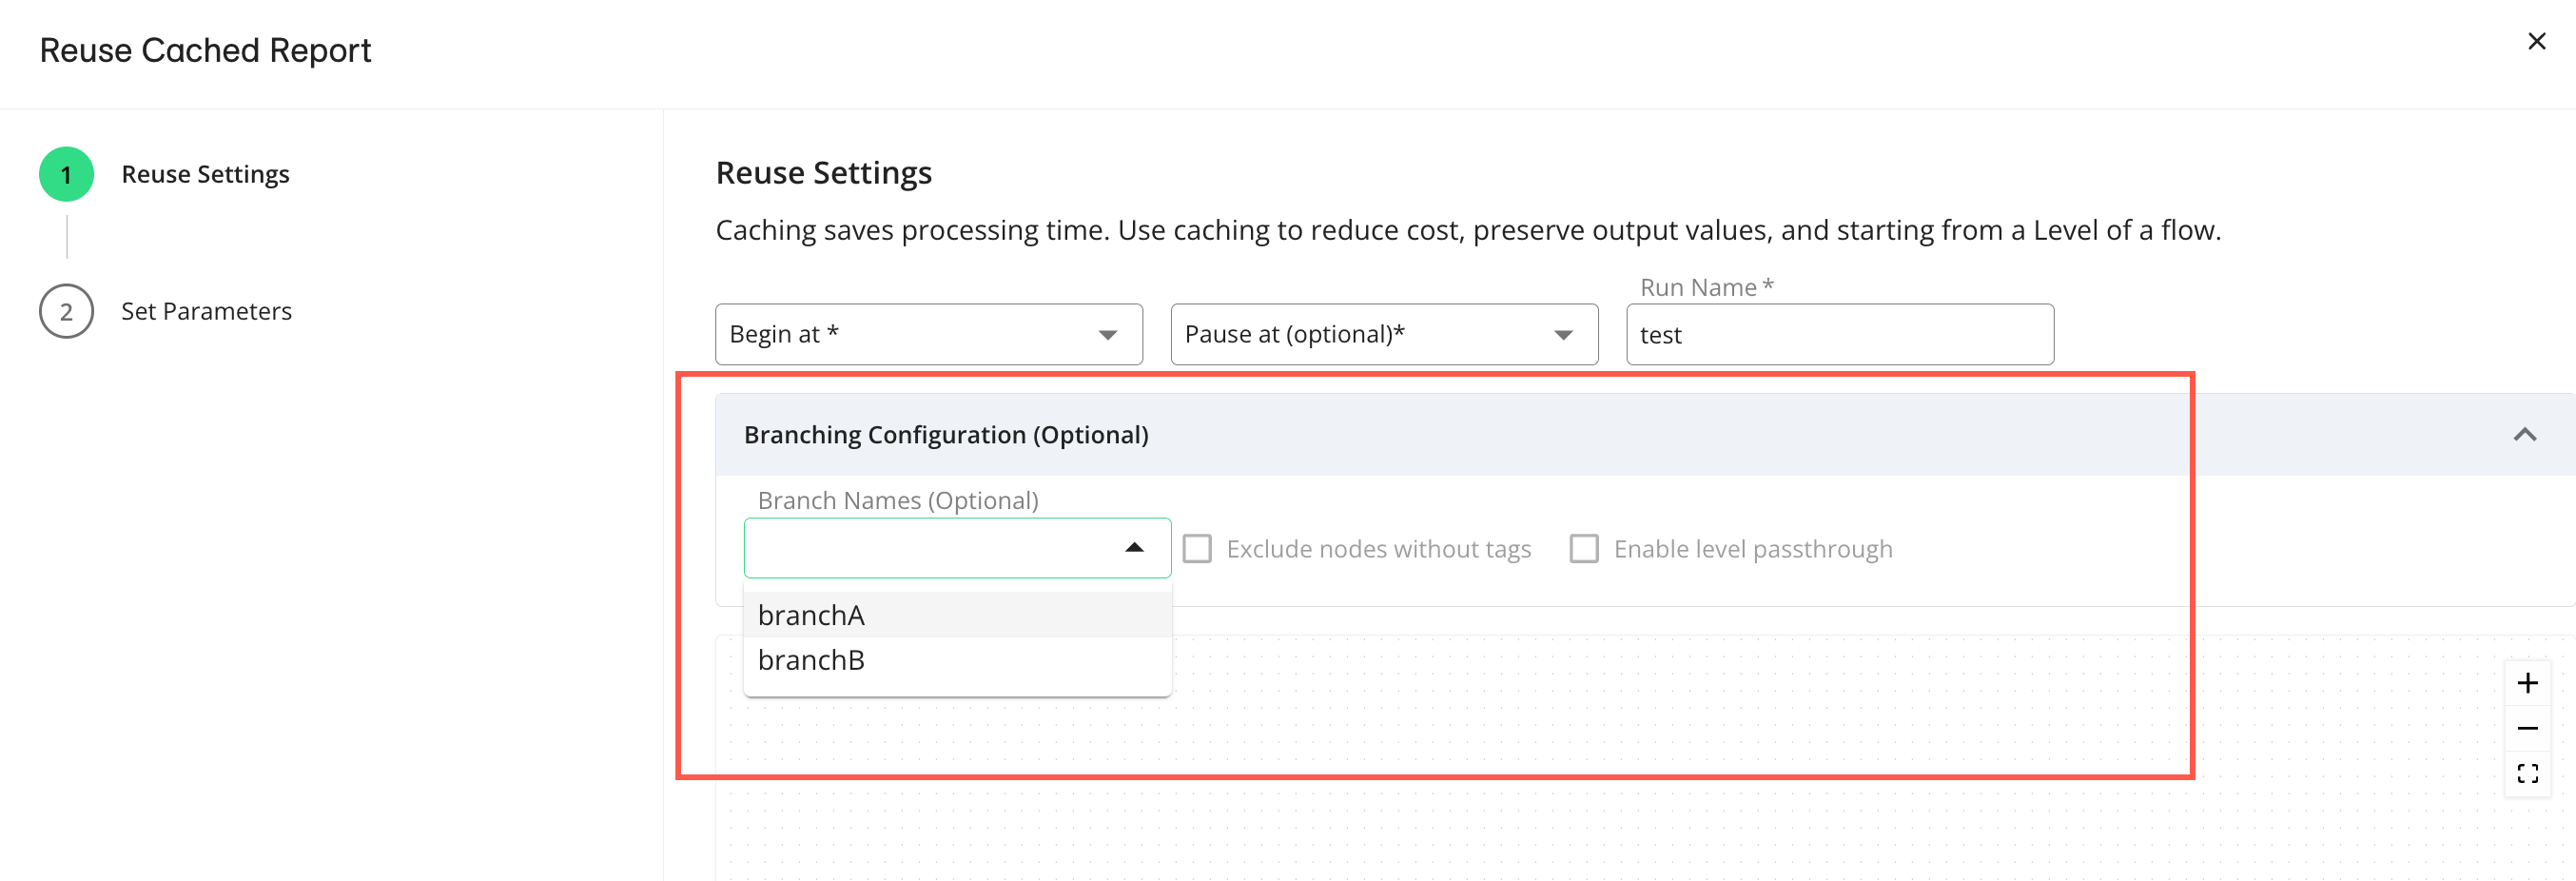
You can tag nodes in a flow to control what branches of a flow execute in a new or reused flow run. After tagging the desired nodes, these tags will appear in the "Branch Names" dropdown on the "Run Details" page for new runs or the "Reuse Settings" page for reused runs. For more information, see “Understanding Flow Branching”.
On the Flow Builder page, select the “i” icon on the node you want to tag to display the side panel.
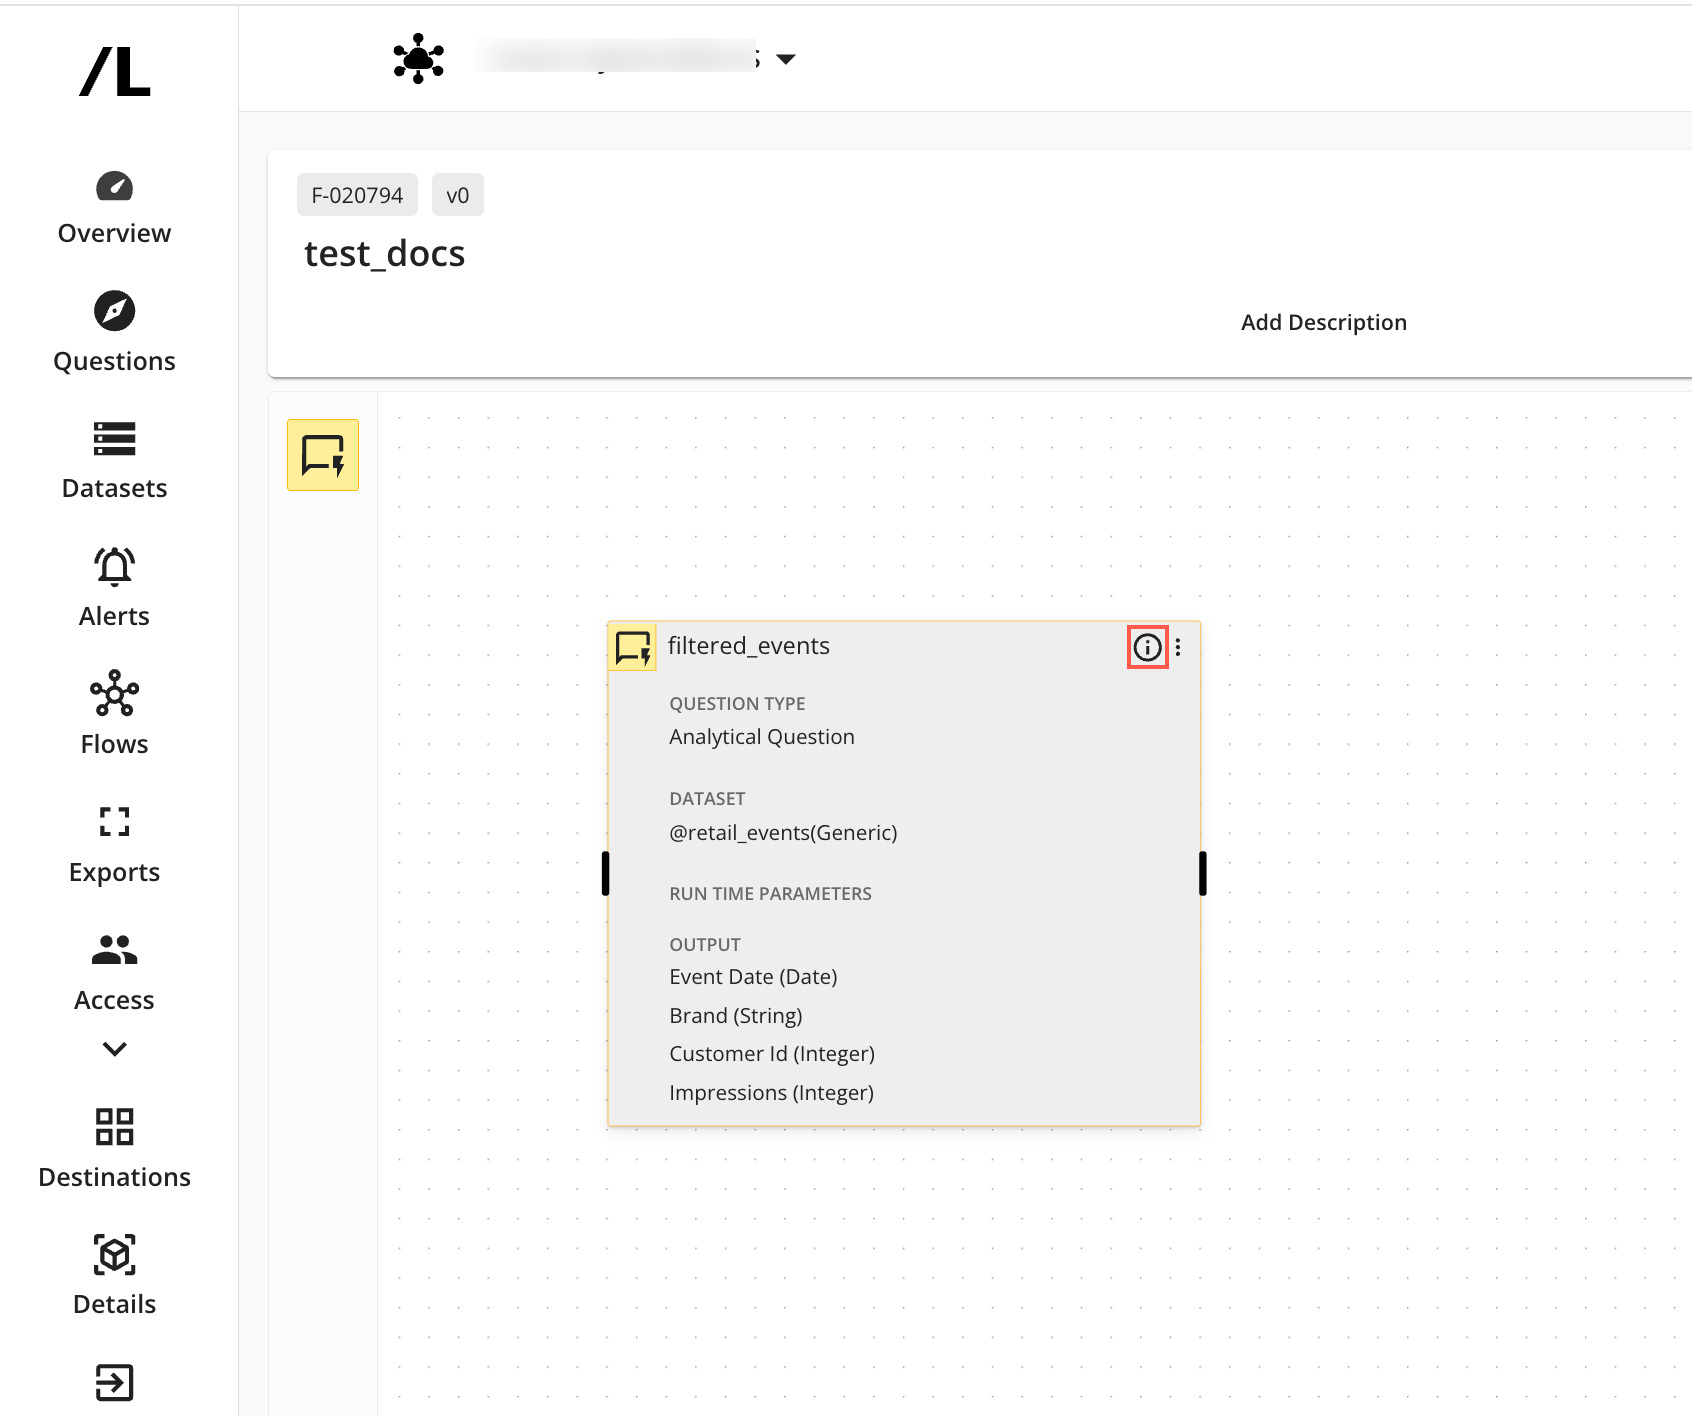
Select the Settings tab to access the Tags section.
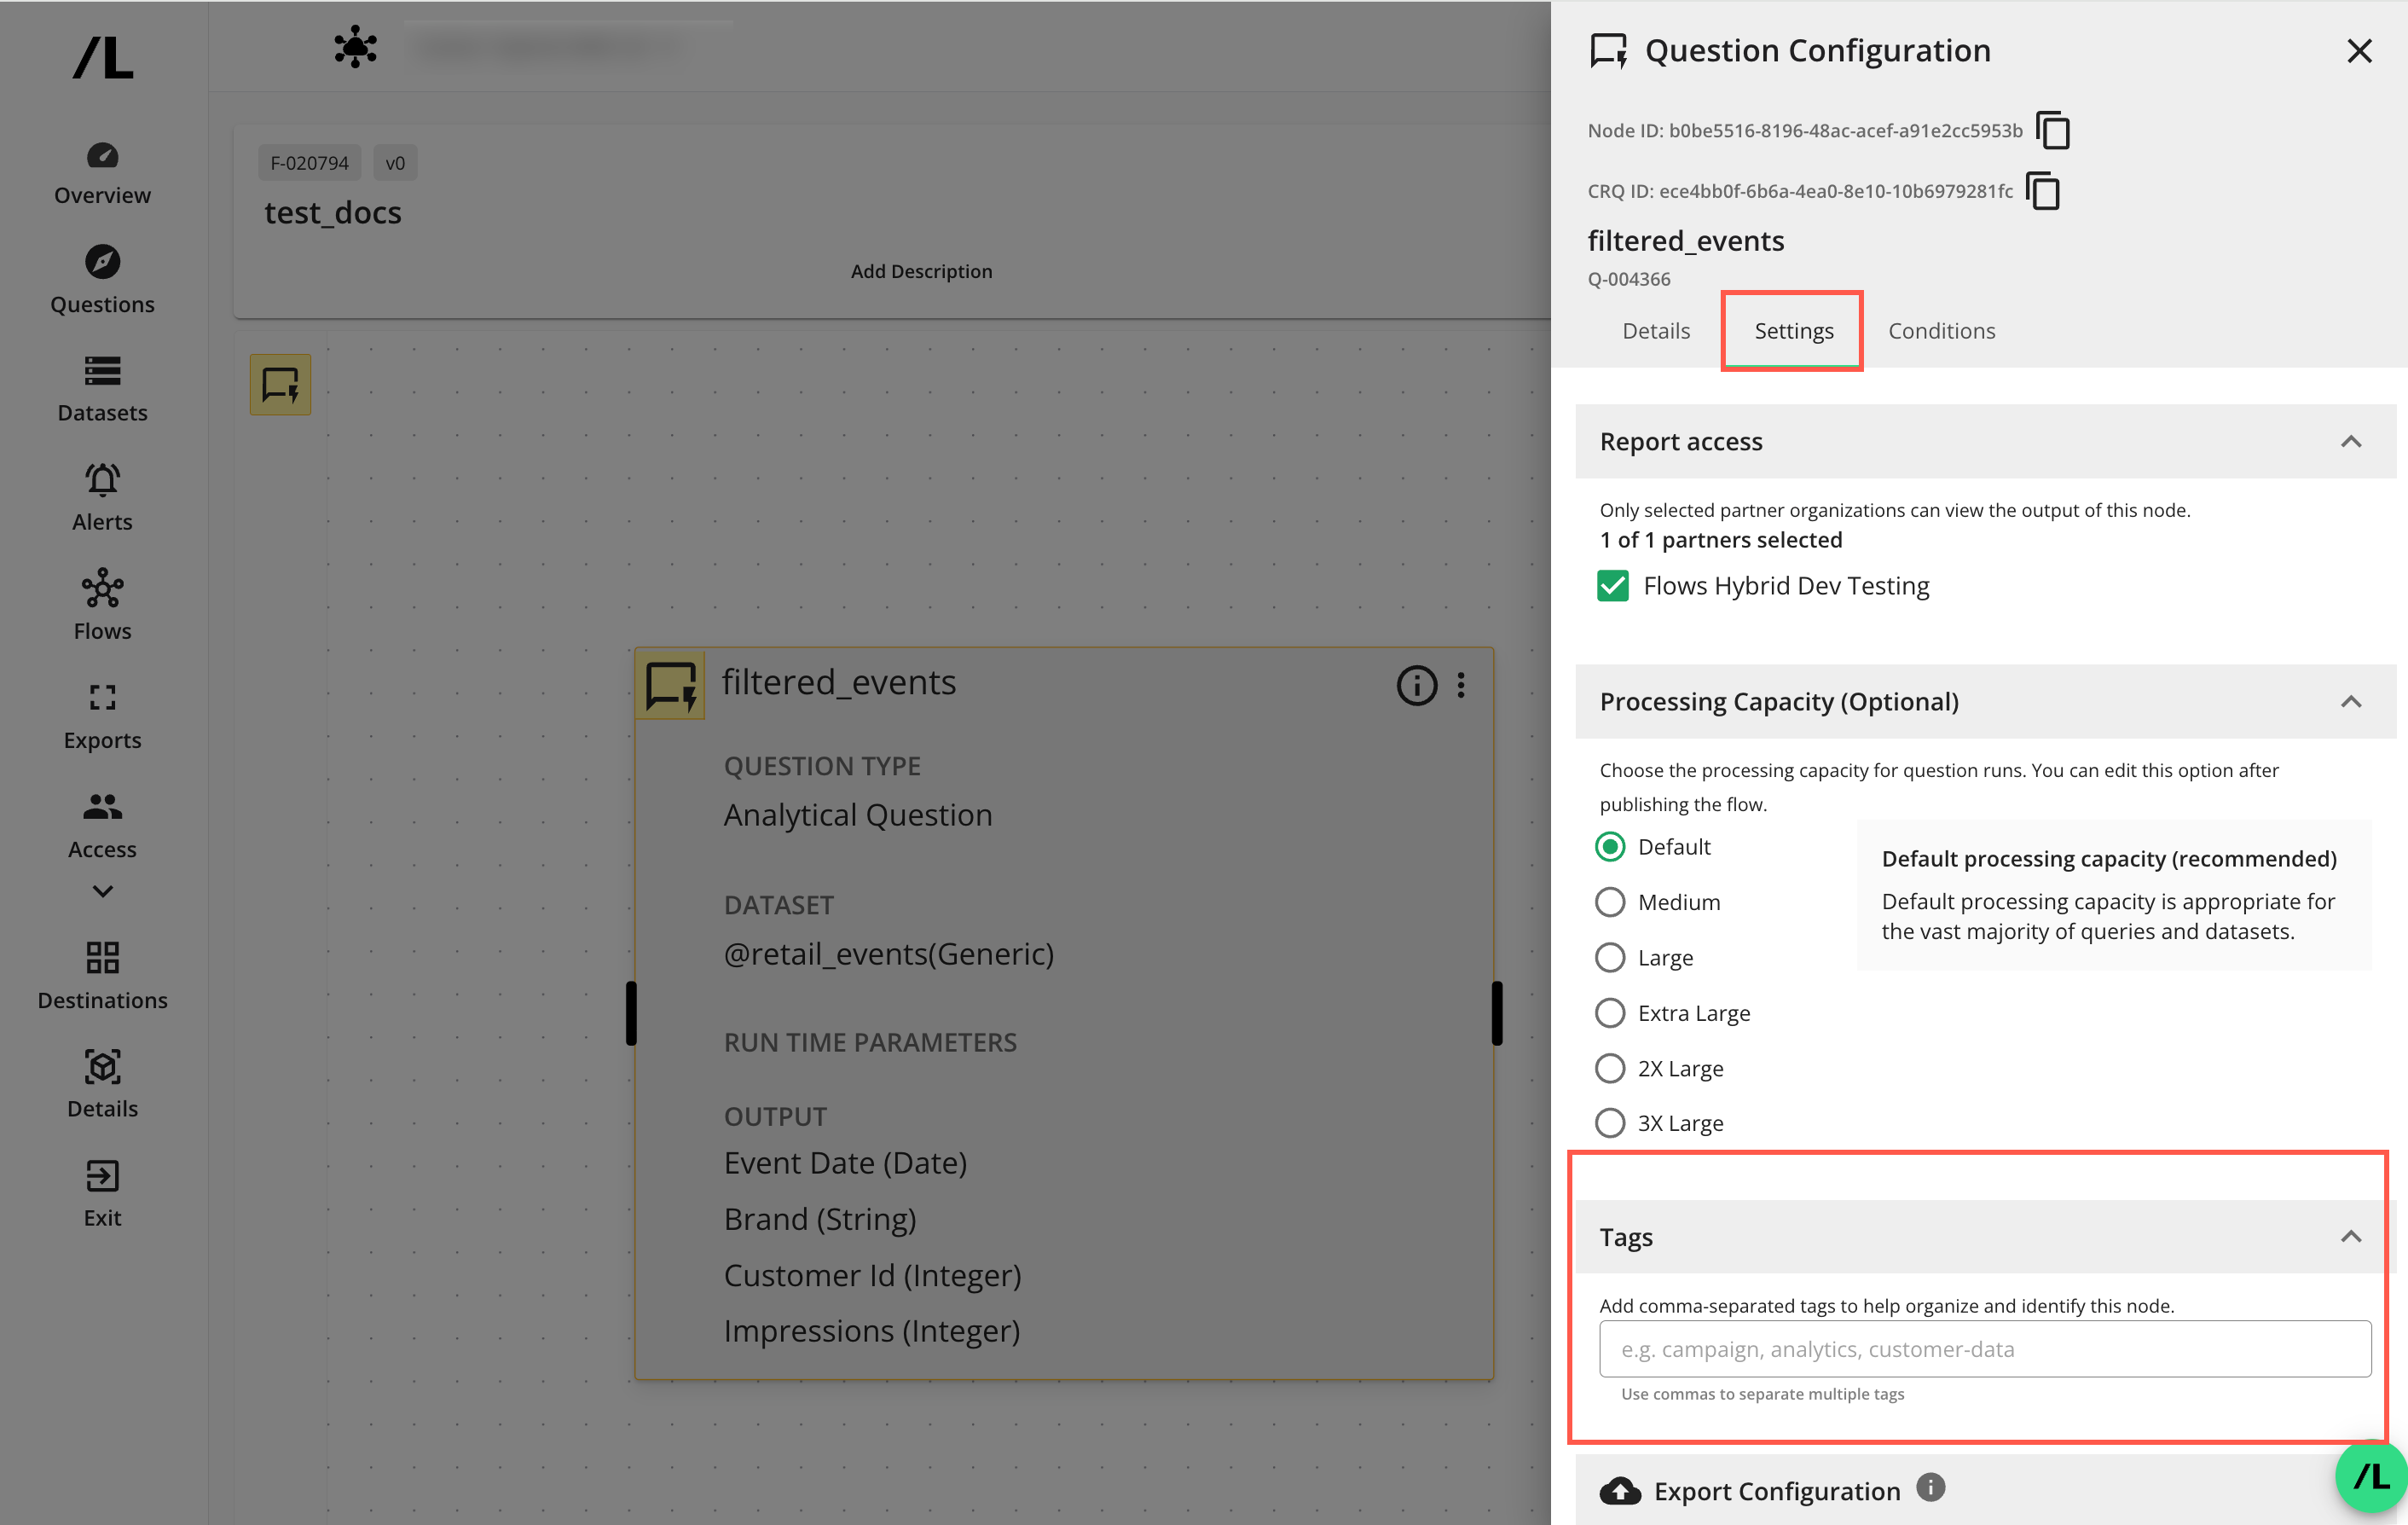
In the Tags section, enter a tag name and press enter (or type a comma) to add it. The tag is displayed as a chip. You can add multiple tags this way.
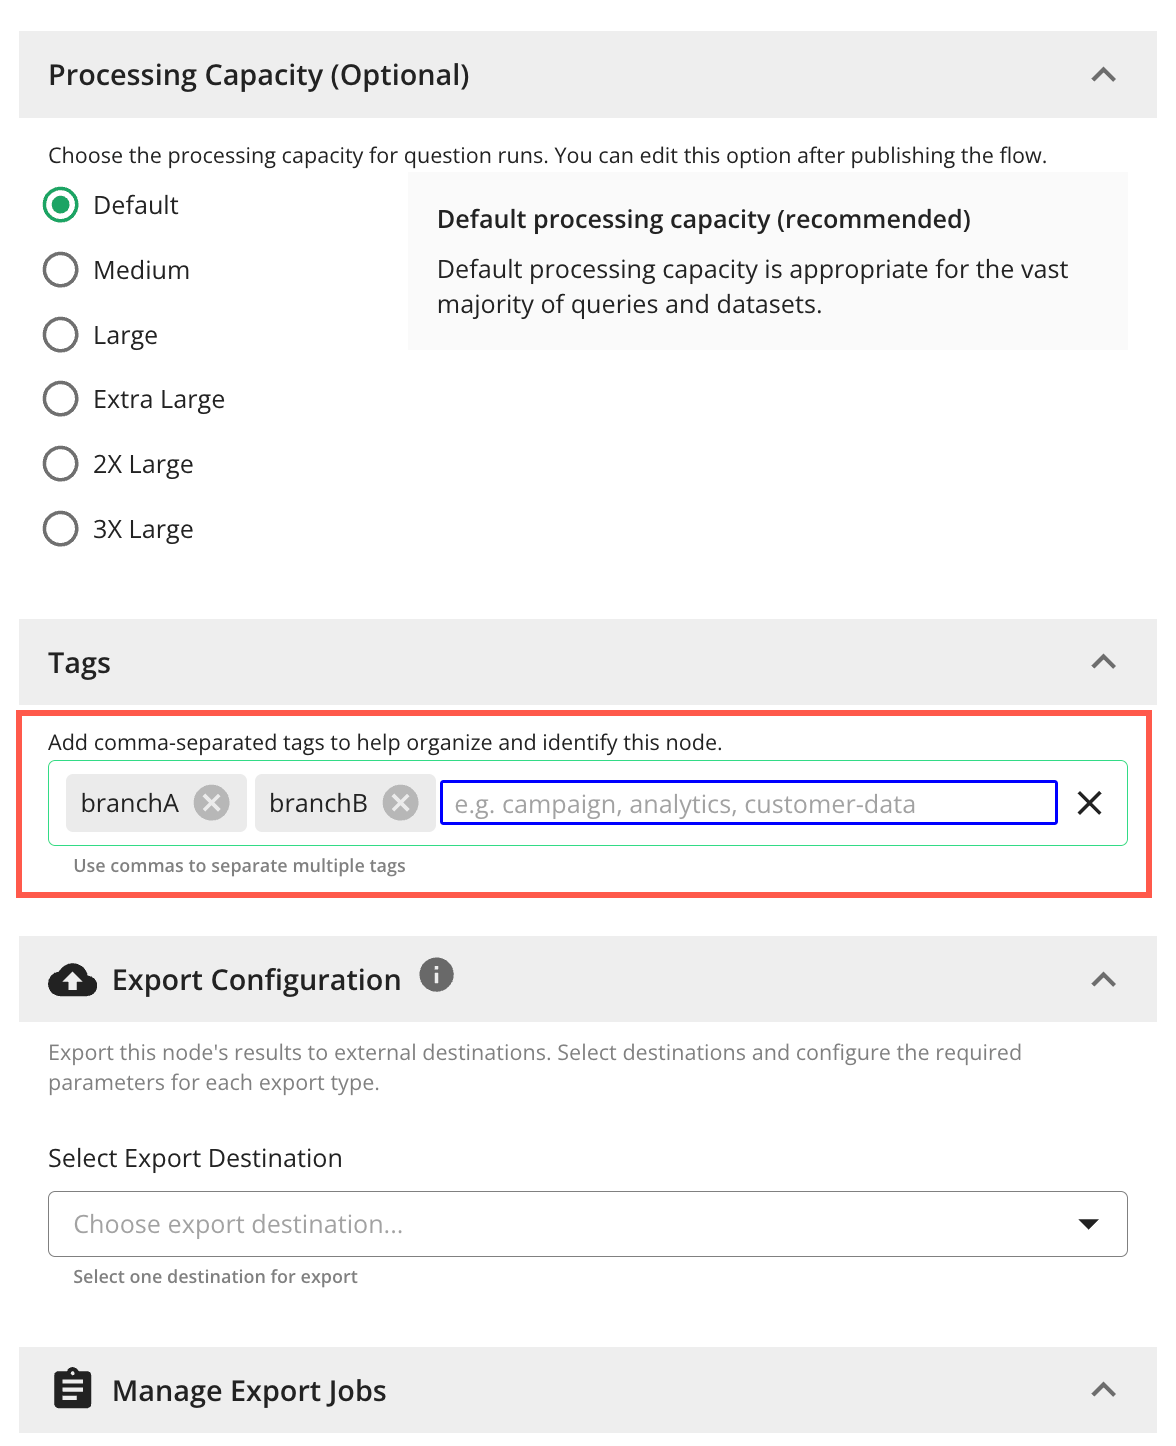
Click Submit to apply the updates to the node so the tags will be available in the flow.
Once the tags are configured in one or more nodes, you can select one or more branch names when configuring a new flow run or reusing an existing flow run to limit execution to those tagged branches as follows:
In the Run Details step of the "New Flow Run" configuration, select the tags from the Branch Names drop-down in the Branching Configurations section. For more information, see “Create a Flow Run”:
In the Reuse Settings step of the "Reuse Cached Report" configuration, select the tags from the Branch Names drop-down in the Branching Configurations section. For more information, see "Reuse a Flow Run":
Control Partner Access to Node Output Reports
You can control which partners can view node output reports for a flow. This is useful when:
Certain intermediate nodes should only be visible to the flow owner or specific partners.
Different partners need to see different output results (for example, partner-specific aggregations).
On the Flow Builder page, select the “i” icon on the node you want to update to display its side panel.
Select the Settings tab to access the "Report access" section:
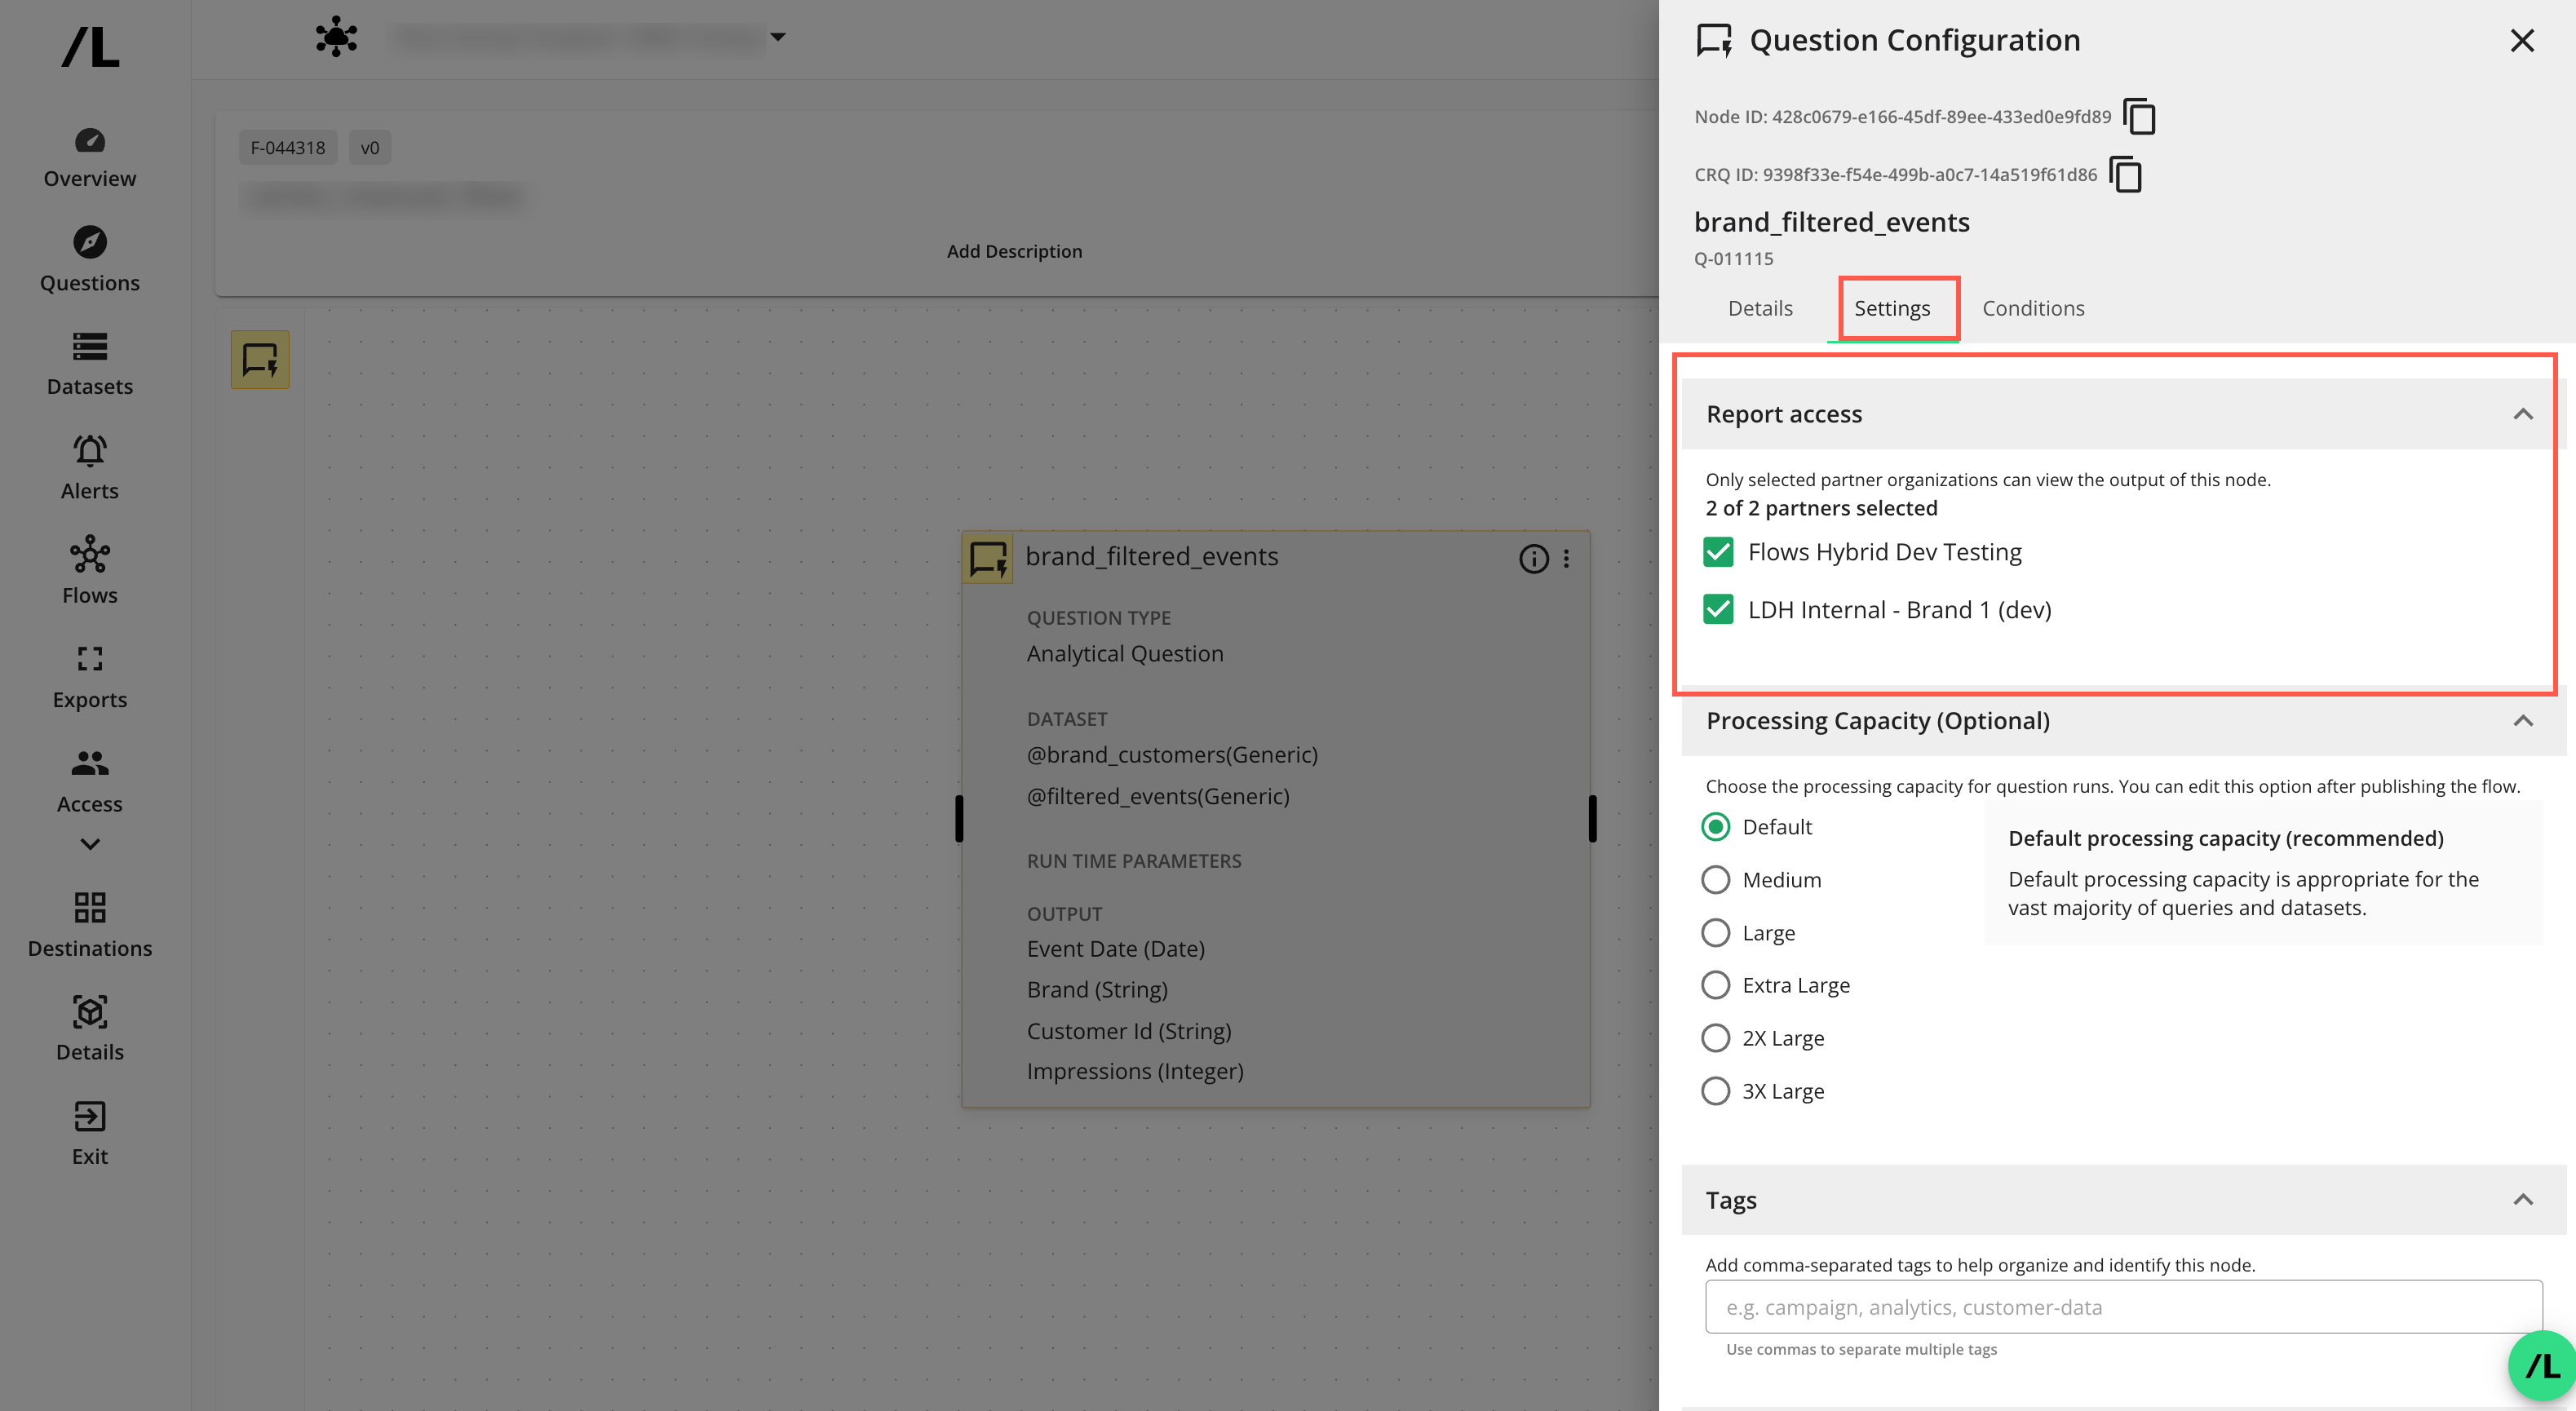
In the Report access section, select a partner to grant access to view the node’s output report, or unselect a partner to remove access.
Only users from the selected partners will be able to view this node’s output in the flow’s run report views, exports, and any other places where node‑level data is displayed.
Note
Access to node-level output data is independent of Clean Room permissions. A partner must have access to the clean room and be granted access in the node’s “Report access” section indicated above.
Some users may only be able to view the list of partners allowed to view a node’s output report in the “Report access” section and not edit the selections. This can depend on:
The user's role
Whether the user is the clean room owner
Updating the “Report access” section does not affect whether the node runs, only who can view the node output data when it does run.