Running LiveRamp’s Local Encoder In a Kubernetes Environment
Local Encoder enables you to generate securely-encoded RampIDs for your consumer data files within your own cloud environment and then utilize that data for onboarding or addressability use cases, depending on your needs. In this way your consumer data is never exposed to an external network, while still enabling full use of the LiveRamp solutions. The encoded RampIDs produced by the application cannot be decoded back to the original consumer identifiers.
Local Encoder can be run on any infrastructure that supports running Docker images. The Local Encoder Docker image is currently distributed via the Amazon Elastic Container Registry (ECR).
For more information on Local Encoder, including information on security, use cases, data you can send, and output options, see "LiveRamp Local Encoder".
For information on running Local Encoder in a Kubernetes environment, see the sections below.
Overall Steps
Running the Local Encoder in a Kubernetes environment involves the following overall steps:
You provide LiveRamp with your PGP public key or Keybase username.
LiveRamp provides you with credentials.
You decrypt the AWS IAM Secret Access Key.
You use the credentials to configure AWS to access LiveRamp’s Docker image in ECR.
You use Docker to access ECR and pull the Docker image for Local Encoder.
You push the Docker image to GCP.
You test the installation.
To receive RampIDs (rather than RampID packets), you configure the output type.
You deploy the Local Encoder.
You format your data files and then upload them to the appropriate input location.
Local Encoder performs the following operations:
The data is normalized and hygiene is performed.
The identifiers in the data are converted into derived RampIDs.
If appropriate, the derived RampIDs for each record are encoded into secure RampID packets or identity envelopes.
The input identifiers are removed and replaced with the appropriate RampID output type (RampIDs, RampID packets, or identity envelopes).
For Onboarding use cases the following steps are performed:
The output containing RampID packets is delivered to LiveRamp.
LiveRamp decodes the RampID packets into their individual derived RampIDs.
LiveRamp matches those derived RampIDs to their associated maintained RampIDs.
LiveRamp creates the appropriate fields and segments from the segment data in your LiveRamp platform (such as Connect or Safe Haven).
For Addressability use cases the following steps are performed:
The output containing RampIDs or identity envelopes is output to the destination of your choice.
You leverage the output to build a mapping table of your customer IDs to RampIDs or identity envelopes.
For more information on performing these tasks, see the sections below.
Prerequisites
Running the Local Encoder in a Kubernetes environment requires that you have the following prerequisites:
A Docker installation
AWS Command Line Interface (CLI)
A PGP public key or Keybase username
A GCP project with access to GKE
Decrypt the AWS IAM Secret Access Key
In addition to providing the Local Encoder account ID and the AWS IAM Access Key ID, LiveRamp will provide the AWS IAM Secret Access Key in an encrypted format. The AWS IAM Secret Access Key must be decrypted for use in subsequent steps.
To decrypt the AWS IAM Secret Access Key:
Export your public and private key to files, name them “public.key” and “private.key”, and save them in the “/tmp” directory.
Save the encrypted AWS IAM Secret Access Key to a file named “secret.txt” and save it in the “/tmp” directory.
Note
If the “/tmp” directory has not already been created, you will need to create it.
From Docker, run the following command:
docker run -it --rm alpine apk add --no-cache wget gnupg && export GPG_TTY=$(tty) && gpg --import /tmp/public.key && gpg --import /tmp/private.key && base64 -d /tmp/secret.txt | gpg --decrypt > /tmp/output.txt
Open the “output.txt” file to access the decrypted AWS IAM Secret Access Key.
Configure AWS to Access LiveRamp’s Docker Image
To configure AWS to be able to access LiveRamp’s Local Encoder Docker image in ECR, set your AWS IAM access key and secret access key in one of the following methods.
Run AWS Configure
From the command line, run the command “aws configure” with the following values:
AWS Access Key Id: [LR_VAULT_LR_AWS_ACCESS_KEY_ID]
AWS Secret Access Key: [LR_VAULT_LR_AWS_SECRET_ACCESS_KEY]
Default region name: eu-central-1
Default output format: json
Edit Files Manually
To set your keys by editing the files manually (MAC OS example):
From Finder, navigate to the Home directory.
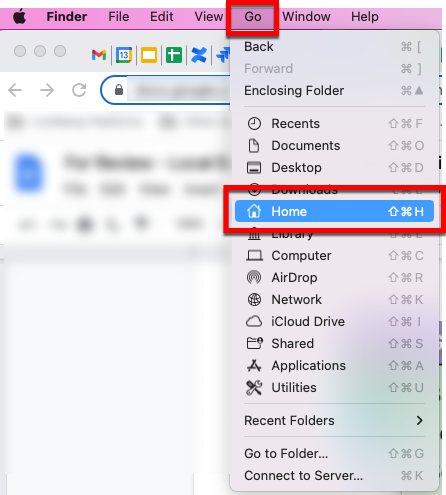
Press (command + shift + .) to reveal the hidden folders within the Home directory Note: If you don’t see these files, you might not have the latest version of AWS CLI installed. Follow the instructions in this Amazon article to install the latest version.
From the .aws folder, open the “config” and “credentials” files and then enter your aws_access_key_id and aws_secret_access_key (2.2) values as shown below:

Pull the Docker Image
The Docker image you need to pull from ECR is “461694764112.dkr.ecr.eu-central-1.amazonaws.com/vault-app:latest”.
Once you’ve configured AWS to access LiveRamp’s Local Encoder Docker image in ECR, perform the following steps to pull the Docker image:
Make sure the Docker Engine is running
Execute the following commands in the CLI:
aws ecr get-login-password --region eu-central-1 | docker login --username AWS --password-stdin 461694764112.dkr.ecr.eu-central-1.amazonaws.com
Note
Make sure to run the command exactly as shown.
The command output should declare “Login Succeeded”.
Note
If you get an error code, check that you have configured AWS correctly.
Run the following command to retrieve the image:
docker pull 461694764112.dkr.ecr.eu-central-1.amazonaws.com/vault-app:latest
The docker image should be available on your local machine or VM to use.
To confirm access to the image, run the following command and make sure that the image shows up in the list of images:
docker images
Push the Docker Image to GCP
Tag the image with the following command:
docker tag 461694764112.dkr.ecr.eu-central-1.amazonaws.com/vault-app gcr.io/<GCP_PROJECT_ID>/<IMAGE_NAME>if you have pulled a specific version of the image then the command should be:
docker tag 461694764112.dkr.ecr.eu-central-1.amazonaws.com/vault-app:<VERSION> gcr.io/<GCP_PROJECT_ID>/<IMAGE_NAME>Push the image to GCP Container registry with the following command:
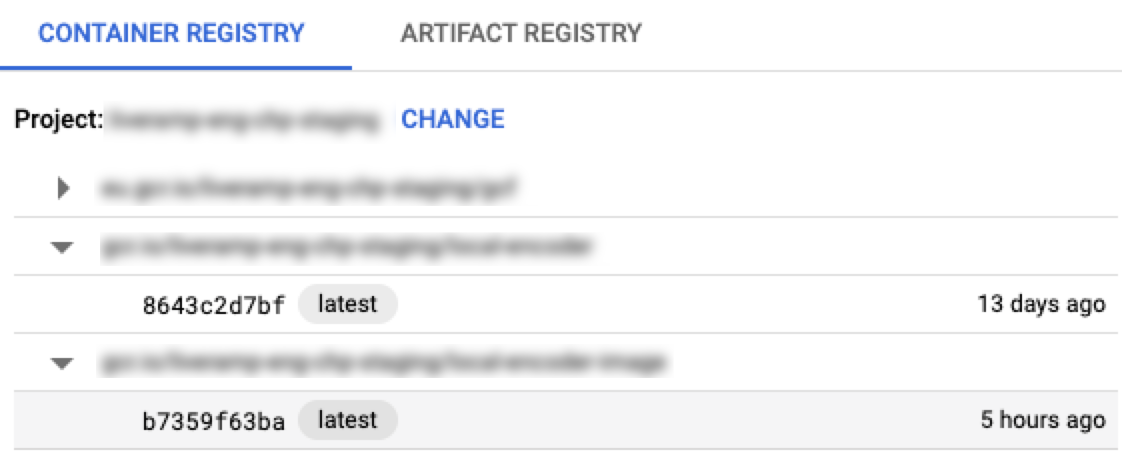
docker push gcr.io/<GCP_PROJECT_ID>/<IMAGE_NAME>You should see the image in container registry and the output should look similar to this:

Create a GKE Cluster using one of the following methods:
Create a GKE cluster using Terraform: In order to create a GKE cluster using terraform, the following resources should be created:
Create a cluster using GCP management console
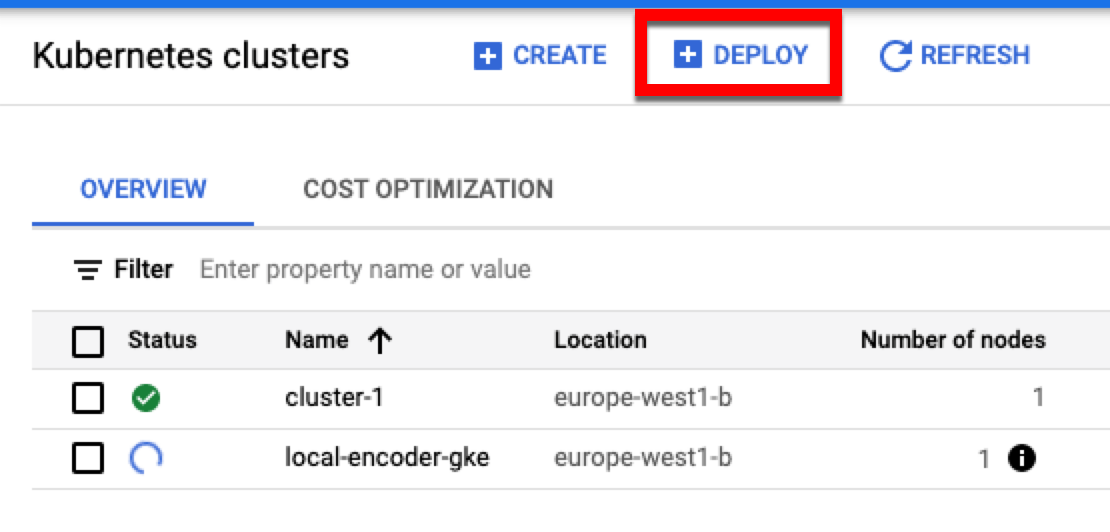
Once you have obtained access to GKE, navigate to the Kubernetes Engine service page and click .
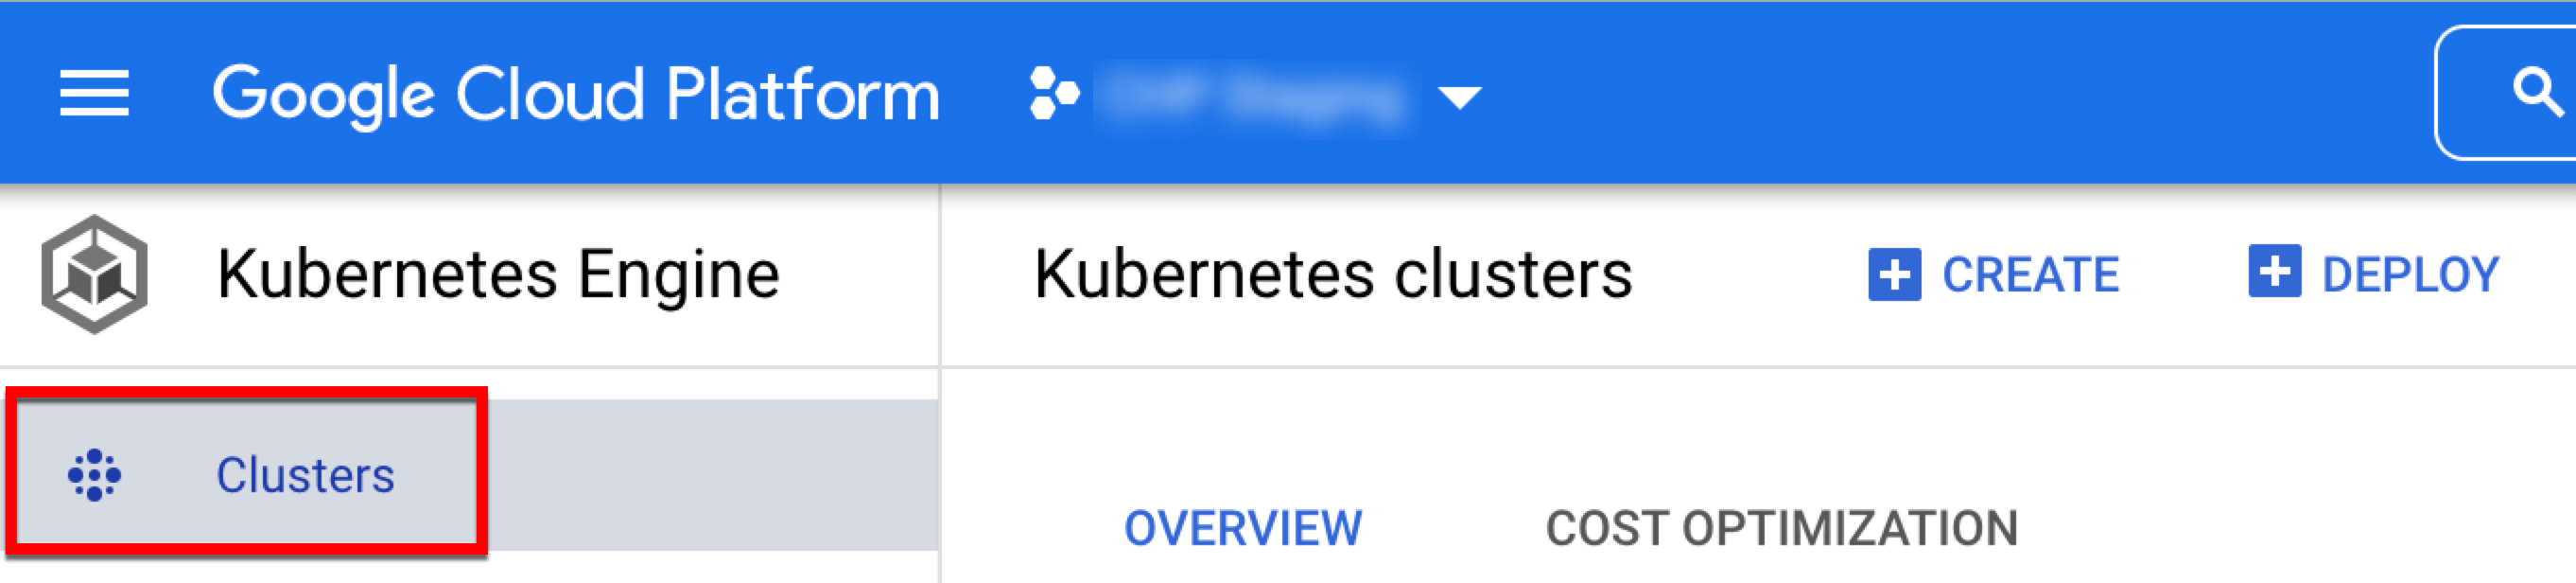
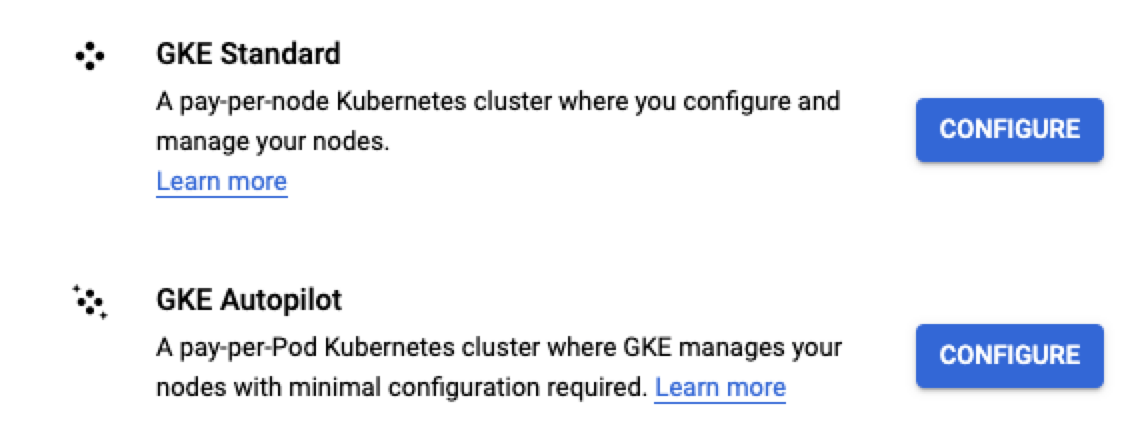
Click and then click for either the Standard or Autopilot cluster (in this example, we use Standard).
In the Cluster basics section, name your cluster (the rest of the settings are optional).
In the default-pool section, name your default pool, and set the number of nodes to the number of instances of Local Encoder you're going to run.
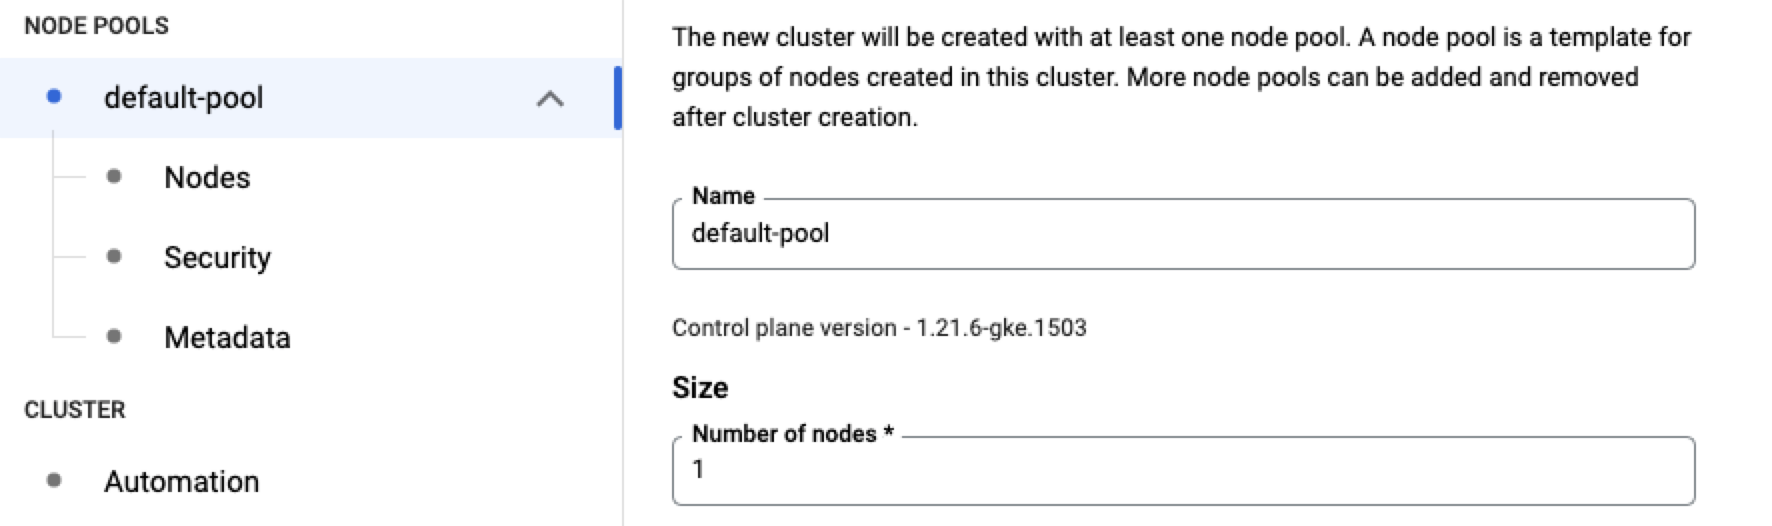
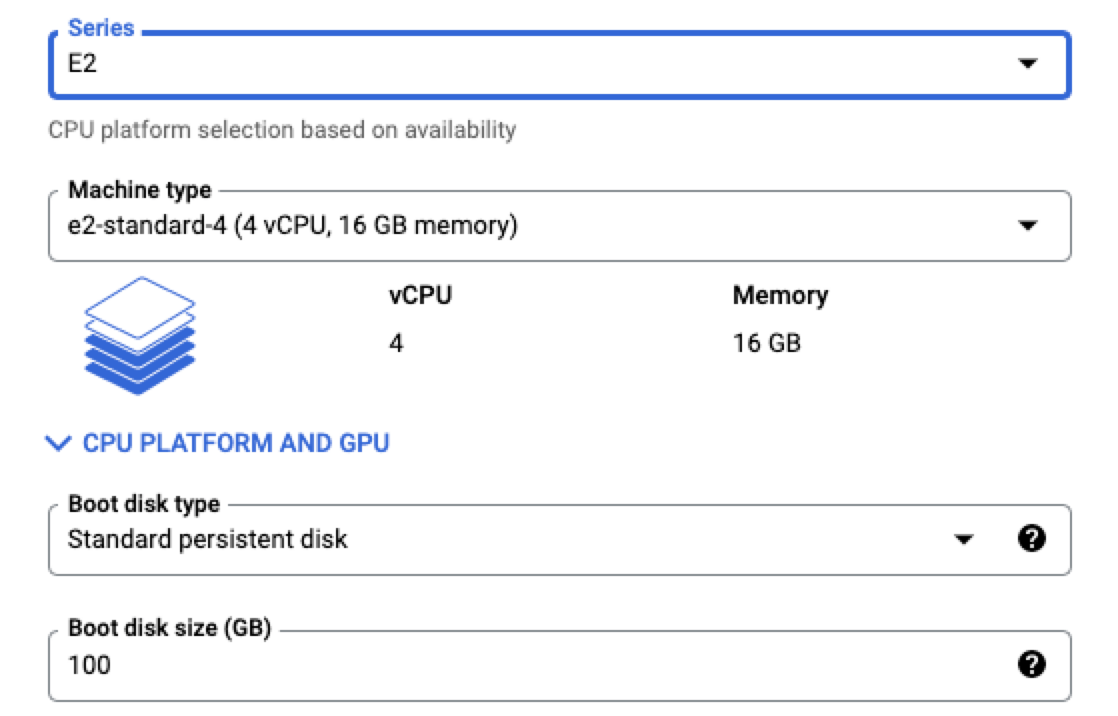
In the Nodes section, choose the type of node you want to set up, depending on the size of the files you are processing. In this example, we’ve selected “e2-standard-4” which has 4 CPUs and 16GB of memory.
Note
All of the other options are optional.
Click to create the cluster.
Test the Installation
To confirm that the installation has been done properly, we recommend that you test the installation. The Local Encoder offers a test mode, which can let you run the app without the data being sent to LiveRamp. To run the app in test mode, run the following command in Docker:
docker run --cap-add IPC_LOCK \
--env LR_VAULT_ACCOUNT_ID=[test] \
--env LR_VAULT_ACCOUNT_TYPE=awsiam \
--env LR_VAULT_DRY_RUN=true \
--env LR_VAULT_INPUT=/tmp/input \
--env LR_VAULT_OUTPUT=/tmp/output \
--env LR_VAULT_LOCALE=au \
--name vault-app vault-app
LR_VAULT_ACCOUNT_ID: You can use any value for dry run mode
LR_VAULT_ACCOUNT_TYPE: You can use either “awsiam” or ”aws”
LR_VAULT_DRY_RUN: Use “true” to enable test mode
LR_VAULT_INPUT: The location of the local folder containing input files to process
LR_VAULT_OUTPUT: The location of the local folder for output files
LR_VAULT_LOCALE: The two-digit country code
If you would like a file with test data, contact your LiveRamp representative. The output of that test file can be run against a truth set to ensure that the application has run as expected.
Complete Configuration Activities
See the sections below for information on completing any desired additional configuration activities. For more information on configuration parameters, see the "Configuration Parameters" section below.
Configure the Output Type
The Local Encoder application offers multiple output formats:
RampID packets: Used for Onboarding by brands and marketers, these RampID packets can be delivered to LiveRamp, where they can be transformed into RampIDs and used to generate fields and segments in your LiveRamp application. This is the default output type.
RampIDs: Used for addressability by publishers and platforms who want to create a RampID mapping.
Identity envelopes: Used for addressability by publishers and platforms who want to get RampIDs into the bidstream to safely engage with the programmatic advertising ecosystem.
Note
If you plan to receive RampIDs or identity envelopes, contact your LiveRamp representative for approval and account configuration changes.
Identity envelope output is only available with Version 1.6 of Local Encoder.
After you are approved for RampID or identity envelope output, add the following line to your Kubernetes ConfigMaps (when deploying the Local Encoder) to add an additional variable using the appropriate method listed below:
Note
To receive RampID packets, you do not need to make any changes to the configuration.
For RampID output, add the following line to the Kubernetes ConfigMaps:
LR_VAULT_PACKET_TYPE: unencoded
For identity envelope output, add the following line to the Kubernetes ConfigMaps:
LR_VAULT_ENVELOPES_FLOW=true
Note
When editing the yml file, any formatting issues will prevent the configuration file from working properly. We recommend that you run the file through a YAML validator.
Utilize Encryption
Optional encryption is available with Local Encoder (version 1.5 and greater). This functionality encrypts each row of data before it is sent to LiveRamp for processing.
Note
Adding encryption increases the processing time approximately 20% depending on the size of the file and number of records. LiveRamp recommends limiting file size to 15GB.
To utilize encryption, add the following line to the configuration file, just before the LR_VAULT_OUTPUT parameter: LR_VAULT_PUBLIC_KEY_ENCRYPTION: 'true'. See the "Deploy Local Encoder" section for more information.
Deploy Local Encoder
Once the cluster has been created, perform the following steps to deploy Local Encoder:
Click .
Choose Existing Container Image and then click . You will be prompted to select the image on the right side. Choose the Local Encoder image that was pushed to the registry.
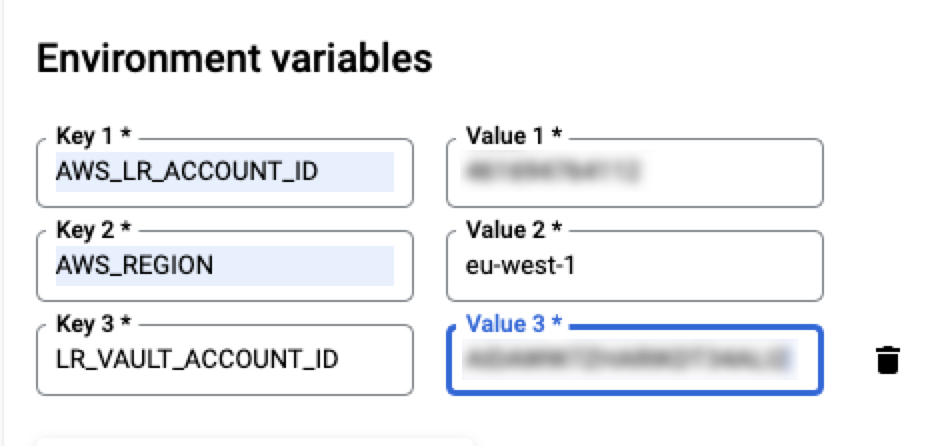
Under Environment Variables, enter all of the variables for Local Encoder and then click (for information on variables, see the “Configuration Parameters” section of this document).
Enter an application name, choose the cluster in which you would like to deploy Local Encoder, and then click .
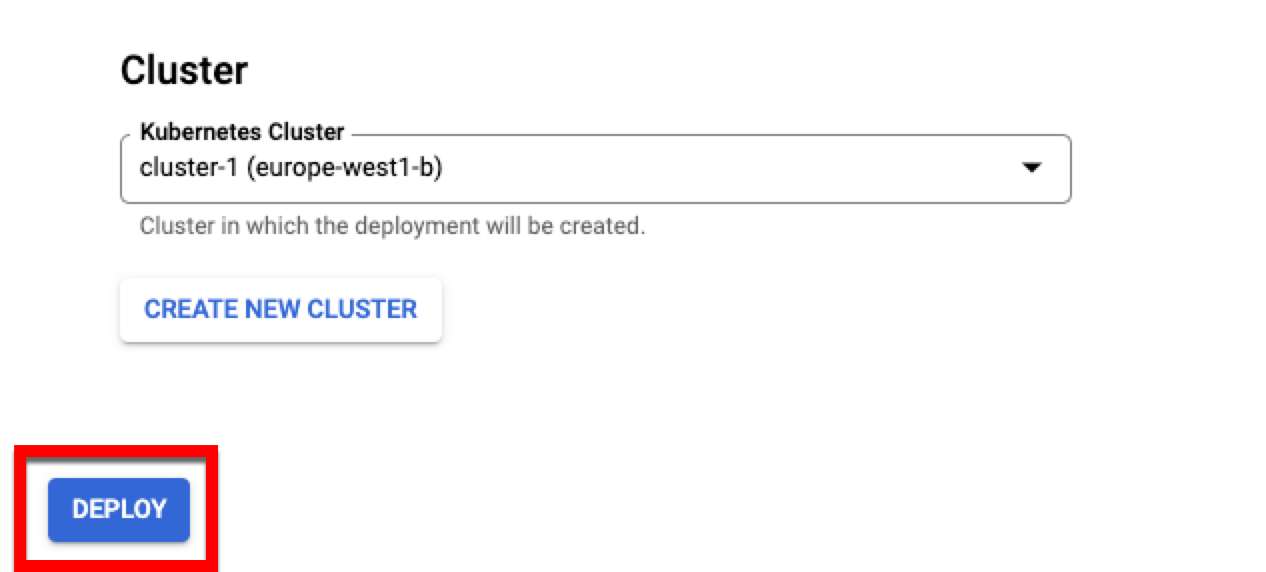
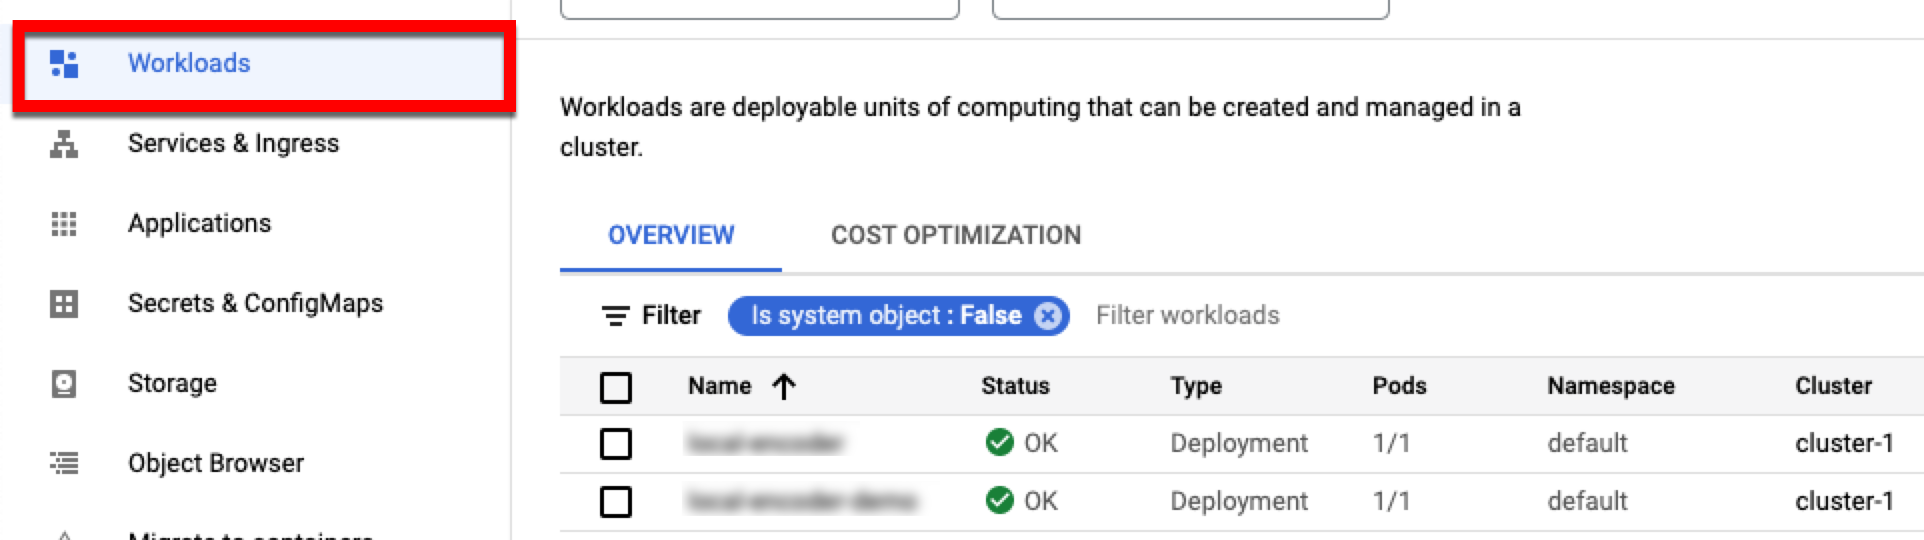
To view your applications and the clusters they are running in, select the Workloads tab.
Open your application and then click to open the YAML file.

Scroll down and paste this section of code below the
imagePullPolicyandnamekeys (as shown in the image below) and then click .
To check that your Local Encoder instance is up and running, click and check for this output:

Format the File
Input files must include identifier fields and (for Onboarding use cases where you're receiving RampID packets) can also include segment data fields if desired. You can also include row IDs (RIDs).
Before uploading a file to the input location, make sure to format the data according to these guidelines:
Include a header row in the first line of every file consistent with the contents of the file. Files cannot be processed without headers.
Make sure that the only identifiers included are the allowed identifier touchpoints listed below.
Maximum of 500 segment data fields in a single file (for Onboarding use cases where you're receiving RampID packets).
Segment data field types can be in the form of a string, numeral, enum, etc.
The application supports three file formats: CSV, PSV, and TSV.
Files must be rectangular (have the same number of columns for every row).
If any values contain the file’s delimiter character (for example, a comma in a .csv file), make sure that your values are contained within quotes.
The recommended maximum file size is 20GB.
Allowed Identifier Touchpoints
You can include any of the following allowed identifier touchpoints for translation to RampIDs in both Onboarding and Addressability use cases:
Plaintext email address (maximum of three per record)
SHA-256 hashed email address (maximum of three per record)
Plaintext mobile phone number (maximum of two per record)
SHA-256 hashed mobile phone number (maximum of two per record)
Plaintext landline phone number (maximum of one per record)
SHA-256 hashed landline phone number (maximum of one per record)
Additional Allowed Touchpoints for Onboarding Use Cases
For Onboarding use cases (where you're receiving RampID packets, the following additional identifier touchpoints are also allowed for translation to RampIDs:
Name and postcode, which consists of first name, last name, and postcode (maximum of one per record)
AAID (maximum of one per record)
IDFA (maximum of one per record)
IMEI (maximum of one per record)
Example Header
See the header shown below for an example of what the header might look like when sending data for an Onboarding use case, where segment data fields are included:
RID|EMAIL1|EMAIL2|EMAIL3|SHA256EMAIL1|SHA256EMAIL2|SHA256EMAIL3|MOBILE1|MOBILE2|SHA256MOBILE1|SHA256MOBILE2|LANDLINE1|SHA256LANDLINE1|FIRSTNAME|LASTNAME|POSTCODE|AAID|IDFA|IMEI|ATTRIBUTE_1|...|ATTRIBUTE_N
Replace ATTRIBUTE_1 … N in the example header with the name of your CRM attributes.
Example Output Files
For more information on the format of the output file, see "Output Examples".
Upload the File to the Input Bucket
Uploading a file to your Local Encoder services input bucket kicks off the encoding operation. To upload your file, run a command similar to the example below (this example shows using an AWS S3, but this could be any local directory):
aws s3 cp [your_file].csv s3://com-liveramp-vault-[your-vpc-id]-input
Once the file has been processed, you’ll get a confirmation message that includes the number of records processed.
For RampID packet output, all consumer identifier data in a row is transformed into derived RampIDs, packaged into one data structure and encrypted again, yielding a RampID packet.
For RampID output, all consumer identifier data in a row is transformed into derived RampIDs in the form of a JSON string in a “RampID” column.
For identity envelope output, all consumer identifier data is transformed into derived RampIDs. A selection logic is applied, then the RampID is additionally obfuscated and encrypted into an identity envelope. Only one identity envelope is returned per row of data.
For more information on the format of the output file, see "Output Examples".
Configuration Parameters
Required Account Configuration Parameters
Configuration Parameter | Value | Comment |
|---|---|---|
LR_VAULT_ACCOUNT_ID | Provided by LiveRamp | AWS user ID |
LR_VAULT_ACCOUNT_TYPE | awsiam | Account type |
AWS_LR_ACCOUNT_ID | 461694764112 | LiveRamp AWS account ID |
LR_VAULT_LR_AWS_ACCESS_KEY_ID | Provided by LiveRamp | AWS IAM access key ID |
LR_VAULT_LR_AWS_SECRET_ACCESS_KEY | Provided by LiveRamp | AWS IAM secret access key (Base64 encoded and encrypted) |
LR_VAULT_INPUT | Local folder path, S3 bucket name or GCS bucket name. For S3 bucket prefix is ‘s3://’ and for GCS buckets, prefix is gs://. Default is the local folder. | |
LR_VAULT_OUTPUT | Example: s3://com-liveramp-chp-vaultapp-output-prod/<LR_VAULT_ACCOUNT_ID> | S3 bucket name for the output bucket:
|
Optional Configuration Parameters
Configuration Parameter | Comment |
|---|---|
LR_VAULT_LR_AWS_REGION | AWS region for LR resources. Value is 'eu-central-1'. |
LR_VAULT_PROFILE | Default is prod |
LR_VAULT_LOCALE | Two letter country code representing the origin of the data being processed. e.g. Australia = au, Great Britain = GB. Note that this controls the hygiene applied to phone numbers in the file. |
LR_VAULT_FILENAME_PATTERN | Value is regex. The app will process files from the folder/bucket with filenames that match the regex. |
LR_VAULT_COUNTRY_CODE_COLUMN | The header name for the column containing country codes for each row. |
LR_VAULT_HEADER_MAPPING | A list of key=value pairs which can be used to replace the default headers for the identifier columns in the file. For example, if the email columns have the headers primary_email, alt_email, then the header mapping would be set to: primary_email=email1,alt_email=email2. |
LR_VAULT_MODE | The default value is 'default' for long-running file processing, set to 'task' to enable single file processing (the application will shut down after processing a single file, not available for Kubernetes setup). |
LR_VAULT_PACKET_TYPE | Include this parameter and set to "unencoded" to receive RampIDs, rather than RampID packets. Include this parameter only when you are receiving RampIDs. |
LR_VAULT_ENVELOPES_FLOW | Include this parameter and set to "true" to have the output RampIDs packaged into identity envelopes. Include this parameter only when you are receiving identity envelopes. |
LR_VAULT_DRY_RUN | The default value is 'false'. Set to true to run the app in dry run mode. |
LR_VAULT_METASTORE_DB_URL | Check 'Metadata store'. |
LR_VAULT_METASTORE_DB_DRIVER | Check 'Metadata store'. |
LR_VAULT_METASTORE_DB_USERNAME | Check 'Metadata store'. |
LR_VAULT_METASTORE_DB_PASSWORD | Check 'Metadata store'. |
LR_VAULT_METASTORE_DB_PLATFORM | Check 'Metadata store'. |
AWS_ACCESS_KEY | Only if using client's S3 bucket as input source. Access key for clients AWS. |
AWS_SECRET_ACCESS_KEY | Only if using client's S3 bucket as input source. Secret access key for clients AWS. |
AWS_REGION | Only if using client's S3 bucket as input source. AWS region in which the bucket is residing. |
AWS_DEFAULT_REGION | Only if using client's S3 bucket as input source. AWS region in which the bucket is residing. |
GOOGLE_APPLICATION_CREDENTIALS | Only if using a GCS bucket as input/output source. Path to your Google Credentials JSON file. |
LR_VAULT_GCP_PROJECT_NAME | Only if using a GCS bucket as input/output source. The name of your GCP project. Added if the default profile name can't be found. |