The OpenAI Conversions API Program for Offline Conversions
LiveRamp's integration with OpenAI Conversions API allows you to send conversion data for attribution to understand how your ads in ChatGPT drive offline conversions. This integration will optimize for performance in OpenAI campaigns and help advertisers prove results, especially with view-through conversions where customers may not click an ad but still make real-life purchases.
Caution
The OpenAI Conversions API Program for Offline Conversions is in limited availability and is by invitation only. Contact your LiveRamp or OpenAI rep to find out about getting approved for this program.
Note
For retail media networks, LiveRamp recommends sending your conversions feed as a view in Connect. This method allows you to create brand- or SKU-specific conversions feed before distributing them to CAPI programs. To learn more, see "Getting Started with Conversions API Feed Distribution for Retail Media Networks".
This program is also available for online conversion events. See "LiveRamp's Online Conversions API Connectors" for more information.
Overview of Steps Involved
The following steps need to be performed to enable attribution analysis with OpenAI:
Before your campaign starts, you send LiveRamp a sample conversion data file so we can test the integration with OpenAI.
If you haven't yet, create a Pixel ID and Conversions API Key in OpenAI.
You activate your campaign on OpenAI.
You grant LiveRamp the ability to deliver data to your OpenAI Ads Manager Account by creating an OpenAI Conversions API destination account.
You upload offline conversion data from the past 7 days with PII to LiveRamp.
LiveRamp passes your conversion data file through OpenAI's Conversions API.
You view the results within OpenAI Ads Manager UI.
Create Pixel ID and Conversions Key in OpenAI Ads Manager
To activate OpenAI's destination account in Connect, you need to provide a Pixel ID and Conversions API Key from OpenAI's Ads Manager. The Pixel ID is tied to a particular data source in Ads Manager, while the Conversions API key allows LiveRamp to send events to that particular data source.
Create a Pixel ID
If you haven't set up a data source yet, follow the instructions below:
In OpenAI Ads Manager, select Conversions from the left navigation menu.
Click and select "Data Source".
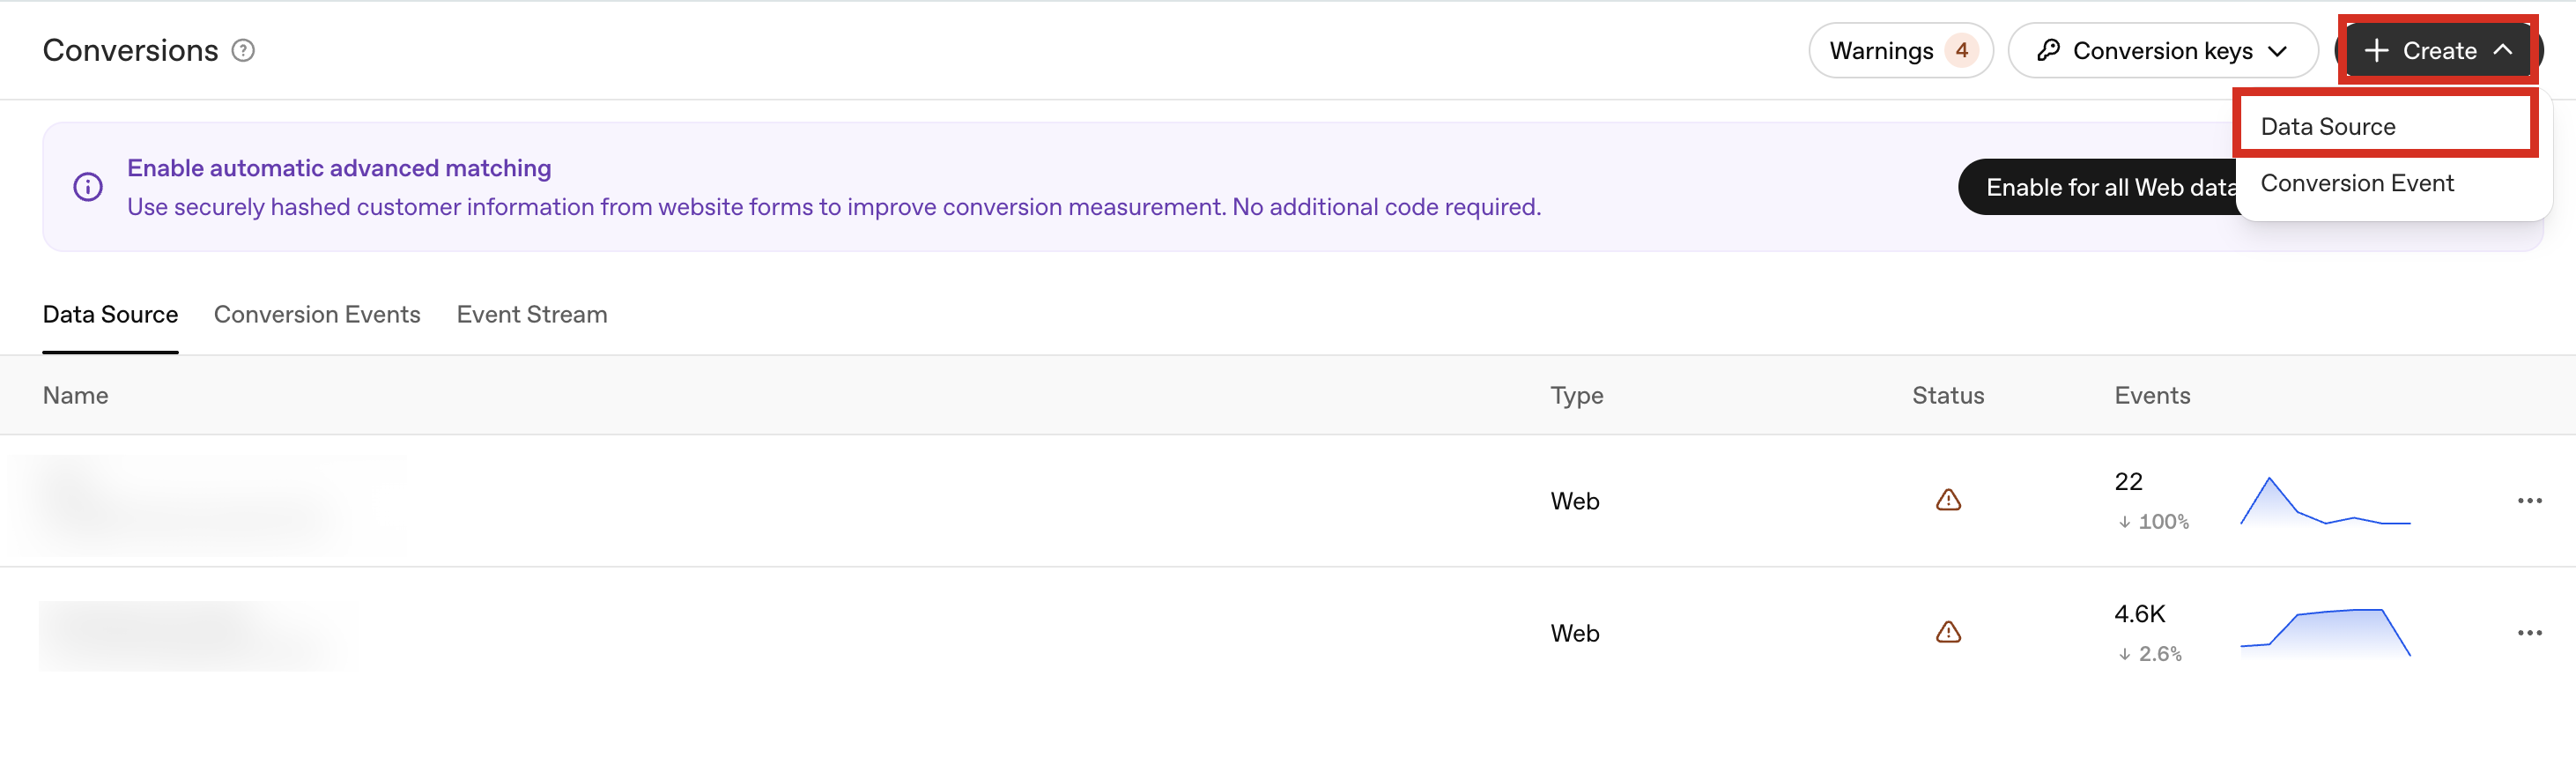
Select Web as the data source type and enter a name.
Click and copy the generated Pixel ID.
Create a Conversions Key
In OpenAI Ads Manager, select Conversions from the left navigation menu.
Use the Conversion keys dropdown and select "Create new key".
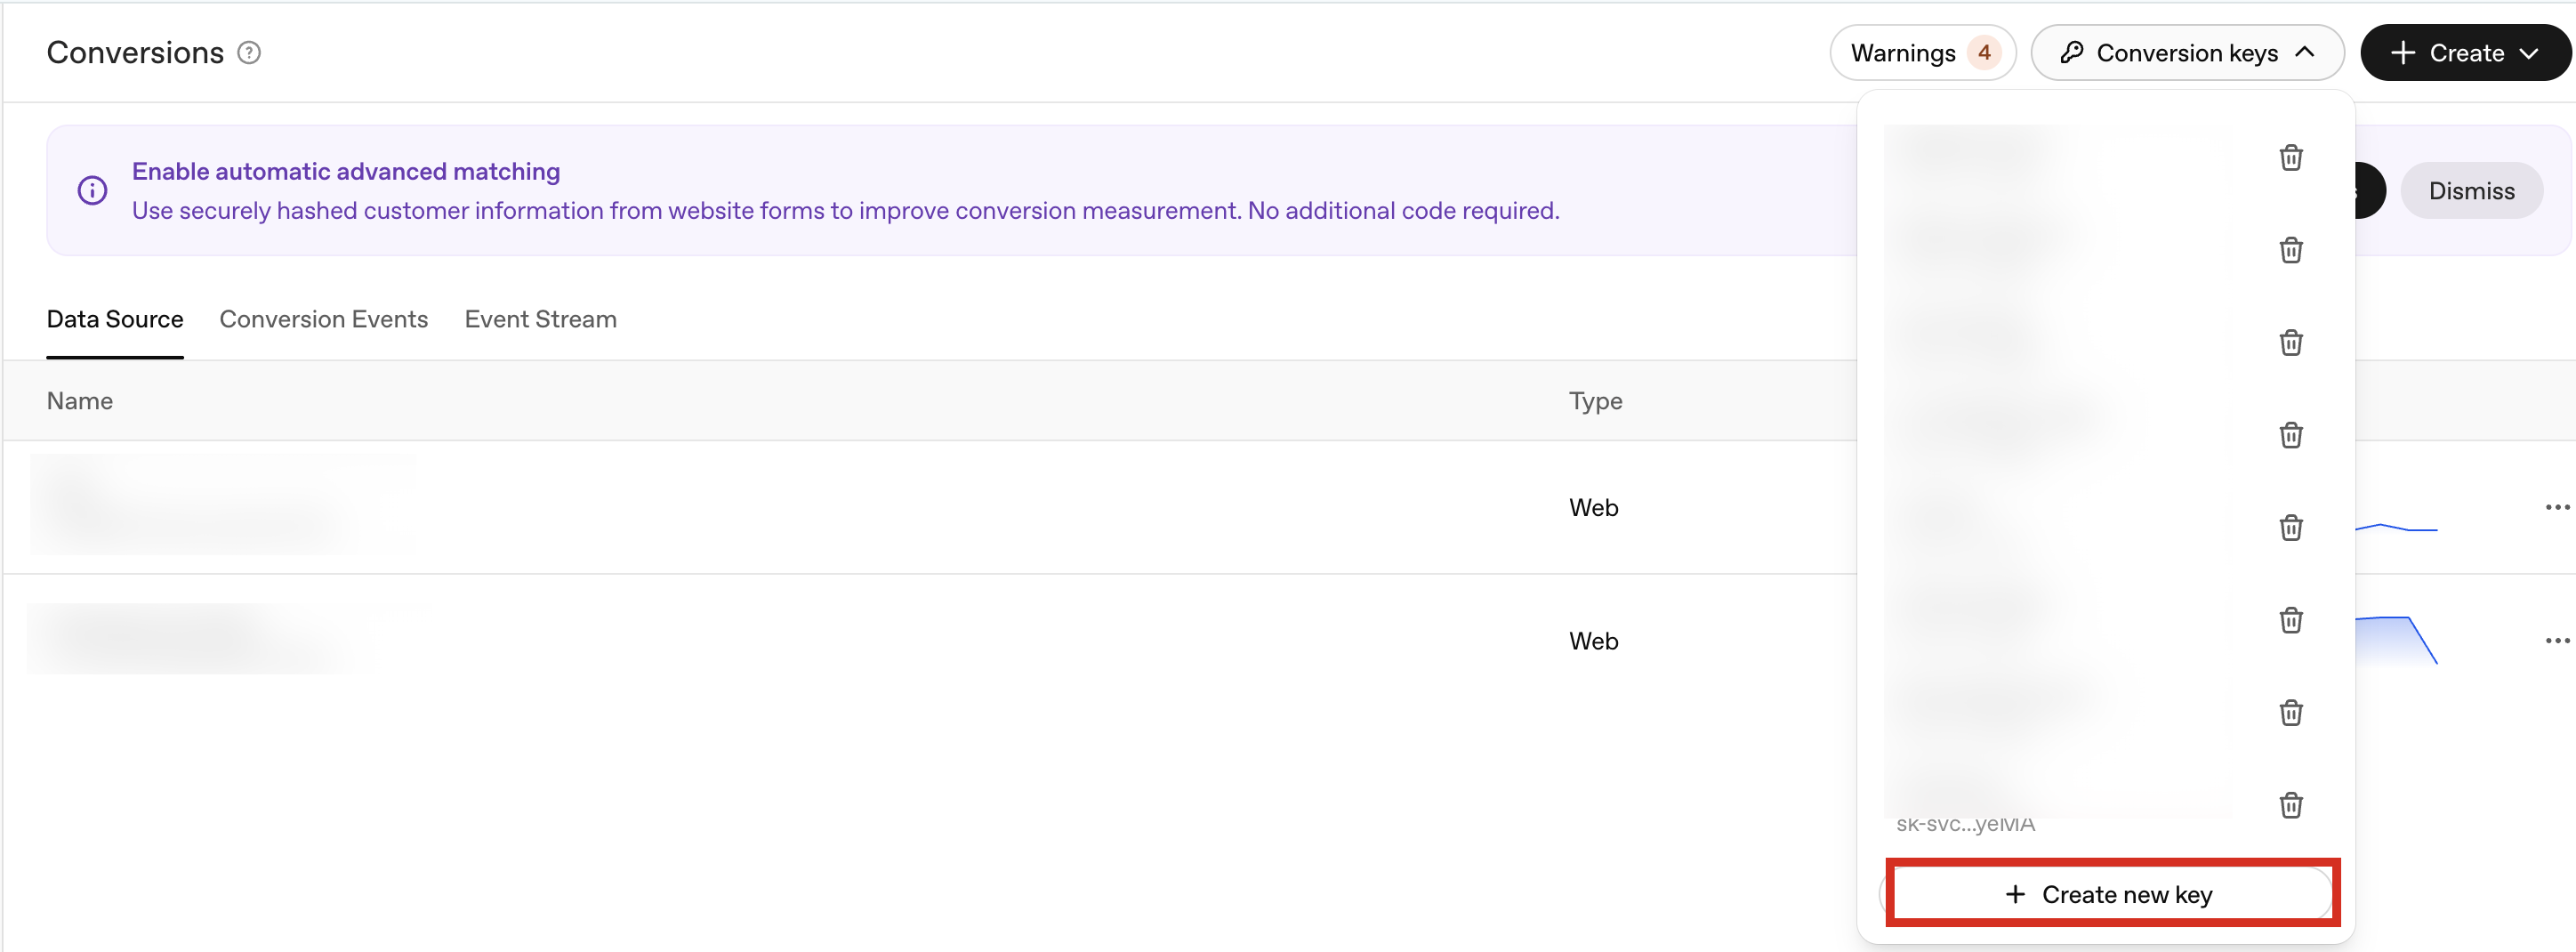
Enter a memorable name for the key.
Click . Copy and store the one-time generated API Key immediately.
Activate an OpenAI Conversions API Destination Account
To distribute offline conversion data, you will need to activate an "OpenAI Conversions API PII Passthrough" destination account in Connect.
Follow the general instructions in "Activate a New Destination Account", performing these additional steps:
Remove the end date to leave the end date open-ended.
Enter the conversion key from OpenAI's Ads Manager.
Enter the Pixel ID associated with your preferred data source in OpenAI.
In the Destination Account Name field, pick a unique and memorable name for this account. We'll suggest one for you but you can use any name you wish as long as it is less than 50 characters in length.
Format the File
This program utilizes the universal file format, which can be used across multiple Conversions API programs. For information on formatting guidelines, see "Using a Universal File for Multiple Conversions API Programs".
Using the Universal File Template
To make things easier for you, we've created a downloadable universal file template that you can use.
Note
The template contains formatting instructions in the second row of the file, along with info on whether a column is required and whether values are required, depending on which conversions programs you're using.
Download the file template by clicking here.
If desired, you can remove any non-required columns that aren't utilized by one of your conversions programs, but you can also leave those columns in the file and not populate them with values.
Transfer your data into the template.
After transferring your data into the file template, delete the second row with the formatting instructions.
Save the file in one of our allowed file types (.csv, .tsv, .psv, or .txt).
Upload the file to LiveRamp.
Once the file has been formatted correctly, upload the file to LiveRamp. See the “Upload the File” section below for more information.
Note
Once you set up the file format for an existing conversions program feed, try to keep the file format (such as the column headers or the column order) the same for all subsequent files. If you change the file format for an existing feed, create a support case before uploading the new file to ensure your existing feeds are not impacted. For more information, see "Changing the Format of an Existing File".
Header Row Example
first_name|last_name|address_1|address_2|city|state|zip|email_1|email_2|email_3|email_4|event_name|transaction_category|transaction_timestamp|transaction_amount|phone_1|phone_2|order_id| data_processing_options
Conversion Data Examples
Alex|Chen|44 Main Street|#12|San Francisco|CA|94100|alex@gmail.com|ac@ymail.com|||Purchase|In-store|2014-03-31|99.99|4157892314|4156438224|58239|LDU
Julian|Roodiger|55 Mission Street||San Francisco|CA|94500|julian@gmail.com||||Purchase|Offline|2014-03-30|55.55|4159032427|4157823435|67324|non-ldu
Send Conversion Data to LiveRamp
If you’re not currently using another LiveRamp Conversions API program (such as Bing or Yelp), we will need you to send us sample conversion data to set up the integration.
Caution
Most platforms require that at least 1,000 unique transaction events be uploaded over a 28-day period.
Conversion Data Guidelines
Each conversion data record must include at least one PII identifier (name and postal address, email, or phone) and the required conversion data:
Transaction category
Transaction timestamp
Transaction amount
Order ID
Event name
Conversion data should be uploaded within 7 days of the conversion.
Upload the File
Upload conversion data files using LiveRamp’s SFTP server or your SFTP server.
You can also have us pull files from an AWS S3 bucket or GCS bucket. See “Getting Your Data Into LiveRamp” for more information.
Caution
Files for this conversions program cannot be uploaded via Connect.
To upload files using LiveRamp's SFTP: Use the credentials provided by your technical contact once the agreement has been signed and follow the instructions in “Upload a File via LiveRamp's SFTP”.
To upload files using your SFTP: Follow the instructions in “Upload a File via Your SFTP”.
Note
For future uploads, you do not have to email LiveRamp to confirm that you have uploaded data assuming headers have not changed or additional columns have not been added.
Once the file is uploaded, information on file processing status can be viewed in LiveRamp Connect (see "Check File Processing Status" below for more information).
After OpenAI has ingested the conversion data, you will see your attribution report within OpenAI Ads Manager.
Check File Processing Status
You can check the status of the files you've uploaded on the Files page in Connect. See "Check the Status of an Uploaded File" for complete instructions.
Note
Once you've uploaded a file, it can take up to 20 minutes before it appears associated with the appropriate dataset(s) on the Files page. If the file does not appear after at least 20 minutes, create a support case.
Files for this program use our Measurement Enablement workflow, so the column headings that display on the Files page will look different from the ones that display for files that use our Activation workflow.
FAQs
At what cadence should I send my conversion data files?
Send conversion data files to LiveRamp daily or at the latest every 3 days. This is required in order to support OpenAI's 21-day attribution window.
What conversion data should I include in my conversion data file?
Include all traceable offline transactions in your delivery. Do not include online transaction data.
Avoid sending duplicate transactions (transactions already sent to LiveRamp). If you send daily files, only include transactions that occurred on that day. If you send weekly or monthly files, only send transactions that occurred since the previous file was sent.
Do not include transactions with a transaction date in the future.