Perform RampID Translation Through AWS Sagemaker
Every RampID has a partner-specific encoding (the "partner encoding") to ensure the security and privacy of our partner's data. LiveRamp's AWS Embedded Transcoder allows for the conversion of RampIDs from one partner encoding to RampIDs in another partner encoding within your own AWS Virtual Private Cloud (VPC).
LiveRamp's AWS Embedded Transcoder allows you to connect your LiveRamp identities with external datasets to solve problems of interest. Brands and platforms want to connect, control, and activate data quickly and securely across the advertising technology marketplace, but are faced with security concerns and latency issues, making it difficult to connect and take action on customer data.
By leveraging LiveRamp's AWS Embedded Transcoder, you can unlock collaboration use cases and translate across identity spaces to drive actionable insights.
LiveRamp's AWS Embedded Transcoder offering is available through the AWS Marketplace and deployed through a CloudFormation template that is stored in a GitHub repository.
This conversion takes place inside an AWS Virtual Private Cloud (VPC) so that the data never leaves your control, which reduces latency and improves security. Translation requires the agreement of each of the parties who own one of the encoding domains involved in the translation.
LiveRamp's AWS Embedded Transcoder deployment invokes Amazon SageMaker's network isolation mode so that it is fully isolated from the Internet, protecting your VPC and data, as well as the deployed LiveRamp technology. The system design forces all interactions between the encryption technology and your VPC through a proxy service. This proxy also handles authentication requirements and any updates to the transcoder.
Note
For more information on SageMaker's network isolation mode, see this AWS article. For general information on Amazon SageMaker, see Amazon's documentation.
LiveRamp support for the AWS Embedded Transcoder is limited to interactions between the proxy and our encoding technology (including incoming requests) and from the proxy out to our core services (authorization requests and updates). For issues involving AWS technology, contact your AWS support team.
You can also access translation in AWS through the Amazon Data Exchange (ADX) Marketplace. For more information, see "Perform RampID Translation Through ADX".
For more info on translation concepts, see "RampID Translation Concepts".
Prerequisites
Before implementing LiveRamp's AWS Embedded Transcoder, make sure that the following prerequisites have been met:
Access to a public GitHub repository.
An AWS Marketplace account and the ability to procure through the Marketplace.
Access to CloudFormation and the ability to create IAM roles and resources.
Customer data are already resolved to RampIDs.
All parties involved in the translation have executed a LiveRamp permission order to be permitted to translate to a partner RampID encoding.
Overall Steps
To deploy LiveRamp's AWS Embedded Transcoder and perform translation, perform these overall steps:
LiveRamp sends you a private link to Embedded Transcoder on AWS Marketplace and sends Embedded Transcoder credentials.
Tip
If you're an existing ID-API customer, you can use the same credentials that you use for the ID-API.
Use the private link to subscribe to LiveRamp's Embedded Transcoder product through the AWS Marketplace.
Download the AWS CloudFormation template from the public GitHub repository and run the template in CloudFormation.
Determine the endpoint URLs to use in the calls.
Initialize the transcoder and get the session key (the transcoder must be reinitialized every 24 hours).
If necessary, refresh the session key (session keys must be refreshed every 15 minutes).
Perform RampID translation.
See the sections below for detailed information on performing these steps.
Download and Run the CloudFormation Template
The LiveRamp Embedded Transcoder is deployed by running a template in the form of a YAML file within AWS CloudFormation. The file is contained inside a ZIP archive that you can get from a public GitHub repository.
The template installs a proxy service (written as an AWS Lambda function) and a SageMaker instance inside a Virtual Private Cloud. The VPC settings place the Transcoder deployment into network isolation mode, which only allows incoming requests through the proxy server to be processed.
Go to the GitHub repository located here (requires access granted by LiveRamp).
Download one of the following templates to the storage system of your choice:
"CloudFormation_Template_10k_Transcodes.YAML" for up to 10,000 translation operations per second
"CloudFormation_Template_100k_Transcodes.YAML" for up to 100,000 translation operations per second
"CloudFormation_Template_1Million_Transcodes.YAML" for one million (1,000,000) translation operations per second
Note
Select the template with the appropriate number of operations per second.
Storage targets include either cloud or local storage, depending on your preference.
The creation of a stack deploys AWS resources that generate charges for an organization. You should use the template that is the appropriate size and delete stacks when the work is completed to minimize your costs (for information on deleting stacks, see the "Delete the Transcoder Deployment" section below).
Log in to an AWS CloudFormation account that allows you to create stacks from project templates and click in the navigation pane.
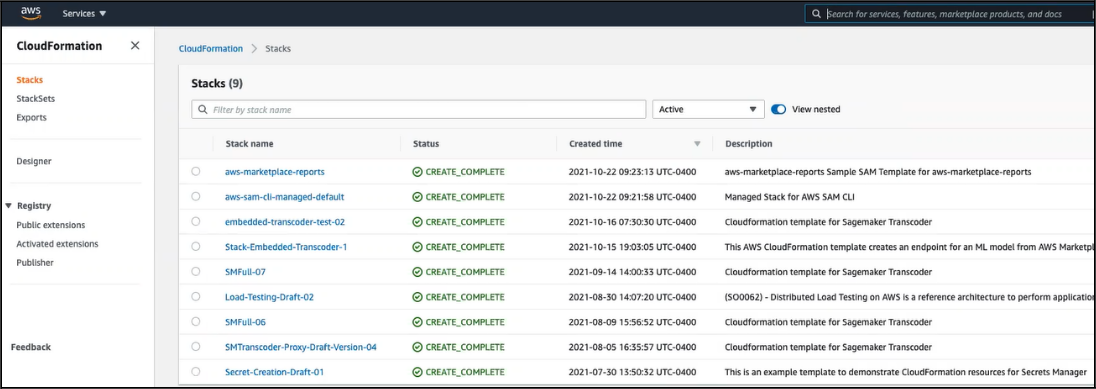
From the Stack Actions dropdown menu at the top right of the Stacks section, select create stack With new resources selection.
From the Create Stack page:
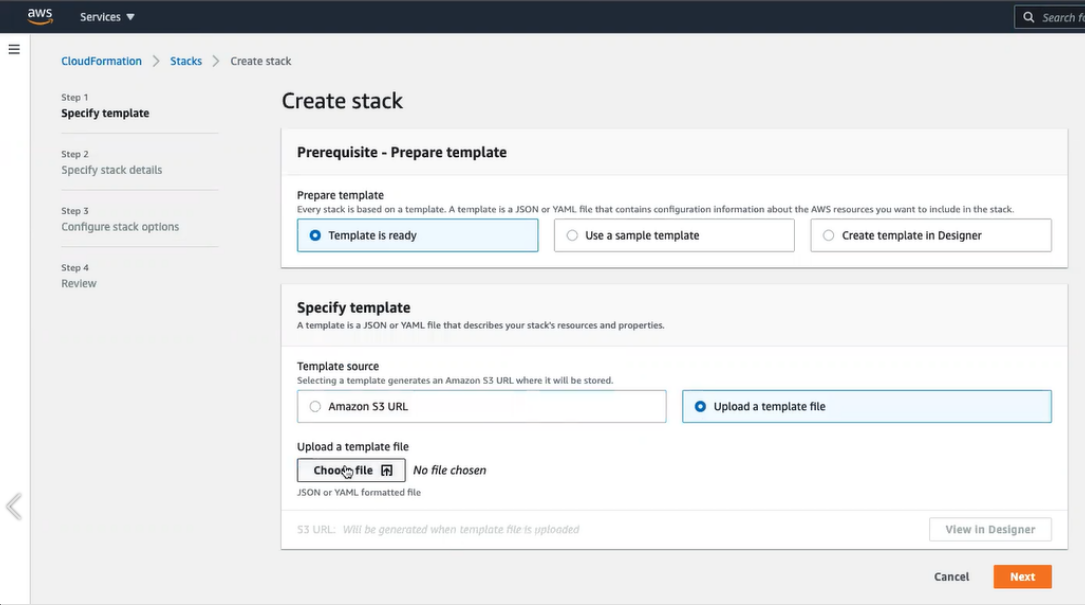
Select the Template source (Amazon S3 URL or Upload a template file).
Click Choose file and then select your template file.
Click .
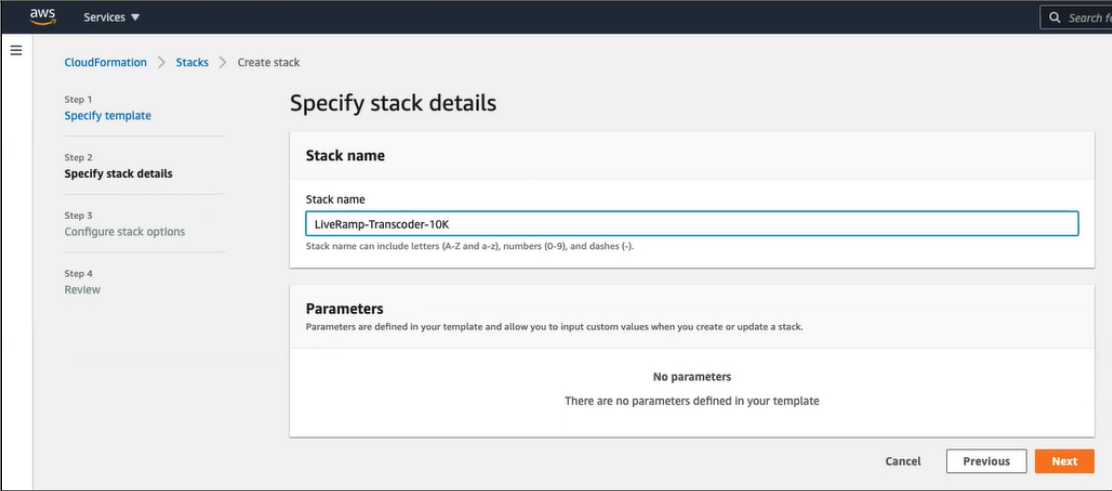
From the Specify stack details page, enter the name of your new stack and click .
From the Configure stack options page, accept the default selections and click .
Scroll down to the Capabilities section and check the "I acknowledge that AWS CloudFormation might create IAM resources." check box.
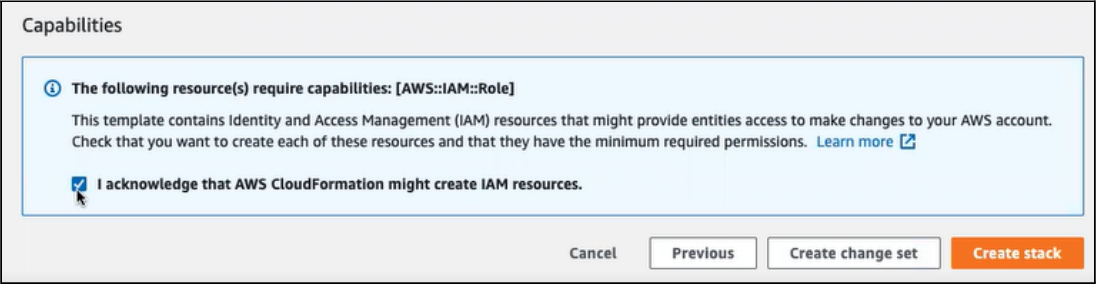
Click .
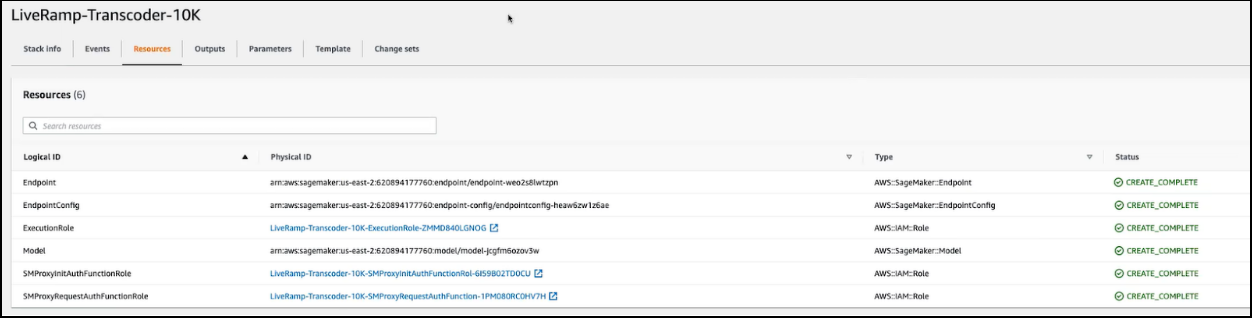
When the wizard closes, you are returned to the Stacks section, and the new deployment will be listed as the latest event, along with its status as CREATE_IN_PROGRESS. The installation time is variable, depending on several factors such as the data center used, network traffic, the template that you chose, and more. A typical deployment installation will take about 7 to 15 minutes.
Note
The creation of a stack deploys AWS resources that generate charges for an organization. You should use the template that is the appropriate size and delete stacks when the work is completed to minimize your costs (for information on deleting stacks, see the "Delete the Transcoder Deployment" section below).
When the deployment is complete, all of the resources will show a CREATE_COMPLETE status. The Endpoint resource is the last resource to be completed.
Determine the Transcoder Endpoint URLs
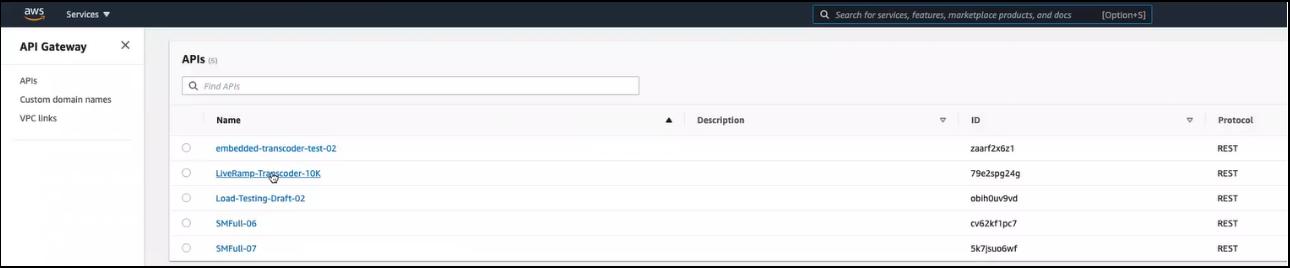
Before making calls, you can use the AWS API Gateway to determine the appropriate URL to use for each transcoder endpoint (/init and /request).
Log in to AWS API Gateway and select the transcoder deployment from the list of available APIs.
From the Resources page, click on the Stages link in the left-hand navigation pane.
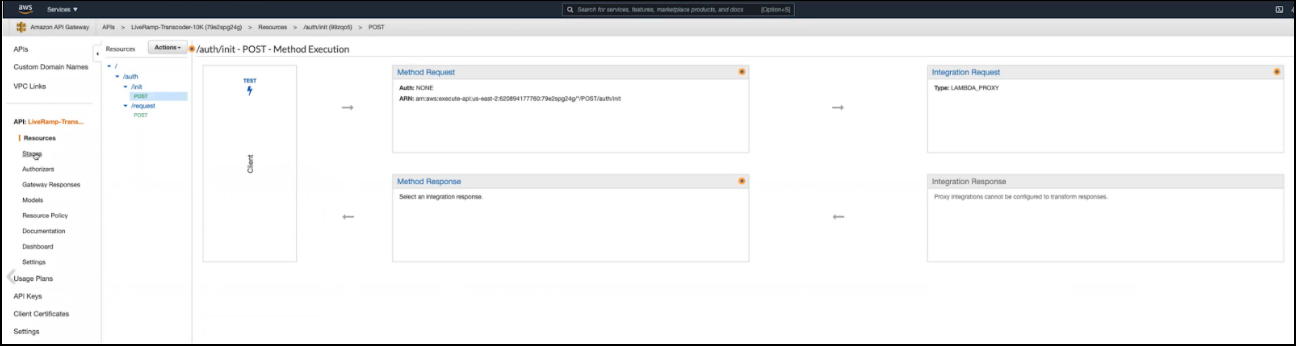
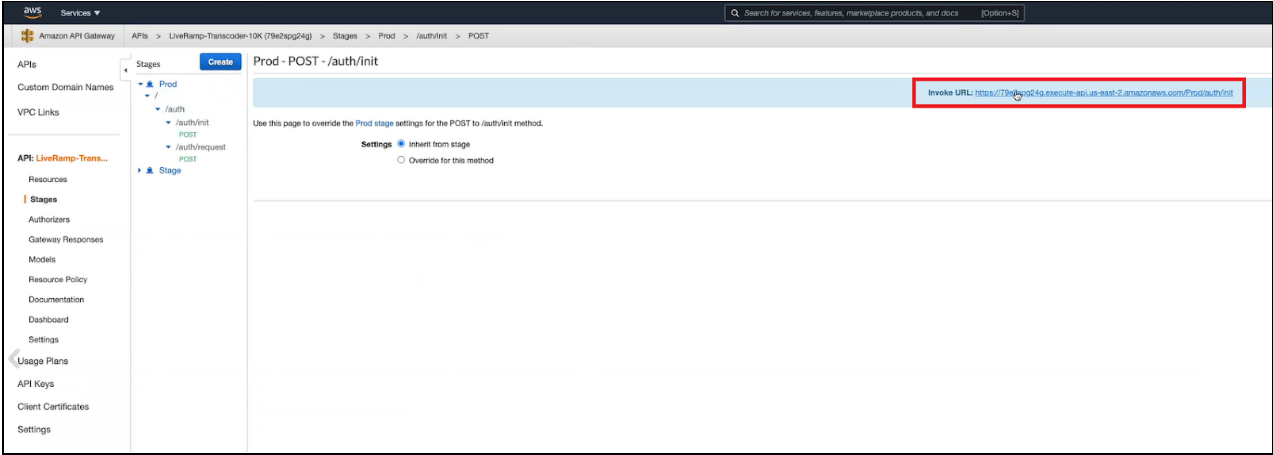
Click on the Prod environment and then click on the endpoint you want to invoke (
/initor/request).The URL to use to invoke the endpoint is listed in the blue stripe at the top of the page.
Initialize the Transcoder
Before performing translation, you need to initialize the transcoder and receive the required session key used to make translation calls. The session key is in the form of a "smart token" that contains the permissions for each source domain and each target domain that you are allowed to use in translation operations.
Note
The transcoder must be reinitialized every 24 hours.
Session keys must be refreshed every 15 minutes (see the "Refresh the Session Key" section below for more information).
To initialize the transcoder and receive the required session key, call the /init endpoint with an rpc value of "init".
Note
To determine the specific URL to use in the call, see the "Determine the Transcoder Endpoint URLs" section above.
The following parameters are required (provided in the credentials previously sent by LiveRamp):
client_id
client_secret
Note
If you're an ID-API customer, use your existing credentials. If not, use the credentials LiveRamp sent you previously.
The cURL request to initialize the transcoder follows the format of the example below:
curl --location --request POST 'https://<hostname>.execute-api.<region>.amazonaws.com/Prod/auth/init' \
--header 'Content-Type: application/json' \
--data-raw '{
    "httpMethod": "POST",
    "client_id": "<client id>",
    "client_secret": "<client secret>",
“rpc": "init"

}'
The call returns the following response:
{
"transcoder_response": "Transcoder Initialization successful",
"smart_token": "xxxxxxxxxxxx"
}
Refresh the Session Key
A valid session key is required to perform translation. The session key contained within the smart token that is returned from the call to the /init endpoint expires after 15 minutes.
To refresh the session key, call the /request endpoint with an rpc value of "refresh".
Note
To determine the specific URL to use in the call, see the "Determine the Transcoder Endpoint URLs" section above.
The following parameters are required:
client_id
client_secret
The cURL request to get a session key follows the format of the example below:
curl --location --request POST 'https://<hostname>.execute-api.<region>.amazonaws.com/Prod/auth/request' \
--header 'Content-Type: application/json' \
--data-raw '{
    "httpMethod": "POST",
    "client_id": "<client id>",
    "client_secret":"<client secret>",
    "rpc" : "refresh"
}'
The call returns the following response:
{
"smart_token": "xxxxxxxxxxxx"
}
Perform RampID Translation
To perform RampID translation, make a call to the /request endpoint with an rpc value of "request".
Note
To determine the specific URL to use in the call, see the "Determine the Transcoder Endpoint URLs" section above.
The following parameters are required:
smart_token: The session key smart token.
transcode_data: The data to translate in the form of a JSON array of JSON objects.
rpc: "request"
Each JSON object must contain the following parameters:
value: The value of the RampID to be translated.
targetDomain: The encoding of the domain to translate the RampID into.
type: "rampidtrampid"
Within one call, you can translate into multiple domains (if you're authorized to do so) by using different target domain encoding values.
The cURL call to perform translation follows the format of the example below:
curl --location --request POST https://<hostname>.execute-api.<region>.amazonaws.com/Pprod/auth/request' \
--header 'Content-Type: application/json' \
--data-raw '{
    "httpMethod": "POST",
    "transcode_data" : [{
            	"value": “<RampID value>”,
            "targetDomain": “<target domain encoding>”,
            "type": "rampidtrampid"
        },
        {
            "value": “<RampID value>”,
            "targetDomain": “<target domain encoding>”,
            "type": "rampidtrampid"
        }
],
    "smart_token" : "<smart token>",
    "rpc" : "request"
}'
The call returns the following response:
If any validations fail, an error response is returned. Common errors include:
400: Bad request
401: Unauthorized
405: Method not allowed
500: Internal Server Error
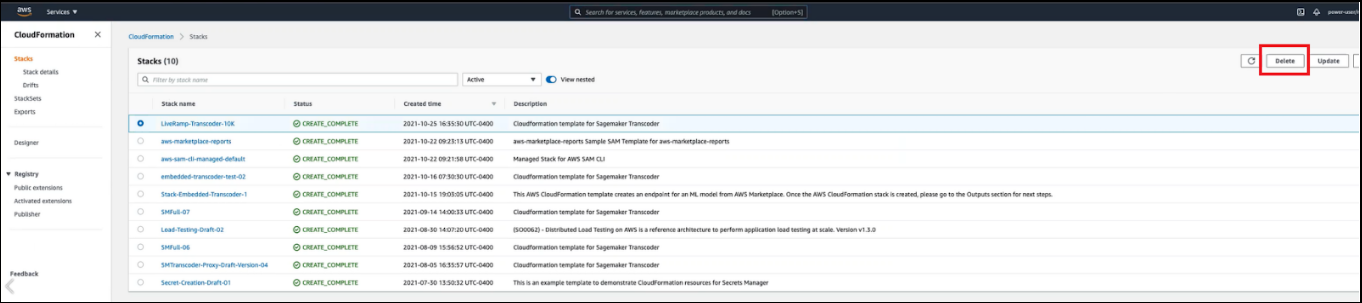
Delete the Transcoder Deployment
To minimize costs when the work is completed, a user with privileges to delete stacks can delete the Transcoder deployment:
Log in to the CloudFormation console.
Select the deployment stack and click .
Metrics
There are multiple logs and metrics captured throughout the system. Some logs are stored only in the account where the appliance is deployed and if an issue arises, it is at the discretion of the AWS Account Owner on the logs and metrics to communicate to LiveRamp.
Other metrics are sent to LiveRamp automatically, including usage metrics (number of successful translation calls by domain, to assist with billing) and authorization metrics (token validation failed), for example.
Other metrics may be stored in AWS CloudWatch on the Account of the deployed appliance. If troubleshooting an issue with LiveRamp, LiveRamp may request copies, screenshots, or dumps of logs and metrics in order to better assist with troubleshooting.
API Reference
The Embedded Transcoder has two API endpoints: /init and /request. They are documented in the following two tables.
API Reference for /initEndpoint
Part | Purpose | Value |
|---|---|---|
Title | Name | init |
Path | URL | /Prod/auth/init |
Method | OpType | POST |
ShDesc | For SEO | Initialize LiveRamp Embedded Transcoder |
Description | Context | The AWS Embedded Transcoder allows for the conversion of a RampID from one encoding to a RampID in another partner encoding. This conversion takes place inside a customer's AWS Virtual Private Cloud (VPC) so that the data never leaves your control, with reduced latency and improved security. Translation requires the agreement of all parties (the owners of each domain). |
Parameters | Config. | clientID (String); client_secret (String); rpc (String, default=int) |
Request | Input | /prod/auth/init |
cURL | curl --location --request POST 'https://<hostname>.execute-api.<region>.amazonaws.com/Prod/auth/init' \
--header 'Content-Type: application/json' \
--data-raw '{
"httpMethod": "POST",
"client_id": "<client id>",
"client_secret": "<client secret>",
“rpc": "init"
}' | |
Response | Output | {
"transcoder_response": "Transcoder Initialization successful",
"smart_token": "xxxxxxxxxxxx"
} |
Status & Errors | Output | "200": "Success" "400": "Bad Request" "401": "Not authenticated" "500": "Server Error" |
Authentication Method | AAA | Yes. Need client credentials within the input request body to initialize the AWS Embedded Transcoder. |
API Reference for /request Endpoint
Part | Purpose | Value |
|---|---|---|
Title | Name | request |
Path | URL | /prod/auth/request |
Method | OpType | POST |
ShDesc | for SEO | Transcode RampIDs or refresh session key. |
Description | Context | |
Parameters | Config. | To translate data: smart_token (String); transcode_data (JSON array); rpc (String, default = To refresh the smart_token: client_id (String); client_secret (String), and rpc (String, default = |
Request | Input | /prod/auth/request |
cURL | For translation: curl --location --request POST https://<hostname>.execute-api.<region>.amazonaws.com/Pprod/auth/request' \
--header 'Content-Type: application/json' \
--data-raw '{
"httpMethod": "POST",
"transcode_data" : [{
"value": “<RampID value>”,
"targetDomain": “<target domain encoding>”,
"type": "rampidtrampid"
},
{
"value": “<RampID value>”,
"targetDomain": “<target domain encoding>”,
"type": "rampidtrampid"
}
],
"smart_token" : "<smart token>",
"rpc" : "request"
}'For session key refresh: curl --location --request POST 'https://<hostname>.execute-api.<region>.amazonaws.com/Prod/auth/request' \
--header 'Content-Type: application/json' \
--data-raw '{
"httpMethod": "POST",
"client_id": "<client id>",
"client_secret":"<client secret>",
"rpc" : "refresh"
}' | |
Response | Output | An array of translated links when RPC in the input request body is requested. A smart token when RPC in the input request body is refreshed: {
"smart_token": "xxxxxxxxxxxx"
} |
Status & Errors | Output | "200": "Success", "400": "Bad Request", "401": "Not authenticated", "500": "Server Error" |
Authentication Method | AAA | Yes. You need a smart token within the input request body to translate the data. You also need client credentials within the input request body to refresh the smart token. |
Errors
When working with the API you may sometimes receive an error code in the response. Refer to the following table for a description of errors you may encounter.
Code | Description |
|---|---|
| Failed Transcoding for Unknown Reason |
| Unable to process transcode due to a security exception. Most likely a bad key or unauthorized transcode |
| Invalid argument size for batch translation |
| Unsupported Transcoding Type for now 'Other to Native |
| Unable to parse and validate the smart token |
| Unable to parse request body |
| Invalid Transcoding type |
| Transcode type not yet supported |
| Unable to create RampID for a partner. Invalid Link Operation |
| Error Decoding RampID |
| Error Decoding RampID |
| Not authorized for this procedure or invalid token |
| Unable to create a private key |
| Unable to create a private key |
| Unable to decrypt via Private/Public Algorithm |
| Unable to decrypt via Bulk Algorithm |
| Unable to decrypt and load key packet |
| Invalid or missing key for domain sent (value) |
| Invalid or missing key for domain sent (target) |
| Not Authorized to go from domain (value) |
| Not Authorized to go to domain (target) |
| Not able to validate access |
| Not able to validate the token |