Configure a Data Preparation Process
To maximize identity resolution outcomes, you can configure LiveRamp Identity Engine's data preparation process to:
Create and declare a data source, or select from assets your organization has access to.
Note
If you have multiple data sources, you can create multiple data preparation processes for a workflow.
Map data sources to Identity Engine's standard data model.
Transform your data, such as removing null or invalid values, applying data hygiene, and mapping to a common taxonomy.
Enable data enrichment with deterministic signal and metadata from the LiveRamp Known Identity Graph.
You cannot configure certain default tasks, such as data normalization and ID enrichment.
There are two types of data preparation processes in the Workflow Editor to select from:
Data Preparation (File): Use this process to declare file(s) of the following format as a data source: Avro, CSV, JSON, Parquet, and text.
Data Preparation (Assets): If your organization has access to Data Assets, use this process to declare an asset as a data source. To view all available assets in your organization, see "The All Assets Page".
Note
Not all customers have access to the Data Preparation (Assets) process. For more information, contact your LiveRamp representative.
Configure Data Preparation for Files
From the Workflow Editor, drag an Import File File Source process onto your workflow editor.
Click the yellow warning icon
 and select . Optionally, to reuse an existing configuration, click and select a JSON file that contains a data preparation configuration.
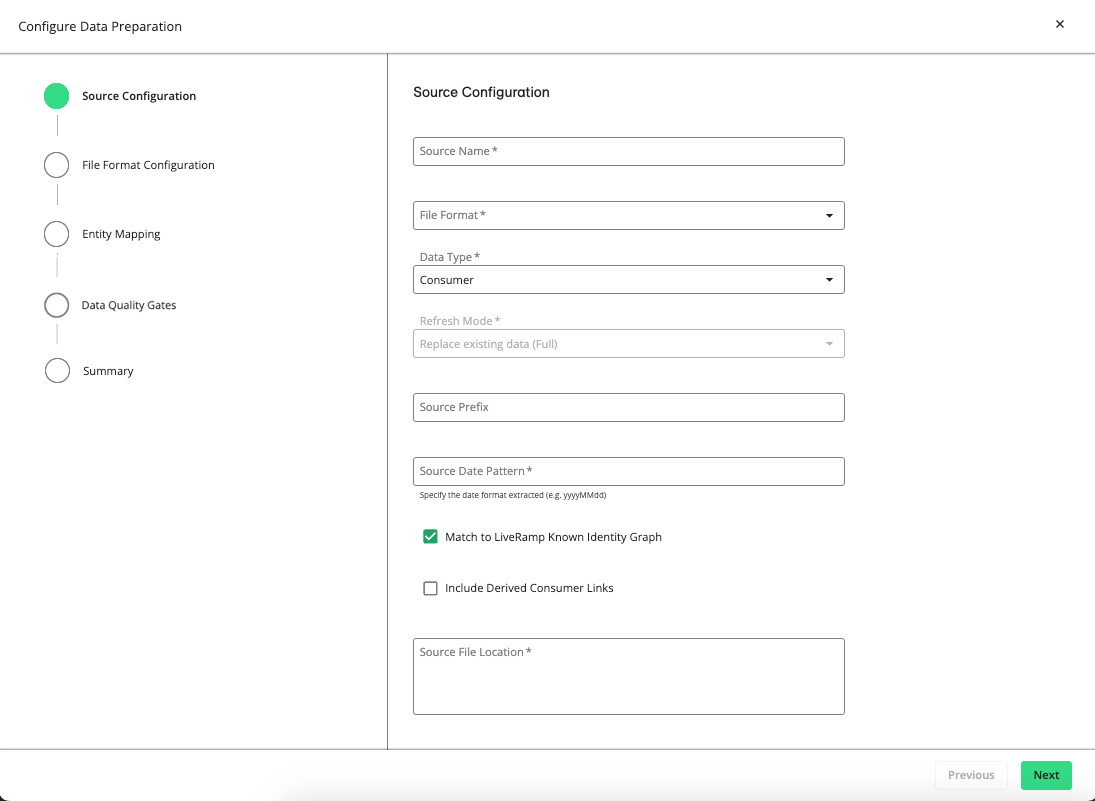
The Source Configuration step is displayed. If you've uploaded a JSON file, all the fields and options will be pre-defined, which you can modify or leave as is.
In the Source Name box, enter a unique name for the source file.
From the File Format list, select one of the following source file formats:
Avro
CSV
JSON
Parquet
Text
For more information, see "File Schema".
From the Data Type list, select one of the following:
: Indicates data that will be used in resolution to create your graph and Enterprise IDs
: Indicates data that won't be used for resolution purposes, but that will instead inform consent decisions on your graph build and export processes
: Indicates profile-enriching data, such as email addresses, phone numbers, or postal addresses, that are matched to your graph to improve its completeness and quality. Contact enrichment is not used to create new Enterprise IDs. The primary goal is to fill in missing information or update existing contact details, which supports identity resolution and downstream use cases that depend on reachability (e.g., marketing communications).
: Indicates profile-enriching data used to add non-contact, often custom, attributes to user profiles for enrichment purposes. This can include attributes like preferences, consent signals, segmentation labels, or other metadata that go beyond standard contact fields. These attributes are mapped into the enterprise schema and can be used for advanced consent tracking and export filtering.
Note
The “Attribute Enrichment” data type is only available if the workflow has a data preparation process already configured with either a “Consumer” or “Contact Enrichment” data type.
From the Refresh Mode list, select one of the following:
Note
“Refresh Mode” is only enabled with the “Consent” and “Attribute Enrichment” data types.
“Incremental” Refresh Mode cannot be used if your Primary ID is automatically generated. For more information, see “Configure a Primary ID”.
Replace existing data (Full): Every update of the file is to be a full refresh and replacement of the file as a whole without comparison to the previous source.
Append to existing data (Incremental): Each update to the file will only contain updates based on existing lines, additional lines, and removed lines. Any data not present in the updated file will remain unchanged in the source.
In the Source Prefix box, enter an identifying string of up to 10 characters to identify a specific source in a workflow. This can be helpful if your workflow has multiple data sources. This prefix value will persist with the source once it is onboarded.
If you want to enable LiveRamp's Known Identity Graph and enrich input data with AbiliTec links and metadata, select the check box.
If you want to enable derived ConsumerLinks and enrich input data with Abilitec’s derived ConsumerLinks, select the check box.
Note
The check box must be selected to display the check box.
In the Source File Location box, enter the full Google Cloud Storage (GCS) path to your source file, such as the following example:
gs://
my-home-bucket/my-folder/my-data/my-file-name.csvNote
If your tenant is linked to a customer home bucket (e.g.,
gs://lc-123456-abc89edf/), the will have a dropdown list of the available buckets. The location you enter must begin with the path (URI) of one of the allowed buckets in the list.The files will then be copied and sorted to find the correct file based on its date.
Note
Depending on your organization's implementation, your GCS bucket could be hosted by LiveRamp or in your organization's remote GCS environment.
LiveRamp-hosted data is retained for 90 days, after which the data will be deleted in line with LiveRamp's retention policy.
If your GCS bucket is deployed remotely, the retention window for the data source bucket must be longer than the frequency between your identity graph builds.
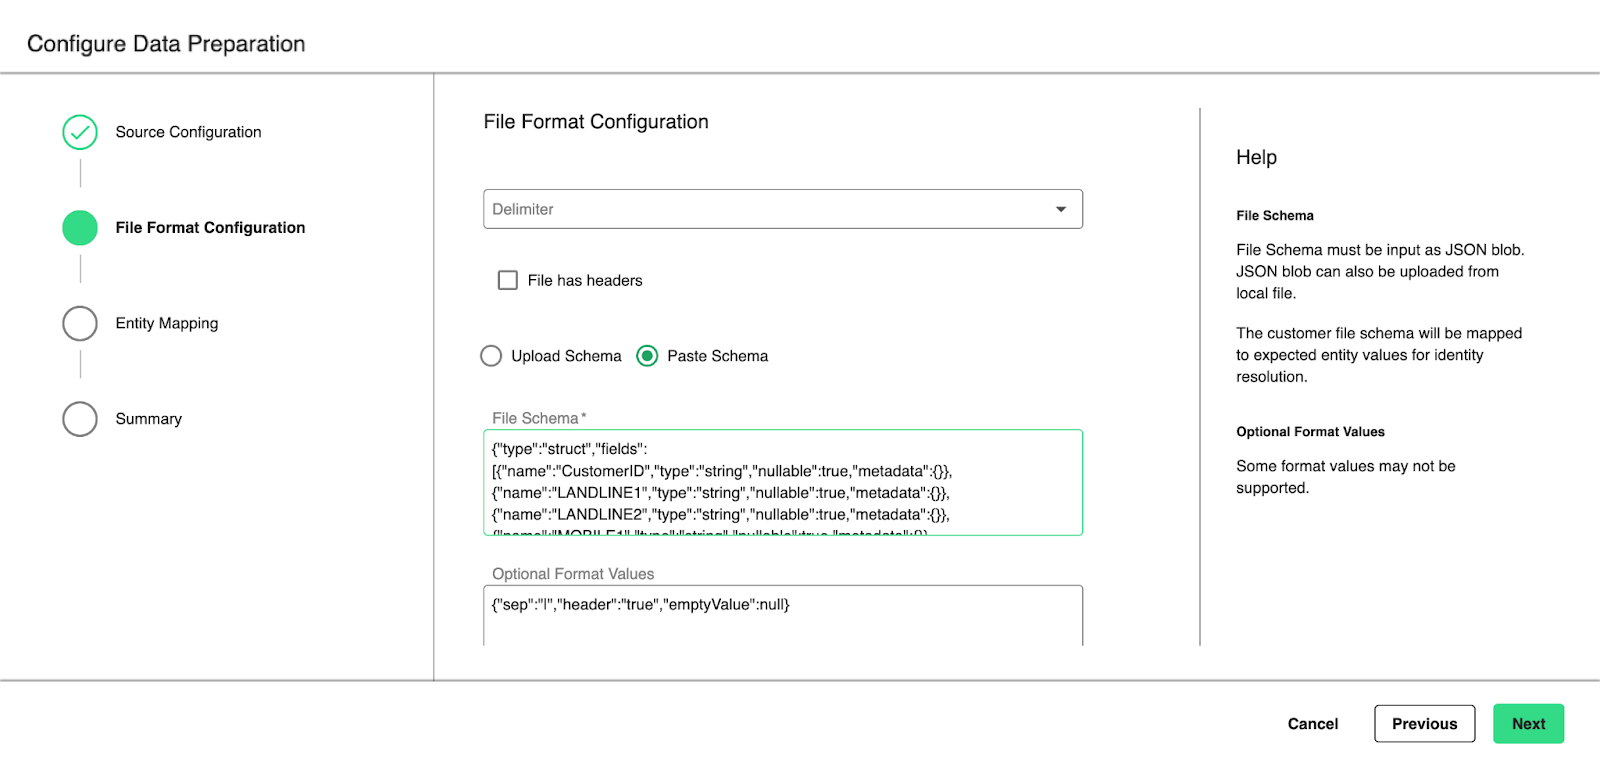
Click . The File Format Configuration step is displayed.
Depending on the file format you declared, select one of the following options:
Upload Schema: Upload a JSON blob or a text file.
Paste Schema: Enter a list of header names separated by a comma, pipe, tab, or semicolon.
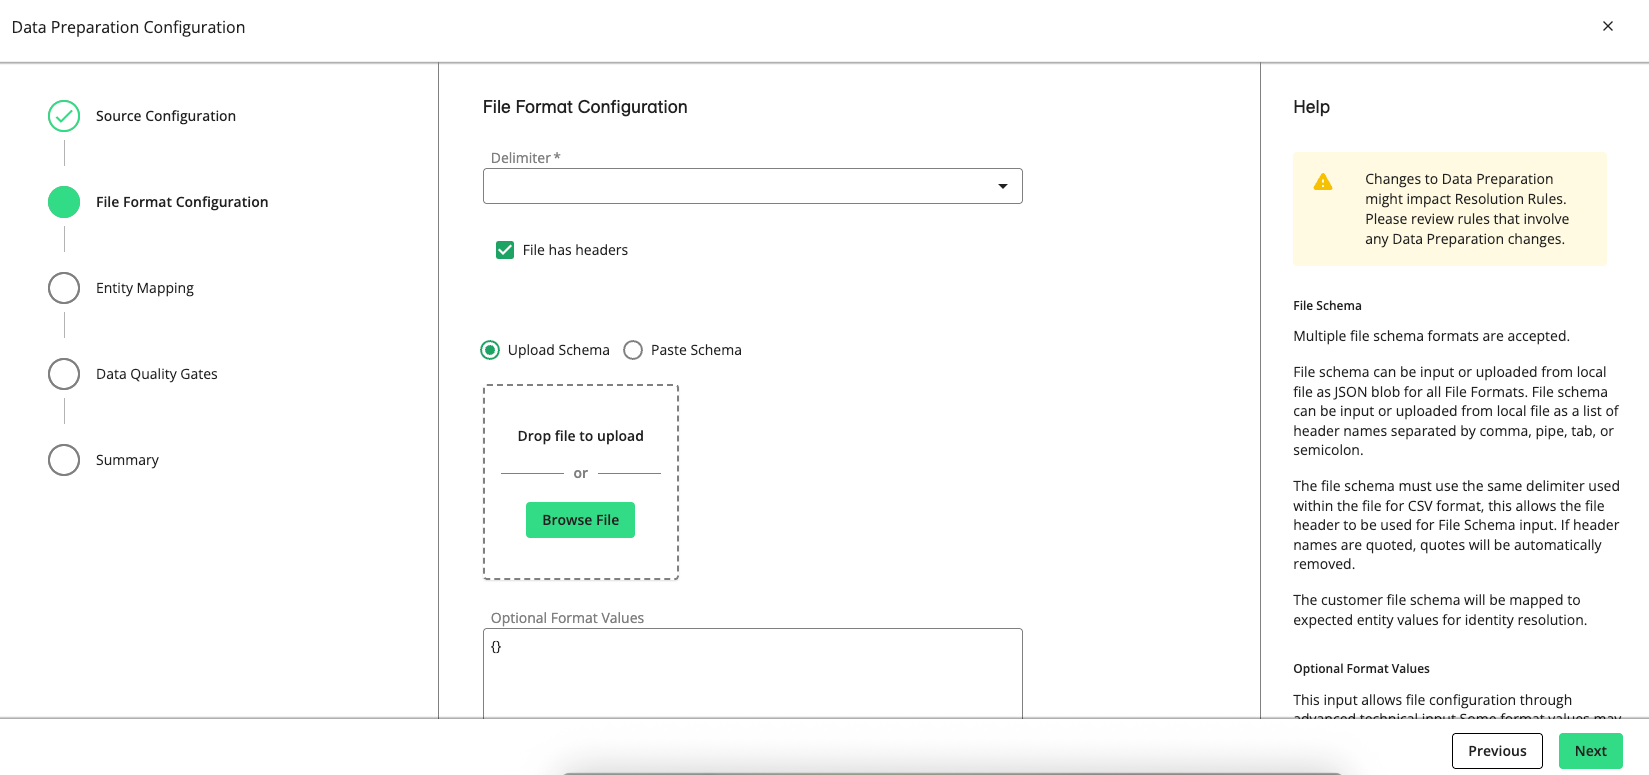
Tip
CSV format is typically the simplest way to copy-paste the file schema (AKA "headers"). The values must use the same delimiter that is used within the CSV file. If header names include quotes, the quote characters are automatically removed.
For JSON and Avro file formats, you can provide a file schema instead of headers. To generate the JSON schema, create a small sample file of input data and read it locally in Spark to auto-infer the schema. Then run
println(df.schema.prettyJson)to generate the JSON schema.
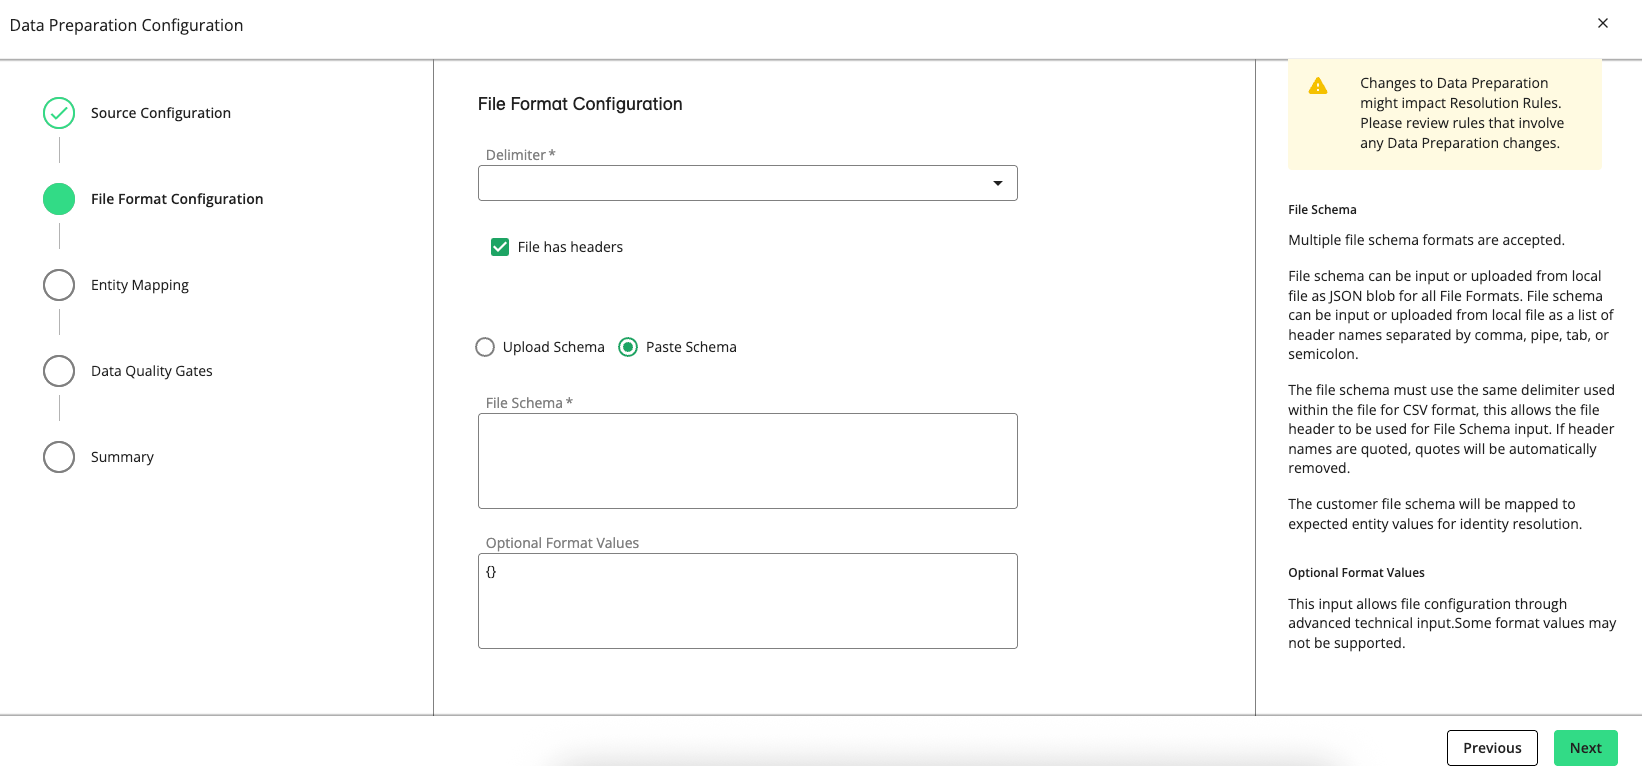
(Optional) Enter format values to customize certain input files and help Spark properly read the input data. For example, you can specify multi-line, encoding, and time format options as key-value pairs. For information, see Spark's "JSON Files" documentation.
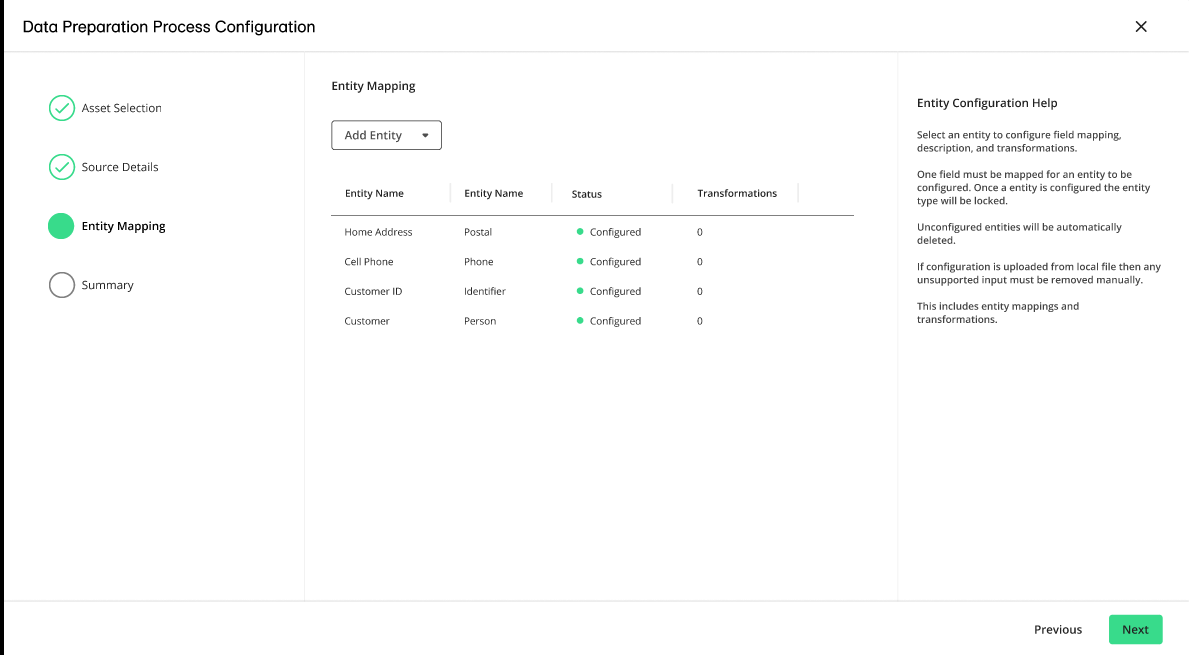
Click . The Entity Mapping step appears, which allows you to add and customize entities to match your data source.
From the Add Entity list, select one or more of the following entity types to map its fields:
Identifier
Note
A “Primary ID” identifier is required. For more information, see “Configure a Primary ID” and “Understanding Entity Identifiers”
Email
Postal
Phone
Custom
Person
Consent

If you add an entity type, you must configure it or delete it. You cannot click if you have an empty entity configuration.
Note
If you do not map a column from your source data to a field, it will pass through and will not be used during the resolution process.
Add any needed entities and then select .
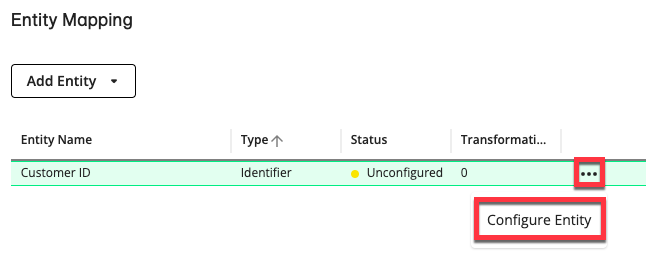
Depending on the selected entity, the Entity Configuration section displays options to customize the entity to match your data source. You can map several columns to a field by selecting several options.
You can optionally enter a description and add transformations.
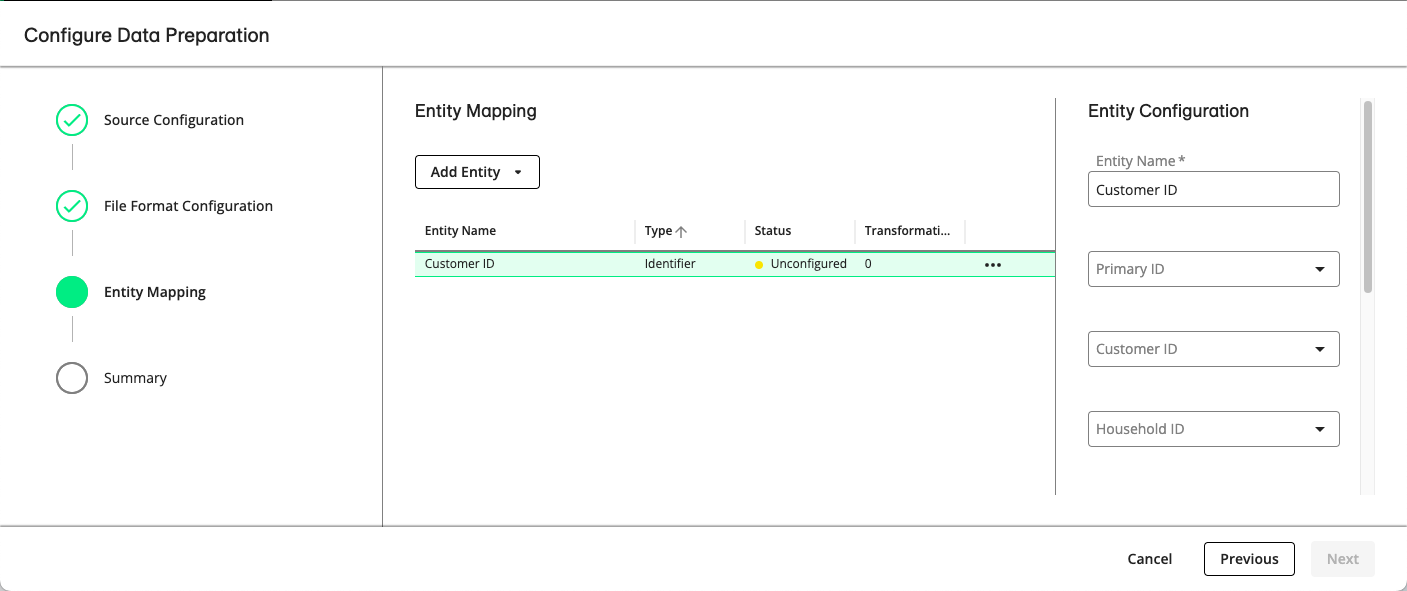
For more information, see "Entity Mapping" and "Transformations".
Click . If you selected “Attribute Enrichment” in step 5, the “Join Conditions” step is displayed, where you can specify how the consumer source should be joined with an attribute source from an existing workflow. Otherwise, skip to step 21.
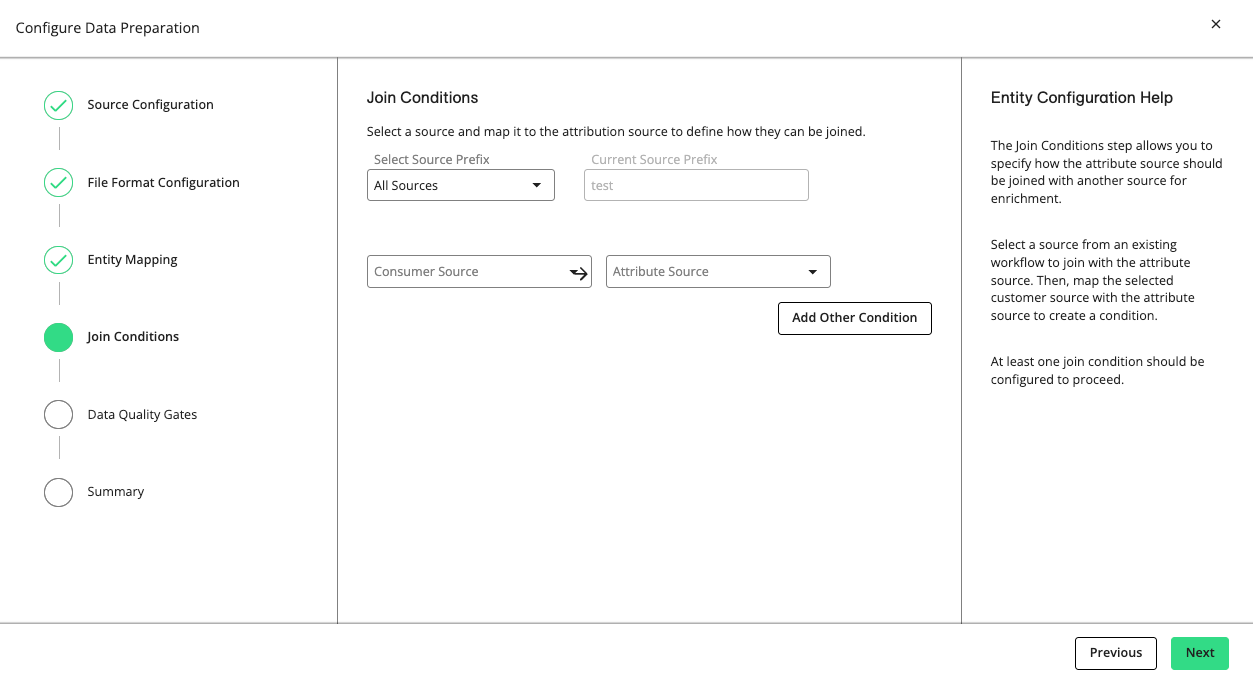
Select a consumer source and an attribute source to establish a join condition.
To configure additional consumer-attribute join conditions, click .
When all join conditions are configured, click .
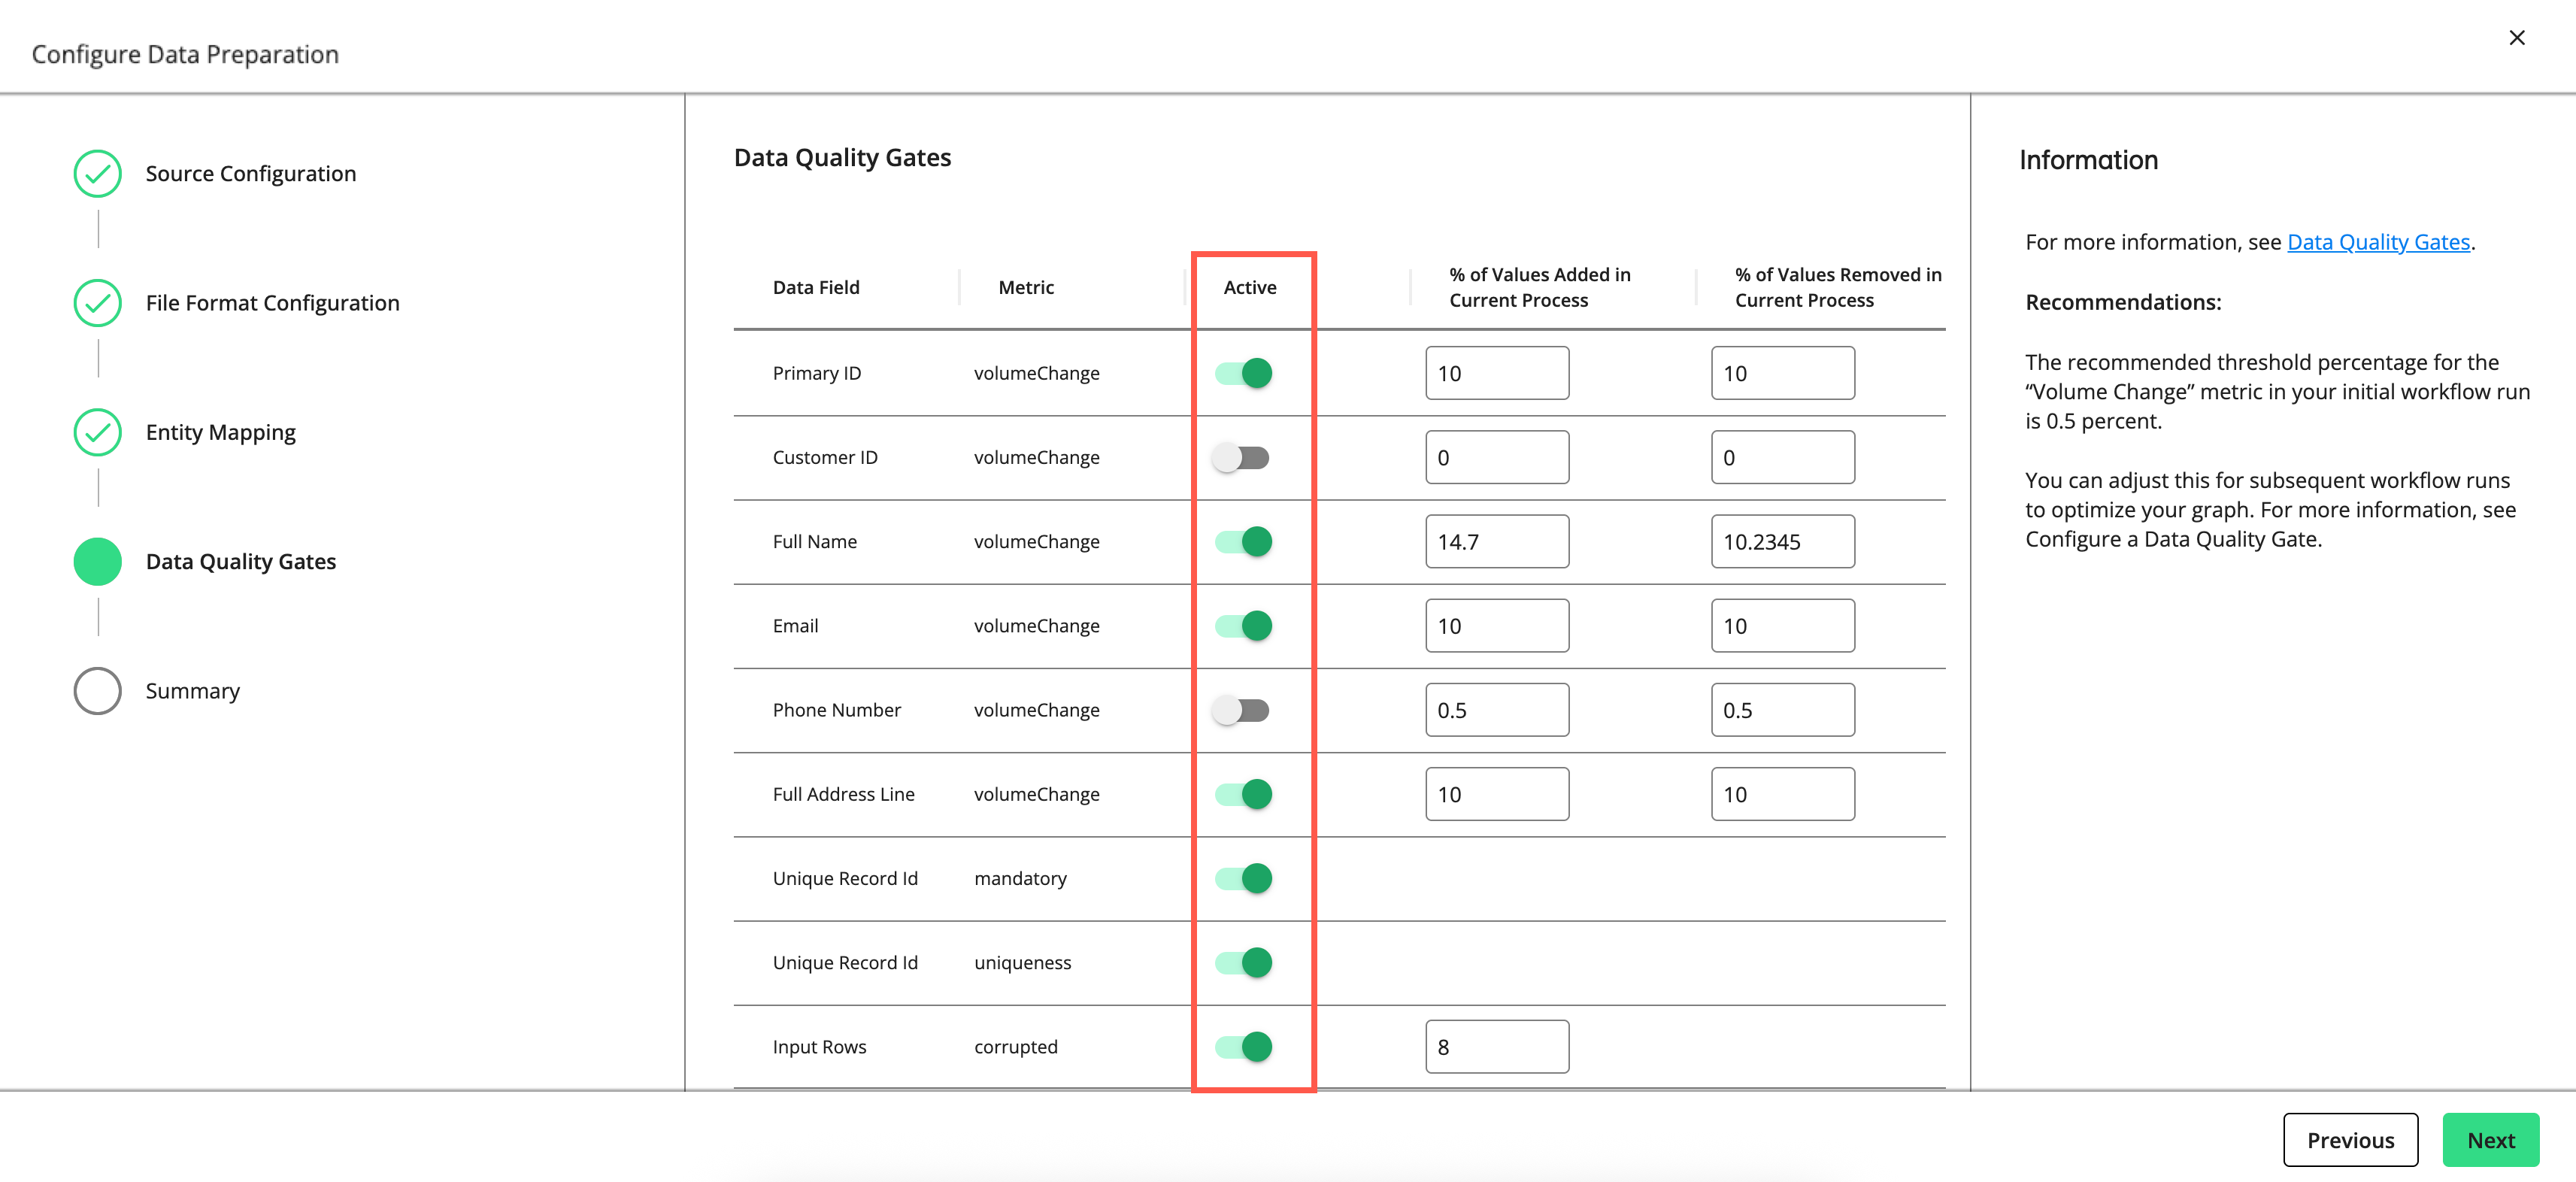
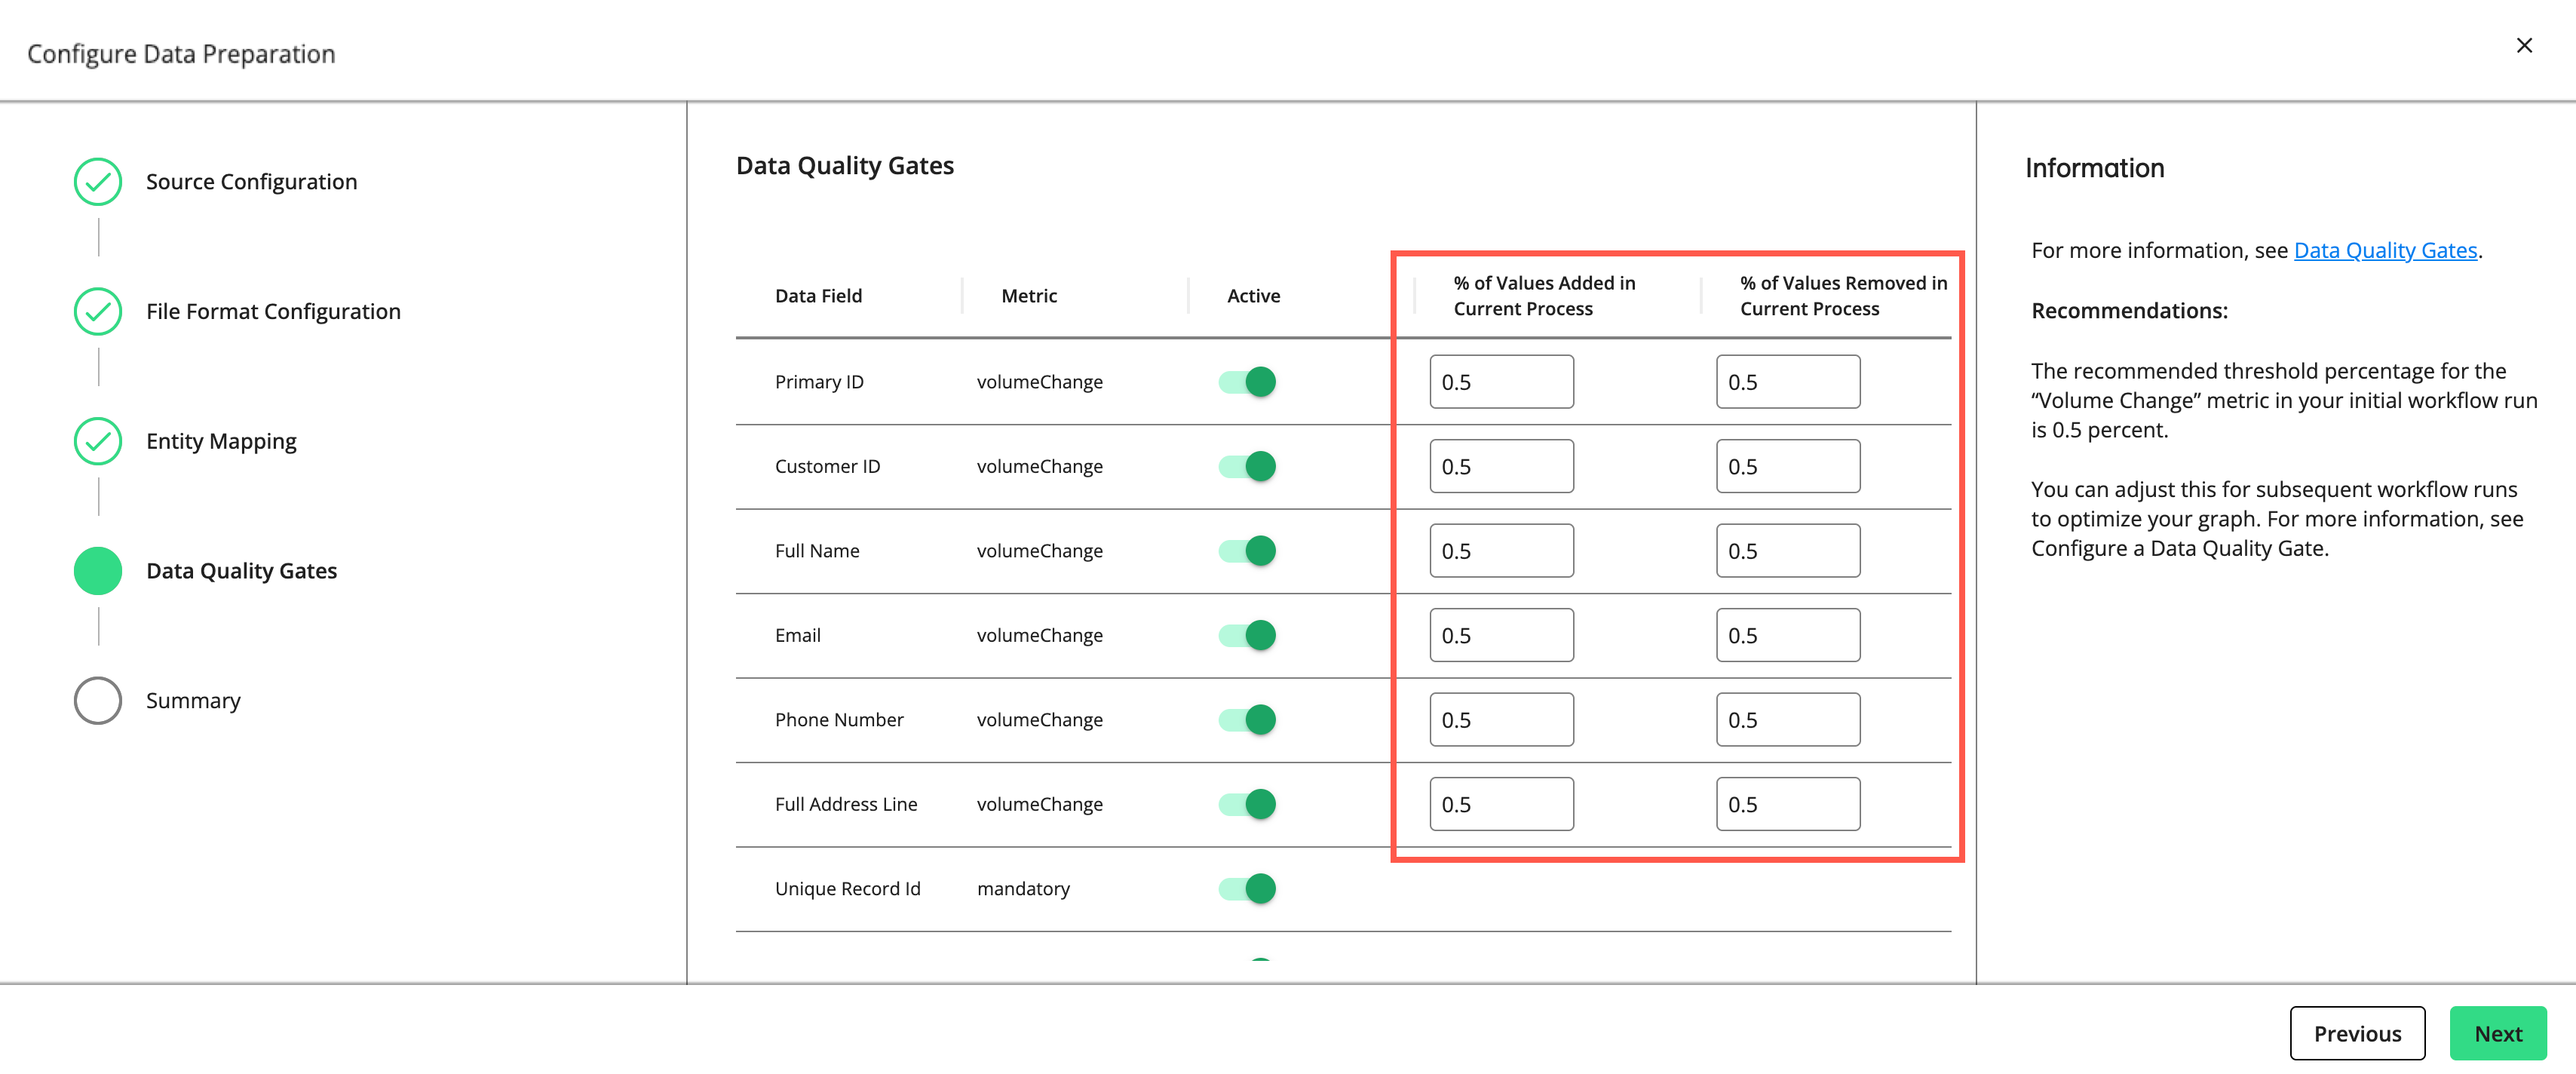
The "Data Quality Gates" step displays the data fields and metrics you can monitor in the process.
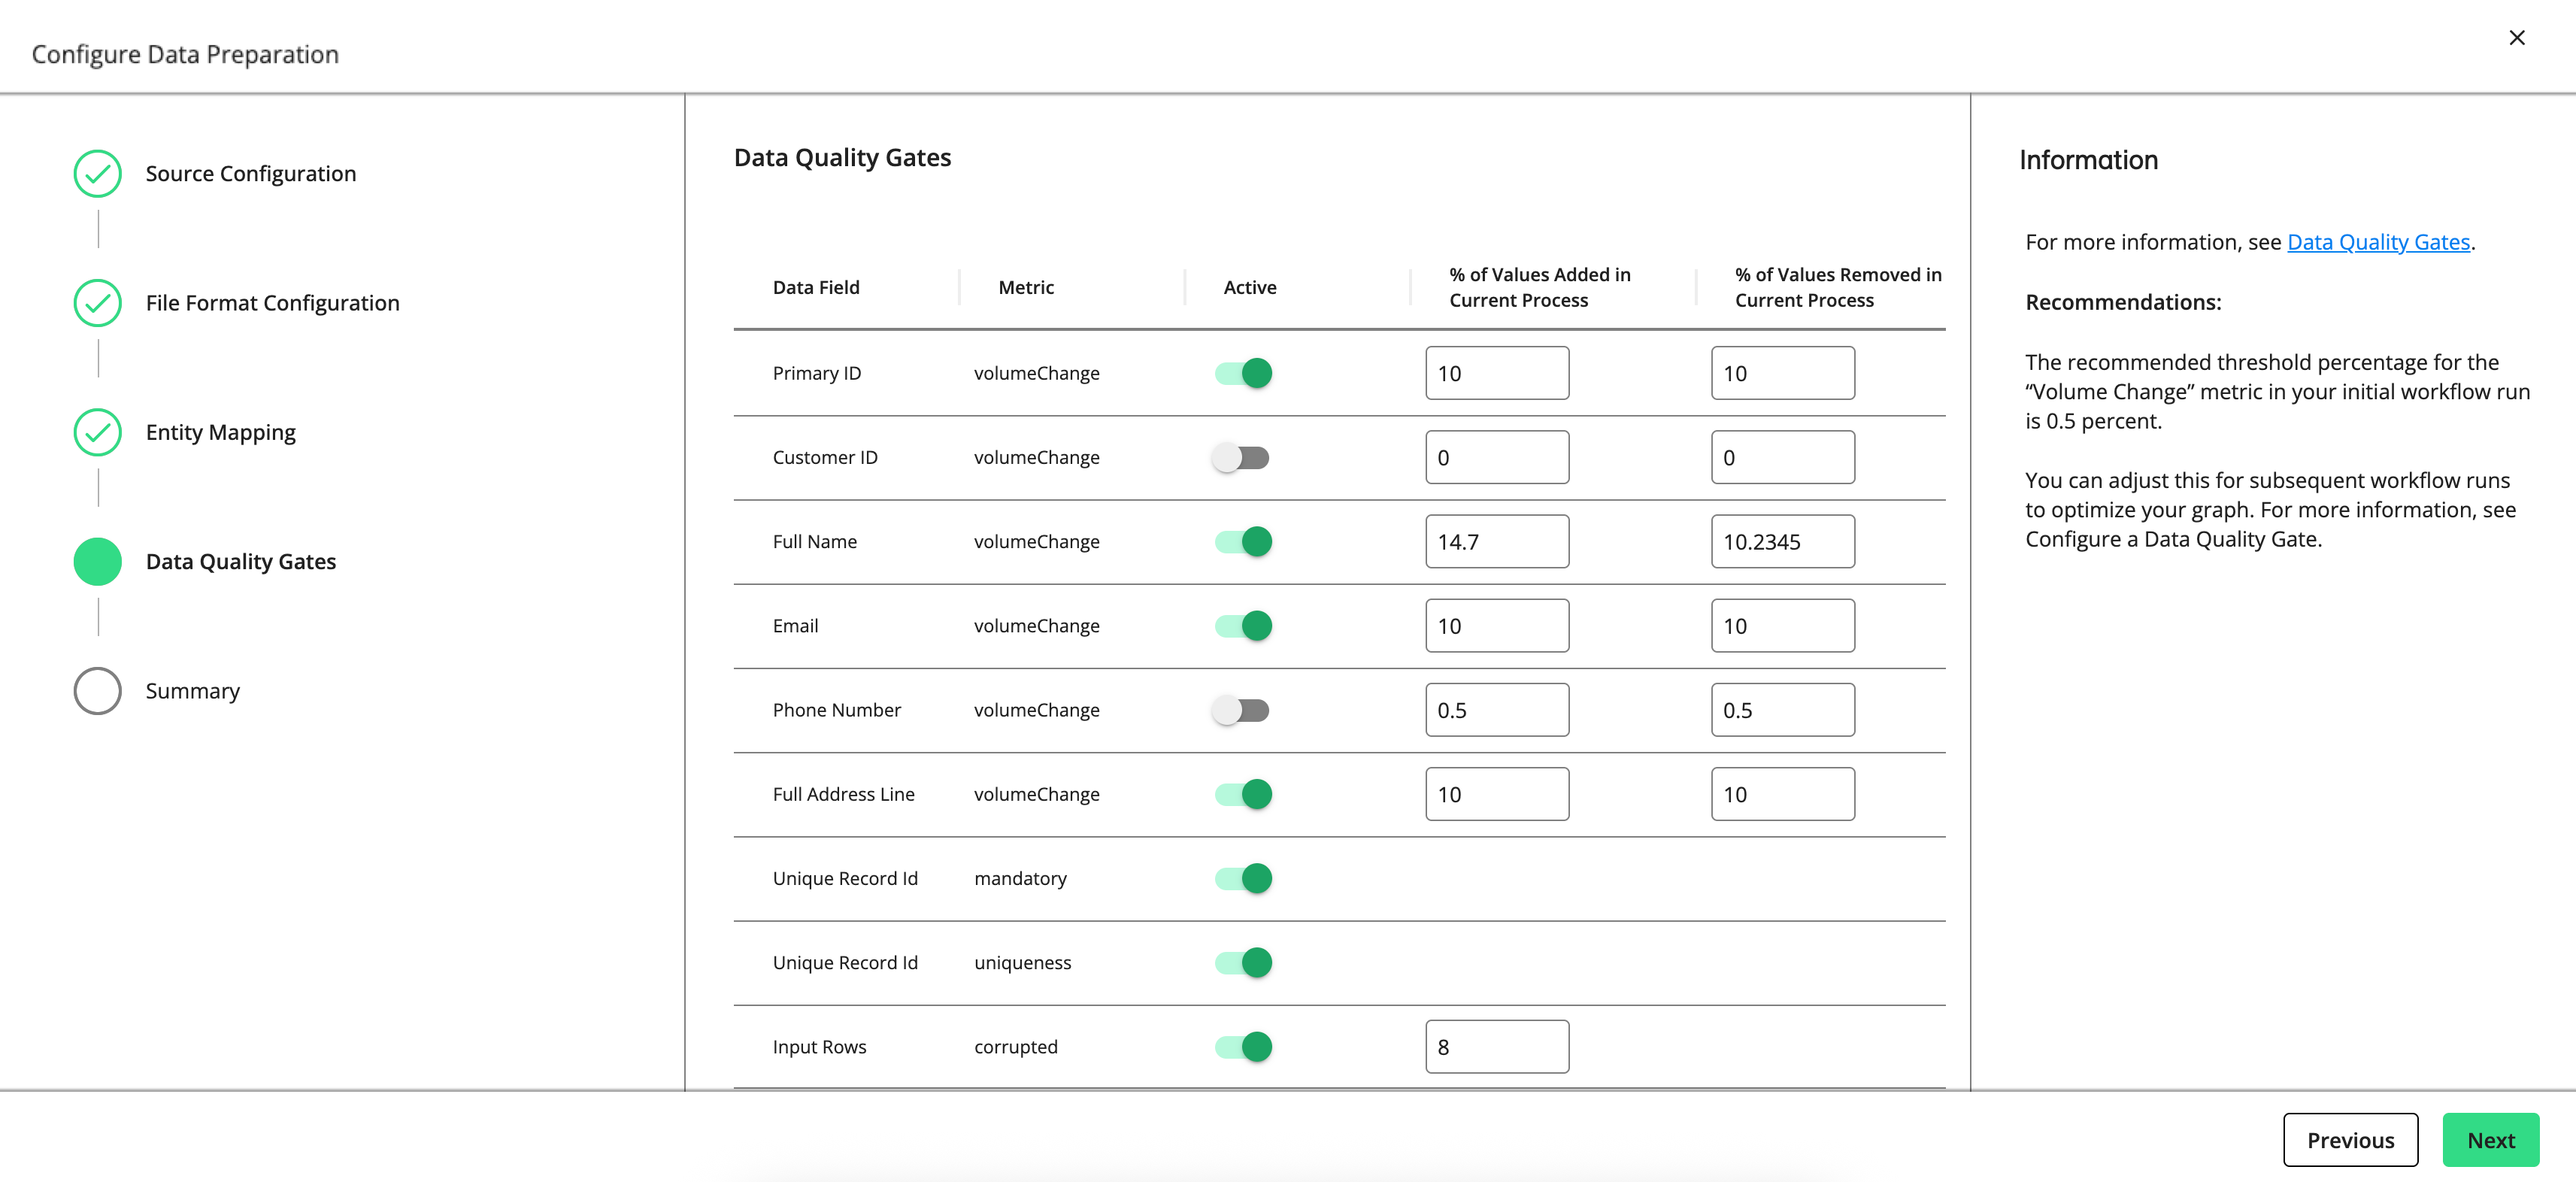
Set a gate to “Active” to have the gate monitor the quality of your data in this process by the metric listed (e.g., “volumeChange”, “mandatory”, “uniqueness”, “uniquenessByGroup”, etc.).
For rows with a "volumeChange" metric, you can adjust the allowable percentage of values added or removed compared to the total volume of the previous run. For rows with a “corrupted” metric, you can adjust the allowable percentage of corrupted values. The default threshold for both metrics is 0.5 percent. If the percentage of change exceeds the allowed percentage, the gate will cause the process to fail.
Note
The recommended threshold percentage for the “volumeChange” and “corrupted” metrics in your initial workflow run is 0.5 percent. You can adjust this for subsequent workflow runs to optimize your graph.
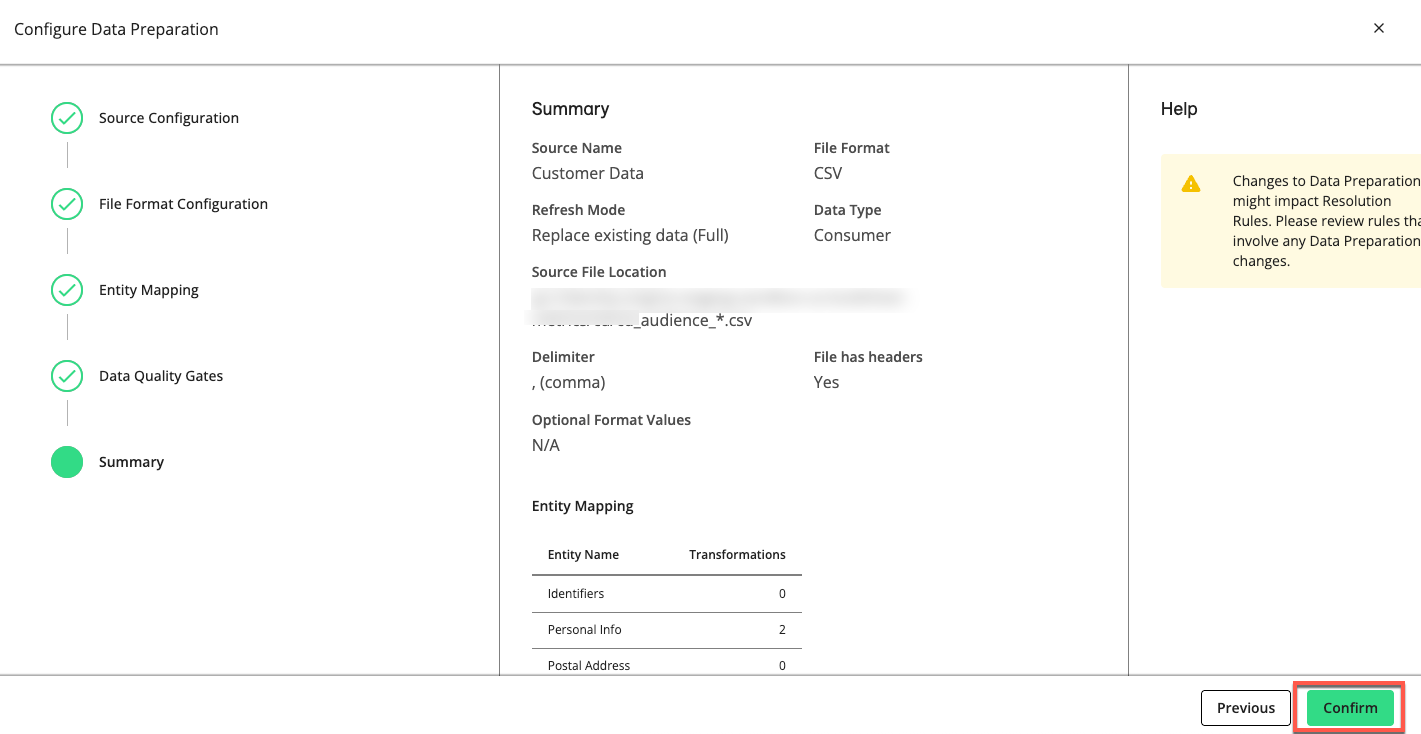
Click , review the summary of your data preparation process, and click .
Tip
You can reuse the saved configuration for other processes of the same type by downloading it as a JSON file. From the Workflow Editor, click the More Options menu (
 ) on the desired process and select .
Configure Data Preparation for Assets
Note
Not all customers have access to the Data Preparation (Assets) process. For more information, contact your LiveRamp representative.
From the Workflow Editor, drag an Import Asset Data Catalog Source process onto your workflow editor.
Click the yellow warning icon
and select . Optionally, to reuse an existing configuration, click and select a JSON file that contains the data preparation configuration.The Asset Selection step is displayed. If you've uploaded a JSON file, all the configurations will be pre-defined, which you can modify or leave as is.
Select an asset you want to declare as the data source.
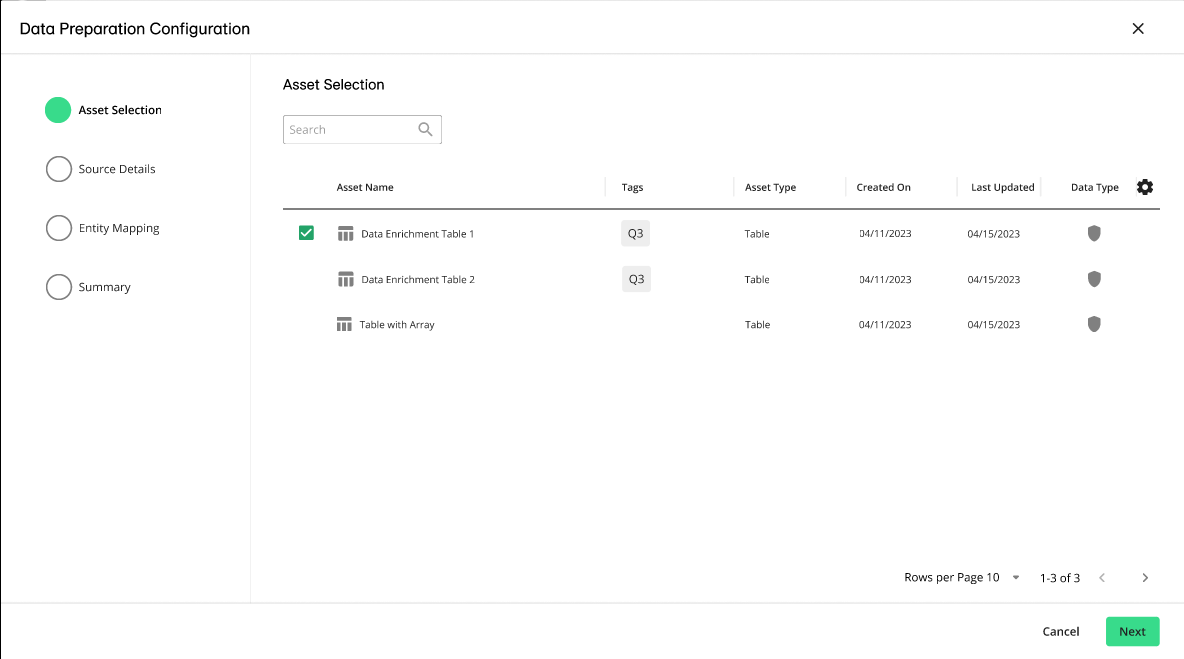
Click Next. The Source Details step is displayed.
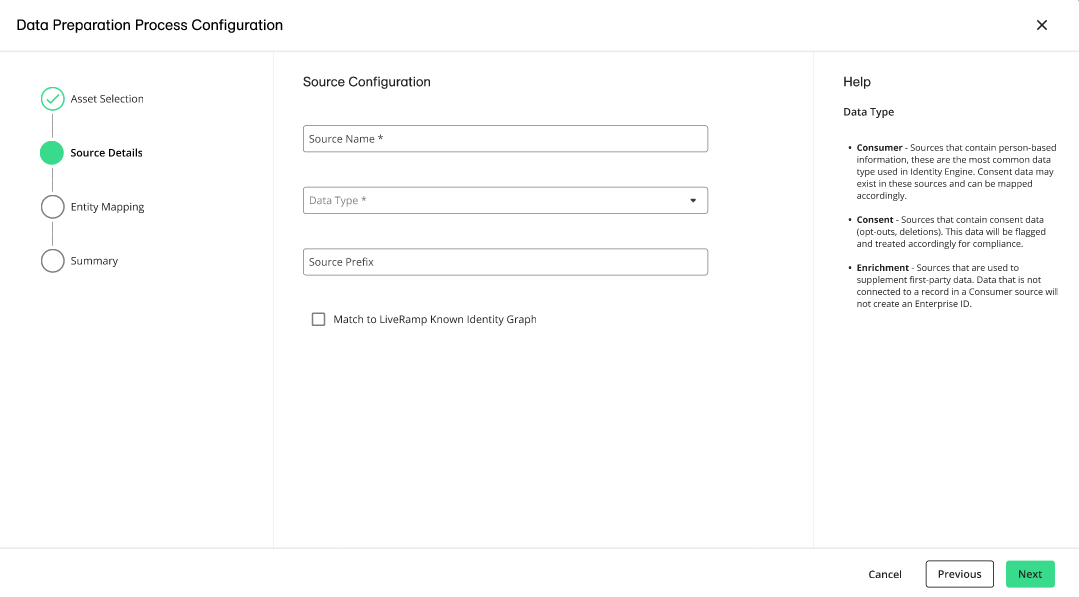
Enter a source name.
From the Data Type list, select one of the following:
Consumer: Indicates data that will be used in resolution to create your graph and Enterprise IDs
Consent: Indicates data that won't be used for resolution purposes, but that will instead inform consent decisions on your graph build and export processes
Enrichment: Use this option when you need to match a data source to your graph, but not build new Enterprise IDs based on those records
In the Source Prefix box, enter an identifying string of up to 10 characters to identify a specific source in a workflow. This can be helpful if your workflow has multiple data sources. This prefix value will persist with the source once it is onboarded.
If you want to enable LiveRamp's Known Identity Graph and enrich input data with AbiliTec links and metadata, select the check box.
If you want to enable derived ConsumerLinks and enrich input data with Abilitec’s derived ConsumerLinks, select the check box.
Note
The check box must be selected to display the check box.
Click .
The Entity Mapping step is displayed. The entity mapping is automatically assigned and configured based on the asset's schema.
Note
A “Primary ID” identifier is required. For more information, see “Configure a Primary ID” and “Understanding Entity Identifiers”
You can change the entities by clicking on an entity's More Options menu (
) and selecting . For more information, see "Entity Mapping" and "Transformations".Click , review the summary of your data preparation process, and then click .
For most Identity Engine use cases, CSV format provides a way to copy and paste the file header.
Note
The file schema must use the same delimiter used within the file for CSV format, this allows the file header to be used for file schema input. If header names are quoted, quotes will be automatically removed.
If you provide a schema instead of headers, generate the JSON schema and enter it in the File Schema box:
Sample File Schema
{
  "type" : "struct",
  "fields" : [ {
    "name" : "CCID",
    "type" : "string",
    "nullable" : true,
    "metadata" : { }
  }, {
    "name" : "FIRSTNAME",
    "type" : "string",
    "nullable" : true,
    "metadata" : { }
  }, {
    "name" : "MIDDLENAME",
    "type" : "string",
    "nullable" : true,
    "metadata" : { }
  }, {
    "name" : "LASTNAME",
    "type" : "string",
    "nullable" : true,
    "metadata" : { }
  }, {
    "name" : "ADDRESS1",
    "type" : "string",
    "nullable" : true,
    "metadata" : { }
  }, {
    "name" : "ADDRESS2",
    "type" : "string",
    "nullable" : true,
    "metadata" : { }
  }, {
    "name" : "CITY",
    "type" : "string",
    "nullable" : true,
    "metadata" : { }
  }, {
    "name" : "STATE",
    "type" : "string",
    "nullable" : true,
    "metadata" : { }
  }, {
    "name" : "ZIP",
    "type" : "string",
    "nullable" : true,
    "metadata" : { }
  }, {
    "name" : "EMAIL",
    "type" : "string",
    "nullable" : true,
    "metadata" : { }
  }, {
    "name" : "PHONE",
    "type" : "string",
    "nullable" : true,
    "metadata" : { }
  }, {
    "name" : "CARD_NBR",
    "type" : "string",
    "nullable" : true,
    "metadata" : { }
  }, {
    "name" : "HOUSEHOLD_ID",
    "type" : "string",
    "nullable" : true,
    "metadata" : { }
  }, {
    "name" : "COUNTRY_CODE",
    "type" : "string",
    "nullable" : true,
    "metadata" : { }
  }, {
    "name" : "COUNTRY_NAME",
    "type" : "string",
    "nullable" : true,
    "metadata" : { }
  }, {
    "name" : "GENDER",
    "type" : "string",
    "nullable" : true,
    "metadata" : { }
  }, {
    "name" : "BIRTH_DT",
    "type" : "string",
    "nullable" : true,
    "metadata" : { }
  }, {
    "name" : "START_EFF_DT",
    "type" : "string",
    "nullable" : true,
    "metadata" : { }
  }, {
    "name" : "MAIL_ALLOWED_ID",
    "type" : "string",
    "nullable" : true,
    "metadata" : { }
  } ]
}
Entity mapping enables you to map each field from source data to a predetermined set of fields supported within Identity Engine and apply data transformation functions to your fields.
To accurately configure entity mapping, analyze your file to understand the specifics of each field, determine their corresponding mappings, and apply needed transformations. If the input file contains multiple email addresses, phone numbers, or addresses, map each to a new entity. You cannot map multiple email addresses, phone numbers, or addresses to the same entity.
If your input file has too many fields, such as passthrough fields that are only required for your export, you do not need to map them. Passthrough fields can be retrieved by calling rawRecord in the export stage.
The default entities include:
Entity Type | Field | Comment |
|---|---|---|
Consent | Opt-Out: The record will be excluded from exports. | Represents data subject requests (DSRs). For more information, see "Data Compliance". |
Deletion: Indicates an order to delete the record. | ||
Last Updated: The timestamp when the record was last modified | ||
Custom | Any raw data field | Define any raw data field to use in resolution. |
Contains all consumer emails. You can have several emails mapped in the Email entity. | ||
Privacy Transformation | Contains the type of transformation applied to the email address. Options include MD5, SHA256, SHA1, and Plaintext. | |
Identifier | Primary ID | Unique ID for this data source. For more information, see “Configure a Primary ID" and “Understanding Entity Identifiers”. |
Customer ID | An ID that can be common to several data sources and can have duplicates within a data source. For more information, see “Configure a Primary ID" and “Understanding Entity Identifiers”. | |
Household ID | An ID that can be common across several sources and can have duplicates within a source. For more information, see “Configure a Primary ID" and “Understanding Entity Identifiers”. | |
Person | First Name | Contains information directly related to an individual |
Middle Name | ||
Last Name | ||
Suffix | ||
Date of Birth | ||
Title | ||
Gender | ||
Phone | Phone Number | Contains all phone numbers. You can have several phone numbers mapped in the Phone entity. |
Privacy Transformation | Contains the type of transformation applied to the phone number. Options include MD5, SHA256, SHA1, and Plaintext. | |
Postal | Address Line 1 | Contains all fields for a postal address |
Address Line 2 | ||
Address Line 3 | ||
Address Line 4 | ||
Address Line 5 | ||
Postal Code | ||
City | ||
Country |
You can optionally specify a transformation to customize an entity to create new fields from the source data. These can be used in downstream resolution processes.
Note
Transformations cannot be added to Identifier entities. For more information, see “Configure a Primary ID" and “Understanding Entity Identifiers”.
To add a transformation, click in the Entity Configuration side panel.
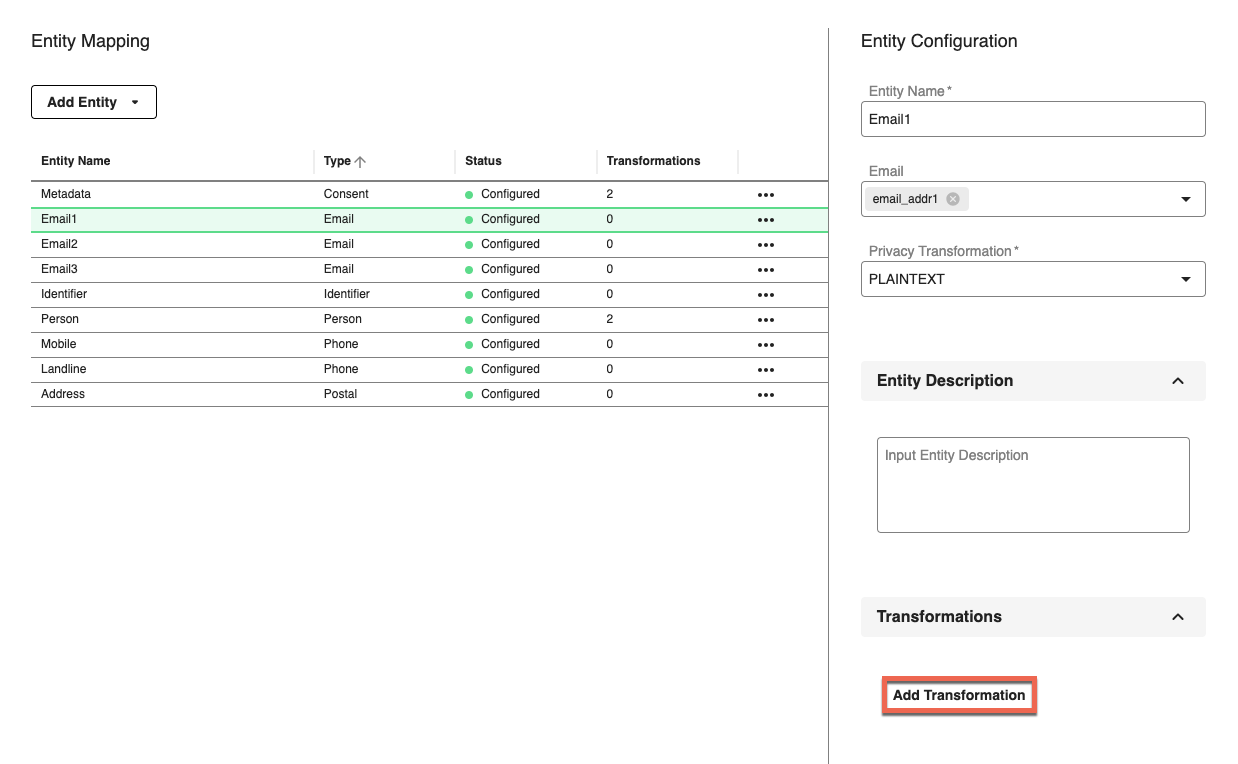
The following example shows a configuration that defaults all email fields to null when a test email, such as testuser@gmail.com, exists. Transformations will be applied during the mapping process.
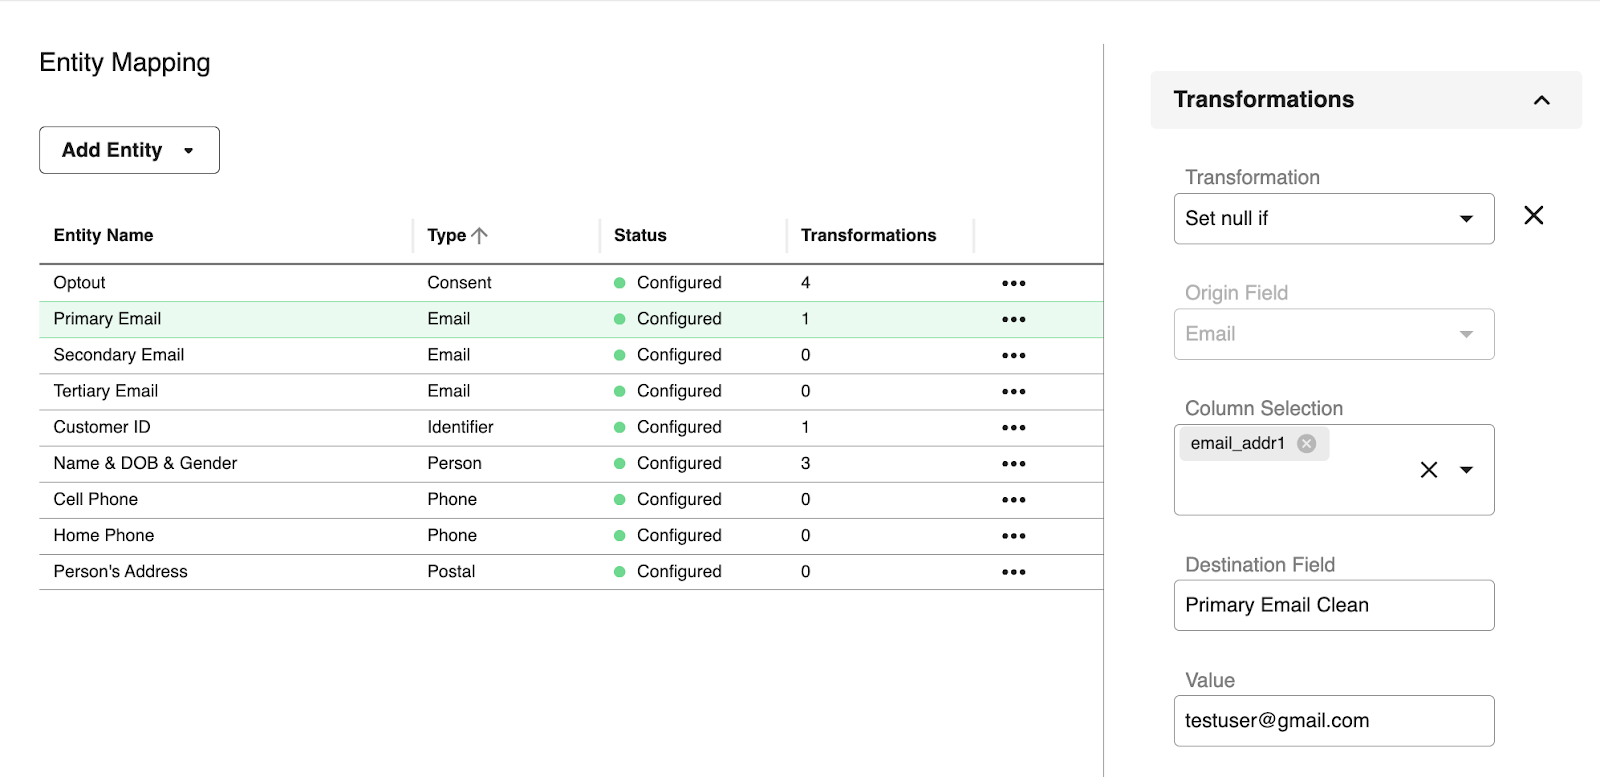
For each transformation, the Transformations section provides the following options:
Transformation: A list of transformation functions to apply, such as Concatenate, Convert to Lowercase, and so on
Origin Field: Field to apply transformation to
Column Selection: Raw field to apply transformation from
Destination Field: Required only when creating a cascading transformation. Otherwise, leave this empty.
When you select certain transformation options, additional options are displayed, such as the following:
Value: This field is displayed if you choose certain transformations, such as or .
Pattern: This field is displayed if you choose certain transformations, such as .
Replacement: This field is displayed if you choose certain transformations, such as .
Algorithm: This field is displayed if you choose certain transformations, such as .
Transformation functions include:
Transformation Functions | Descriptions | Arguments | Examples |
|---|---|---|---|
Concatenate | Link fields together in a single string. If you select the Mandatory Parts check box, both fields need to be present. Otherwise, the transformation returns null. |
| Separator: "," Input: "123","456" Output: "123,456" |
Convert Unix (Date) | Convert a numeric Unix timestamp to date format |
| |
Convert Unix (Datetime) | Convert a numeric Unix timestamp to datetime format |
| |
Convert to Lowercase | Convert all the field values to lowercase |
| |
Convert to Uppercase | Convert all the field values to uppercase |
| |
Format using Pattern | Format a string by replacing | Output Format: String |
|
Generate Unique ID | Generate a UUID. | Output: "{ | |
Greatest | Return the highest value from the provided source fields. |
| |
Hash | Generate a hash value based on the specified method. Options include SHA256, SHA1, and MD5. | Algorithm: String | / |
Join | Join values from the specified source fields. | Separator: String |
|
Least | Return the lowest value from the specified source fields. For example, calculate the earliest join date from two date fields. |
| |
Left Pad Column Value | Add a specified character at the left of the string until the final string has the specified length. |
|
|
Parse Date | Parse a string to a date using a specified format, such as yyyy-mm-dd. |
|
|
Remap | Matches input values using a provided map. It returns the corresponding value for a match, and for values without a match, you can choose either null or keep the original value. | ||
Remove Spaces Before/After | Remove all spaces from the start and the end of the string. | Input: " value " Output: "value" | |
Replace | Replace characters matching the specified value with another specified value. |
| From: "-" To: " " Input: "test-string" Output: "test string" |
Replace (Regex) | Replace any regex matching pattern with the specified value |
| Pattern = "[^a-zA-z]" Replacement = "" Input = "abc123" Output = "ABC" |
Set Constant Value | Set a constant value for the field based on the parameter value. | Value: String |
|
Set null if | Return null if the input matches the specified value. Otherwise, keep the original value. | Value: String |
|
Cascading Transformations
If a field requires multiple transformations, click again to apply cascading transformations. For example, you can concatenate two values and transform the result into uppercase characters.
To apply multiple transformations in a cascade:
Use the Destination Field to specify a column name that will receive the output from the first transformation. The next transformation will receive the value in its Column Selection and apply the second transformation.
Add as many transformations as you need.
Leave the Destination Field of the last transformation empty.