Configure Partition Parameter Values
When you map the fields of a new data connection (or edit that mapping), you can choose to configure a set of allowed values for fields that use partition parameters. You can then either choose to allow users to enter additional partition parameter values for that field or limit them to only the values you’ve configured.
Once you provision the dataset to a clean room, you can then edit the partition parameter values (either adding and/or deleting values) to make the values specific to that clean room.
Note
If you change the configured partition parameter values for a particular field in the clean room, the values will not stay in sync if that field's values are changed at the data connection level. If you do not change the values in the clean room, the values will stay in sync if they’re changed at the data connection level.
You can also choose to not configure any partition parameter values when mapping the data connection’s fields but configure values when provisioning the dataset to a clean room.
Users can then select from these configured values when running a question in that clean room.
Note
Configuring partition parameter values is optional. If you do not configure values, users continue to enter partition values as free text during question runs.
Partition parameter values do not currently work with Flows or scheduled runs, but this functionality is planned for a future release.
Configuring partition parameter values can help with the following issues:
Reduces user error: Users see a list of valid options instead of typing values from memory or guessing.
Enables governance: Data owners can enforce that only specific values are used, preventing partners from querying data outside their scope.
Saves time: Users do not need to know or look up valid values in an external system.
Consider configuring partition parameter values in the following case:
You operate multiple clean rooms with different partners who each need access to a specific subset of your data (for example, specific brands or campaign IDs).
Your partition column has a known, finite set of valid values.
You want to restrict which date ranges partners can query.
Note
This feature is separate from value constraints for runtime parameters, which operate at the clean room taxonomy level. For more information, see "Value Constraints for Runtime Parameters”.
This is a different mechanism from the value filtering you can do when provisioning a dataset to a clean room. The Equals/Not Equals/In/Not In filters you set when provisioning a dataset restrict which rows are queryable at all. Partition parameter values, by contrast, constrain what a partner can enter into the question-run parameter field for a column already set up for partitioning.
Available Partition Parameter Value Options
You can configure partition parameter values in one of three ways, depending on the column's data type and your use case:
Value type | Description | Supported Data Types |
|---|---|---|
Fixed values | A specific list of allowed values (for example, "Acme," "Contoso," "Fabrikam"). | String, Integer, Long, Decimal, Double |
Date range | A fixed start and end date (for example, 2026-01-01 through 2026-06-30). | Date, Timestamp |
Rolling window | A relative window that updates automatically (for example, the last 30 days, or the last 3 months). | Date, Timestamp |
For each partition parameter, you can choose to limit the user to only the values you configure by enabling the toggle for "Only allow these values":
Enforced on: Users can only select from the defined values when running a question. Free-text entry is disabled. A question run submitted with a value outside the list, including through the API, is rejected.
Enforced off (default): The defined values appear as suggestions or defaults, but users can still enter other values manually.
If partition parameter values have been configured for a dataset's data connection, the question-run dialog displays available values differently depending on the configuration:
Fixed values, enforced: A dropdown or multi-select shows only the allowed values. Free-text entry is not available.
Fixed values, not enforced: The defined values appear as suggestions in a dropdown, but users can also enter custom values.
Rolling window or date range, enforced: The date picker is constrained to the configured range. Users cannot select dates outside it.
Rolling window or date range, not enforced: The configured range appears as a default, but users can override it with custom dates.
Steps to Configure Partition Parameter Values for a Data Connection
You configure partition parameter values during field mapping when creating or editing a data connection, either by entering the values manually or by uploading a CSV file containing the values. See the sections below for more information.
Note
You can use either manual entry or CSV upload for a given data connection, but not a combination of both methods at the same time.
You can also configure partition parameter values using the LiveRamp Clean Room API:
POST /v1/data-connections/{dataConnectionId}/field-configurations: set values when saving field configuration.
GET /v1/data-connections/{dataConnectionId}/field-configurations: retrieve current values (includes allowedValues, allowedRanges, and isEnforced in the partition field configuration).
Once you've configured partition parameter values for a data connection, any edits to those values at the data connection level will update the values in the associated dataset in any clean rooms that dataset has been provisioned to. However, if you edit the values of a particular field in the associated dataset itself in a clean room, that field's partition parameter values will not stay in sync with any edits to the data connection's partition parameter values.
Configure Partition Parameter Values Manually
To configure partition parameter values manually:
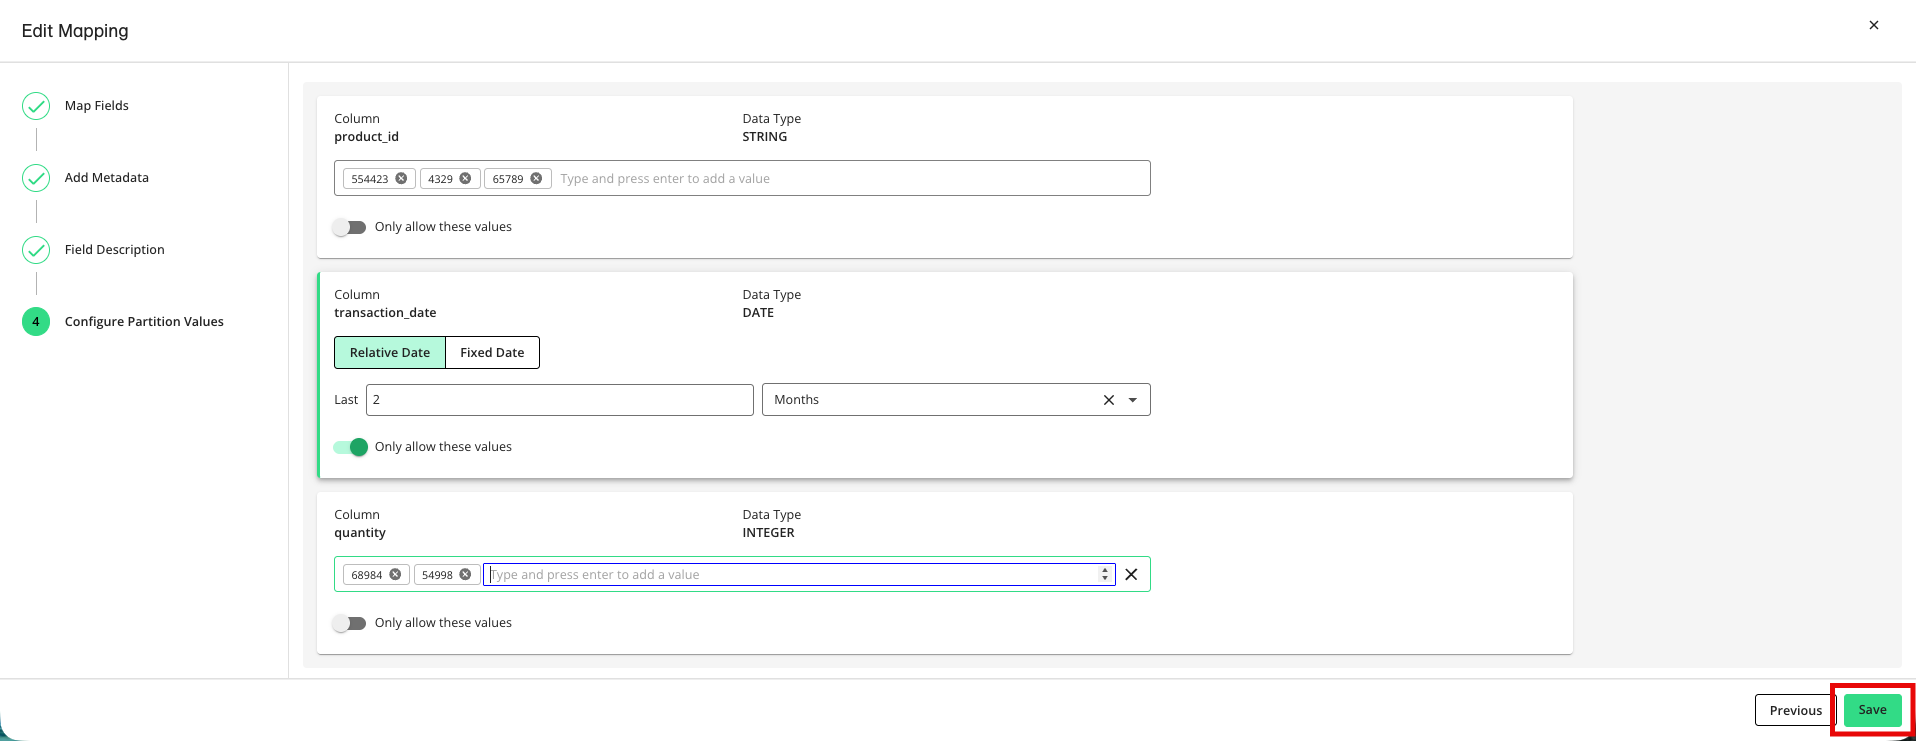
During the Add Metadata step of field mapping, enable the toggle for "Allow Partitions" for the fields you want to use partition parameters for.
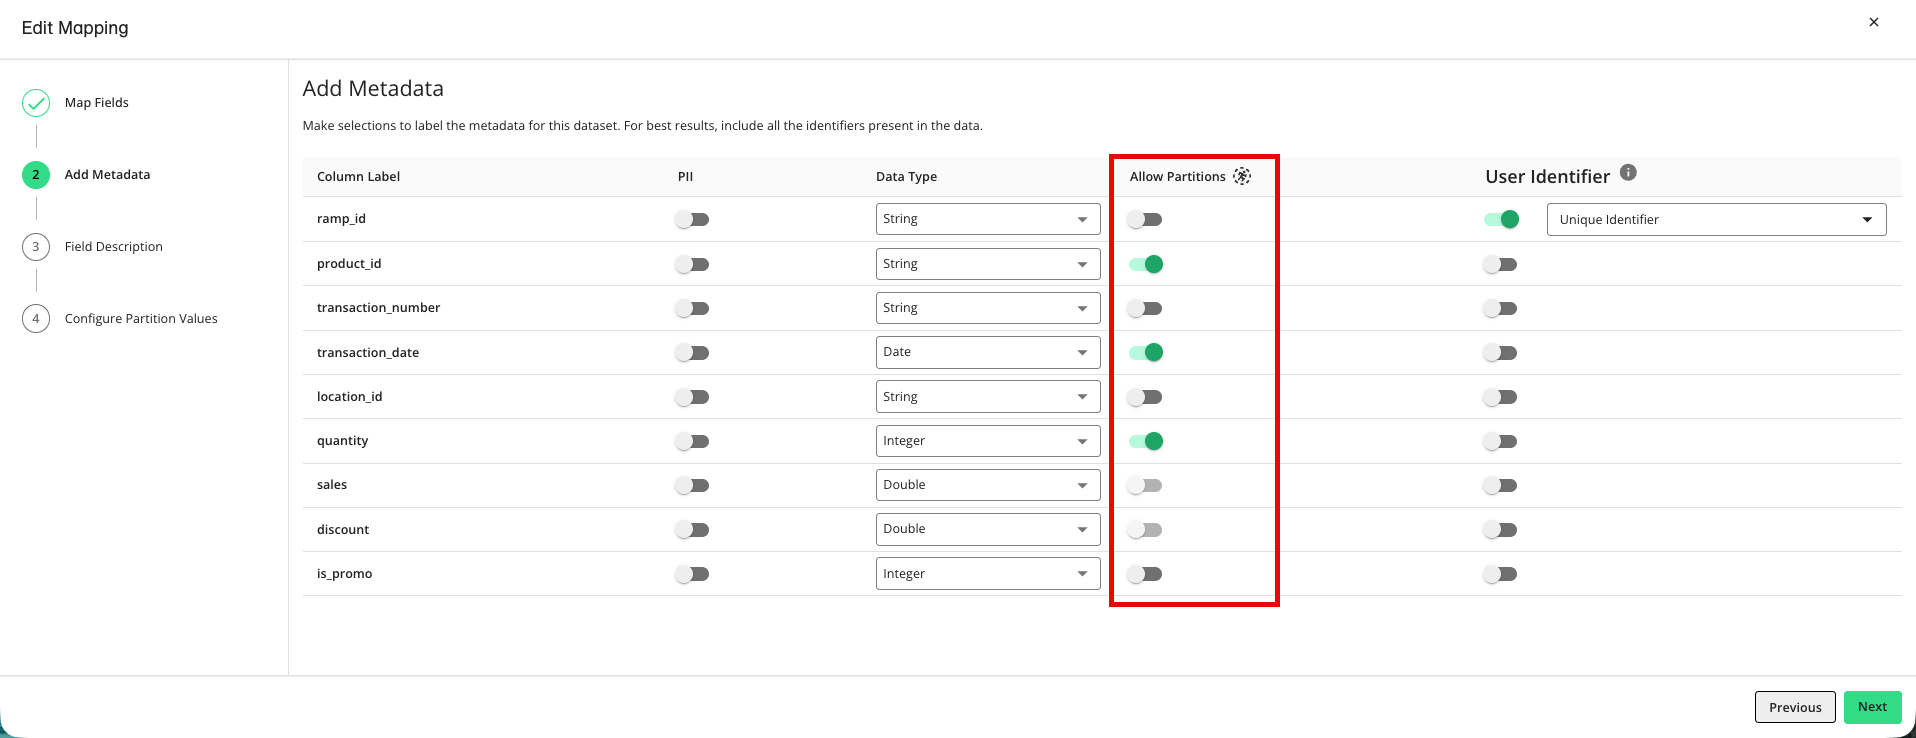
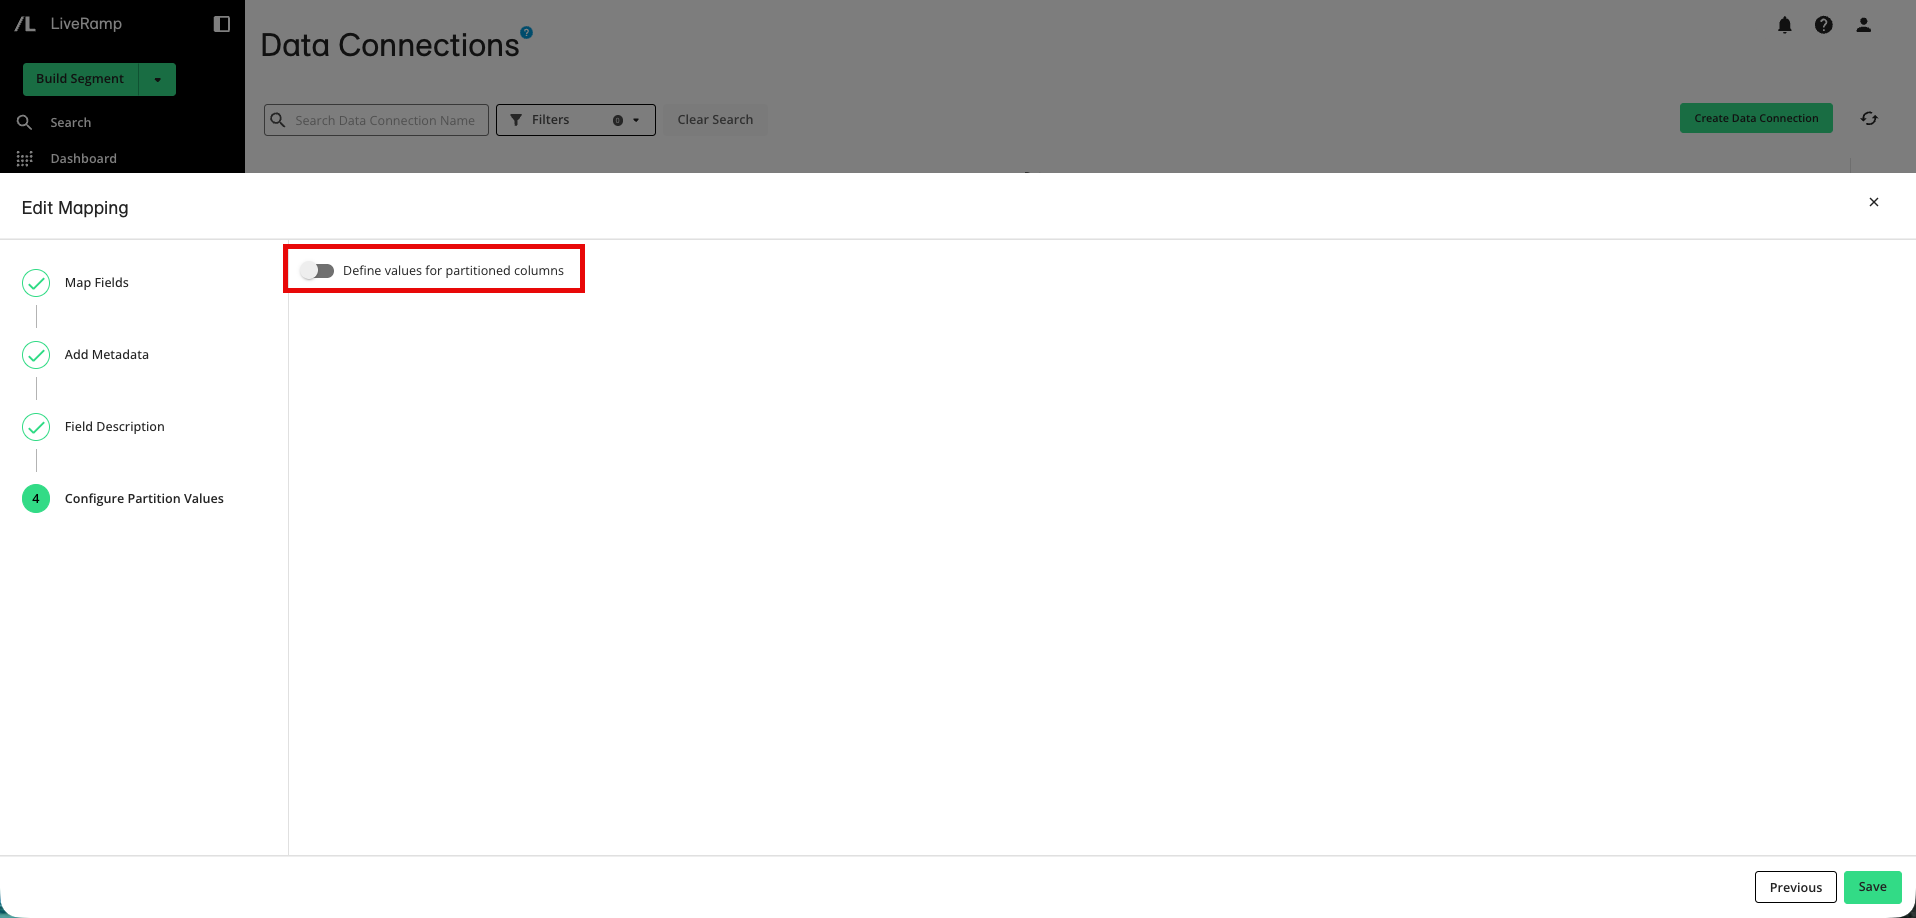
Advance to the Configure Partition Values step.
Enable the toggle for “Define values for partitioned columns”.
For the Source of Partition Values selection, leave Manual Configuration selected.
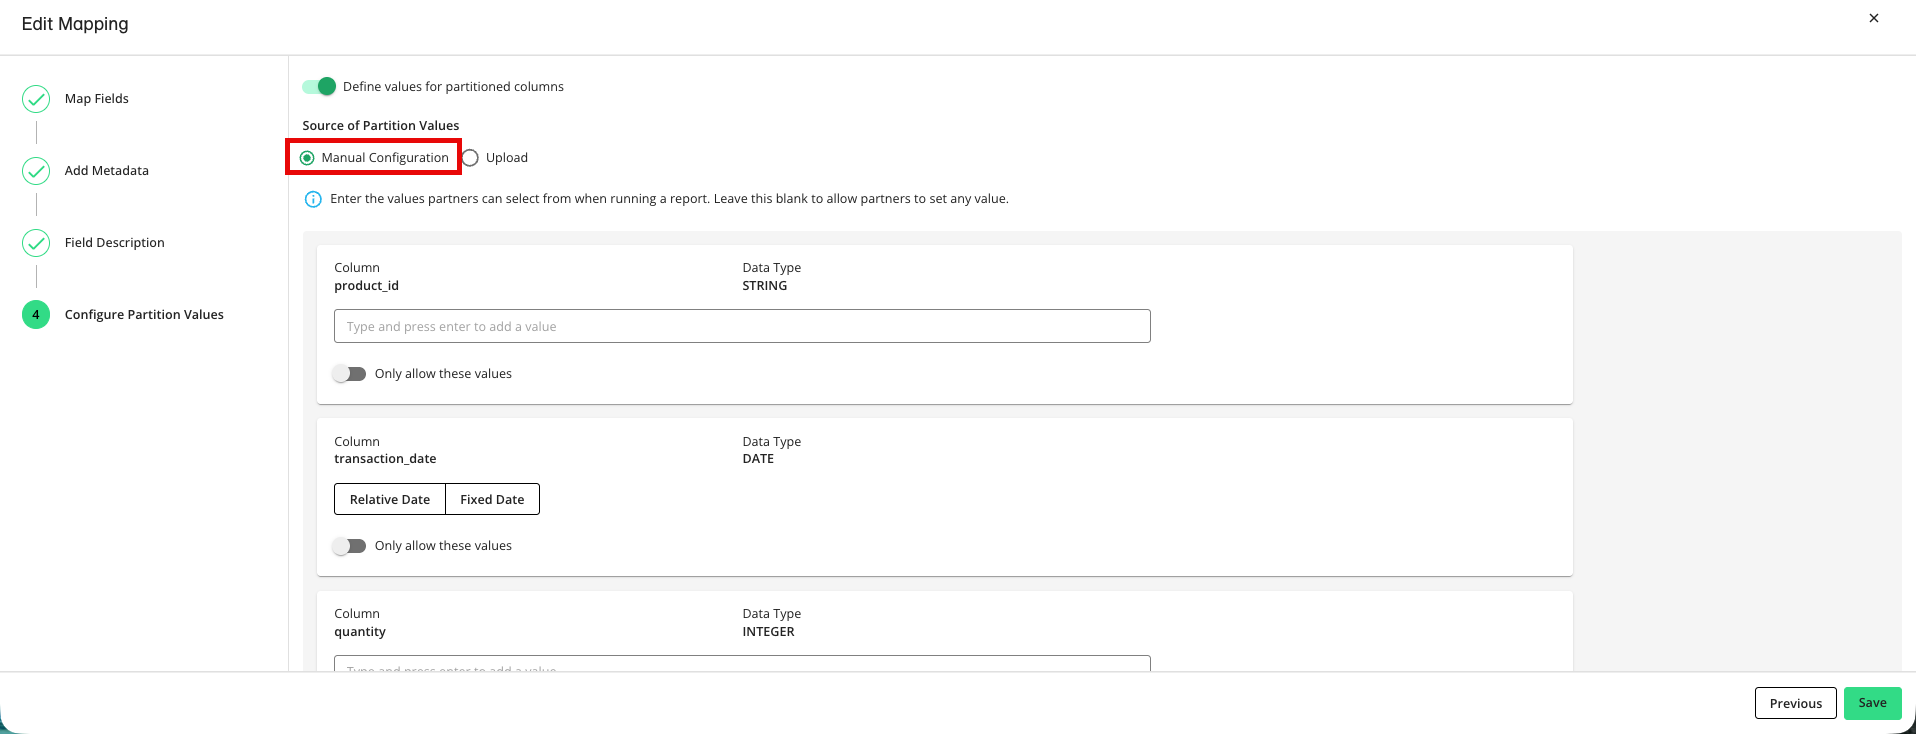
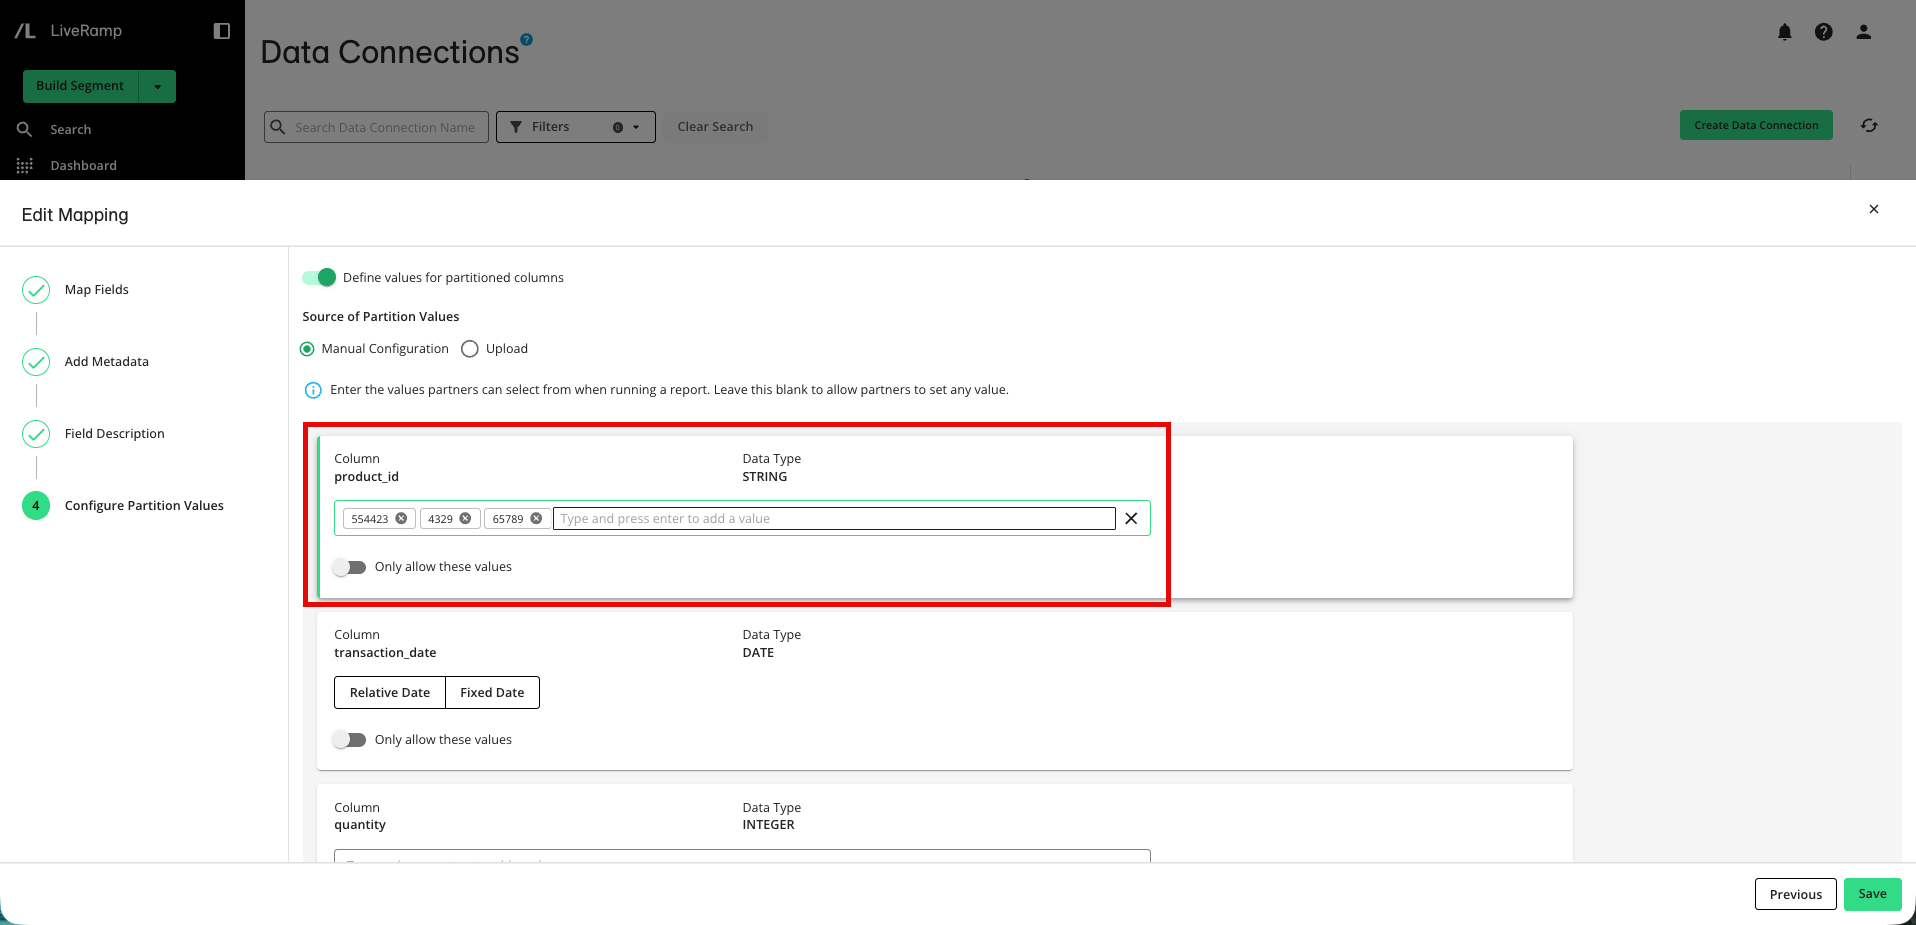
For non-date fields (such as string or integer fields), enter each value individually and then press the Enter or return key. You can also paste a comma-separated list.
For date fields where you want to use a fixed date:
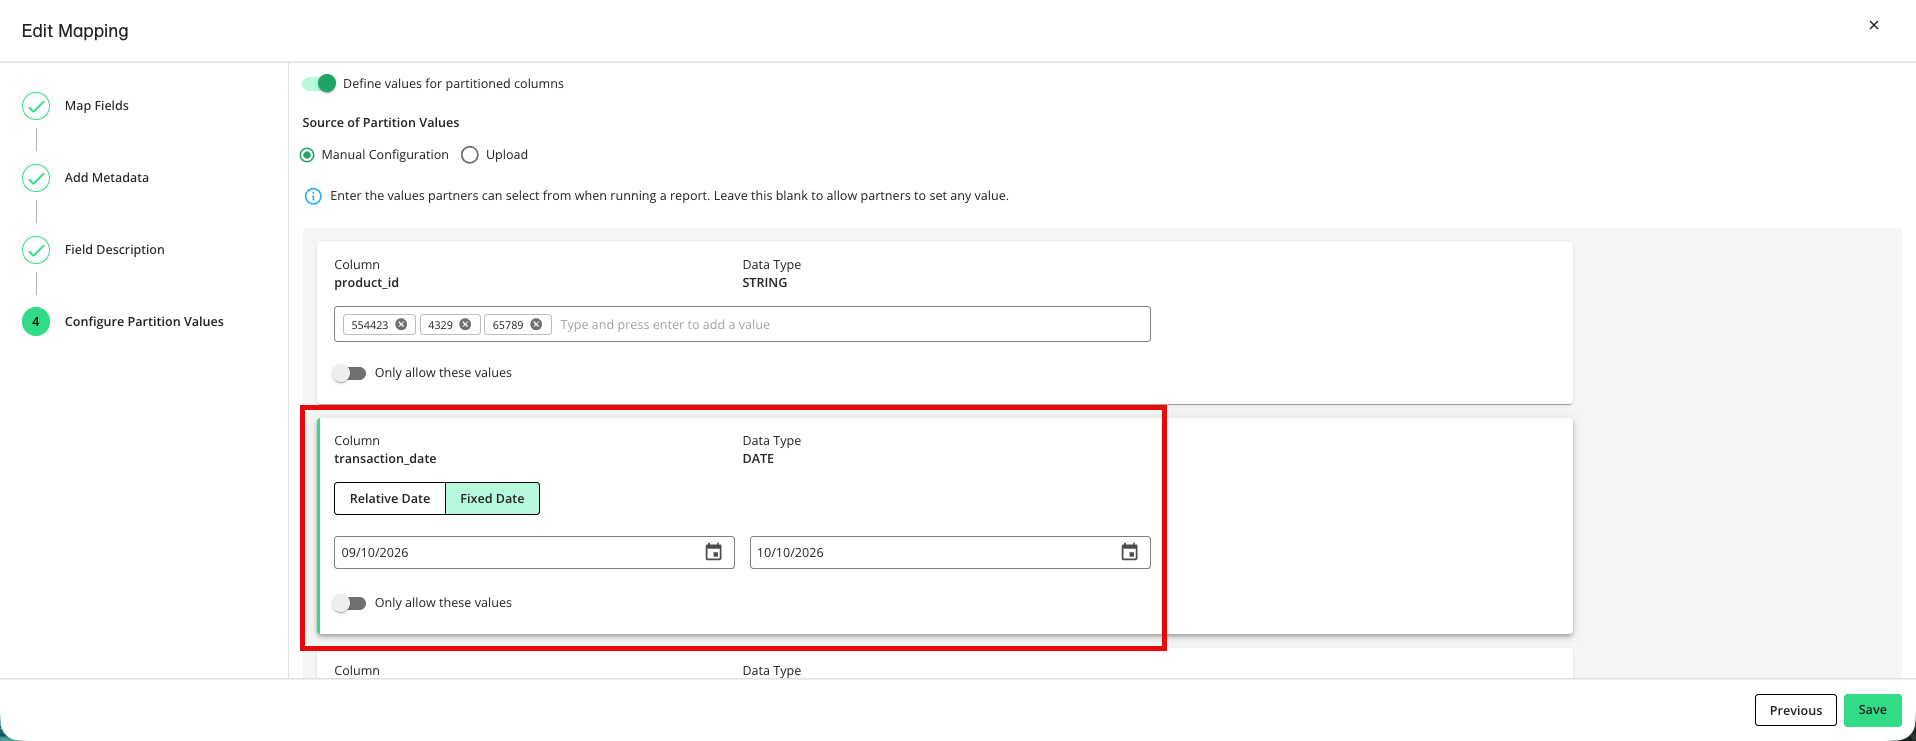
Select Fixed Date.
From the start date field, either click the calendar and then select the start date or enter the start date manually.
Repeat the previous step for the end date field.
For date fields where you want to use a rolling window:
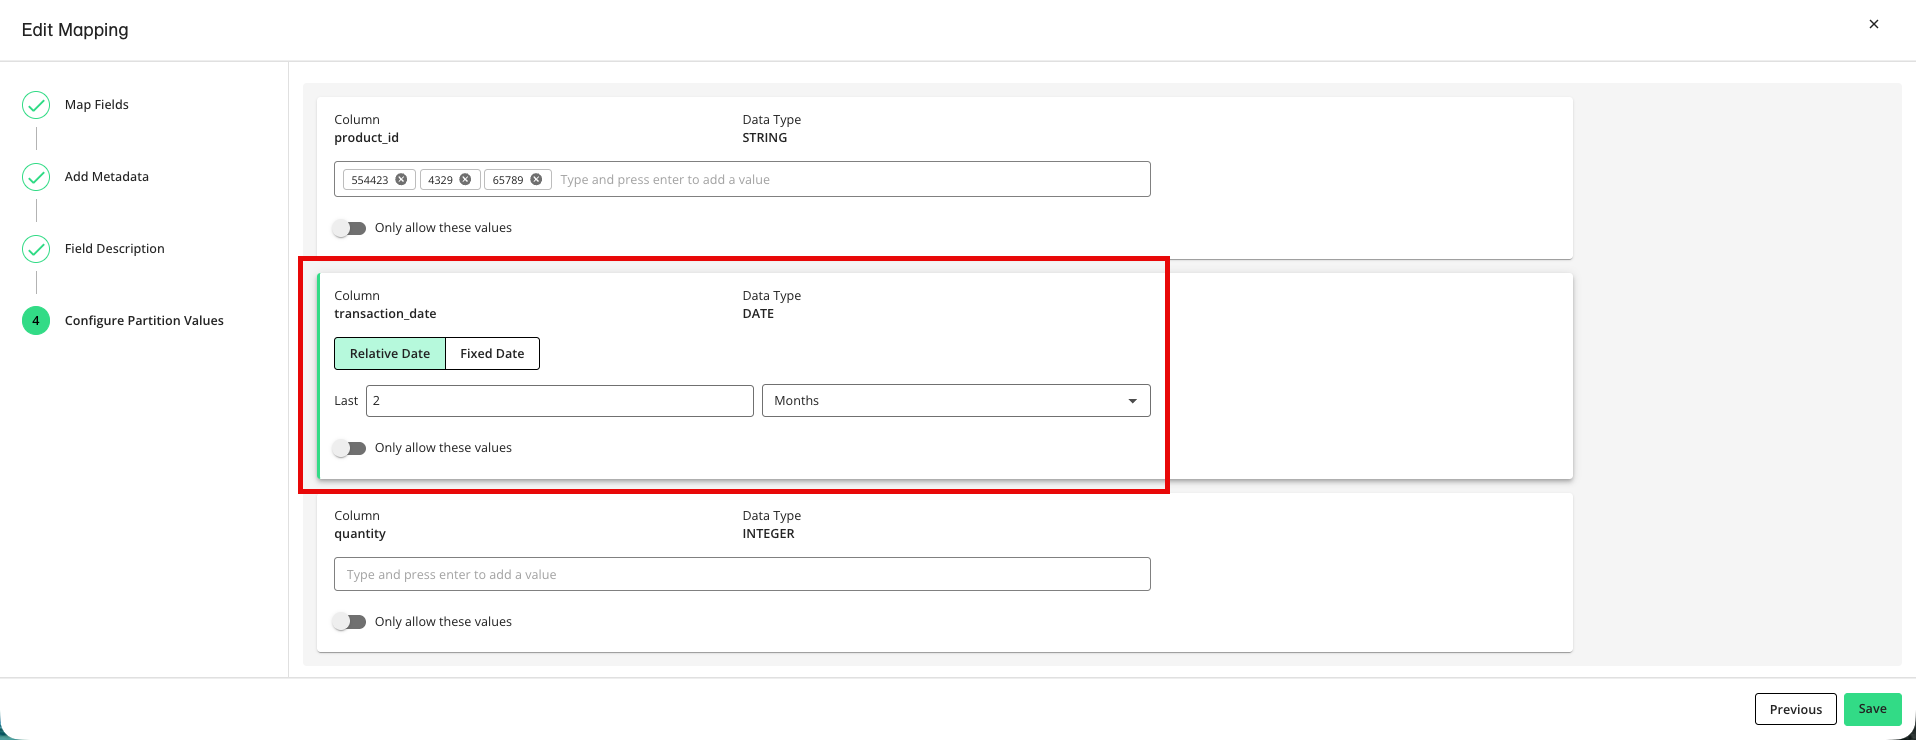
Select Relative Date.
Enter the number and unit of measure (“Days” or “Months”)(for example, "Last 30 Days" or "Last 3 Months").
Note
For days, you must enter a number between 1 and 30. For months, you must enter a number between 1 and 12.
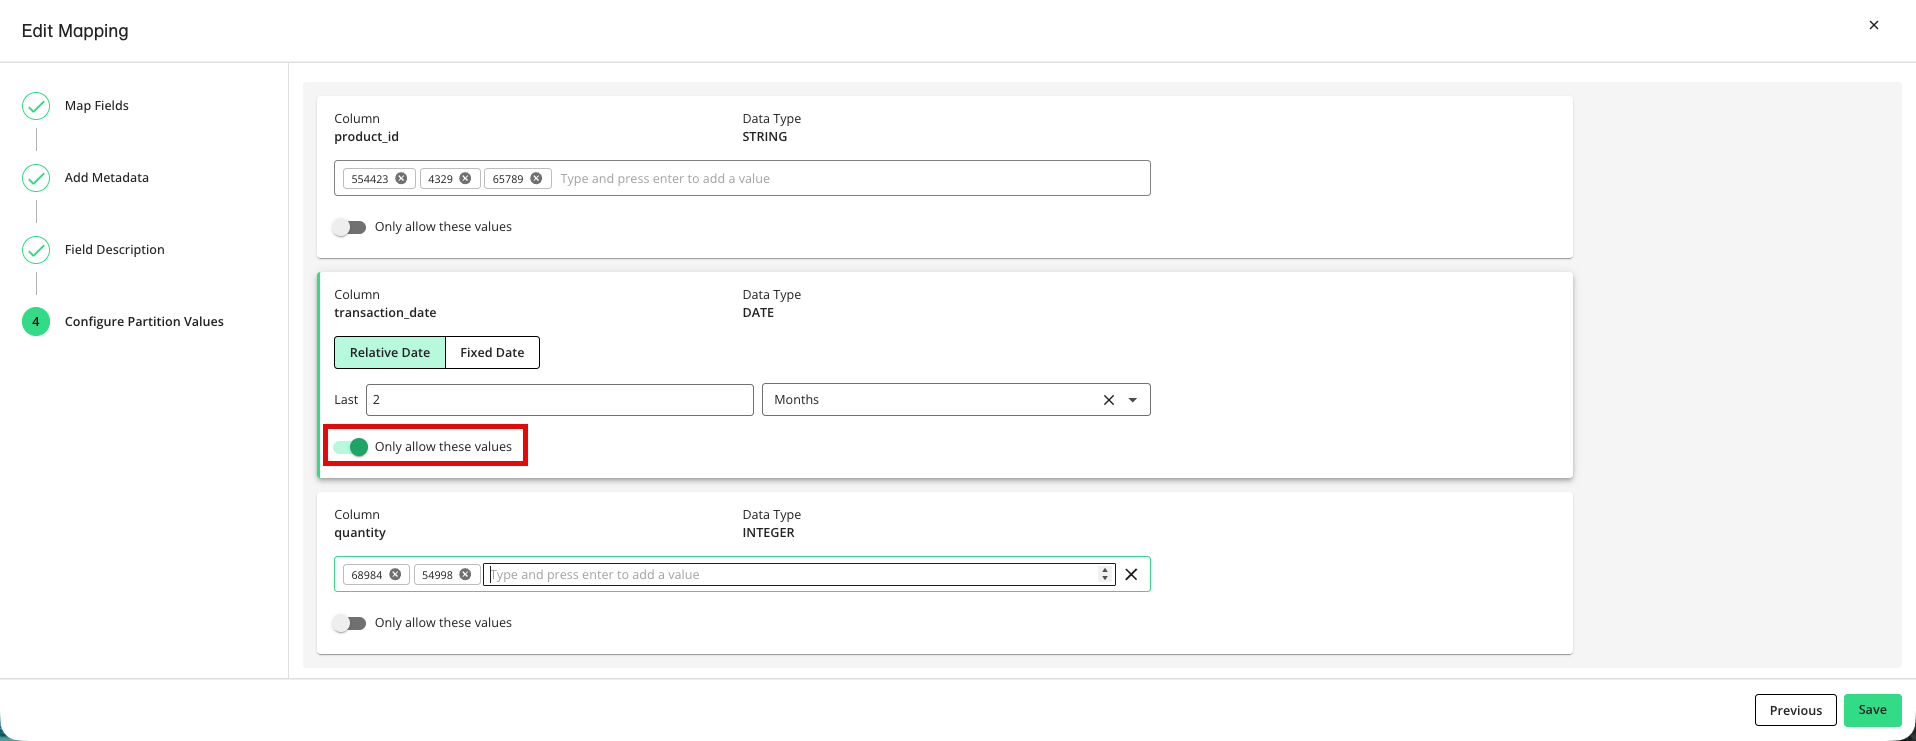
If you want users to only be able to select from the values you configured, enable the toggle for “Only allow these values” for each partition parameter you want to restrict. If you do not enable the toggle, users will be able to enter values other than those you've configured.
Click .
Configure Partition Parameter Values Via a CSV Upload
To configure partition parameter values via a CSV file upload:
Prepare a comma-separated value (CSV) file:
Note
During the Configure Partition Values step of the field mapping process, you'll have the opportunity to download a template file for your specified partition columns. Once you download the file, replace the entries in the "values" and "enforced_values" columns with your desired entries.
Create the following columns: "field_name", "values", and "enforced_values".
Add one row per partition column, using the column names as the "field_name" values.
In the "values" column, enter the appropriate values:
For non-date fields, enter all values, separated by commas
For date fields that will use a relative date framework, enter the number and units that represent the rolling dates to use (such as “15 days” or “3 months”).
Note
For days, you must enter a number between 1 and 30. For months, you must enter a number between 1 and 12.
For date fields that will use a fixed start and end date, enter the start date and end date in YYYY-MM-DD format, separated by a comma (for example, to set a fixed date range for August 13 to August 20, 2026, enter "2026-08-13, 2026-08-20").
In the “enforced_values” column for each partition parameter field, enter “yes” to require users to use only the configured values during question runs or enter “no” to allow them to enter other values.
During the Add Metadata step of field mapping, enable the toggle for "Allow Partitions" for the fields you want to use partition parameters for.
Advance to the Configure Partition Values step.
Enable the toggle for “Define values for partitioned columns”.
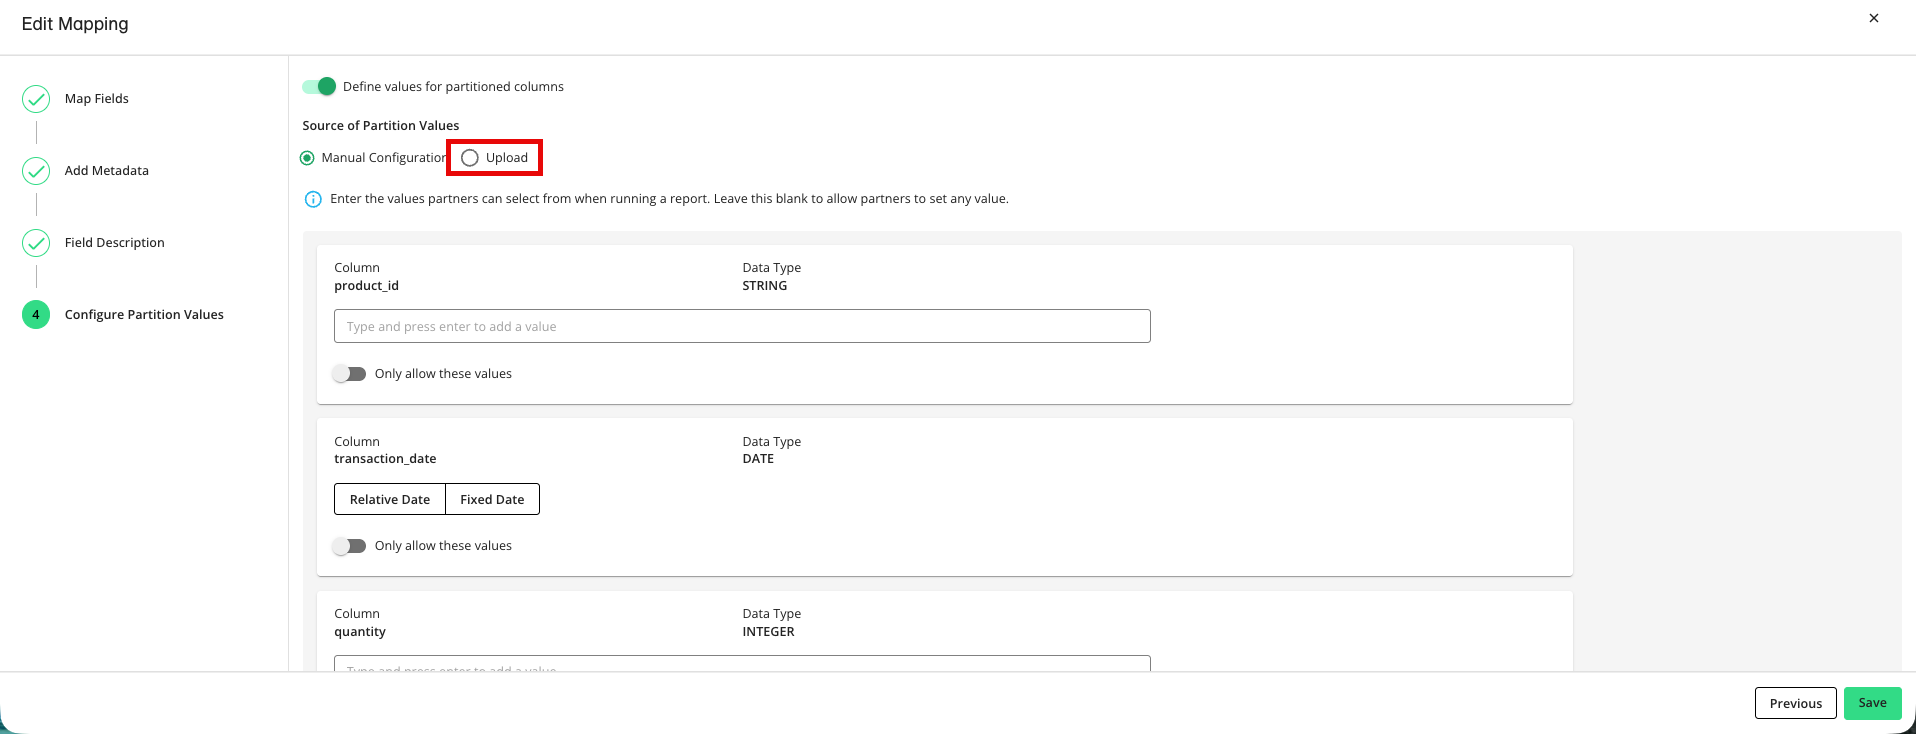
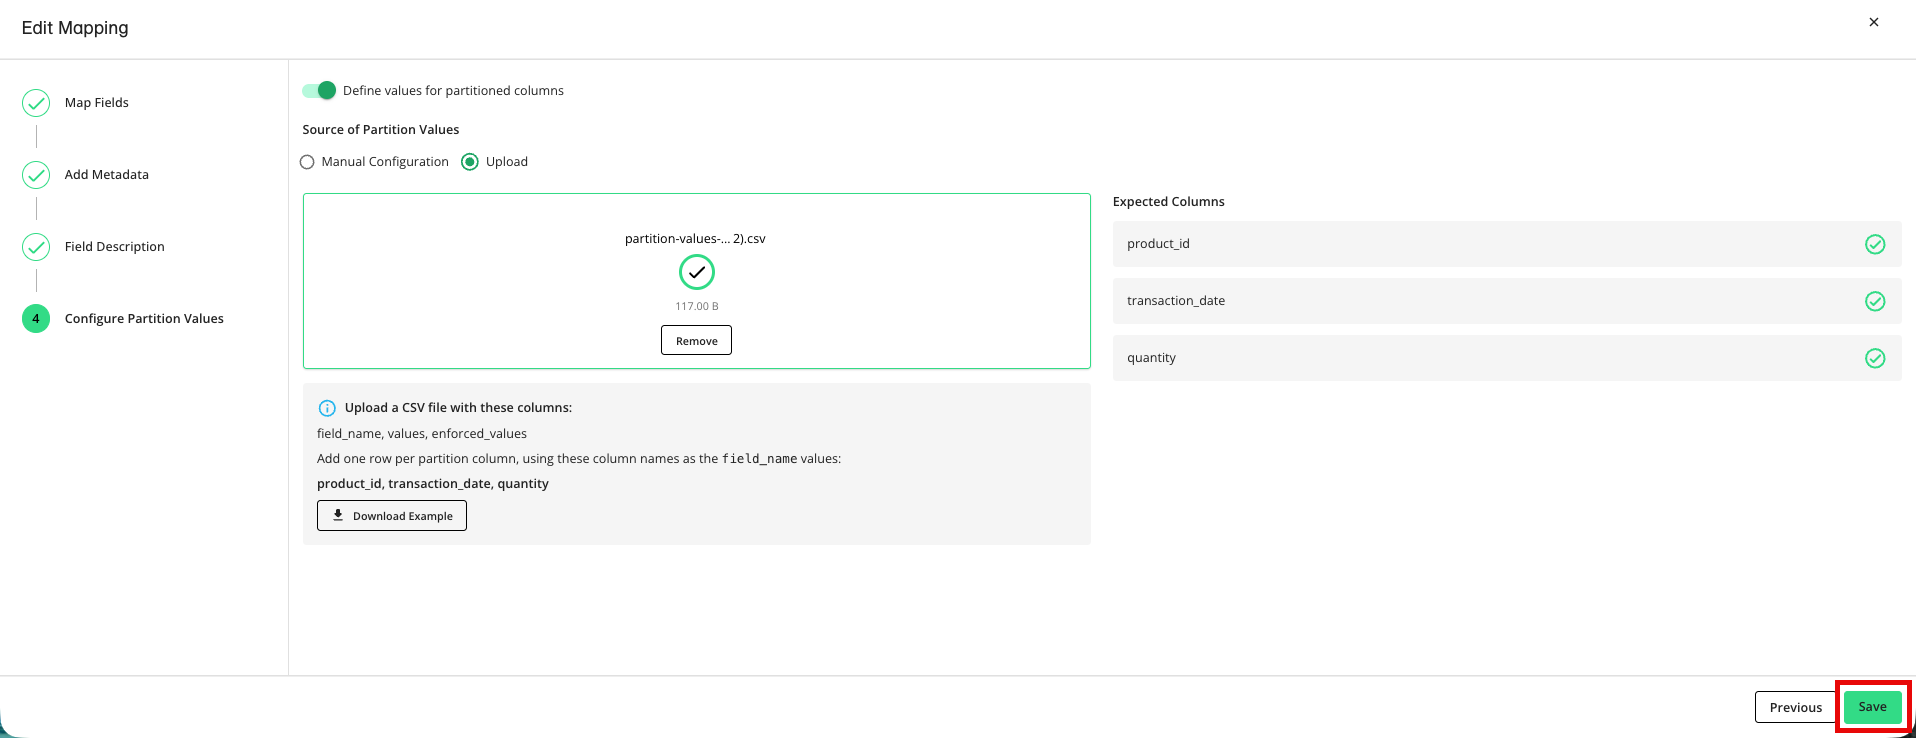
For the Source of Partition Values selection, select Upload.
Note
To download a template file populated with column headers and rows for each of your partition columns, click . Once you download the file, replace the entries in the "values" and "enforced_values" columns with your desired entries.
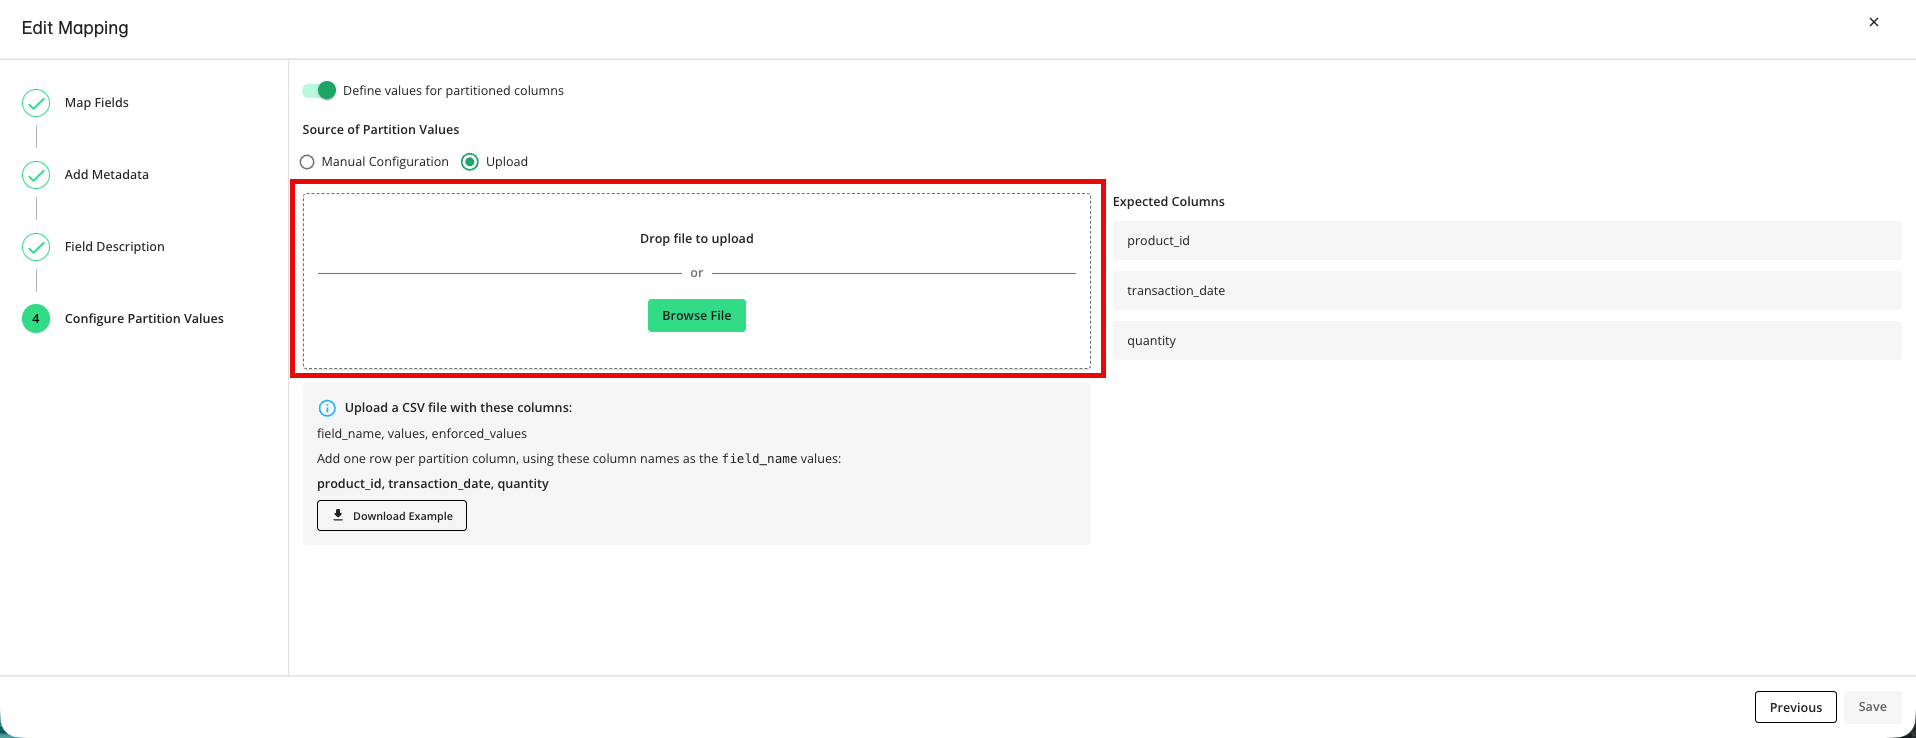
Upload your CSV file, either by dragging the file into the upload box or by clicking and selecting your file. The system maps the rows to your partition fields and reads the values.
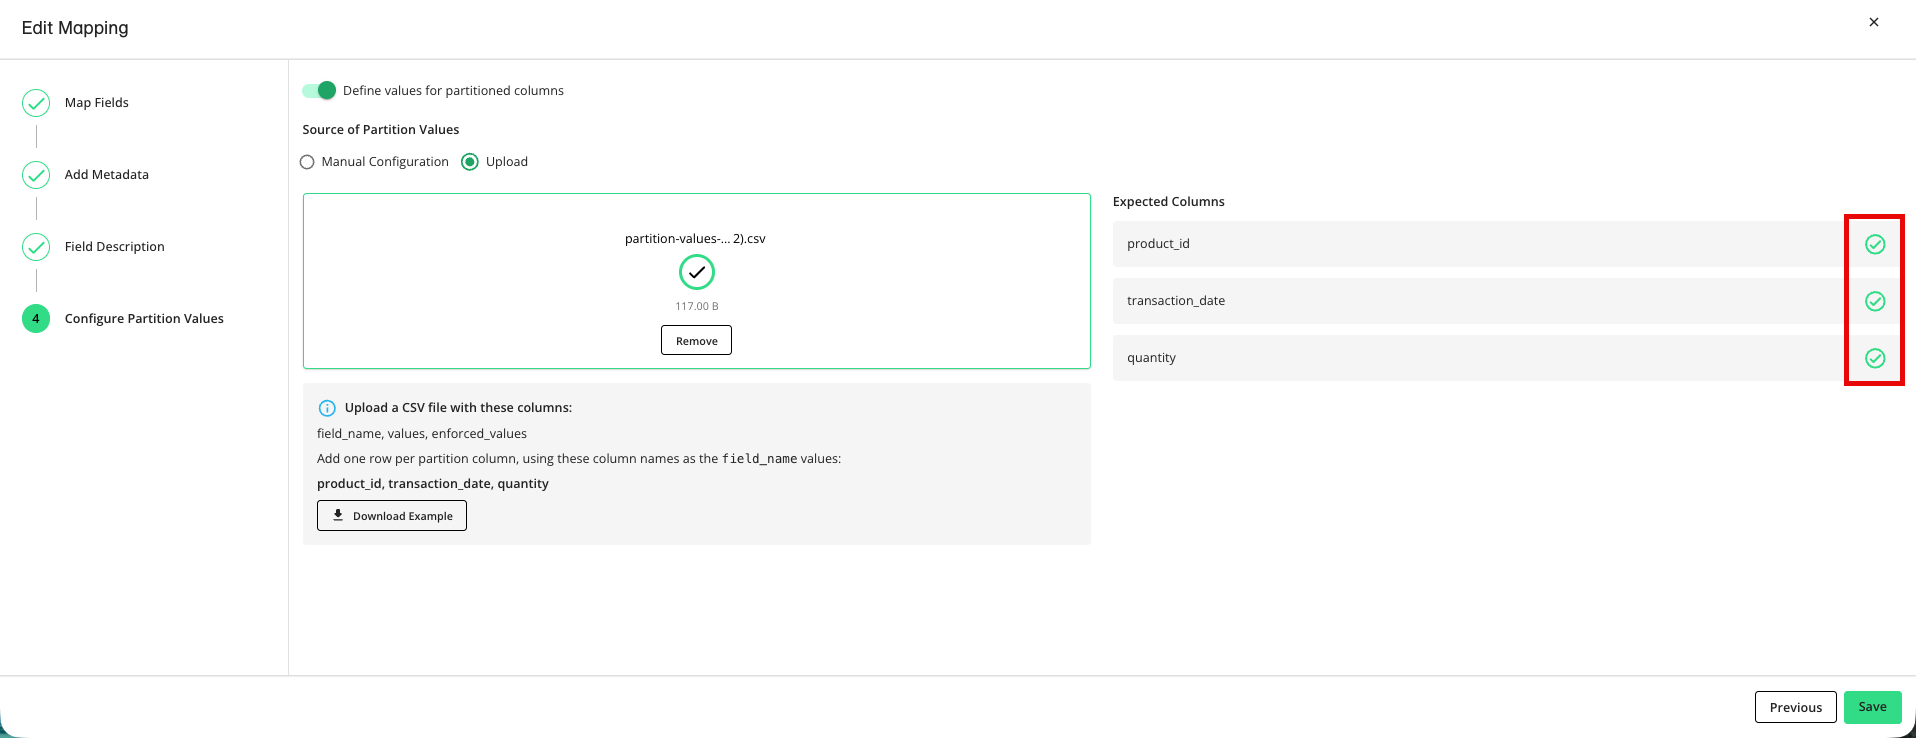
Check that all expected partition columns were configured successfully by making sure that each column name in the Expected Columns area has a green check mark.
Note
For columns that do not have a green check mark, review the error message, correct the CSV file, and upload it again until all columns are configured successfully:
Values that do not match the field's data type are rejected (for example, entering "five" for an Integer field).
Rolling window values must follow the format of a number followed by "Days" or "Months" (for example, "30 Days"). For days, you must enter a number between 1 and 30. For months, you must enter a number between 1 and 12.
Duplicate values are automatically deduplicated.
If a CSV column header does not match a partition field name, the system reports an error for that column.
Click .
Partition Parameter Values in Templates
When you create a template that includes data connections with configured partition parameter values, those values carry over when a clean room is generated from the template. The clean room owner can then edit the values at the clean room level for each collaboration without affecting the template or other clean rooms generated from it.
This is particularly useful for templates used across multiple partners: The data owner can set a universal list of allowed partition values in the template, then customize the enforced values per partner after generating each clean room.
Configure or Edit Partition Parameter Values in a Clean Room
When you provision a data connection to a clean room, any partition parameter values configured at the data connection level automatically flow through to the dataset in that clean room. At the clean room level, you can choose to:
Keep values synced with the data connection: The partition parameter values in the clean room stay in sync with the data connection level values. If the data connection owner updates the values, the dataset updates automatically.
Override the values for this clean room: You can edit the partition parameter values in the clean room. Overriding breaks the sync with the data connection: Later changes to the data connection's values no longer flow through to the dataset in the clean room. When values have been overridden, an indicator shows that the dataset's values are no longer in sync with the data connection.
Note
Only users with Admin or Dataset Management permissions can modify partition parameter values at the clean room level.
If you override values, the sync with the data connection breaks for that field, and a visual indicator shows the values have been customized for this clean room.
To view or edit partition parameter values for a dataset in a clean room:
Go to the clean room's Clean Room Assets page.
From thbe Datasets and Views tab, access the dataset’s fields, depending on whether the dataset has been provisioned to the clean room:
If the dataset hasn’t been provisioned yet, click in the row for that dataset.
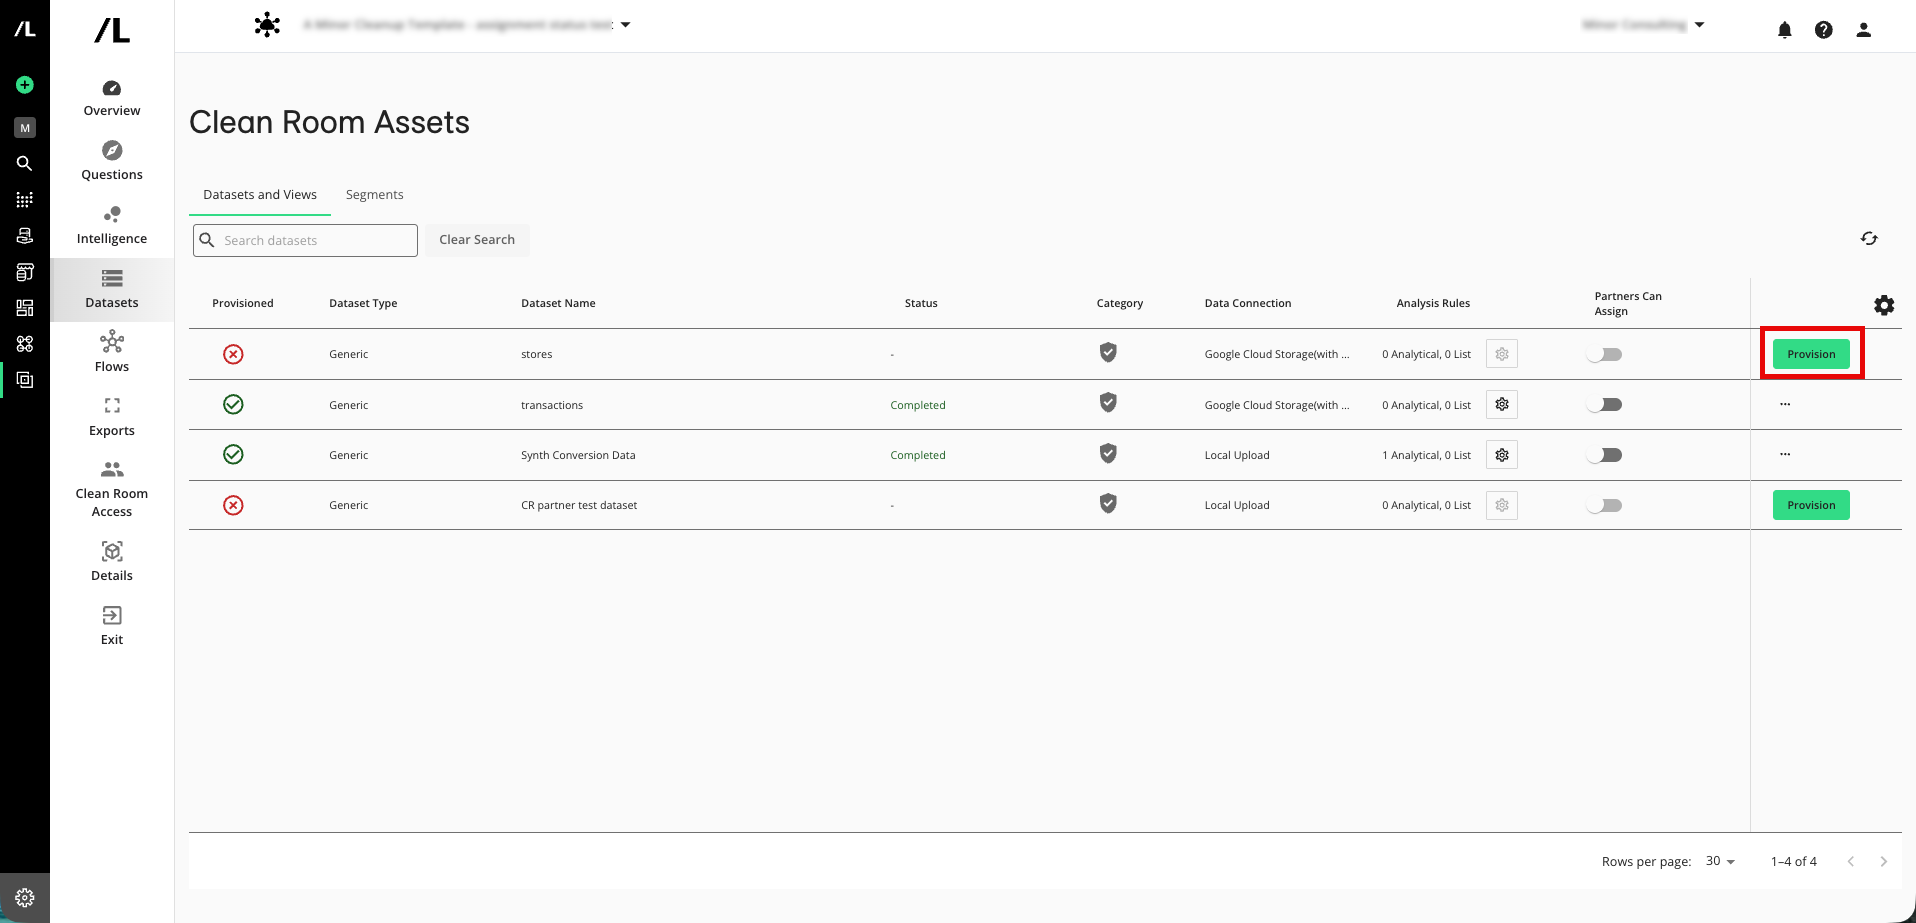
If the dataset has been provisioned, click the More Actions menu (the three dots) and then select Edit Configuration.
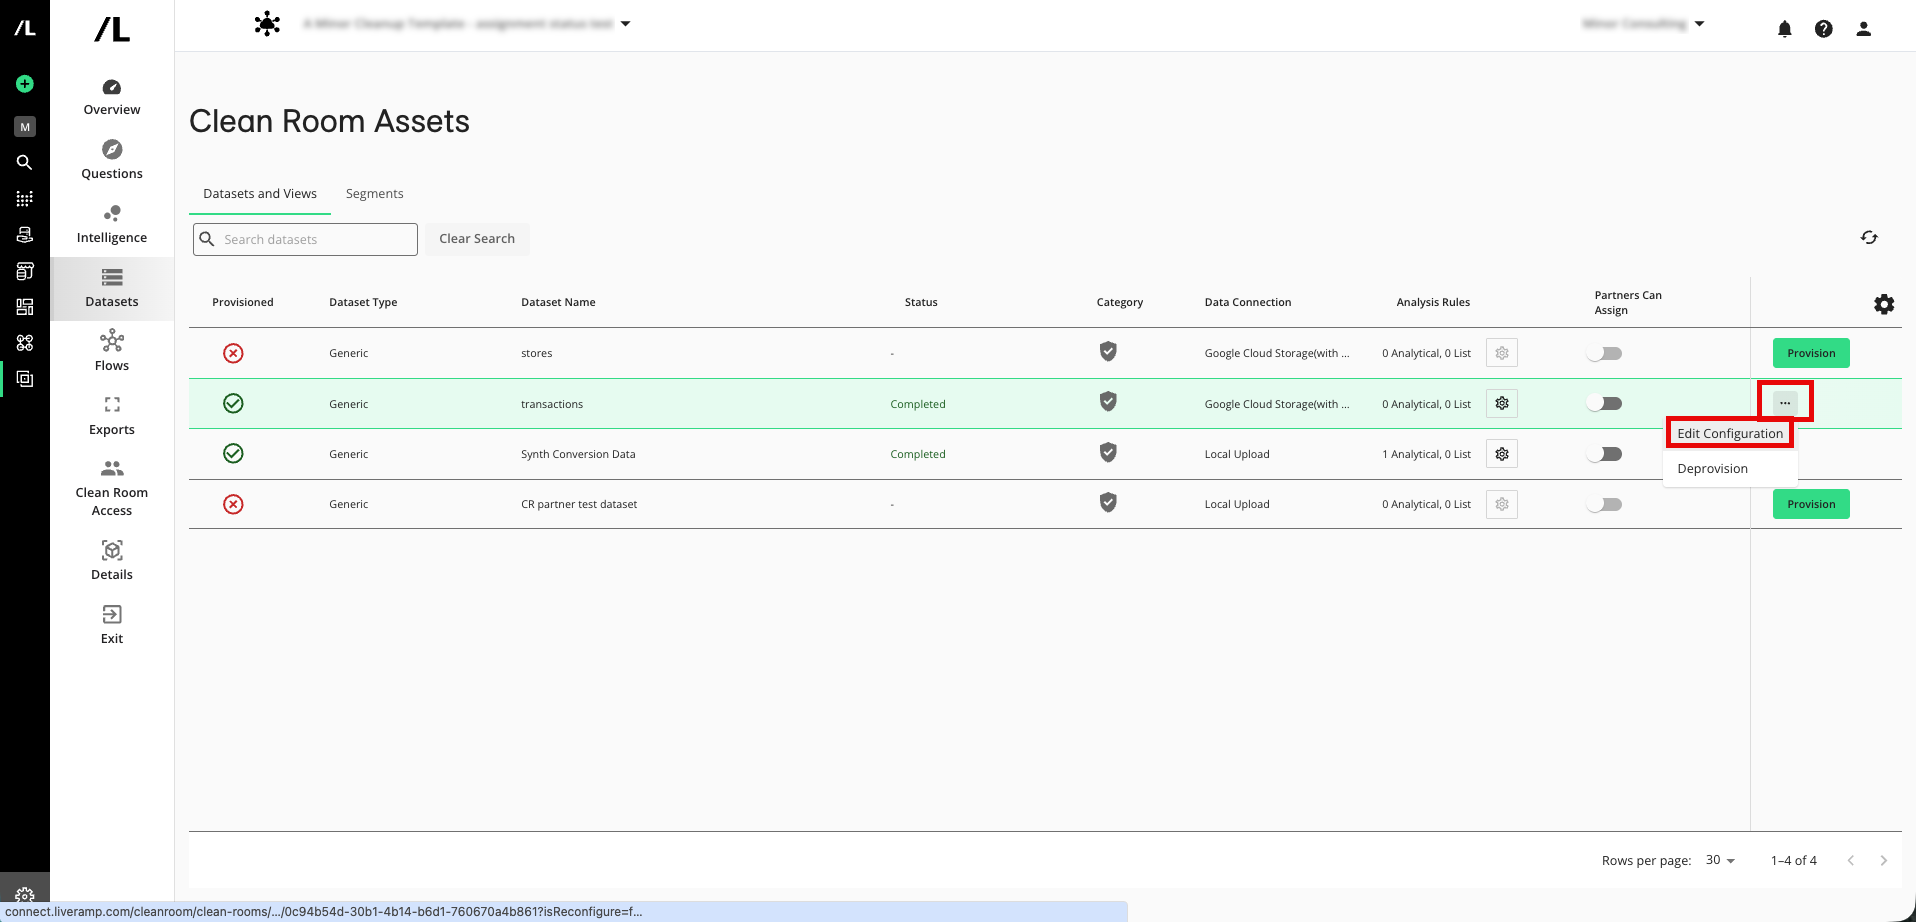
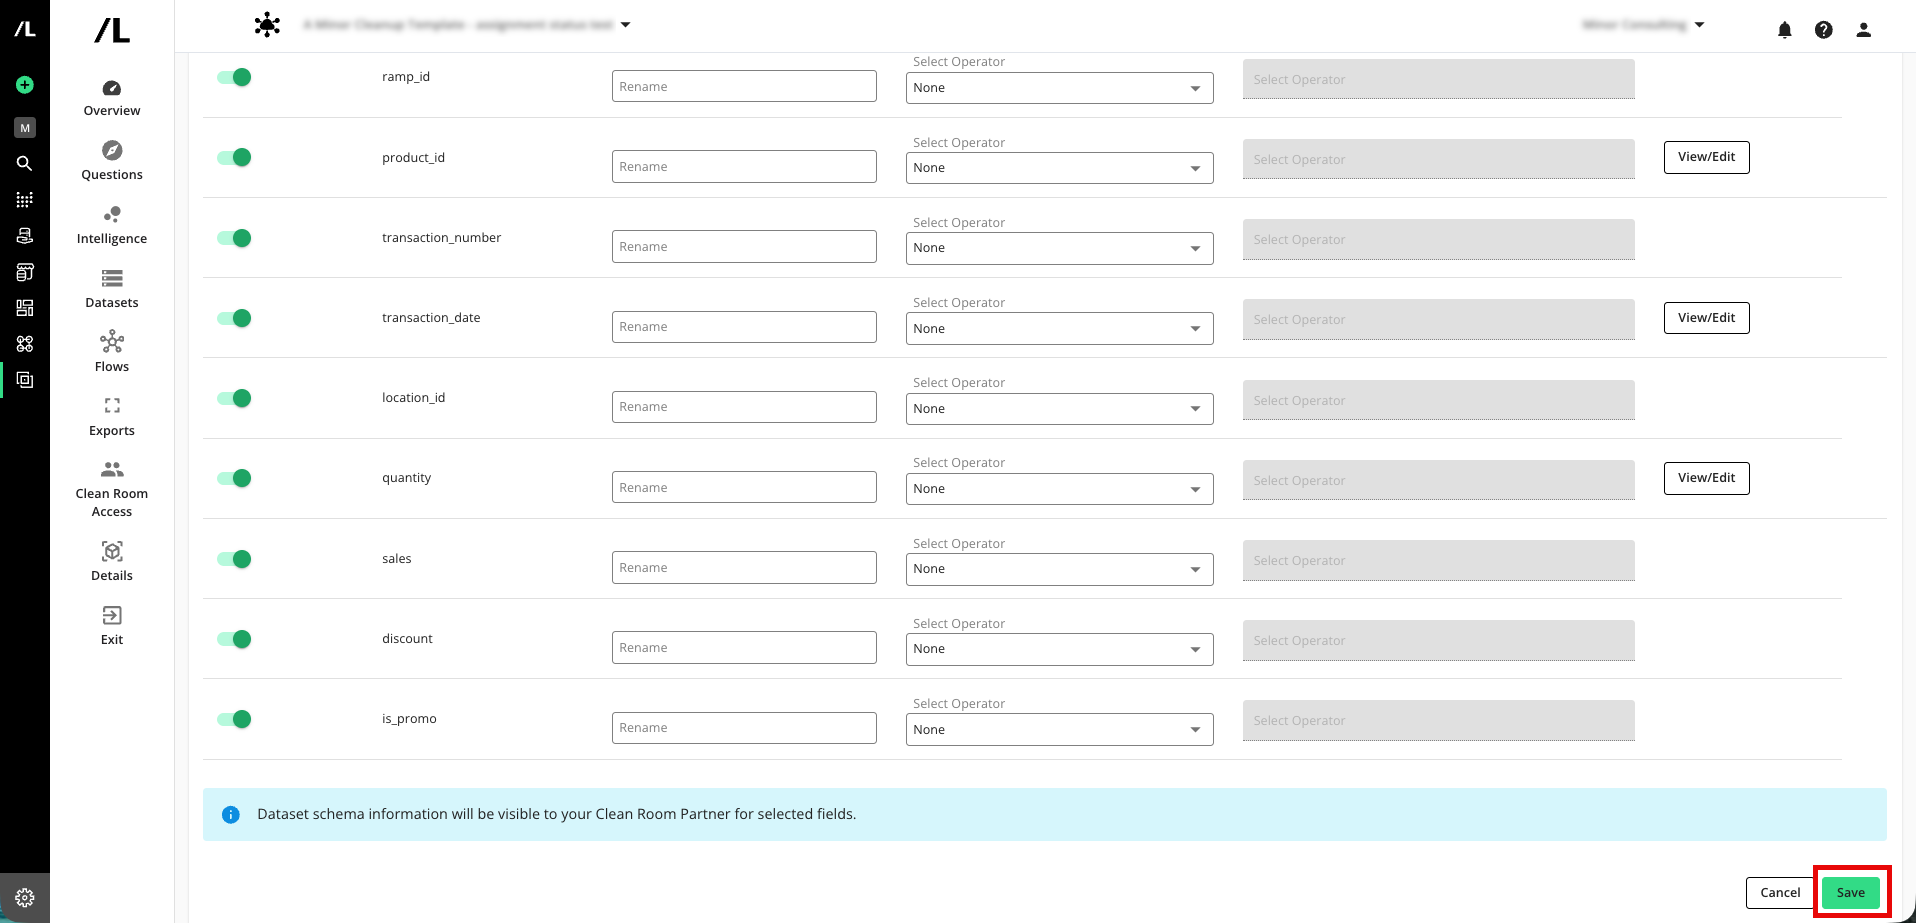
In the Partition Values column for the field whose partition parameters you want to view or edit, click View/Edit.
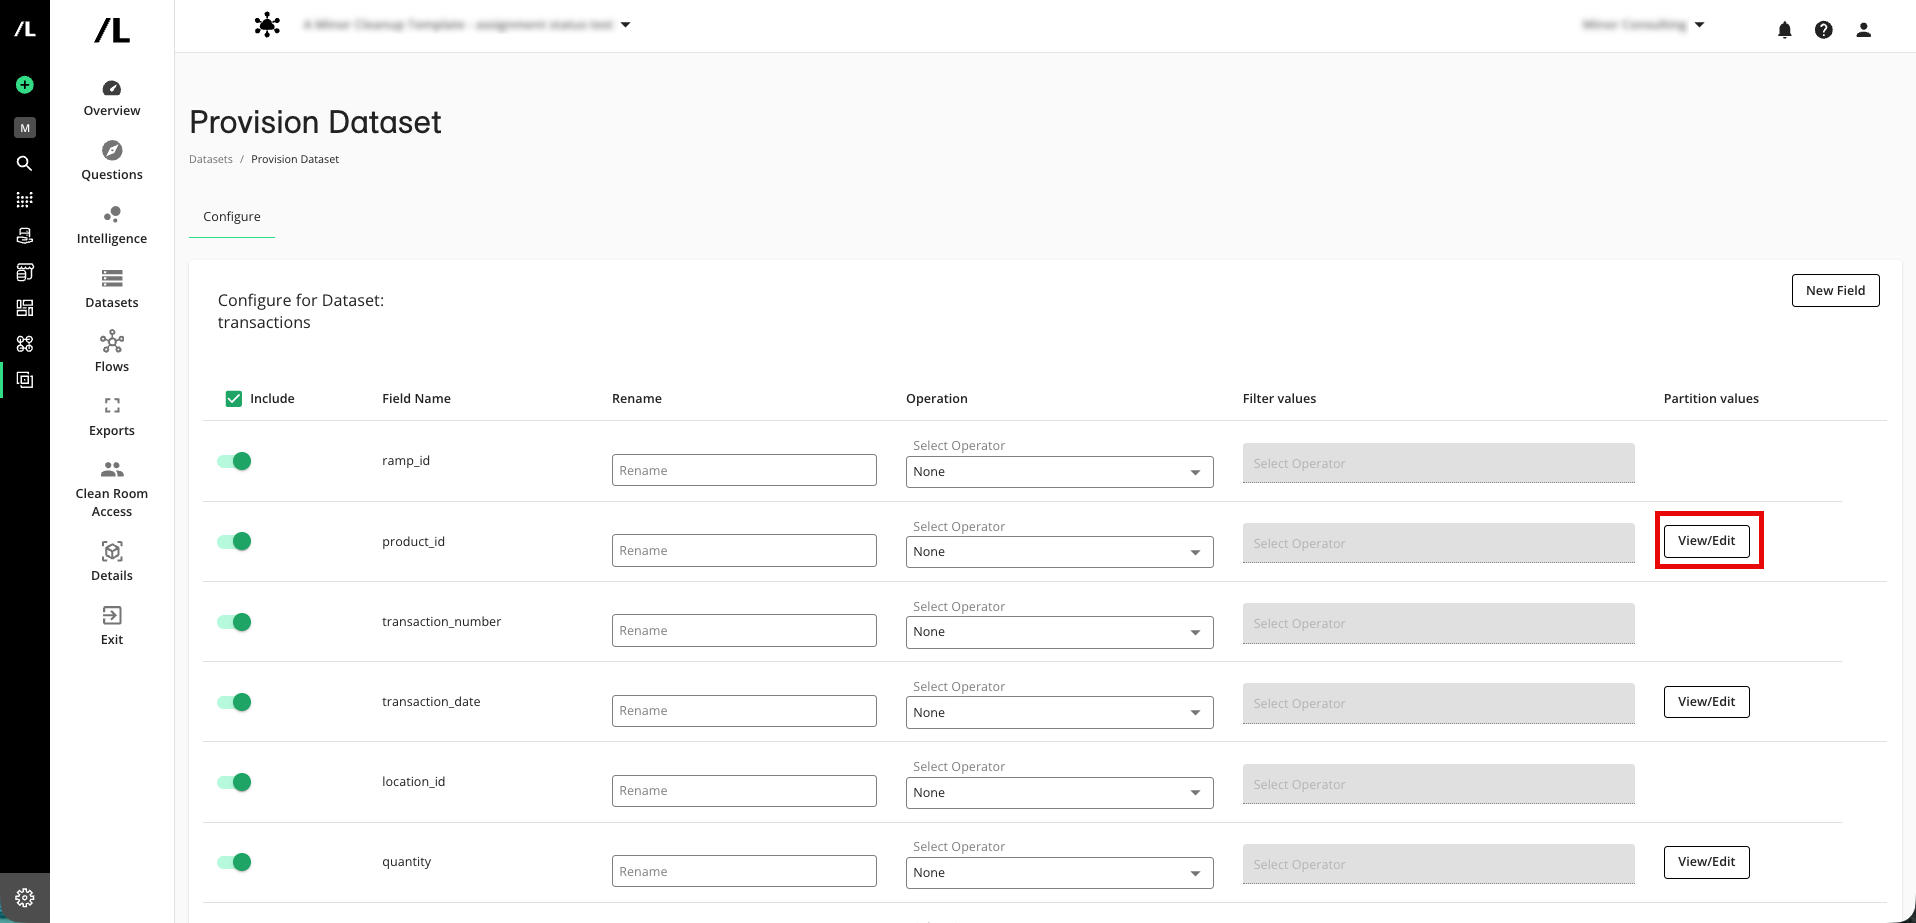
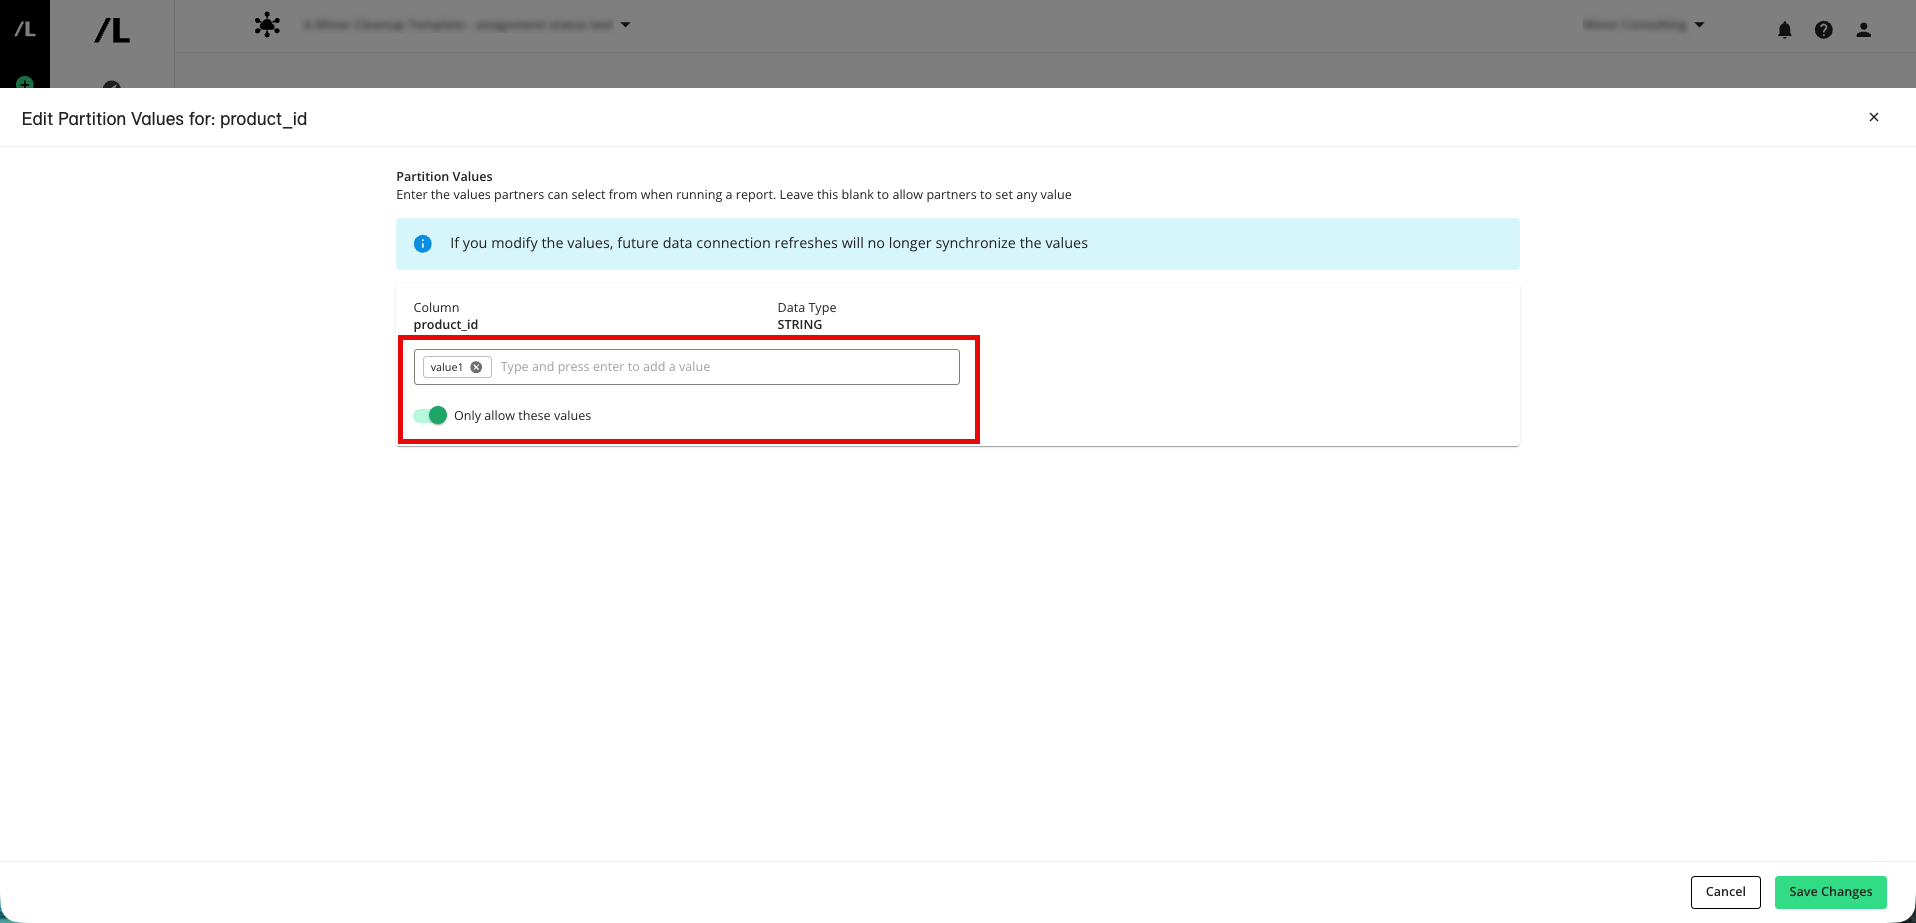
To edit the configuration, delete, add, or edit values, depending on the type of partition parameter values used. You can also adjust the toggle to change whether to allow only these values or to allow additional values.
Click .
Repeat the previous three steps for any additional fields you want to view or edit.
Click .