Perform RampID Translation in Databricks
LiveRamp's RampID Translation capability in Databricks allows for the translation of a RampID from one partner encoding to another using either maintained or derived RampIDs. This allows you to match persistent pseudonymous identifiers to one another and enables use of the data without sharing the sensitive underlying identifiers.
LiveRamp's RampID Translation capability in Databricks allows for the translation of a RampID from one partner encoding to another using either maintained or derived RampIDs. This allows you to match persistent pseudonymous identifiers to one another and enables use of the data without sharing the sensitive underlying identifiers.
Note
For more information about RampIDs, see "RampID Methodology".
Specifically, RampID translation enables:
Person-based analytics
Increased match rates in data enrichment and data collaboration
Measurement enablement across device types
These capabilities are available within Databricks through a packaged clean room. This allows you to share your data sets in a privacy-safe way to be queried against the LiveRamp Identity Graph directly in your Databricks environment. See "LiveRamp Embedded Identity in Databricks" for more information.
LiveRamp Identity Translation in Databricks requires the creation of two tables:
A metadata table, indicated in the sample SQL as
transcoding_meta_table.An input table, indicated in the sample SQL as
transcoding_input_table.
Overall Steps
After you've created the LiveRamp Identity packaged clean room in Databricks (see "Create a Packaged Clean Room" for instructions), perform the following steps to perform RampID translation:
Create the input table for translation.
Note
An input table needs to be prepared for each translation operation.
Note
As long as the column names in the input table stay the same, the original metadata table can be reused for multiple operations. You only need to create a new metadata table if you change the column names in the input table.
Add the input and metadata tables to the packaged clean room.
See the sections below for information on performing these tasks.
Create the Input Table for Translation
An input table containing the RampIDs to be translated needs to be prepared for each operation.
When creating input tables, keep the following guidelines in mind:
The column names for the input table can be whatever you want to use, as long as the names match the values specified in the metadata table and match Databricks' column name syntax without special characters (for more information, see Databricks' documentation).
Do not use any column names that are the same as the column names returned in the output table.
Every column name must be unique in a table.
Try not to use additional columns in the tables required for the translation operation. Having extra columns slows down processing and all attribute columns will be dropped during translation.
The translate operation can process records containing blank fields.
Per Snowflake guidelines, table names cannot begin with a number.
See the table below for suggested input table columns and descriptions.
Column | Example | Description |
|---|---|---|
|
| RampID (maintained or derived) for translation. |
|
| Target domain:
|
|
| Target type. Currently only "RampID" is supported. |
The output table is created by the job that you run. For an example, see the "View the Output Table" section below.
Note
You can translate both maintained RampIDs and derived RampIDs in your table. For more on RampID types and versions, see “RampID”.
Create the Metadata Table
The metadata table passes the required credentials, specifies the type of operation, and specifies the column names in the input table to reference for the original RampIDs, the domain to translate to, and the identifier type.
Note
As long as the column names in the input table stay the same, the original metadata table can be reused for multiple operations. You only need to create a new metadata table if you change the column names in the input table.
To create the metadata table:
Update the following variables in the Execution Steps sample SQL shown below and then run the SQL:
<
client_id>: Enter either an existing client ID or a new one provided in implementation (for more information, see "Authentication").<
client_secret>: Enter the password/secret for the client ID.<
input_table>: Enter the table path of your input table. Note that you will have to specify the packaged clean room path which will replace the catalog of the table path.<
output_table>: Enter the desired name of the output table.<
target_column>: Enter the column name of the input table which contains the RampIDs to be translated.<
target_domain_column>: Enter the column name of the input table which contains the target domain for the encoding the RampIDs should be translated to.<
target_type_column>: Enter the column name of the input table which contains the target identifier type.
CREATE OR REPLACE TABLE {{ input_schema }}.transcoding_meta_table(
  config variant
);
INSERT INTO {{ input_schema }}.transcoding_meta_table VALUES (
   PARSE_JSON('{
       "client_id": "<your_client_id>",
       "client_secret": "<your_client_secret>",
       "execution_mode": "transcoding",
       "execution_type": "TRANSCODING",
       "input_table":" “creator.{{ input_schema }}.transcoding_input_table",
       "output_table": "transcoding_output_table",
       "target_column":"RAMPID",
	"target_domain_column":"TARGET_DOMAIN"
	"target_type_column":"TARGET_TYPE"
   }')
);
Add Your Input Table and Metadata Table to the Clean Room
Before you perform an identity resolution run on input tables and metadata tables in your account, you need to add those tables to the clean room:
Open the clean room and select the “Input data” tab.
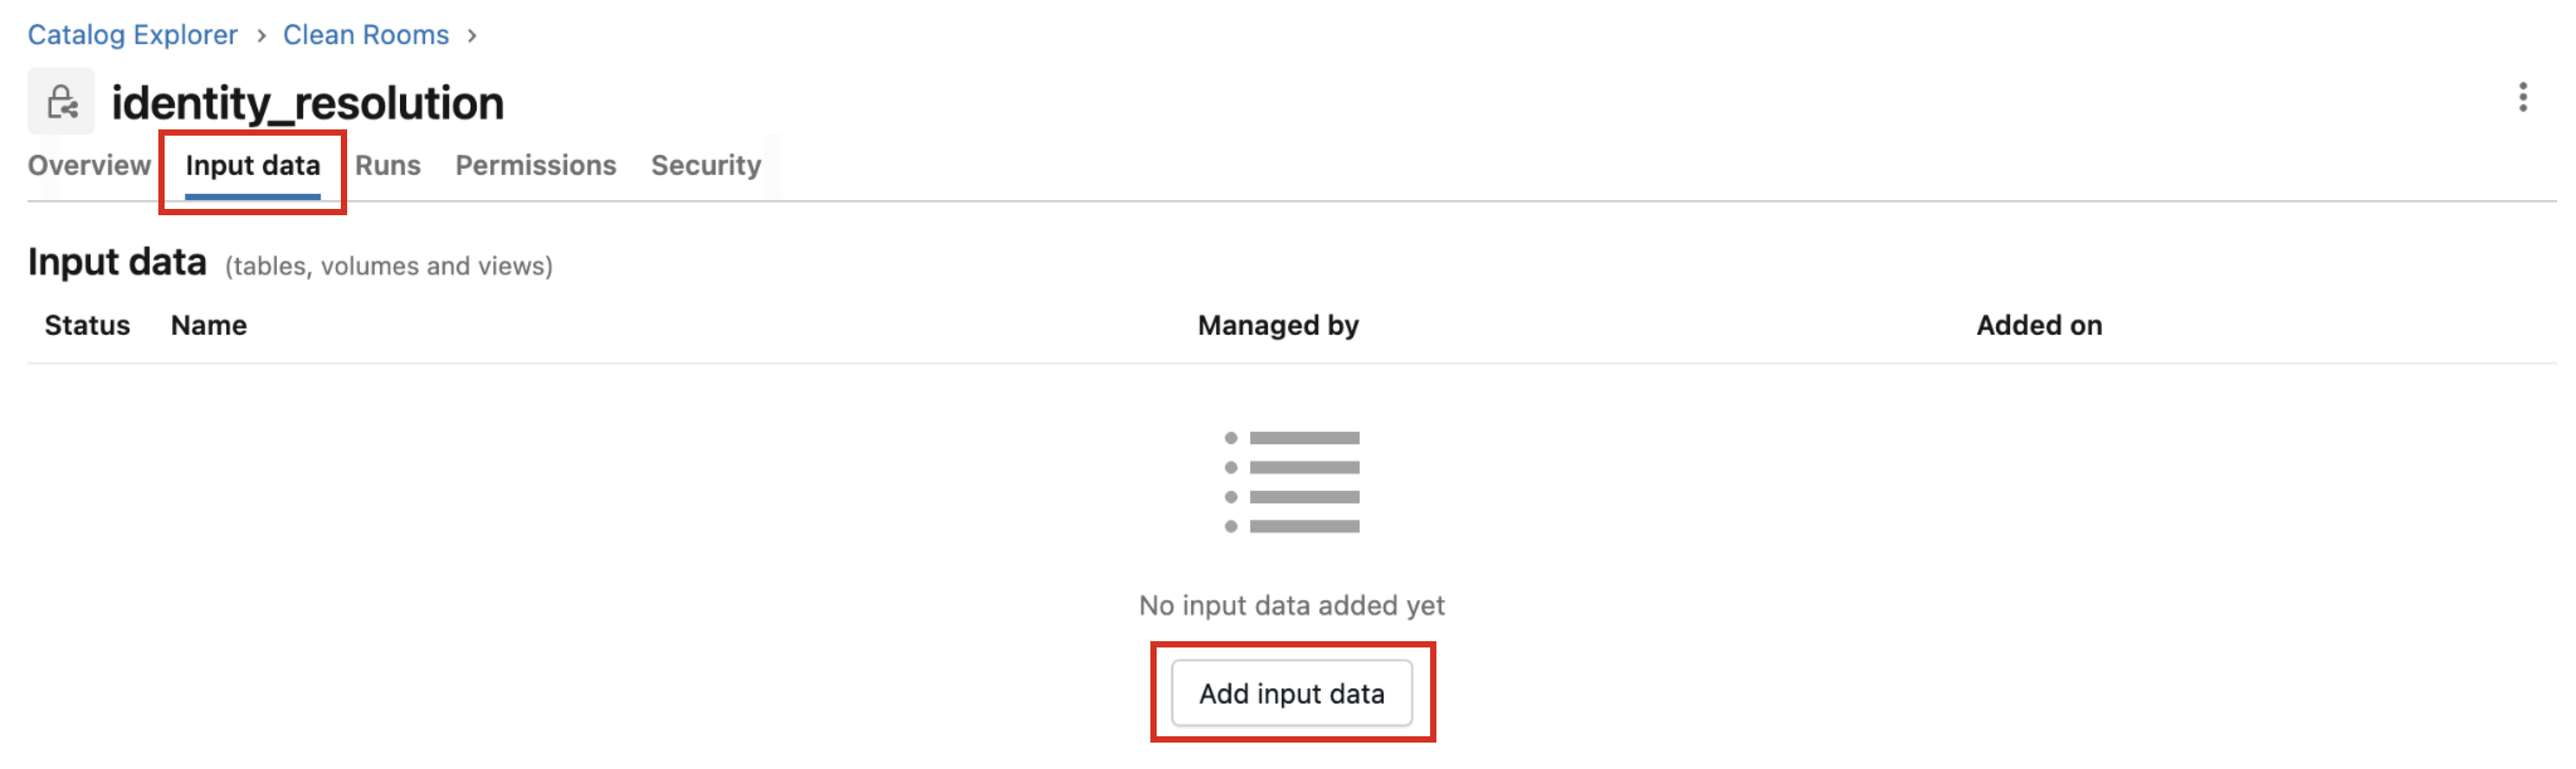
Click and then select the appropriate input table and metadata table.
Note
If you want to rerun an input table and metadata table that you’ve run previously, you do not need to add them again.
Click .
Run the Notebook
Once the clean room has been created and the tables have been added to the clean room, you can perform the identity translation operation by running the notebook:
Note
Only users with the EXECUTE CLEAN ROOM TASK permission can run the notebook.
If you’ve run a previous operation and want to save the previous output table, make sure to copy it before running the notebook (the previous output table will be overwritten).
Open the clean room.
Click to enter into the notebook.
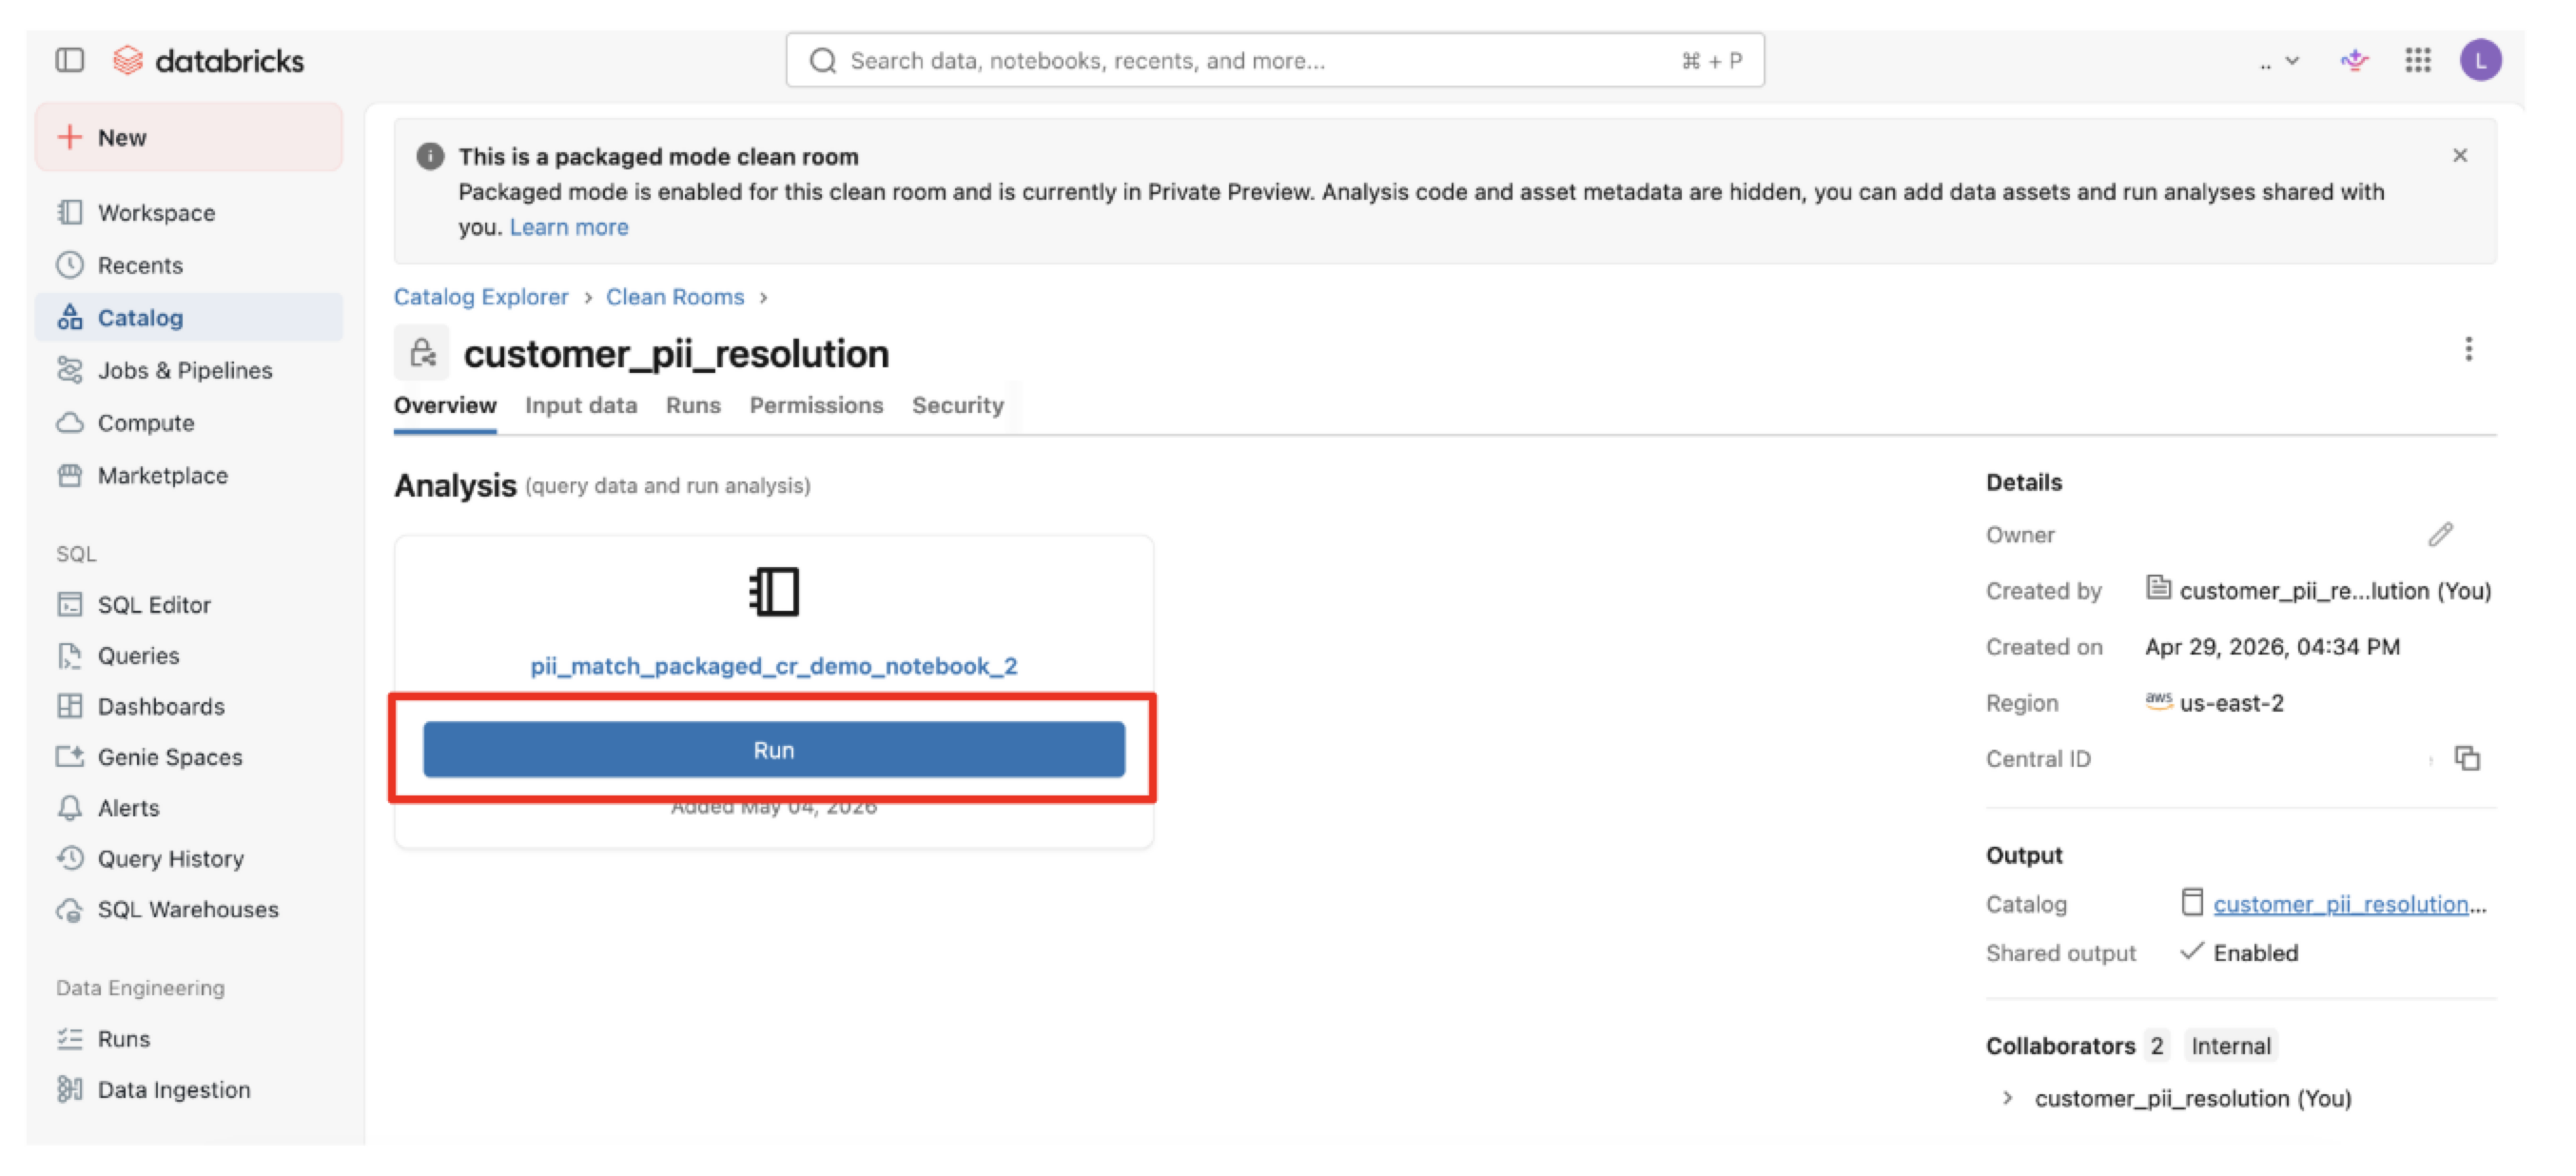
From the Parameters area of the Run notebook dialog, click .
Enter a parameter of "meta_table" and then enter the name of the metadata table that includes the configuration for the Identity job.
Note
Because the metadata table specifies the input table to use, you do not need to add that table as a parameter.
Check the check box for "Save the notebook output" and then enter or adjust the name of an output catalog where the output table and shared schemas (logging and metrics tables) will populate.
Click .
View the Output Table
The identity translation results will be stored as a new schema in the specified catalog for up to 30 days or until you run another operation (which overwrites any existing output table).
Note
Each output table is retained for a maximum of 30 days. To use the output table in your Databricks account, you’ll need to copy it before you run another operation or within 30 days (whichever comes first).
To view the output table:
From the clean room, click the output schema link in the Output schema column.
From the Overview tab, click the output table link in the Name column.
The output table includes the columns shown in the table below.
Column | Example | Description |
|---|---|---|
|
| Returns the original RampID included in the input table. |
|
| Translated |