Configure ATS Analytics for Prebid.js
If you've already implemented ATS, you can easily set up ATS Analytics to see helpful metrics related to your placement. To do this, you must create an Analytics Adapter in console and use the automatically generated snippet to integrate with Prebid.js. This method works for both ATS.js and API implementation of ATS.
Before You Begin
Add ATS Analytics to your subscription from the Marketplace.
Configure Prebid.js for ATS with the ATS Analytics module. You can check to see if your Prebid.js already has ATS Analytics module installed by calling the function
pbjs.installedModulesin your your browser console. We recommend running the latest version of Prebid, or at least version 8.27.0 and above.Caution
If you are running Prebid in the EU, it is strongly recommended to include the following modules in conjunction with your TCF Consent Management Platform (CMP) when configuring Prebid.js:
This ensures that Prebid can effectively receive and enforce a user’s consent choices in line with GDPR requirements.
Make sure you are running only one Prebid library/version on your page. Running multiple libraries/versions of Prebid can cause issues when sending data to LiveRamp’s back-end which can result in empty or incomplete data.
Note
While ATS Analytics supports Prebid module version 3.26 or higher, we recommend running the latest version or version 8.27.0 and above to make sure you're able to see complete data on the analytics dashboard.
Running a Prebid.js version older than 5.20.00 will result in the dashboards/metrics using the bid_won data in their calculations not working properly.
Create an ATS Analytics Adapter for Prebid.js
From the navigation menu in Console, select the ATS Analytics tab and then select the Adapters tab.
In the Analytics Adapters area, click Add.
From the Select Placement dropdown, select the desired placement.
Click Submit.
Update your Prebid installation with the code snippet for the new placement ID:
In the row for the new placement, click the three dots and then select "Get Snippet."
Click Copy to copy the code snippet. Make sure the "PID" parameter from the code snippet matches the placement ID you use elsewhere for ATS and Prebid.
Warning
Winning Bids data are not shown if your Prebid version is older than 5.20.0. In order to collect bids won data, Prebid version 5.20.0 or higher must be installed on your site. Click here to go to the Prebids download page.
Add the snippet into the code for the Prebid module on every page of your site(s). The code snippet is used to fire and load the analytics JavaScript directly on your page. See the example below:
    pbjs.que.push(function () {
      pbjs.enableAnalytics([{
        provider: "atsAnalytics",
        options: {
          pid: "9999"
        }
      }])
    });
Tip
See Prebid's documentation on Analytics adapters for more information.
Test Your ATS Analytics Module Configuration
Use this test guide to make sure the ATS Analytics adapter has been implemented properly within Prebid.js and on your page:
Enable debug mode for Prebid.js by adding "pbjs_debug=true" to the end of your page’s URL. For example: https://www.example.com/prebid_demo.html?pbjs_debug=true.

Make sure you are using Prebid version 5.20.0 or higher by opening your browser console and entering
pbjs.version.
Check whether the ATS Analytics adapter is loaded on the page by opening the browser console and look for the event:
ATS Analytics - adapter enabled!
ATS Analytics module uses a sampling rate of 1/100, using dice roll method where a 100 sided dice is rolled every time an ad request is made to determine if logs should be sent to Console. When data can be sent, you will see the following message in the console of the browser:
ATS Analytics - Should Fire Request: true. You must refresh the page untilfalsechanges totrueto see if data is correctly sent.
When
ATS Analytics - Should Fire Request:is set totrue, go to the network tab in your browser console, look for "analytics.rlcdn.com" and check if the status code is a 200.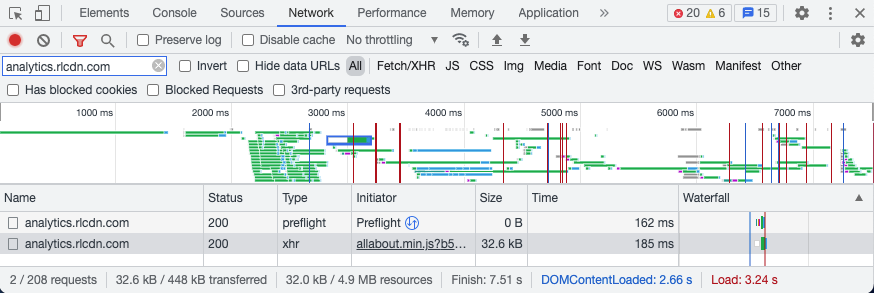
Note
If you are experiencing issues with the Analytics Adapter not sending data to our backend (causing your ATS Analytics page to not show any data), we recommend you to update your Prebid module to at least version 7.6.0.
Schema Validation for Incoming Prebid Analytics Data
Console uses API gateway validations to make sure that the data sent to us is following the requirements needed for us to process it successfully. When invalid data in the payload is sent to Console, an "Invalid request body" error message will be shown in the console of the browser.
Name | Type | Validation | Required |
|---|---|---|---|
| number | Required | |
| boolean | ||
| string | MinAllowedCharacters: 1, MaxAllowedCharacters: 50 | Required |
| string | MinAllowedCharacters: 1, MaxAllowedCharacters: 30 | Required |
| string | MinAllowedCharacters: 1, MaxAllowedCharacters: 50 | Required |
| string | MinAllowedCharacters: 1, MaxAllowedCharacters: 40 | Required |
| number | ||
| string | MinAllowedCharacters: 1, MaxAllowedCharacters: 5 | |
| string | MinAllowedCharacters: 1, MaxAllowedCharacters: 60 | Required |
| boolean | ||
| boolean | ||
| string | MinAllowedCharacters: 1, MaxAllowedCharacters: 10 | Required |
| string | MinAllowedCharacters: 1, MaxAllowedCharacters: 30 | |
| string | MinAllowedCharacters: 1, MaxAllowedCharacters: 15 | Required |
| string | MinAllowedCharacters: 1, MaxAllowedCharacters: 40 | Required |