Configure How Identifiers Are Obtained
Once you have created an ATS configuration, you can specify how you want ATS to obtain identifiers from your sites. In this article, you will learn how to send identifiers directly to ATS.js, or configure ATS to detect identifiers on your sites.
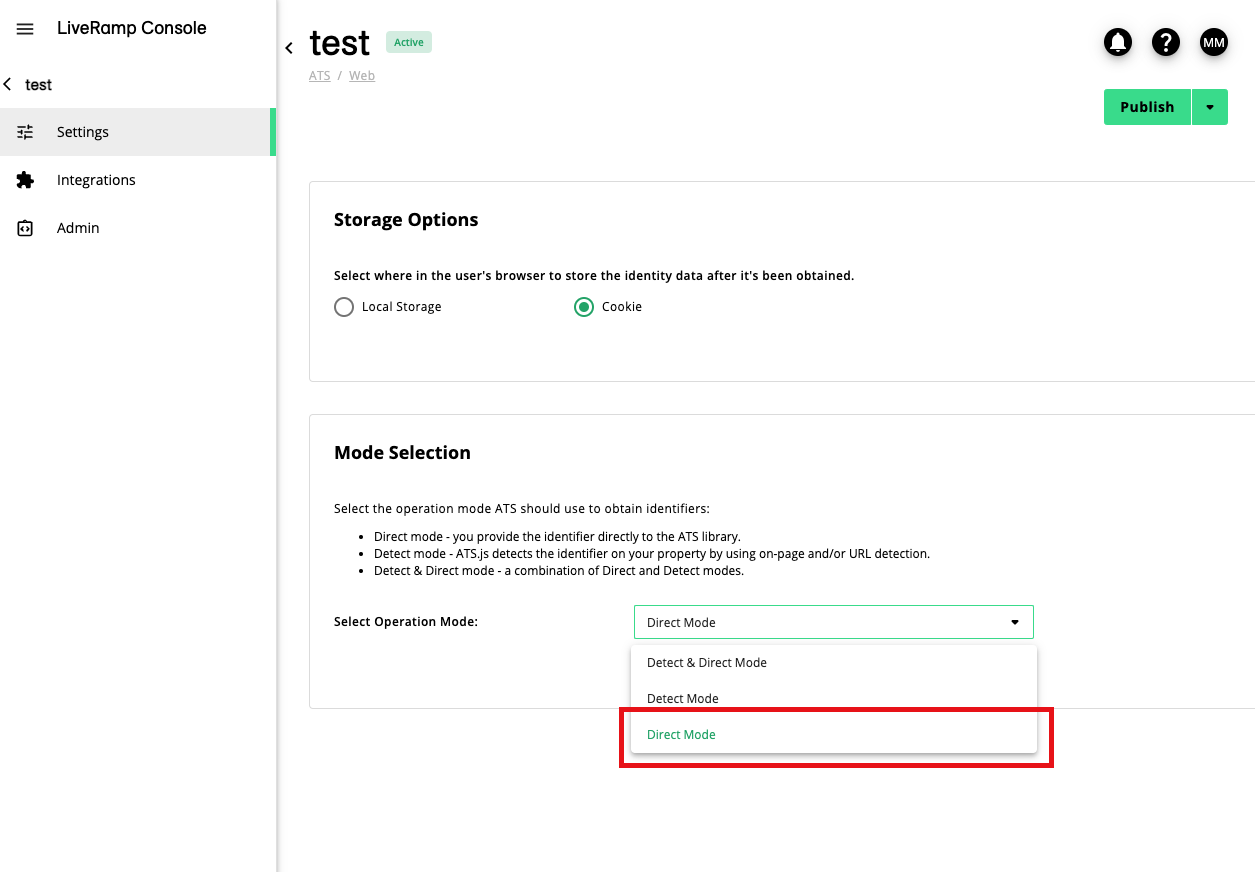
In Console, select ATS → Web, click the desired ATS configuration and select the Settings tab. You can select your preferred detection mode under the "Mode Selection" section.
ATS for Web (ATS.js) has two basic modes of operation: direct and detect mode.
In direct mode, you provide the identifier directly to the ATS library. This works if you already have user login information on your backend.
In detect mode, you can use DOM or URL-driven detection methods. This works if you know that users will provide an identifier on your property, but you aren't able to provide it server-side (i.e., if you have a newsletter signup provided by a third-party widget).
You can also use a combination of the two modes by selecting "Detect & Direct Mode" from the Select Operation Mode dropdown. Follow the configuration instructions for both detect mode and direct mode below.
Note
A sure-fire way to ensure that the identifier is usable by demand is to include the identifier directly in your configuration.
Configure ATS With Direct Mode
if you already have user login information on your backend, use direct mode to provide the identifier directly to the ATS library. To use direct mode, certain functionalities need to be enabled in the ATS configuration. Note that ATS can be used with any form or way of integration as long as the identifier (email or phone number) is stored somewhere. The flow doesn’t differ between log-in modules, newsletter sign-ups, or any other form of collection of the user’s identifier. The only difference between each integration is how the email is fetched from the provided technology. The push towards the ATS script will always be done in the same manner.
There are two ways emails can be passed directly to ATS: either by passing the raw email, where the hash will be applied by LiveRamp before the call to create the envelope goes out, or by passing the already hashed email.
Phone numbers can be passed as either raw for U.S. numbers, where the hash will be applied by LiveRamp before the call to create the envelope goes out, or with SHA-1 hash already applied for other phone numbers. Raw U.S. phone numbers can be passed with or without extraneous characters as our library automatically removes such characters.
Pre-Processing for Raw Email Identifiers
While ATS.js handles some of the email normalization automatically, If you are passing raw emails directly to ATS, you must still pre-process them to ensure valid identifiers are being sent to ATS.
Note
The library can only normalize plain-text email identifiers.
How to pre-process email identifiers for ATS:
Filter out “fake” email addresses. We recommend using an email validator library to filter out fake emails.
Remove any whitespace (spaces, tabs, etc) in the middle of the email string.
What ATS.js is already doing with email identifiers:
Removes "+" and what comes after it. For example;
JohnDoe+test@email.comwill becomejohndoe@email.com.Removes whitespaces (spaces, tabs, etc) at the beginning and end of an email string.
Sets uppercase to lowercase.
For Gmail addresses, removes any dots "." before "@". For example
John.Doe@gmail.comwill becomejohndoe@gmail.com.Validates the email against a regular expression. You can use the below regex as a starting point for email validation, but note that pre-processing is highly recommended to ensure valid identifiers are sent.
const EMAIL_VALIDATION_REGEX = /((([^<>()\[\].,;:\s@“]+(\.[^<>()\[\].,;:\s@“]+)*)|(“.+“))@(([^<>()[\].,;:\s@“]+\.)+[^<>()[\].,;:\s@“]{2,}))/i;
How to Configure Direct Mode
Under the "Mode Selection" section, select Direct Mode from the Select Operation Mode dropdown.
Modify your existing ATS implementation depending on whether you’re passing raw or hashed emails or raw phone numbers:
Passing raw emails: Once the email has been fetched from the provided technology (most likely through their public API), you can pass the raw email to the ATS script as a variable as shown below:
ats.setAdditionalData({'type':'email','id':'<EMAIL_VARIABLE>'})The script will hash the email before the outgoing call will be made to LiveRamp to create the envelope.
Warning
Make sure the event listener envelopeModuleReady is loaded before
ats.setAdditionalDatato avoid the risk of the ATS library being called before the envelope module is fully loaded.Passing hashed emails: LiveRamp supports three different hash methods: SHA1, SHA256, and MD5. The hashed email(s) have to be provided in an array and you can include up to all three methods in one push. Note that our ATS library does not allow for an empty element or placeholder within an array. This will not result in an envelope even if it contains a hashed email.
While the ATS script only needs one hash to create the envelope, we highly recommend providing the ATS Library with all three email hash types to get the best match rate. If you are only able to provide one hash, use SHA256 for EU/EAA and SHA1 for U.S.
ats.setAdditionalData({
   'type': 'emailHashes',
   'id': [
       "<EMAIL_HASH_SHA1>",
       "<EMAIL_HASH_SHA256>",
       "<EMAIL_HASH_MD5>"
   ]
})
Passing raw phone numbers (for U.S. numbers): For U.S. phone numbers, you can pass them raw directly to the ATS script with or without extraneous characters. Our library automatically removes the following characters; +1, ., (, ), -, [space] before the phone number is hashed and sent to the ATS API.
atsenvelopemodule.setAdditionalData({
  id: '4155556656',
  type: 'phoneNumber'
});
Passing hashed phone numbers: Country codes, parentheses, and hyphens must be removed before applying SHA-1 hashing. For example, if the input number is "+1(555) 123-4567", it should be converted to "5551234567" before hashing.
atsenvelopemodule.setAdditionalData({
            'type': 'phoneNumberHashes',
            'id': ["<PHONE_HASH_SHA1>"
]
     });
Configure ATS With Detect Mode
Configure ATS with detect mode so ATS knows how to automatically retrieve the identifier, and knows how and when to transform PII into secure, encrypted identity envelopes.
Select Detect Mode from the Select Operation Mode dropdown. The "Detection Settings" section displays.
Select how the identifier should be obtained. You can choose one of the following options:
URL detection: ATS will watch for an identifier in a URL parameter.
On-page detection: ATS will detect an identifier on a website.
Note
When On-page detection is selected you must set the event for which it needs to listen to and also set any CSS selectors it needs to obtain the identifier from.
On-page & URL detection: ATS will use a combination of On-page and URL detection.
If you selected a method that includes URL detection, use the Enter URL Query Parameters field to enter the parameters ATS should use to check for values in the URL. Your URL must contain a question mark (?) to separate the base URL from the query parameter for ATS URL detection to work correctly.
Note that you shouldn't include the full URL and only enter the query parameter you want. For example, if users click through email notifications and land on “https://example.com/alerts?email_trigger=user@liveramp.com”, you can configure ATS to check values in the 'email_trigger' parameter by entering email_trigger in the Enter URL Query Parameter field.
ATS.js can also detect multiple hashed identifiers (SHS1,SHA256, or MD5) in the URL. For example:
https://example.com/signup?param_a=#####¶m_b=#####¶m_c=#####
For multiple query parameters, you can use a comma or click enter to separate each one.
If you selected a method that includes On-page detection, you must configure when ATS should detect the identifier, which element to trigger the detection, and where to find the identifier.
Use the Start Detecting Identifier on dropdown to choose the listener event type for when ATS needs to actually detect the identifier on the website:
Click Event: Click event will fire off whenever a specified element is clicked.
Submit Event (recommended): Submit event will fire off whenever a specified form is submitted. We recommend this option because only identifiers from valid form submissions, such as successful logins, are obtained.
If you selected Click Event or Submit Event, add the element selectors to define which elements on your page should trigger the event.
For Click Event: Specify the element ID or element class of the button the user needs to click. In the Enter Element Selector field, you must add a
.at the beginning of a class, and a#at the beginning of an ID.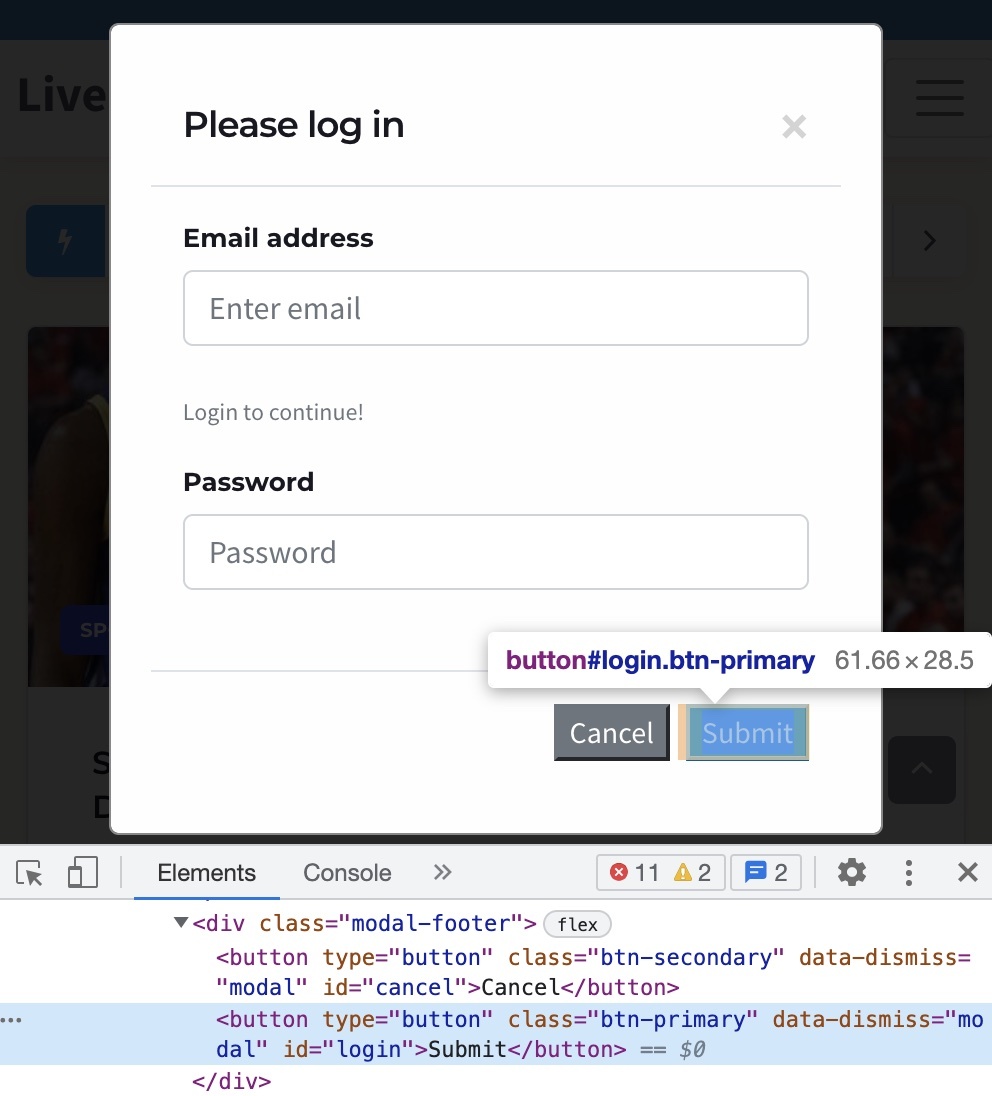
Based on the example above, you may use one of the following as an element selector:
Element class:
.btn-primaryElement ID:
#login, or the complete element ID (required in some cases);button#login.
For Submit Event: Specify the element ID or element class of the entire form the user needs to submit. In the Enter Element Selector field, you must add a
.at the beginning of a class, and a#at the beginning of an ID.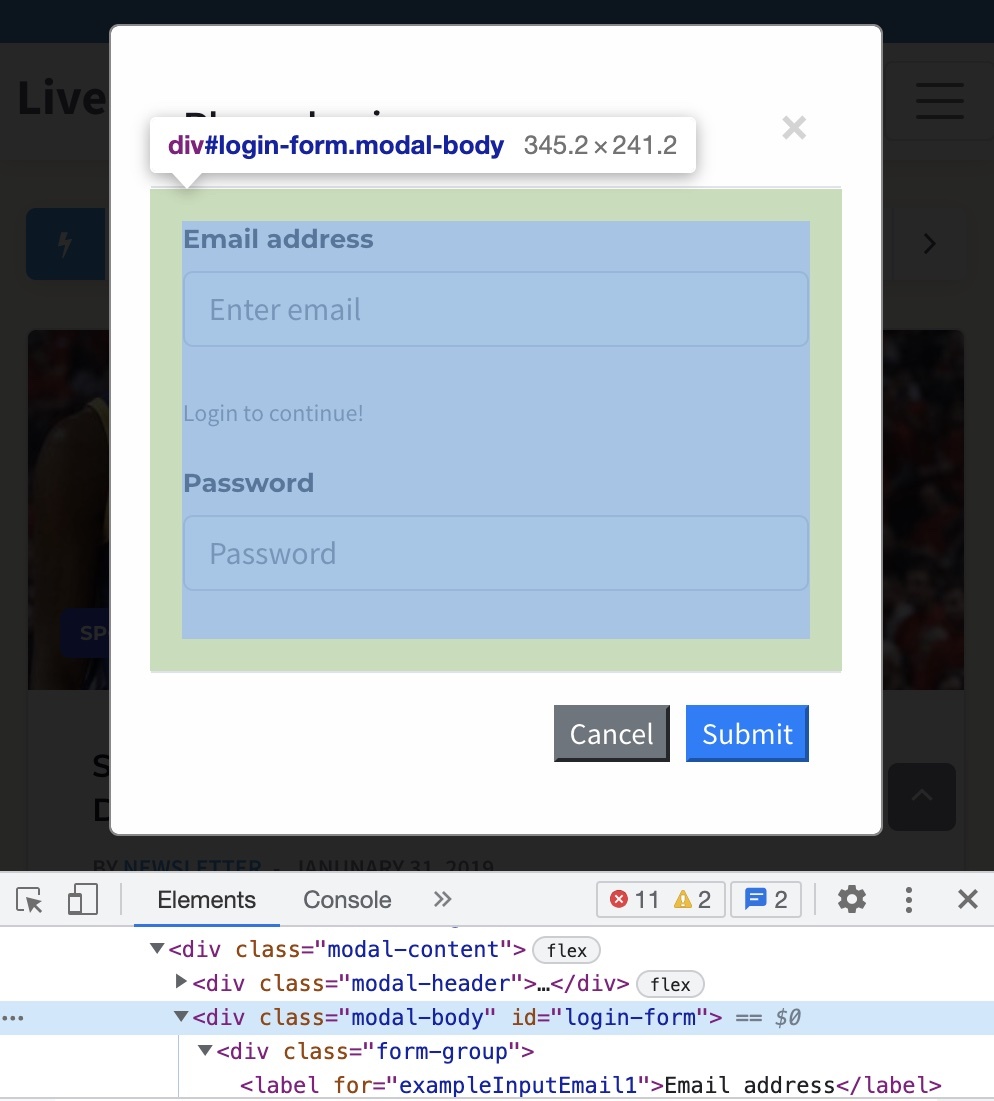
Based on the example above, you may use one of the following as an element selector:
Element class:
.modal-bodyElement ID:
#login-form, or the complete element ID (required in some cases)div#login-form
If you selected a method that includes On-page detection, select one or more standard CSS selectors that instruct ATS where to watch for identifiers:
Note
We recommend to use CSS element IDs instead of HTML elements in your forms. Element IDs are unique and therefore less error-prone when ATS.js tries to obtain the identifier.
When using element IDs, it is advisable to select ‘Custom selectors’ and provide the element ID.
Upon email input
Upon text input
For paragraphs
For labels
For span
Custom selectors (Recommended)
If you selected Custom selectors in the previous step, you must specify the element ID or element class of the field where the user needs to enter their identifier. In the Enter Element Selector field, you must add a
.at the beginning of a class, and a#at the beginning of an ID.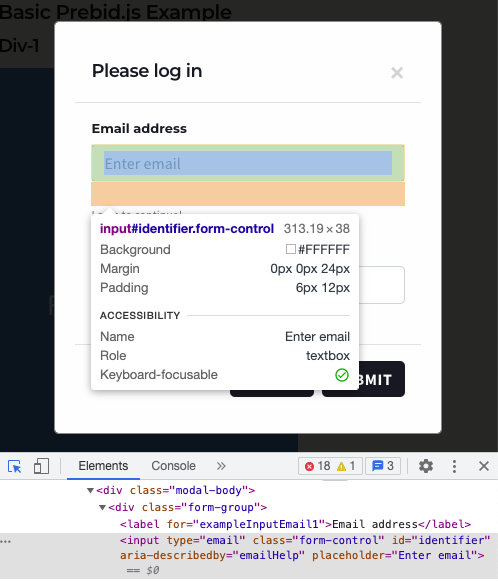
Based on the example above, you may use one of the following as an element selector:
Element Class:
.form-controlElement ID:
#identifier
Select the appropriate radio button under “Detect Identifier on” to specify whether ATS should detect the identifier on every page or on some pages.
If you choose “Some Pages”, a row appears for you to add rules to configure which pages ATS should try to detect identifiers on.
If you have a site that has parts that load dynamically, or if you want to have ATS load only on specific browsers, configure additional advanced settings.
Configure Advanced Settings for Detect Mode
If you have a site that has parts that load dynamically, or if you want to have ATS load only on specific browsers, configure additional advanced settings:
Click “Advanced” on the right side of the page to open additional settings.

From the Select Type of Identifier dropdown, choose the type of identifying value(s) ATS will be obtaining:
Email
Phone Number (U.S. ten-digit number)
Note
Currently, detect mode can only accept ten-digit phone numbers.
Note
Due to a lack of support for SHA1 hashing, phone numbers are not supported on Microsoft IE/Edge browsers.
Custom Identifier (when selected, a customer ID regex needs to be provided)
Envelope (only applicable when using URL detection. When selected, other identifier types will be disabled)
Hashed Identifier (only applicable when using URL detection)
If you selected “Hashed Identifier” as the detection object, use the Select Hashed Object dropdown to specify which identifier will be included in the URL:
Hashed email (MD5, SHA1 and SHA256 hashes are allowed for email)
Hashed phone number (only SHA1 hashes are allowed for phone numbers for detect mode)
Note
If you decide to pass email hashes, make sure that you:
Validate the email against a regular expression
Filter out “fake” email addresses
Remove whitespace (spaces, tabs, etc)
Downcase the email address
To choose whether to run ATS only on specific browsers, check the appropriate check boxes in the Detect Identifier on Browser(s) dropdown.
If you use a method that includes On-page detection and your site has parts that load dynamically, check the check box for “Detect Dynamic Elements”.
Note
An example of this would include a website that has infinite scroll or a newsletter subscription pop-over that appears after the initial page load.