Configure an Export Process
An export process extracts elements of your first-party graph into a file for consumption by downstream clients of the identity graph, or RampIDs. Within an export process, you can select the fields you want to extract or write SQL statements using Spark SQL syntax to create different views of the output for systems that have distinct requirements or use cases.
When you run a workflow:
The export process extracts data from your first-party graph based on your selected fields or configured SQL statements.
Any relevant privacy suppressions are applied based on the configured consent behavior.
The refined data is output into a Google Cloud Storage (GCS) bucket or table where it can be accessed by other processes.
Once you configure a data preparation process and a resolution process, you can configure one or more export processes. If the option to configure an export process is grayed out, it indicates that your data preparation process or resolution process has not yet been configured.
There are two types of export processes to select from:
Known Data Export: Export known first-party data for consumption by downstream clients.
RampID Data Export: Export RampIDs (tied to Enterprise IDs) that you can use for other LiveRamp products.
Note
To comply with LiveRamp's data restrictions, any file containing Personally Identifiable Information (PII) received from Identity Engine must be encrypted before being delivered outside of LiveRamp. For more information, see “Export Data Restrictions”.
Once you drag and drop an export process onto your workflow canvas, a yellow warning icon
 indicates that it is not yet configured.
Click the warning icon and select "Configure". If this option is grayed out, it indicates that your data preparation process or resolution process has not yet been configured.
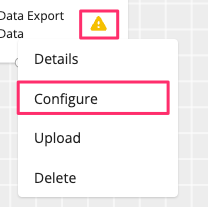
Optionally, to reuse an existing configuration from another process, select "Upload" and select a JSON file that contains the desired configuration.
The Export Process Configuration wizard displays the Process Details step. If you've uploaded a JSON file, all the fields and options will be predefined, which you can modify or leave as is.
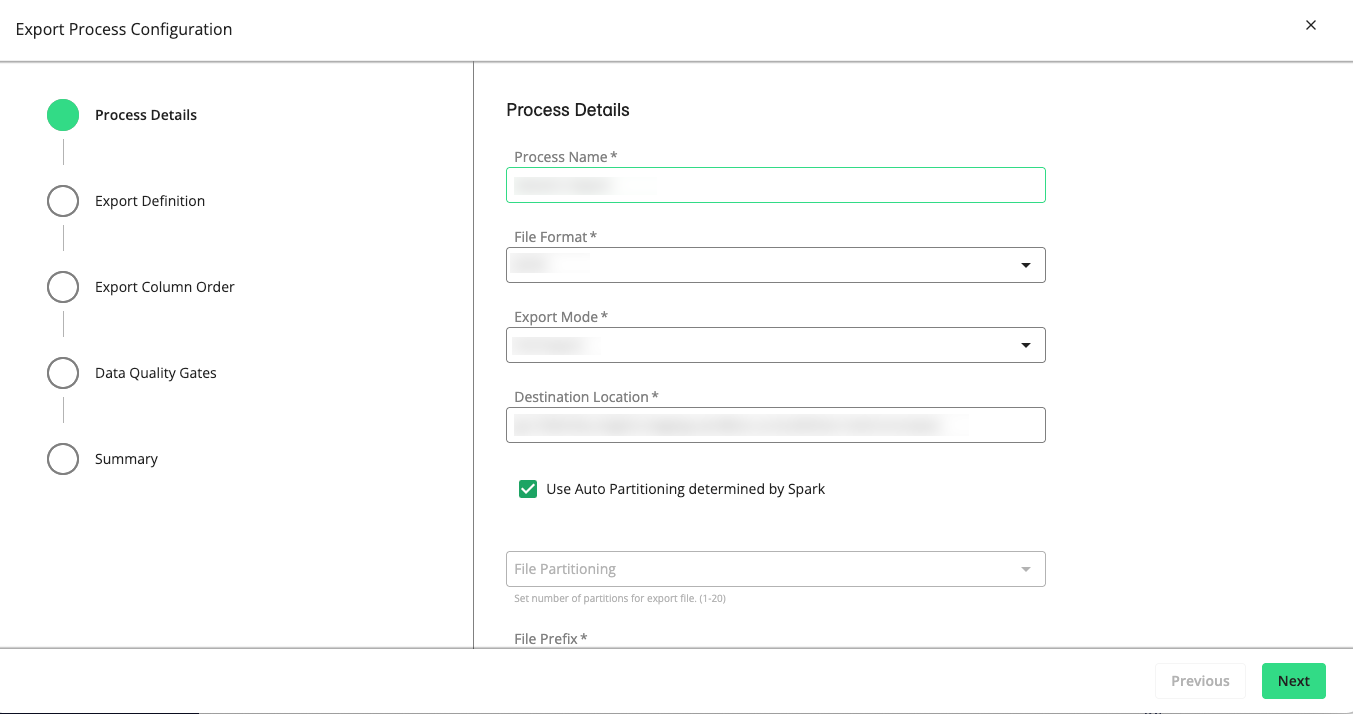
Configure the following process details:
Process Name: Enter a name for this export process.
File Format: Select CSV, Text, or JSON format.
Note
Support for nested field types, such as arrays or structs, requires the JSON format because nested fields are not compatible with CSV.
Enable PGP Encryption on Export File: For known data export, select this option to apply PGP (Pretty Good Privacy) encryption to the exported file.
Field Delimiter: If you selected the CSV format, select one of the following delimiters: comma, pipe, tab, or semicolon.
Add Headers: If you selected the CSV format, you can select this check box to include a heading row in the first line of the exported CSV file.
Export Mode: Choose one of the following modes:
Full Export: Export the entire first-party graph.
Last File Related: For file-triggered builds, filter on records exclusively from the input data that triggered the build.
Graph Change: Filter on records that include changed Enterprise ID formations.
Destination Location: Specify the path to the GCS bucket and folder for your export file. For example,
gs://mybucket/myfolder/myexportfolderNote
If your tenant is linked to a customer home bucket (e.g.,
gs://lc-123456-abc89edf/), the will have a dropdown list of the available buckets. The location you enter must begin with the path (URI) of one of the allowed buckets in the list.File Partitioning: Select either "Auto (Spark partitioning)" or a value from 1 through 20.
File Prefix: If you specified a numeric partitioning value, you must define a file prefix.
(Optional) Description: Enter any important details that other users may need to know about this export configuration.
Click . The Export Definition step displays the Attribute Selection table. There are two ways you can specify the fields you want to extract:
Using the Attribute Selection table: Click the arrows to display available fields within each group and select the fields you want to see in your export file.
Writing a SQL query statement: Switch on the "Input Export Definition using SQL" toggle to display the Export Definition (SQL) box. By default, it includes the following query statement:
SELECT portraitId
FROM genDf
Where
portraitIdrefers to Enterprise IDs andgenDfis the name of a temporary Spark view. For a list of fields in this view, see "genDf Fields".Enter a SQL query statement in the Export Definition (SQL) box that is based on the structure of your input data, the applicable genDf fields, your data extraction needs, and other requirements. For more details, see "Export Process SQL Query Guidelines".
Note
The Export Definition (SQL) box is not a SQL editor. It does not run queries and does not validate SQL code that you enter. You must compose valid SQL code using your preferred tools.
Click . If you have written a SQL query statement, the wizard will skip the "Export Column Order". If you have used the Attribute Selection table in the previous step, the "Export Column Order" displays all the fields you've selected. Click and drag each row based on how you want them to be ordered in the export file.
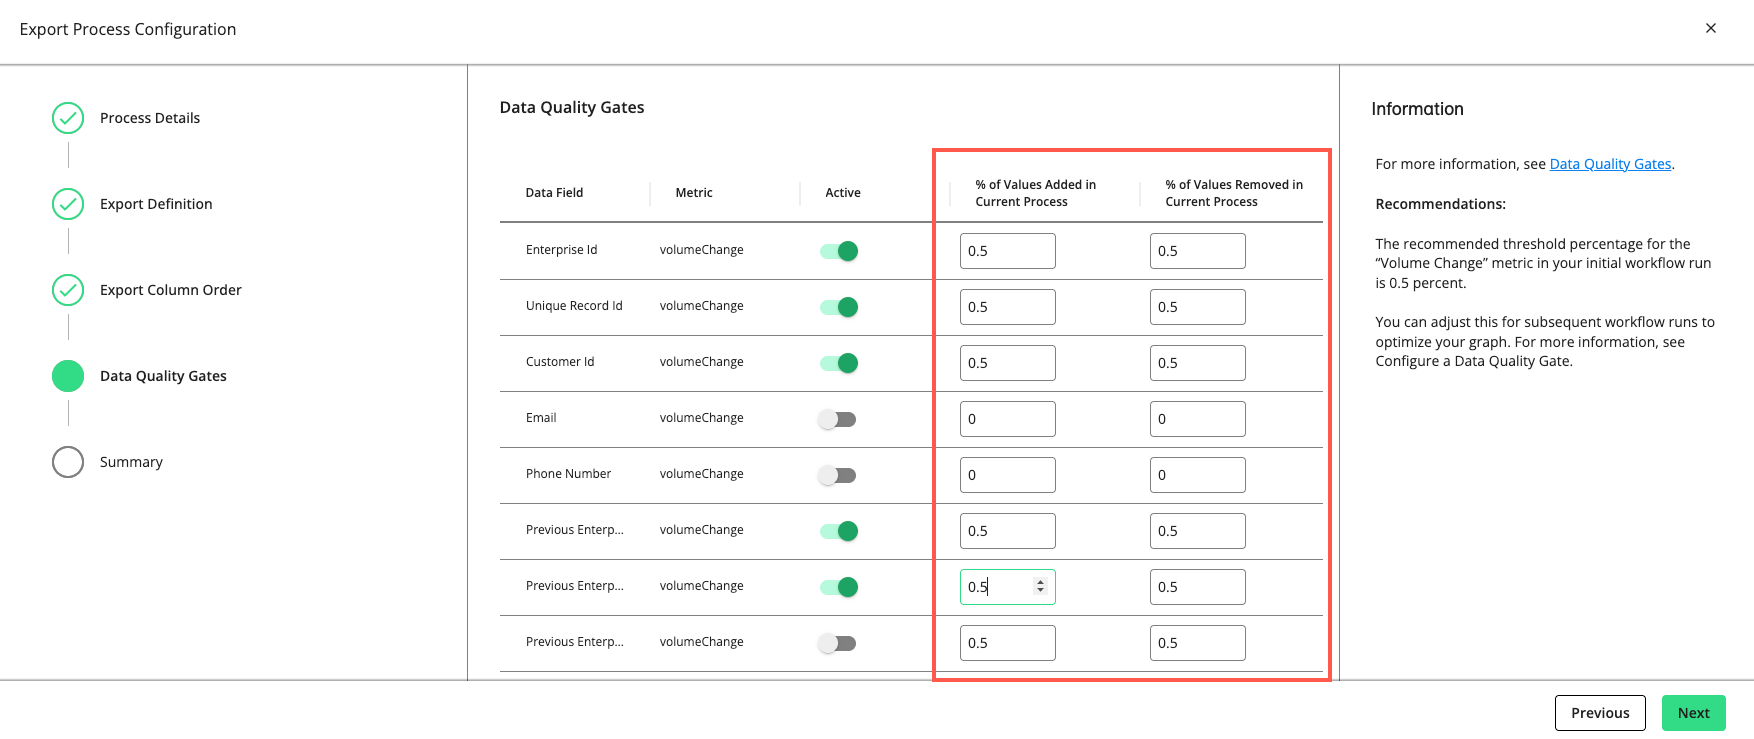
Click . The "Data Quality Gates" step displays the data fields and metrics you can monitor in the process.
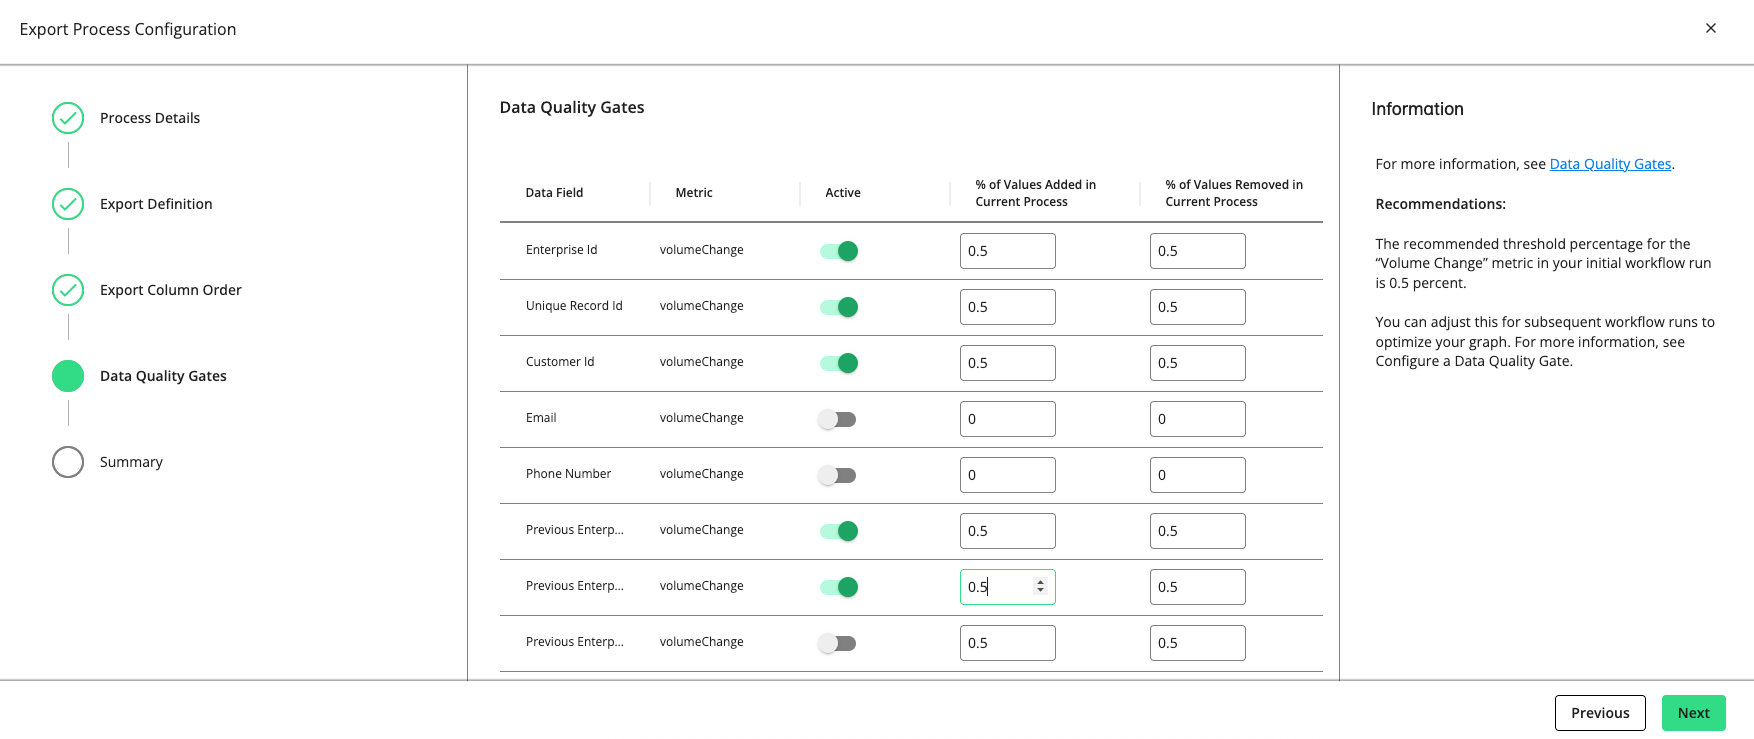
Set a gate to “Active” to have the gate monitor the quality of your data in this process by the metric listed (e.g., “volumeChange”, “mandatory”, “uniqueness”, “uniquenessByGroup”, etc.).
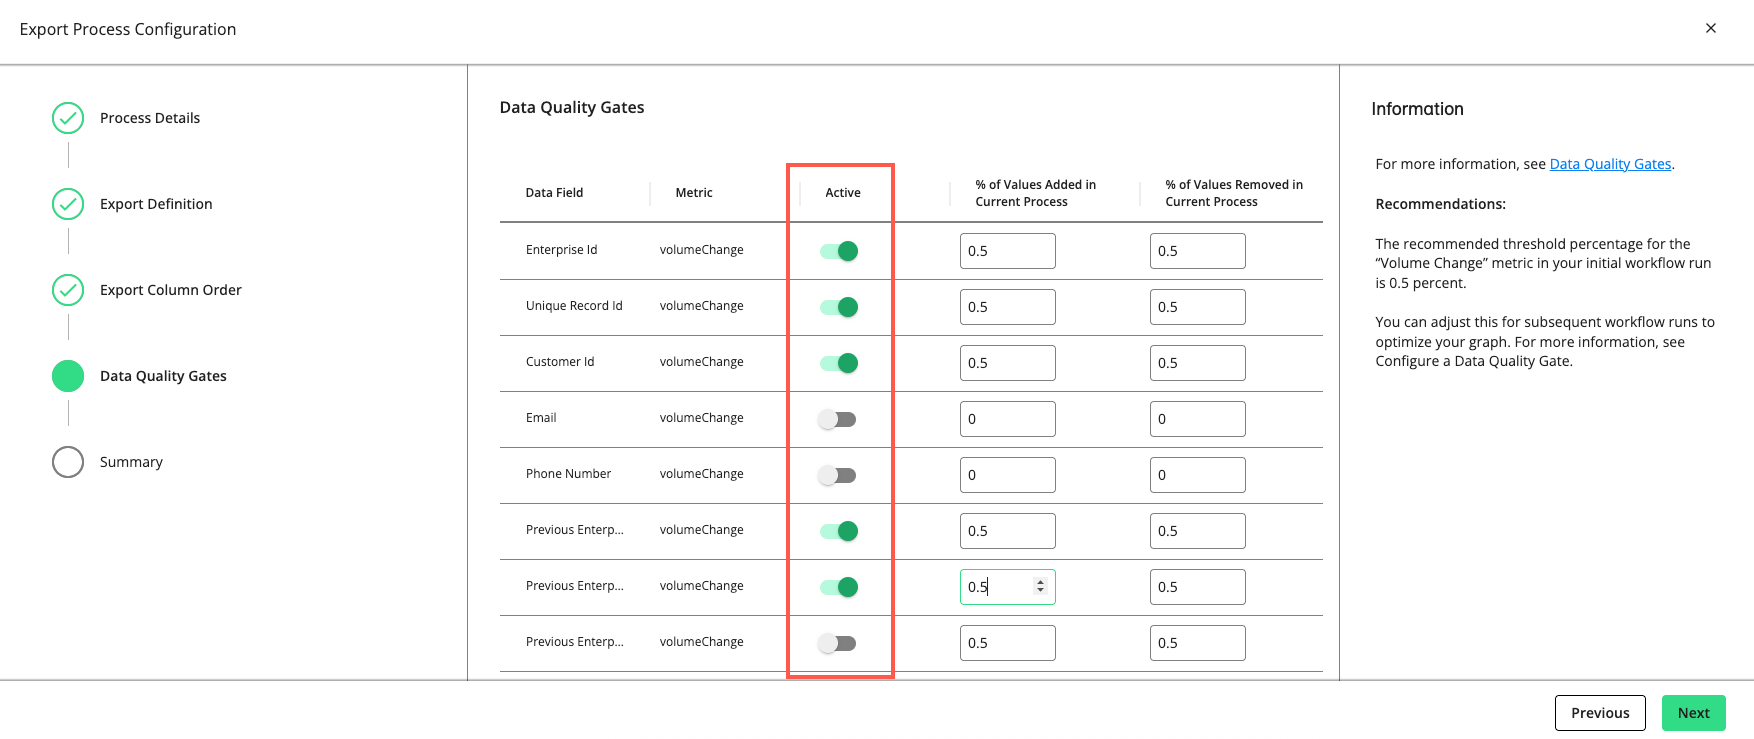
For rows with a "volumeChange" metric, you can adjust the allowable percentage of values added or removed compared to the total volume of the previous run. The default threshold is 0.5 percent. If the percentage of change exceeds the allowed percentage, the gate will cause the process to fail.
Note
The recommended threshold percentage for the “volumeChange” metric in your initial workflow run is 0.5 percent. You can adjust this for subsequent workflow runs to optimize your graph.
Click . The Export Process Configuration wizard displays the Summary step.
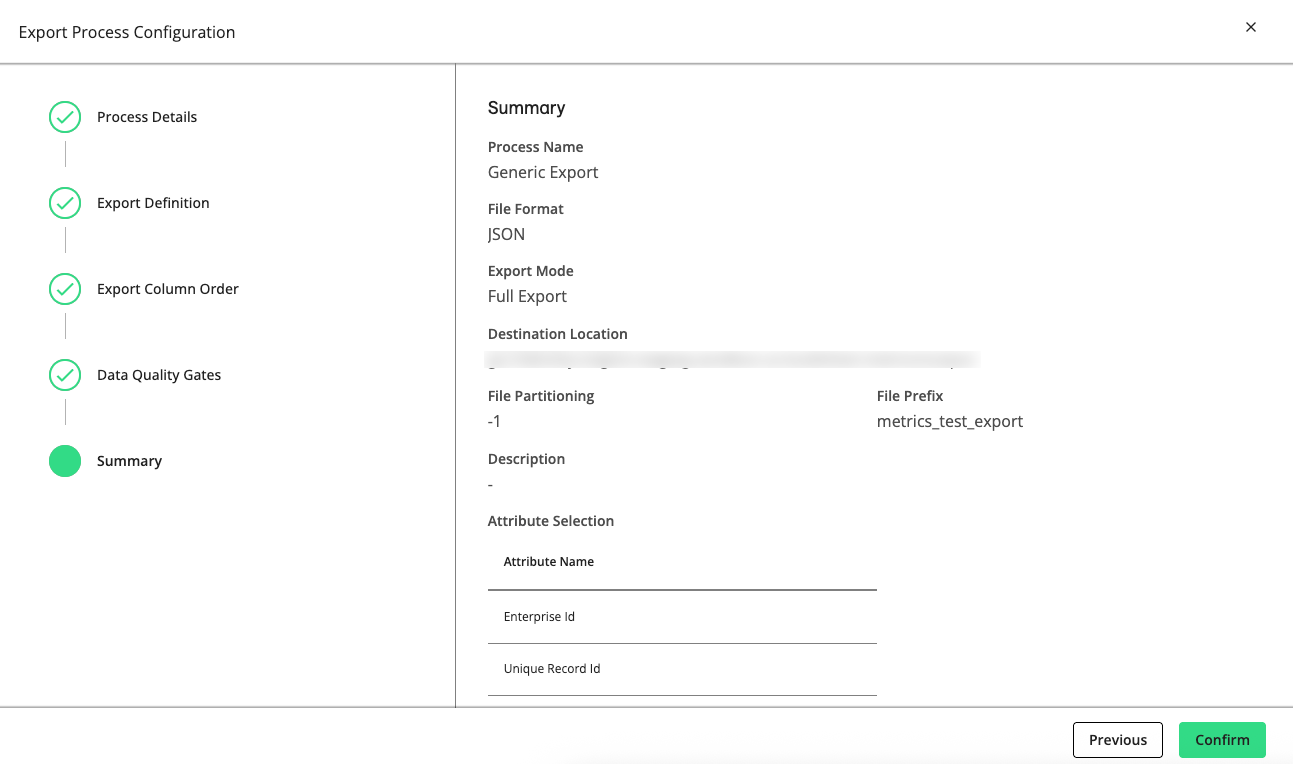
Review the configuration and then click .
Tip
You can reuse the saved configuration for other processes by downloading it as a JSON file. From the Workflow Editor, click the More Options menu (
 ) on a desired process and select . Then click in your new process' menu and select a JSON file that contains the desired configuration.
Export Process SQL Query Guidelines
When configuring an export process, consider the following SQL query guidelines when preparing code to paste into the Export Definition (SQL) box:
Note
When exporting files that have had an enrichment data source, the data appended from this enrichment source may have Customer IDs that don't match the Customer IDs in the original source file. This is especially likely when the appended data is from a different provider. This mismatch occurs because a standard export process outputs row-level data, using only the Enterprise ID for linking the consolidated records. To align the Customer IDs, use Spark SQL or BigQuery SQL to correctly link the appended data’s Customer IDs with the original file’s Customer IDs.
Use Spark SQL syntax to create simple queries.
The Export Definition (SQL) box is not a SQL editor. It does not run queries and does not validate SQL code that you enter. You must compose valid SQL code using your preferred tools.
Avoid overloading the export process with query statements such as
SELECT * FROM genDfAny fields referenced by your query must be included in the input data and mapped by the data preparation process.
Support for nested field types, such as arrays or structs, typically requires the JSON format because nested fields are not compatible with the CSV format. This includes fields such as portraitIdHistory, emails, phones, addresses, and links.
Consider the data types of queried columns. For example, arrays and structs might require additional handling using the explode and transform functions before exporting to CSV format.
Test your queries against your BigQuery tables to verify their columns are available for export.
Sample Query
SELECT
  portraitid,
  portraitIdHistory,
  rawRecord.CCID AS cid,
  rawRecord.COUNTRY_NAME AS country,
  rawRecord.GENDER AS gender
FROM genDf
Sample Query for Retrieving Nested Values
SELECT
  portraitId,
  groupId AS sourceId,
  customerId AS customerId,
  struct(
    people.firstName,
    people.lastName
  ) AS people,
  emails.email AS emails,
  phones.phone AS phones,
  transform(links, x -> struct(
    x.matchConfidence,
    x.cl
  )) AS links
FROM genDf
Sample Query for Flattening Nested Values
SELECT
  portraitId,
  explode(transform(phones, x -> phone)) phone
FROM genDf
genDf Fields
Depending on the export process type, the genDf view provides the following fields for your queries:
For known data export:
portraitid: Enterprise IDs
portraitidHistory: An array with elements containing the history of Enterprise IDs, portraitidUpdateDate, and reasons
generationId: Identifies the build
rawRecord: A struct field for information extracted from the input data, which is structured based on the input schema. All fields from raw input data will persist under rawRecord.
recordId: Unique identifier associated with each PII or AbiliTec link per Enterprise ID
groupId: A three-digit string identifying a specific data source in a workflow
tenantName: A unique name for the tenant
customerId: The unique ID of the customer
people: A nested field containing information about people (if any), such as title, suffix, firstName, middleName, lastName, gender, dateOfBirth, yearOfBirth, firstSeenDate, lastSeenDate, and isValid
emails: An array of structs containing email information (if any), such as email, isotopes, isValid, isfake, firstSeenDate, lastSeenDate, and hashFormat
phones: An array of structs containing phone information (if any), such as phone, phoneType, internalNumber, isValid, firstSeenDate, lastSeenDate, and hashFormat
addresses: An array of structs containing information about physical addresses (if any), such as addressLine{1-4}, addressLineFull, postalCode, zip4, city, state, country, firstSeenDate, and lastSeenDate
links: An array of structs containing link information (if any), such as cl (for ConsumerLink), al (for AbiliTec link), hhl (for householdLink), matchComponents, and matchConfidence
For RampID data export:
portraitId: Enterprise IDs
householdId: Household IDs if your schema includes household-level data
rampId: The pseudonymous identifier tied to a record in the LiveRamp Identity Graph
rampIdType: The metadata stored on a RampID
customerId: The unique ID of the customer
recordID: Unique identifier associated with each PII or AbiliTec link per Enterprise ID
Note
With the exception of raw input data under the rawRecord field, all these fields must be mapped by the data preparation process. For example, if the data preparation process does not map the postalCode field, it will not be available to the export process.
Sample Export Field Hierarchy
| -- portraitId: string
| -- portraitIdHistory: array
| | -- element: struct
| | | -- portraitId: string
| | | -- portraitIdUpdateDate: string
| -- recordId: string
| -- generationId: long
| -- groupId: string
| -- tenantName: string
| -- customerId: string
| -- rawRecord: struct
| | -- field_1: string
| | -- field_2: string
| | -- field_3: string
| | -- ...
| -- people: struct
| | -- firstName: string
| | -- middleName: string
| | -- lastName: string
| | -- gender: string
| | -- dateOfBirth: string
| | -- yearOfBirth: long
| -- emails: array
| | -- element: struct
| | | -- email: string
| | | -- isFake: boolean
| | | -- isValid: boolean
| -- phones: array
| | -- element: struct
| | | -- phone: string
| | | -- internalNumber: string
| | | -- phoneType: string
| | | -- isValid: boolean
| -- addresses: array
| | -- element: struct
| | | -- addressLine1: string
| | | -- addressLine2: string
| | | -- addressLine3: string
| | | -- addressLine4: string
| | | -- addressLine5: string
| | | -- city: string
| | | -- country: string
| | | -- postalCode: string
| | | -- zip4: string
| | | -- state: string
| -- links: array
| | -- element: struct
| | | -- al: string
| | | -- cl: string
| | | -- hhl: string
| | | -- matchConfidence: long
| | | -- matchType: string