Question Builder
You can use LiveRamp Clean Room Question Builder to create a question that includes a SQL query and provides results for either an analytical query or a user list query. You can create queries for ad hoc or repeated use. The Question Builder UI enables you to swap datasets, explore table schemas, create advanced visualizations, validate queries, and reuse questions.
Note
To access Question Builder from within a clean room, you must have the "Question Builder" permission enabled as part of your clean room-level role. For information, see "Manage Permissions Within a Clean Room".
If you have the "Question Builder Admin" permission, you can manage Question Builder access at the organization level.
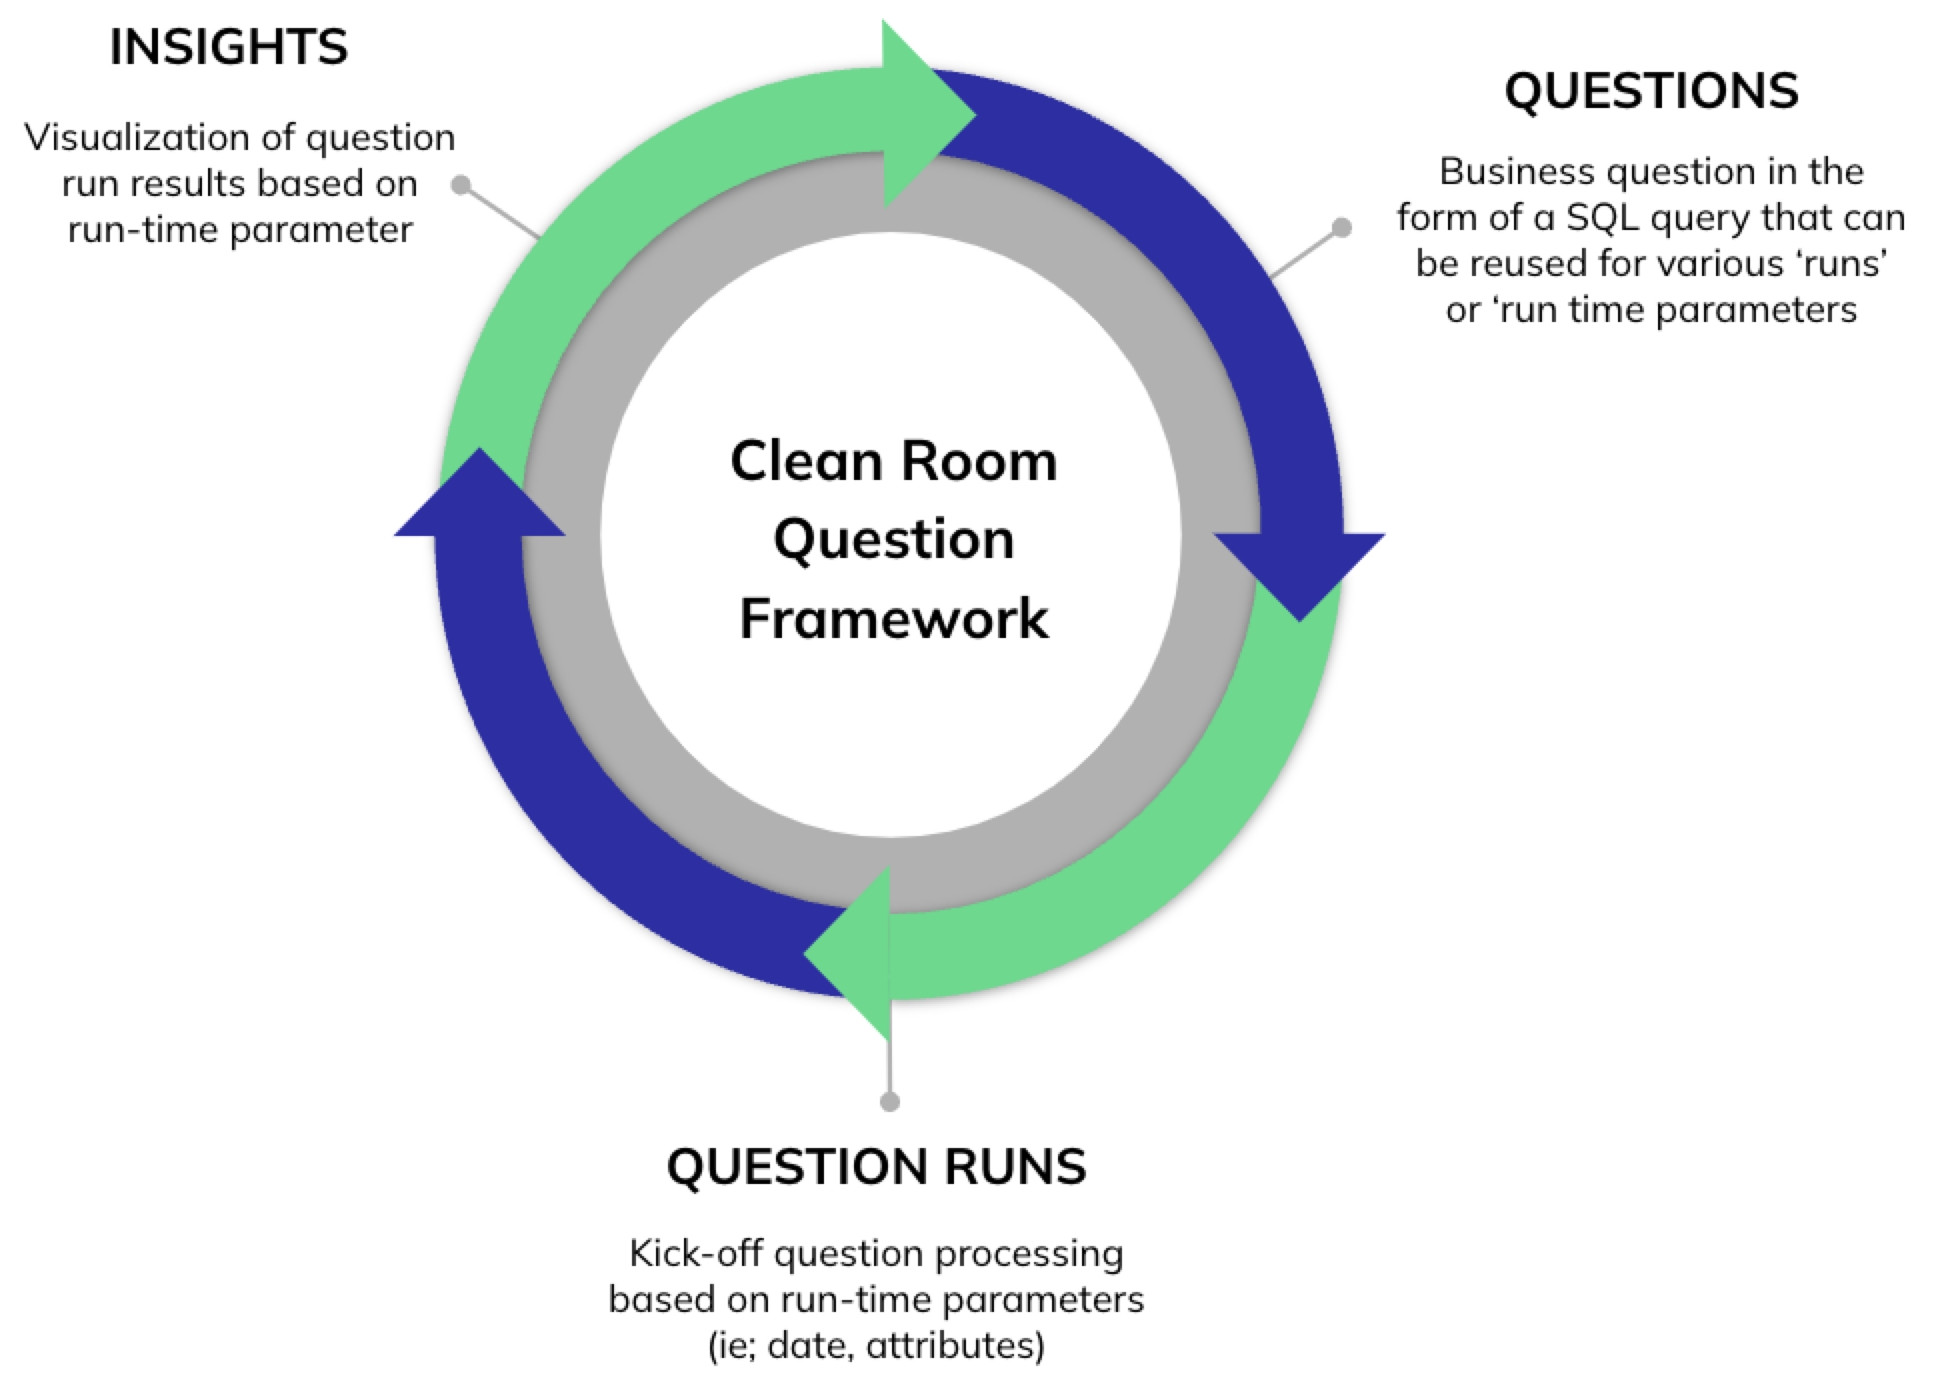 |
Question Builder supports the following types of clean room use cases:
Data collaboration clean rooms: Clean room owners can invite one or more partners to a clean room for a range of data collaboration use cases, such as joining first-party sources like CRM and transaction data through distributed joins to generate cross-party insights. Privacy-preserving techniques prevent each party from seeing the other's underlying data or model while still benefiting from the results.
Industry clean rooms: For industry clean rooms (such as for Amazon Marketing Cloud (AMC), Google Ads Data Hub (Google ADH), and Facebook Advanced Analytics), you can use Question Builder to write direct queries or use pre-built insights. For information, see "Connect to Walled Garden Data".
Question Builder Basics
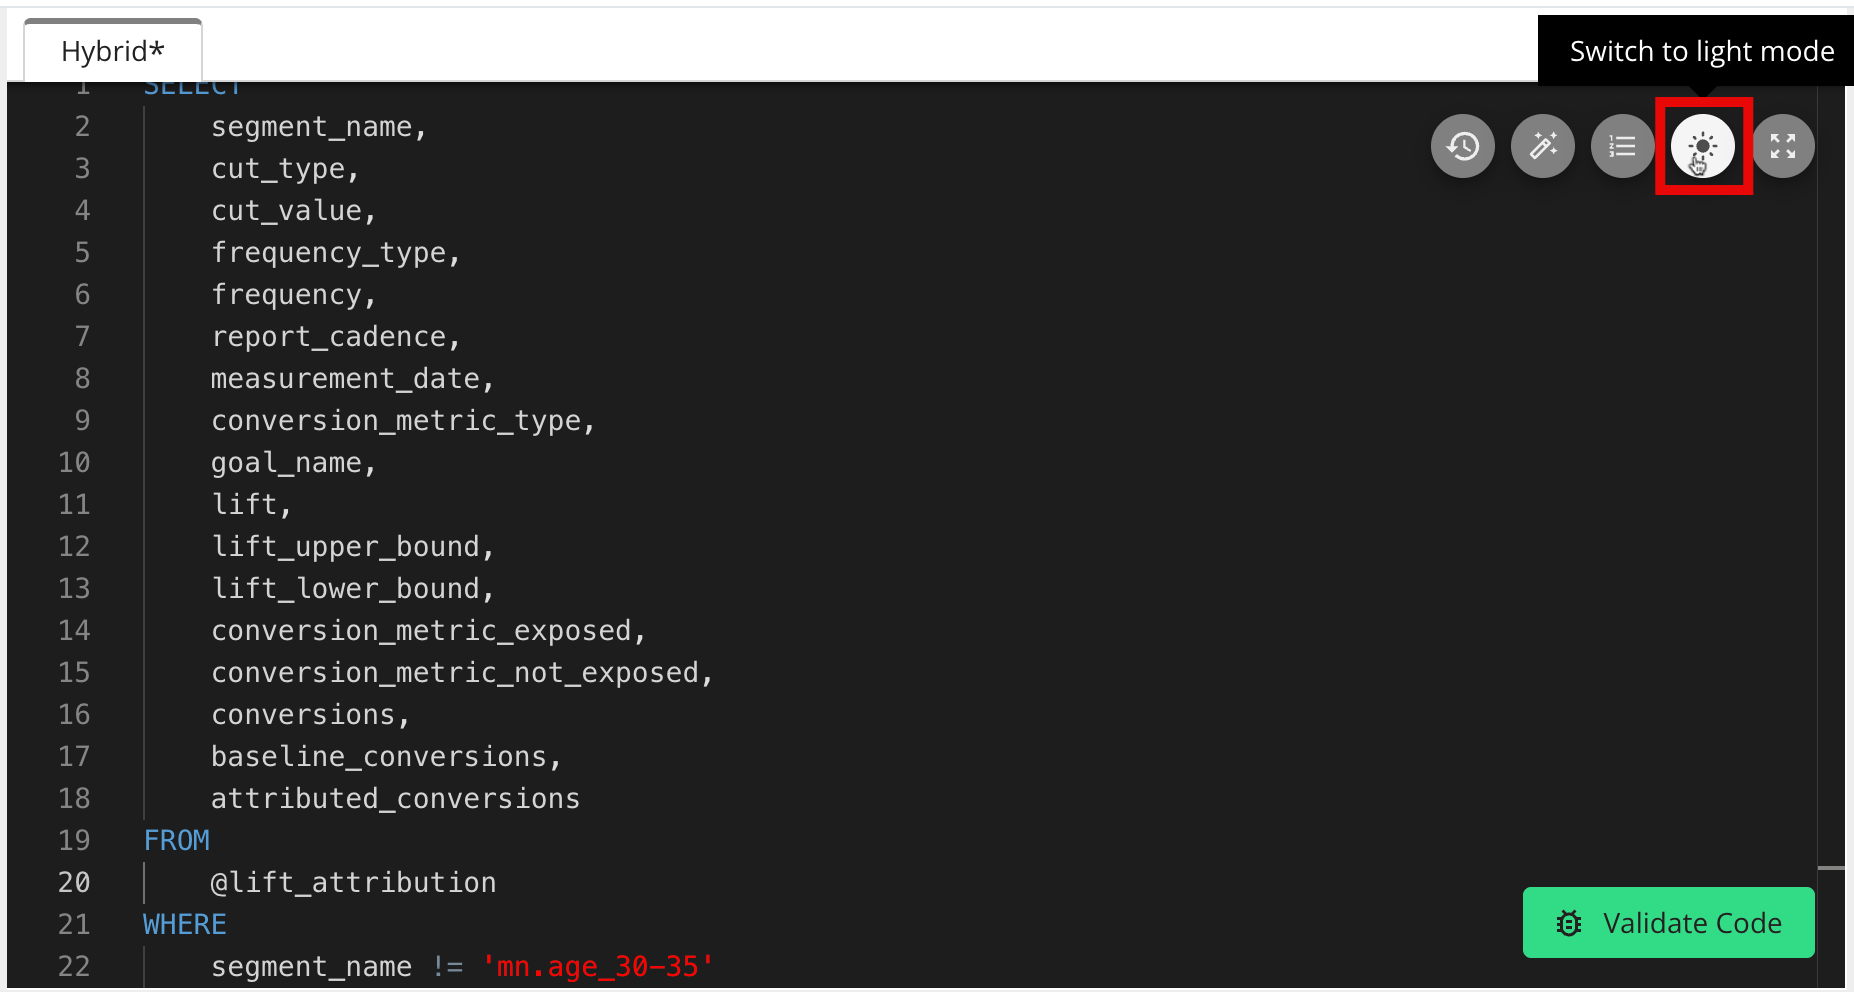
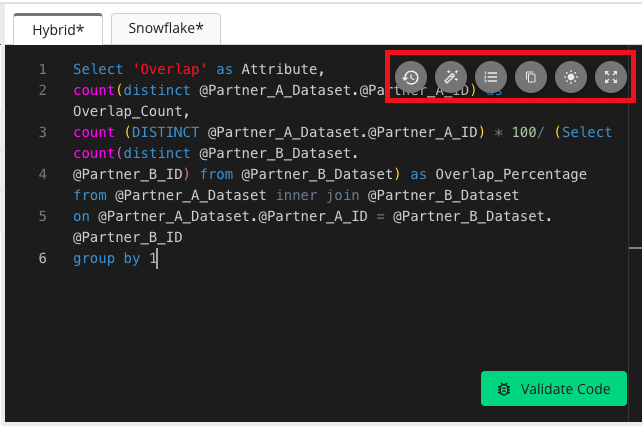
The Query Editor provides a script notebook to assist in SQL authoring.
Typing @ opens a window of available macros and formatting functions, such as tab spacing and colors for functions. A macro is a custom name given to a table by the user, and that name is going to be used in the query.
You can switch between dark and light mode, and use other controls.
Using a Macro to Customize the Table Name
Question Builder includes the following fields and options:
Question Title
Use Case / Category
Question Description
Available Objects
Parameters
Builder
Dimensions and Measures
You can use this UI to work in Snowflake, Amazon Marketing Cloud, Google Ads Data Hub, Facebook Advanced Analytics, and so on.
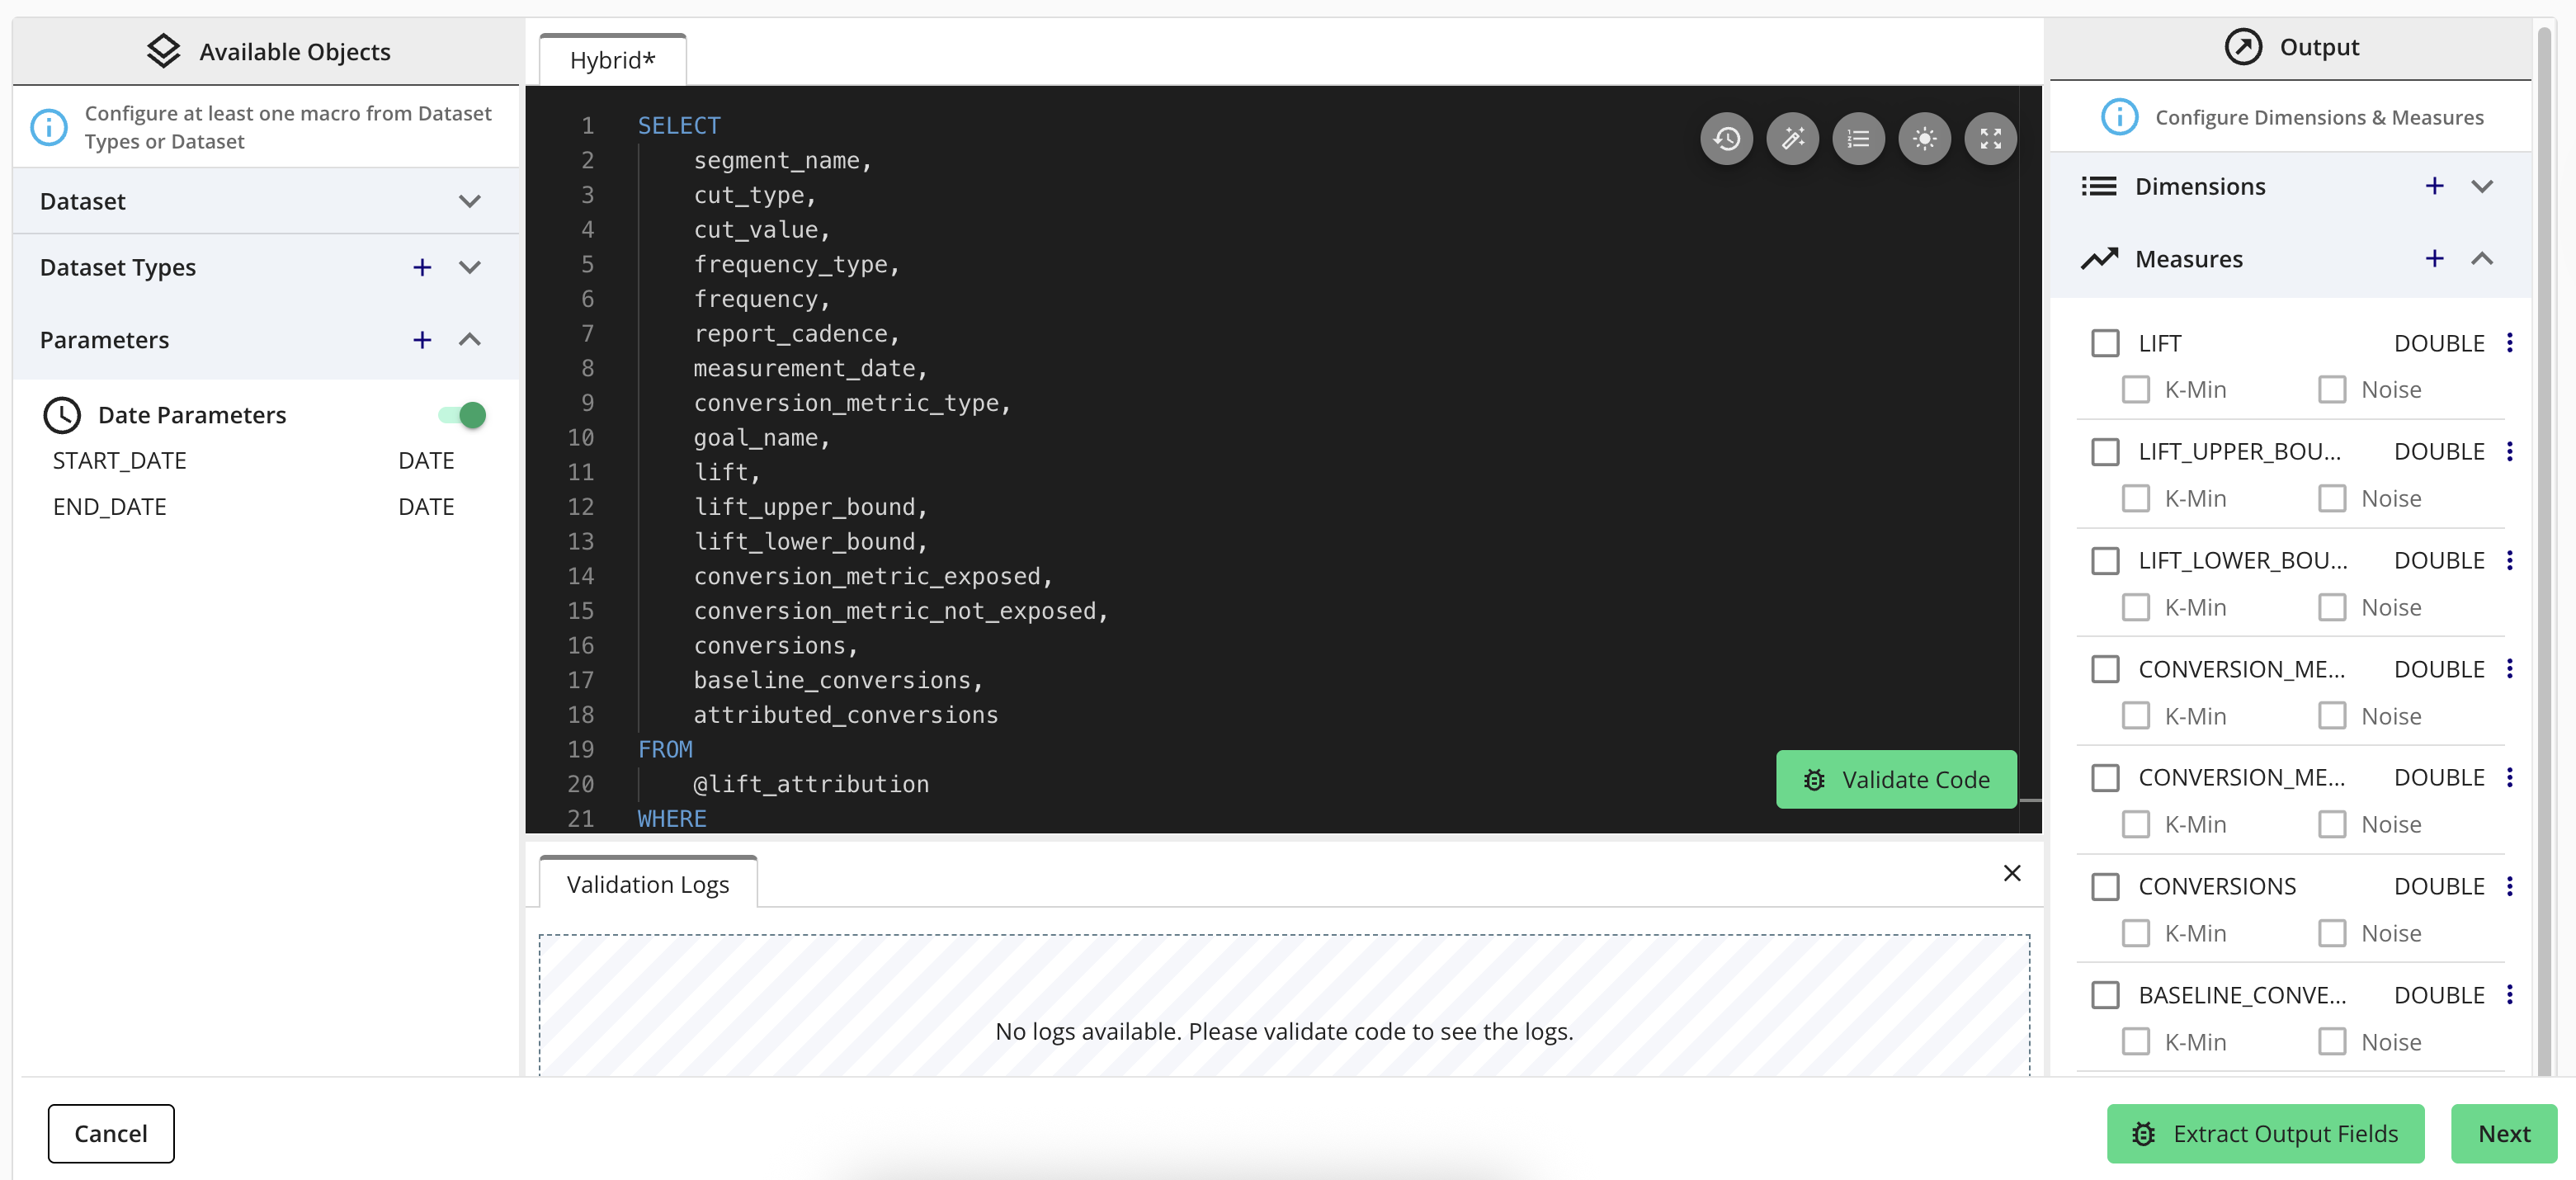
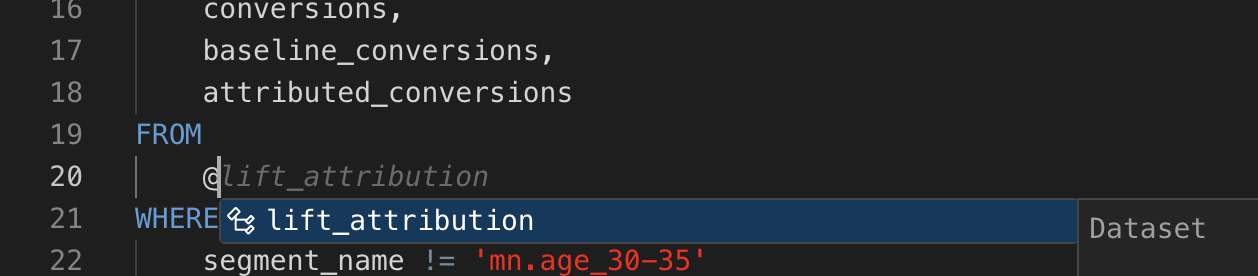
In the "Available Objects" section on the left, you can give a custom name to a table using the Add Macros icon (+) and refer to the new name in your query. For example, the following screenshot shows that the L&A Reports table is renamed using the macro lift_attribution.
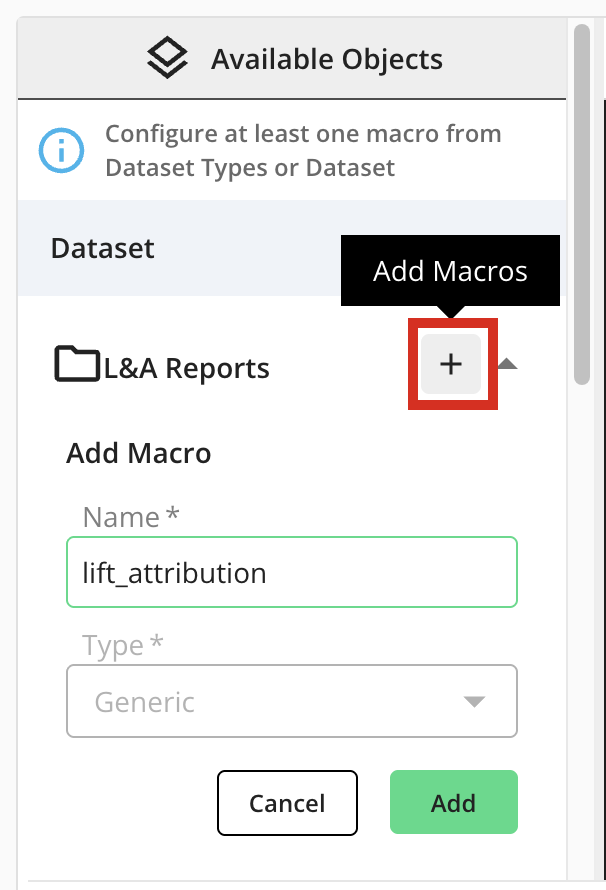
When you enter a macro name, do not include the @ symbol. After you create the macro, it is prefixed with the @ symbol.
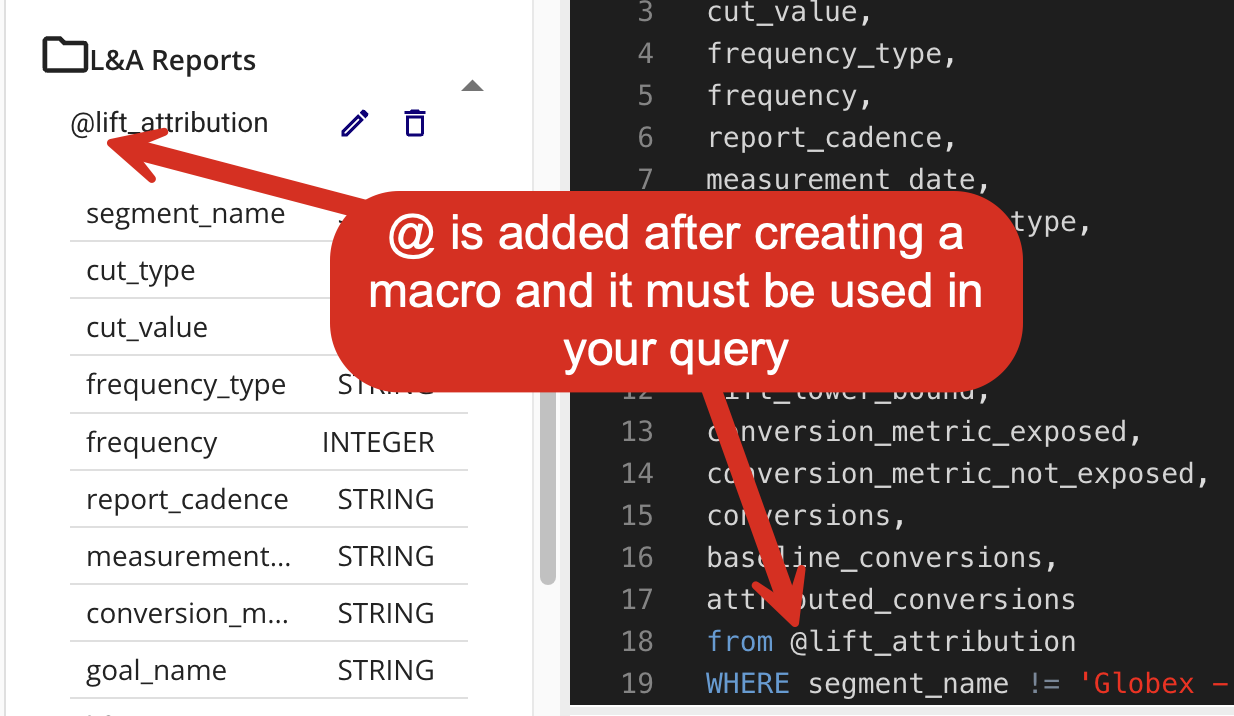
If you define a macro, you must use the macro in the query, and you must include the @ symbol. To ensure that the fields in your reports and visualizations use user-friendly names, you can specify custom names with aliases in your SQL query.
For more information, see "Question Builder Best Practices".
Create a Question
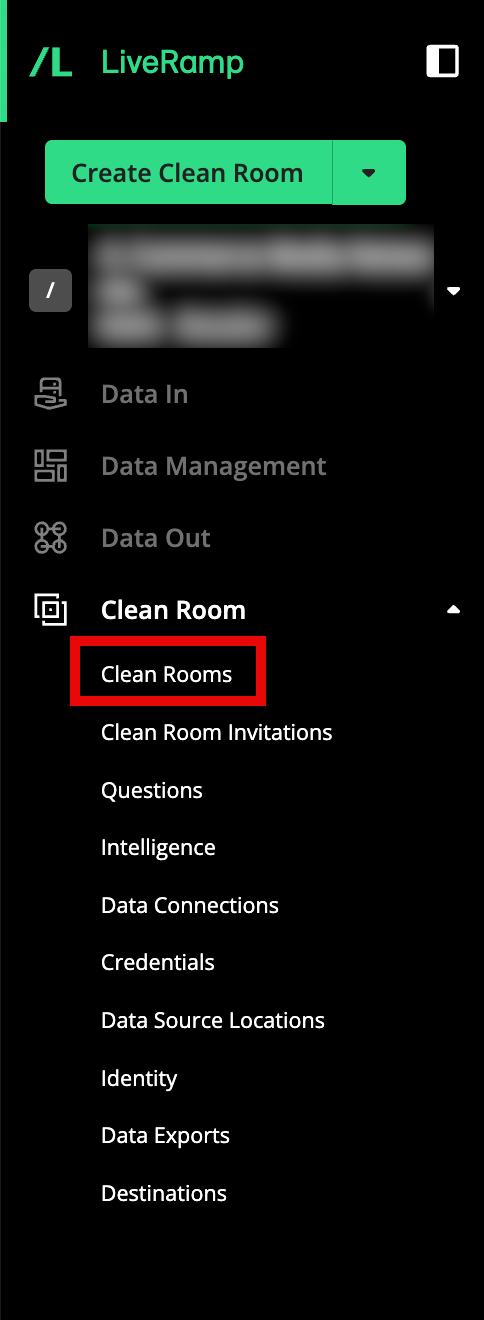
From the navigation menu, select Clean Room → Clean Rooms to open the Clean Rooms page.
Tip
If permissions for Question Management are enabled for your user account, you can also access Question Builder from the home screen by selecting Questions → New Question.
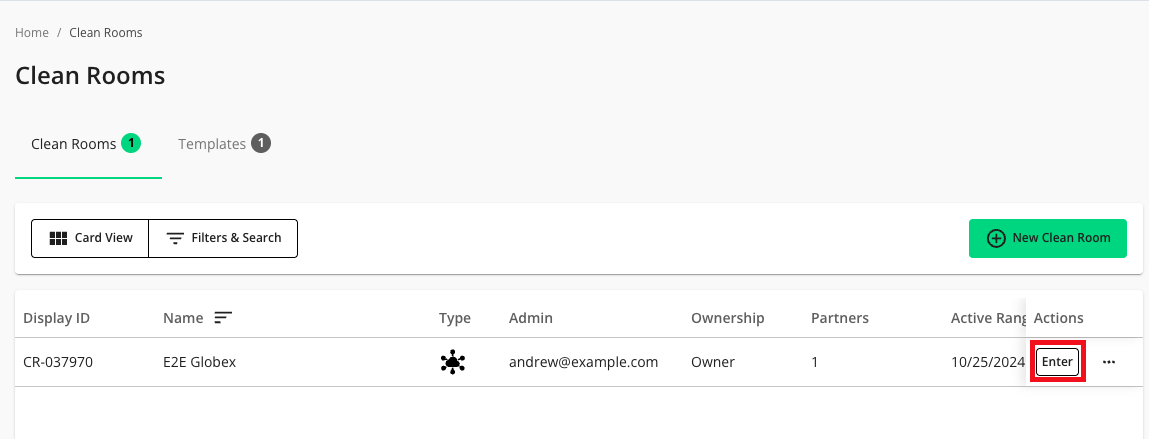
Click on the row for the clean room you want to open.
On the Questions page, click .
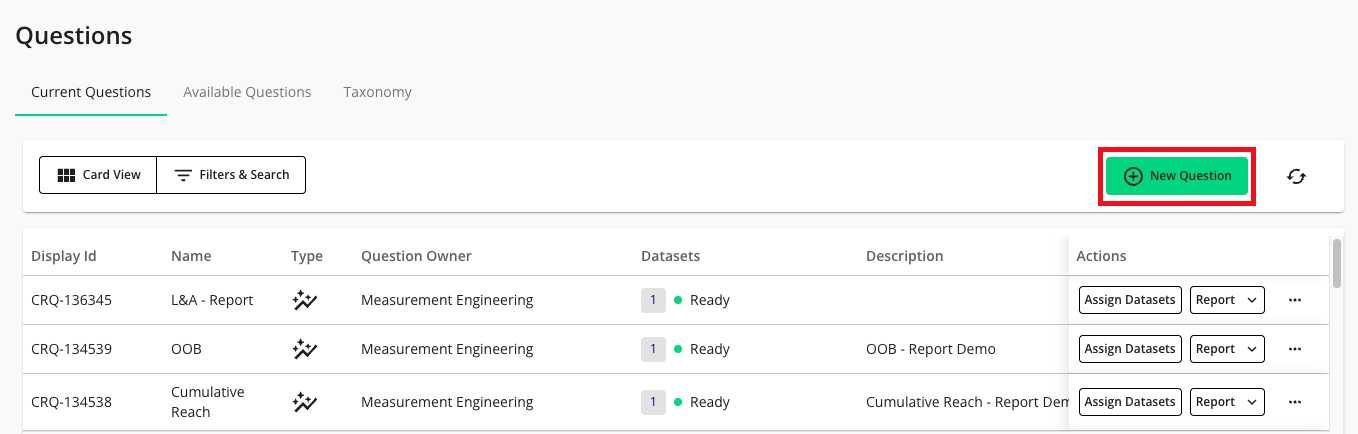
The New Question page displays a set of fields for creating your question.
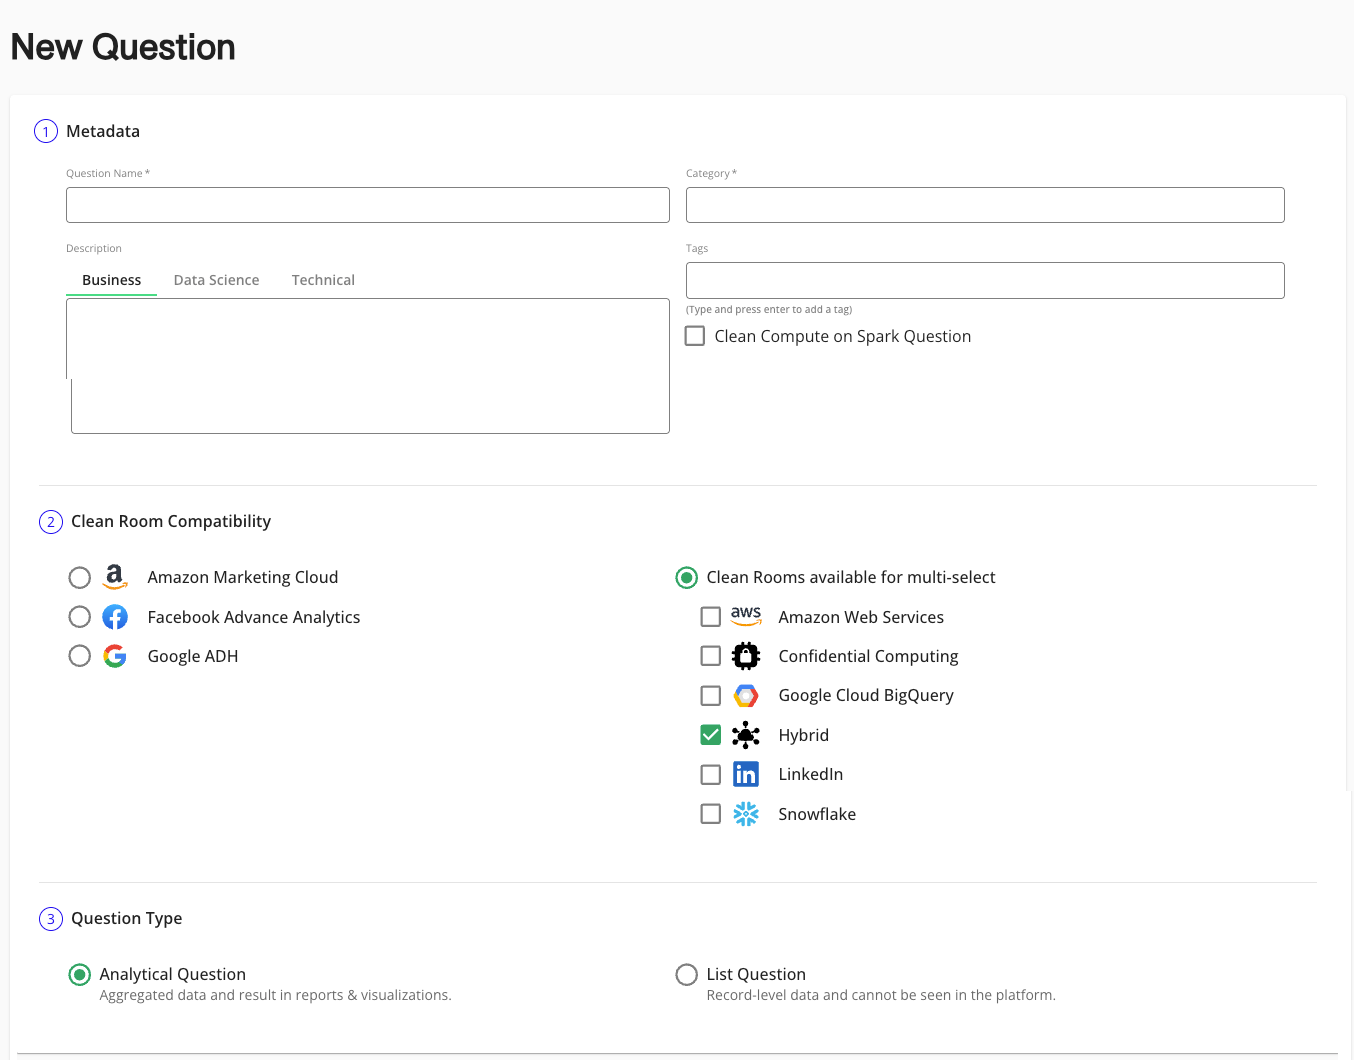
The fields in the Metadata section define how your question is displayed to end users, so you should provide a level of detail that will help them understand the context of a question.
Enter values for the following metadata fields:
Question Name: Enter a descriptive name that will make it easy for internal and external users to quickly understand the context of the question.
Category: Consider a naming convention for ease of search.
Description (optional): You can create descriptions for different audiences, including business, data science, and technical users. Descriptions explain how the report should be read, provide insights derived from the report, and can be tailored for different user profiles.
Tags (optional): Add a tag to help with question categorization and filtering of questions. To add a tag, type the desired value and press Enter.
Question Type: Select User List or Analytical Question. Once you save a question, you cannot change its question type.
Clean Compute on Spark Question: Select this option if your organization uses the Clean Compute on Spark feature.
In the Clean Room Compatibility section, specify the following types of clean rooms the question can run in:
Walled Garden (Industry) Clean Rooms: If you select a walled garden clean room, you can't select another clean room type.
Note
To specify an additional clean room type, create a separate question.
Cloud Platforms: Multiple cloud platforms can be selected, which results in multiple tabs in the Query Editor found on the next screen to account for nuances in query languages.
For Question Type: select one of the following types of questions.
Note
Once you save a question, you cannot change its question type.
Analytical Question: Create a SQL-based aggregated query from one or more enabled datasets. The output will be available in Clean Room with the option to create a visualization for insights.
List Question: Create a record-level user list that can be used for audience activation to any of LiveRamp Clean Room's native activation channels, such as Google, Facebook, Snapchat, and TikTok. The output will only show a count of records and it will not be available in Clean Room.
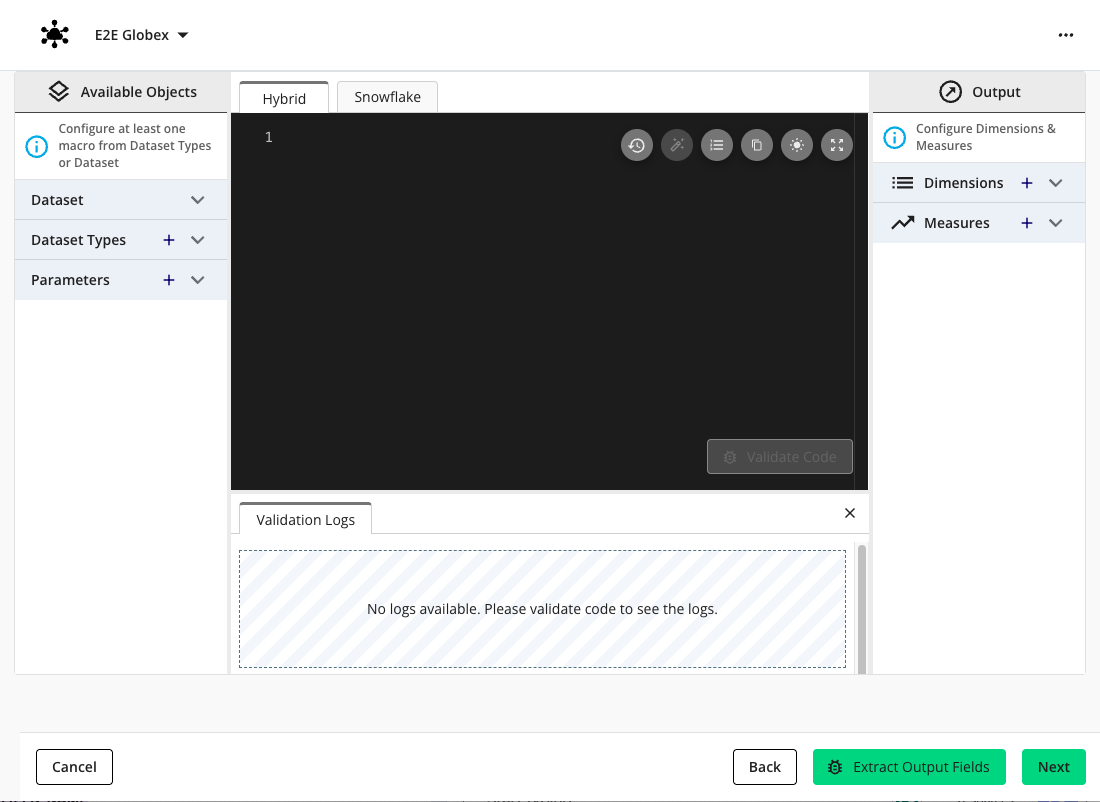
Click . The Query Editor is displayed.
Use the query editor to do the following:
Edit metadata: Edit the previously entered metadata (question name, category, tags, and description) by clicking on a metadata field.
Available objects: Customize your query based on dataset types and the datasets available to the clean room.
To create reusable query templates that work across clean rooms and partners, use field macros whenever you specify dataset types.
To differentiate each dataset, create a macro value for each dataset used in your query. For information, see "Add a Dataset".
Add parameters: If you add parameters, you can use them to filter reports. For example, you can enable start and end date parameters to customize query run windows. Alternatively, click and create one or more custom parameters by entering a parameter name and selecting its data type. Ensure the runtime parameter is written into the query, using the parameter name as the macro, such as "@Brand".
Note
To schedule runs by month, the query must have the
@START_DATEand@END_DATEdate parameters enabled.
In Query Editor, enter your SQL code and use dataset macros to further structure the query. For information on dataset macros, see "Add a Macro for a Dataset Type".
Query Editor guidelines and capabilities:
All output fields require an alias
Table + field syntax is:
@TABLE_NAME.FIELD_NAMEField alias syntax is:
@TABLE_NAME.@FIELD_ALIASMacros used in a query are case-sensitive and should be identical to how they are named in the left pane of the Question Builder tool.
Use the AI Query Helper to make edits to a query using natural language prompts.
If you selected multiple clean room types, Query Editor displays a tab for each. To copy the current tab's query to all other tabs, use the copy function.
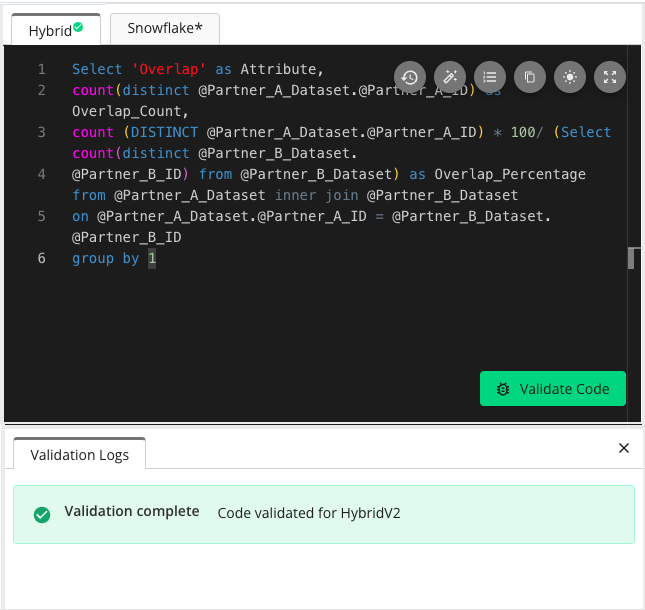
Once you're done specifying your query, click to identify any code/syntax errors.
The Validator may return the following prompts:
Validation failed - No alias for field: Check that the dataset macros are populated properly in your SQL query.
Validation failed - Query should only have 1 final select query: Remove UNION queries that are not within a subquery.
Validation failed - SQL Error Message: Reflects an issue with the SQL that requires review and repair of the code. Issues may relate to missing SELECT statements, commas, unknown commands, etc.
Validation complete - Validator ran successfully with no failures: Users must still verify that all datasets, dimensions, and measures are properly mapped in the right pane of Question Builder.
Once you validate your query, click .
Your question will initially be published in the "Stage" publish status. Use this status to test a question run and validate if the expected results are returned.
Note
In the "Stage" status, a query can be edited, cloned, or deleted.
If you edit a question in the Stage status, a new version is created and named accordingly (such as Stage v1 or Stage v2).
Datasets have to be reassigned to ensure that all parties are comfortable with any logic changes.
Once you publish a question, you cannot modify it. However, you can modify a cloned question.
Once you are ready to publish a question, go to the Questions page, scroll to the Publish Status column on the right, and switch the question's status to "Published".

Once you create a question, you can provision it to an organization and clean room. For information, see "Question Management".
Add a Dataset
Queries require datasets to be given a custom name or macro to differentiate that dataset from others. Create a macro value for each dataset used in your query.
Note
Do not create macros if they are not used in your query.
In the Query Editor, click next to the dataset.
Enter a unique name for the macro. This name will be used in the query and in the dataset assignment.
Note
Dataset macro names are case-sensitive and should not be duplicated across datasets and data types.
The type will be automatically populated based on the dataset configuration in the associated clean room.
Click .
Add a Macro for a Dataset Type
Field macros are used as placeholders or templates for datasets so that any partner can use the query, provided they opt in the correct dataset type for your requirements. They enable the clean room owner to author a question without knowing the schema of a partner dataset. For example, the owner may know the partner is bringing CRM data into the clean room, but not the structure of the CRM tables. With field macros, the owner can set a field associated with the expected dataset fields without knowing the true names of the fields.
Adding a field macro for a generic dataset type will allow a question author or their partner to assign any dataset, regardless of its dataset type, to that field macro. You should confirm that the dataset's fields satisfy the question's requirements.
Next to Dataset Types, click .
Enter a name for the field macro, such as "your_transactions".
Select a value from the Data Type list that best represents the type of data your question would expect.
Click .
Select a macro and then click next to the macro.
Enter a name for the field.
Select the field type, such as date, integer, string, timestamp, or double.
Click and then continue adding field macros for each needed dataset type.
Only add field macros for dataset types that will be added to the query. Otherwise, an error is displayed when validating the query.
In the query editor, enter your field macros and prefix them with the @ character. For example, if you created a "gender" field macro for the partner's incoming CRM dataset, reference the dataset type and field as
@crm.@gender (@dataset_type_macro.@field_macro).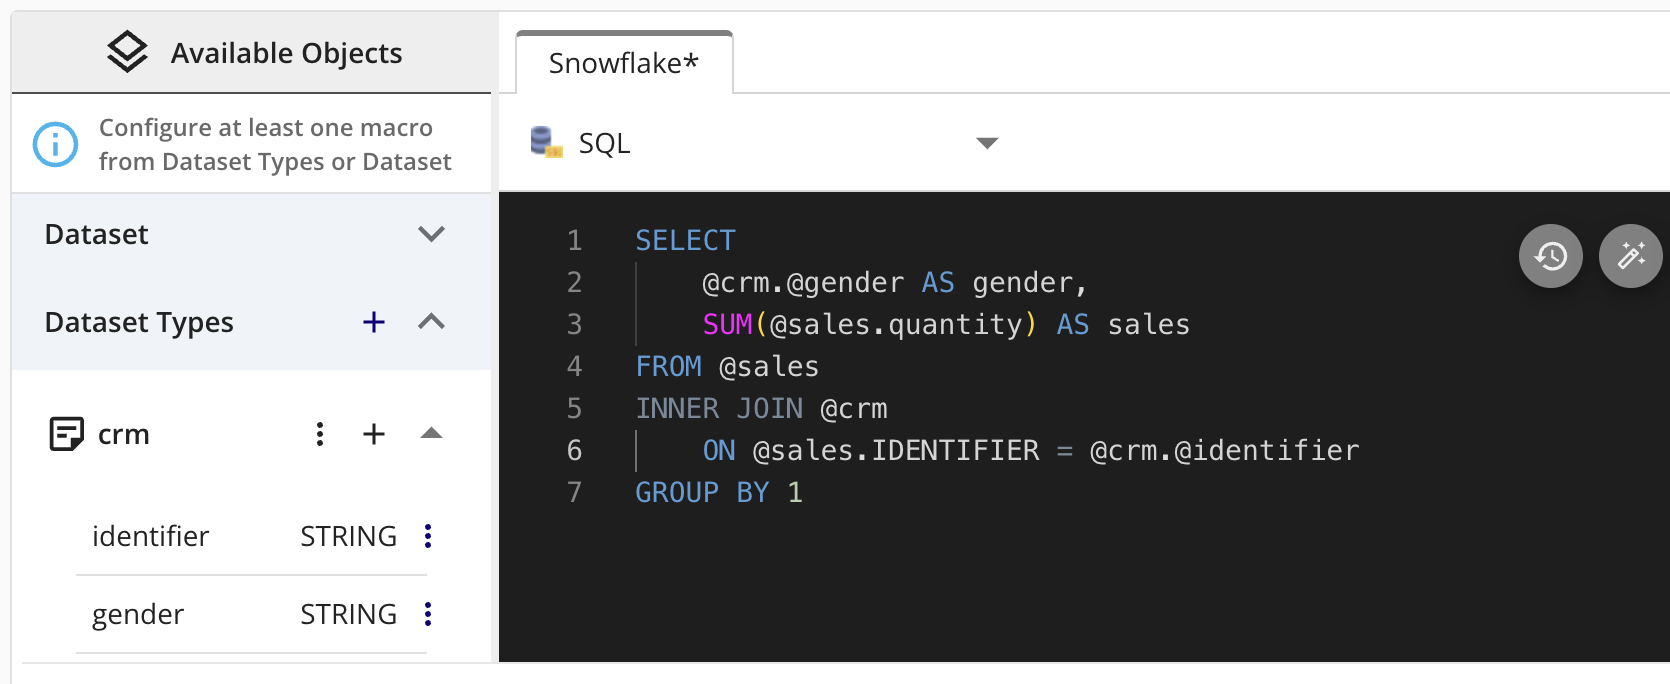
Once you add field macros and save the query, your partner is required to map the dataset fields to the specified macros adds a dataset to the clean room so that question results will process and populate. For information, see "Clean Room Partner Implementation Guide."
Caution
If you modify a query after a partner maps their dataset fields to the macros, they must remap the fields as part of the approval process for the revised query.
Validate Dimensions and Measures
It is important to validate that all values are populated and correctly configured. You may need to add missing dimensions and measures from your query as needed. You can also edit and remove dimensions and measures as needed from this view.
Dimensions define the levels to be plotted and filtered in your visualization. Measures define the measures to be shared on the defined dimensions in your final output.
Click to analyze the query, automatically map the outputs for the question, and populate the dimensions and measures in the right-hand pane.
Note
When validating a list question, outputs are listed as List Fields and are not shown in the output reports. Only the file location and count are shown, and the values are used for downstream capabilities such as clean room activation.
A user list query can be output with more than one field from the available tables. You can also output a mix of dimensions and measures in a user list query.
To add a new dimension, click next to the Dimensions section, enter a name for the dimension, and select the dimension type from the list.
Types include:
Date
Decimal
Double
Integer
Long
String
Timestamp
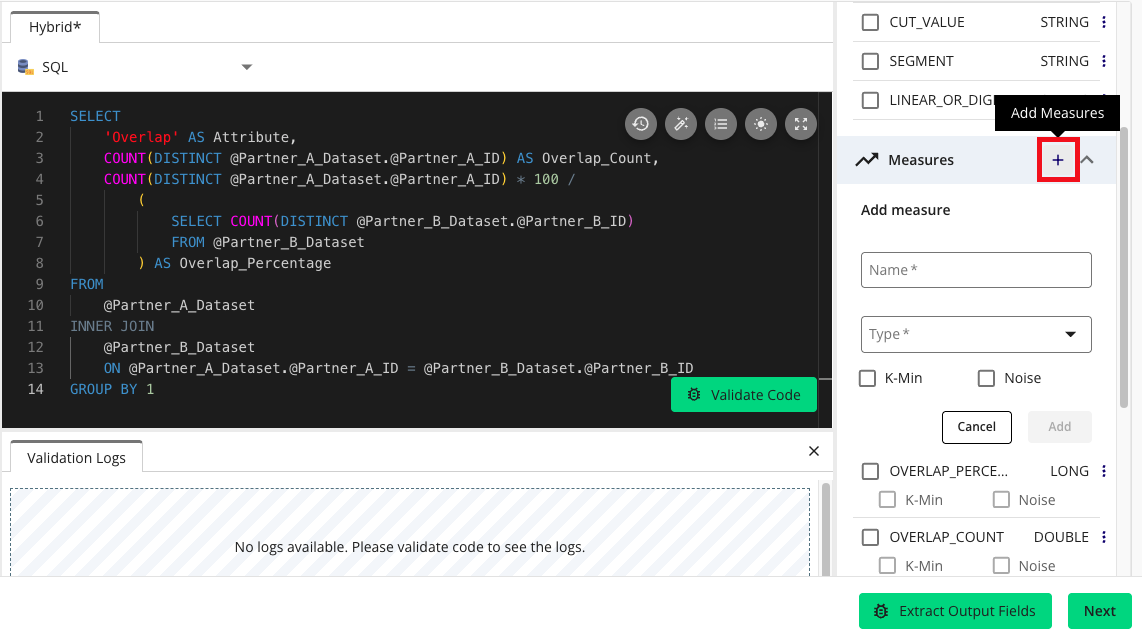
To add a measure, click next to the Measures section, enter a name for the measure (such as "Impressions"), and select the measure type from the list, such as Integer.
Click .
Configure a Report Visualization
Once you create a question, define your SQL query, specify dataset macros, field macros, and measures, and then click , the Report Configuration page displays a set of options for configuring the visualization associated with the query you just authored, including selecting a chart type and detailing how the dimensions and measures you previously defined will be displayed.

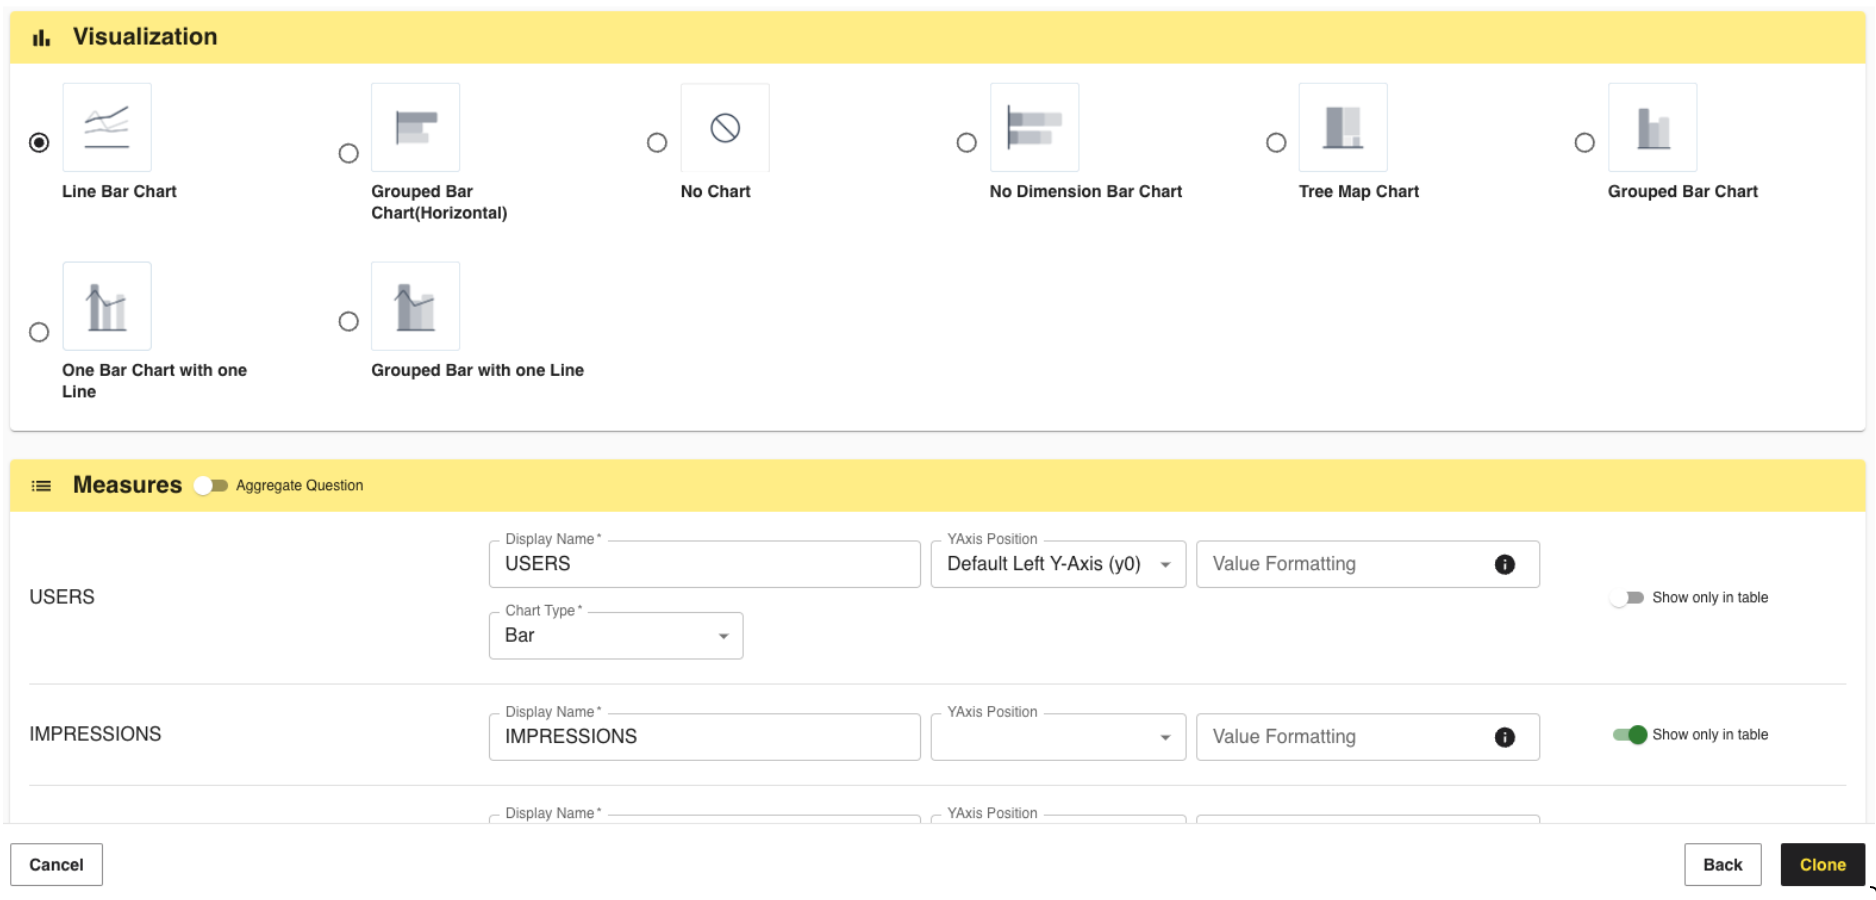
Select one of the following chart visuals based on how you want the dimensions, measures, and axes to be displayed:
Line Bar Chart
Grouped Bar Chart (horizontal and vertical)
Bar Chart with Line (single or grouped)
Tree Map Chart
No Dimension Bar Chart (only displays the measures from your query)
No Chart (table view only)
The measures you selected when authoring the query will be listed here. If you see a measure missing, click and add measures.
For each measure, complete the following:
Display Name (required): How the measure name will display in the visualization.
YAxis Position (optional): Select if the measure should appear on the following.
Default Left Y-Axis (y0)
Default Right Y-Axis (y1)
Independent Left Y-Axis
Independent Right Y-Axis
Value Formatting (optional): Use this tool to customize how a measure is displayed, such as adding currency, formatted decimals, numbers, or abbreviated numbers.
Click the information (i) icon to display options and test them by entering a value, selecting a formatting option under Examples, and reviewing the result.
Once confirmed, copy and paste the formatting option into the Value Formatter field.
Show Only in Table: If the measure should not be plotted in the chart, but still appear in the table view, toggle this option on.
The dimensions you selected when authoring the query are listed in the Dimensions section. If a dimension is missing, click and add the needed dimensions.
For each dimension, complete the following:
Display Name (required): How the dimension name will be displayed in the visualization.
Filter: If the dimension data should be filterable in the visualization, toggle this on and select one of the following filter types:
Multi Select: The user can select multiple dimensions from the filter list.
Single Select: The user can select one dimension from the filter list.
Plot: Toggle on if the dimension should be plotted in the visualization.
Click . Your report is configured, and the Questions page is displayed.
If you need to change the report configuration, you can select from the question's More Options menu ( ). Once the Question Builder is displayed, click to display its Report Configuration page.
Note
Once you publish a question, you cannot edit it or its report configuration. However, you can clone the question and then edit its report configuration.
Clone a Question
You can clone any question in the Stage or Published status to create a similar version of an existing query.
On the Questions page, select Clone from the question's More Options menu (
).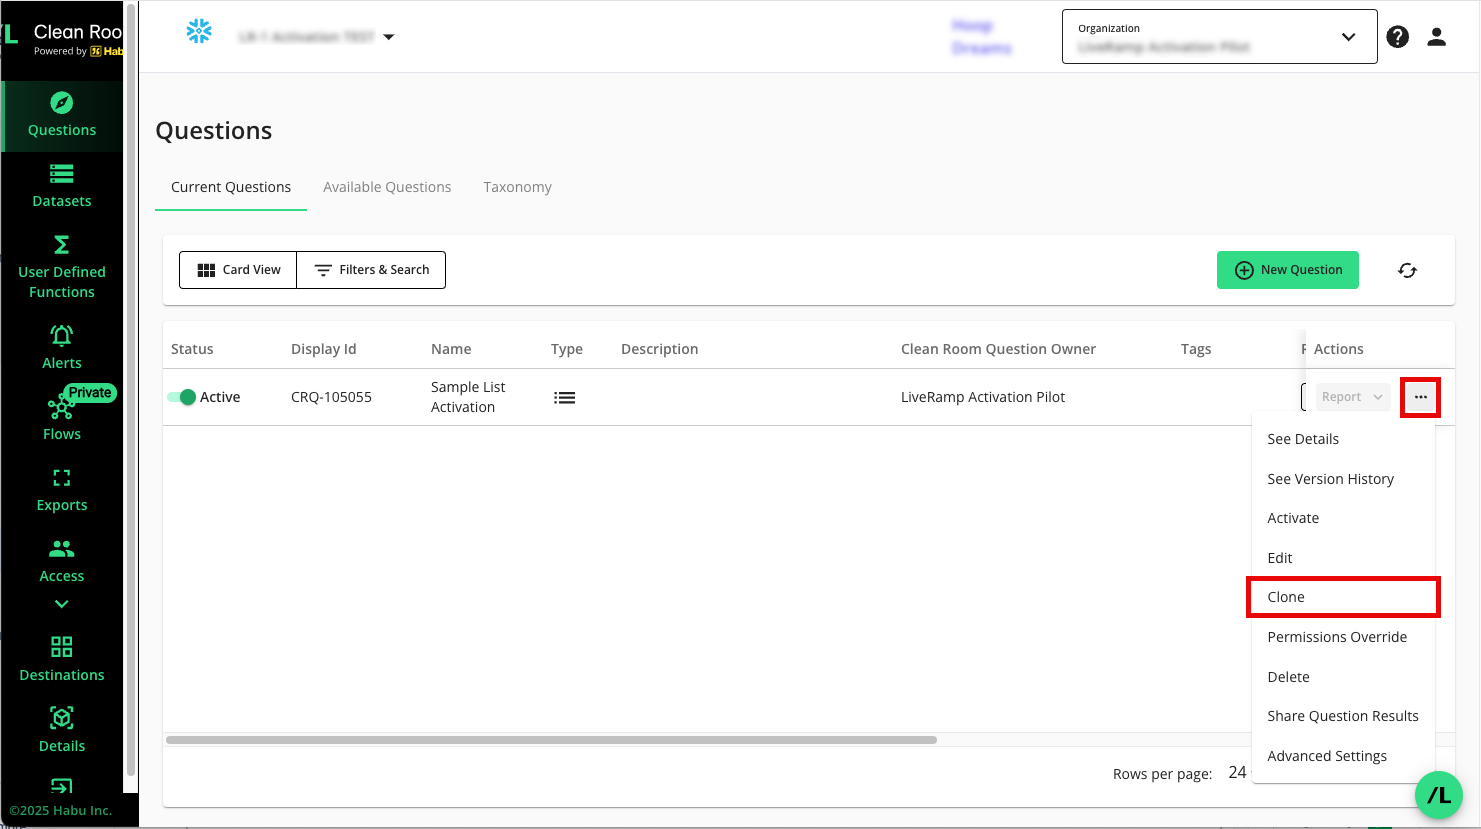
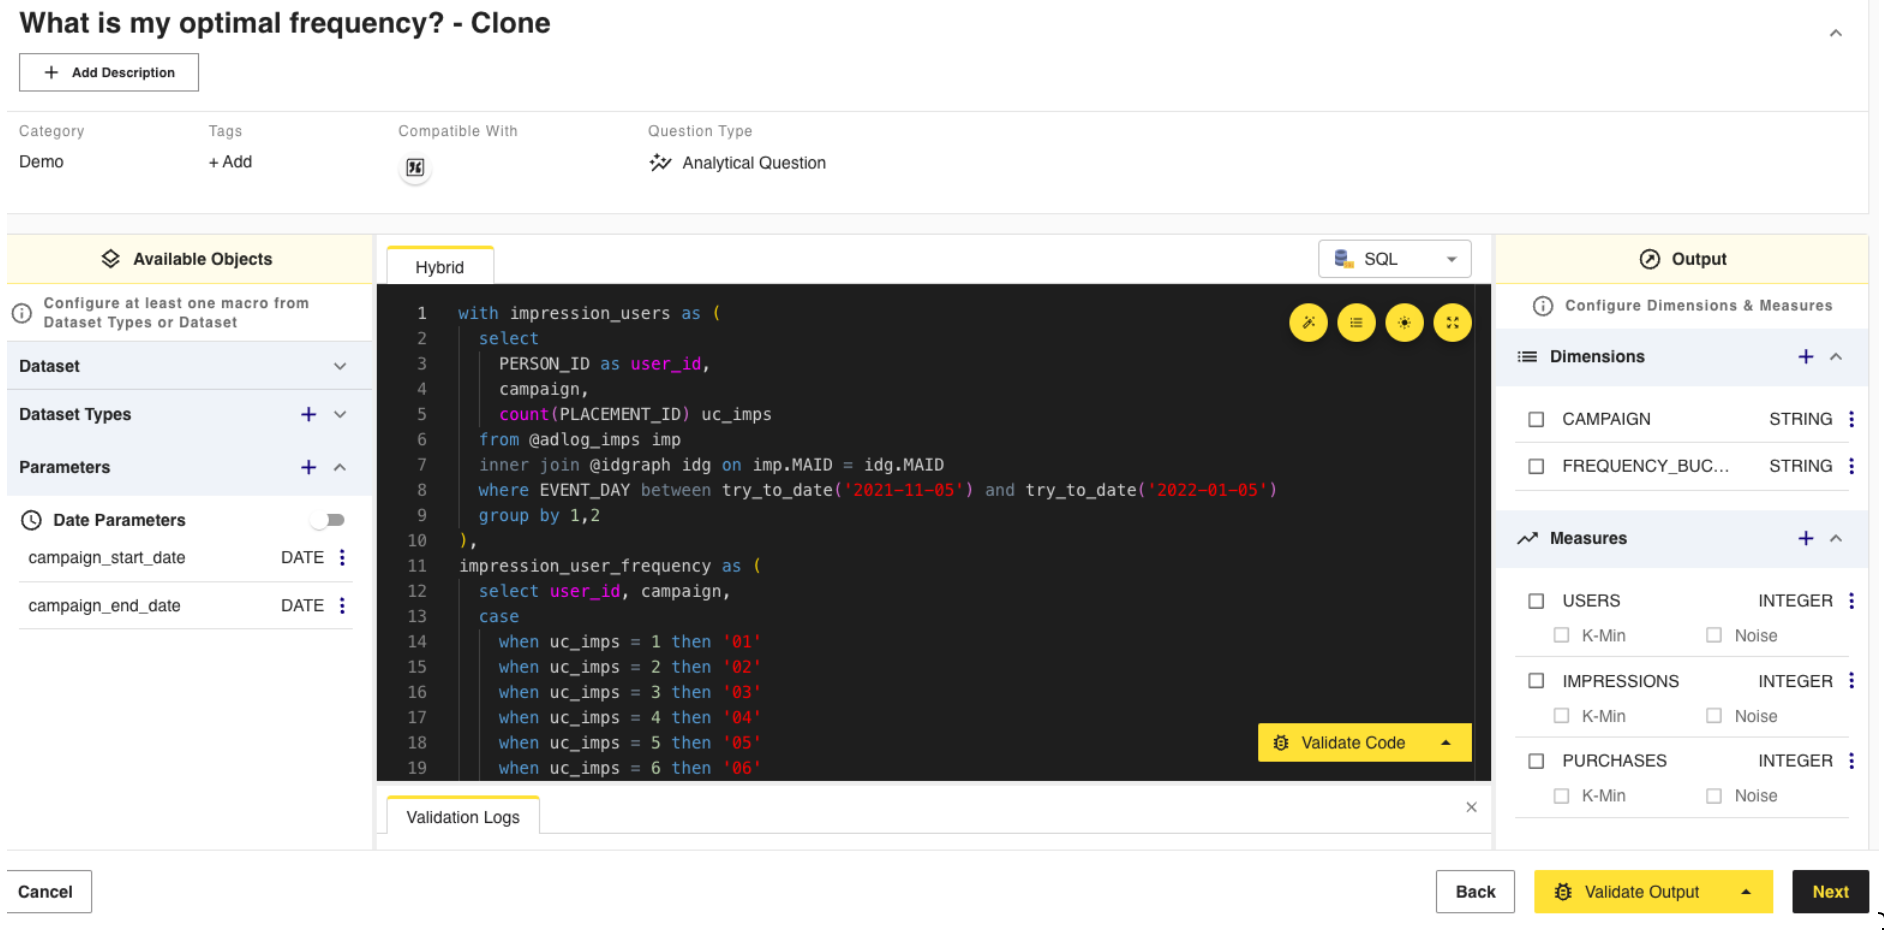
The Query Editor view is displayed. All configurations associated with the original question will be auto-filled for the cloned question, including the question type, clean room type, query syntax, and outputs. The original question name has " - Clone" added to it. To change its name, click on it, enter a new unique name, and click .
Click .
The Report Configuration page displays the same values from the original question, such as chart type, measures, and dimensions.
Click .
The cloned question is initially saved in the Stage status. Next, you can publish the question (if applicable) and complete the dataset configuration for your cloned question.
View Question Details
Once you create a question, you can view the following details:
General Info:
Name: The name given to the question
Category: The category assigned to the question
Tags: Any tags that may have been applied to the question
Status & Version: The question's version
Created At: The date when the question was created
Authored by: The user who created the question
Updated At: The date of the most recent update
Dataset Providers: The platform where the dataset is warehoused, such as Snowflake
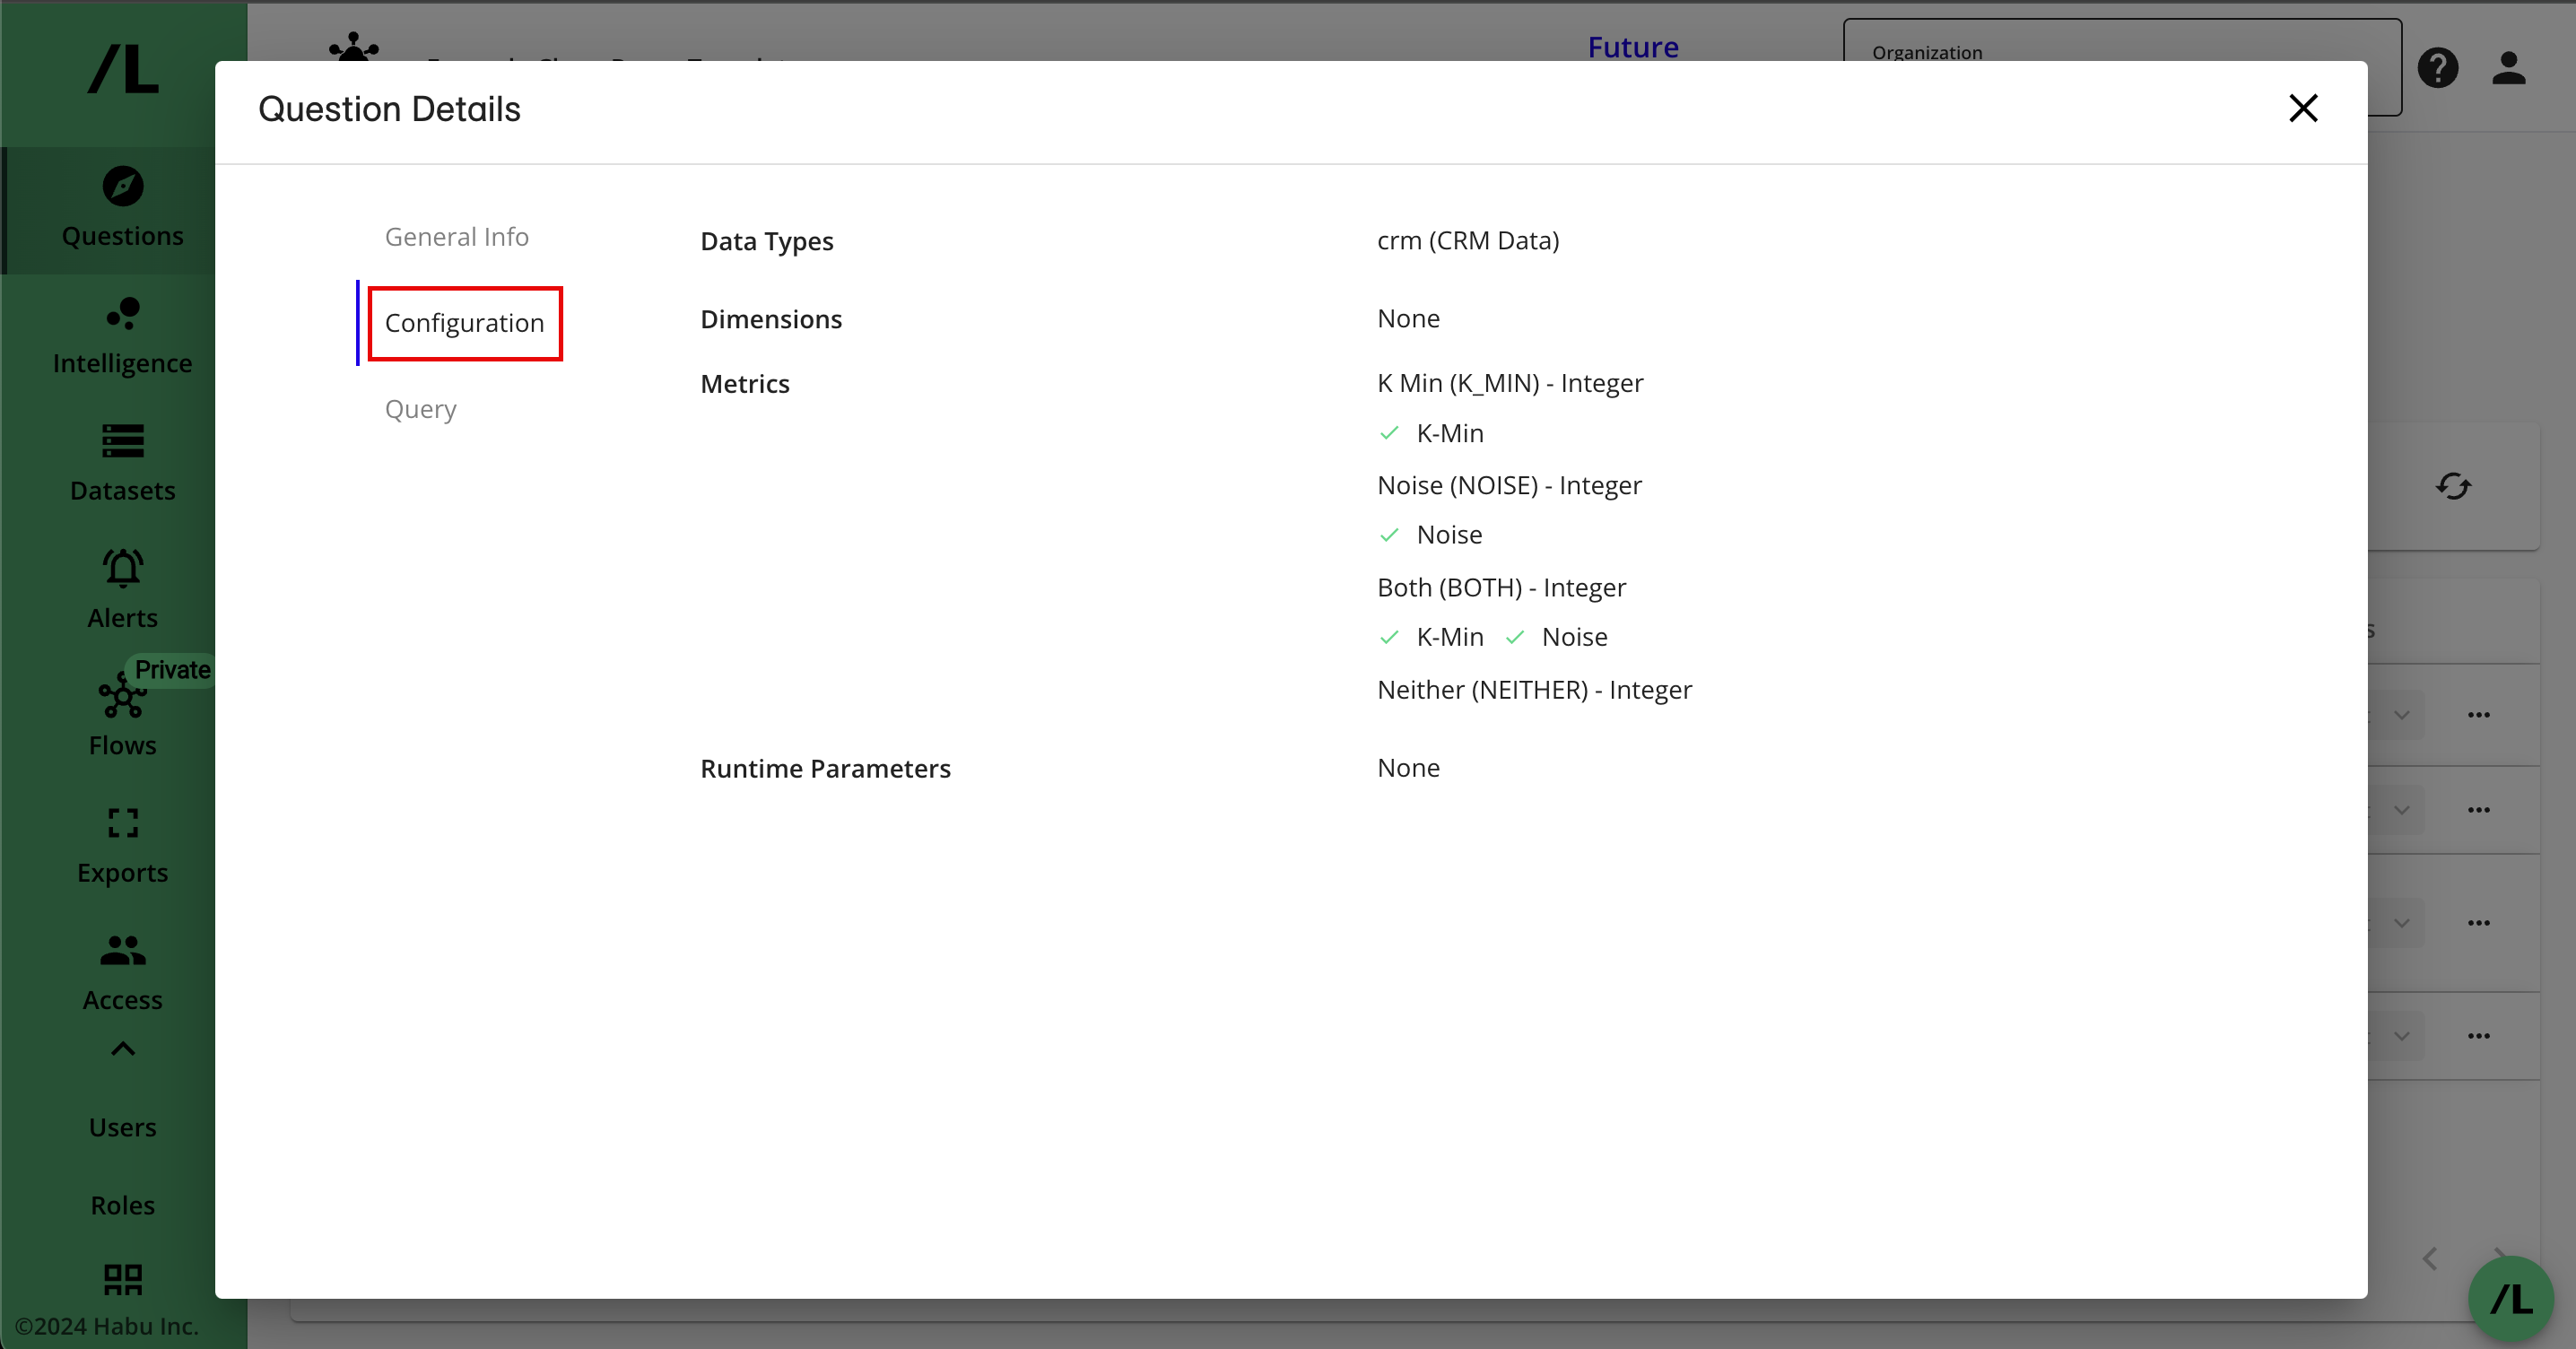
Configuration:
Data Types: The data types of your inputs and outputs, which must be aligned with the data types used in your query
Dimensions: Fields in your data that can be used to aggregate the data, such as campaign name or device type
Metrics: For analytical questions, displays configured metrics such as k-min, noise, reach, or frequency
List Fields: For list questions, displays the fields included in the list, such as HASHED_EMAIL (String)
Runtime Parameters: Parameters that act as dynamic variables within your code, such as start and end dates. For information, see "Using Runtime Parameters".
Query: The question's SQL code
Version History: The question's version history (see View Question History and Switch Versions)
From the navigation menu, select Clean Room → Clean Rooms to open the Clean Rooms page.
Click on the row for the clean room that includes the question you want to view. The Questions page displays the available questions.
From the More Options menu (
) of the question you want to view, select See Details. The General Info tab of the Question Details page displays a description of the question and other general details.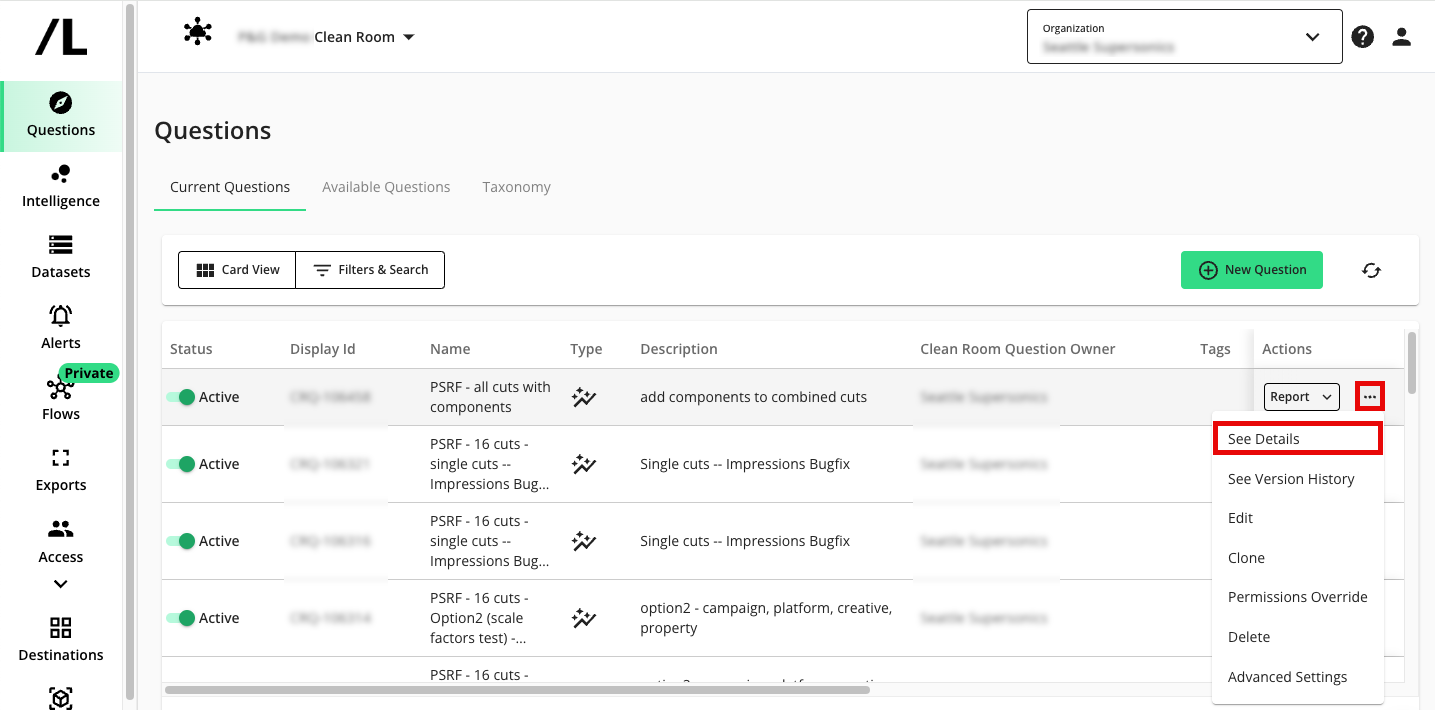
Select the other tabs to view the corresponding question details.
View Question History and Switch Versions
If question versioning is enabled for your organization, you can view past version history for the question and quickly switch between versions if needed. The version history option is available on the Questions page, the Question Management page, and within the question's Query Editor.
Note
Versions are only available for staged questions.
Published questions are considered complete and cannot be edited or changed back to a prior version.
Changing the version affects question runs:
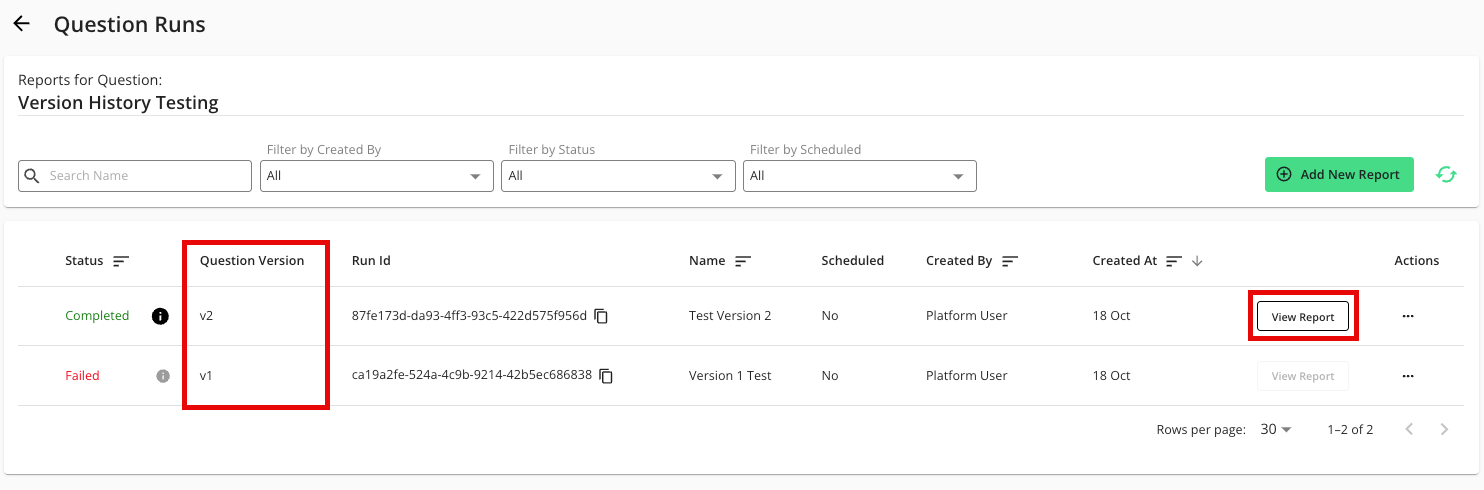
The Question Version column in the runs table indicates the version of the question that was used to perform the run.
When you change a question's version, previously run reports are retained in the View Reports view.
Enter the desired clean room and select Questions from the left navigation.
Select from the More Options menu (
) for the desired question.
The Question Details dialog displays the current version in its Version History tab.
From the version list at the top, select the version you want to display.
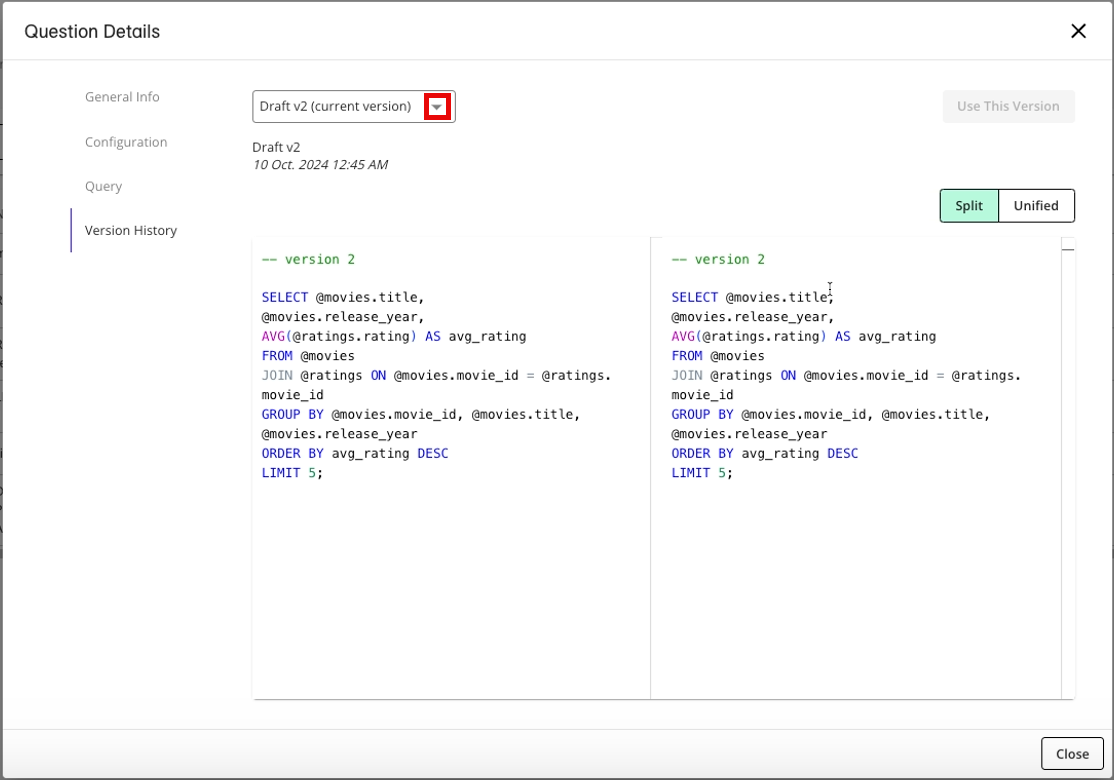
Once you select a prior version, the Version History tab shows the differences between the selected version and the current version. You can view the diff in the default pane view or switch to to view the differences inline.
If you want to use the selected prior version, click .
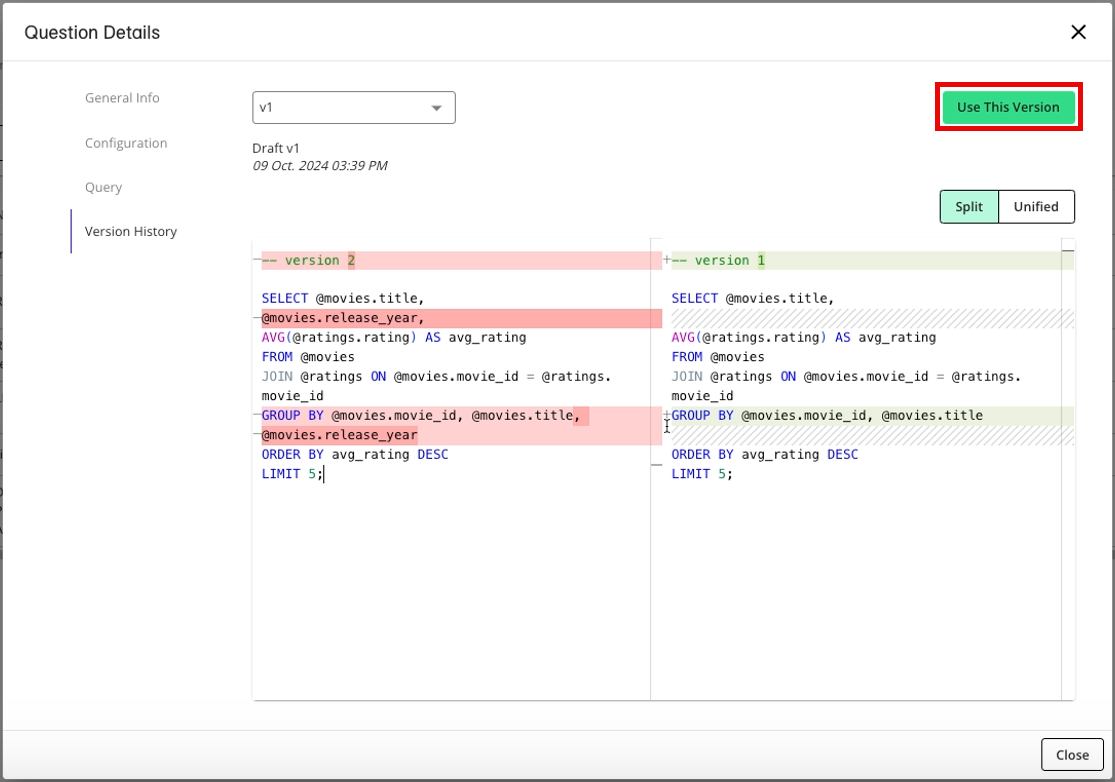
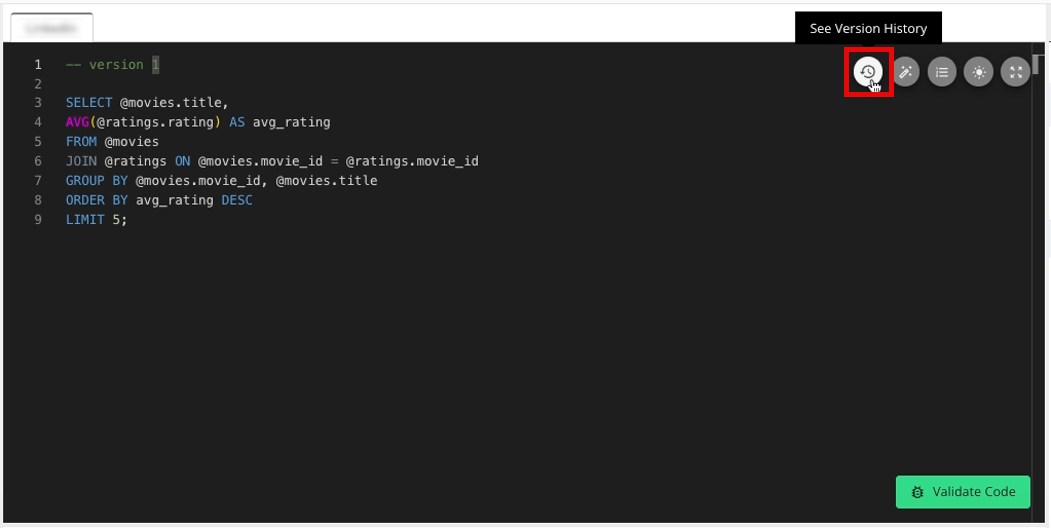
The selected version is opened in Question Builder and the version number is displayed at the top of the page and on the first line of code in Query Editor.
If you want to return to the version history, click the See Version History icon at the top of Query Editor.