Create a Flow
Note
The Flows feature is currently only available for:
Hybrid clean rooms
Confidential Computing clean rooms
Snowflake clean rooms
A "flow" is a visual workflow that lets users configure, organize, and run multi-step analytic processes by connecting existing "questions" as modular workflow objects called "nodes". Creating a new flow and preparing it to run requires a series of steps that move the flow through various stages until it reaches the "Ready" state.
Overall Steps
Perform the following overall steps to create and configure a new flow so it’s ready to run:
For information on performing these steps, see the sections below.
Prerequisites
Access and proper permissions to a LiveRamp Clean Room environment that has the flows feature.
For flow creation and management, the following permissions are required:
Create, Schedule, and Delete Flow Runs: Allow users to access the Flow Runs and Scheduled Flow Runs pages to create, schedule, reuse, and delete flow runs.
Flows Builder: Allow users to access the Flow Builder page to create, configure, update, edit, clone, and version flows.
Manage Datasets: Allow users to assign datasets to flows.
View Reports: Allow users to view the run reports of a flow run.
For more information, see "Managing Clean Room Permissions".
Datasets must be provisioned in Clean Room to assign to the flow.
Since flows are built from question nodes, there must be existing questions available in Clean Room to associate to the question nodes.
Create a New Flow
From the Flows page, click .
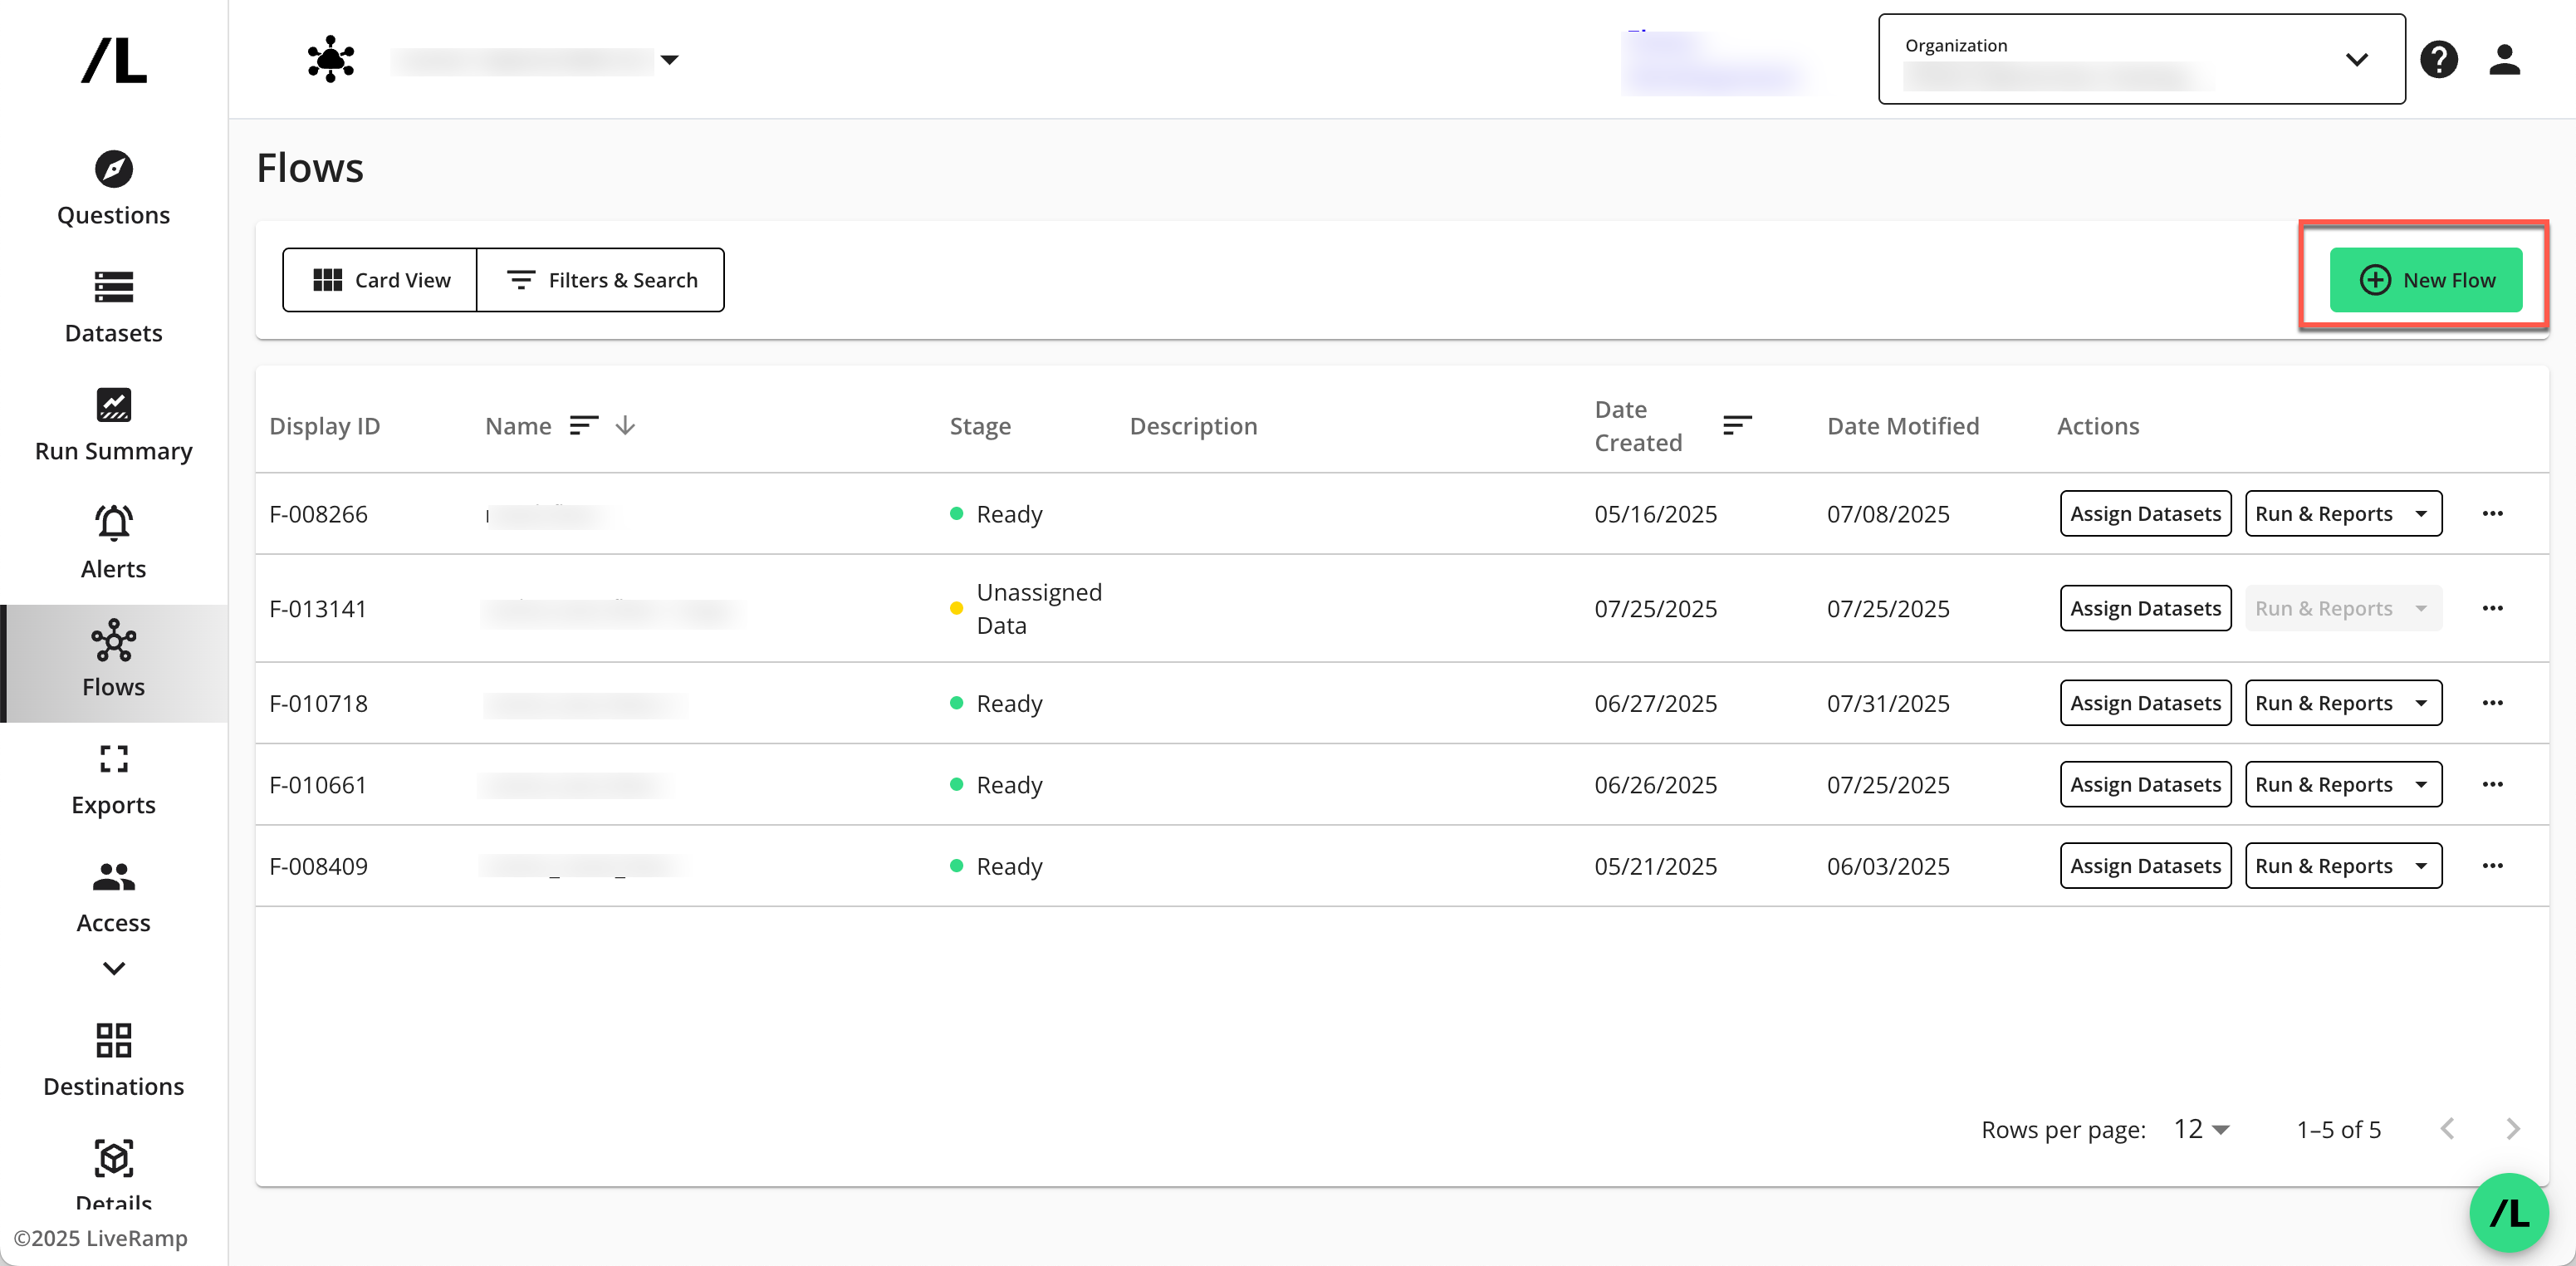
Enter a name for the flow (required) and a description (optional). Click .
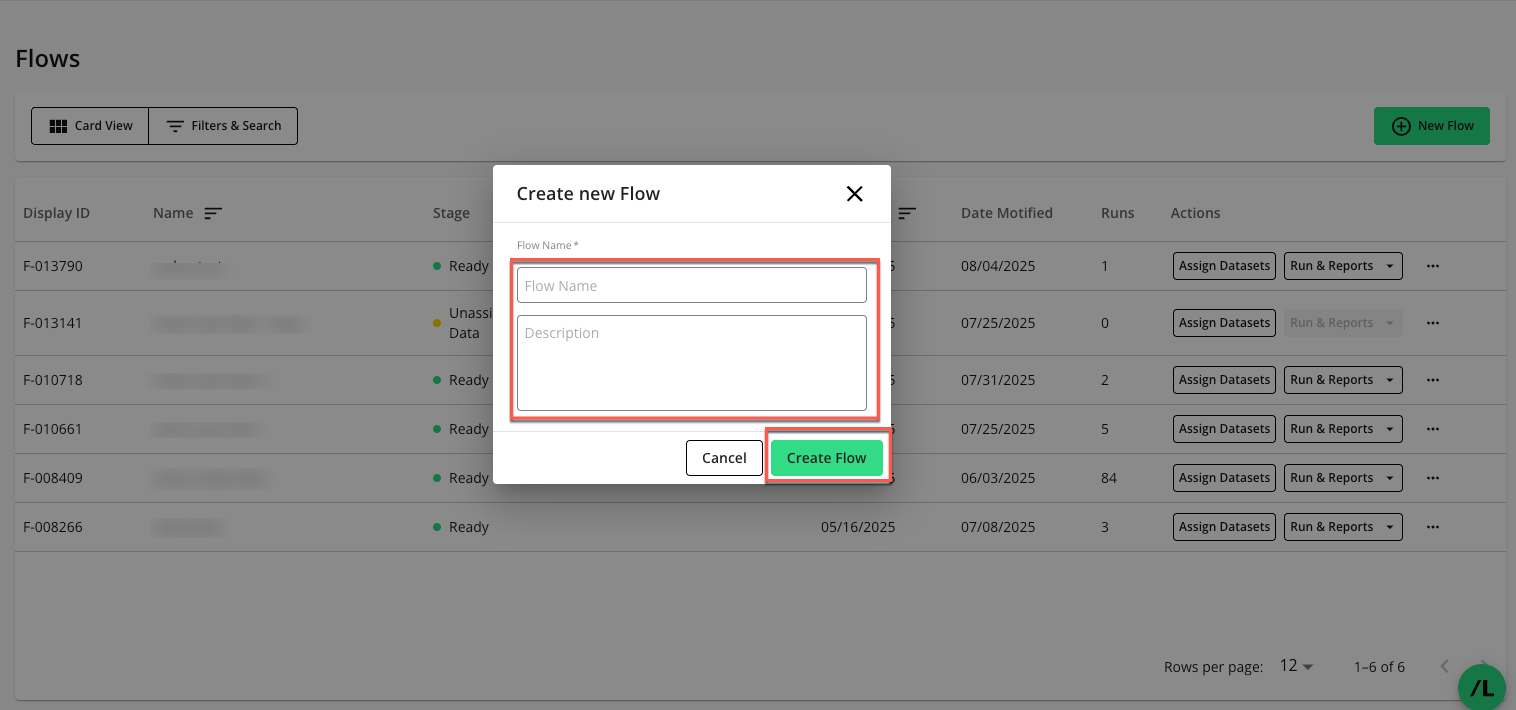
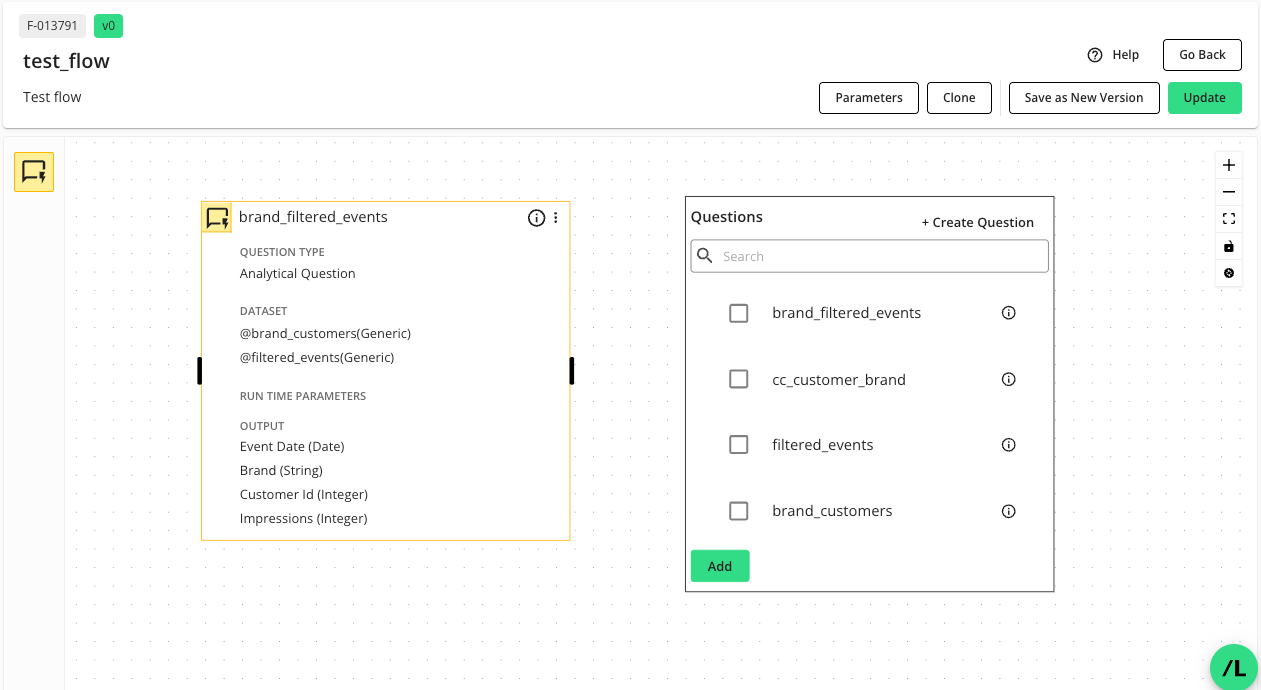
The Flow Builder page displays, which provides a workflow canvas for designing your flow.
Design a Flow in Flow Builder
The Flow Builder includes several key sections:
Flow Metadata: Displays read-only information such as the flow ID, version number, name, and description.
Node Library: Contains different objects that can be used in the flow. Currently, the only node type available is a question node.
Flow Canvas: This is the primary area where you lay out and connect your workflow steps.
Canvas Controls: Provides tools for zooming, fitting all nodes on the screen, and locking node positions.
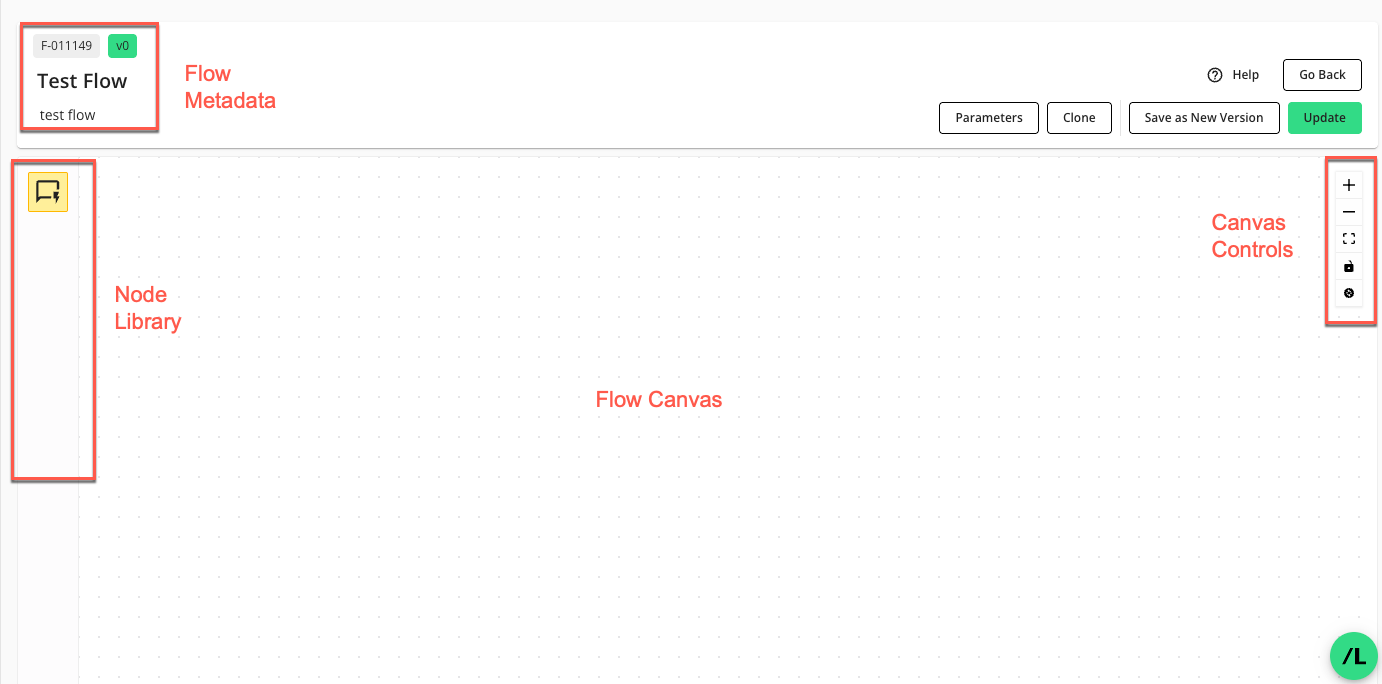
For more information, see "Flow Builder".
Add Nodes to a Flow
Note
Question nodes are currently the only type of node available in flows.
Drag the node's icon from the node library onto the flow canvas.

For question nodes, an inventory list shows all available questions that have been provisioned to the clean room, even those not currently listed on the "Current Questions" tab of the Questions page.
Note
Adding a question to a flow does not impact the question’s existing dataset management, version, runs, or scheduled runs in the clean room.
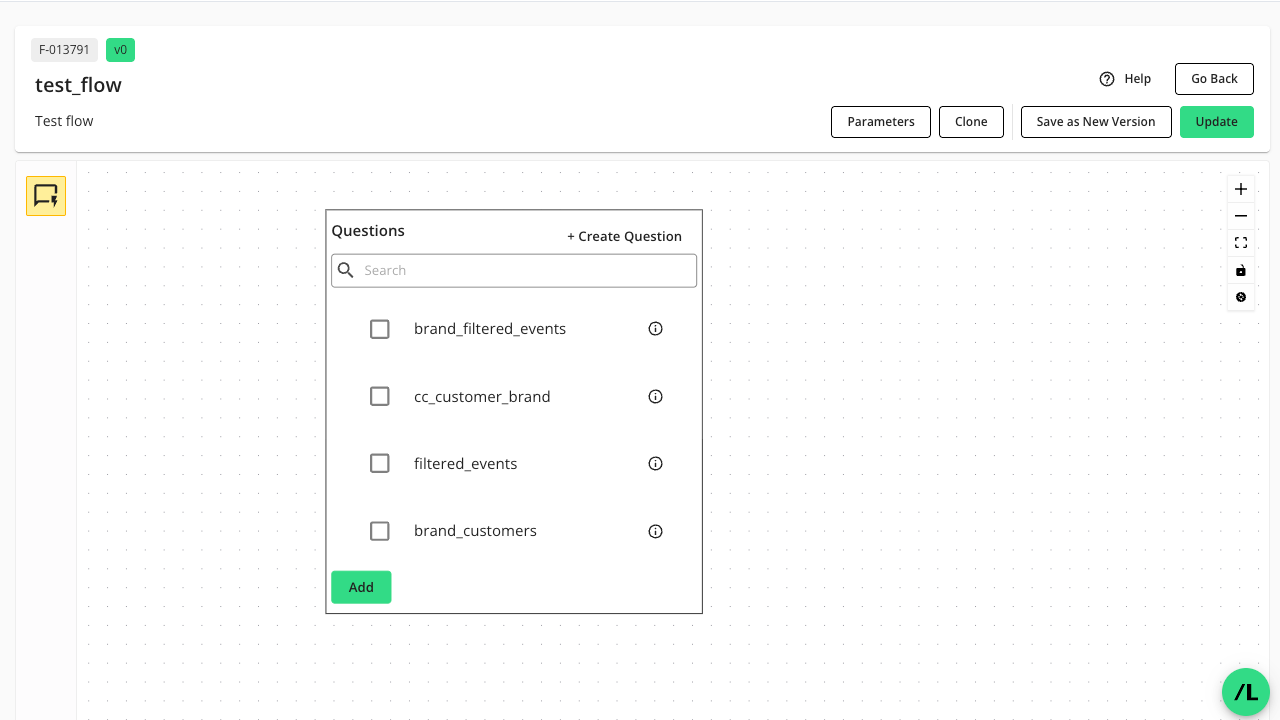
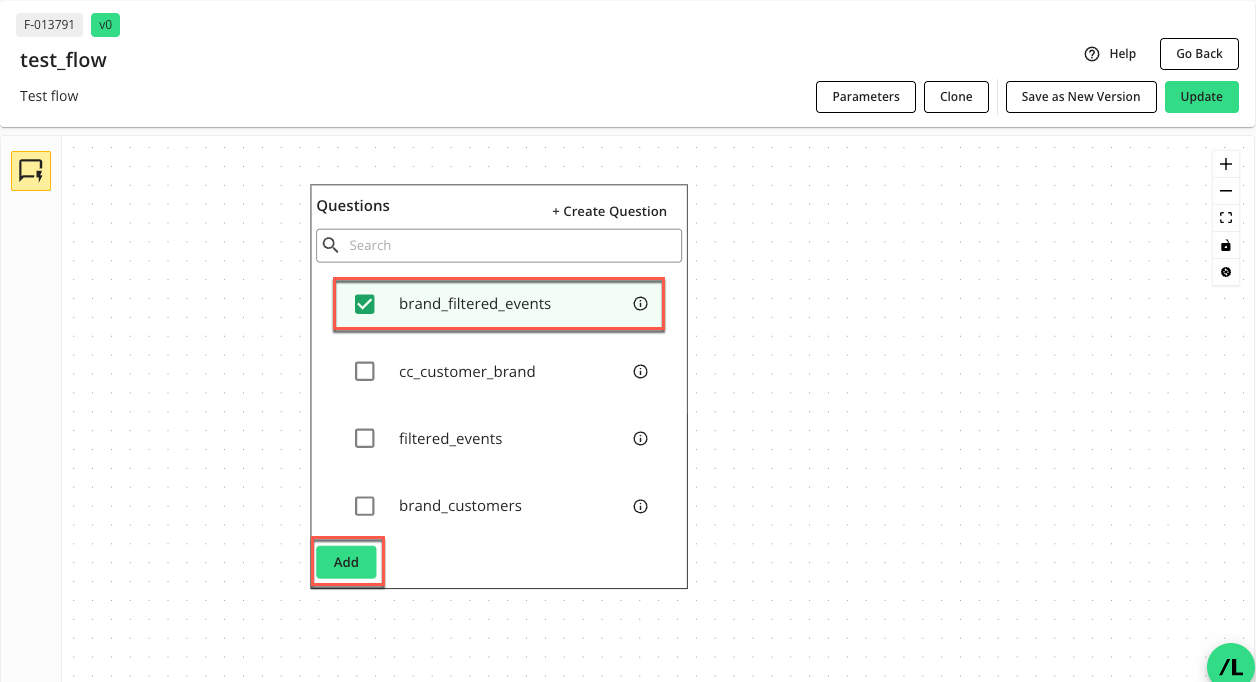
Select the desired question from the list and click .
The question node displays the node’s name, question type, dataset, runtime parameters, output, and tags.
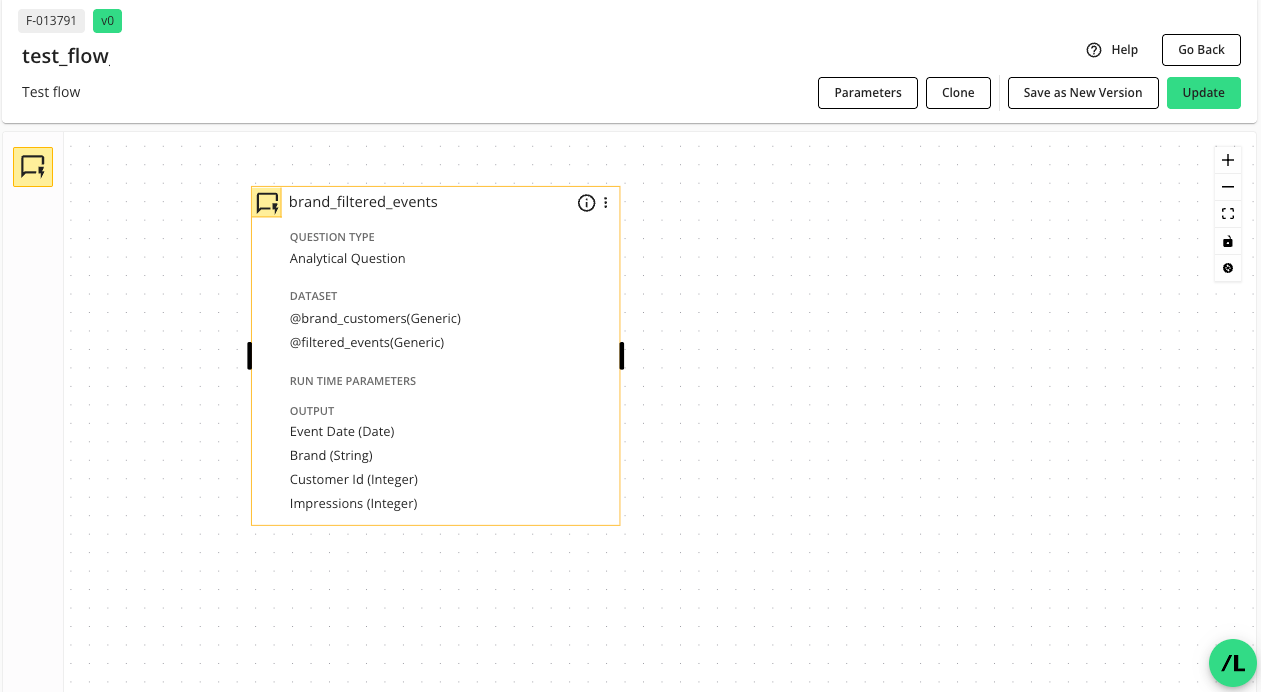
Double-click on the question node to view its details in the side panel.
The top of the side panel lists the question node’s ID (Node ID), name, and the display ID of the question associated with the node.
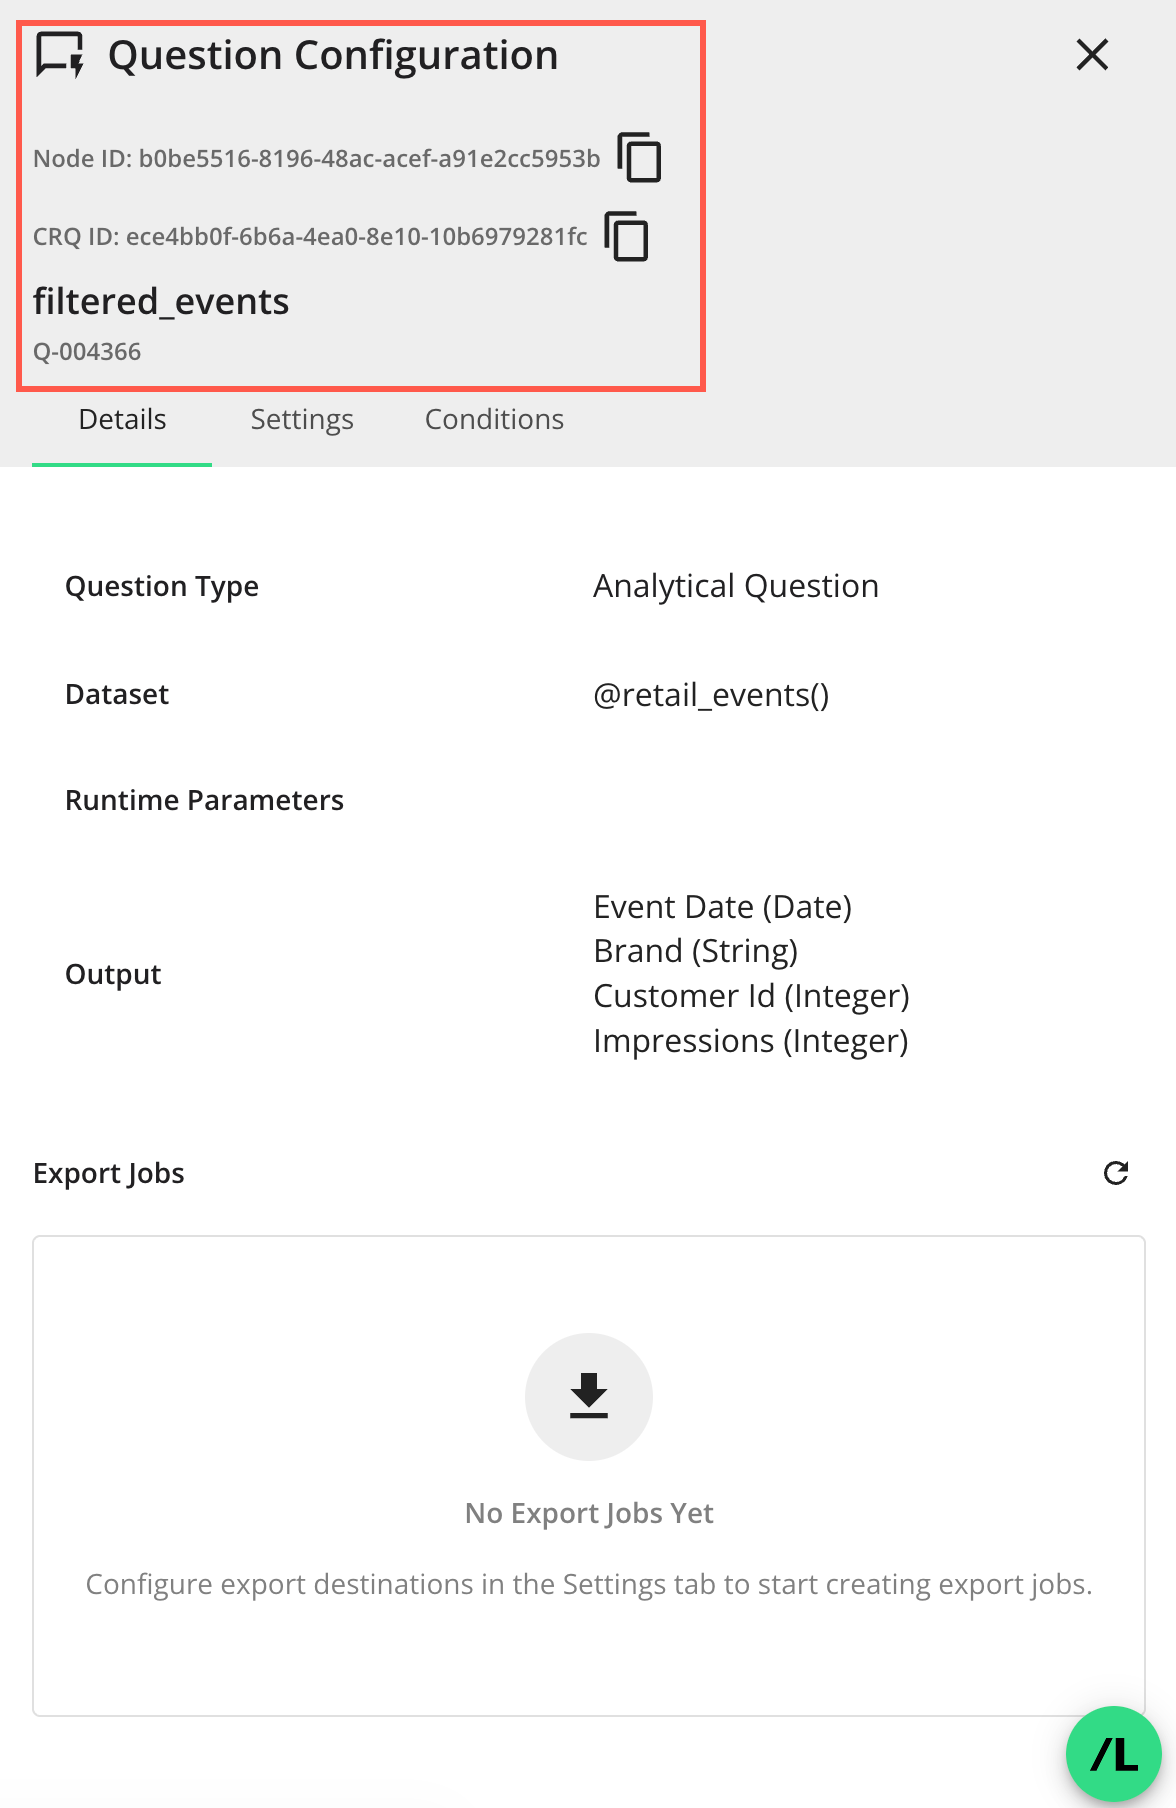
The “Details” tab of the side panel displays the following:
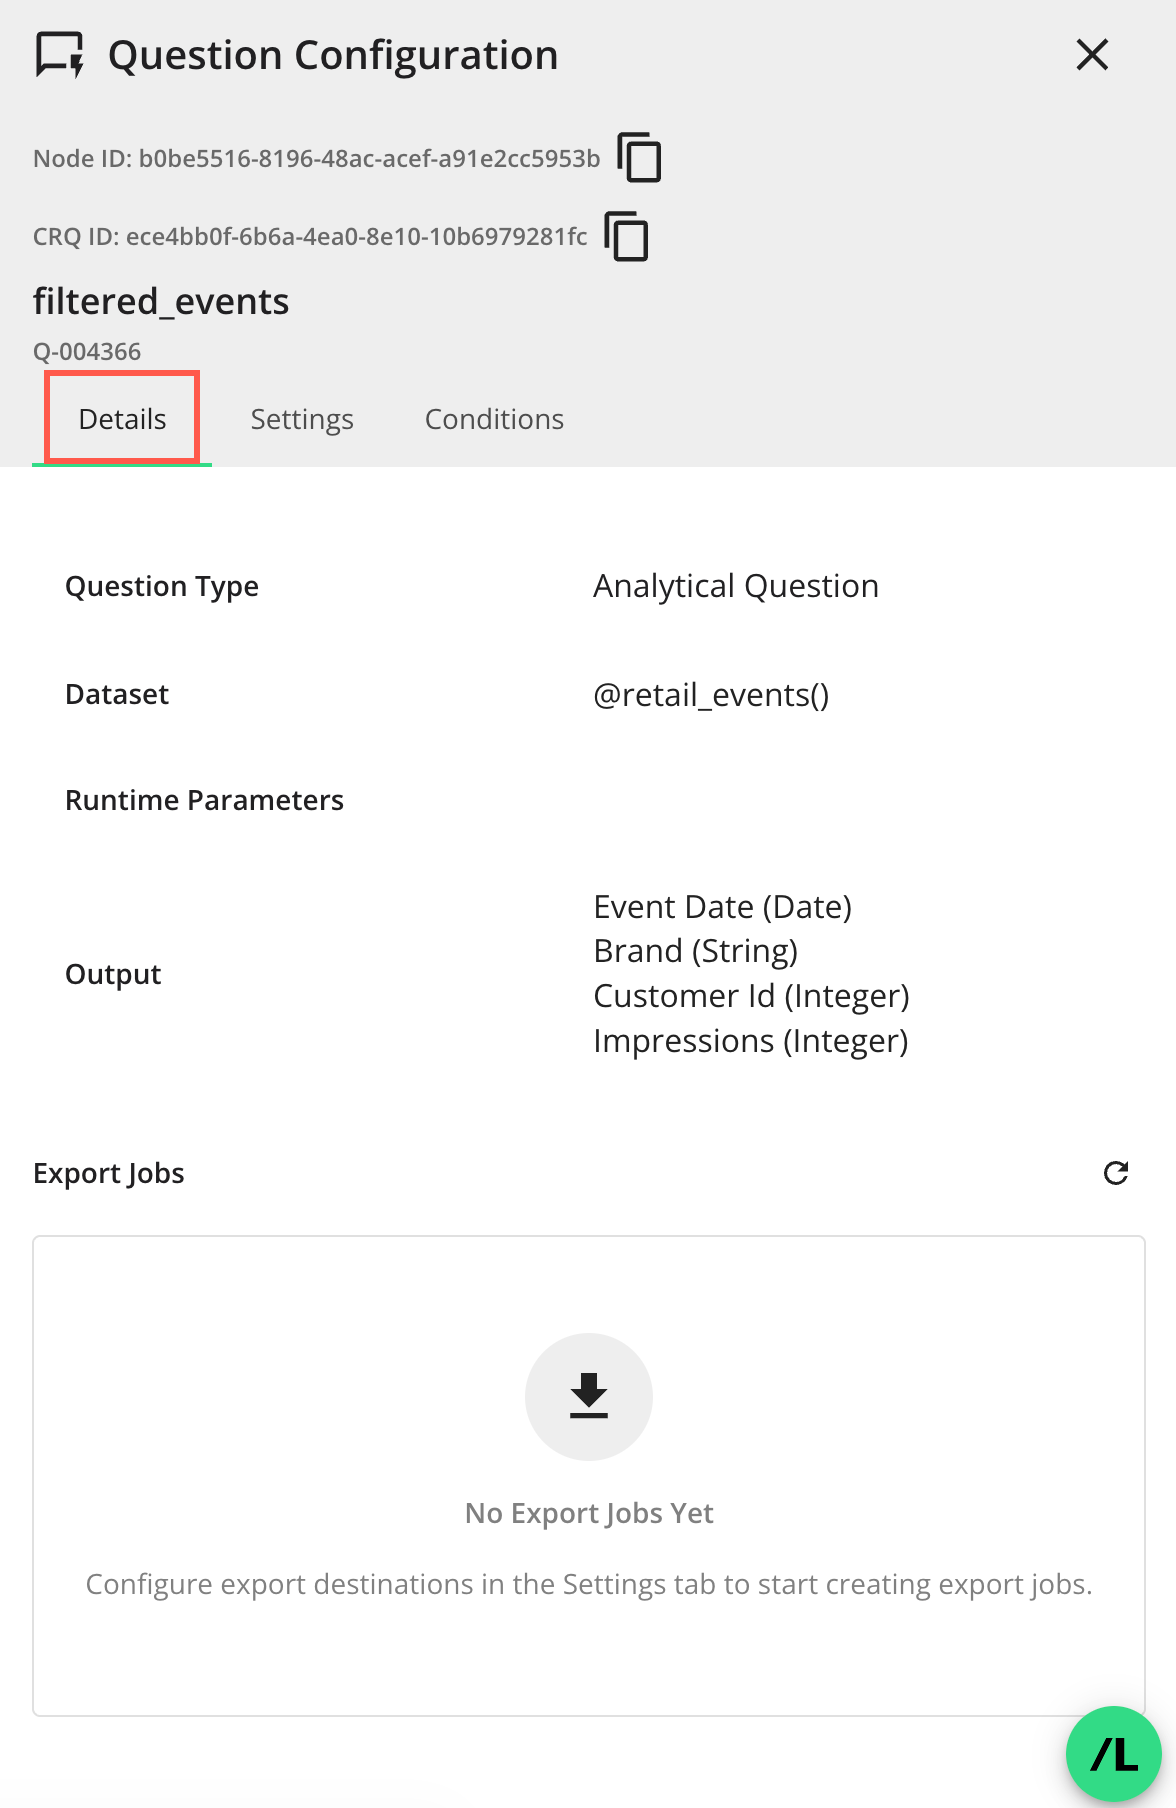
Question Type: The type of question, e.g., Analytical Question or List Question.
Dataset: The dataset macros assigned to the node.
Runtime Parameters: The runtime parameters for the question.
Output: The output fields of the question.
Click the Settings tab to display the following options that you can select for this question node:
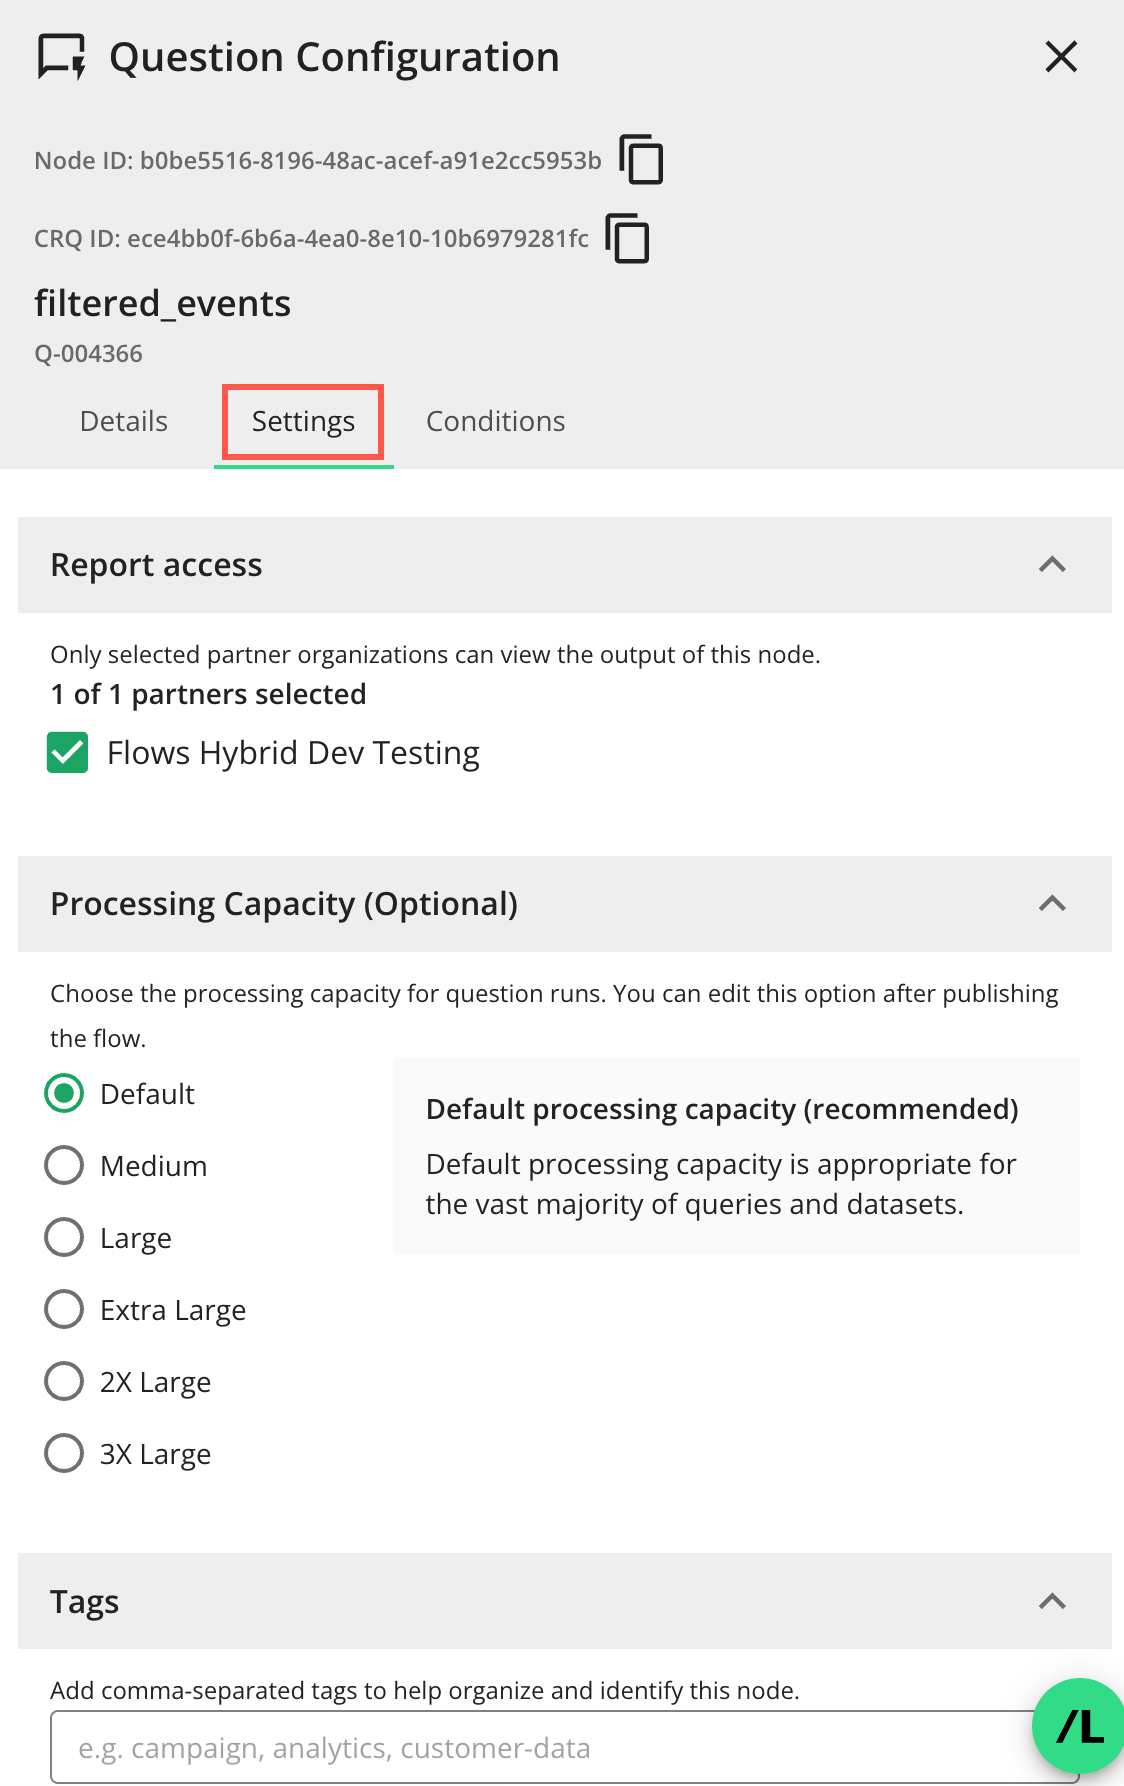
Report access: The permission access for the output of this question node. Select or unselect partner organizations who can view the output of this question node. Only the selected partner organizations can view the output.
Note
You must have the "View Reports and Outputs" permission to access the reports. To learn more, see "Managing Clean Room Permissions".
Processing Capacity (Optional): Choose the processing capacity for question runs. You can edit this option after updating the flow. The option is recommended and is appropriate for the vast majority of queries and datasets. The available processing capacities are as follows:
Default: Recommended and appropriate for the vast majority of queries and datasets.
Medium: Only required for questions that are not satisfied by the default setting or for complex queries.
Large: Only required for questions that are not satisfied by the default setting or exceptionally complex queries and large record counts (e.g., 1+ billion).
Extra Large: Only required for questions that are not satisfied by the “Large” setting or exceptionally complex queries and very large record counts (10+ billion).
2X Large: Only required for extremely complex questions and very large datasets. Use only when “Extra Large” capacity is insufficient.
3X Large: Only required for exceptionally high-complexity questions and massive-scale datasets. Requires pre-approval from LiveRamp due to significant resource consumption.
Tags: You can add comma-separated tags in the field to help you organize and identify this node.
Tip
You can use tags to identify which branch a node belongs to. This can be helpful when you only want to run the nodes in specific branches of a flow. For more information, see "Understanding Flow Run Branching."
Export Configuration: You can select an export destination to send data to from this node in the Select Export Destination drop-down list. For more information, see “Flow Exports”.
Manage Export Jobs: Any flow export and/or segmentation jobs configured for this node are displayed. You can set them to “Active” or “Paused”. For more information, see “Flow Exports”.
Click Submit to save your selections in the "Settings" tab.
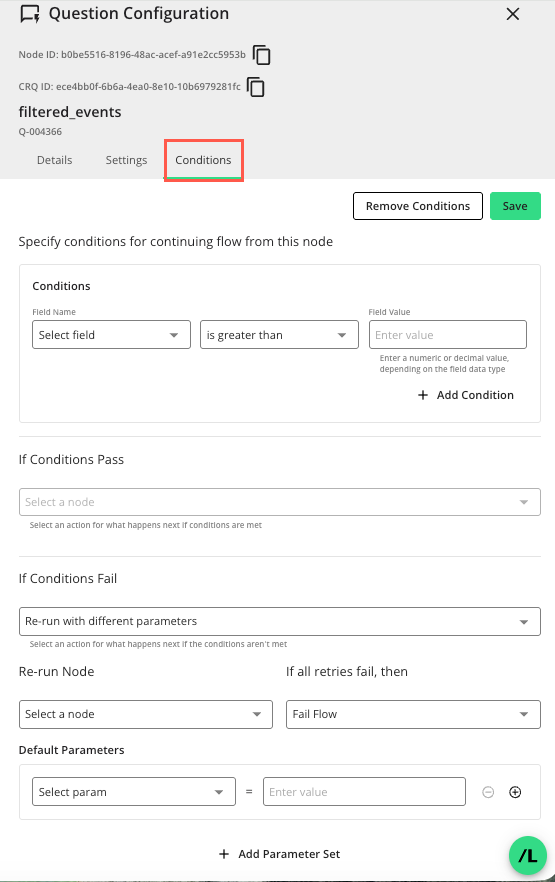
Select the Conditions tab to display options for defining conditions on the node’s output and configuring what the flow does if those conditions pass or fail. The following options are available:
Note
A node can only be configured with conditions if it has at least one upstream node and at least one same-level or downstream node.
Only one node configured with conditions is currently supported per flow.
Conditions: Define one or more conditions for the output of the current node by:
Selecting an output field of the current node in the Field Name drop-down list
Selecting a logical comparison operator
Entering a Field Value against which the node’s output will be compared to determine if the condition passes or fails
+ Add Condition: Add additional conditions by clicking + Add Condition. Multiple conditions are combined with AND, so all configured conditions must pass for the overall result to pass.
Note
Conditions currently support only numeric field types and comparisons, and the conditional check can be performed against only a single output value.
If Conditions Pass: Select the node to proceed to if the configured conditions pass. This drop-down list is populated with nodes at the same level as the current node.
Note
If the drop-down list is empty, there are nodes at the same level as the current node and you must either choose a different node to add conditions to or modify the flow.
If Conditions Fail: Select what happens if the configured conditions fail. Currently, the only available option to select is Re-run node with different parameters, which will rerun the node with different runtime parameters.
Re-run Node: Select the upstream node to rerun if the conditions fail. Only upstream nodes that have at least one runtime parameter field defined are available in this drop-down list. If the default parameter set does not satisfy the configured conditions, the selected node runs again with a different set of runtime parameters, and the conditions are evaluated again when the flow returns to the current node.
Note
If the drop-down list is empty, there are no qualified upstream nodes and the condition cannot be saved. If this occurs, you should do one of the following: choose a different node to add conditions to, add a runtime parameter field to an upstream node, modify the flow, or consider not using a conditional node.
If all retries fail, then: Select what happens if none of the configured runtime parameter sets cause the conditions to pass. Currently, the only available action is Fail Flow, which immediately ends the flow run and generates a report.
Default Parameters: Configure the first set of runtime parameter values used when the rerun node runs. This default set is used for the initial conditional validation.
Note
All retry parameter sets must be configured as part of the flow and cannot currently be set at runtime
+ Add Parameter Set: Add additional runtime parameter sets by clicking + Add Parameter Set. Additional parameter sets are used only for later retries if the default set fails the conditions. These values appear on the “Parameters” screen when creating a flow run and are currently read-only there.
Note
All additional runtime parameter sets must be configured as part of the flow and currently cannot be set at runtime
Click Save to save any changes to the "Conditions" tab. (To remove conditions previously saved, click Remove Conditions).
Close the side panel by clicking the side panel's exit (X).
Add any additional nodes to the canvas and configure them following the above steps.

You can click , if you are not going to continue working on the flow and want to save it, otherwise, continue to "Connect Nodes in a Flow" below.
Note
Clicking saves the flow and checks if the flow is ready to run or if datasets need to be assigned. For more information, see the Stage column description in "Columns Available on the Flows Page".
Connect Nodes in a Flow
A flow typically has two or more connected nodes to establish a sequence of operations when the flow runs. You connect two nodes by clicking on an "edge" (a black bar on the left or right side of a node) and dragging it to the target node. The first question in a flow is referred to as the "parent node," and any subsequent connected nodes as the "child nodes".
Note
If a question associated with a node is edited, its connections (edges) will automatically be deleted and must be reconfigured. The system does this because the existing edge configurations may no longer be valid.
Click on an "edge" (a black bar on the left or right side of a node) and drag the edge line to the edge of the target node.
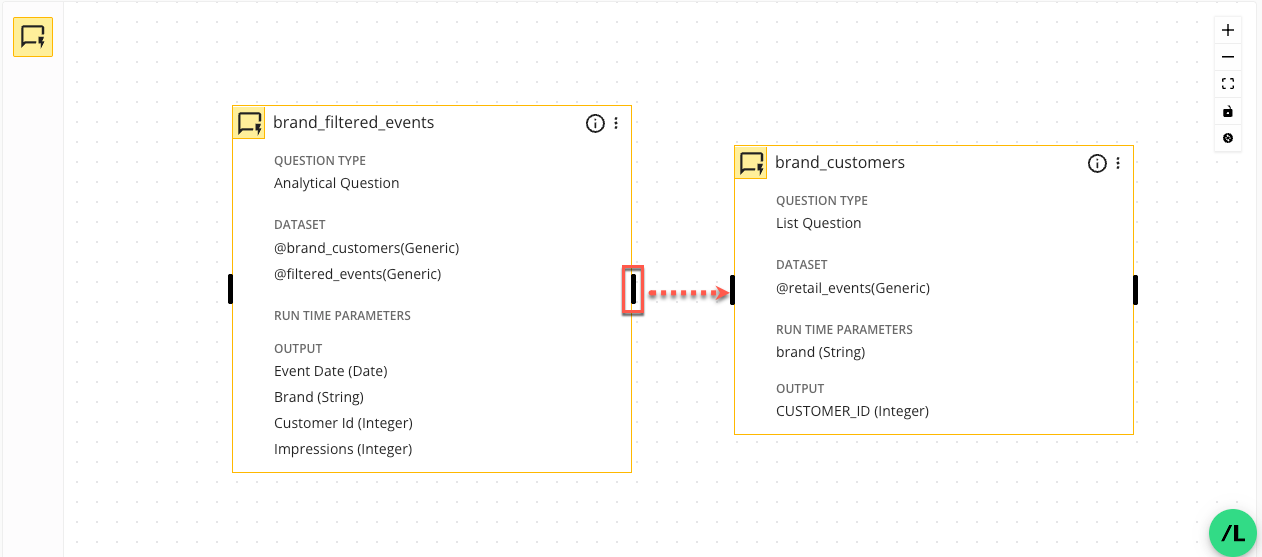
The Connection Configuration side panel opens.
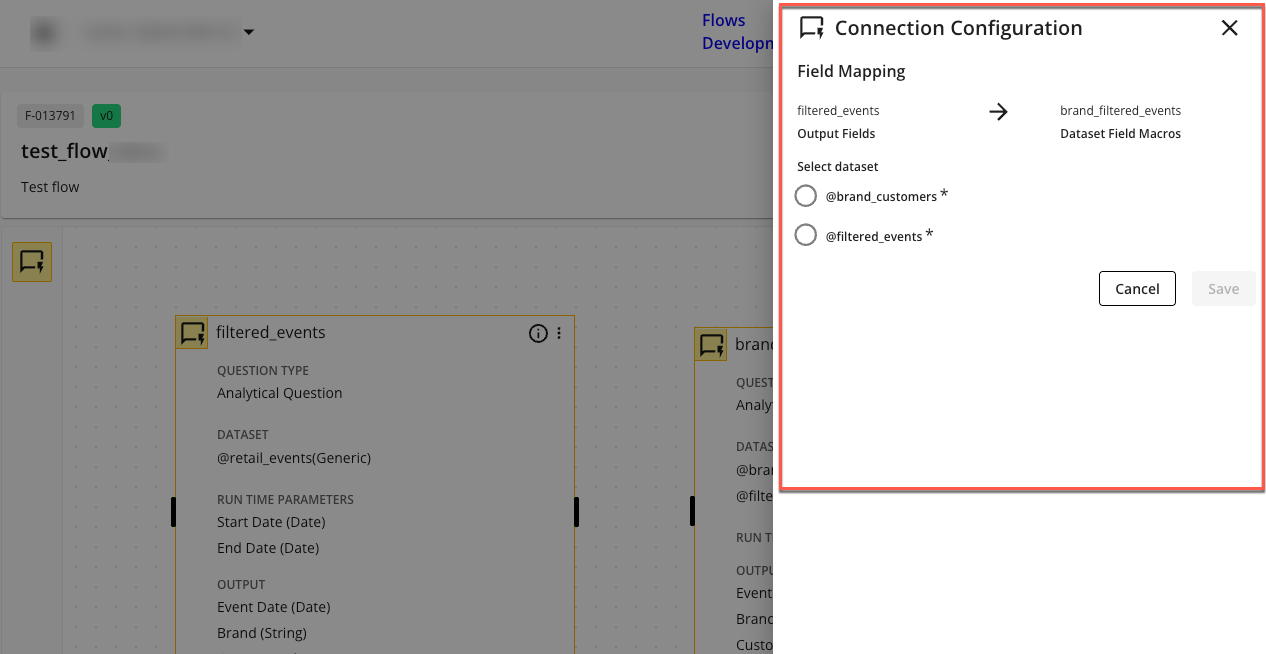
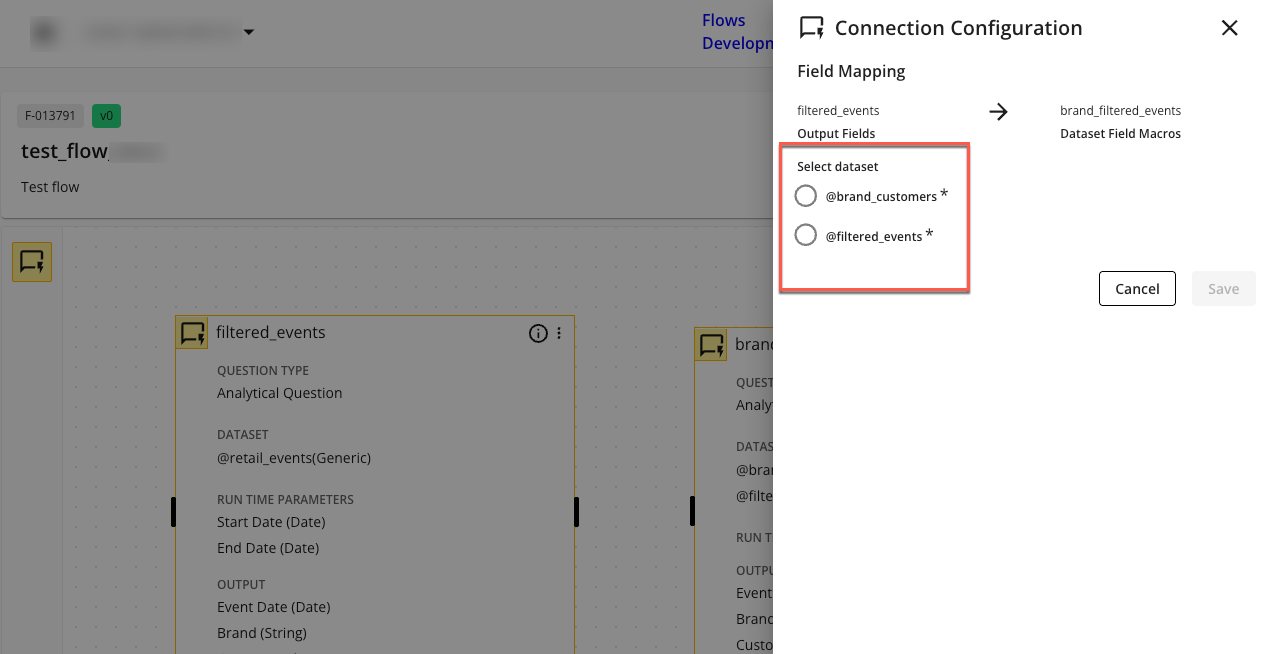
In the Connection Configuration side panel, select the appropriate parent node dataset to use for mapping parent node output fields to the child node input fields.
In the selected parent node dataset, select the child node field in the dropdown to indicate the child node fields the parent node fields should map to.
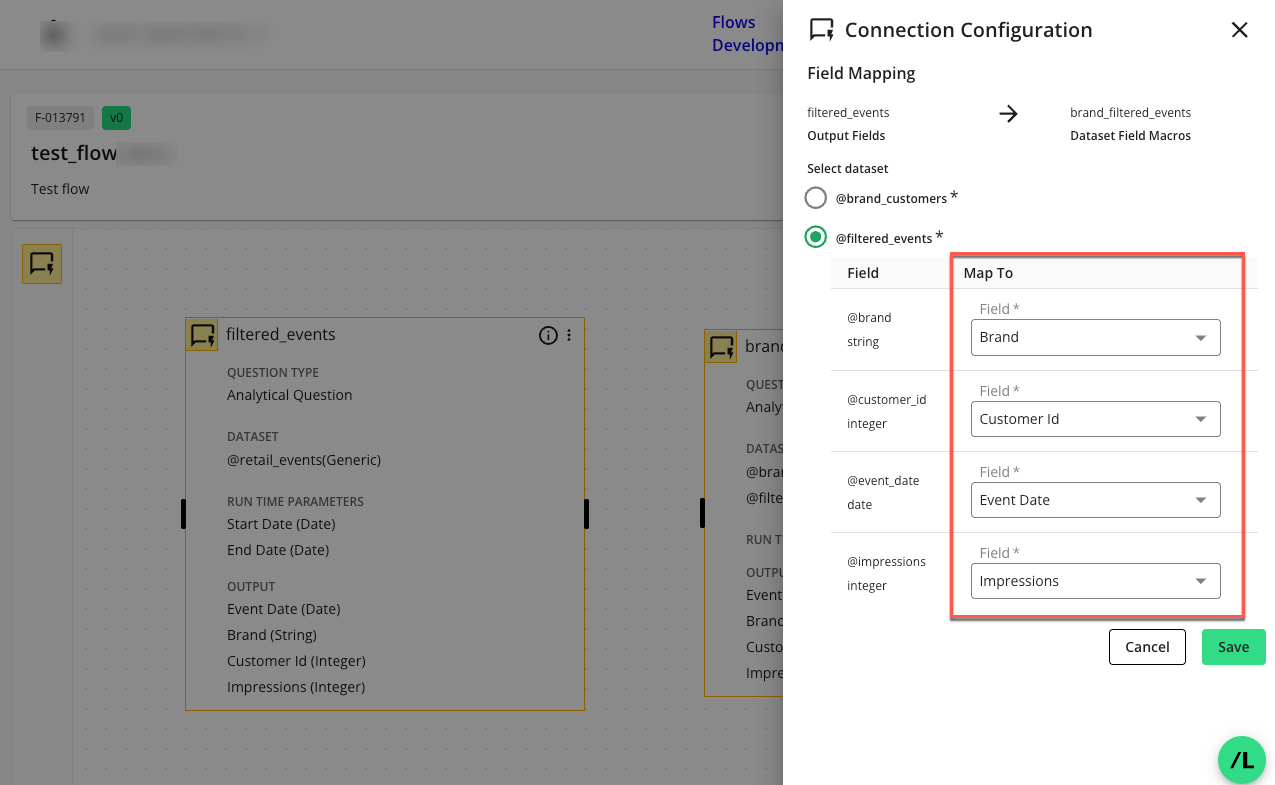
Click . The configured connection will display as a directional line between the parent and child nodes.

You can open the "Connection Configuration" panel to view its details or edit it by clicking the green icon (
 ) in the middle of the connection line.
When you've finished connecting and configuring all nodes in the flow, click to save the flow structure.
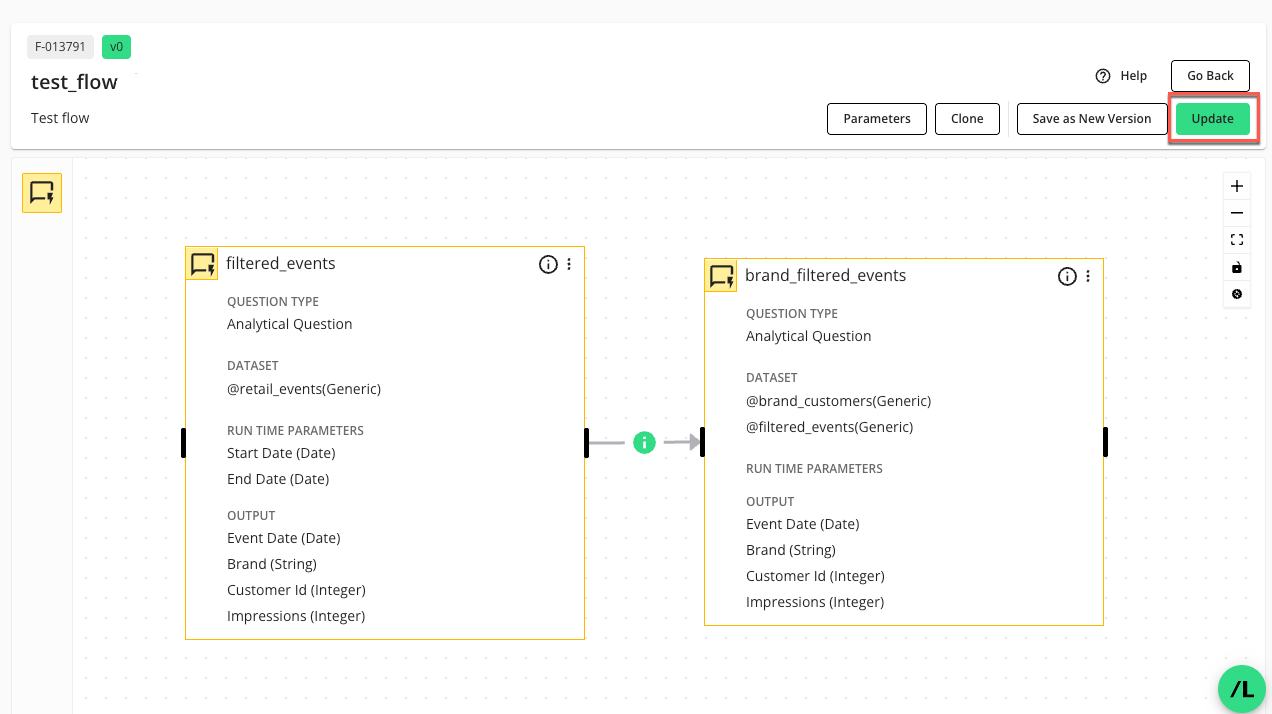
The Update option saves the flow and returns you to the Flows page, where you’ll find the newly created flow listed.
To continue configuring the flow, proceed to the "Manage Flow Datasets" steps below.
Manage Flow Datasets
Before a flow is ready to run, it needs to have datasets assigned to it. There are three steps required for managing these datasets:
Assign dataset ownership: You must specify the owner for the datasets that the flow will use. Assigning dataset ownership in a flow means designating which organization is providing or is accountable for the data associated with each data input macro within your multi-step workflow.
Note
To enable a partner organization to assign datasets to a flow it created, the Clean Room owner must first assign dataset ownership to that partner.
Assign datasets to the flow: You must add one or more specific datasets directly to the flow itself. This forms the shared data pool for all analytical steps within the flow. For shared datasets, clean room partners can mark their datasets as "Partners can assign," making them visible and available for selection in your flow.
Assign dataset field mapping: After datasets are assigned to the flow, their fields must be mapped to align with the expectations of the questions (question nodes) configured within the flow.
Note
Any start (Level 0) node in a flow must have datasets assigned to it.
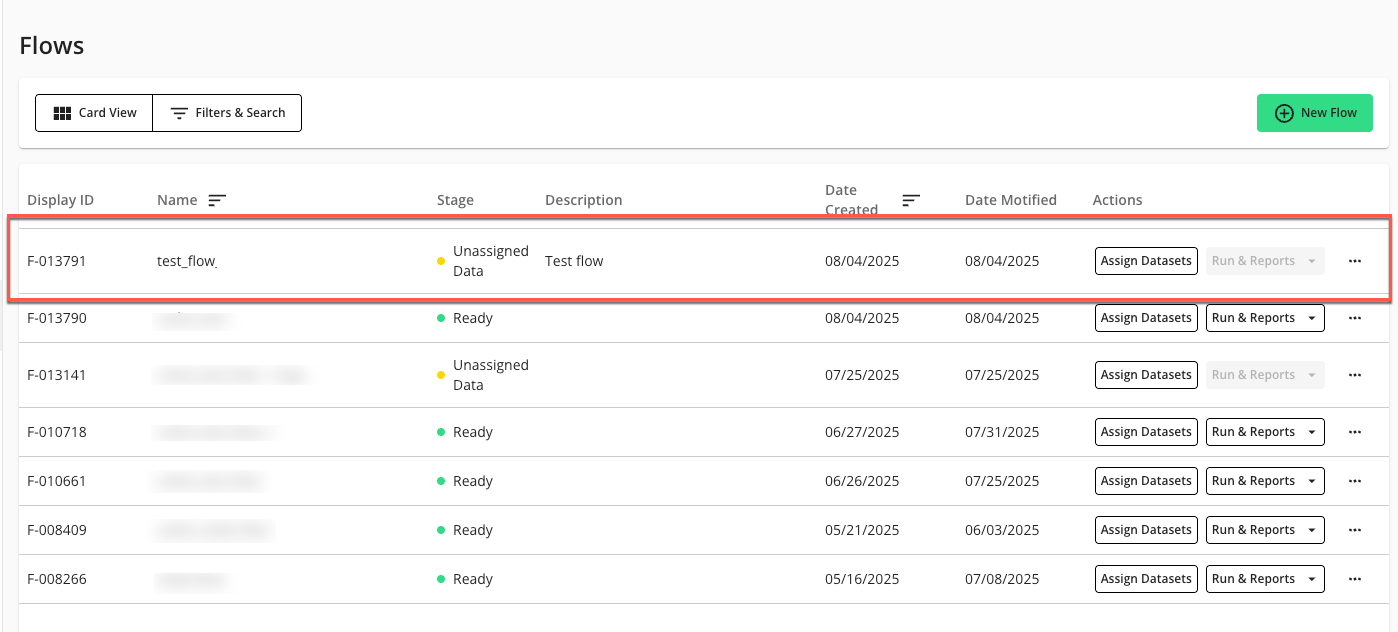
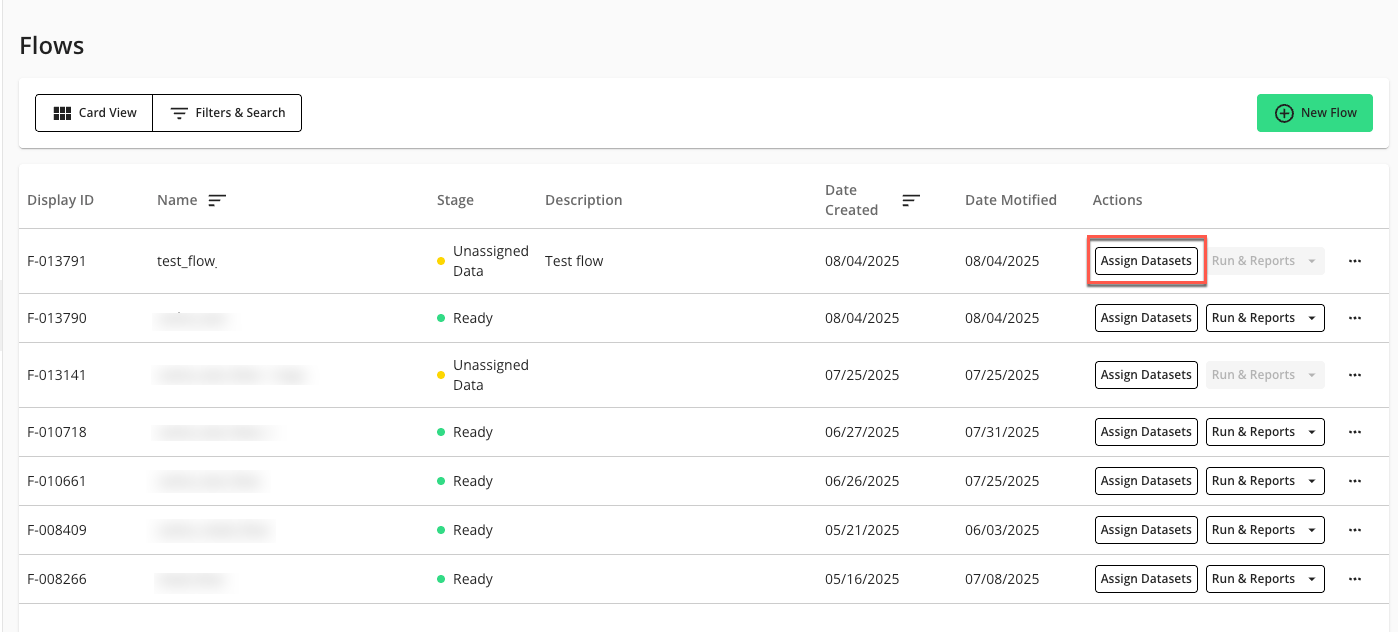
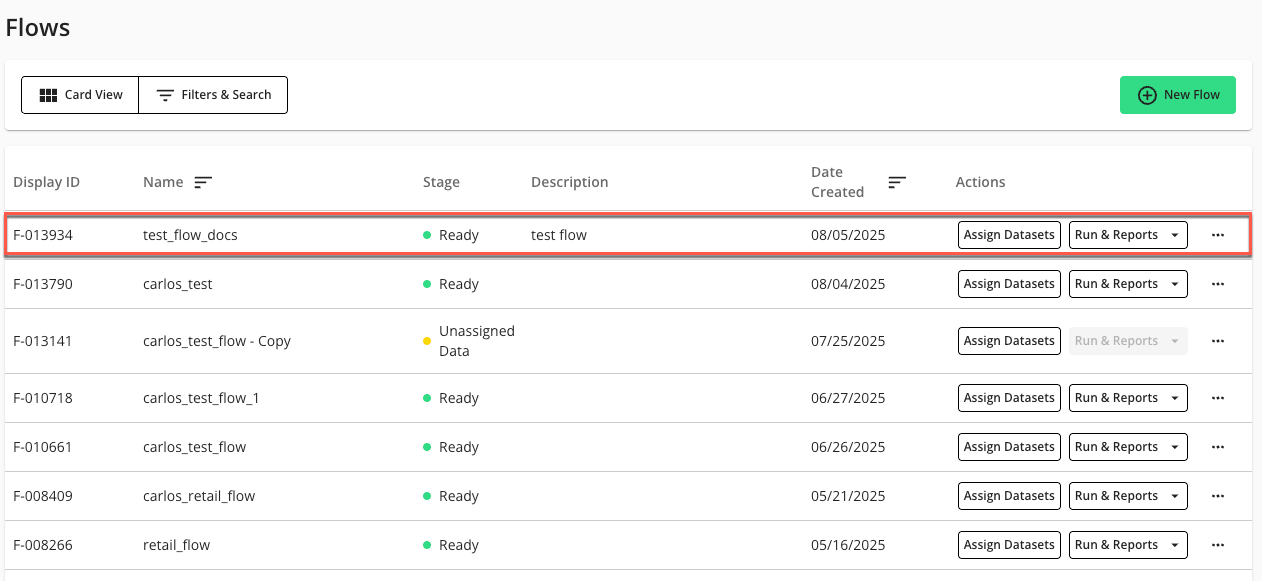
On the Flows page, in the desired flow's Actions column, click .
The Manage Datasets page displays:
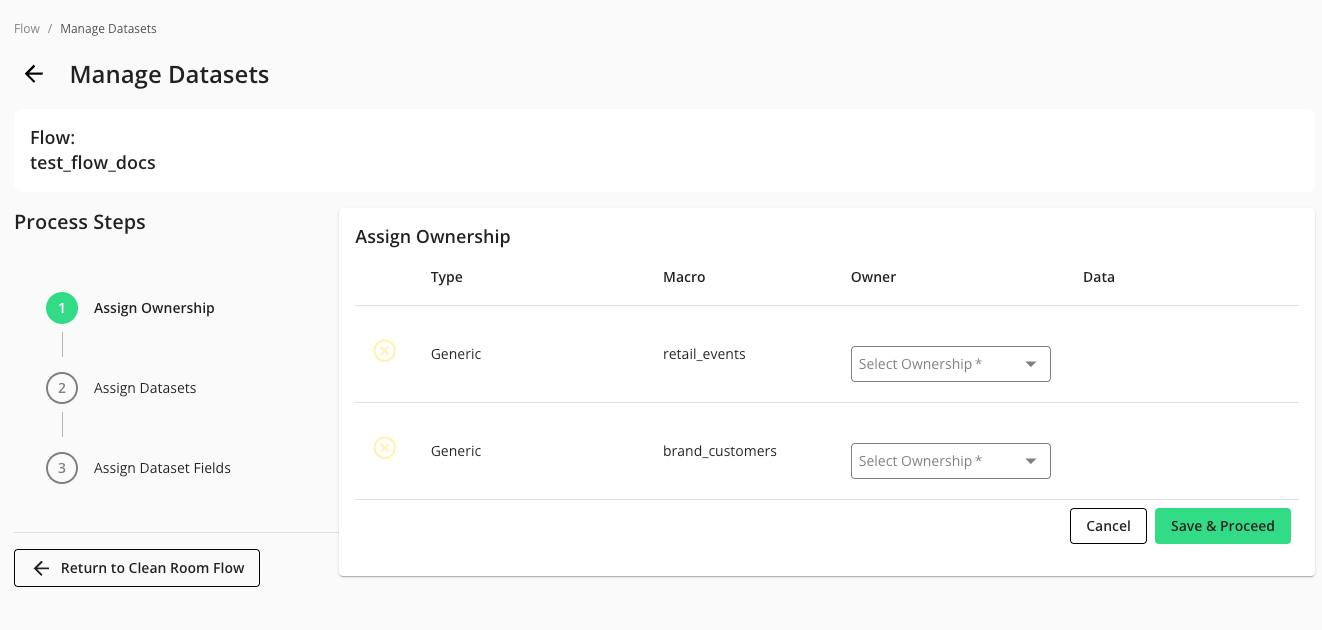
In the Assign Ownership step, select the appropriate value in any dropdown lists. You must assign ownership to each dataset macro listed.
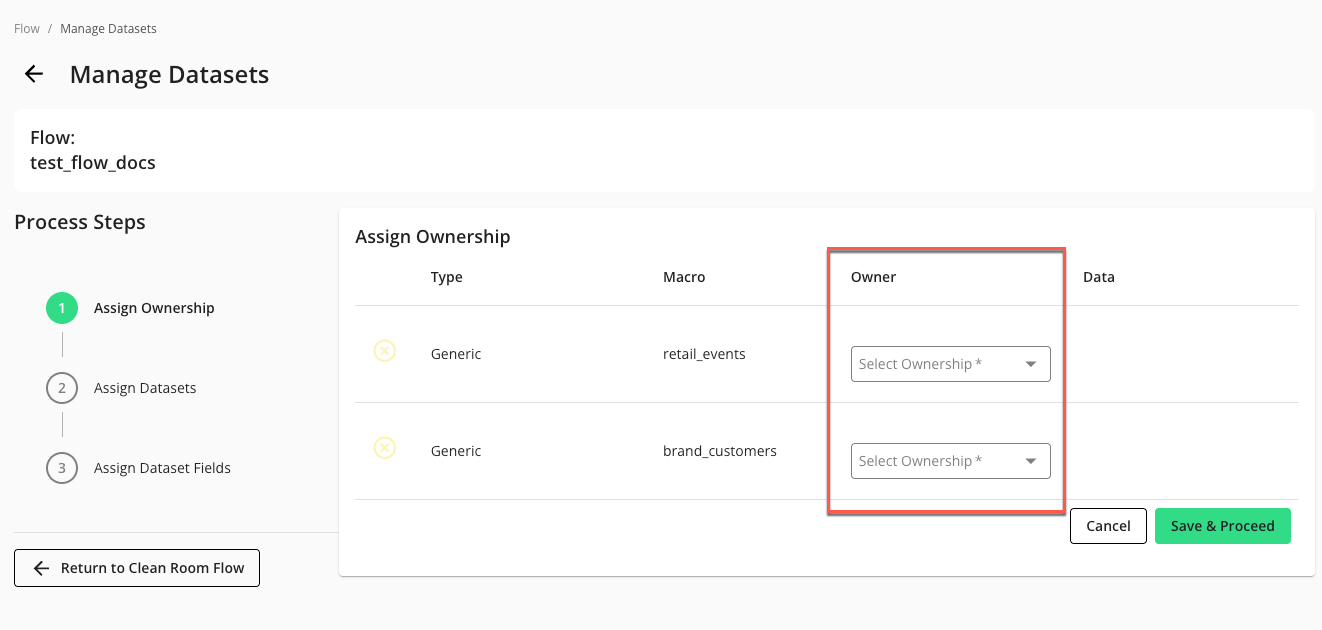
Click .
In the Assign Datasets step, select the appropriate dataset value in each dropdown list. You must assign a dataset to each dataset macro listed.
Note
If you are working with data shared by partners, the partners might also need to assign datasets.
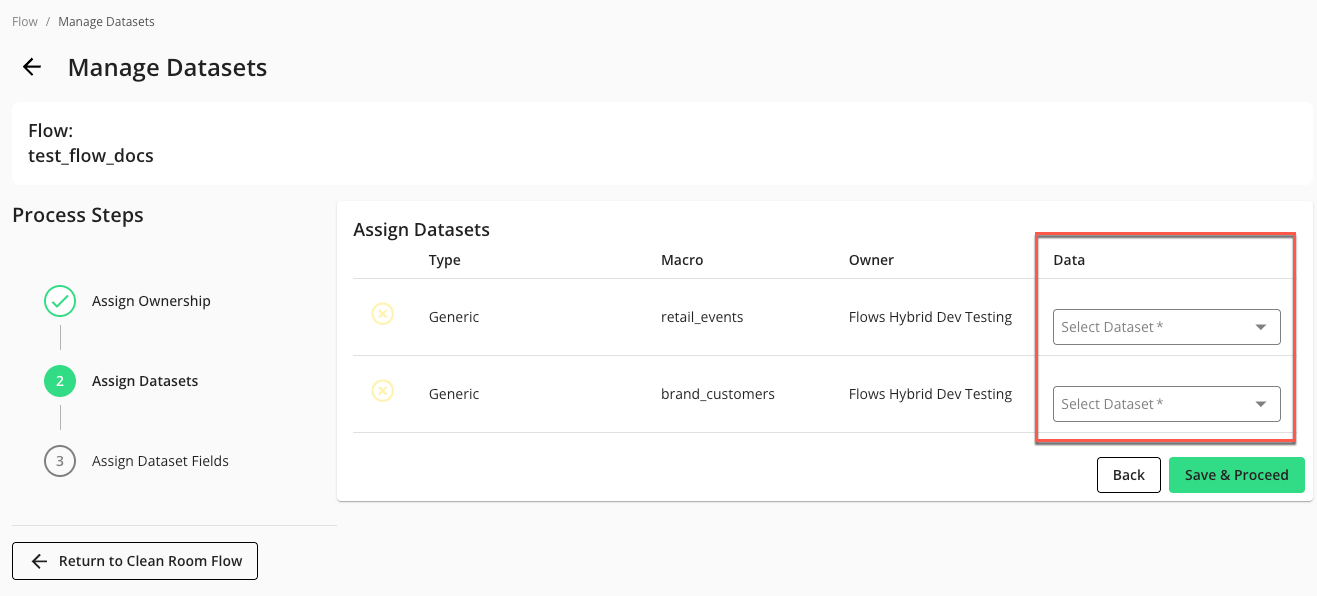
Click .
In the Assign Dataset Fields step, select the appropriate dataset field value in each dropdown list.
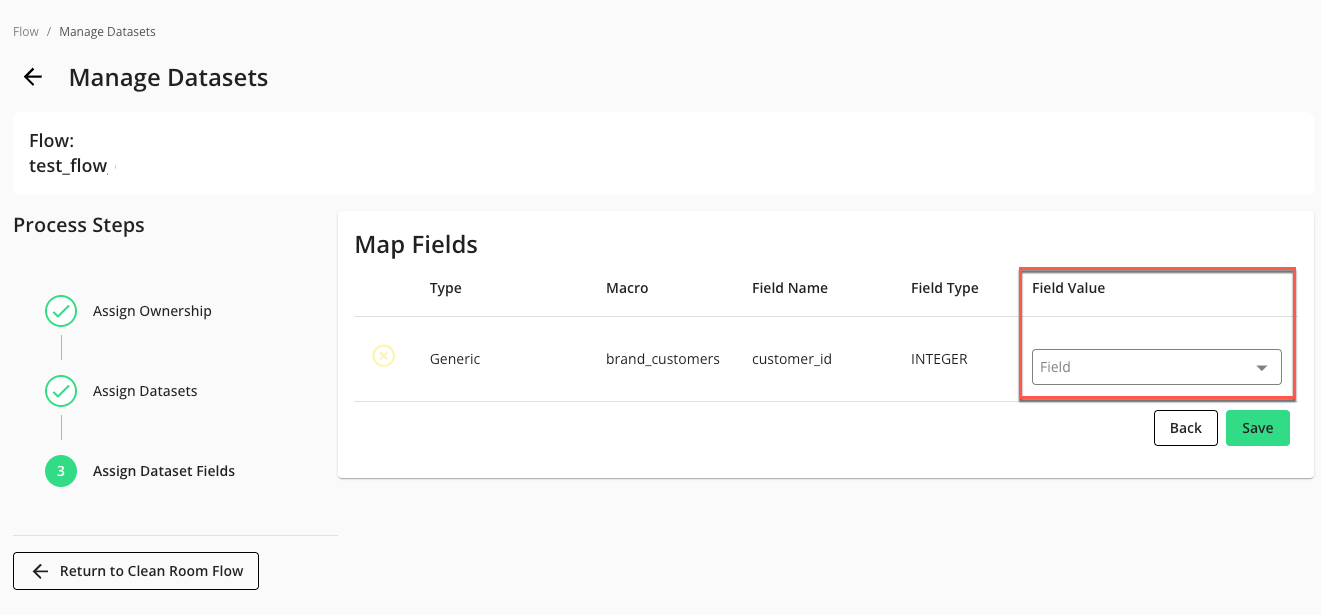
Click .
The Save option saves the flow and returns you to the Flows page, where the newly configured flow is listed.
If the flow was fully configured, the “Stage” of the flow should display “Ready” and the Run & Reports dropdown should be available in the flow’s Actions column.
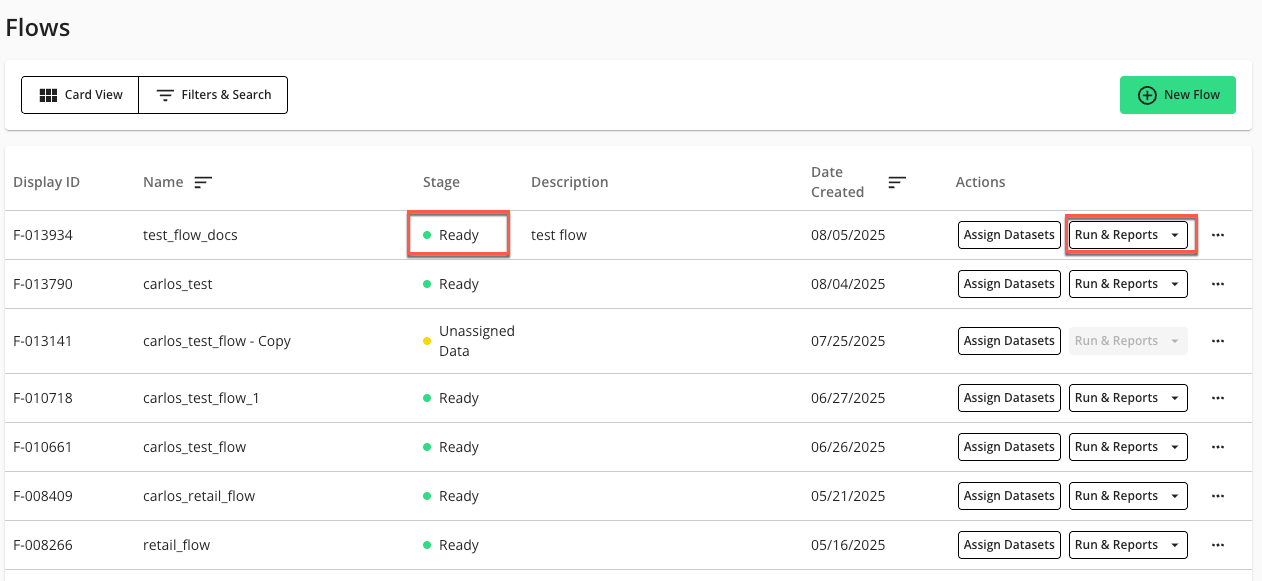
If the flow “Stage” is “Ready”, the flow is ready to be run. For more information, see “Flows”, “Flow Runs”, and “Create a Scheduled Flow Run”.
Configure Flow Parameters
In LiveRamp Clean Room, a "parameter" is a dynamic variable or placeholder used in a question's logic or a flow's configuration. This allows for flexible, reusable, and dynamic reporting and analytics. Flow parameters combine all parameters from individual question nodes within a flow. By configuring these flow parameters, all necessary parameters are collected and presented in a unified manner when you execute or schedule a flow run. This ensures that parameters with the same label use the same value throughout the flow's execution.
When you are creating a new scheduled flow run, for example, the "Runtime Parameters" section in the "New Scheduled Run" window will display these flow-level parameters. There, you can specify the actual values for each flow-level parameter, such as start and end dates or other custom attributes, which will then be applied when the flow runs. These specific values chosen at the time of a flow run are called "flow run-level parameters".
On the Flows page, click the flow’s More Options (
 ) menu and select .
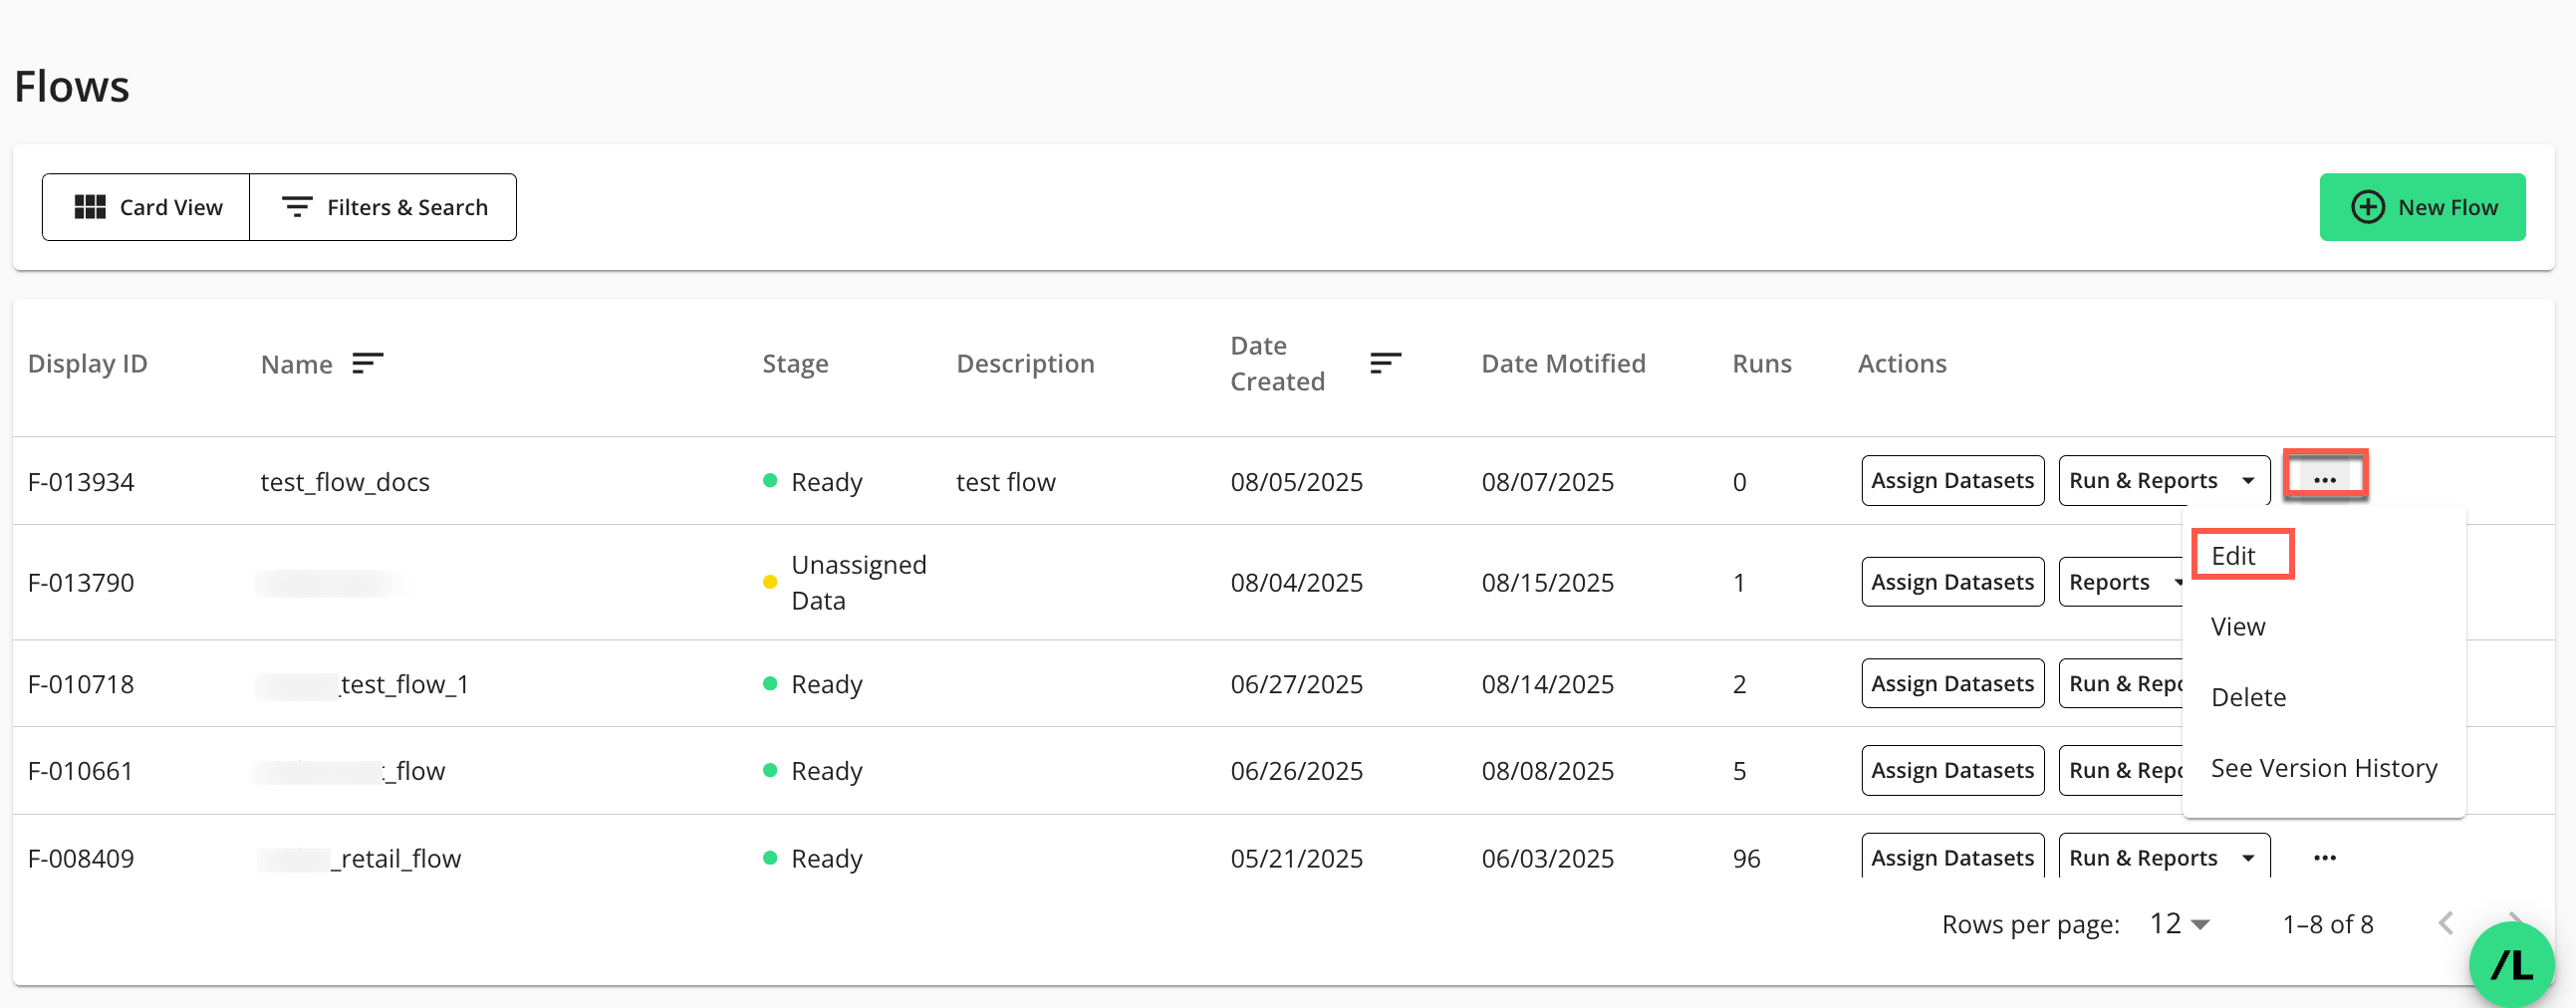
The Flow Builder page in edit mode displays:
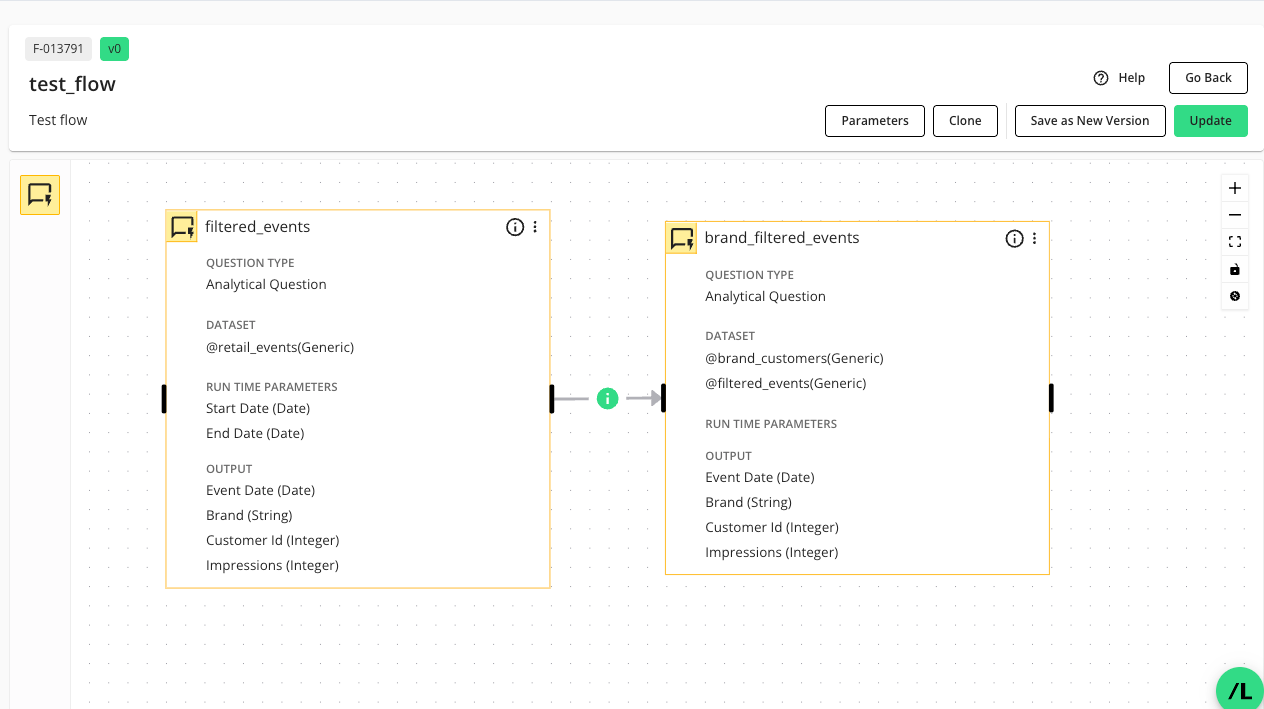
On the Flow Builder page, click .
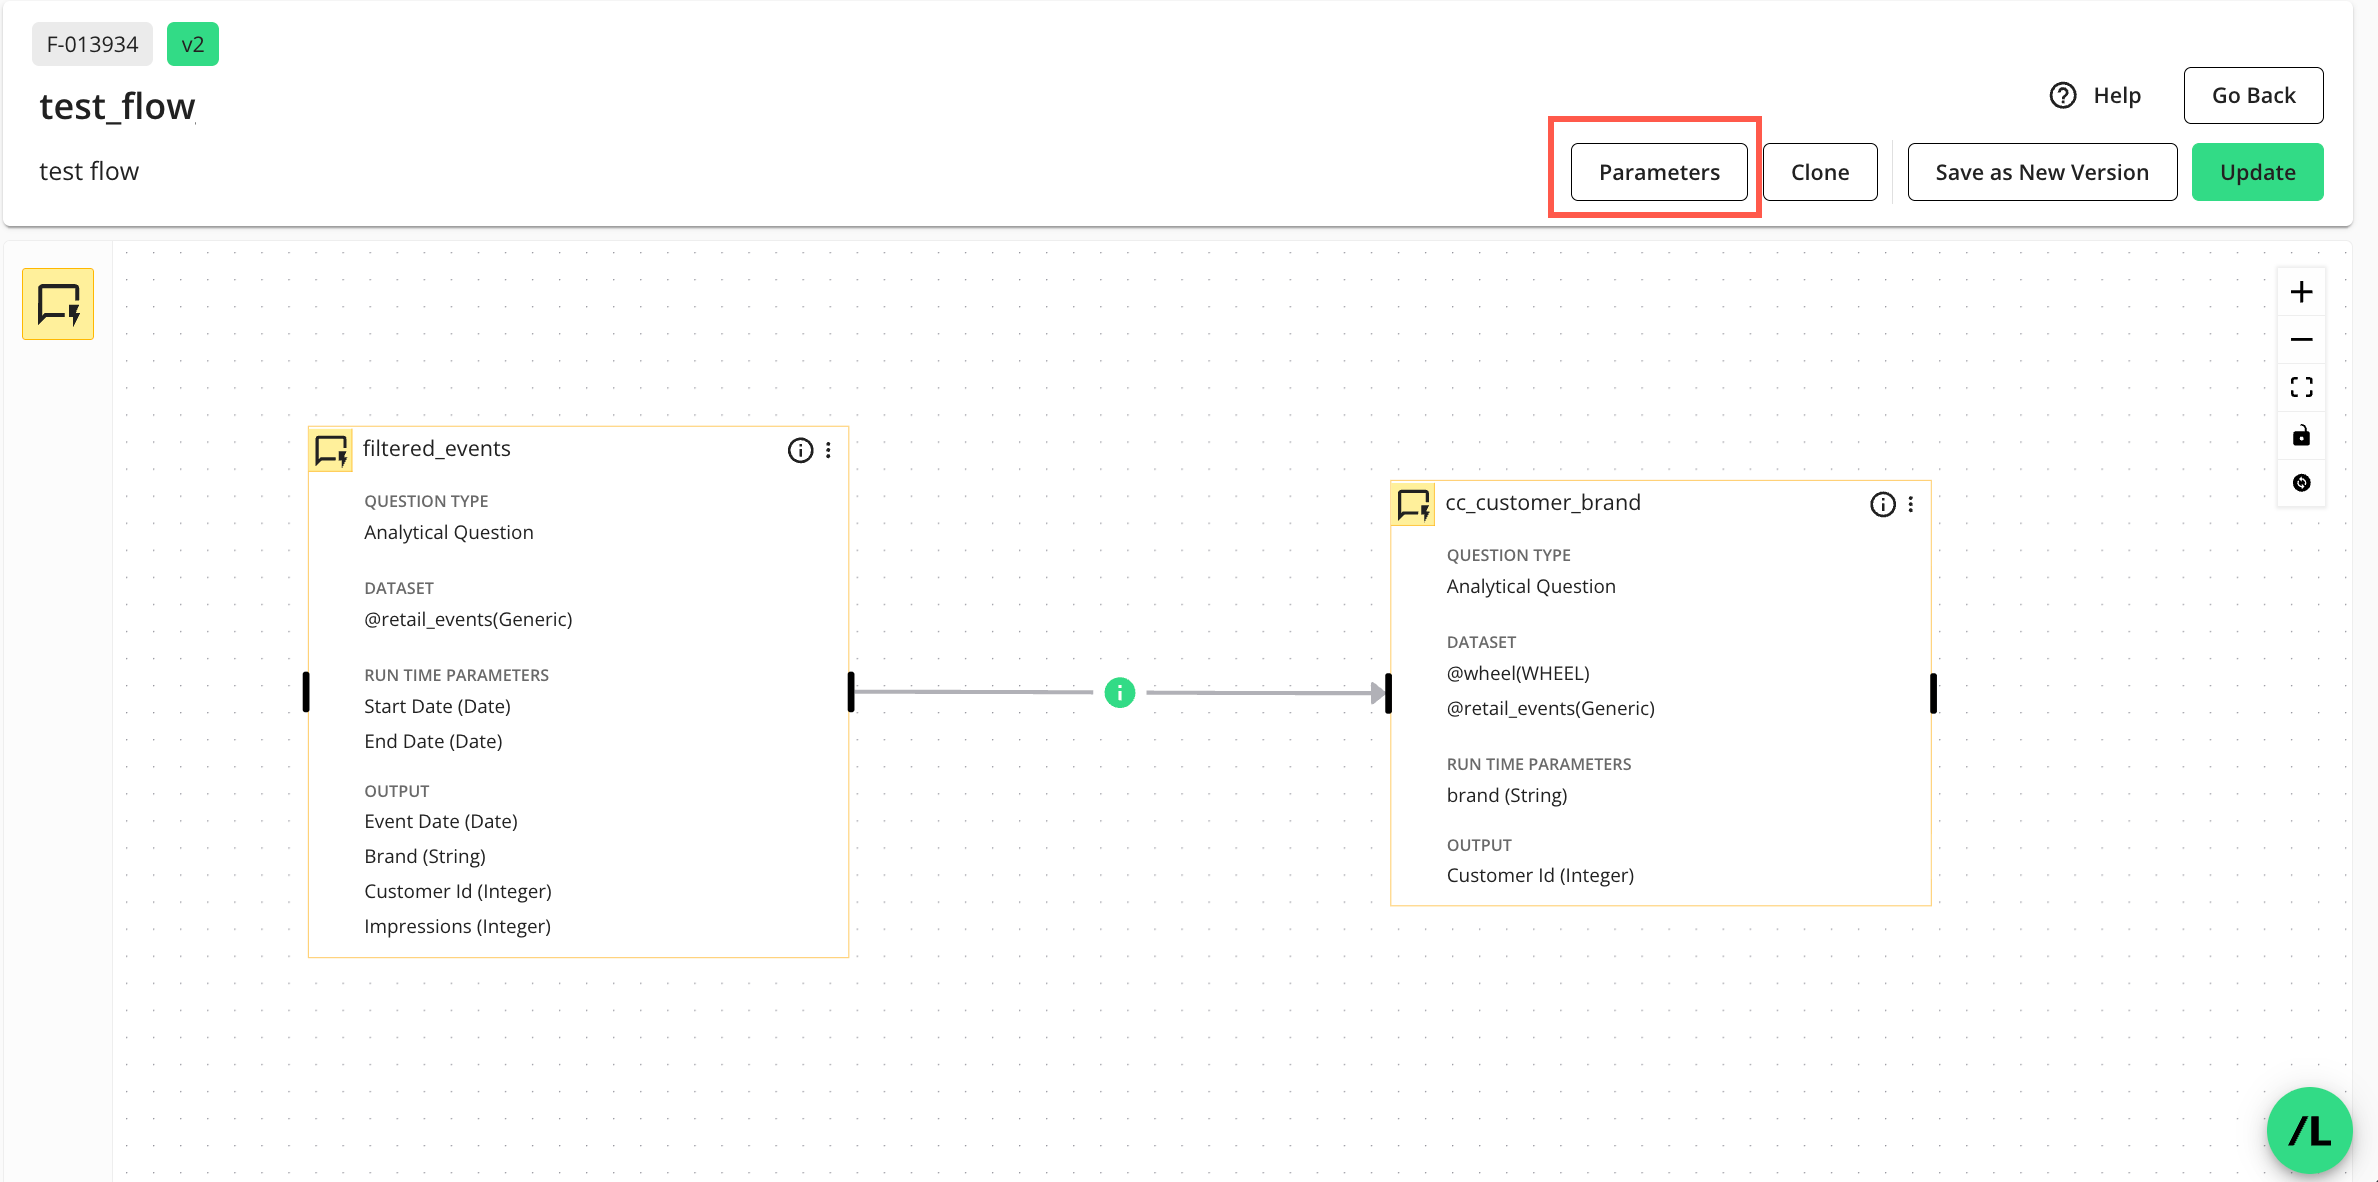
The Parameters side panel displays:
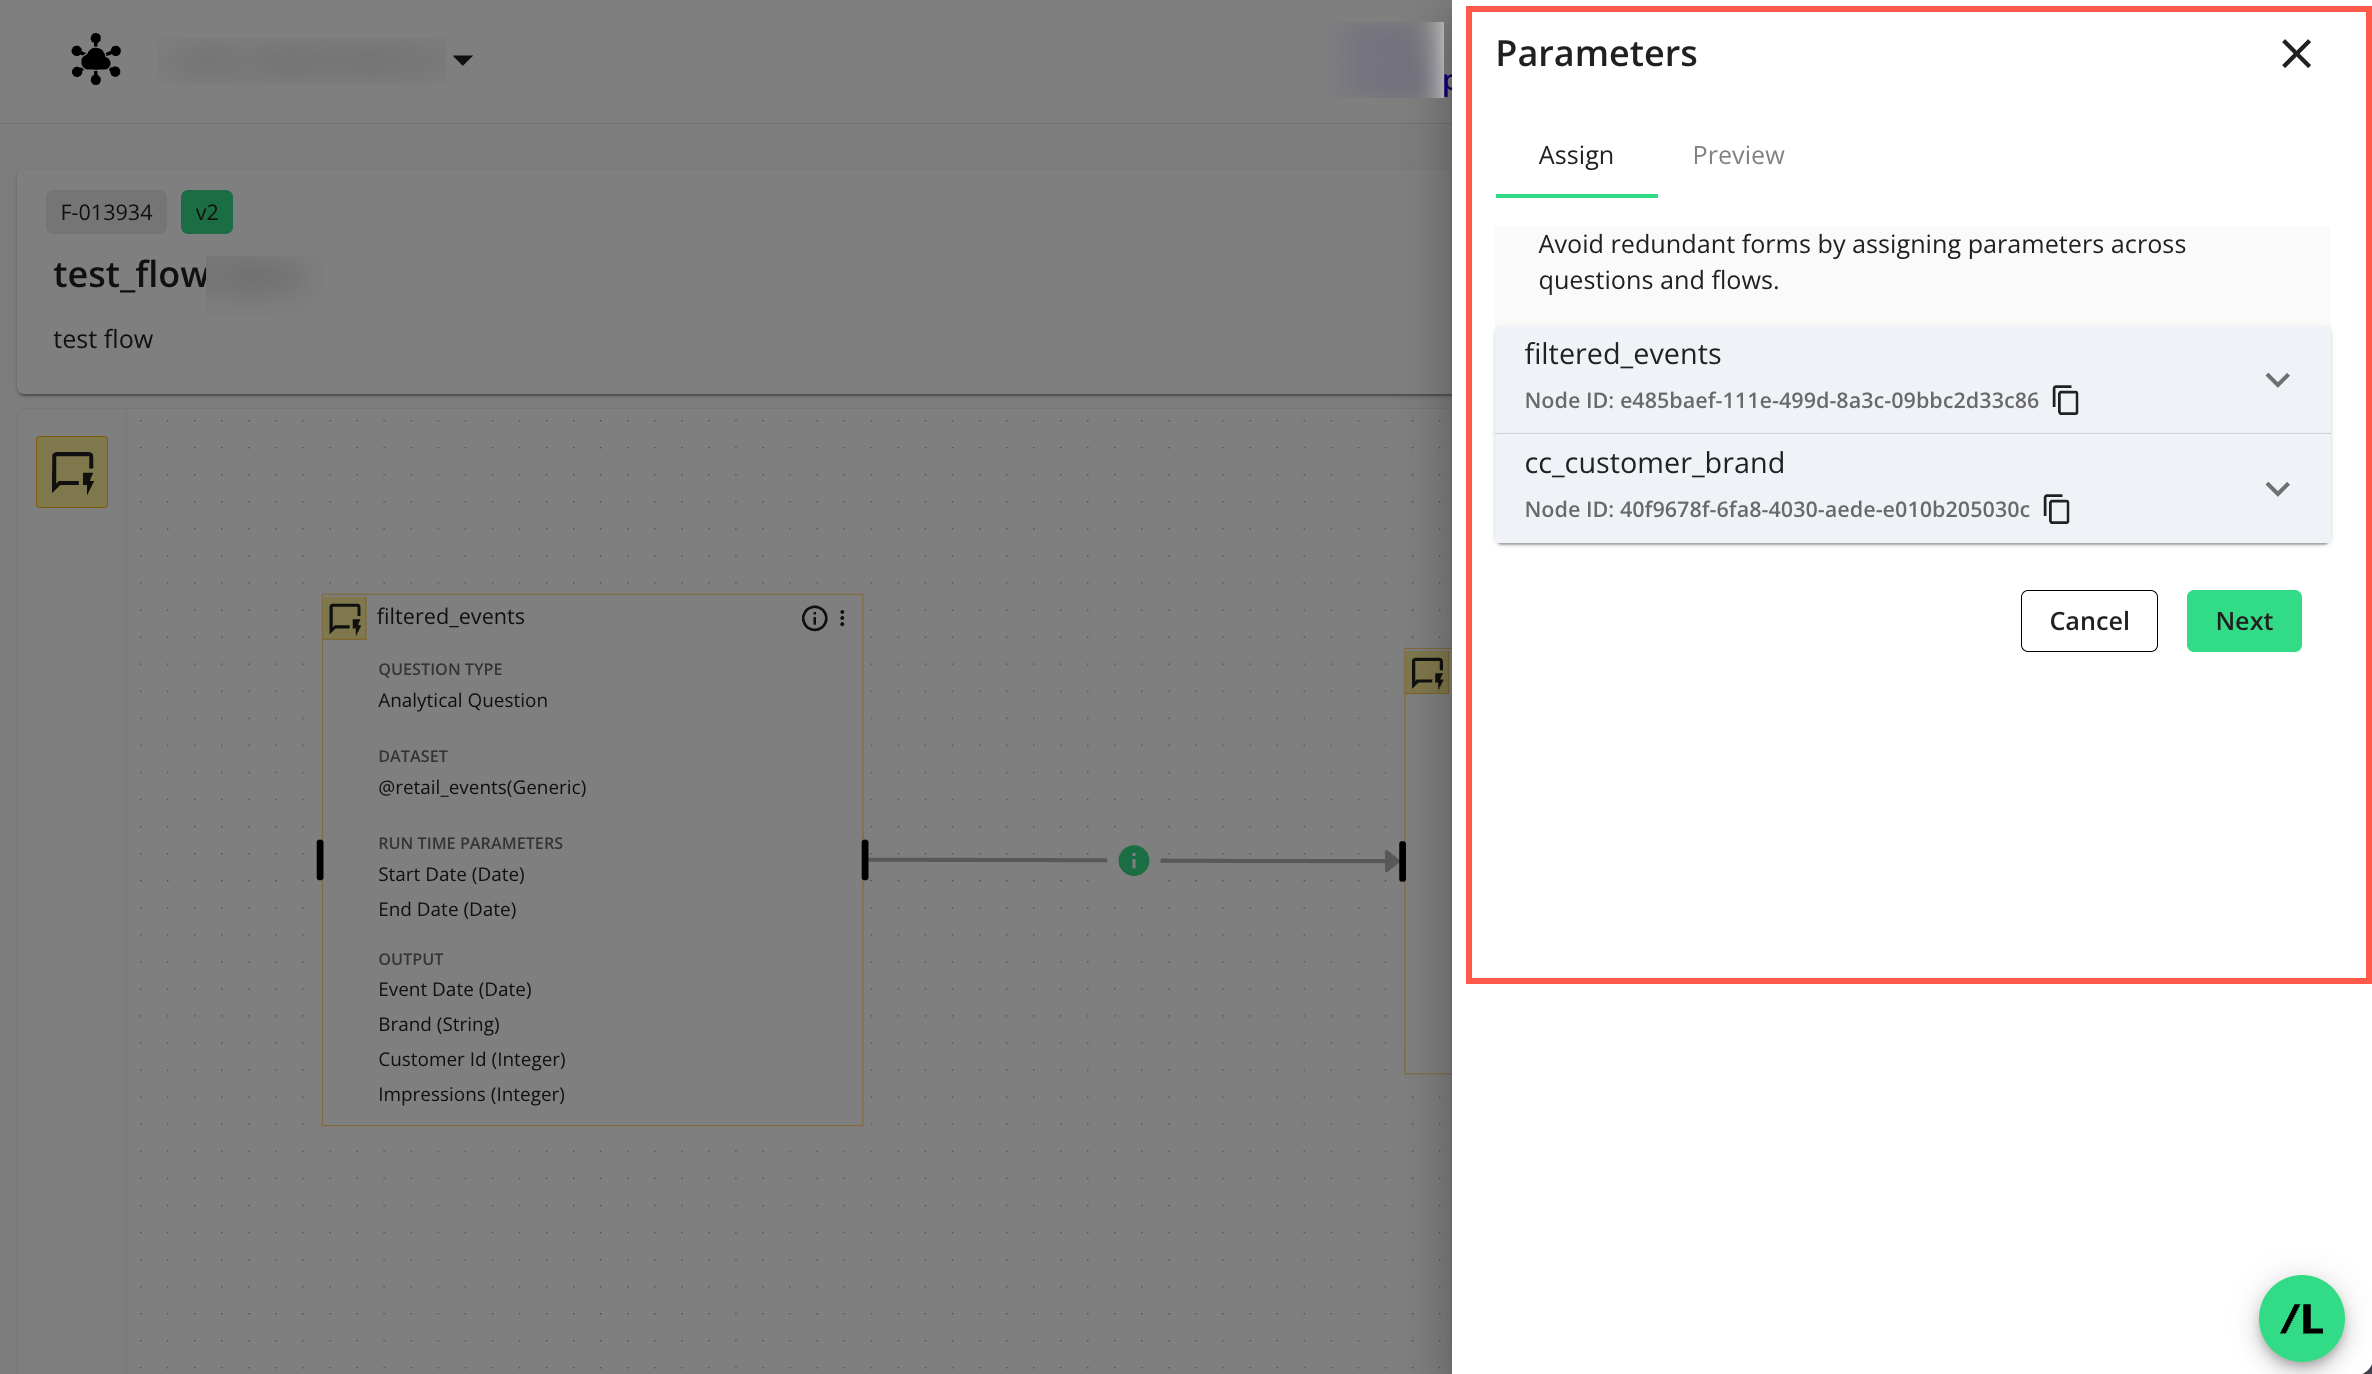
On the Parameters side panel, select the tab and assign appropriate macro names (variables) to each node in the dropdown(s) by entering a name and clicking
 to add it.
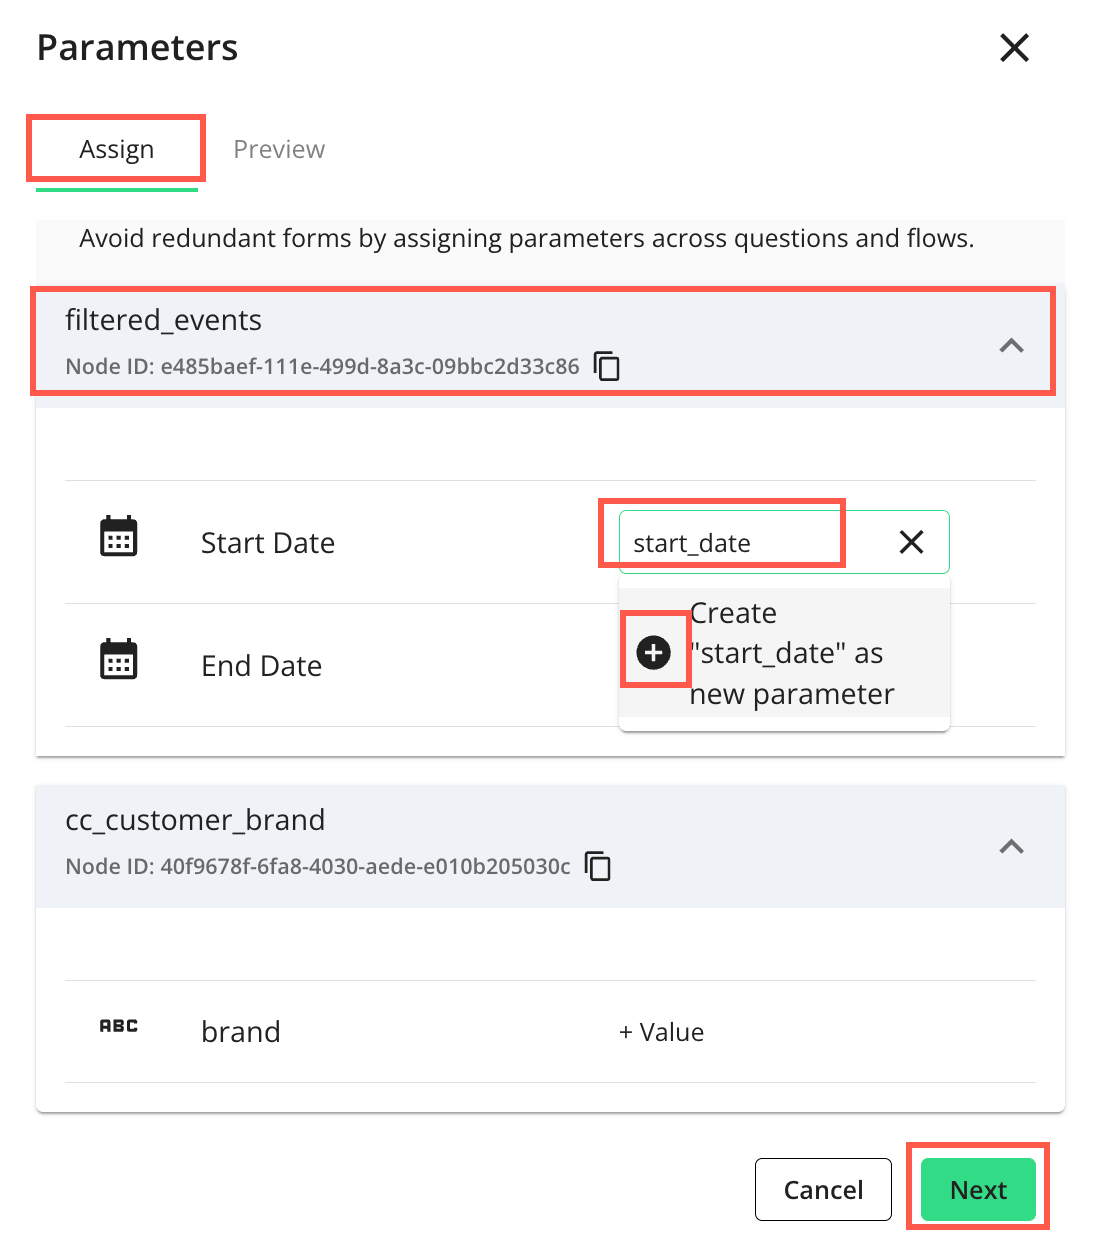
Click to preview and add descriptions to parameters (if any) your partners will need to enter values for before they can run the flow.
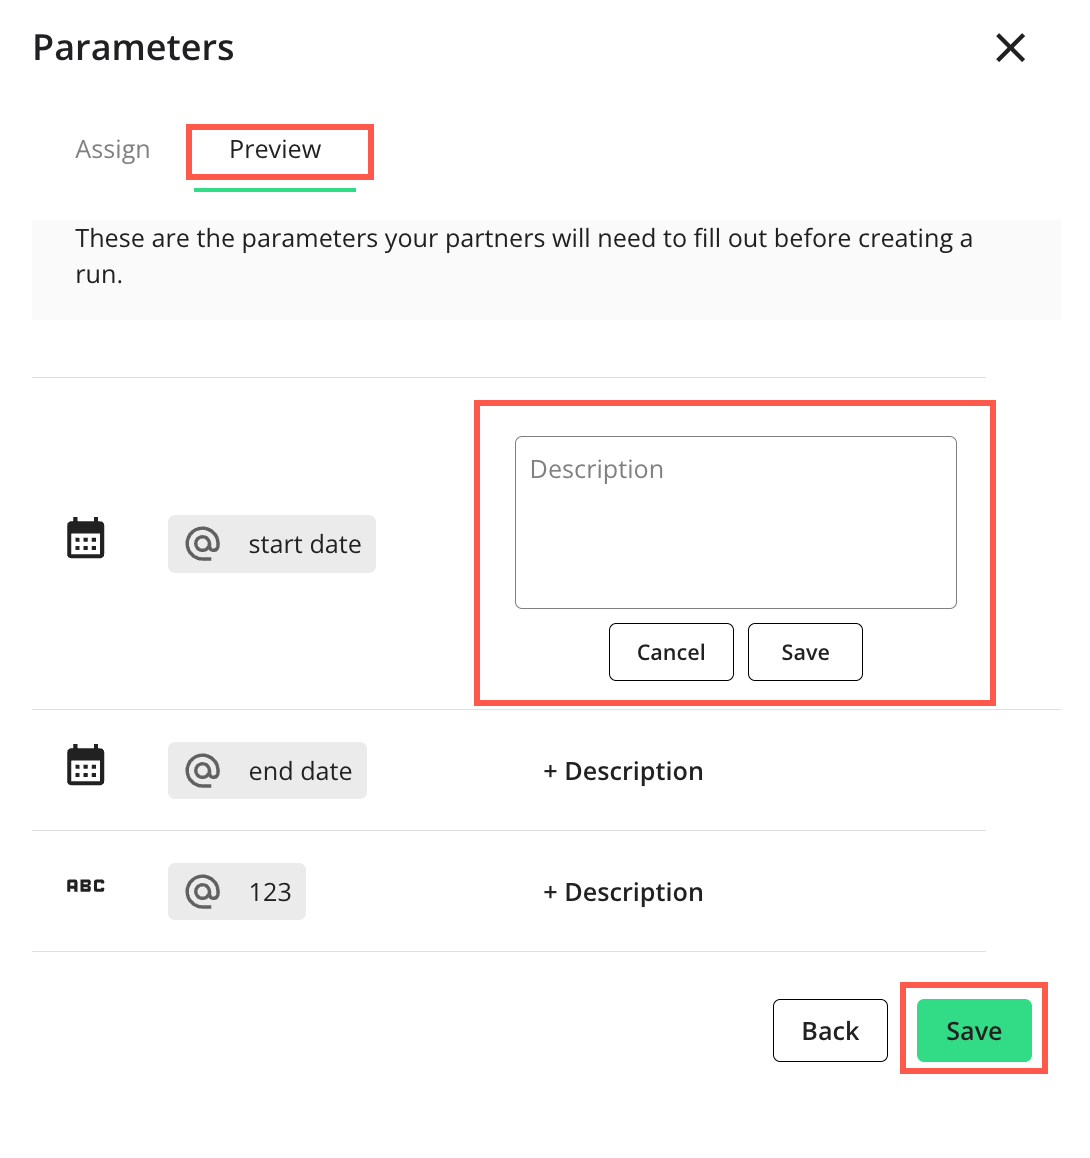
Click to save the parameter(s).