Install ATS and Test Your Implementation
Once you have completed the ATS configuration, you can install ATS and test if everything is working correctly. Is your placement still pending review? Then your configuration will be in test mode automatically.
Note
We recommend installing ATS on every page to make sure envelopes don’t expire and opt-out signals can immediately be passed to ATS. ATS.js script handles envelope refreshes and it does so every 30 minutes. For example, when a user with an envelope returns to a page, the script refreshes the lifetime of the envelope so it doesn’t expire and can still be used. Additionally, implementing ATS.js on all pages ensures that the user's journey, from landing page to subpage, remains compliant and relevant for both the publisher and the brand.
You can find settings related to your ATS installation in the Admin tab. To get there, go to "ATS" > Web. Then, click on a configuration and select "Admin".
Install ATS
To install ATS, select one of the following methods:
Via LaunchPad: To install via LaunchPad, follow the instructions in "Integrate ATS for Web with LaunchPad". Installing ATS through LaunchPad allows you to set trigger conditions enabling ATS to only fire based on the trigger types and locations you selected. If you are running ATS in the US, you can also specifically select which states in the US you want the trigger to fire.
Note that LaunchPad implementation only supports SSL-certified (
https) domains.Caution
If you are creating a new LaunchPad wrapper through the ATS for Web Admin section, you must make sure to set up the loading rules to specify the domains and countries you want to include, especially if you are running multiple ATS configurations on a single LaunchPad wrapper.
See Configure the Loading Rules for ATS for Web to learn how.
As a standalone product: To install ATS as a standalone product, click Advanced in the Install ATS area, and then follow the instructions to copy the snippet and implement it on your site.
Tip
We highly recommend that you install ATS via LaunchPad to get the following benefits:
Easy implementation: There is only one tag to implement for all of your LiveRamp publisher products.
Easy maintenance: All configurations, product updates, and additions can be managed from Console.
Smaller footprint: ATS will only be loaded when appropriate conditions are met.
Compliance: ATS won't be loaded outside of geo-restrictions.
Security: ATS won't be loaded outside of the allowed domains.
Test Mode
Your ATS configuration will be in test mode when the placement is still pending approval. During this time your configuration will use a (temporary) test ID instead of the actual placement ID and will log all library events in Console.
The test ID enables you to continue the implementation and testing of ATS.js with mocked envelopes until the placement is approved. Once the placement is approved then Test Mode will be disabled and your configuration will automatically be re-published with the approved placement ID included.
Learn more about the privacy review process in Create an ATS Placement.
Debug Mode
By default, ATS will not log any library events. However, especially during development, it can be useful to view more verbose logs. You can enable debug mode by adding query parameter: /?ats_debug=true
After entering a supported identifier, see if ATS resolved it to an envelope by opening the developer console and running ats.retrieveEnvelope();. If an envelope string value is returned, then ATS.js is working.
Alternatively, you can use use the Logging Events dropdown in the Debug Mode area to select which events you want ATS to log:
All (debug mode): Includes all three event types listed below.
Info: The event does not require any immediate action and does not represent an exception. This type of event is used to check the status or to confirm the state of an activity.
Warning: The event is generated when the service is approaching an agreed threshold (KPI). Warnings are intended to notify the process in order to take the necessary actions to prevent an exception occurring.
Errors: The event is generated when the service is currently operating below the normal parameters/indicators. This means that the business service is impacted and the service presents a failure, performance degradations or loss of functionality.
Test Your ATS.js Implementation
Follow the steps below to check if ATS.js is running correctly on your page. Note that for ATS to run, you need to be in one of the geographical locations included in the Placement ID.
Caution
For ATS to successfully communicate with your Consent Management Platform (CMP), make sure that the CMP loads before ATS. If the CMP does not have enough time to load, ATS will consider it as no consent. This will cause ATS to remove all envelopes from the storage due to failure to obtain consent strings for countries that require them.
On a page of your site, go to the 'Network' tab of your Developer Tools. If you're on Chrome, left-click on your page and go to Inspect > Network.
Search for 'ats.js' in the filter or search field. If ATS.js is implemented correctly, you should see ATS appear under the domain 'ats-wrapper.privacymanager.io'. If you are implementing ATS via Launchpad, the domain is the same but the initiator is: launchpad.bundle.js.

Go to the 'Console' tab and run
ats.outputCurrentConfiguration()command to check the ATS configuration parameters. It should return the following objectDETECTION_MODULE_INFO: DETECTION_MODULE_CONFIG: accountID: "-1" consentIsPassed: false cssSelectors: (2) ['input[type=email]', 'input[type=text]'] detectionEventType: "onclick" detectionSubject: "all" detectionType: "scrape" urlHashType: "email" [[Prototype]]: Object DETECTION_MODULE_VERSION: "1.0.2" [[Prototype]]: Object ENVELOPE_MODULE_INFO: ENVELOPE_MODULE_CONFIG: accountID: "-1" catchIdentifier: true expirationRefreshTime: 1800000 expirationTime: 1296000000 gdprConsentString: "CPPAMdcPPAMdrADABBENBzCoAP_AAE7AAAAAG7wBQAKgBOADCAvMBu4F5wAwAKgBhAXmAAA.YAAAAAAAA4AA" passConsent: false placementID: 12345 startWithExternalId: false storageType: "cookieNext, trigger an authentication event by entering an email address on your site.
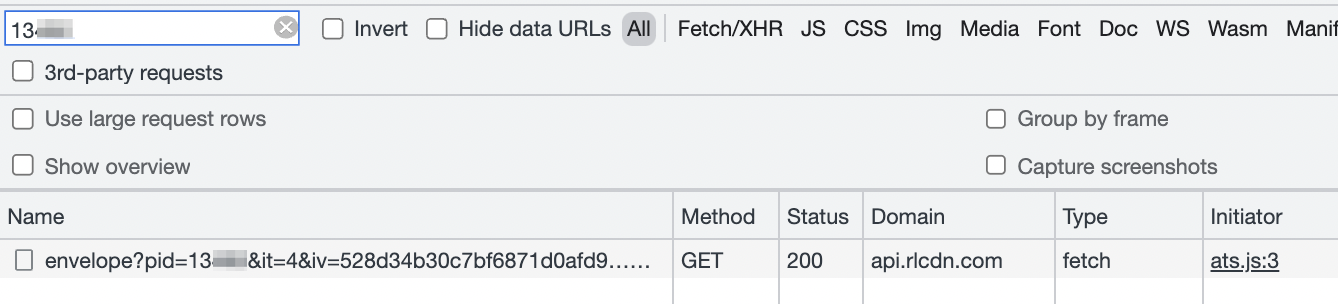
In the Network tab, you should see 1 call with the Placement ID from the domain api.rlcdn. The iv parameters are the individual hashed emails.
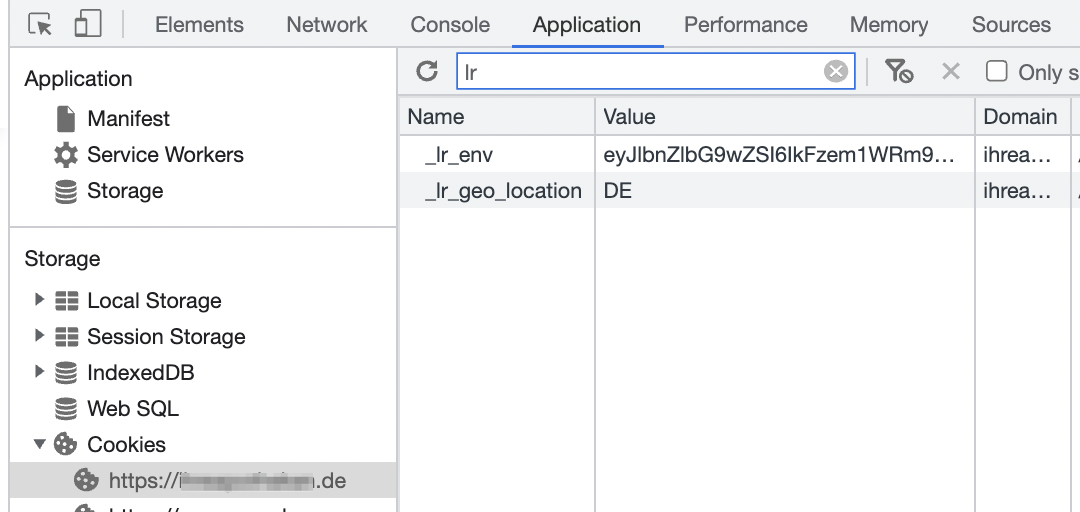
In the 'Application' tab you should see the envelope stored under a variable called _lr_env either in 1st party cookies or local storage. ATS will also drop a _lr_geo_location cookies in the domain cookie section.
What's Next
Once you've made sure ATS has been implemented correctly, you can configure Prebid.js for ATS to enable monetization of your inventory. If you are working with other header-bidding solution, contact our support team to receive implementation support. If you are working with Amazon Publisher Services, see "Connect ATS with Amazon Publisher Services".
To learn how you can improve authentications and enrich your inventory, check out Strategies to Increase Authentications.