Using Code Sync
Note
If you would like early access to the following Code Sync features, create a support case in the LiveRamp Community portal.
You can synchronize code files in your organization's repository with the Analytics Environment in the following ways:
This allows you to use code developed outside of LiveRamp and manage it in GitHub.
Adding GitHub Actions
Once you add webhook and collaborator actions to your GitHub account, you can manage code sync for your organization and your partners and then access it in Analytics Environment using the GitLab extension in JupyterLab.
In GitHub, select the Settings tab.
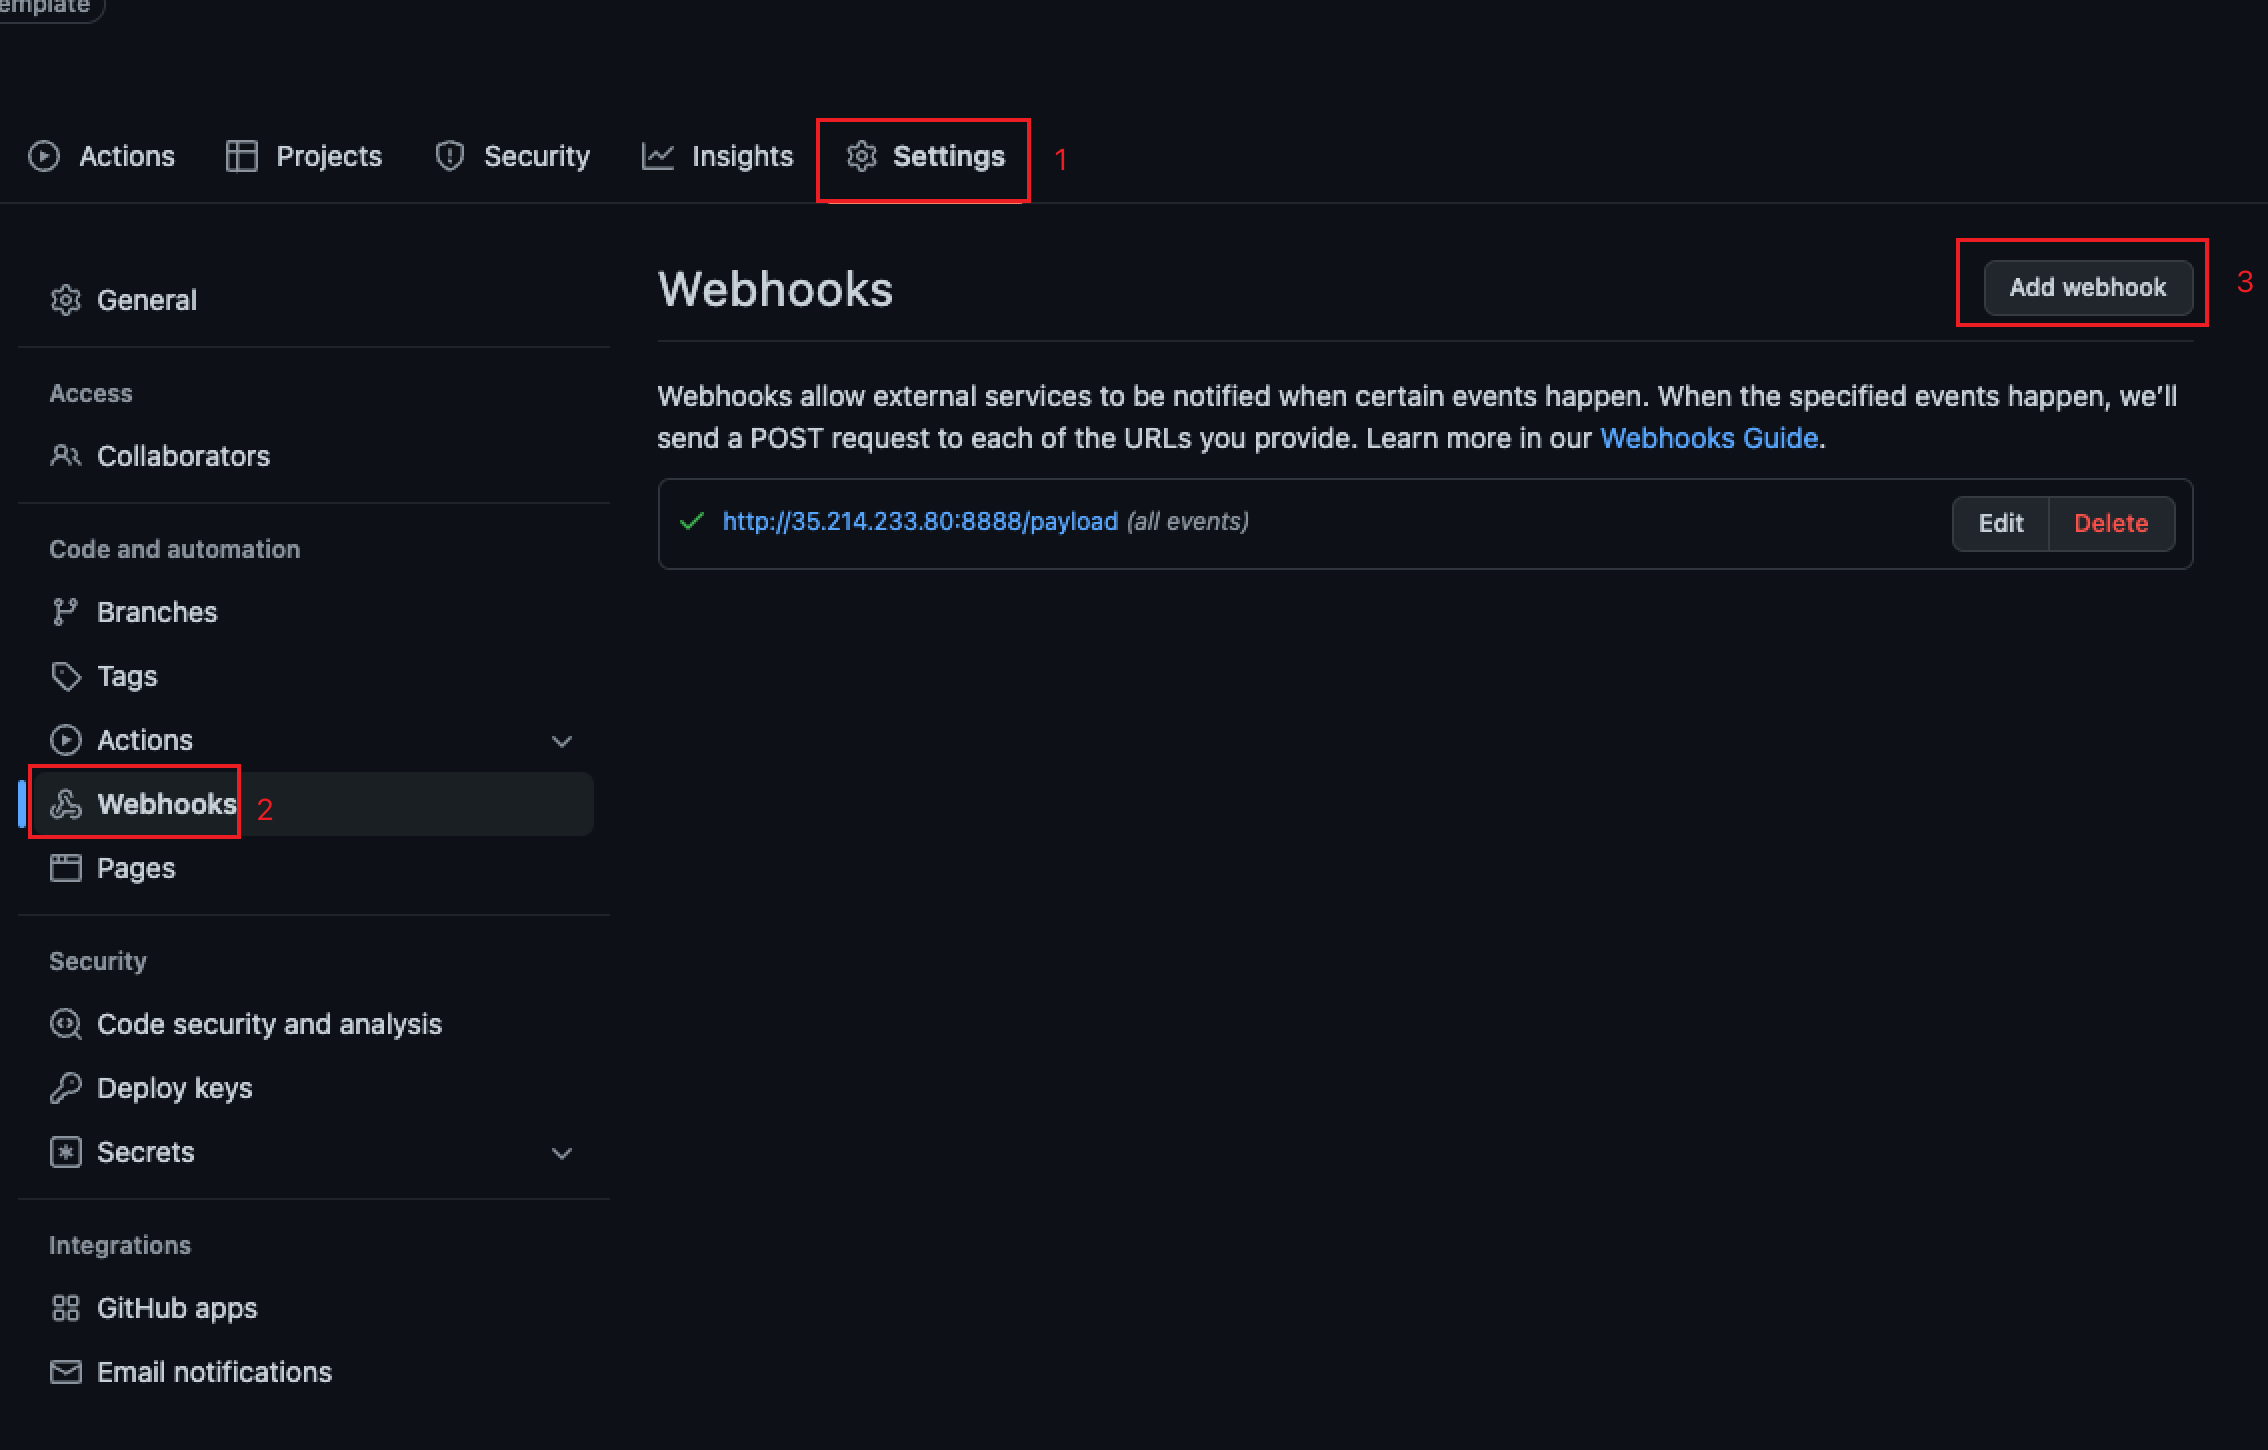
In the "Code and automation" section, click .
Click . The "Add webhook" page is displayed.
In the Payload URL box, enter
https://europe-west1-datalake-landing-eng-us-prod.cloudfunctions.net/github_webhook_receiver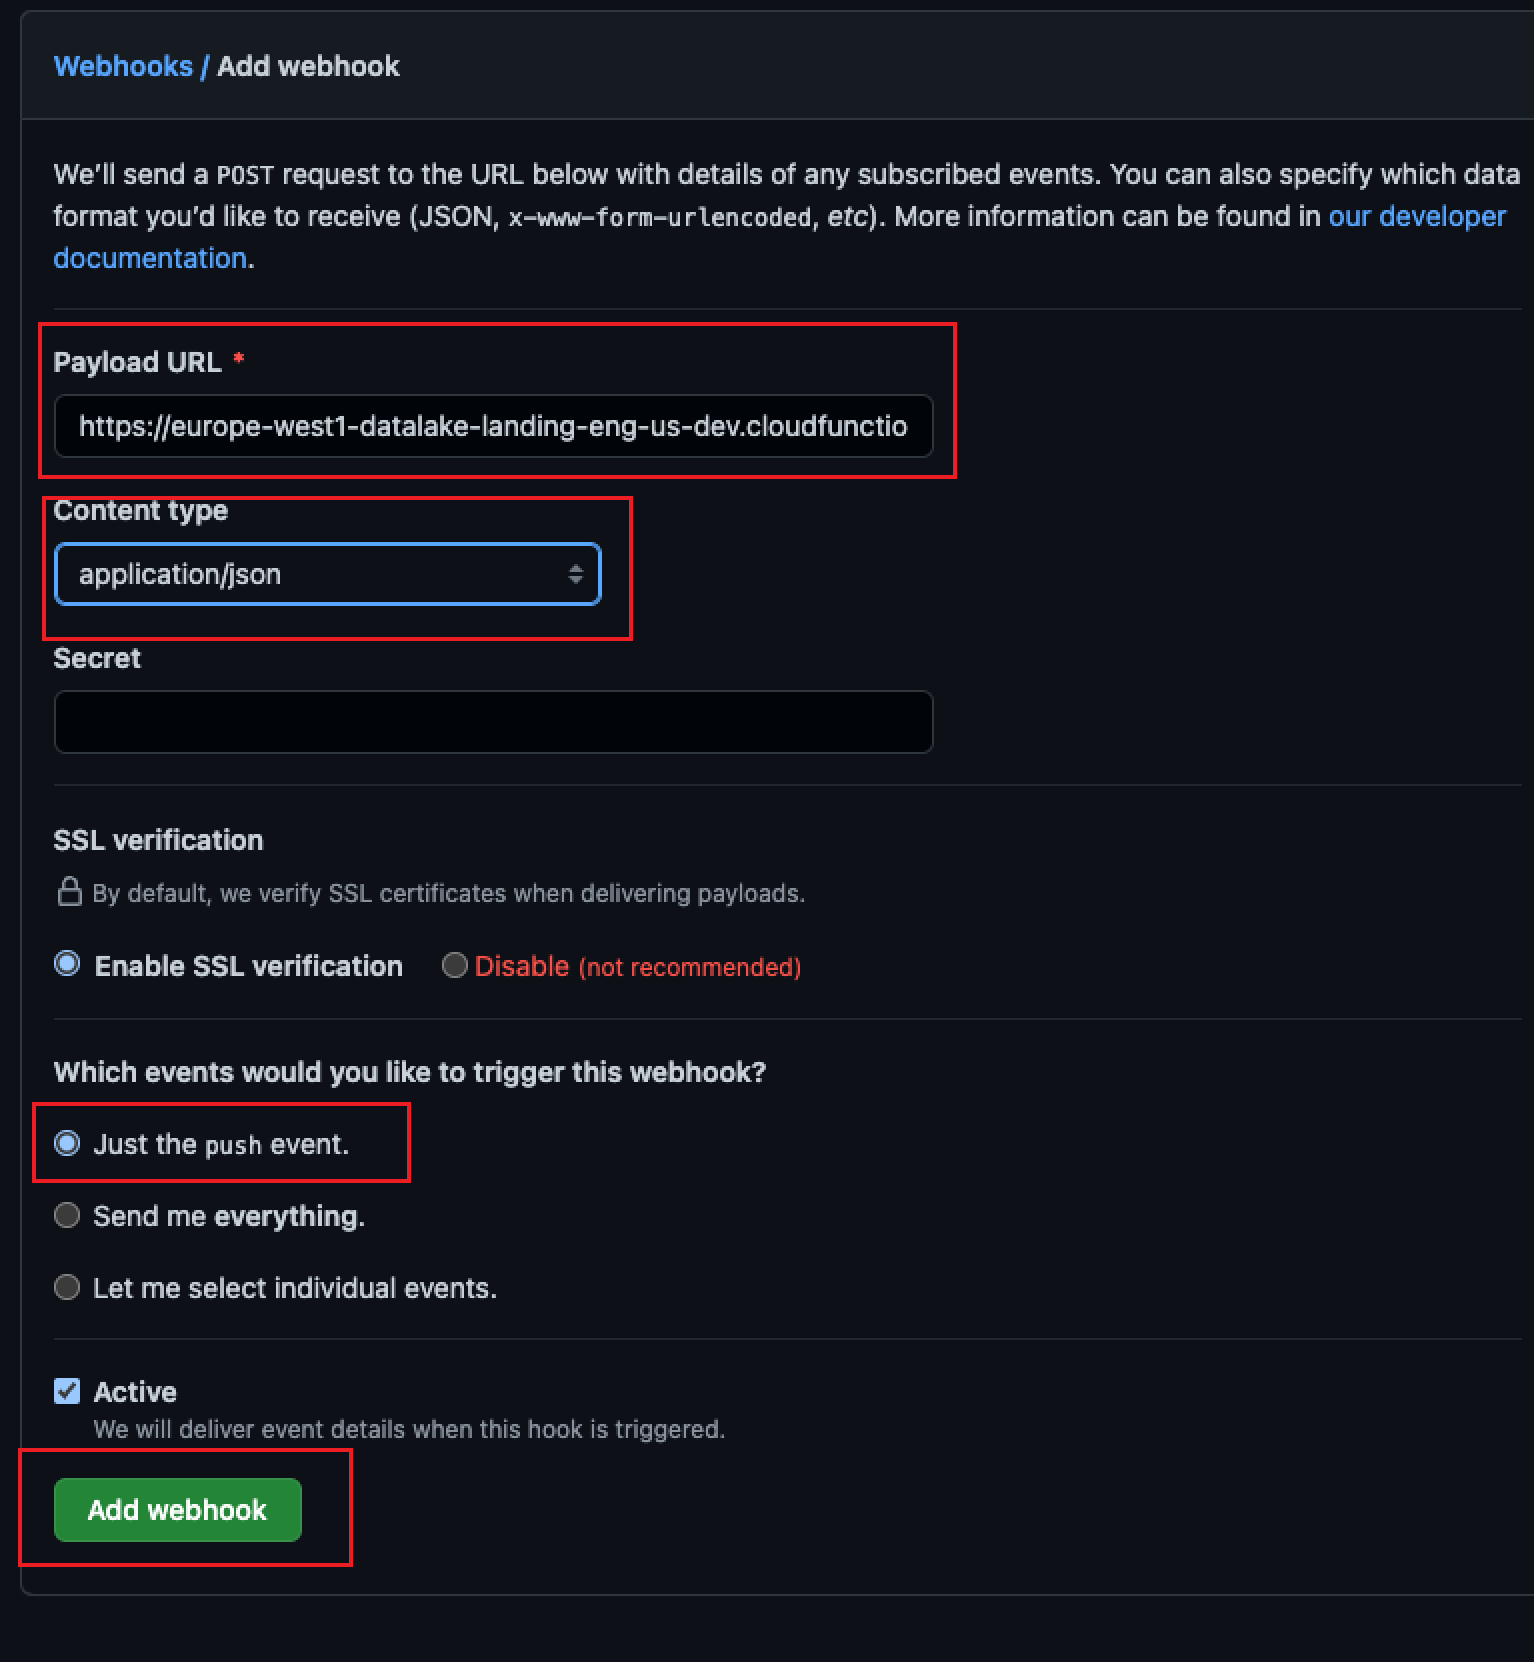
From the Content type list, select .
In the "Which events would you like to trigger this webhook?" section, select the option.
Click .
In GitHub, select the Settings tab.
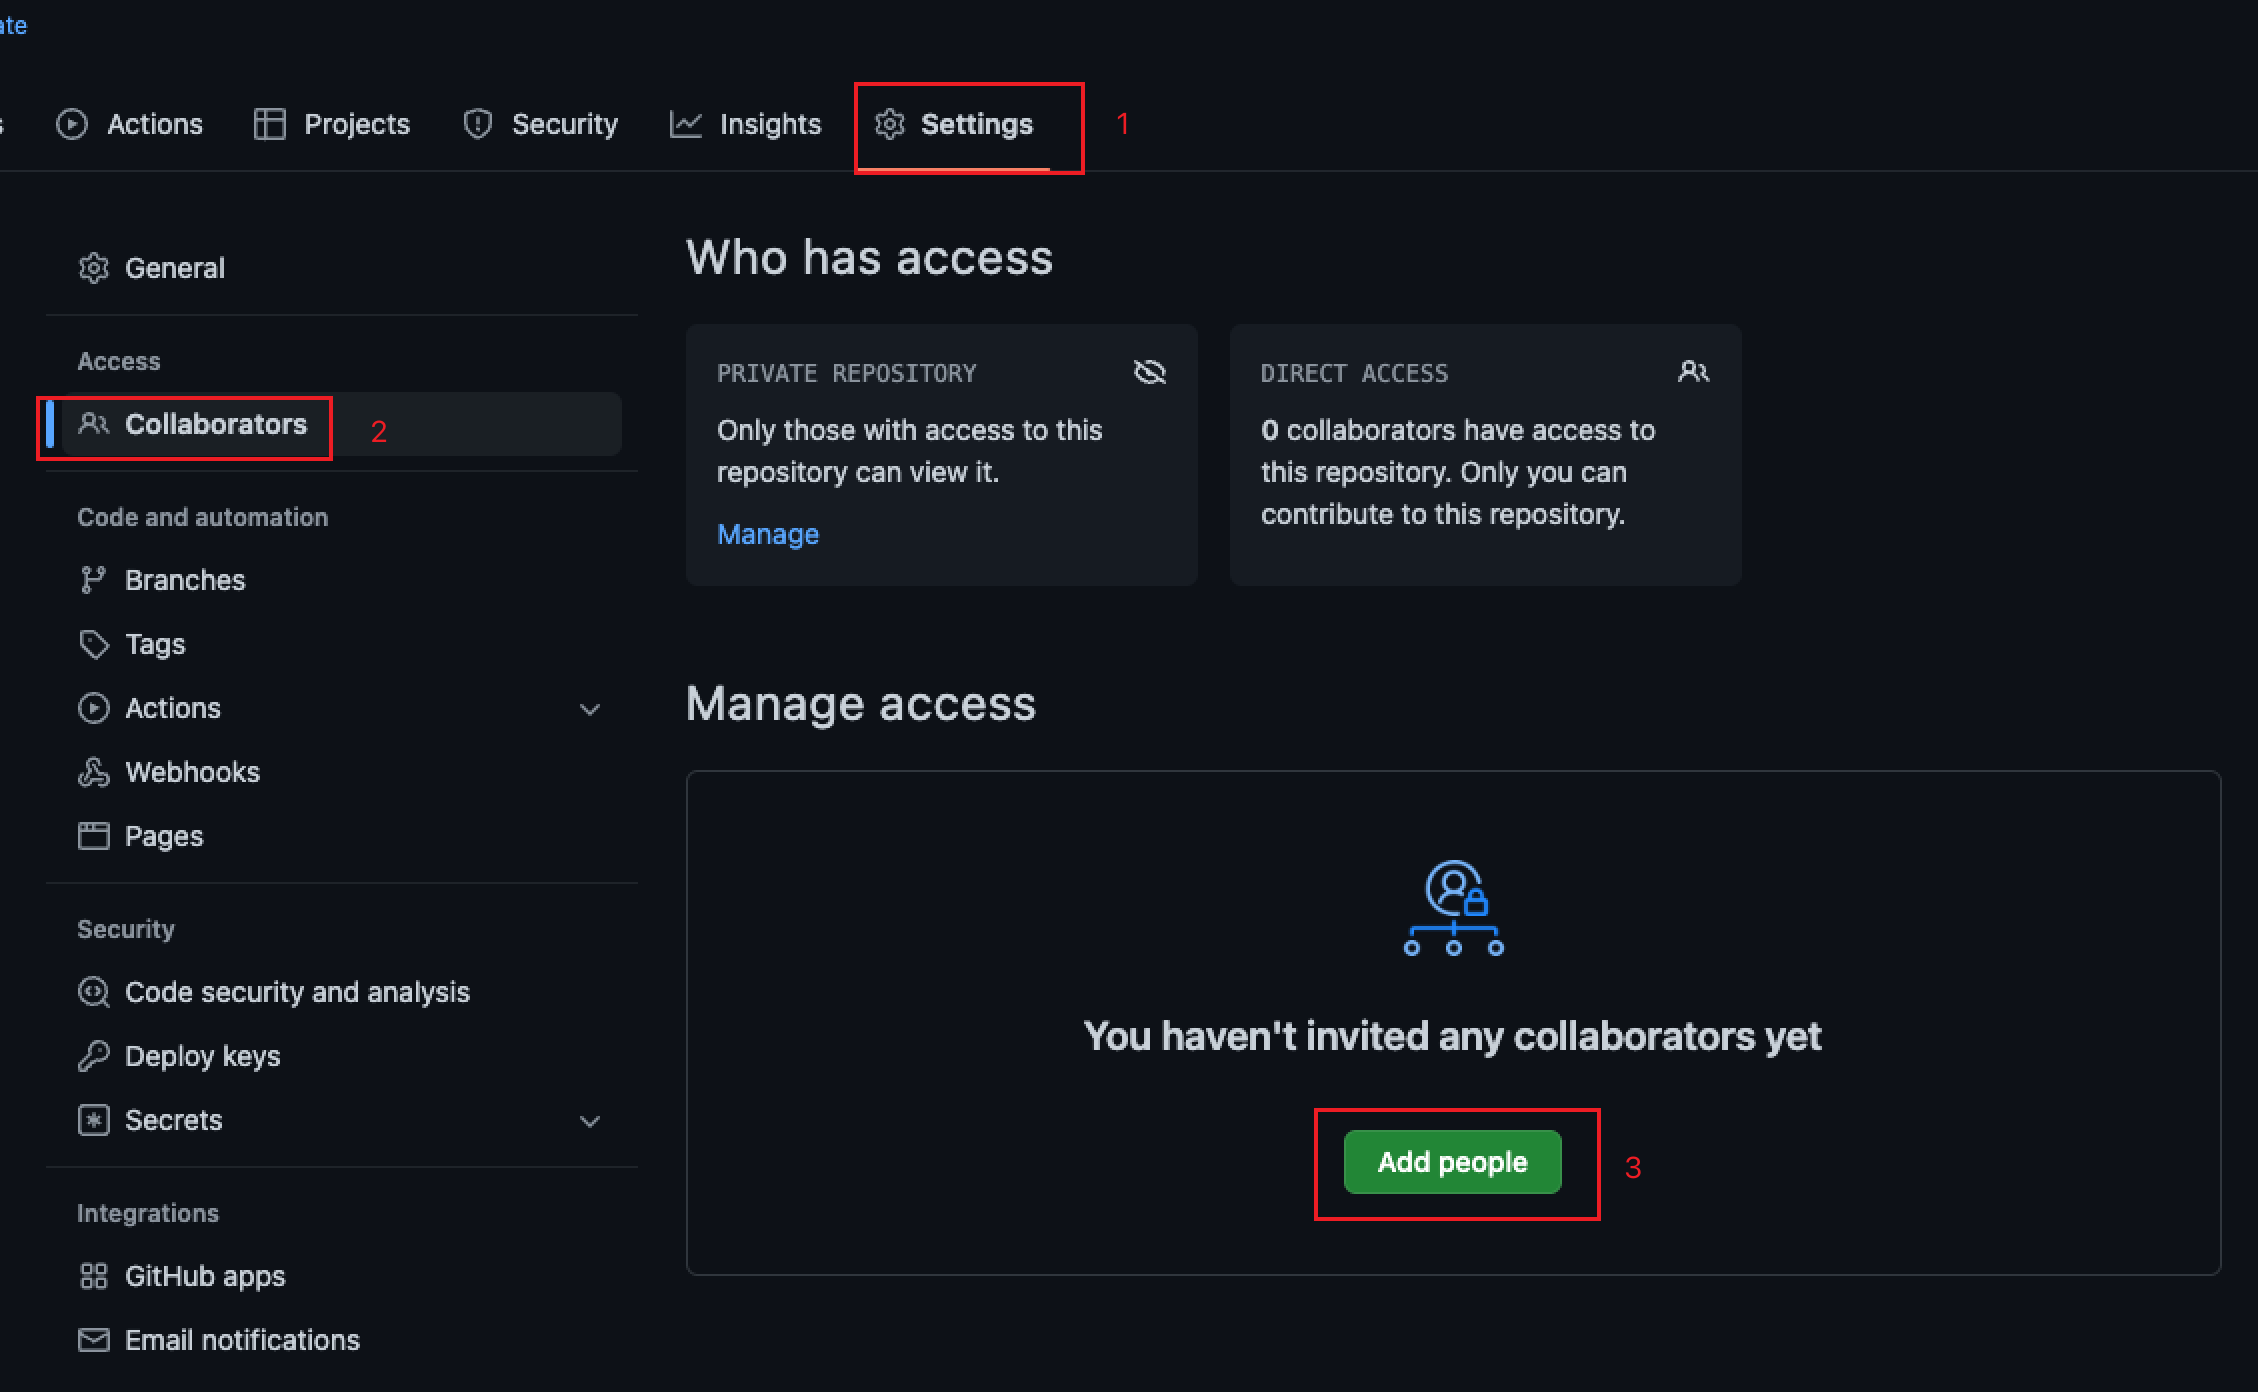
In the "Access" section, click .
Click . The "Add collaborator" page is displayed.
In the box, enter the Safe Haven public GitHub account:
lsh-ae-code-sync@liveramp.com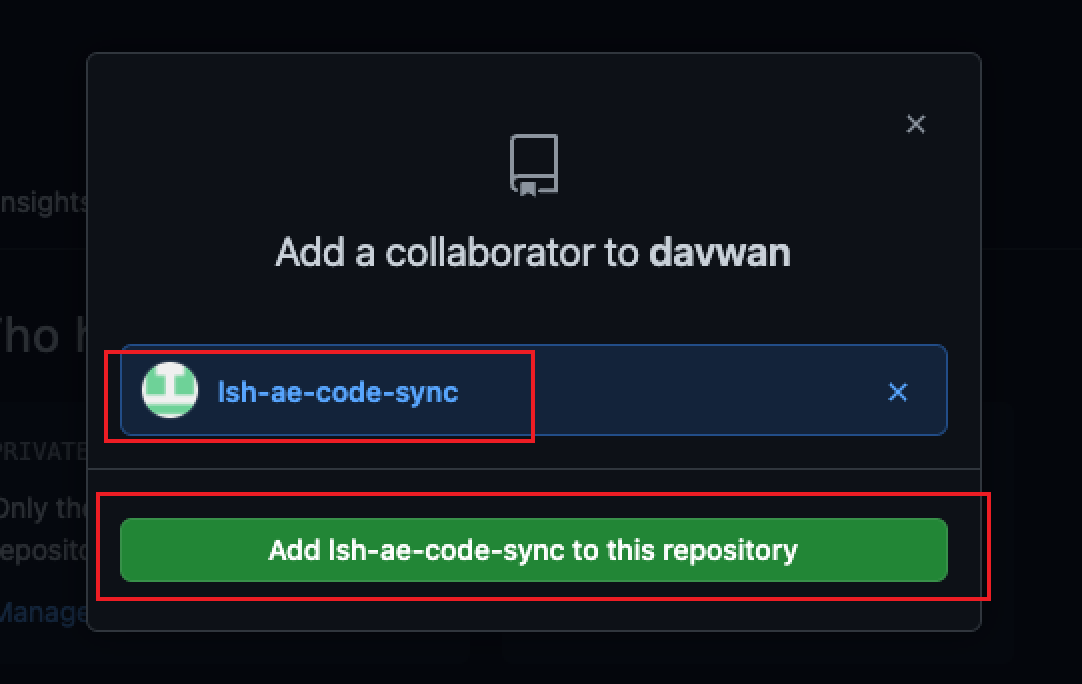
Click .
Clone a Repository
You can use the GitLab extension to clone the repository that you want to sync with Analytics Environment. For information on setting up the GitLab extension, see "Use JupyterLab's GitLab Extension."
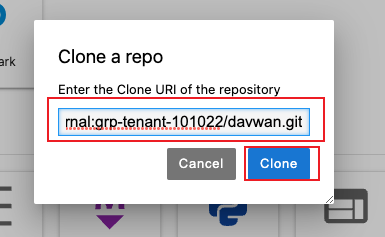
To set up the code sync, you will need to adjust the following GitLab SSH URL for your organization's region, tenant ID, and repo:
git@gitlab-{region}.datalake-loading.internal:grp-tenant-{tenant_ID}/{repo_name}.gitWhere:
{
region}: Your organization's region, which can beeu,us, orau.{
tenant_ID}: Your tenant ID, which was provided to you by your LiveRamp representative.{
repo_name}: The name of your GitHub repository.
Log in to Analytics Environment and open JupyterLab.
Open your home folder.
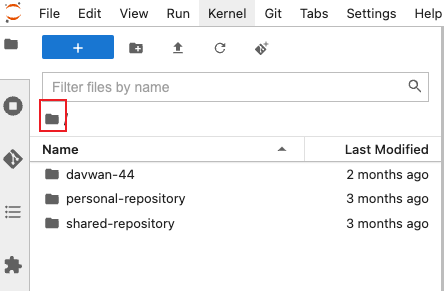
Click the GitLab extension icon
 .
.Click . The Clone a repo dialog is displayed.
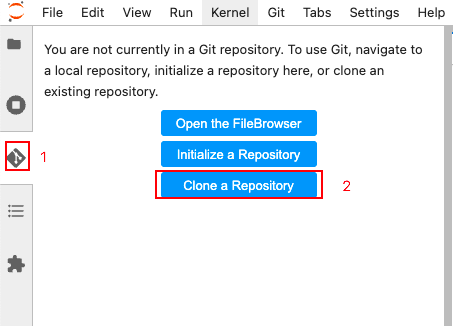
Enter the GitLab SSH URL that you prepared in the box and click .
Clone a Repository at the Terminal
Alternatively, you can clone your repository at the Terminal in JupyterLab.
Log in to Analytics Environment and open JupyterLab.
Click the Terminal tile.
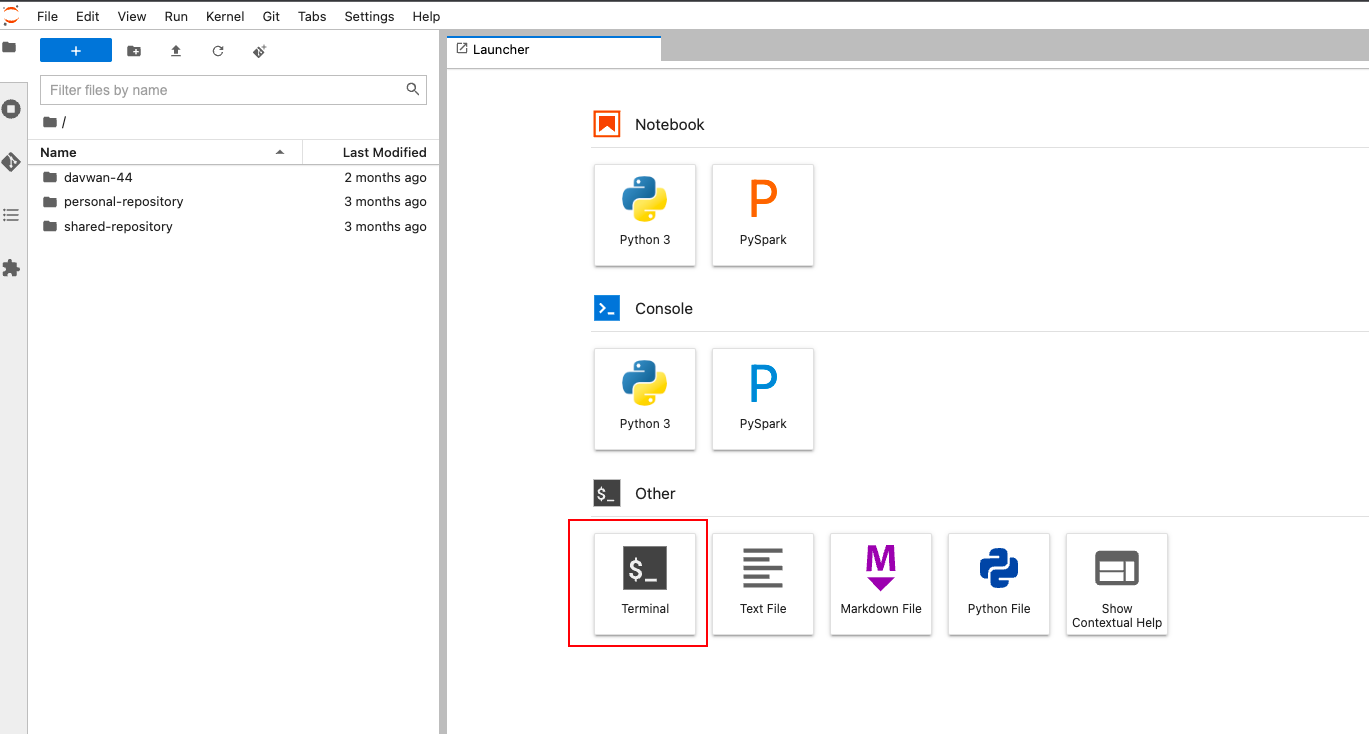
In the terminal pane, enter the GitLab SSH URL for your organization's region, tenant ID, and repo:
git clone git@gitlab-{region}.datalake-loading.internal:grp-tenant-{tenant_ID}/{repo_name}.git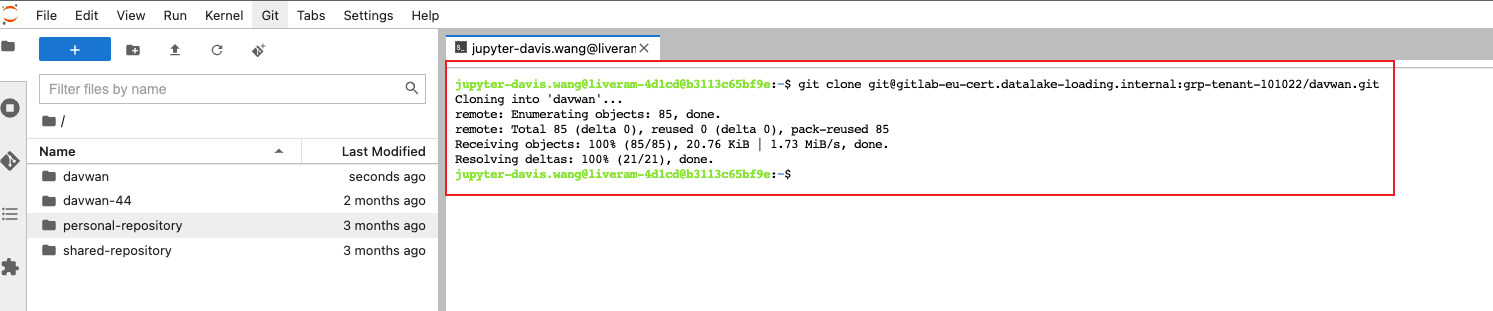
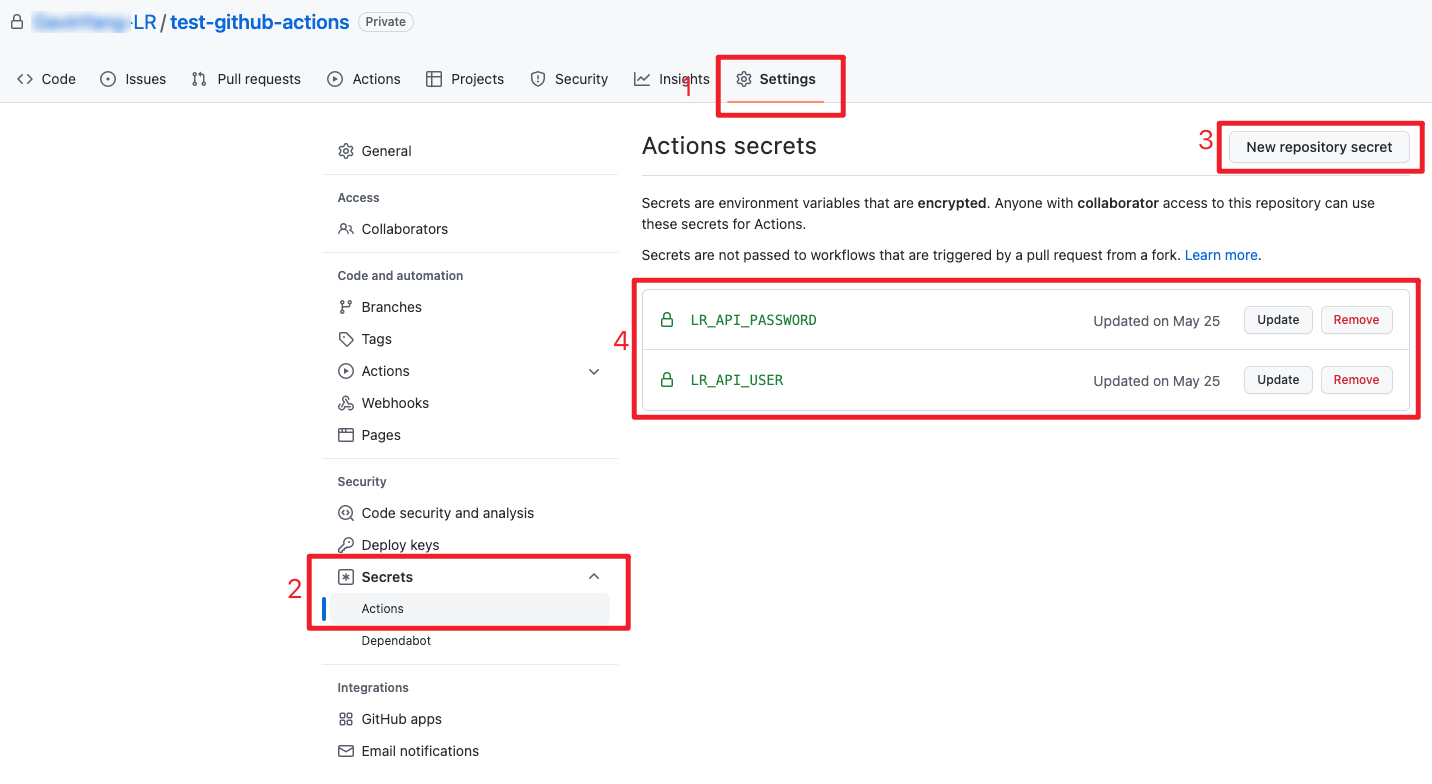
Using the Code Sync API
You can use the Code Sync API to send your code files from your code repository to your Analytics Environment, enabling the use of code that you develop outside of LiveRamp.
To use the Code Sync API, you need the following account credentials to obtain an access token:
A username, which is your service account ID
A password (also known as a "secret key" because it is encrypted)
In your GitHub account, select the "Settings" tab.
In the "Security" section, select → .
On the "Actions secrets" page, click and add your password and username.
If you lack these credentials or need a LiveRamp Service Account, create a case in the LiveRamp Community portal or contact your Customer Success Manager. You should receive a JSON file that includes the needed credentials.
Note
Access tokens expire at the interval specified by the expires_in value. For example, "expires_in":600 indicates 10 minutes (600 seconds). To ensure that calls are successful, set up an automated way to fetch new access tokens.
Request an Access Token
Use the following cURL command to request an access token:
curl -X POST https://serviceaccounts.liveramp.com/authn/v1/oauth2/token \
  --header 'Content-Type: application/x-www-form-urlencoded' \
  -d grant_type=password \
  -d username=$USERNAME \
  -d password=$PASSWORD \
  -d client_id="liveramp-api" \
  -d response_type=token
Where: $USERNAME is your service account ID and $PASSWORD is your secret key.
The response will include the access token and indicate an expires_in value that is expressed in seconds, such as 600 (10 minutes). You must use the access token to make any API requests before it expires.
Encode Your File
Use the following Base64 encryption command to encode a file located in your repo and save it as a post_data.json file:
base64Data="`base64 {codefile} -w 0`"
echo "{\"base64Data\": \"{base64Data}\",\"bucket\": \"coderepo\",\"filePath\":\"{folder and fileName}\",\"tenantId\": {tenant_ID}}" >post_data.jsonWhere: {codefile} is your code file and {tenant_ID} is your organization's tenant ID.
Example:
base64Data="`base64 {codefile} -w 0`"
echo "{\"base64Data\": \"${base64Data}\",\"bucket\": \"coderepo\",\"filePath\":\"upload/testingUploadLge.py\",\"tenantId\": 666079}" >post_data.json
Send Your File to Your Analytics Environment
Use the following cURL command to POST your post_data.json file from your repository to your Analytics Environment:
curl --location --request POST 'https://api.liveramp.com/analytics-environment/v1/upload-files' \
     --header "Authorization: Bearer {access_token}" \
     --header 'Content-Type: application/json' \
     -d @post_data.json
Where: {access_token} is replaced with the access token you received.
Adding a GitHub Workflow
You can create a GitHub workflow that will call the Code Sync API to sync your code.
In GitHub, select the Actions tab.
In the Choose a workflow section, click .
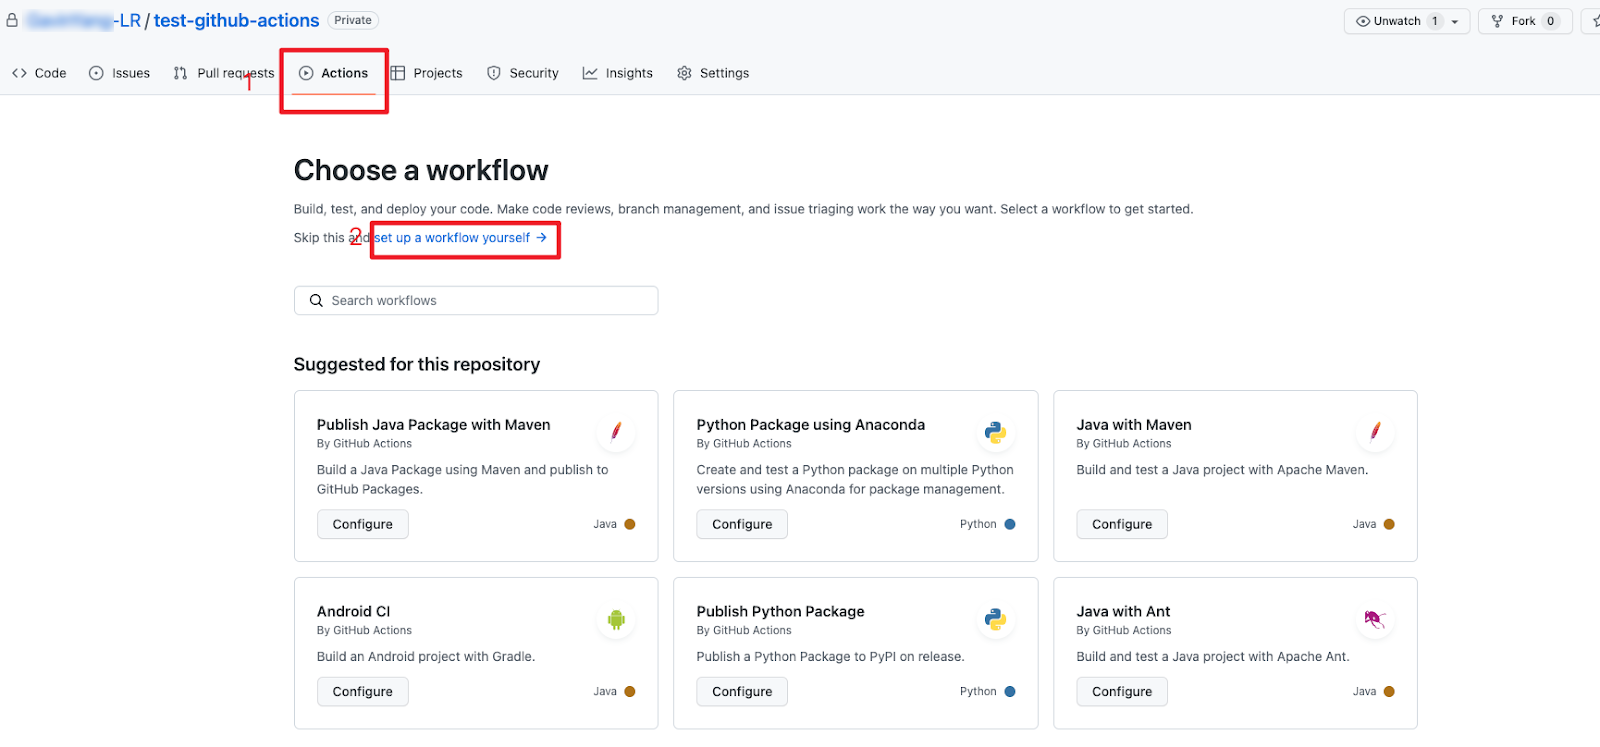
Enter the code that contains your GitHub actions.
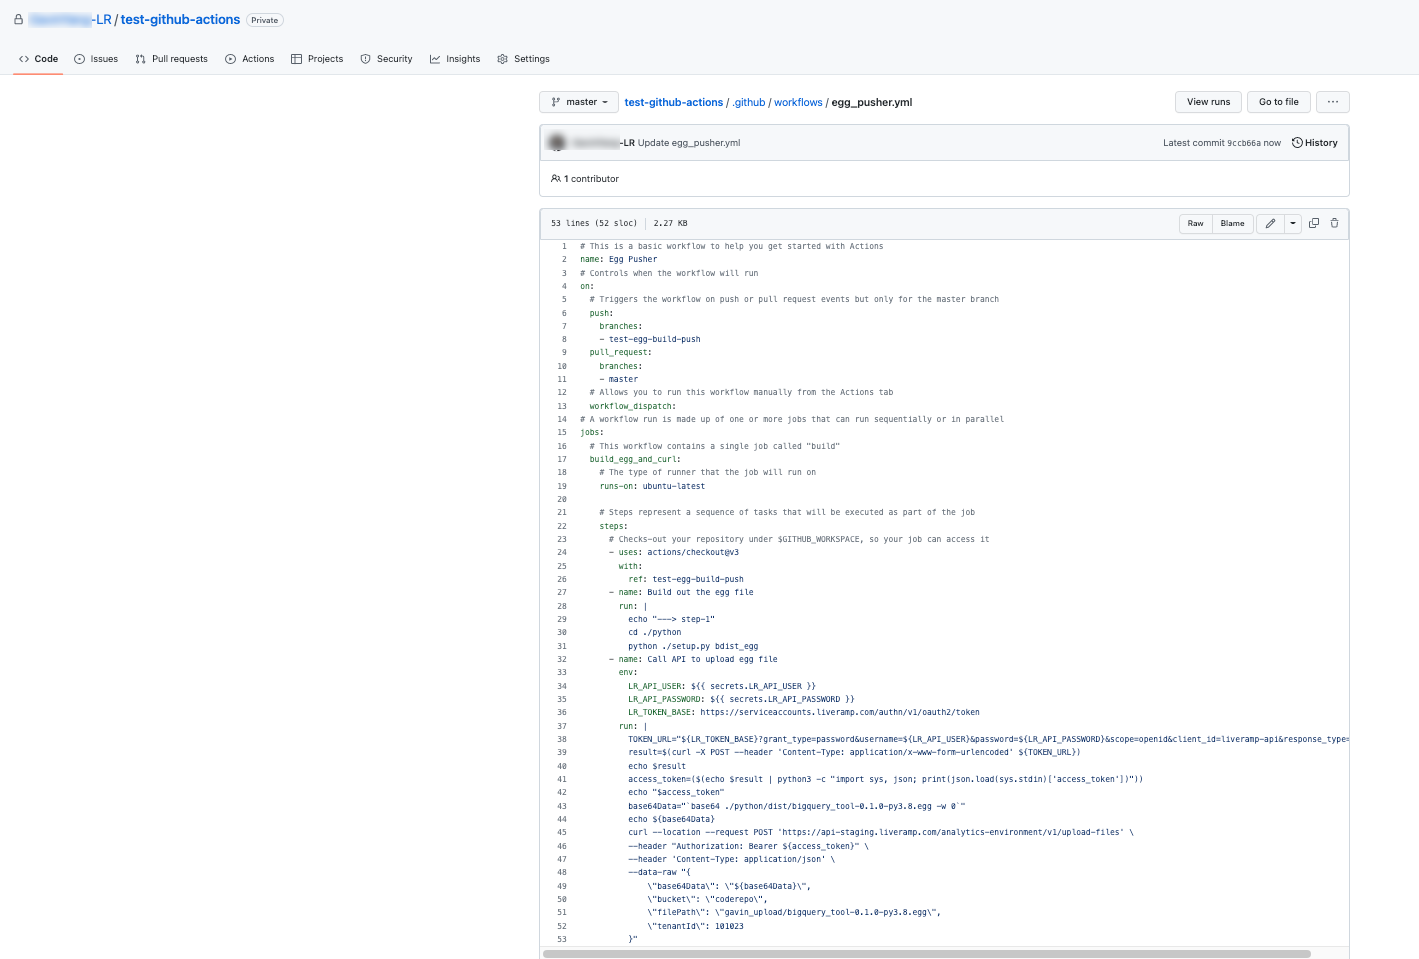
Sample GitHub Workflow Code
# This is a basic workflow to help you get started with Actions
name: Code Sync Workflow
# Use the on key to specify what events trigger your workflow
on:
  # Controls when the workflow will run
  push:
    # The push event has a branches filter that causes your workflow to run only when a push to a branch that matches the branches filter occurs, instead of when any push occurs
    branches:
    # Replace the branch name "test-egg-build-push" with your branch name
    - test-egg-build-push
  # Allows you to run this workflow manually from the Actions tab
  workflow_dispatch:
# A workflow run is made up of one or more jobs that can run sequentially or in parallel
jobs:
  # This workflow contains a single job called "build_and_sync"
  build_and_sync:
    # The type of runner that the job will run on
    runs-on: ubuntu-latest
    # Steps represent a sequence of tasks that will be executed as part of the job
    steps:
      # Checks out your repository under $GITHUB_WORKSPACE, so your job can access it
      - uses: actions/checkout@v3
        with:
          # Replace the branch name "test-egg-build-push" and specify the branch that you want to pull
          ref: test-egg-build-push
      - name: Build the project
        run: |
          cd ./python
          python ./setup.py bdist_egg
      - name: Call API to upload the file
        env:
          # LR_API_USER and LR_API_PASSWORD should be provided by LiveRamp, open your Github project and go to Settings -> Security -> Actions, add it and use in the following code
          LR_API_USER: ${{ secrets.LR_API_USER }}
          LR_API_PASSWORD: ${{ secrets.LR_API_PASSWORD }}
          LR_TOKEN_BASE: https://serviceaccounts.liveramp.com/authn/v1/oauth2/token
        run: |
          TOKEN_URL="${LR_TOKEN_BASE}"
          DATA="grant_type=password&username=${LR_API_USER}&password=${LR_API_PASSWORD}&scope=openid&client_id=liveramp-api&response_type=token"
          result=$(curl -X POST --header 'Content-Type: application/x-www-form-urlencoded' --data "${DATA}" ${TOKEN_URL})
          echo $result
          # Get the access_token from response
          access_token=($(echo $result | python3 -c "import sys, json; print(json.load(sys.stdin)['access_token'])"))
          echo "$access_token"
          # Encode the content with base64
          # Replace the "./python/dist/bigquery_tool-0.1.0-py3.8.egg" with your file that you want to upload
          base64Data="`base64 ./python/dist/bigquery_tool-0.1.0-py3.8.egg -w 0`"
          echo ${base64Data}
          # This call will upload the file bigquery_tool-0.1.0-py3.8.egg to the LiveRamp default code GCS bucket
          # Replace the "000000" with your own tenant id
          curl --location --request POST 'https://api.liveramp.com/analytics-environment/v1/upload-files' \
          --header "Authorization: Bearer ${access_token}" \
          --header 'Content-Type: application/json' \
          --data-raw "{
              \"base64Data\": \"${base64Data}\",
              \"bucket\": \"coderepo\",
              \"filePath\": \"upload/bigquery_tool-0.1.0-py3.8.egg\",
              \"tenantId\": 000000
          }"