Using the LiveRamp Community Portal
Whenever you have a technical support issue (such as an issue with file uploads, distribution troubleshooting, or billing calculations), the LiveRamp Community portal is the place to go to get help.
Whenever you have a technical support issue (such as an issue with file uploads, distribution troubleshooting, or billing calculations), the LiveRamp Community portal is the place to go to get help. To access the portal directly, click here or use one of the methods listed in the "Access the LiveRamp Community Portal" section below.
To access the Support page on Community directly, click here.
Note
If you're a Safe Haven partner tenant, contact your primary tenant for technical issues or questions.
Cases should be created by the customer, rather than the LiveRamp account team on their behalf.
The portal uses a case management system that enables you to easily create a new case, communicate with the case owner and other team members, and track the progress of open cases.
The portal allows you to perform the following actions:
Create a new case
Perform other case actions, such as:
View all open cases
Update case information
Create a new message for an existing case
Share a case with a partner's users
Leave support case feedback
View your accounts (if you have multiple LiveRamp accounts)
Search across LiveRamp help content, forum discussions, Community articles, and your company’s support cases
Access LiveRamp University training courses on various topics
Note
For information on our first response time SLAs, see the "Setting the Case Priority" section of this article.
For more information on the features of the LiveRamp Community portal, see the Community articles in the portal.
Access the LiveRamp Community Portal
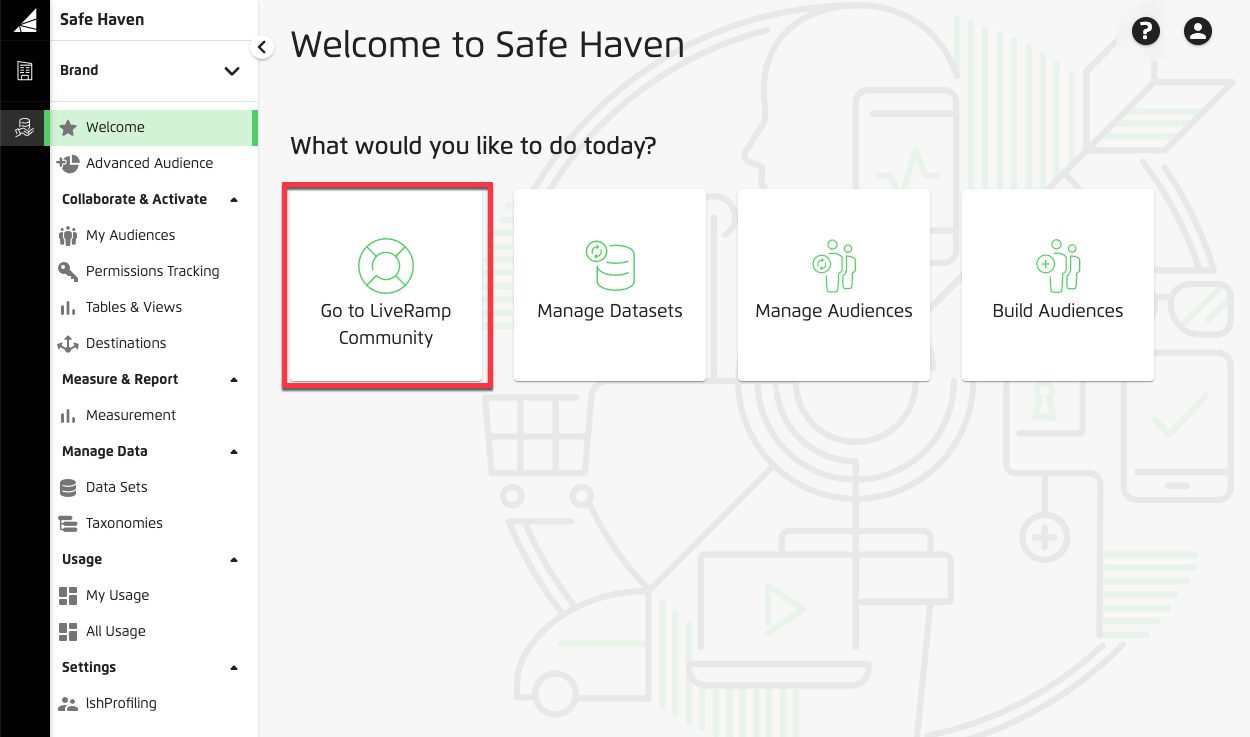
When you log into your LiveRamp application (such as Connect or Safe Haven), we automatically log you into the LiveRamp Community portal. For that reason, the portal is accessed through your LiveRamp application.
You can access the portal from the application Welcome page by clicking the "Go To LiveRamp Community" tile.
Note
If the "Go To LiveRamp Community" tile does not appear on the Welcome page and the "LiveRamp Community" menu selection does not appear when you click the Help icon, LiveRamp Community portal might not be enabled for your organization. Contact your LiveRamp representative for more information.
You can also access LiveRamp Community portal by going to the following URL: https://support.liveramp.com/s/. However, you must already be logged in to LiveRamp single sign-on (SSO) and have LiveRamp Community portal enabled for your organization.
Accepting Terms and Updating Initial Settings
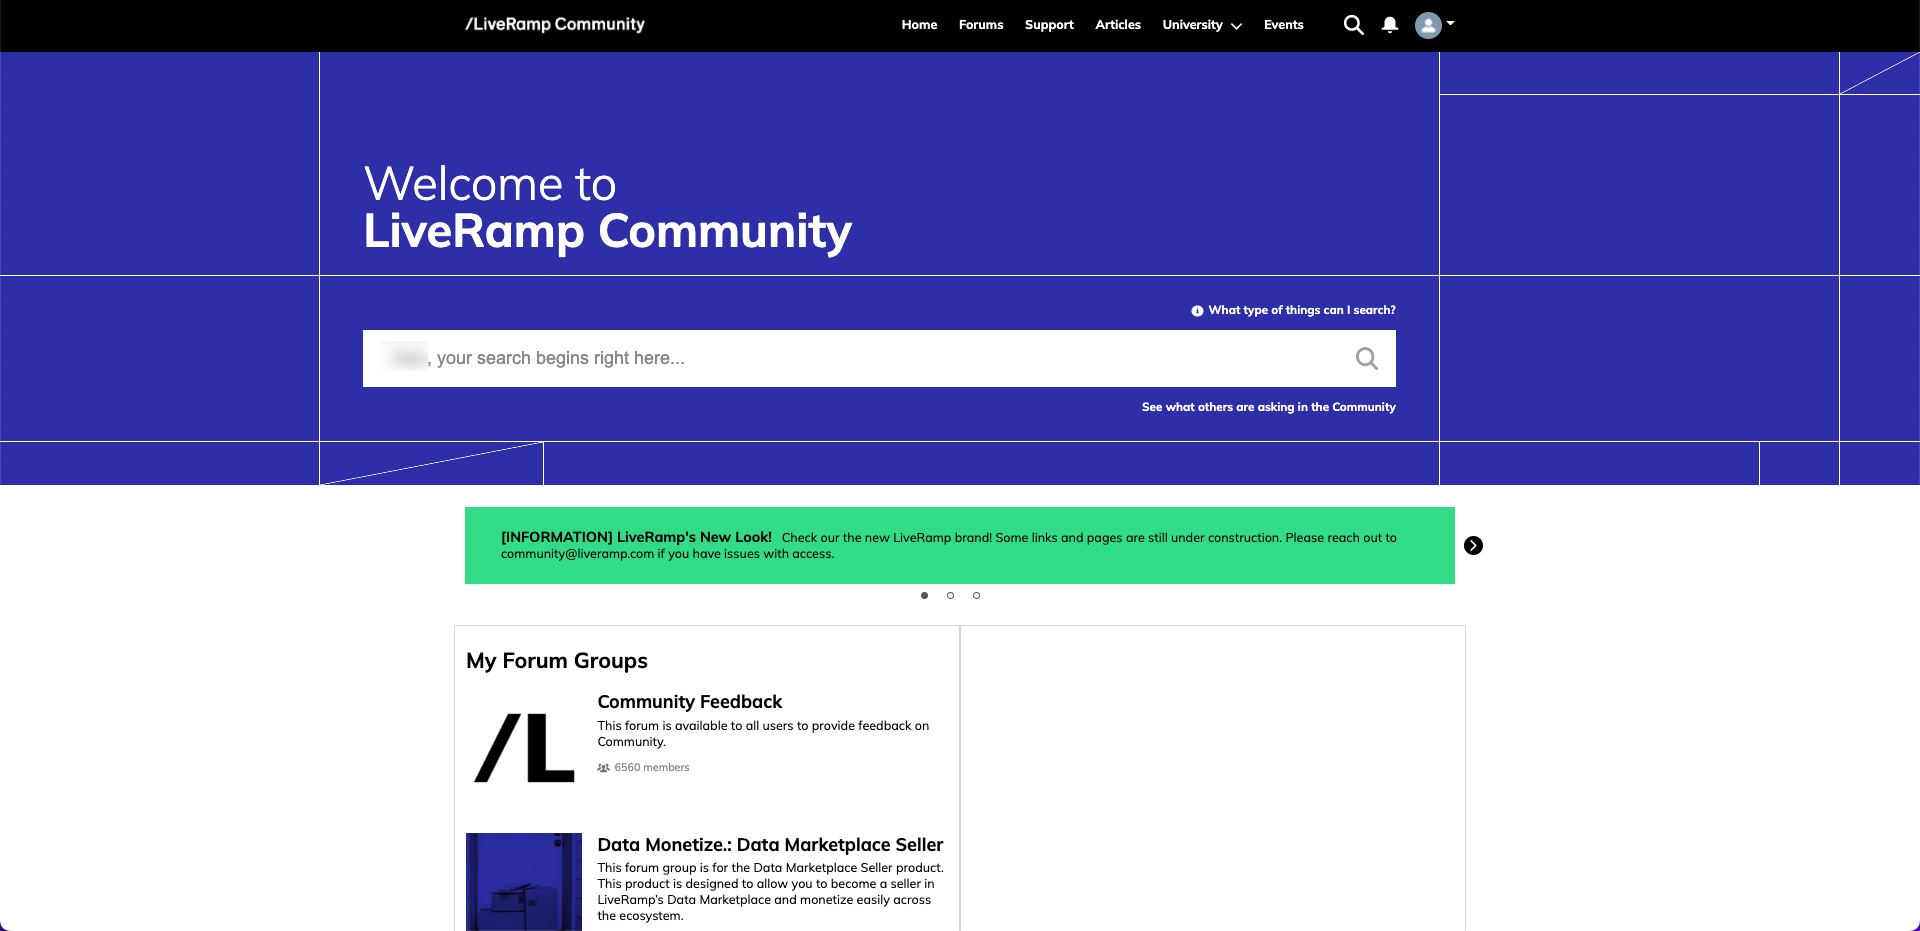
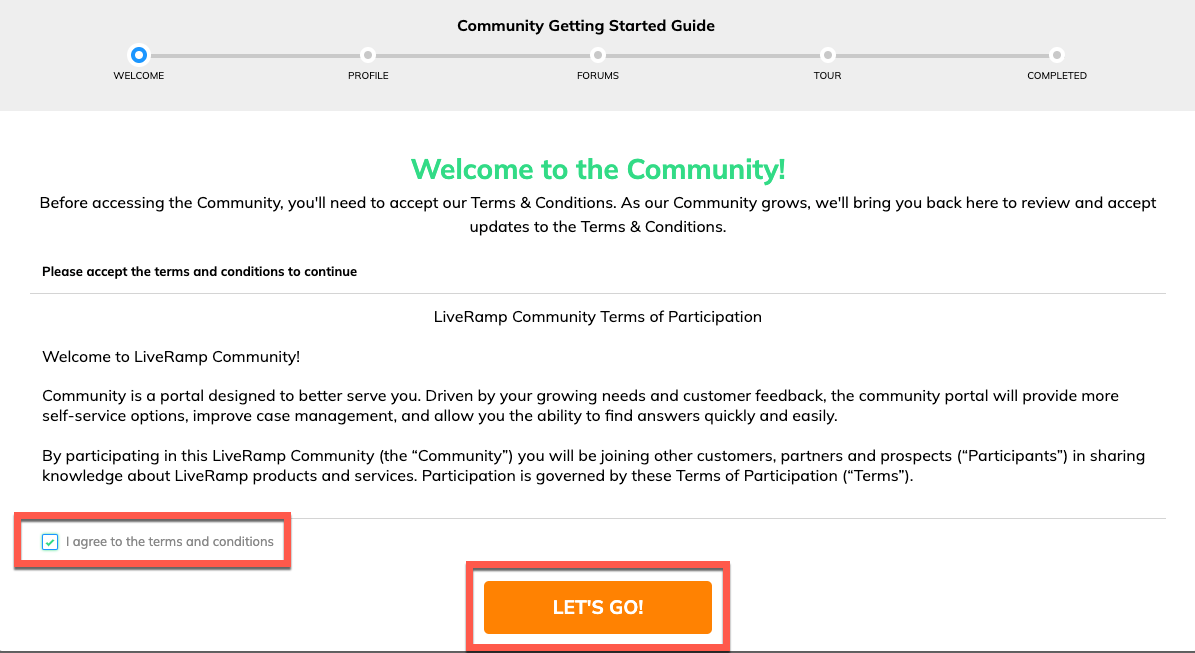
The first time you access the LiveRamp Community portal, a window will appear that will walk you through the steps you need to perform to start accessing the portal. You will need to accept our terms and conditions. You will also have a chance to update your profile information.
Once you've read through all of the terms and conditions, check the "I agree to the terms and conditions" check box and then click .
Make any desired updates to your profile and then click :
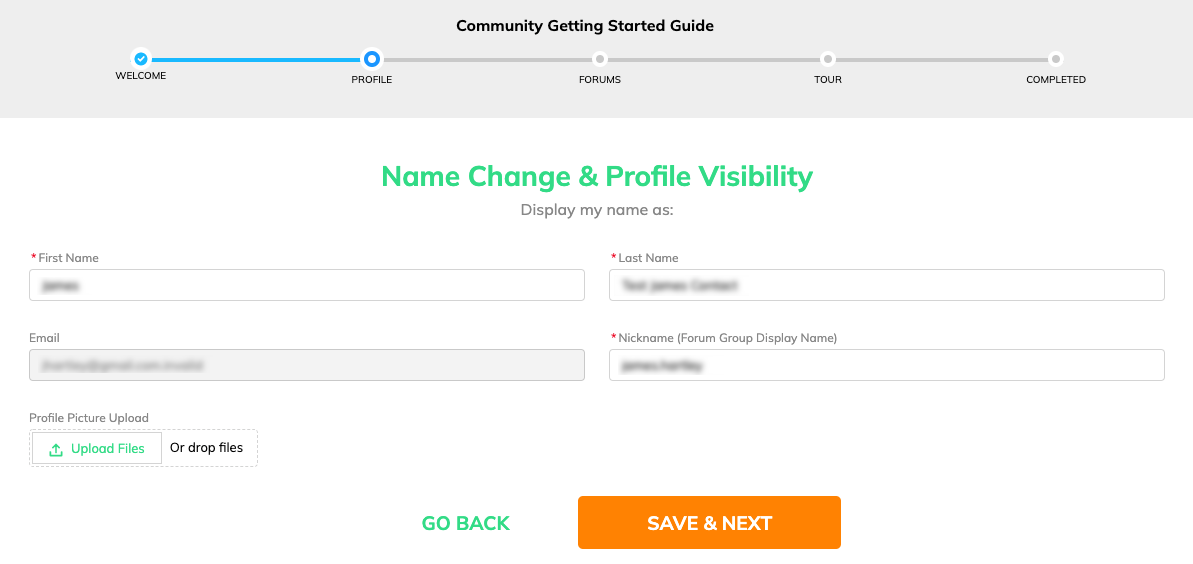
First name
Last name
Email
Profile picture (click to upload an image file)
After you've advanced past the Tour window, click to close the window and go to the portal or choose one of the other available options:
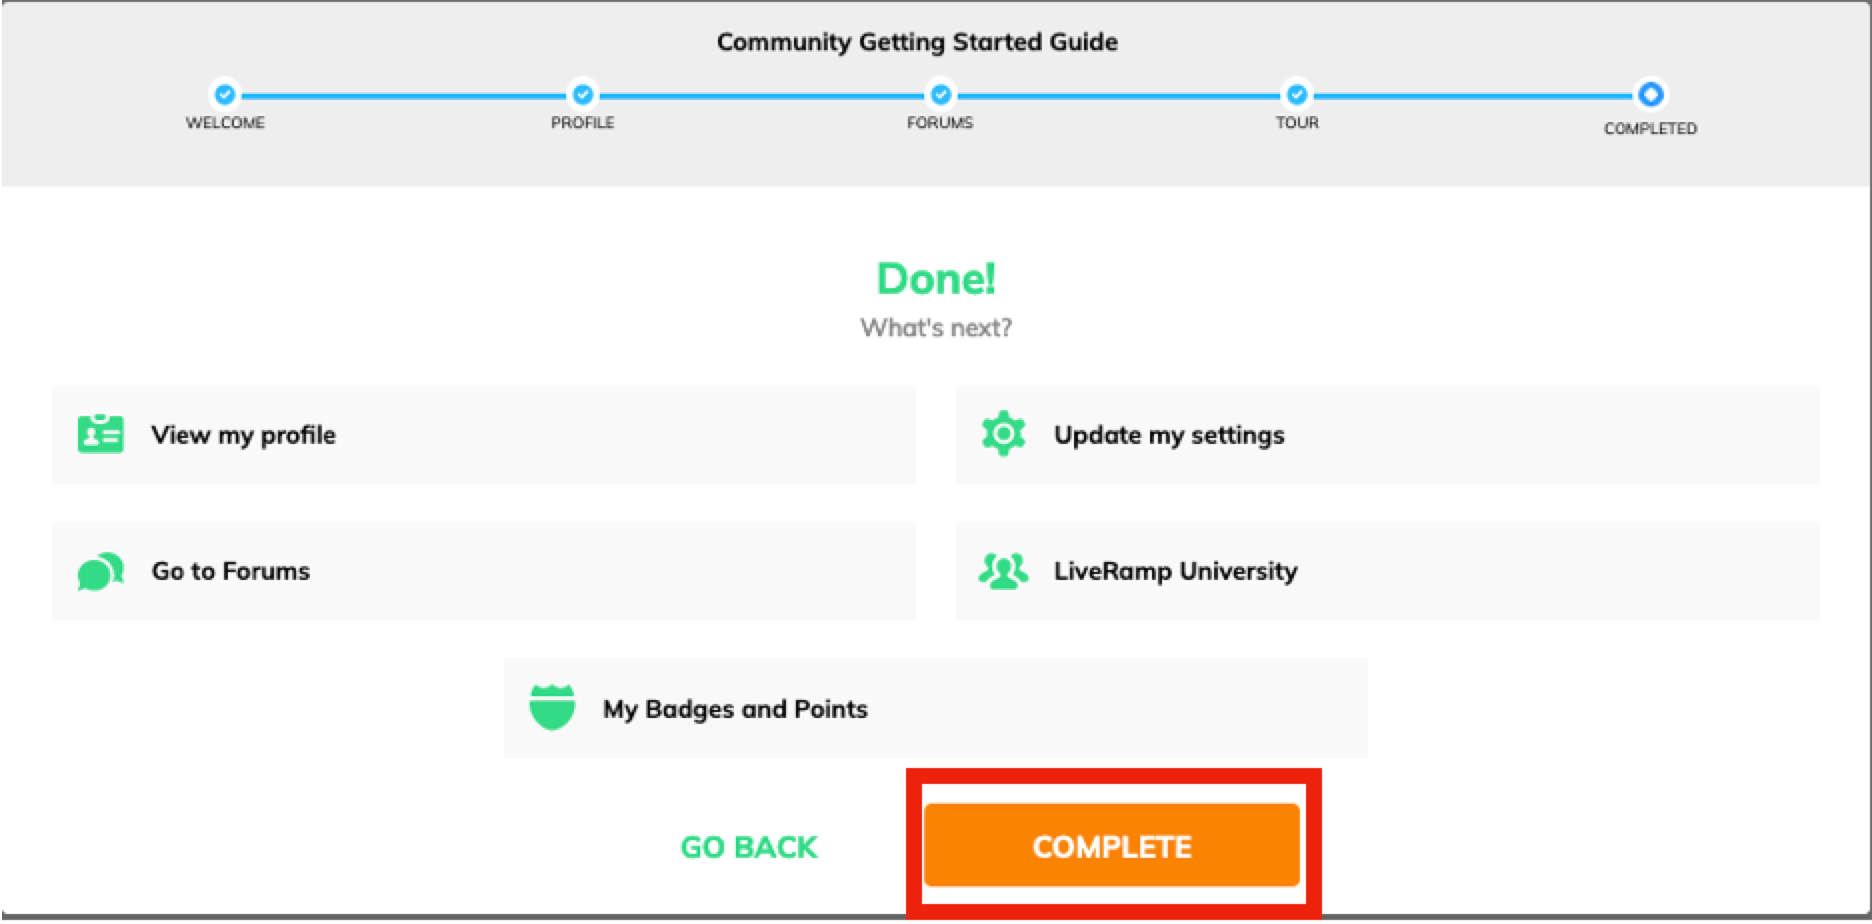
View your profile
Update your settings
Go to LiveRamp University
View your badges and points
When you're finished using the portal, you can close your browser tab.
Create a Support Case
The LiveRamp Community portal uses a case management system to resolve technical support issues. The first step in getting help is to create a support case.
Note
Before creating a case we recommend first checking to see if you can find an answer more quickly through our other resources:
Our help articles (via searching this help documentation site)
Currently open cases for your account
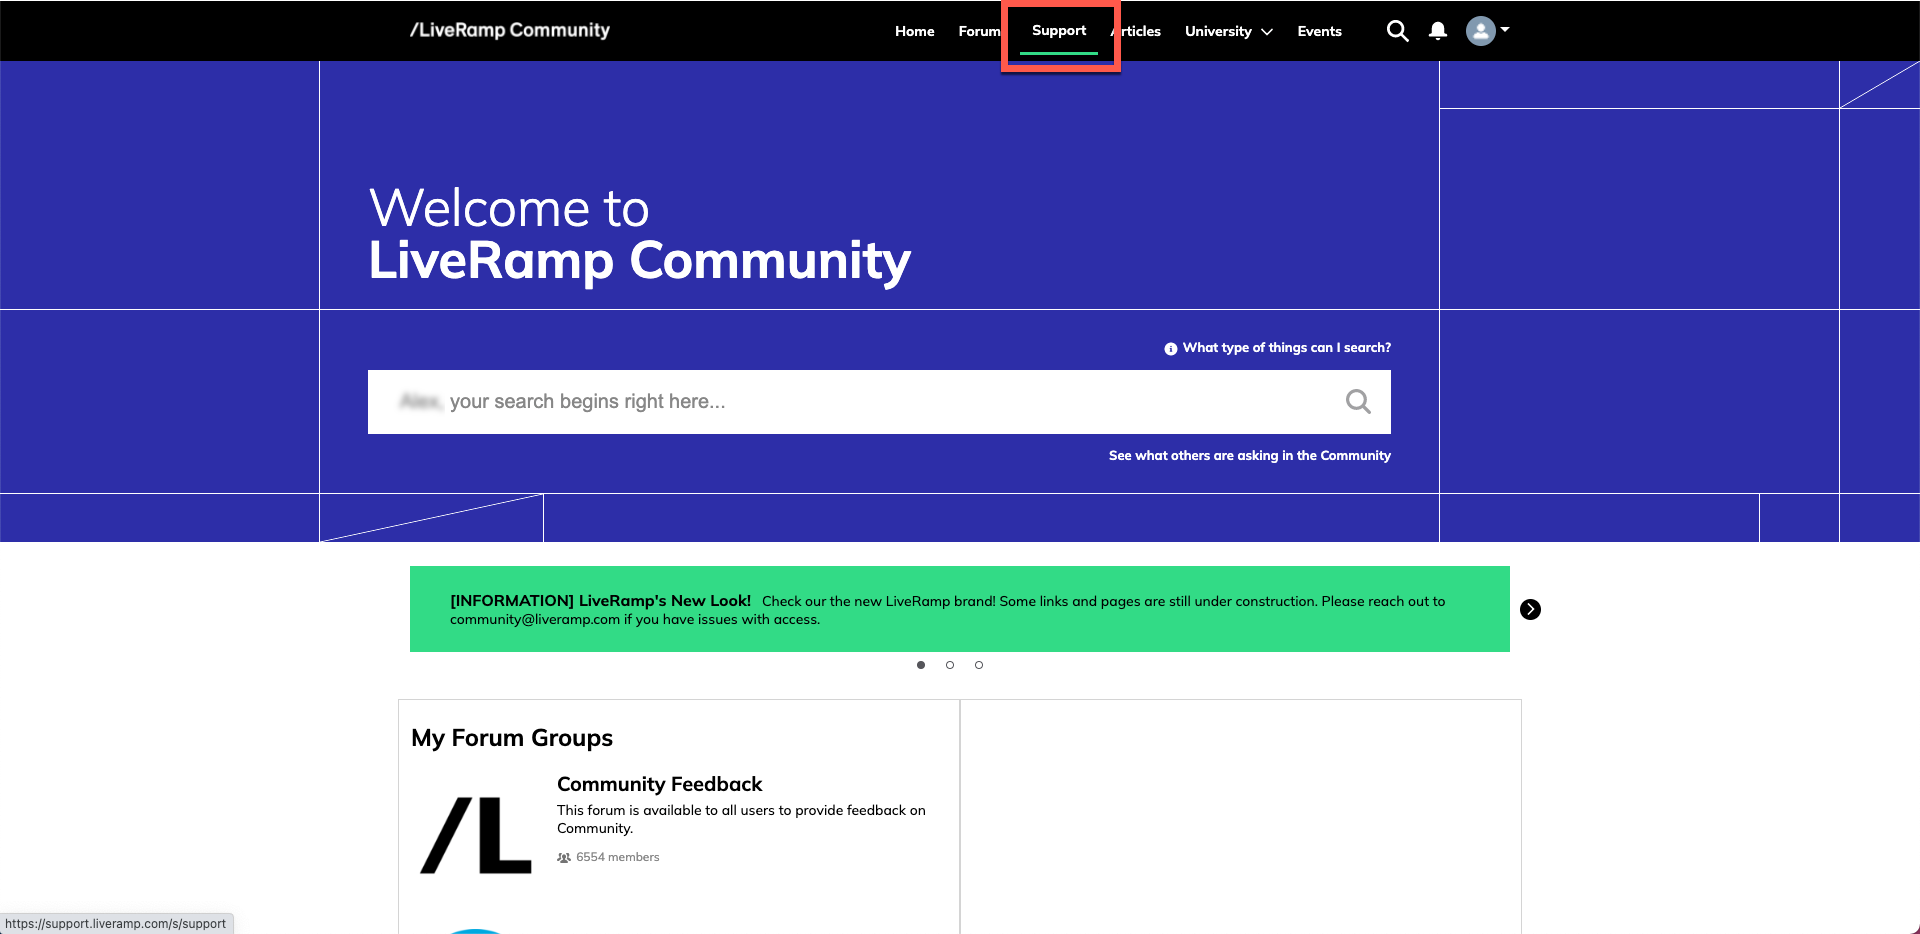
To access the Support page on Community directly, click here. You can also access the Support page by following one of the methods in the "Access the LiveRamp Community Portal" section of this article to access LiveRamp Community and then select the Support tab.
If your case reason appears among the Quick Case tiles, click the appropriate tile to take advantage of a case template with prepopulated information.
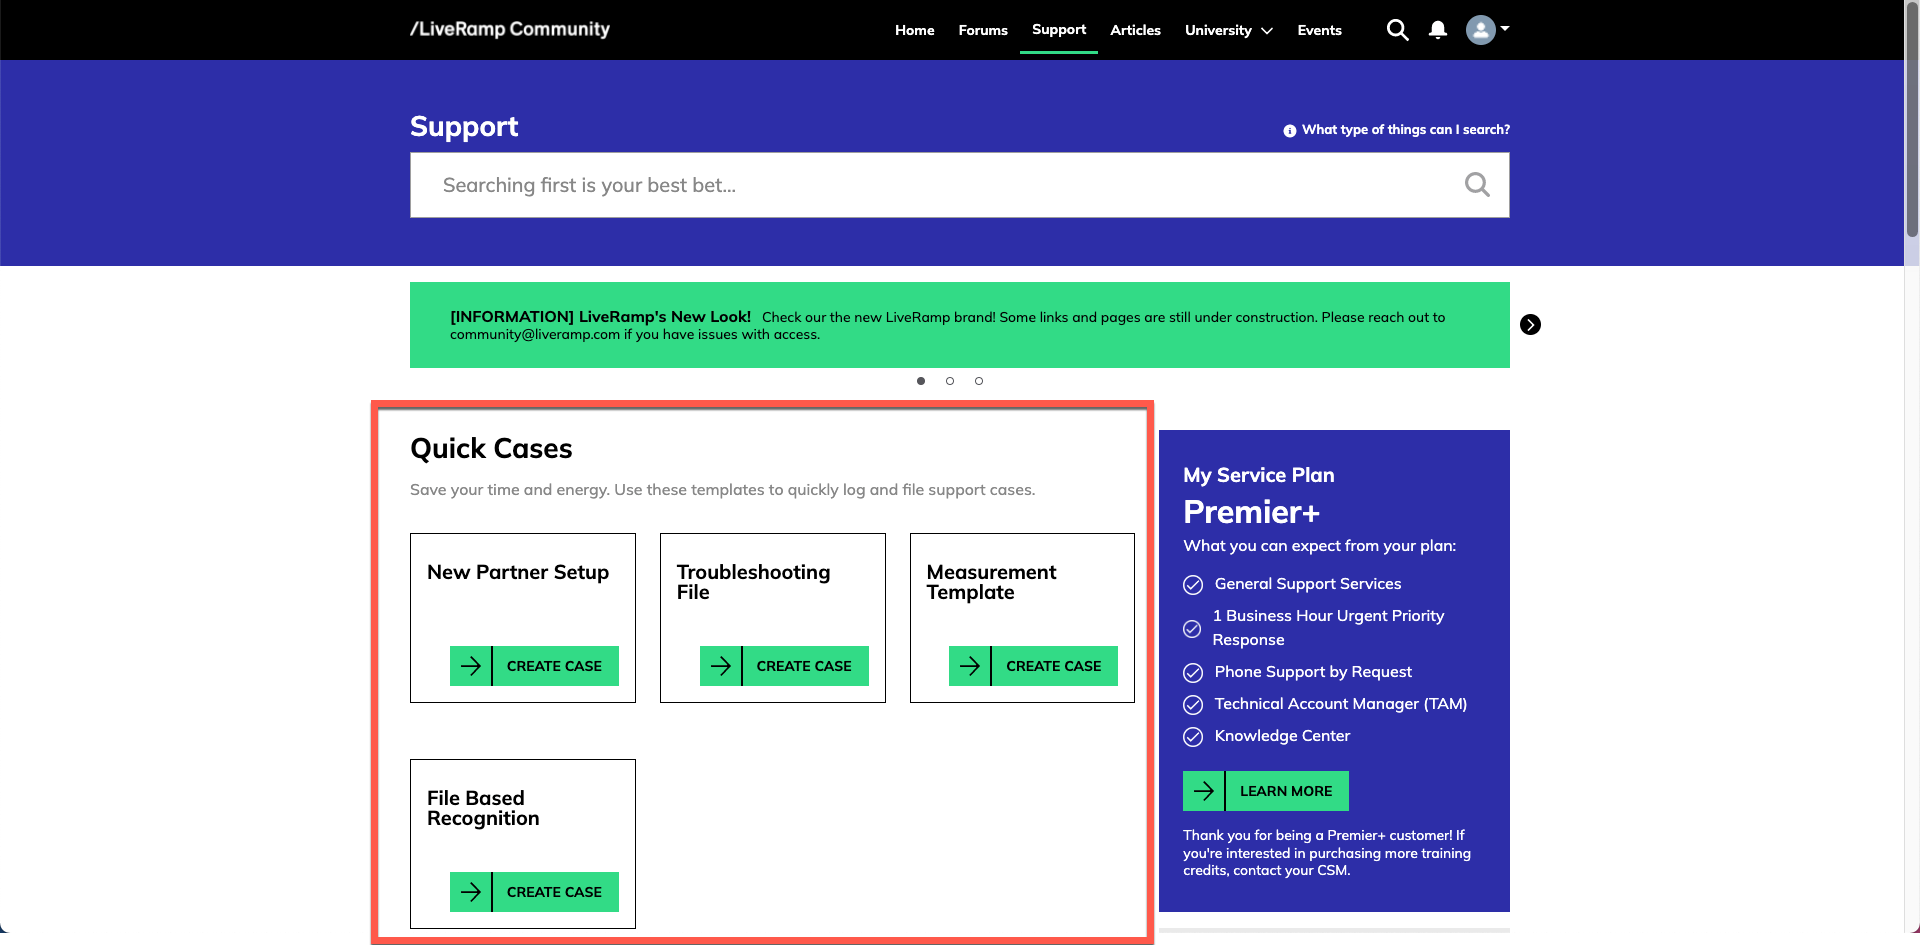
Note
For a list of the quick cases that are currently available, see the "Use Quick Cases" section of this article.
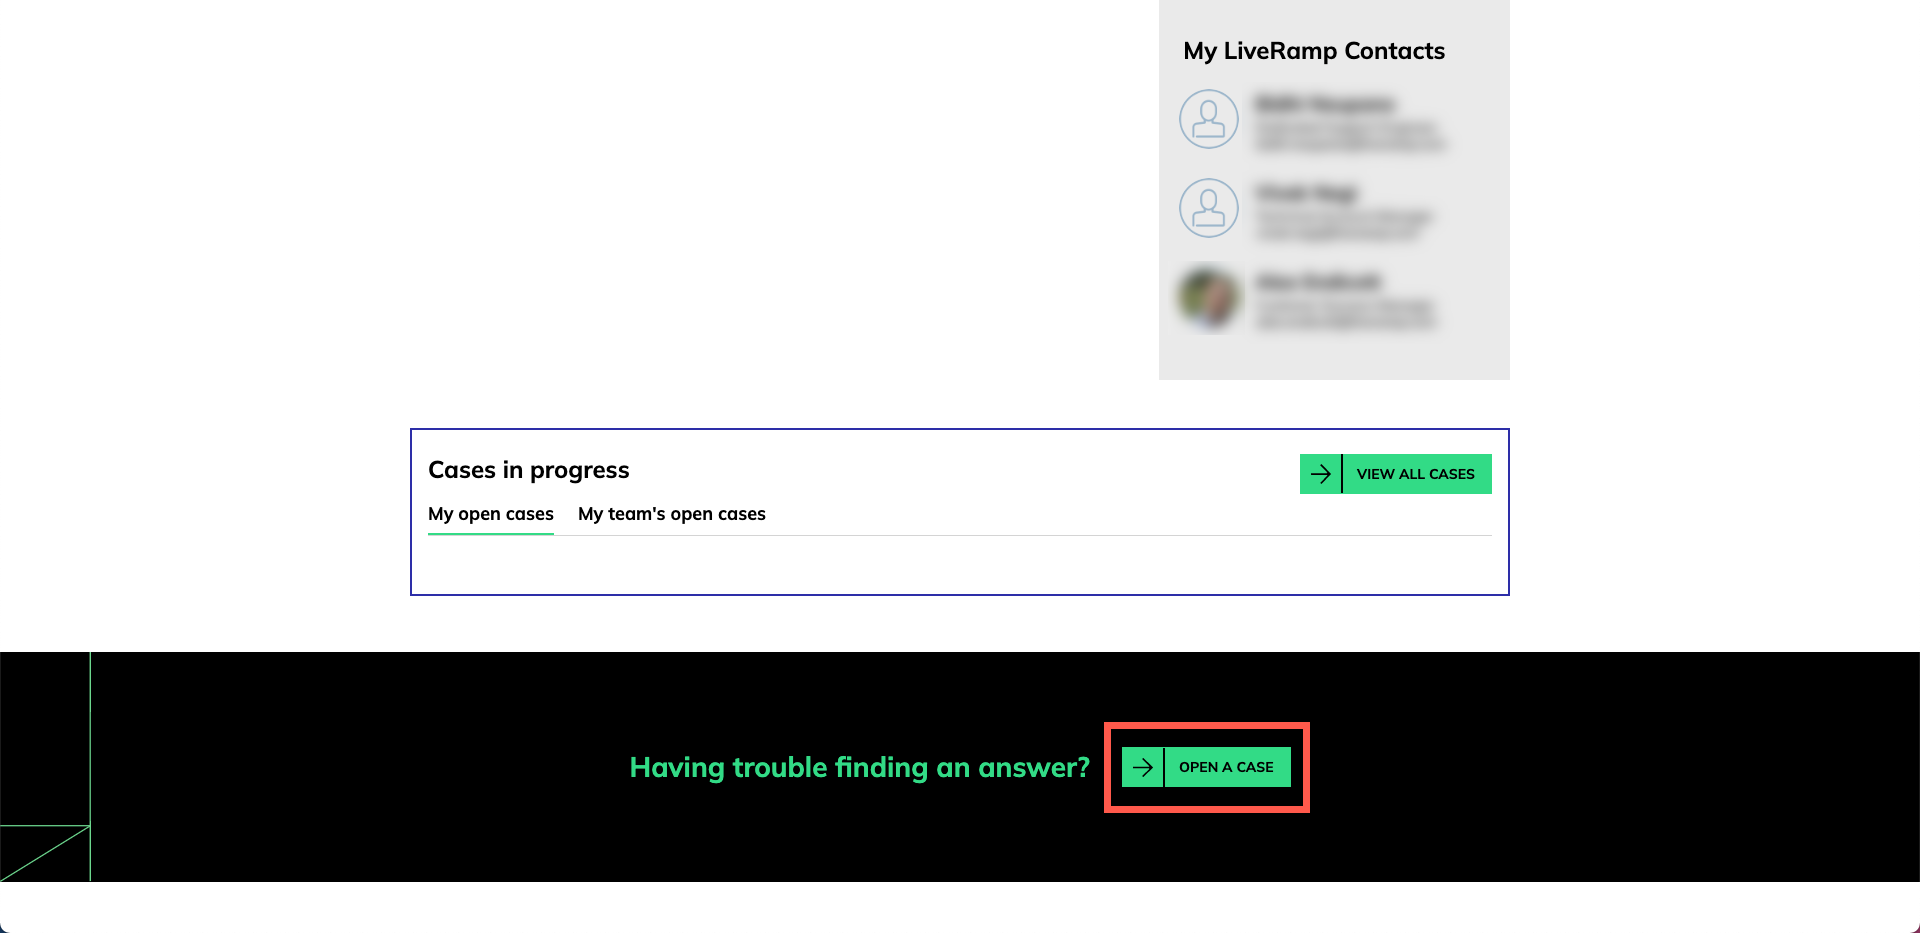
To go directly to the case creation process and skip the option to use a Quick Case, click this link.
Further down the page, click .
Select the reason for opening the case by clicking the appropriate tile:
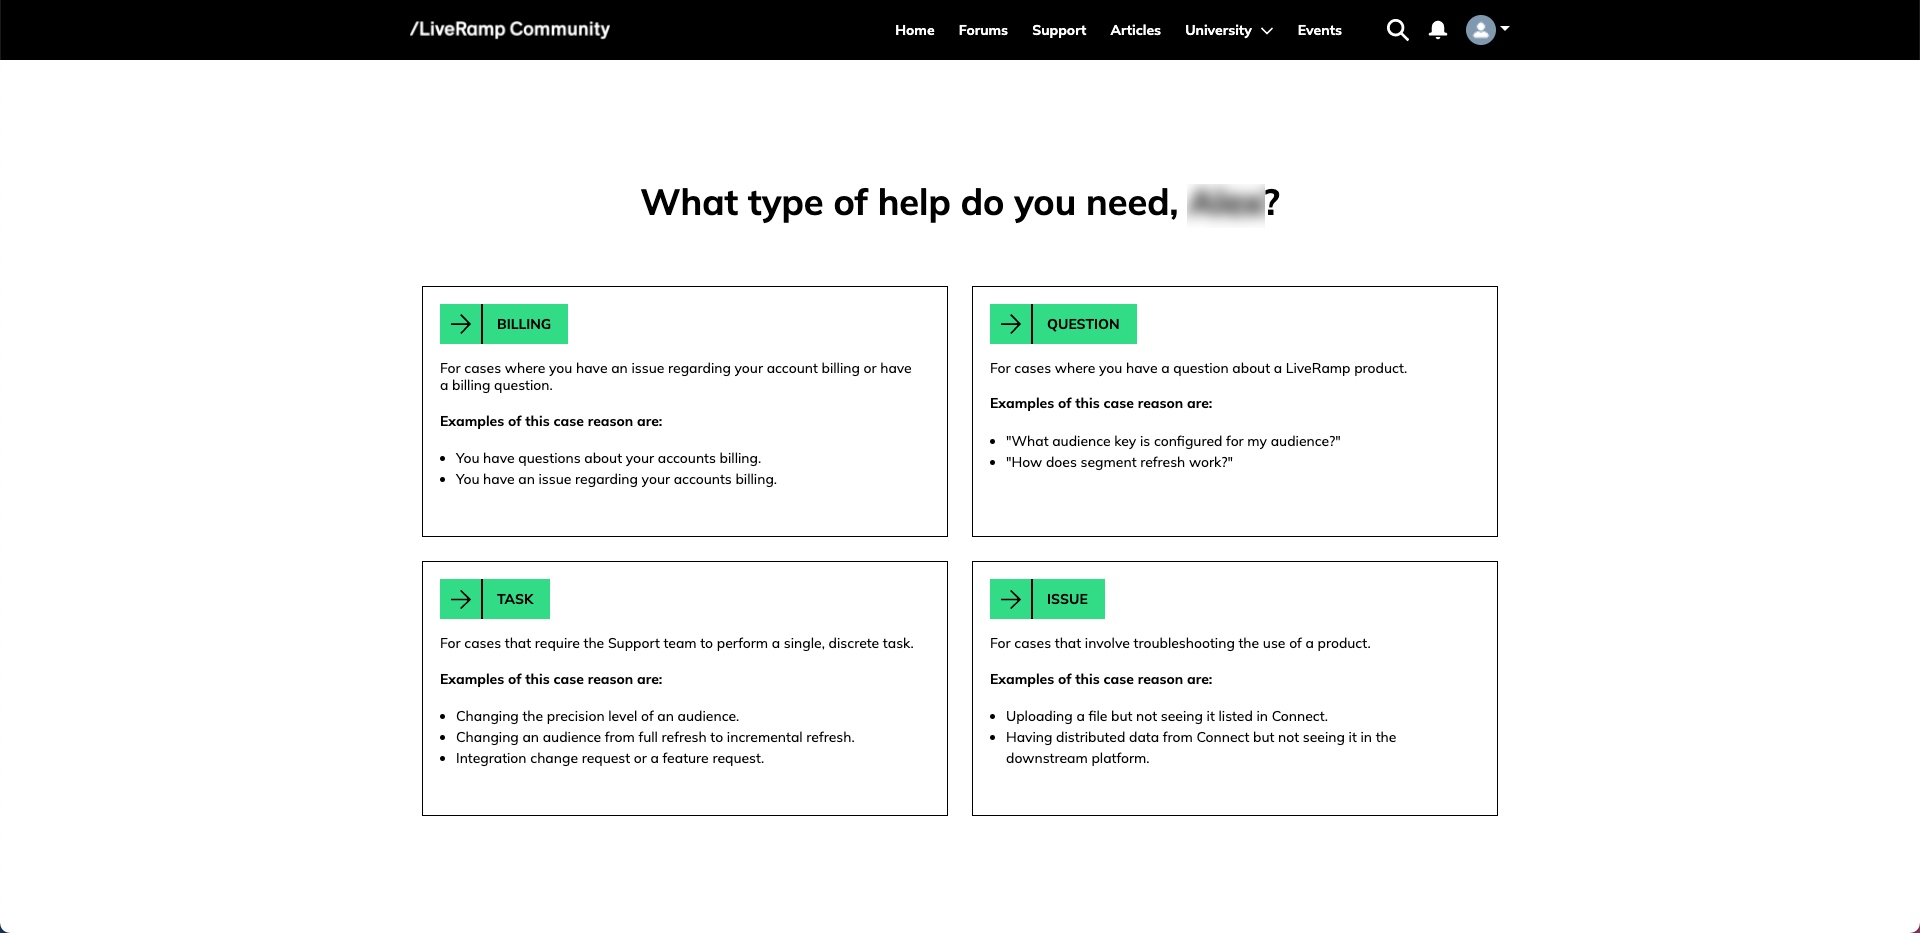
Billing: For cases where you have an issue regarding your account billing or have a billing question.
Question: For cases where you have a question about a LiveRamp product. Examples of questions include "What key is configured for my ?" or "How does segment refresh work?."
Task: For cases that require the Support team to perform a single, discrete task. Examples of tasks include changing the precision level of an , changing an from full refresh to incremental refresh, an integration change or a feature request.
Note
Create a separate case for each task.
Issue: For cases that involve troubleshooting the use of a product.
Click the appropriate priority level radio button for the case:
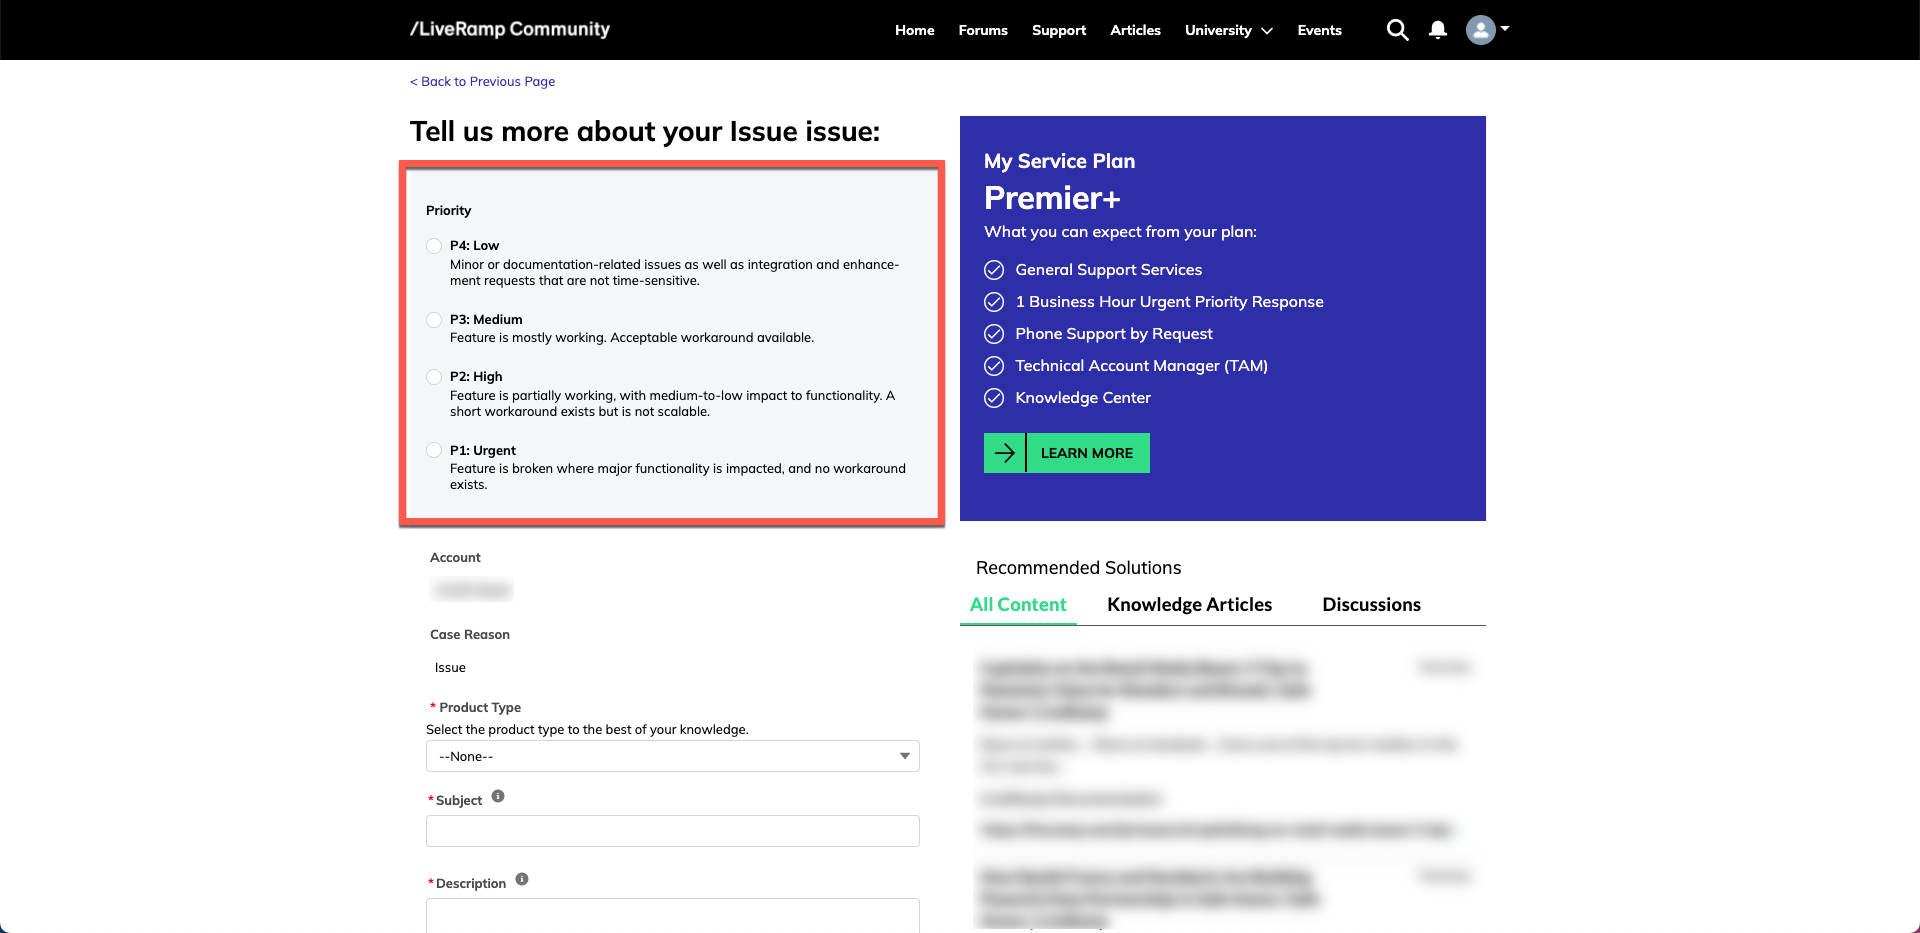
Caution
Make sure to properly categorize each case. Without accurate input, our team will not be able to properly prioritize your requests. We will review the priority of each case and adjust it as needed to align with the priority definitions listed in the "Setting the Case Priority" section.
Note
Not all priority levels are available for all case reasons. For Task or Question case reasons, the highest priority level available will be "P3 - Medium".
If you have access to multiple accounts, select the account the case applies to from the Account dropdown list.
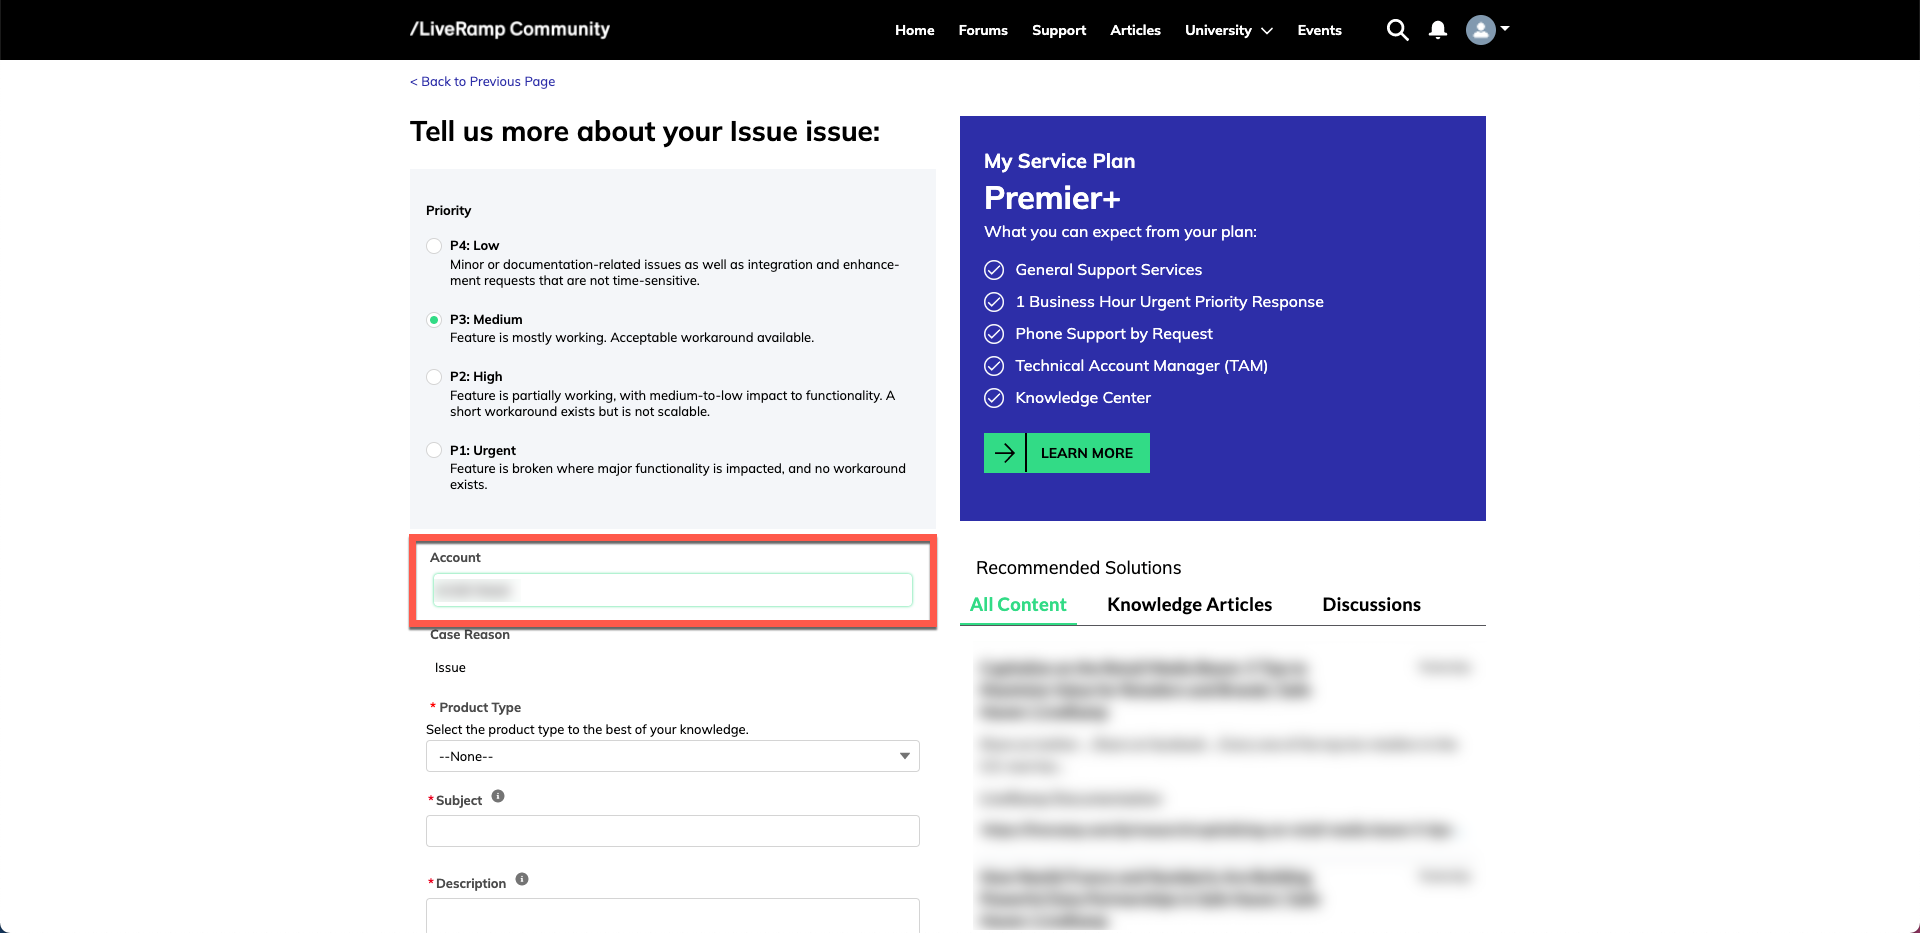
Select the product the case relates to from the Product Type dropdown list.
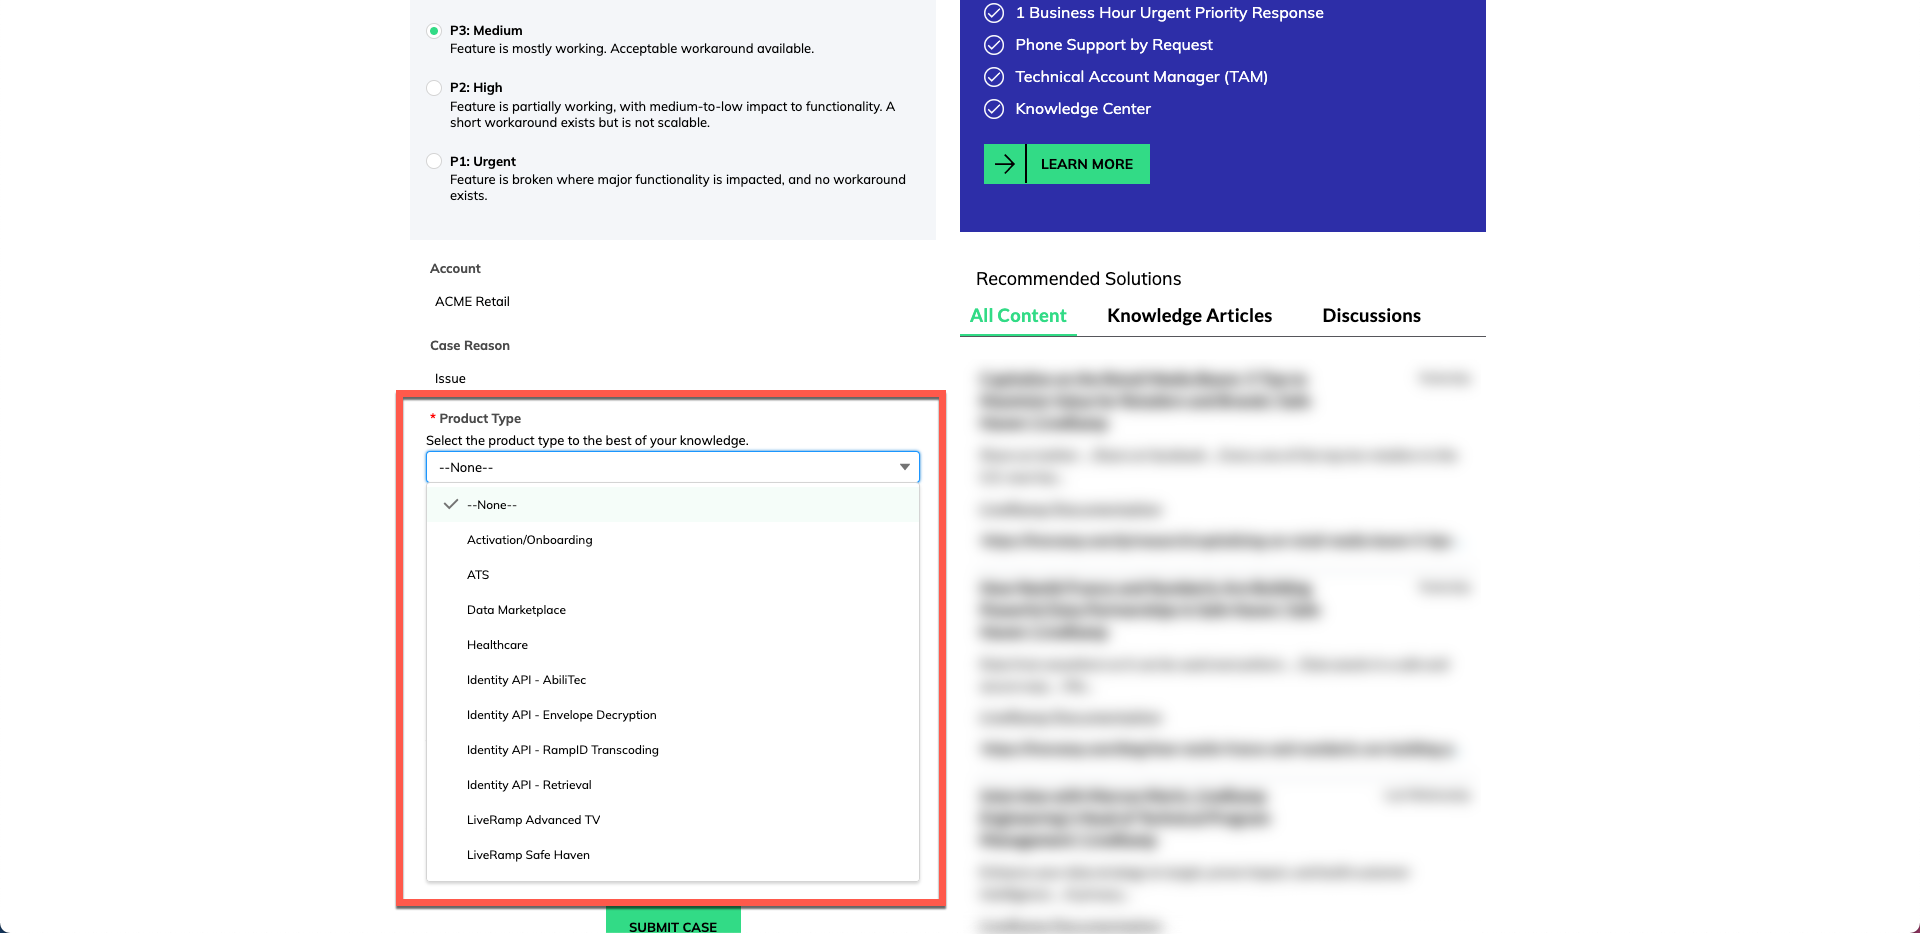
Activation: Cases related to uploading Activation workflow data to LiveRamp or activating data to a platform (including for Data Marketplace data).
Advanced TV Activation: Cases related to our Advanced TV product (our self-service tool for TV planning and activation).
Analytics Environment: Cases related to the use of the Analytics Environment.
Analytics Library: Cases related to the use of the Analytics Library.
Authenticated Traffic Solution: Cases related to our Authenticated Traffic Solution product (which provides an encrypted, persistent, people-based identifier throughout the programmatic supply chain).
Client-Side Tag: Cases related to the use of the Client-Side Tag or Enhanced Client-Side Tag.
Conversions API: Cases related to LiveRamp's partner Conversions API programs for offline and online data.
Data Marketplace - Buyer: Cases related to buying/requesting data in the Data Marketplace (LiveRamp's marketplace for third-party data).
Data Marketplace - Seller: Cases related to selling data in the Data Marketplace (LiveRamp's marketplace for third-party data).
Healthcare: Cases related to token ingestion and mapping (such as Datavant tokens), or PHI identity resolution for healthcare data.
Identity API - AbiliTec: Cases related to the AbiliTec API, which enables the input of PII and output of AbiliTec IDs (ConsumerLinks, HouseholdLinks, and AddressLinks) and metadata.
Identity API - Envelope Decryption: Cases related to the Envelope Decryption API, which enables the input of Identity Envelopes and output of RampIDs.
Identity API - RampID Translation: Cases related to the RampID Translation API (and any related permissioning), which enables the translation of RampIDs to different partner encodings.
Identity API - Retrieval: Cases related to the Retrieval API, which enables the input of PII (name+address, email addresses, phone numbers) and output of RampIDs.
LiveRamp Clean Room: Cases related to LiveRamp Clean Room.
Mapping Files: Cases related to mapping files (flat files we deliver to you that contain links between online identifiers and RampIDs).
Measurement Enablement: Cases that involve our Measurement Enablement workflow (where we replace the input identifiers in files you send us with their associated RampIDs and return the file to your specified location), as well as LiveRamp tags (pixels) used for measurement.
Privacy Workflows: Cases related to privacy workflows, including CCPA and GDPR opt-out, subject access, and deletion requests.
System Account Management: Cases that involve configurations at the company level, including account migrations, permissions, SFTP configurations, and user management.
Wholesale Linkage Services: Cases for wholesale customers.
Note
If the issue relates to the Safe Haven platform, select "Safe Haven" as the product type so that the case is routed to the proper support team. If you are not a Safe Haven customer, do not select the "Safe Haven" product type.
For product types "Activation", "Measurement Enablement", "Data Marketplace", and "Mapping Files", an Integration dropdown list appears:
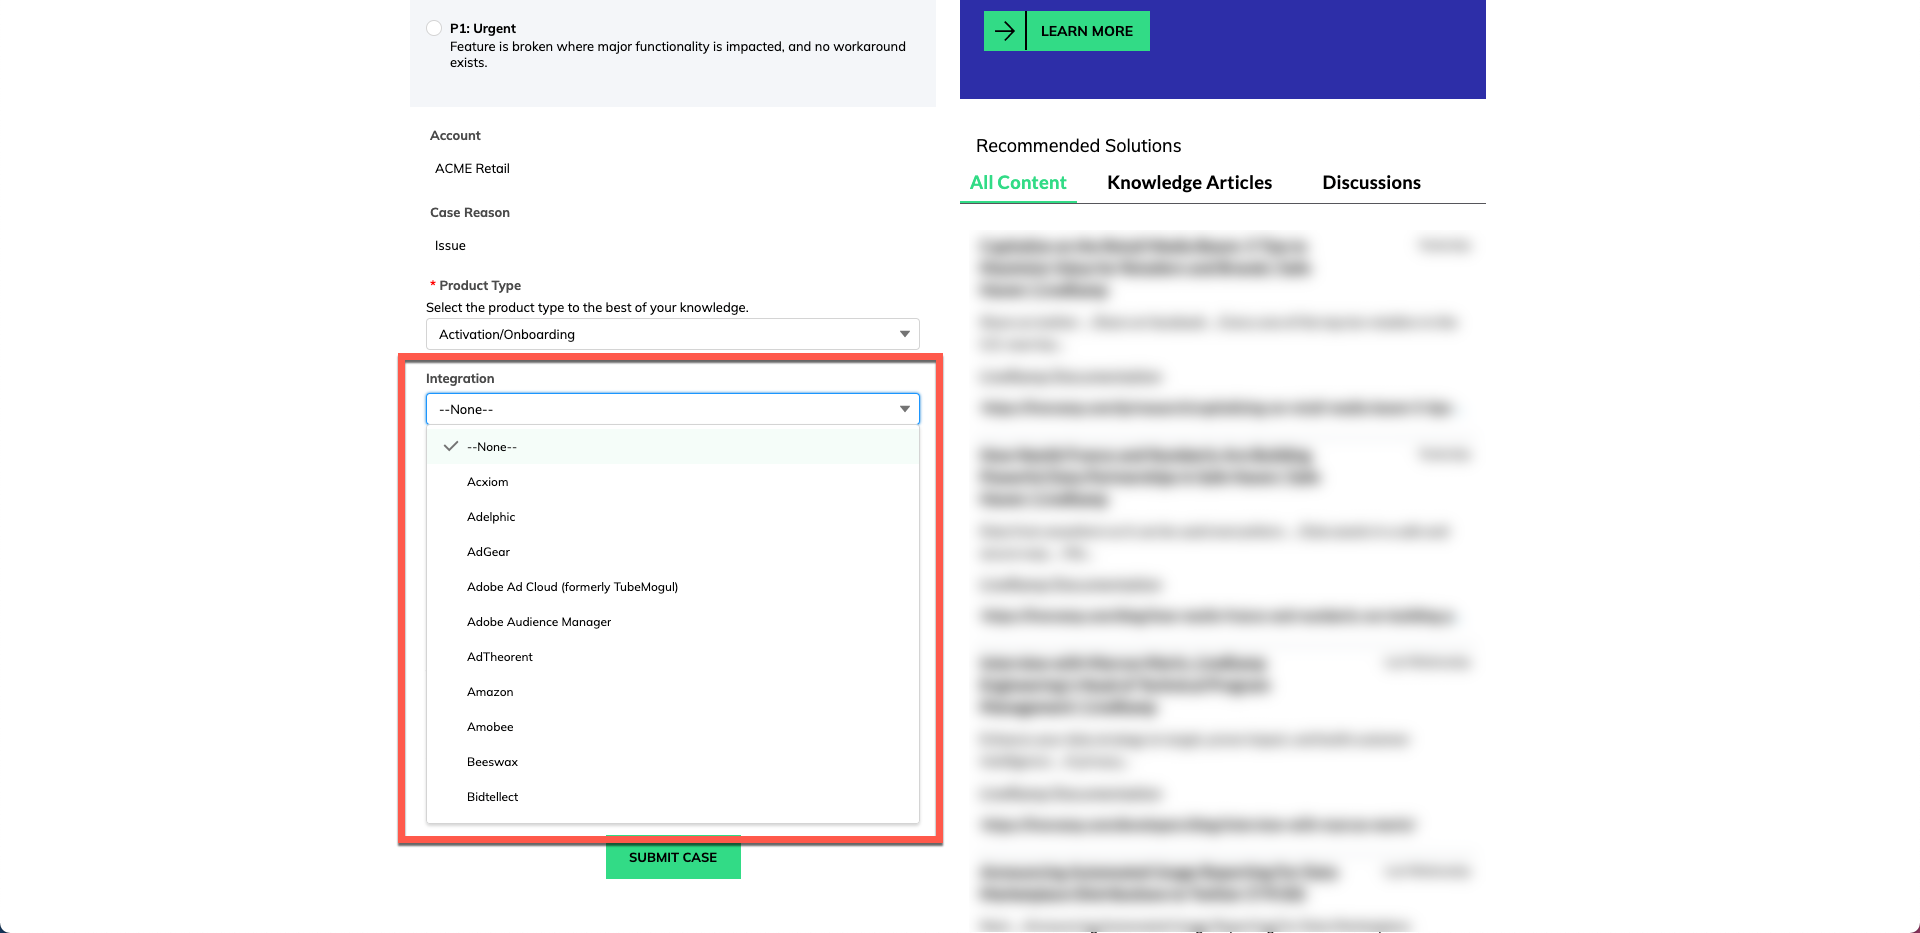
If your issue relates to a particular LiveRamp integration (such as an issue with distribution to Facebook or The Trade Desk), select the integration name from the dropdown list.
Note
The Integration dropdown list contains our top 50 integrations. If the desired integration does not appear, select "Other" and then select the integration from the Other Integration dropdown list that appears.
If your issue does not relate to a particular LiveRamp integration, do not make a selection from the Integration dropdown list.
Enter a short subject in the Subject field that is a high-level statement of the issue or request.
Tip
As you enter text into the field, the recommended solutions displayed on the right-hand side of the page are updated. Check to see if any of the solutions can solve your issue or resolve your question.
Enter a description of the issue, request, or question in the Description field. Make sure to include all information that might help us address your issue, including:
A detailed description of the issue
The LiveRamp audience name and the file name, if applicable
The steps you went through
The result you expected
The actual result
Information to help us understand the business context and priority for the issue
Tip
As you enter text into the field, the recommended solutions displayed on the right-hand side of the page are updated. Check to see if any of the solutions can solve your issue or resolve your question.
Upload any files or screenshots that will help us understand your issue by either dropping them in the drop box or clicking and then selecting the appropriate file.
Warning
Do not upload files that contain PII.
Note
Accepted file types for uploaded files are .csv, .doc, .xsl, .pdf, .png, .jpg, .jpeg, .docx, and .doc.
When the upload has finished processing, click .
Click SUBMIT CASE.
The newly created case opens.
You will receive an email confirmation that your case has been created that includes the case number. You will also receive email notifications for any case updates. You can reply to those emails to update the case, or you can reply via the portal.
Note
To include external parties on your case thread (such as users or organizations that don't have access to the Community portal), you can reply to the initial email or use the email feature within the case thread (for more information, see the "Send a Message via Email" section below).
Setting the Case Priority
When creating a new case, use the breakdown in the following table to assign the correct priority to your case in the “Priority” field.
Caution
Make sure to properly categorize each case. Without accurate input, our team will not be able to properly prioritize your requests. We will review the priority of each case and adjust it as needed to align with these priority definitions.
The first response time SLA will vary depending on the support level: Standard, Premier, Premier Flex, or Premier Plus. These SLAs are based on business hours, which consist of Monday through Friday from 6 AM to 5 PM PST. A business day consists of 11 business hours.
The first response time SLAs given represent our good-faith efforts to respond to your requests promptly. We aim to meet these thresholds for no less than 90% of issues submitted through the TSP.
Priority Level | Definition | Additional Definitions for Activation and Measurement Enablement Workflows | Additional Definitions for Issues with Connect, LiveRamp Tags, or LiveRamp APIs | First Response Time SLA |
|---|---|---|---|---|
P1: Urgent | Feature is broken where major functionality is impacted, and no workaround exists. Only available for the "Issue" and "Billing" case reasons. | Data needed for a campaign or analysis in the next 24 hours is not present in platform, was sent to LiveRamp, and attempted to be configured for distribution more than 3 days ago | Customer cannot access a real-time system and no workarounds exist for the issue |
|
P2: High | Feature is partially working, with medium-to-low impact of functionality. A short term workaround exists but is not scalable. Only available for the "Issue" and "Billing" case reasons. |
| Real-time system is impacted intermittently or a short term workaround exists for the issue. |
|
P3: Medium | Feature is mostly working. Acceptable workaround available. Note: This is the highest priority a "Task" or "Question" case type can be assigned. | Data needed for a campaign or analysis 3 or more days from now is only partially present in the platform. | Real-time system is impacted occasionally or a workaround exists for the issue. |
|
P4: Low |
| Integration Change Request |
|
|
View Cases
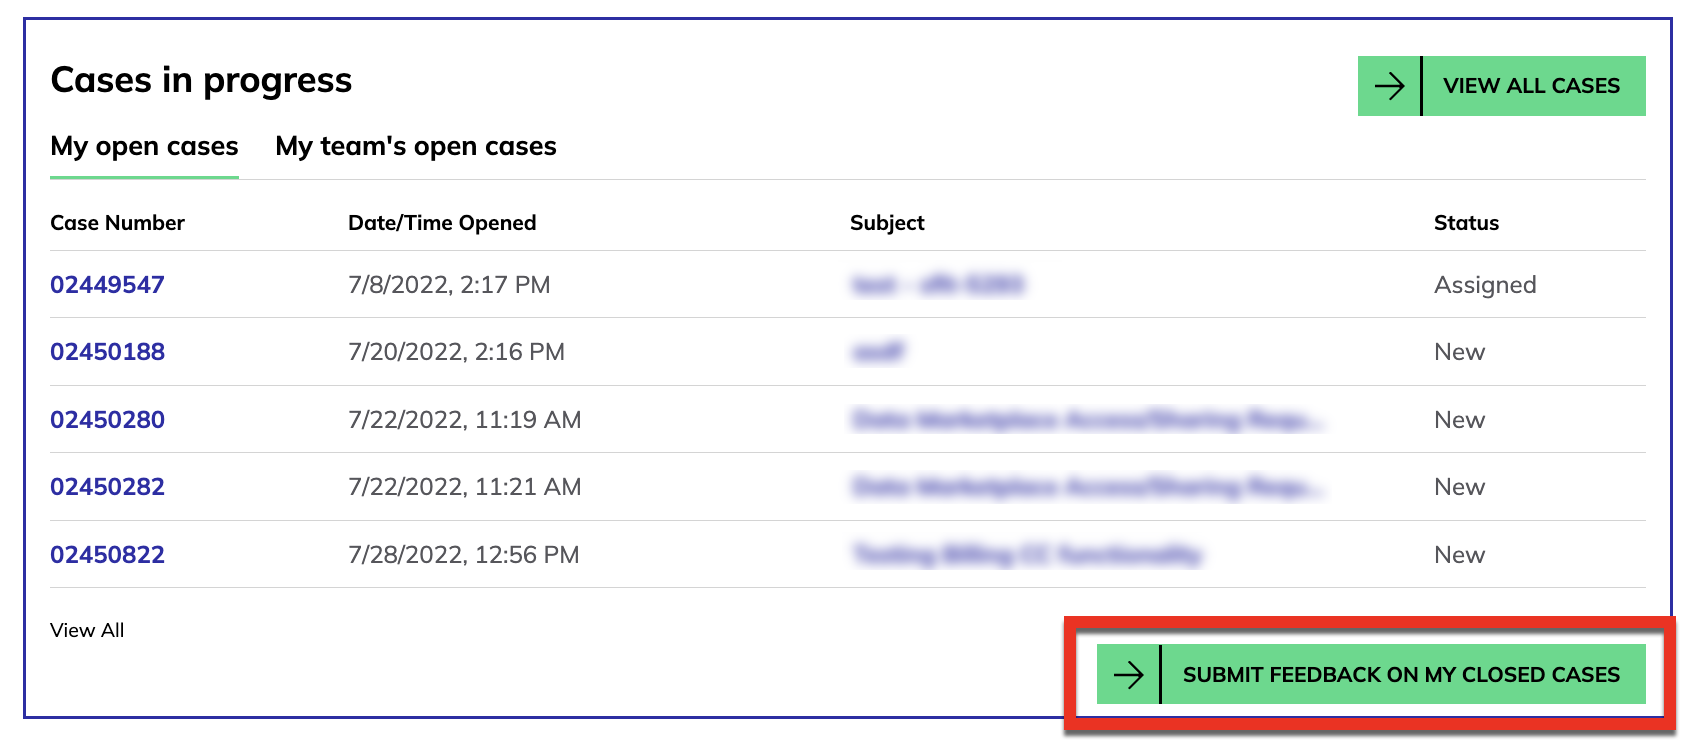
By default, a portion of your most recent open cases is displayed on the Support page of the LiveRamp Community portal. This view includes:
Case number
Date/time opened
Subject
Status (such as “new”, “assigned”, “in progress”, etc.)
You can also view a portion of the most recent open cases that were created by other team members by selecting the "My team's open cases" tab.
To view all cases, click .
This view includes additional fields:
Priority
Contact name (the name of the user who created the case)
Case reason
Last modified date
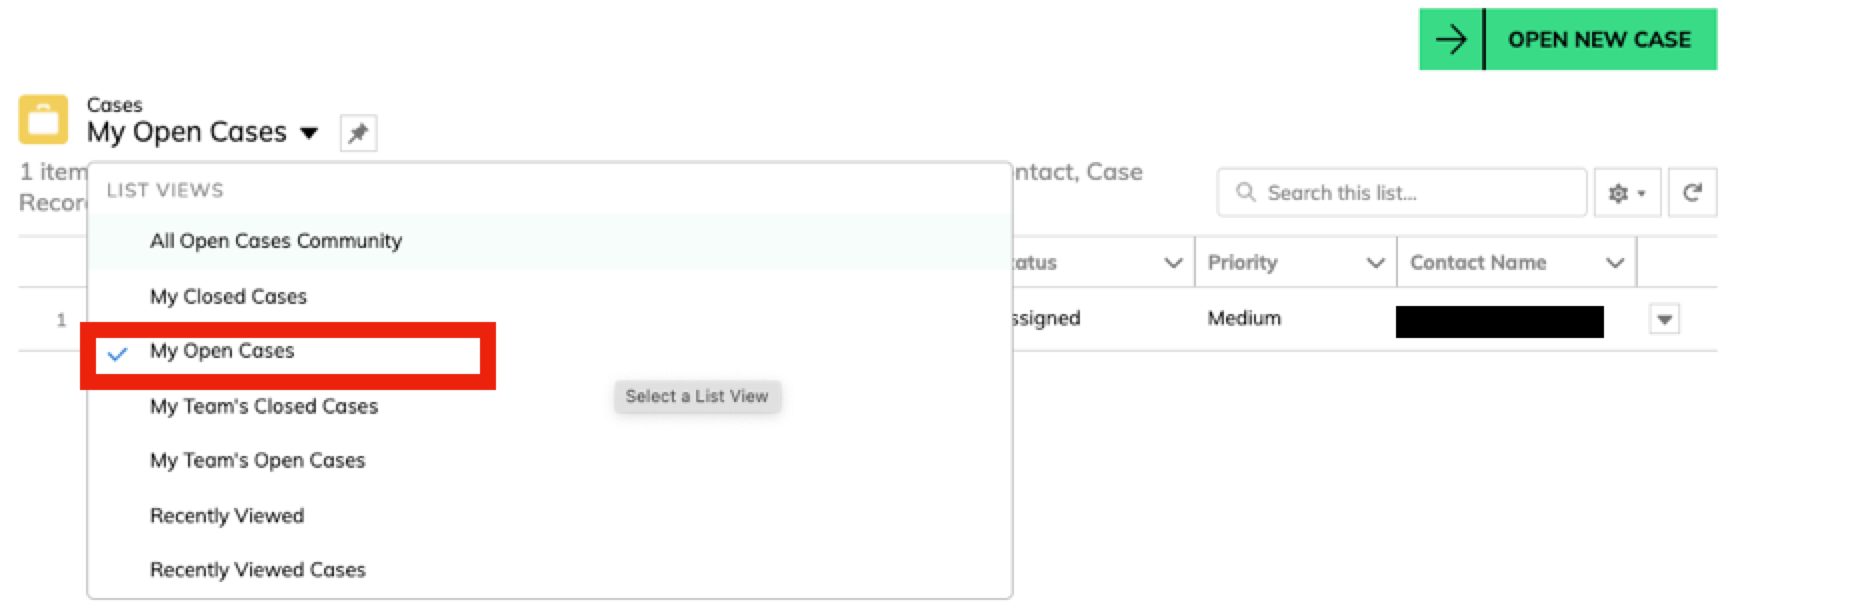
The portal uses “list views” to determine which cases to display. List views are customized, filtered selections of your cases. You can also select additional fields to display for a particular list view. See the “Create a Custom View of Your Cases with List Views” section of this article for more information.
By default, the cases are sorted by status and use the "My Cases" List View. You can switch to a different List View by clicking on the dropdown menu in the upper left and then selecting the desired List View.
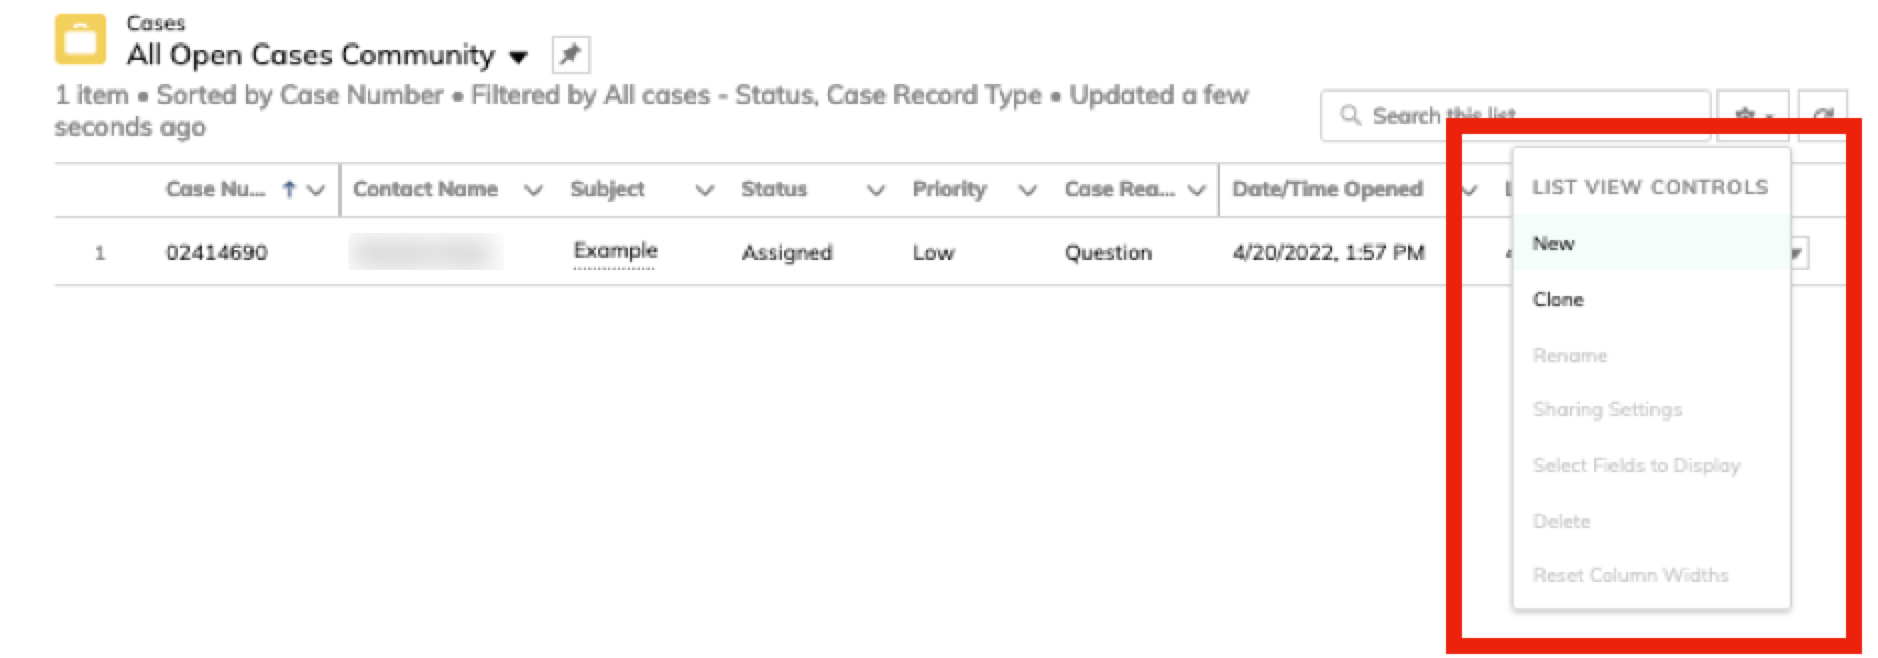
You can create filtered, custom views of your cases through List Views.
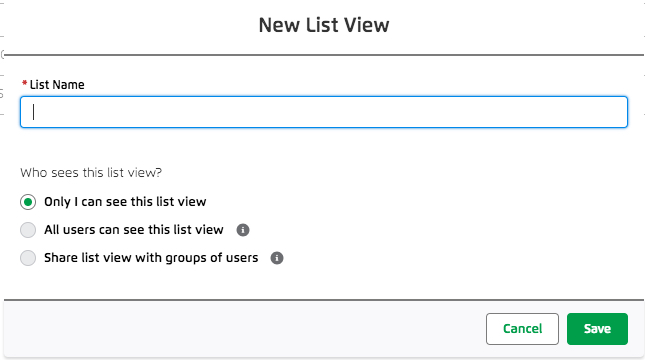
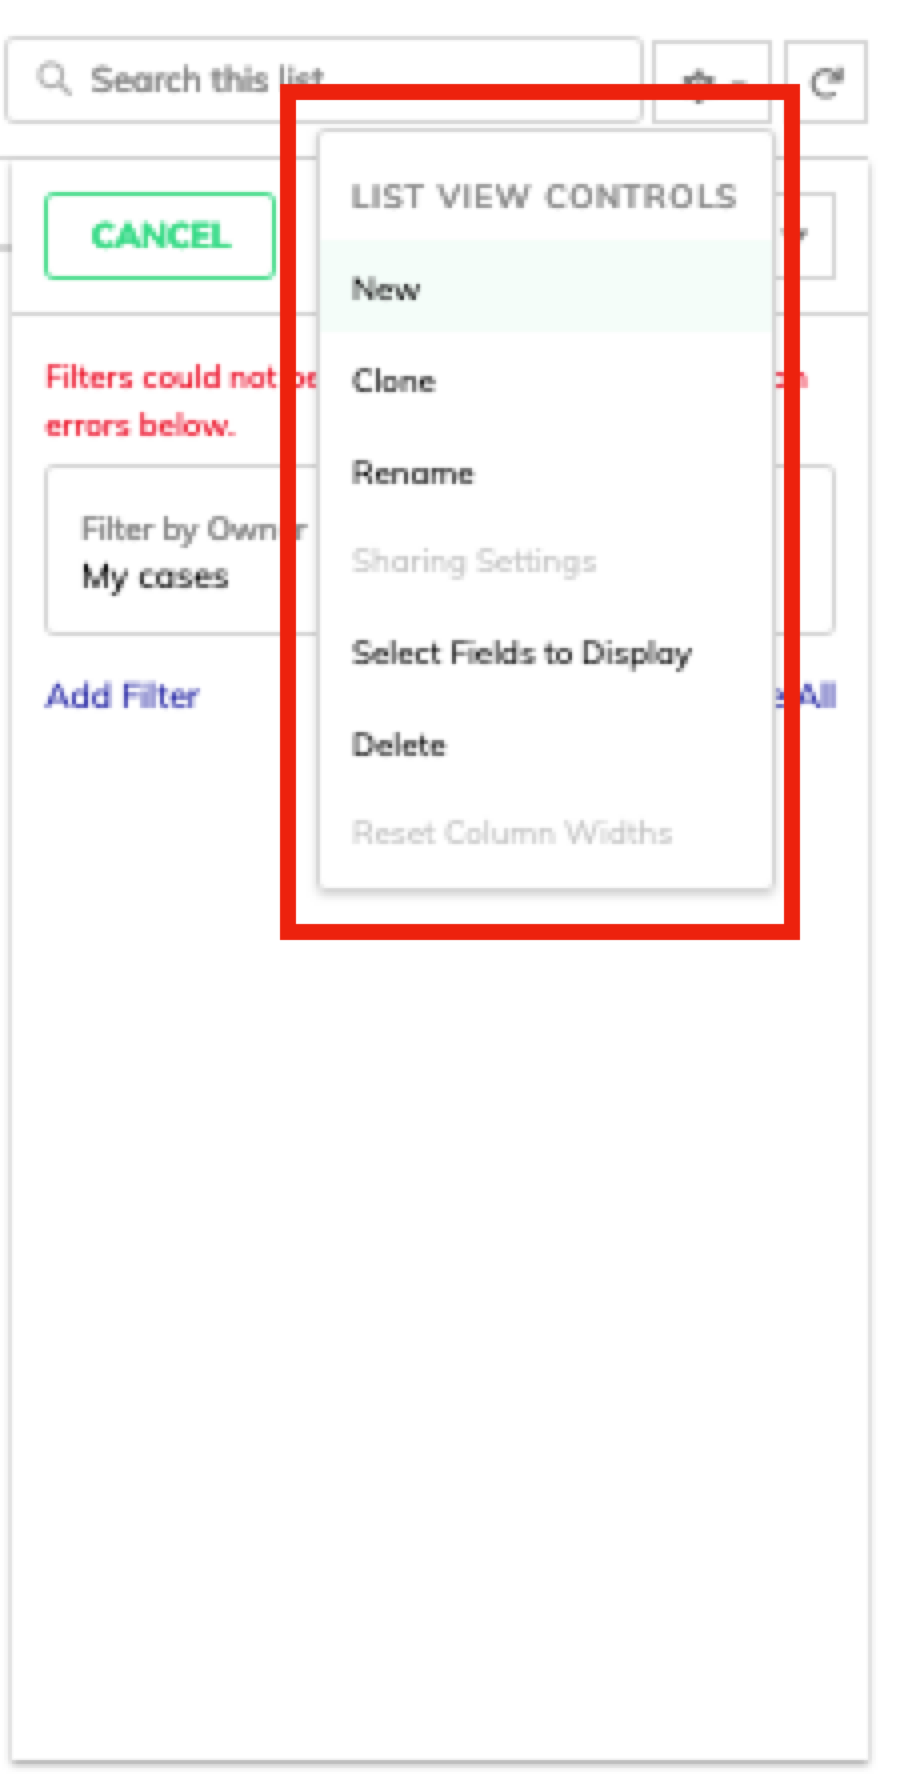
From the Cases page, click the Settings icon to see "List View Controls" and then select "New."
Enter a name for your list view in the List Name field, choose who will be able to see the list view, and then click Save.
By default, a new list view is set to filter only your cases. To change this setting:
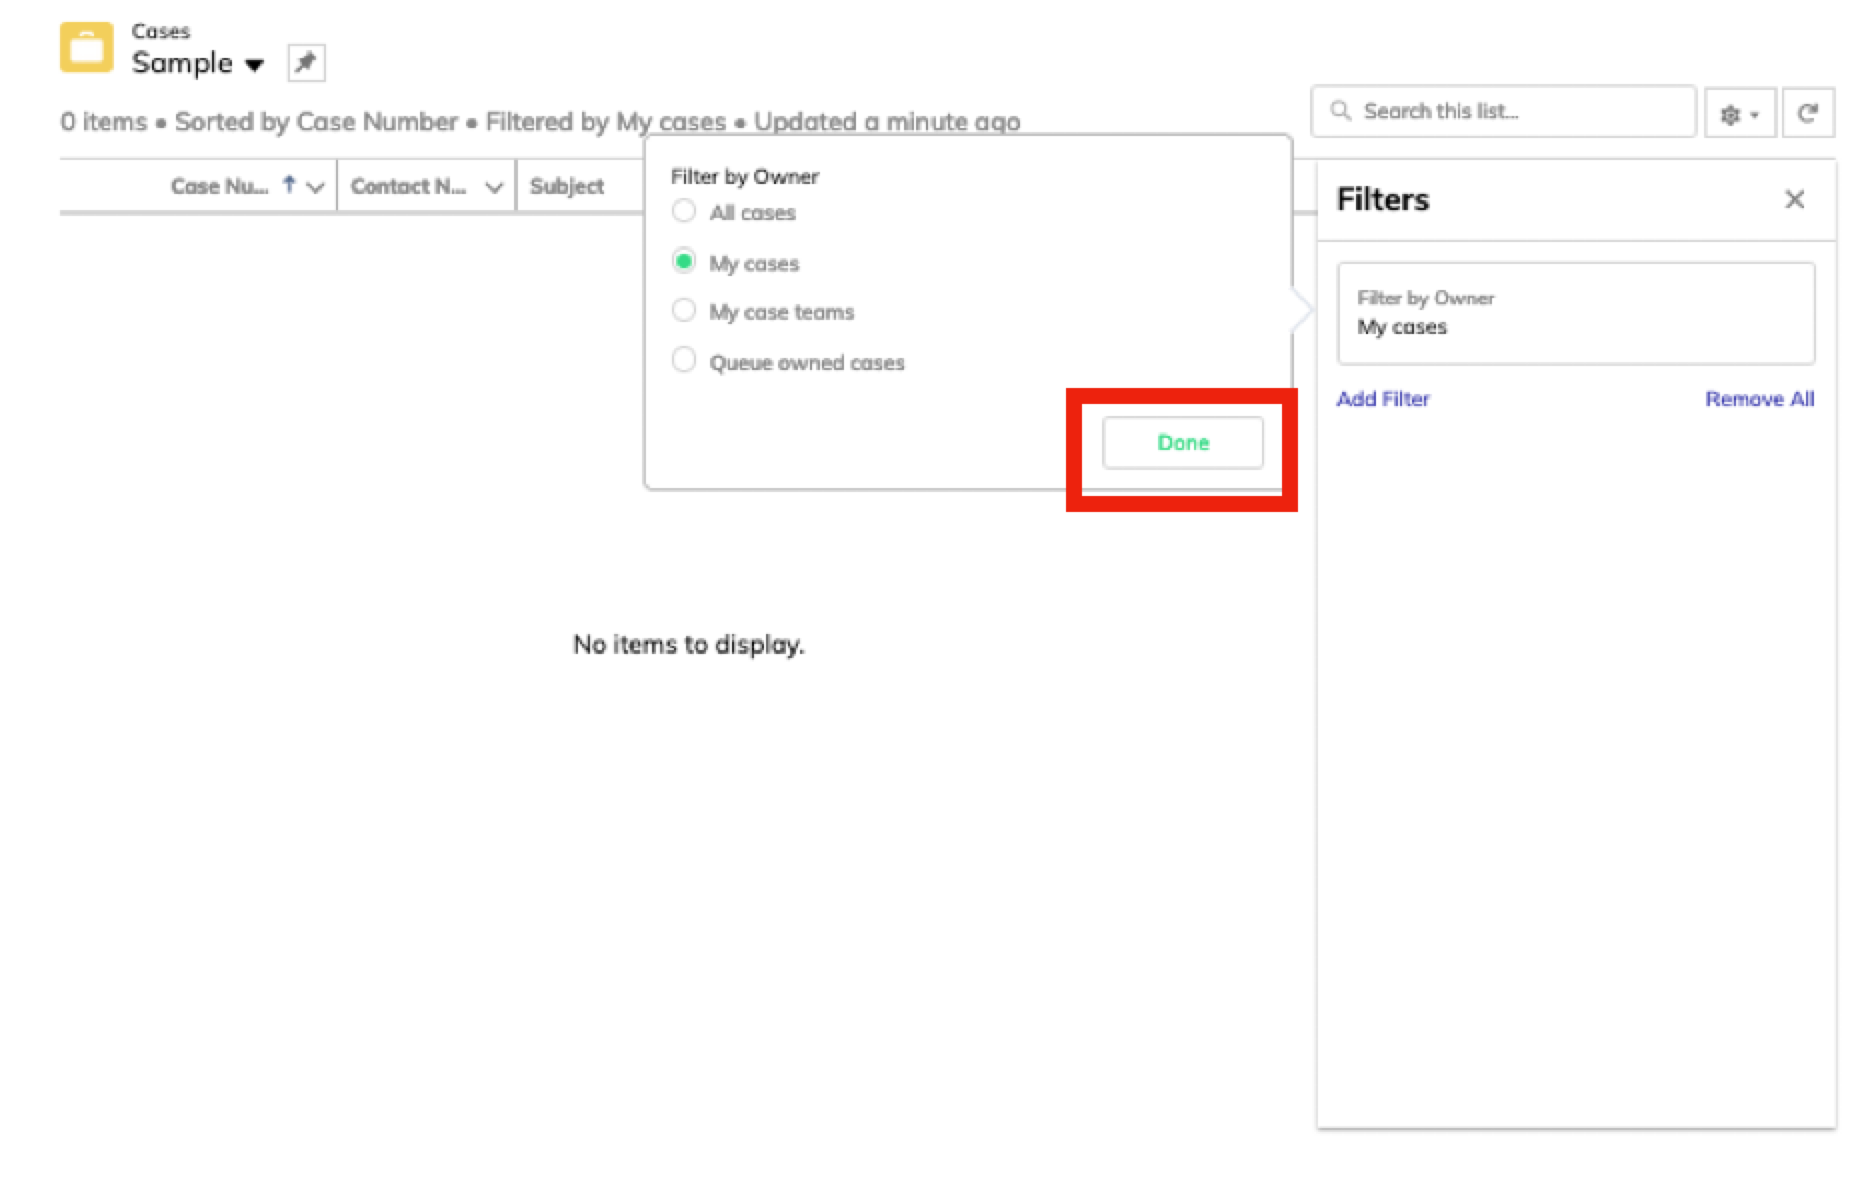
Click the filter box.
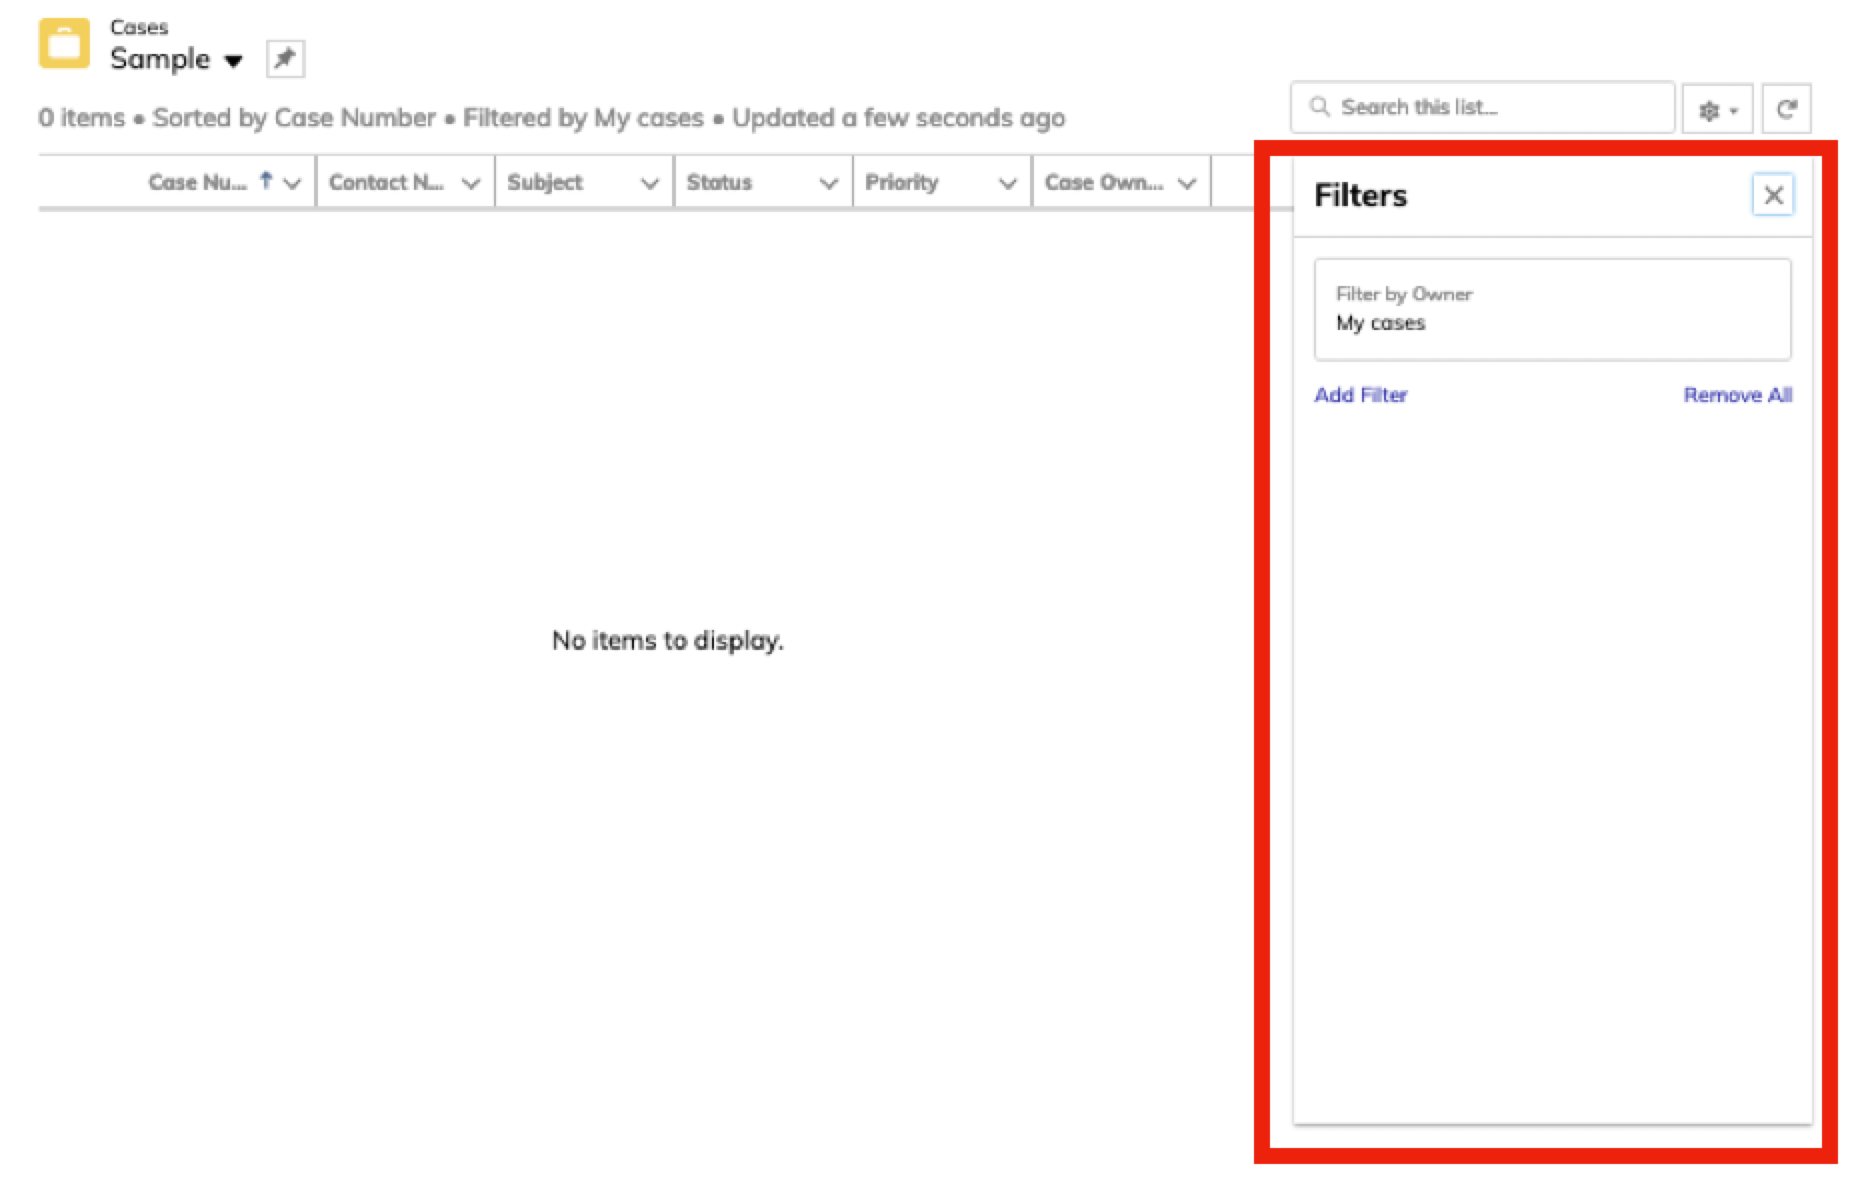
Select the appropriate option and then click Done.
To add an additional filter, click Add Filter link to open the filter selector.
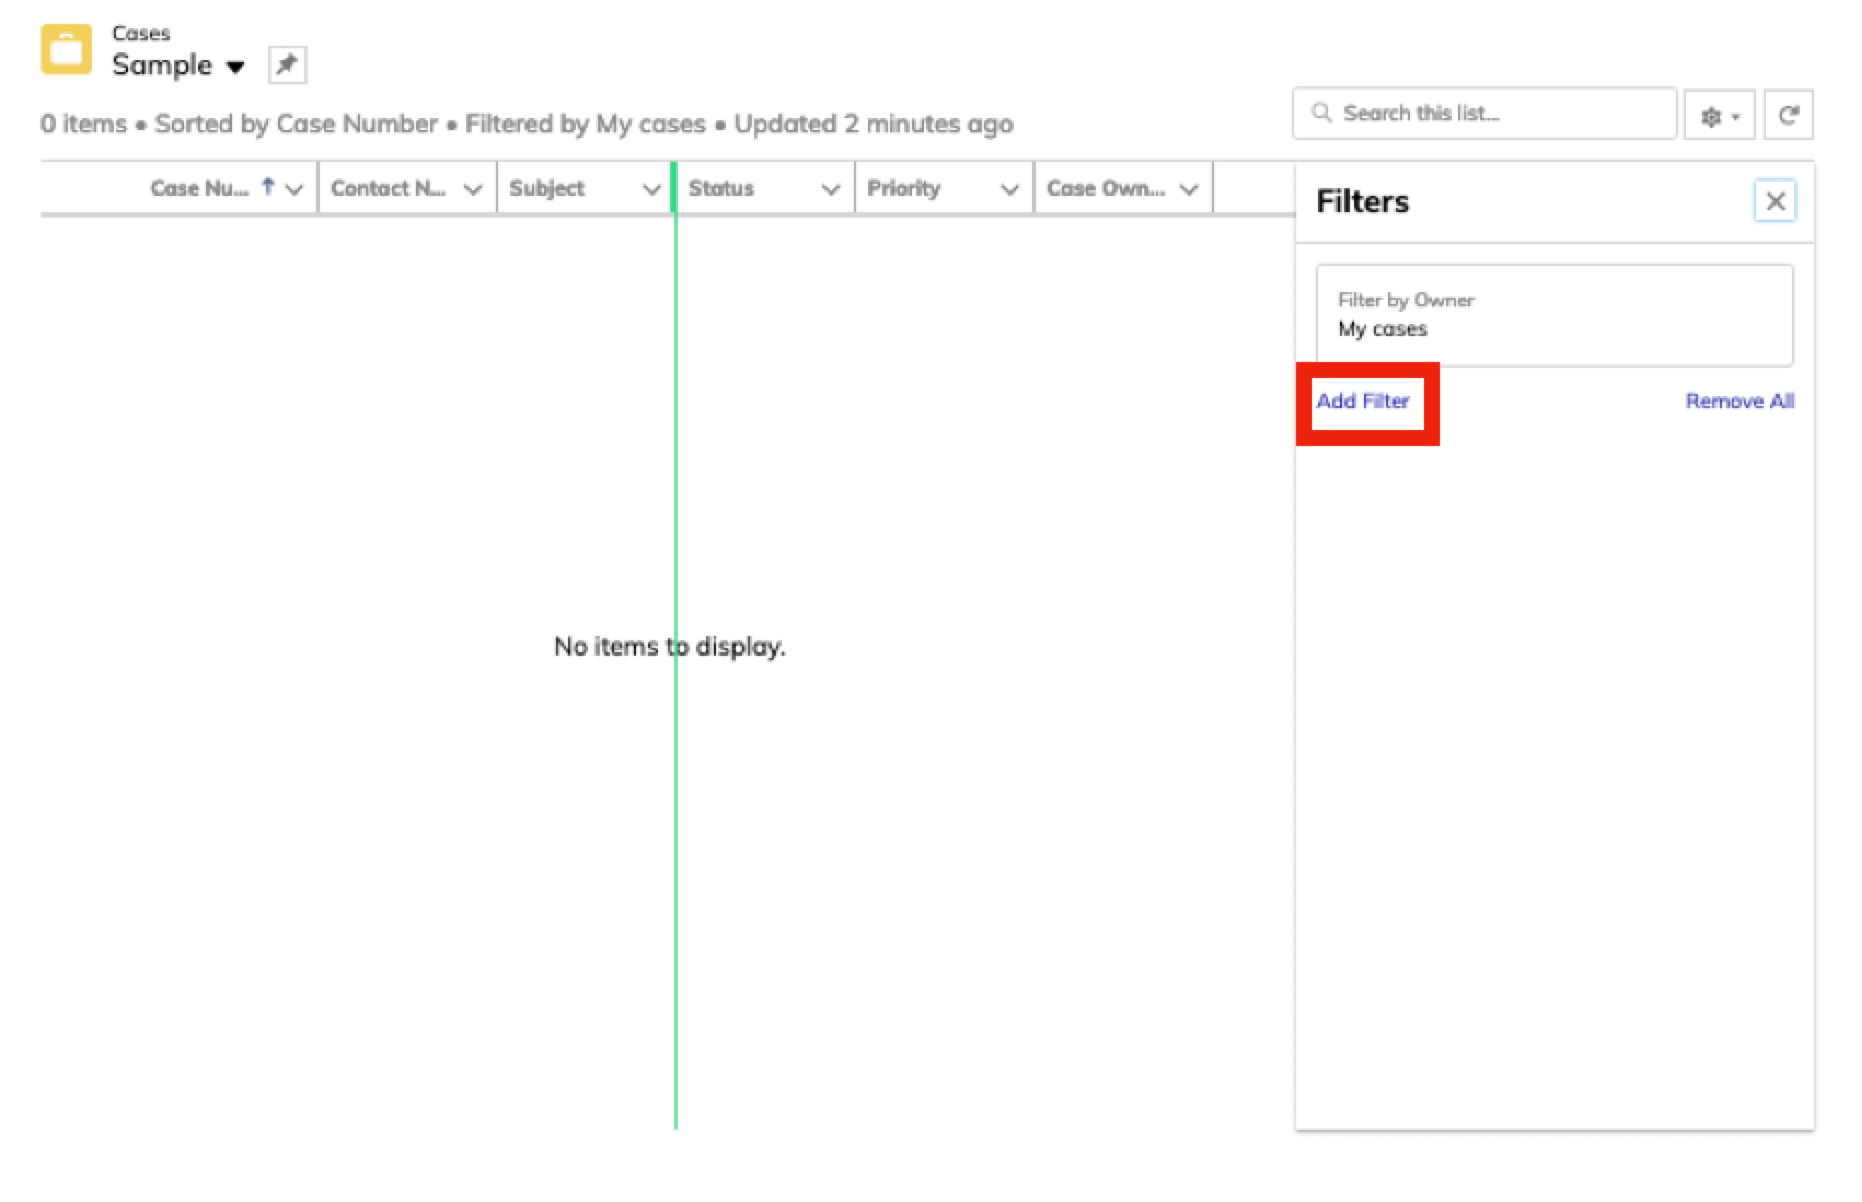
From the Field list, select a field to filter on.
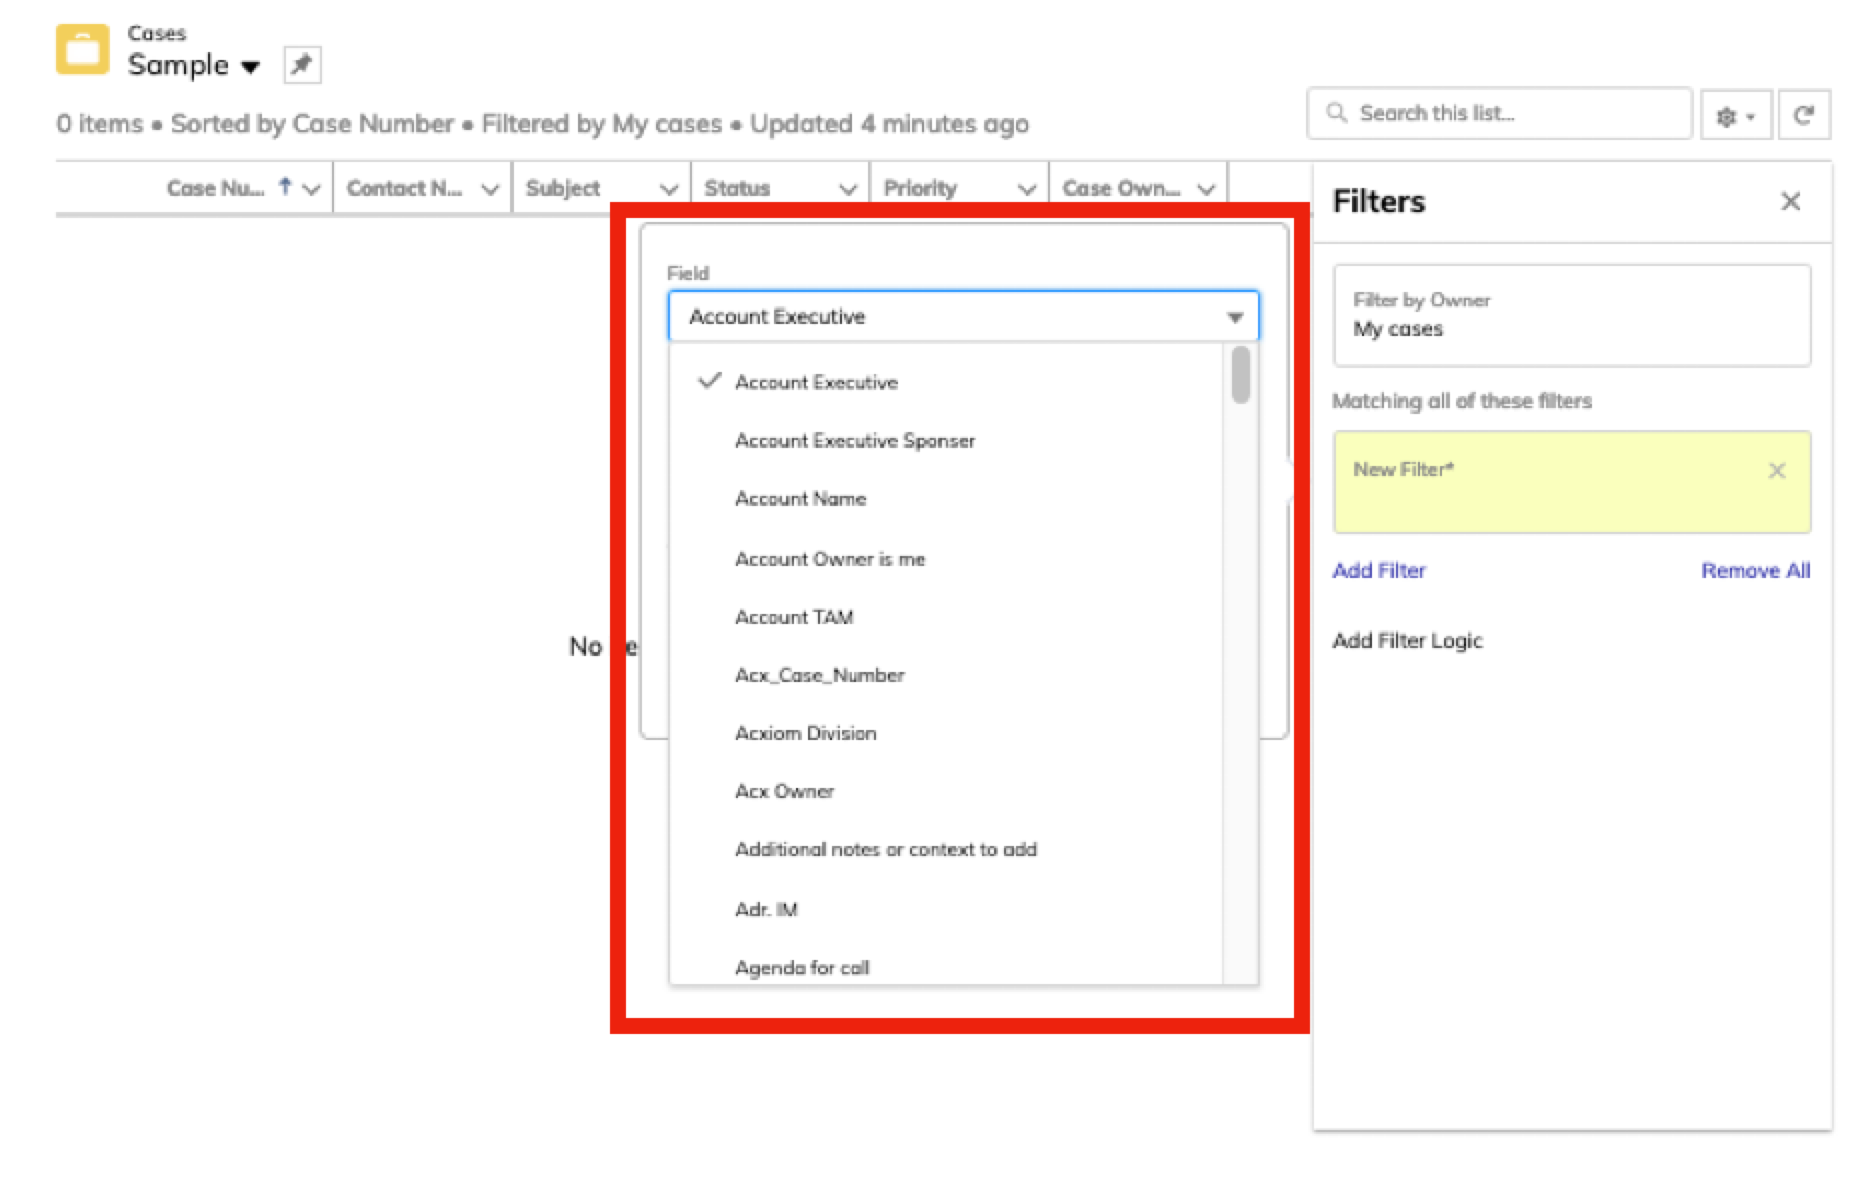
Select the appropriate operator from the Operator list.
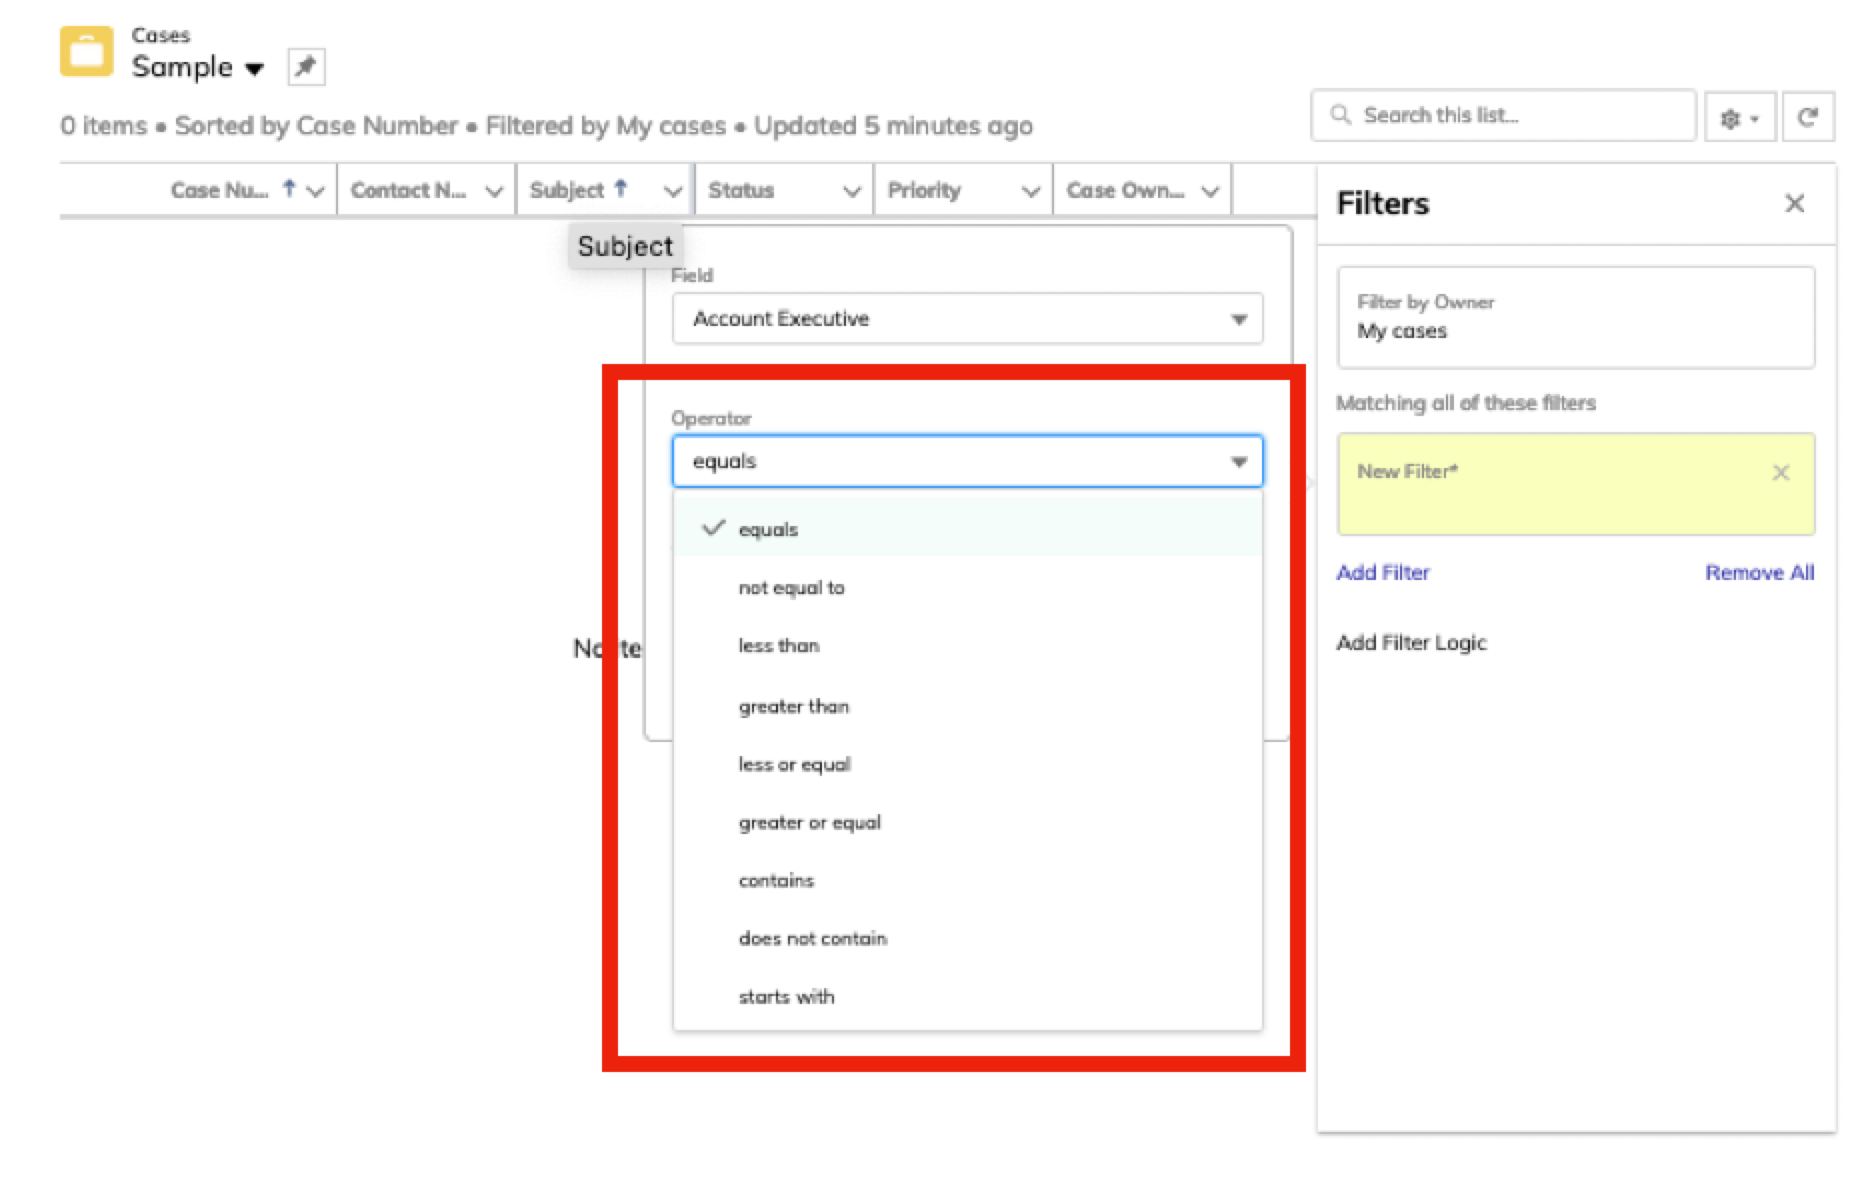
Caution
Not all operators are appropriate for all field types. For example, operators such as “less than” and “greater than” will only work with fields that contain only numeric values (such as date fields).
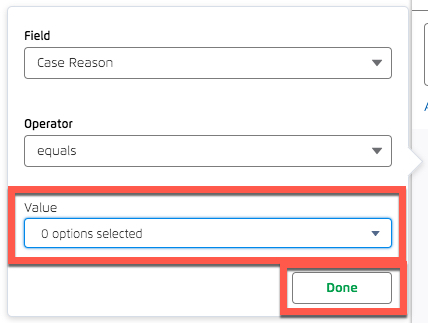
Select the desired value or values from the Values list and then click Done.
Repeat the previous steps to add any desired additional filters.
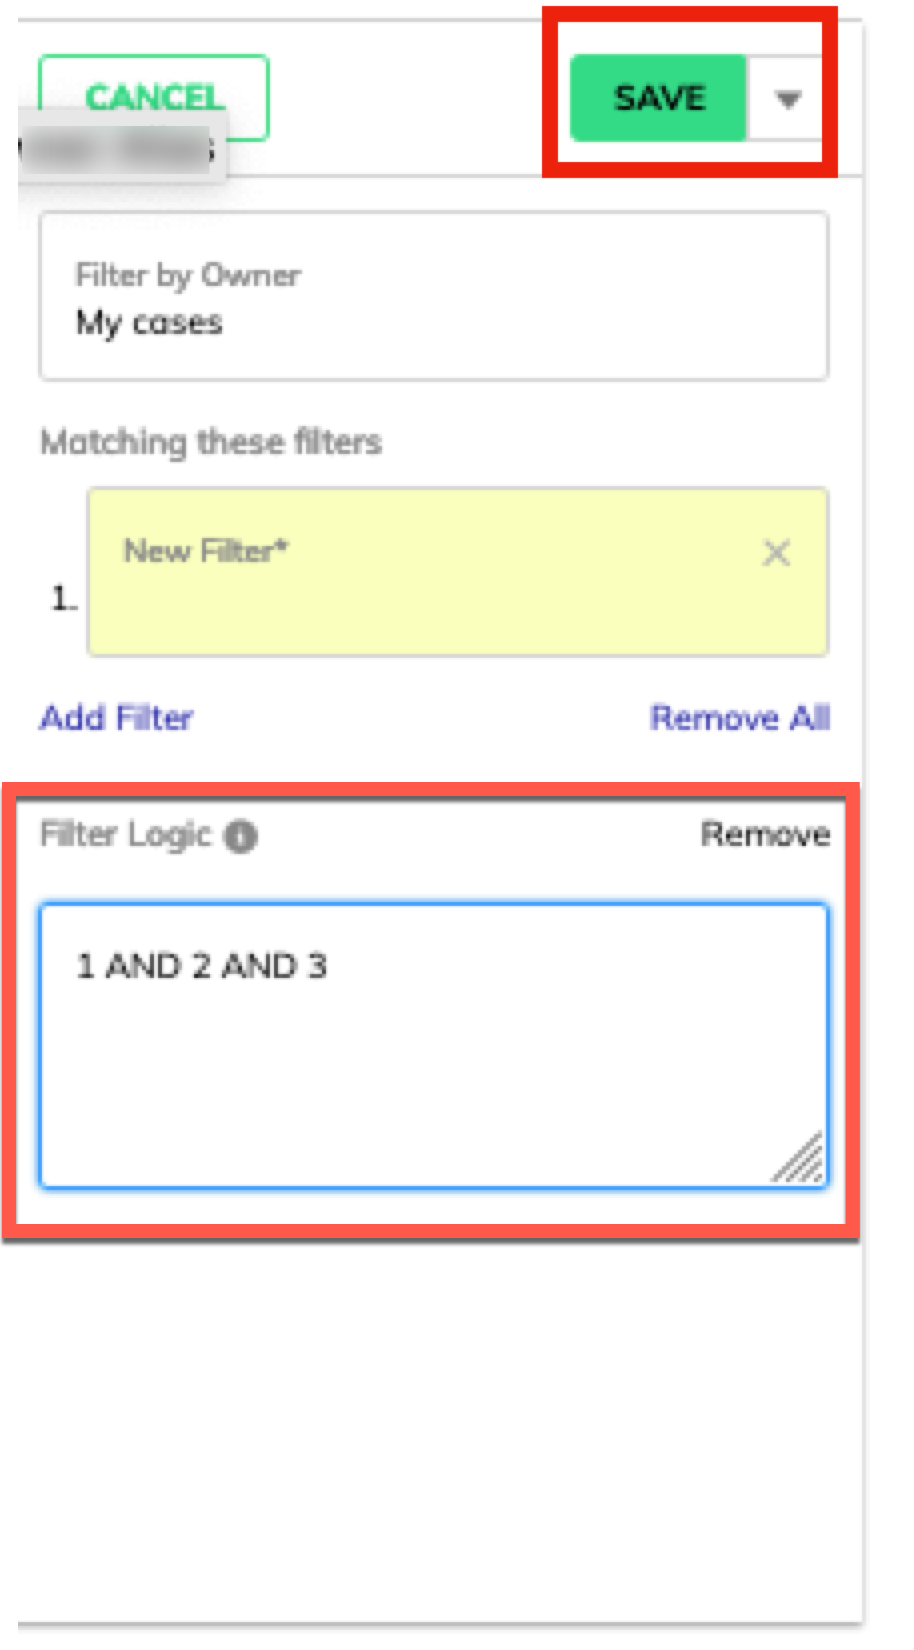
By default, the list view displays only cases that match all filters (i.e., cases that match filter 1 AND filter 2 AND filter 3). If you want the list view to display all cases that match at least a subset of the filters, use the Filter Logic feature:
Click the “Add Filter Logic” link.
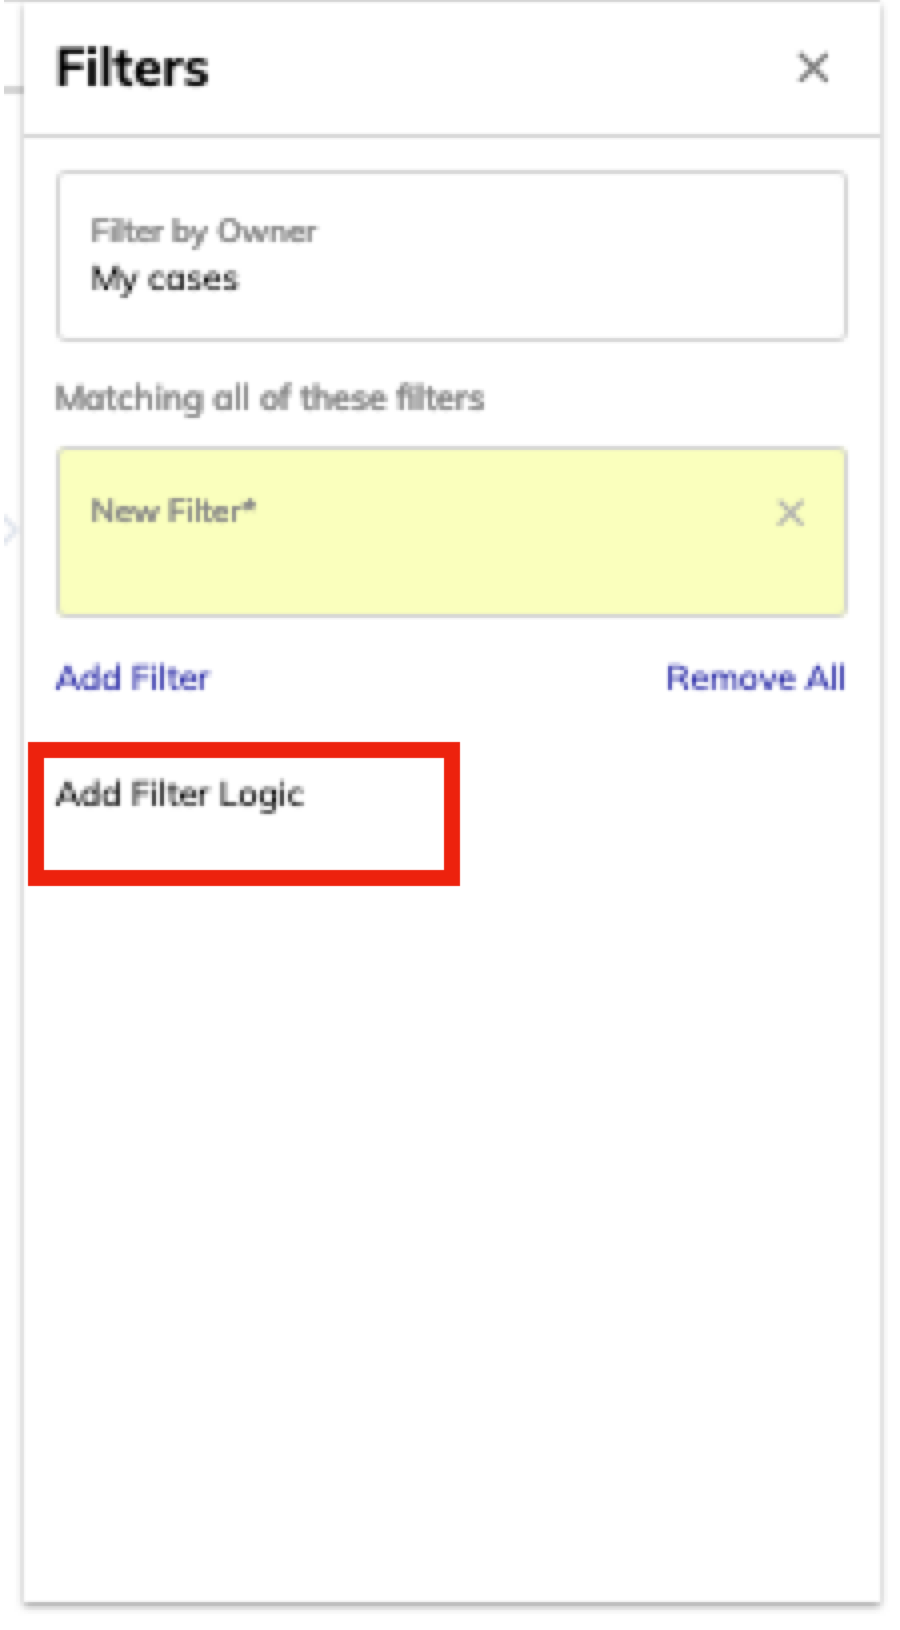
In the filter logic window, revise the desired logic operators and then click .
Once the List View has been created, click the Settings icon to perform a number of actions on the List View.
 |
To view or update a case, click on the case number (either from the "Cases in progress" list on the Support page or the Cases page).


The case information opens.
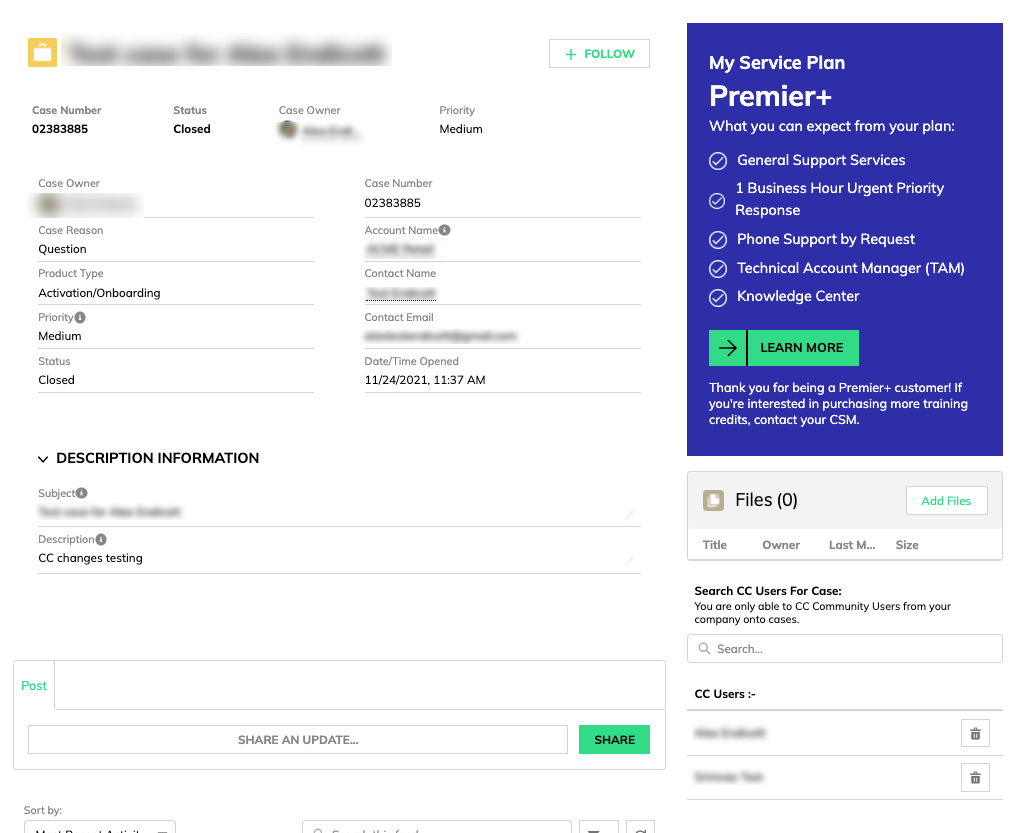
In the top section, you can see the general case details, including who owns or is managing your case ("Case owner"). if you want to add a file or screenshot to a case, scroll down and click in the "Files" section.
In the lower section, you can see message and comment history, as well as create a post. In the right-hand section, you can see the CC users or send an email to the case owner.
The case feed for each case contains all of the activity for that case, including status updates, posts, comments, and emails. To more easily find the information you need, the case feed can be sorted. You can also search the case feed for a particular word or phrase.
Note
The case feed can also be filtered, but the majority of the filter options use a "questions" criteria that is not being used in the LiveRamp Community portal. Filtering based on a "questions" criteria will not return any results. The default filter of "All Updates" is the only filter that should be used.
Sorting the Case Feed
You can sort the case feed in the following ways:
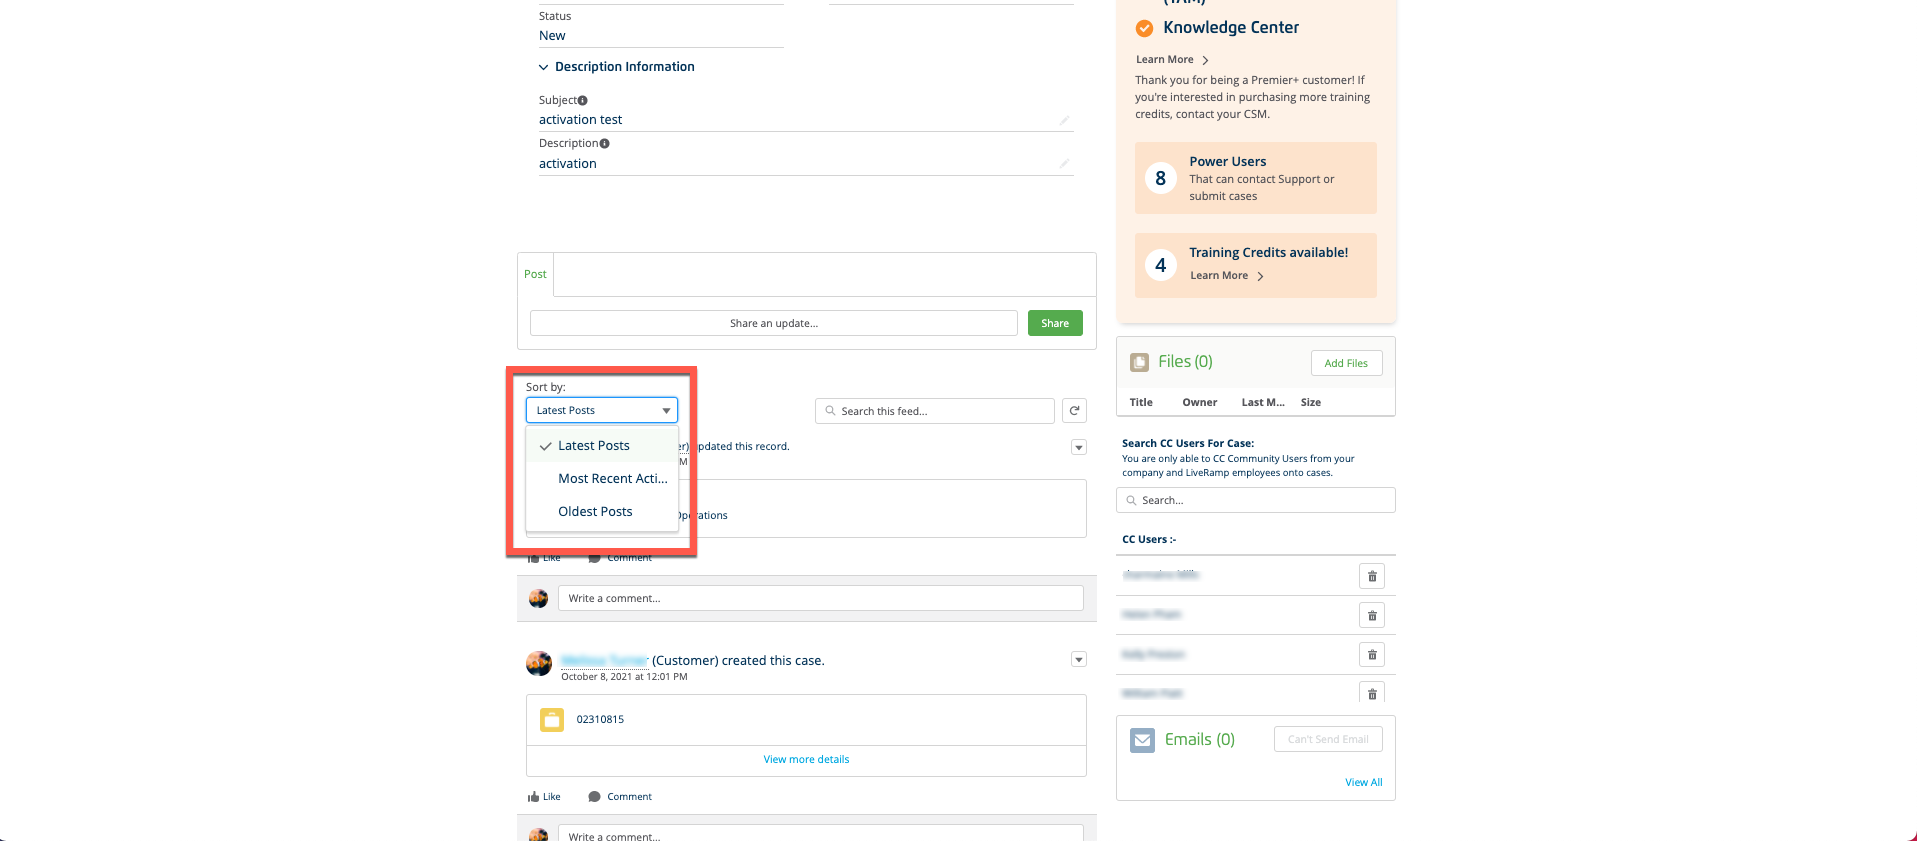
By latest posts: Sorting by "Latest Posts" will sort the case feed by posts made most recently by a user.
Note
This does not sort the posts by the most recent comment made. An older thread that contains a newer comment would still display below a newer thread.
By most recent activity: Sorting by "Most Recent Activity" will sort the case feed by the most recent update on the case.
Note
This is the default sorting option, as well as our recommended sorting option.
Updates include but are not limited to:
Posts
Comments
Change of Case Owner
Status Update
By oldest posts: Sorting by "Oldest Posts" will show you the first updates made on a case, starting with the case being created.
Searching the Case Feed
You can search the case feed for keywords, updates, and more.
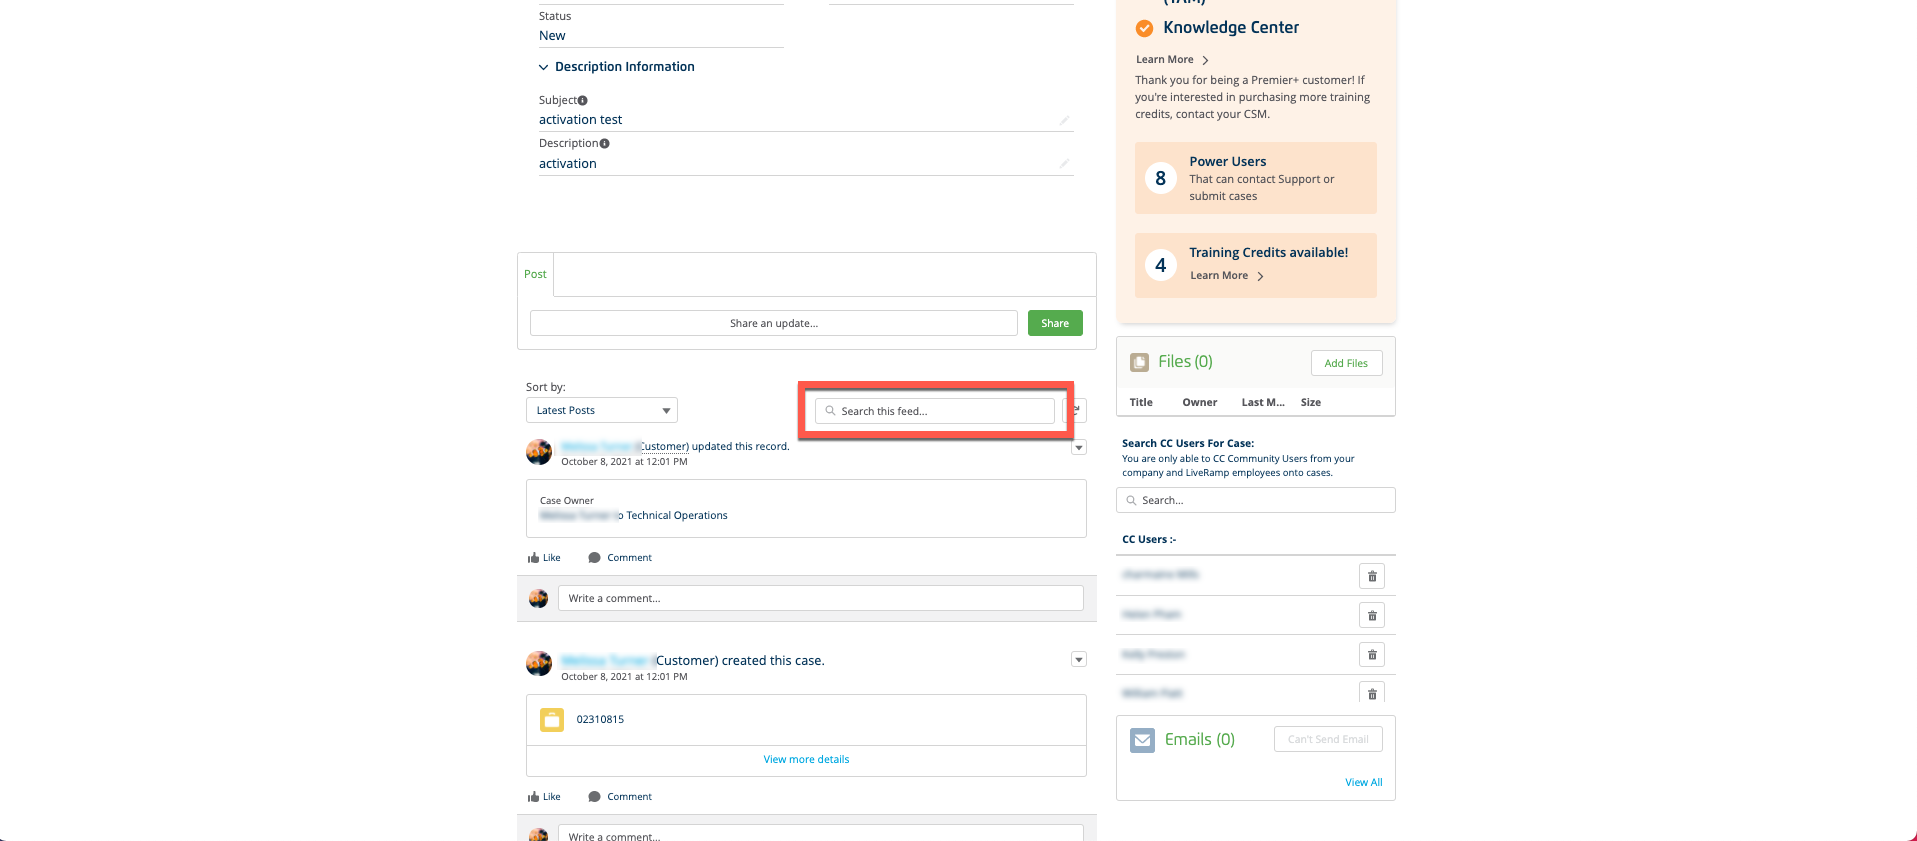
For example, if you're trying to find a post that included the name of a file you had tried to upload, you could search for that file name.
Send a Message to the Case Owner
Once you’ve created a case, you might want to send a message to the assigned LiveRamp case owner (and other team members) with updates or additional questions.
Tip
Need to include someone who doesn't have portal access? Use the Email function (rather than the Post function) to include external parties.
You can send a message to the case owner in either of two ways:
Post: Use the Post function to quickly communicate with the case owner when you only need the message to be visible to those with access to your company portal. We recommend sending messages via Post when possible as Posts are easily searchable (using "search this feed").
Email: Use the Email function within the portal to communicate with your case owner when you need to include any external parties that do not have access to your company portal.
Tip
Need to attach files or images? Sending messages via email does not allow you to attach files or images. If you need to attach files or images to your message, send the message via post.
To send a message via Post, click into the “Share an update…” field.
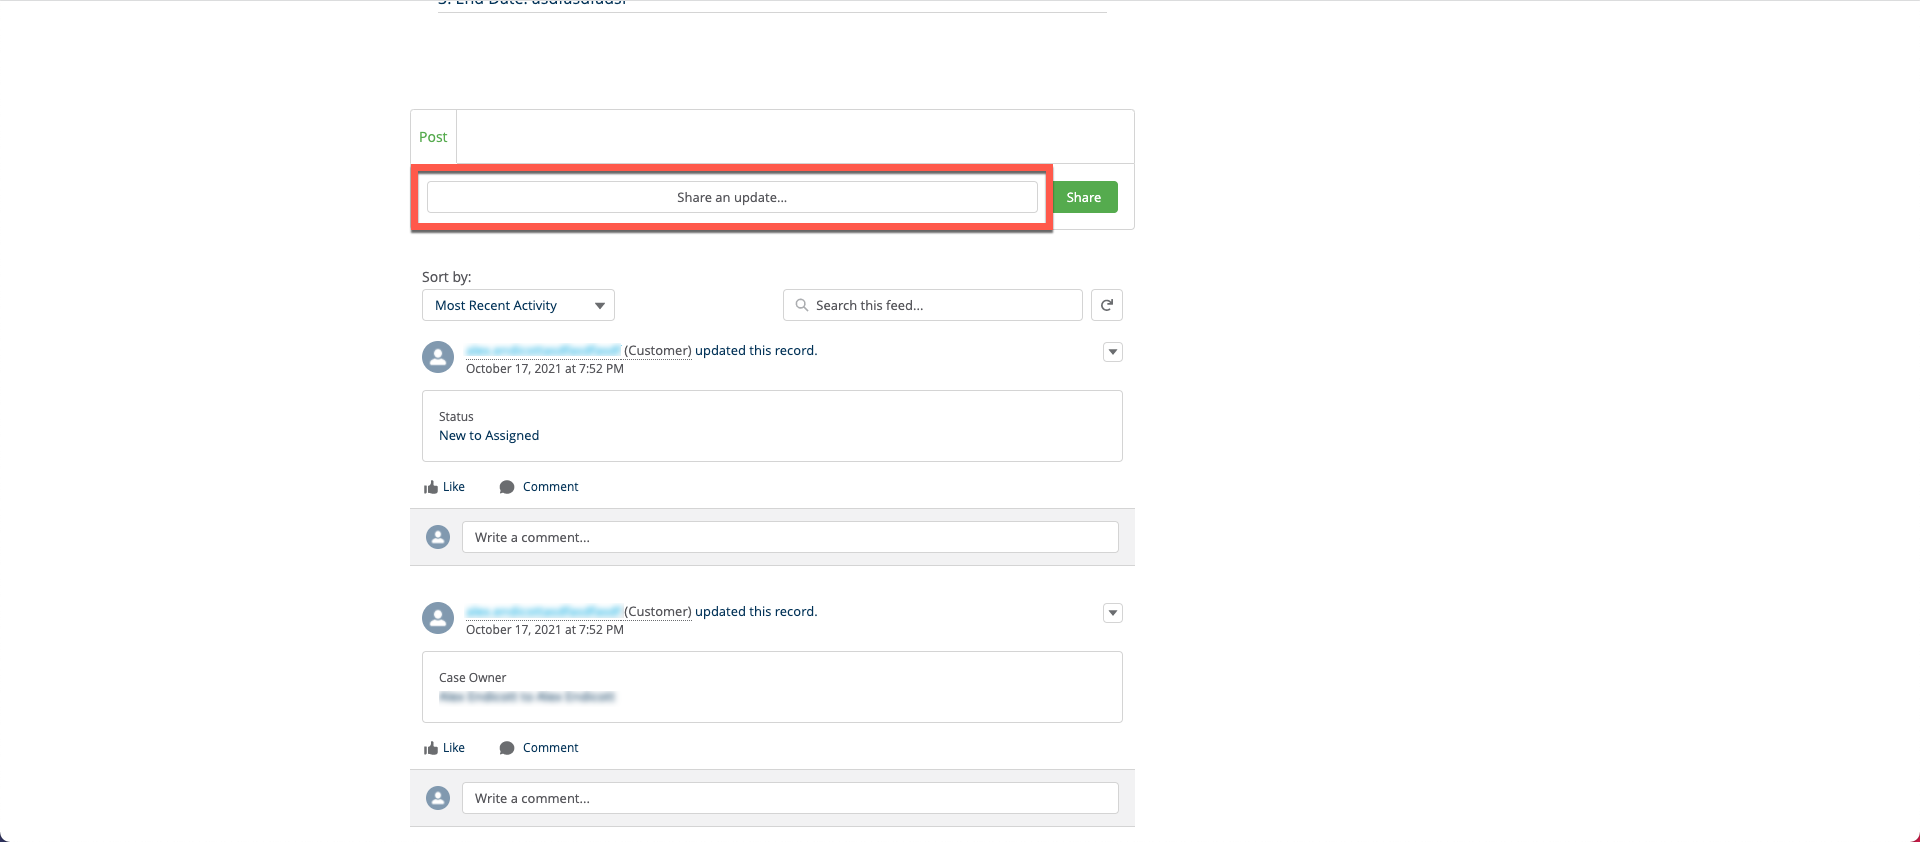
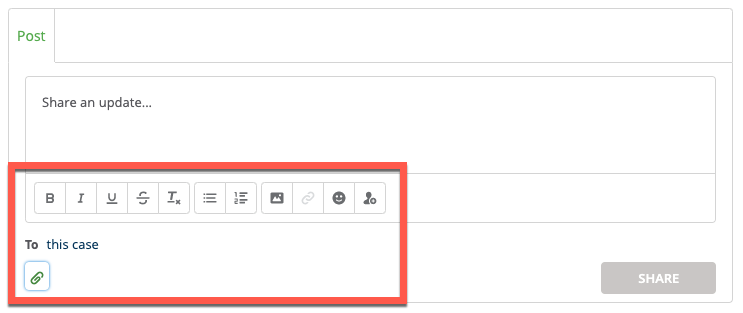
The Post window expands to give you access to options for:
Formatting
Inserting images and emoticons
Adding links to external URLs
Linking in other team members
Attaching files
Create your message.
Click Share.
Your Post message will be displayed in the feed of Posts in the case view and any internal or external team members will be notified.
Use the Email function within the portal to communicate with your case owner when you want to include any parties that do not have access to your company portal or when you prefer to communicate via an email thread that doesn’t require you to log in to the Community portal.
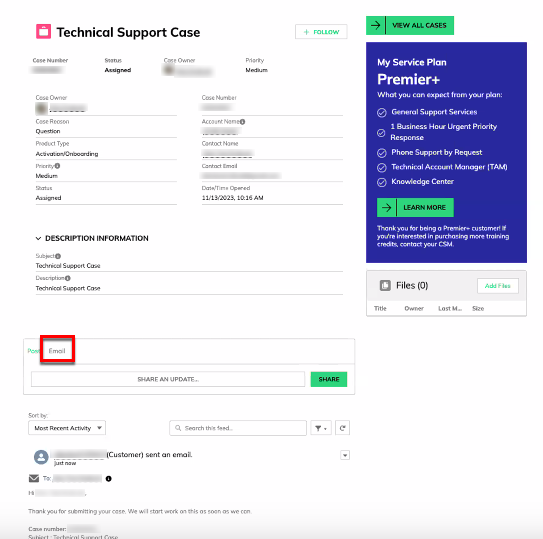
Once your case has been created, the option to send messages to the case owner via email is enabled.
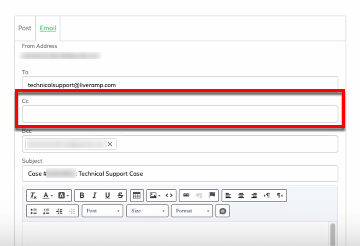
From the tabs at the top of the communication thread, select Email.
To include internal or external team members on the email thread, enter their email address in the CC field (separate multiple email addresses with commas).
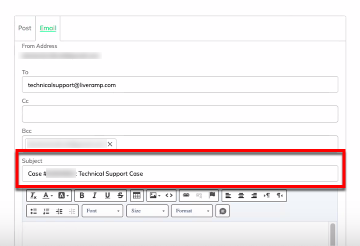
Accept the default subject line or enter a short subject that includes the case number in the Subject field.
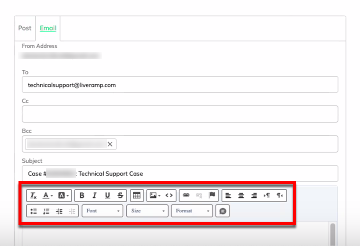
Enter your message in the Body field (formatting options are available via the buttons at the top of the field).
Click Send.
Share a Case with a Partner's Users
For accounts that have been enabled with hierarchical sharing (such as agency accounts, where the main company account is linked to a partner’s account), you can share a case with a partner’s users who would not otherwise have access to that case.
Once the case has been shared with those users, they have access to view the case, comment, and send messages.
To share a case:
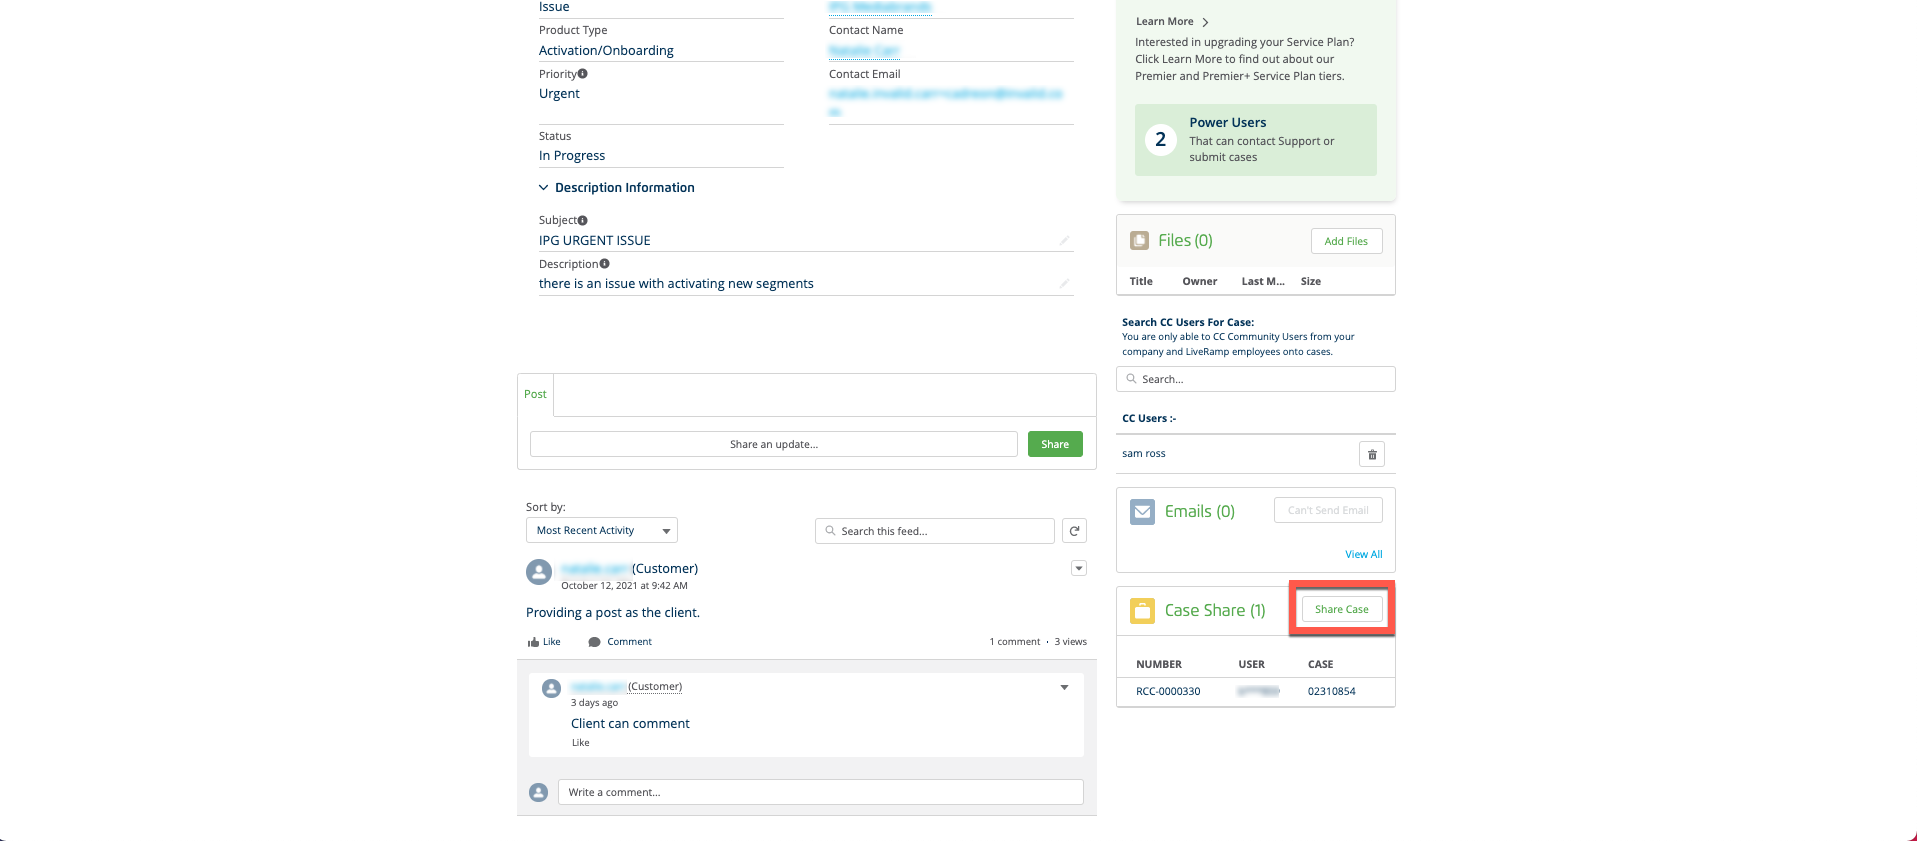
From within the LiveRamp Community portal, open the case you want to share.
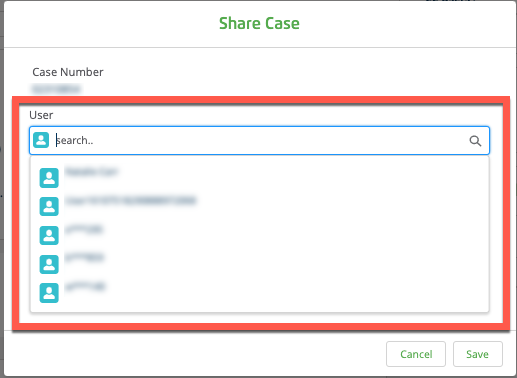
In the Case Share pane, click Share Case.
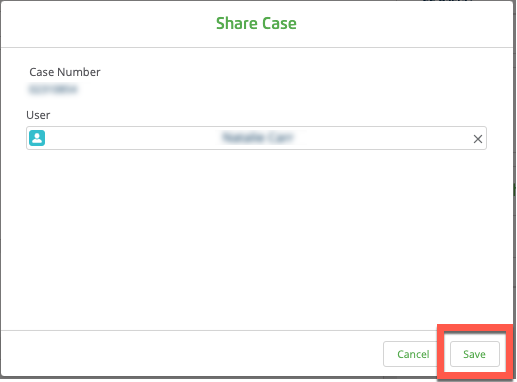
In the Share Case dialog, enter the name of the partner user you want to share the case with or select the partner user from the dropdown list.
Click Save.
Repeat the previous steps to add any additional partner users.
The list of the partner users that the case has been shared with appears in the Case Share pane.
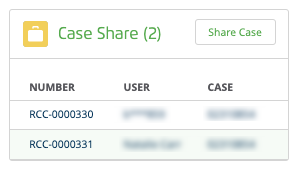
These users are now able to view the case, as well as comment and send messages.
Use Quick Cases
Quick cases allow you to use a template to quickly create support cases for certain issues. Quick cases come prepopulated with the Priority, Product Type, Case Reason, and Subject fields filled in for you. The description field contains a template to prompt you to include the required information for the case.
See the sections below for a list of the quick cases available for different LiveRamp product types, including links to those quick cases.
Activation Quick Cases
The following quick cases are available for LiveRamp's Activation product using Connect:
Note
Activation was formerly known as "Onboarding".
Set Up Audience for First File Upload: Use if you've created a new Activation in Connect and need to have the first file ingested.
Set Up S3 Bucket for File Uploads: Use if you are looking to begin uploading files to LiveRamp through either an external SFTP, GCS bucket, or Amazon Web Service (AWS) S3 bucket.
Troubleshooting File Upload Issue: Use to have the Support team investigate Activation workflow files that have failed ingestion, are delayed, or have been uploaded but aren't appearing in the right .
Enable Match Reports: Use to enable and run Match Reports for a specific and/or file.
High / Low Match Rate Investigation: Use this option if you are seeing match rates that are higher/lower than expected.
Troubleshoot Segment Distribution: Use this option after you've performed troubleshooting for a segment delivery issue but still need help from the Support team to investigate potential issues or delays.
Configure New Client-Side Tag (Pixel): Use if you are in need of having LiveRamp configure a new Client-Side Tag (aka CST or eCST) for an Activation worklow.
New Nexxen IFO Destination Account: Use to have a new Nexxen IFO destination account set up.
New Partner / Reseller / Child Account Set Up: Use to set up Connect reseller / child account and permissions (i.e. Match Reports, Data Marketplace Buy / Sell access, etc.)
Measurement Enablement Quick Cases
The following quick cases are available for LiveRamp's Measurement Enablement product:
Note
Measurement Enablement was formerly known as "File-Based Recognition".
Set Up Audience for First File Upload: Use if you have created a new Measurement Enablement in Connect and need to have the first file ingested.
Set Up a New Measurement Enablement Workflow: Set up new Measurement Enablement feed to pass files to/from LiveRamp and associated location (SFTP, S3).
Troubleshooting File Upload Issue: Use to investigate Measurement Enablement workflow files that have failed ingestion, are delayed, or have been uploaded but are not appearing in the right .
High / Low Match Rate Investigation: Use this option if you are seeing recognition rates that are higher or lower than expected.
Troubleshoot File Delivery / Output for Existing Measurement Enablement Workflow: Use if you already have an existing Measurement Enablement workflow set up but you are seeing issues with receiving files.
Set Up Exposure Logs: Use to have an Exposure Log workflow set up. (i.e. Google DCM, Verizon Media/Yahoo/Trade Desk).
Configure New Client-Side Tag (Pixel): Use if you are in need of having LiveRamp configure a new Client-Side Tag (aka CST or eCST) for measurement.
Leave Support Feedback
We welcome your feedback so we can improve your support experience.
Once your support case has been resolved and closed, you can leave feedback on the case. All feedback methods allow you to rate your case on a scale of 1-5 stars:
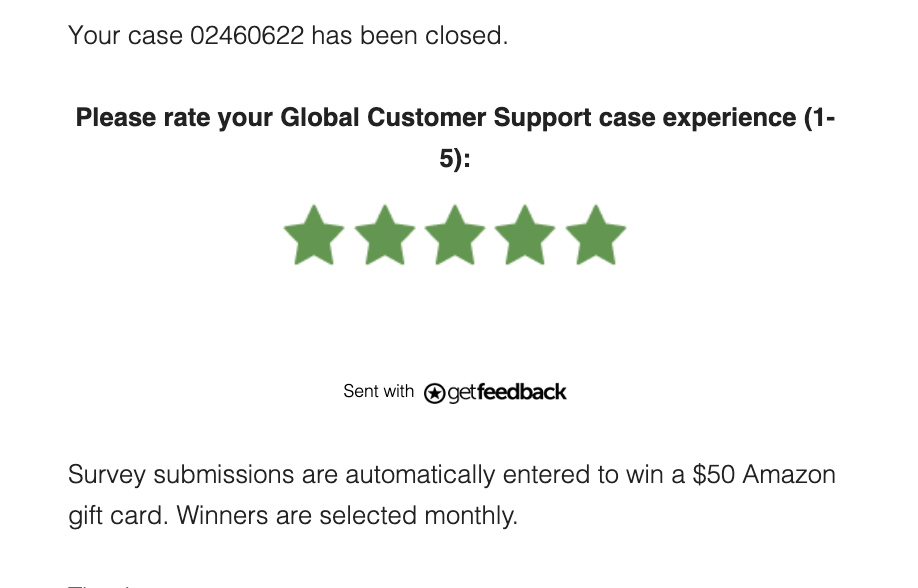
Depending on the survey method, you'll either be given the option to provide detailed feedback in the first screen or once you rate the case:
All feedback submissions are entered into a monthly drawing for a $50 Amazon gift card.
You can leave feedback on a support case using a number of methods:
Via the feedback email you'll receive once the case has been closed
Via the dialog prompt you'll see in the Community portal once the case has been closed
Via the button that's displayed when viewing your cases in progress