View Segment Details
You can view segment details in the details panel or full details page of the Segments page. The details panel view is useful if you want to quickly view details from one segment to the next in the Segments table. The full details page is useful to view more details of the segment, including the Segment Rules and Overlap tabs.
There are two ways you can view segment details on the Segments page:
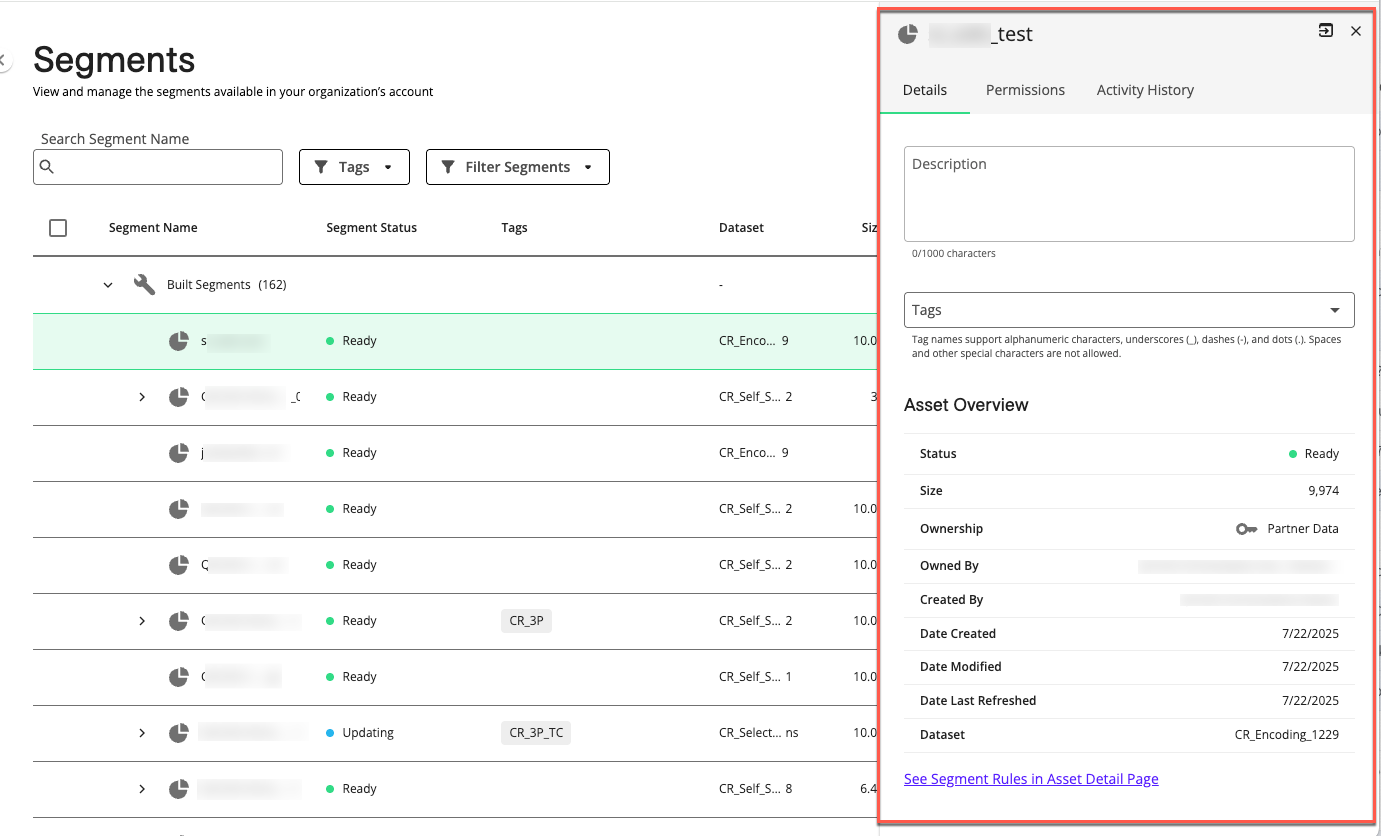
Details Panel: Click on the row of a segment to display the details panel and view the details, permissions, and activity history tabs.
Full Details Page: Double-click on the row of a segment to open the details page and view (depending on the kind of segment it is) the details, segment rules, overlap, permissions, and activity history tabs.
Tip
You can also open the details page by:
Select the More Options menu (
 ) of a segment row and click .
Select the check box to the left of a segment row and click at the bottom-right of the Segments page.
The following tabs display segment details on the details panel and full details page.
Note
The details panel view does not include the Segment Rules and Overlap tabs and some details available in the full details page (noted below).
Details
The Details tab displays the following information about the segment:
Configuration
Description: The description of the segment.
Tags: A dropdown list of available segment tags. Use the check boxes to add or remove tags on the segment. To add a new tag, enter the name and click . Tag names support alphanumeric characters, underscores (_), dashes (-), and dots (.). Spaces and other special characters are not allowed.
Asset Overview
Status: The status of the segment. See “Segment Statuses”.
Size: The size of the segment in maintained RampIDs.
Ownership: The ownership of the dataset:
 My Data (first-party data): Data you've brought into LiveRamp (including data you've collected yourself and data you've purchased outside of LiveRamp)
 Partner Data (second-party data): Data that's been permissioned to you by a LiveRamp partner or that originated in Clean Room
 Purchased Data (third-party data): Data that you've purchased in the LiveRamp Data Marketplace
Owned By: The name of the organization that owns the segment.
Created By: The name of the organization that created the segment.
Date Created: The date when the segment was created.
Date Modified: The date when the segment was modified.
Date Last Refreshed: The date the segment was last refreshed.
Dataset: The name of the dataset the segment is from.
Segment Rules
The Segment Rules tab (only available in the details page) displays the segment rules. For more information, see “Build a Segment”.
Note
Currently, only first-party and Clean Room segments can be edited in the Segment Rules tab.
For derived segments (segments built in Connect with Asset Management 1.0 and displayed in the “
 Built Segments” system folder in Connect with Asset Management 2.0), the following guidelines apply:
Segment rules can be viewed but currently cannot be edited.
Segment rules that use a segment along with the operator “Is Present” or “Any Value Except” are not displayed.
To edit segment rules in the Segment Rules tab, see “Build a Segment with the Segment Builder”
Overlap
The Overlap tab lets you overlap the data assets in your account to see the percentage and number of members those assets have in common. For more information, see “Overlap Data Assets”.
Permissions
The Permissions tab displays the following information about the segment:
Partner: The partner who owns the segment.
Clean Room: The name of the clean room the segment came from.
Clean Room End Date: The end date of the permission to use the segment.
Collaboration Rules
Combine: The allowed data combinations in this clean room.
Activate: Whether you can activate this data and to which destinations.
Additional Activation Fee: Whether additional activation fees apply when activating this data.
Activity History
The Activity History tab displays historical logs of actions taken on the asset, and lists activity date and time, the type of activity, and any details of the activity. If a child asset has been created or updated, click the hyperlink to go to the Details page of the child asset.
Select the Hide Data Refreshes toggle to hide (default) or display data refresh events in the Activity History table. You can use the Filter drop-down to view and filter the following information:
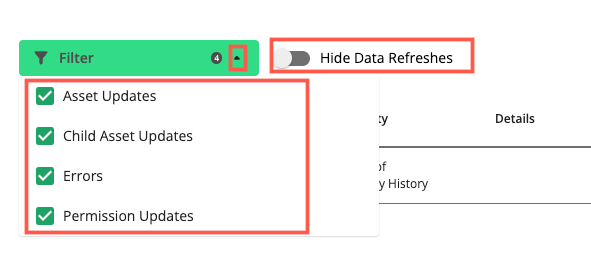
Asset Updates: e.g., asset creation
Child Asset Updates: e.g., child asset creation
Errors: e.g., asset marked invalid because underlying data was deleted
Permission Updates: e.g., permission changes