The Google Campaign Manager 360 Offline Conversions API Program for Offline Conversions
The Google Campaign Manager 360 Offline Conversions API Program for Offline Conversions enables Google Display & Video 360 customers, Search Ads 360, and Campaign Manager 360 customers to understand the ROI of their advertising campaigns across online and offline purchase channels in one place. This enables closed-loop measurement of transactions tied to digital ad exposure to provide marketers a full understanding of the customer journey.
This attribution analysis is done by Google and attributed conversions are available in Google Display & Video 360, Search Ads 360, and Campaign Manager 360 reporting.
Note
LiveRamp's integration only covers offline conversions. Tag-based online conversion attribution must be implemented directly with Google.
This program utilizes the universal file, which can be used for multiple programs. For more information, see "Using a Universal File for Multiple Conversions API Programs".
The Google Campaign Manager 360 Offline Conversions API Program for Offline Conversions was formerly known as "the Google Campaign Manager Offline Conversions API Attribution Program".
Program Benefits
Utilizing info from the Campaign Manager 360 Offline Conversions API, advertisers can:
Receive granular attribution by tying offline, in-store sales to a click, device, or user IDs.
Further refine their ad campaign to optimize bids (manual or auto) to drive performance across omni channel
Exclude or remarket to existing customers
Provide personalized creative experiences
Overview of Steps Involved
The following steps need to be performed to enable the attribution analysis in Google Campaign Manager 360:
You authorize LiveRamp to send data to your Campaign Manager 360 account.
You grant LiveRamp user access to insert (upload) offline conversions to your account.
If necessary, set up your Floodlight activities.
You send the generated IDs to LiveRamp.
You contact LiveRamp to set up additional audiences in Connect for each additional Floodlight activity, if necessary.
You send LiveRamp a sample conversion data file that follows the guidelines listed below.
You activate the campaign.
You send conversion data from the last 28 days to LiveRamp.
LiveRamp matches the data and delivers your data to your Google Campaign Manager 360 account.
You view the attribution analysis in Google Campaign Manager 360, DV360, and Search Ads 360.
See the appropriate sections below for more information on performing these steps.
Authorize LiveRamp to Send Data
Contact your DV360 Account Manager to inform them you wish to enable the LiveRamp + DV360 integration. Once you receive an email from your DV360 Account Manager asking for confirmation to allow LiveRamp to send data into your account, provide confirmation.
Grant LiveRamp User Access in Campaign Manager 360
This step will grant LiveRamp access to insert offline conversion data into your Campaign Manager 360 account. The permission given will only allow LiveRamp to insert offline conversions via the API.
Tip
Save the ID: Once you’ve created a new user profile for LiveRamp, record the LiveRamp Access Profile ID so you can send it to us in a later step.
To grant access in Campaign Manager 360:
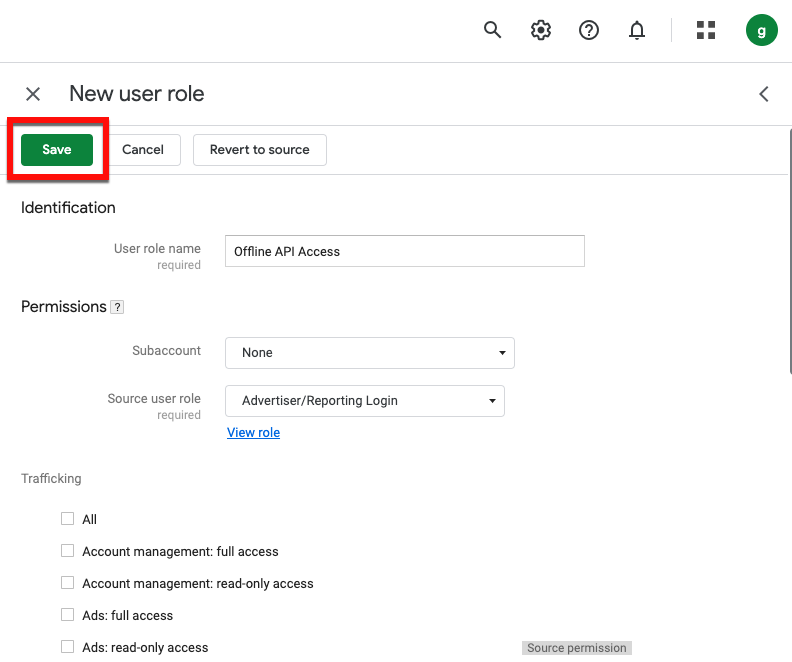
Create a new user role:
From the navigation menu in Campaign Manager 360, select and then select .
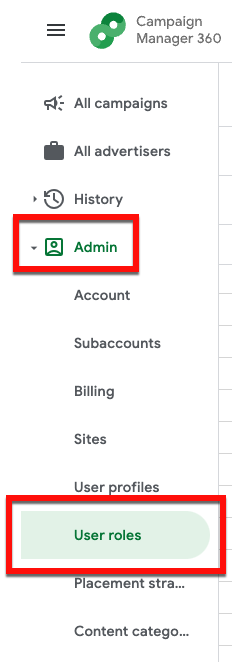
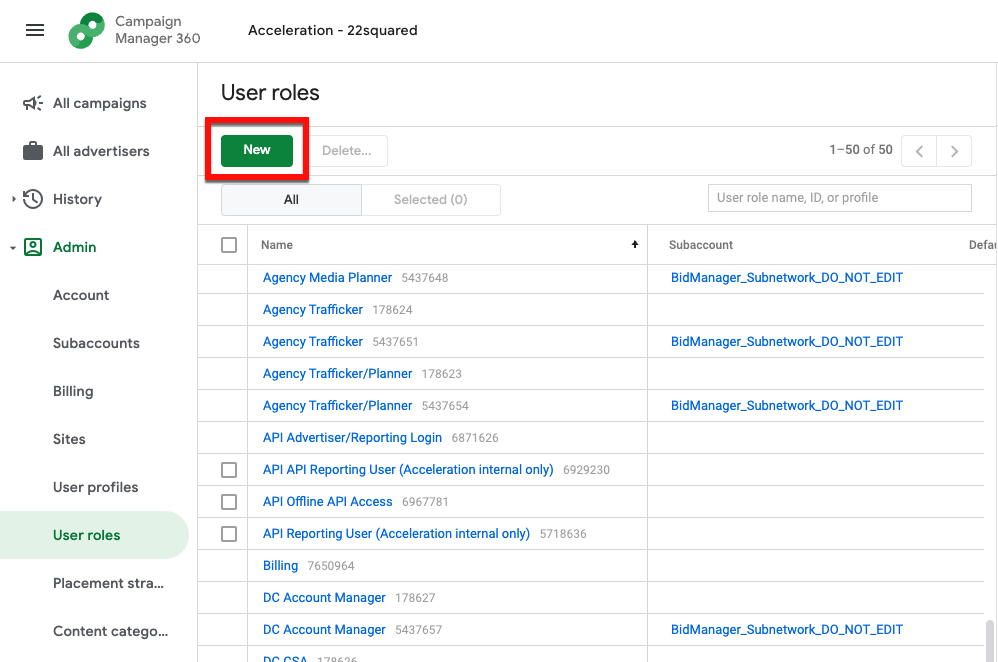
From the User Roles page, click .
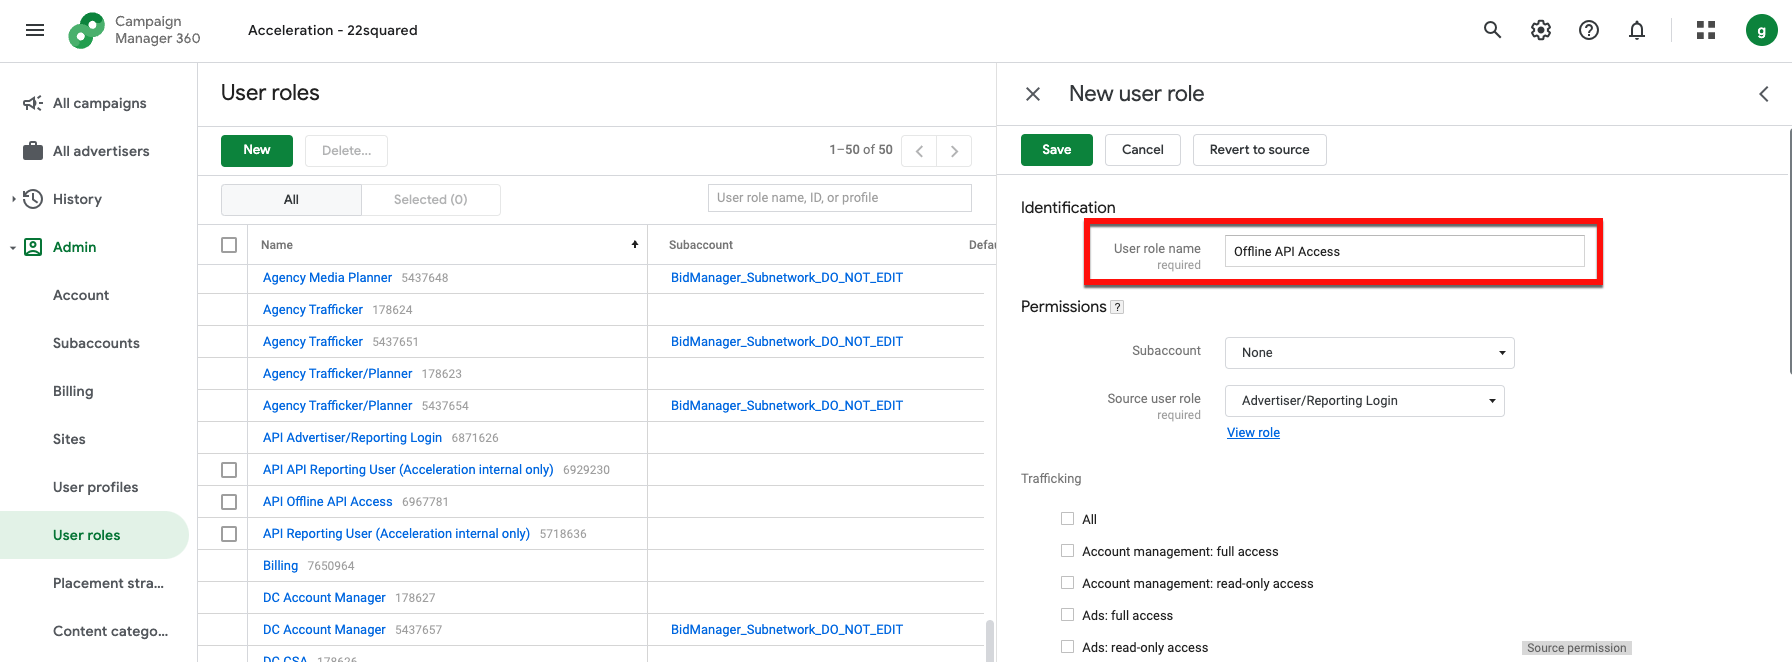
In the “User role name” field, enter “Offline API Access”.
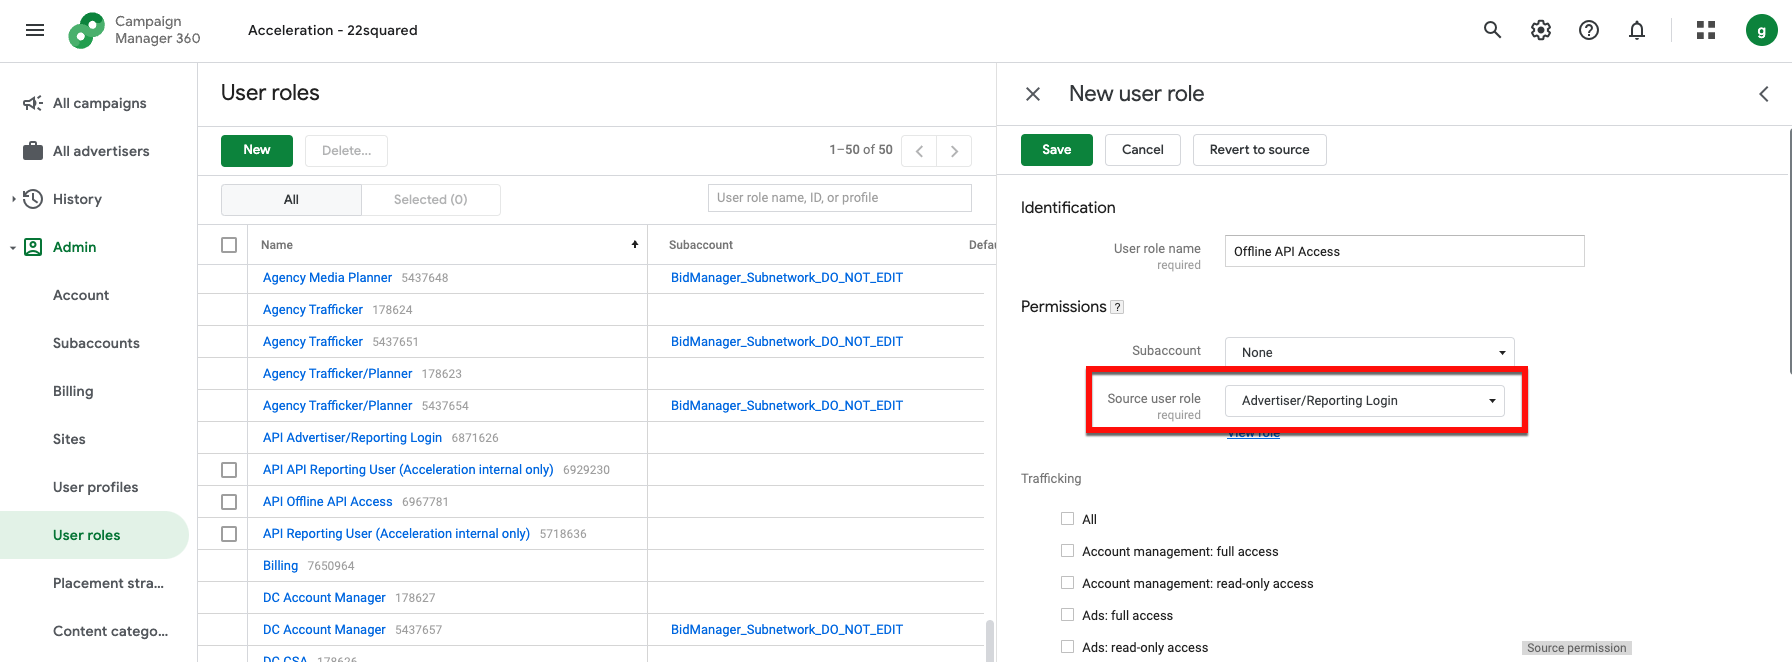
In the “Source user role” field, select “Advertiser/Reporting Login”.
In the Trafficking section, check the box for "Floodlight: full access".
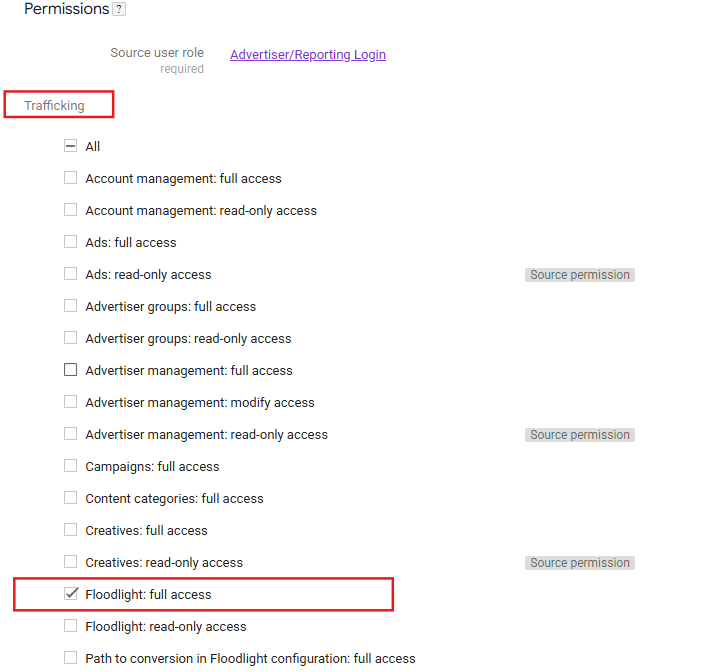
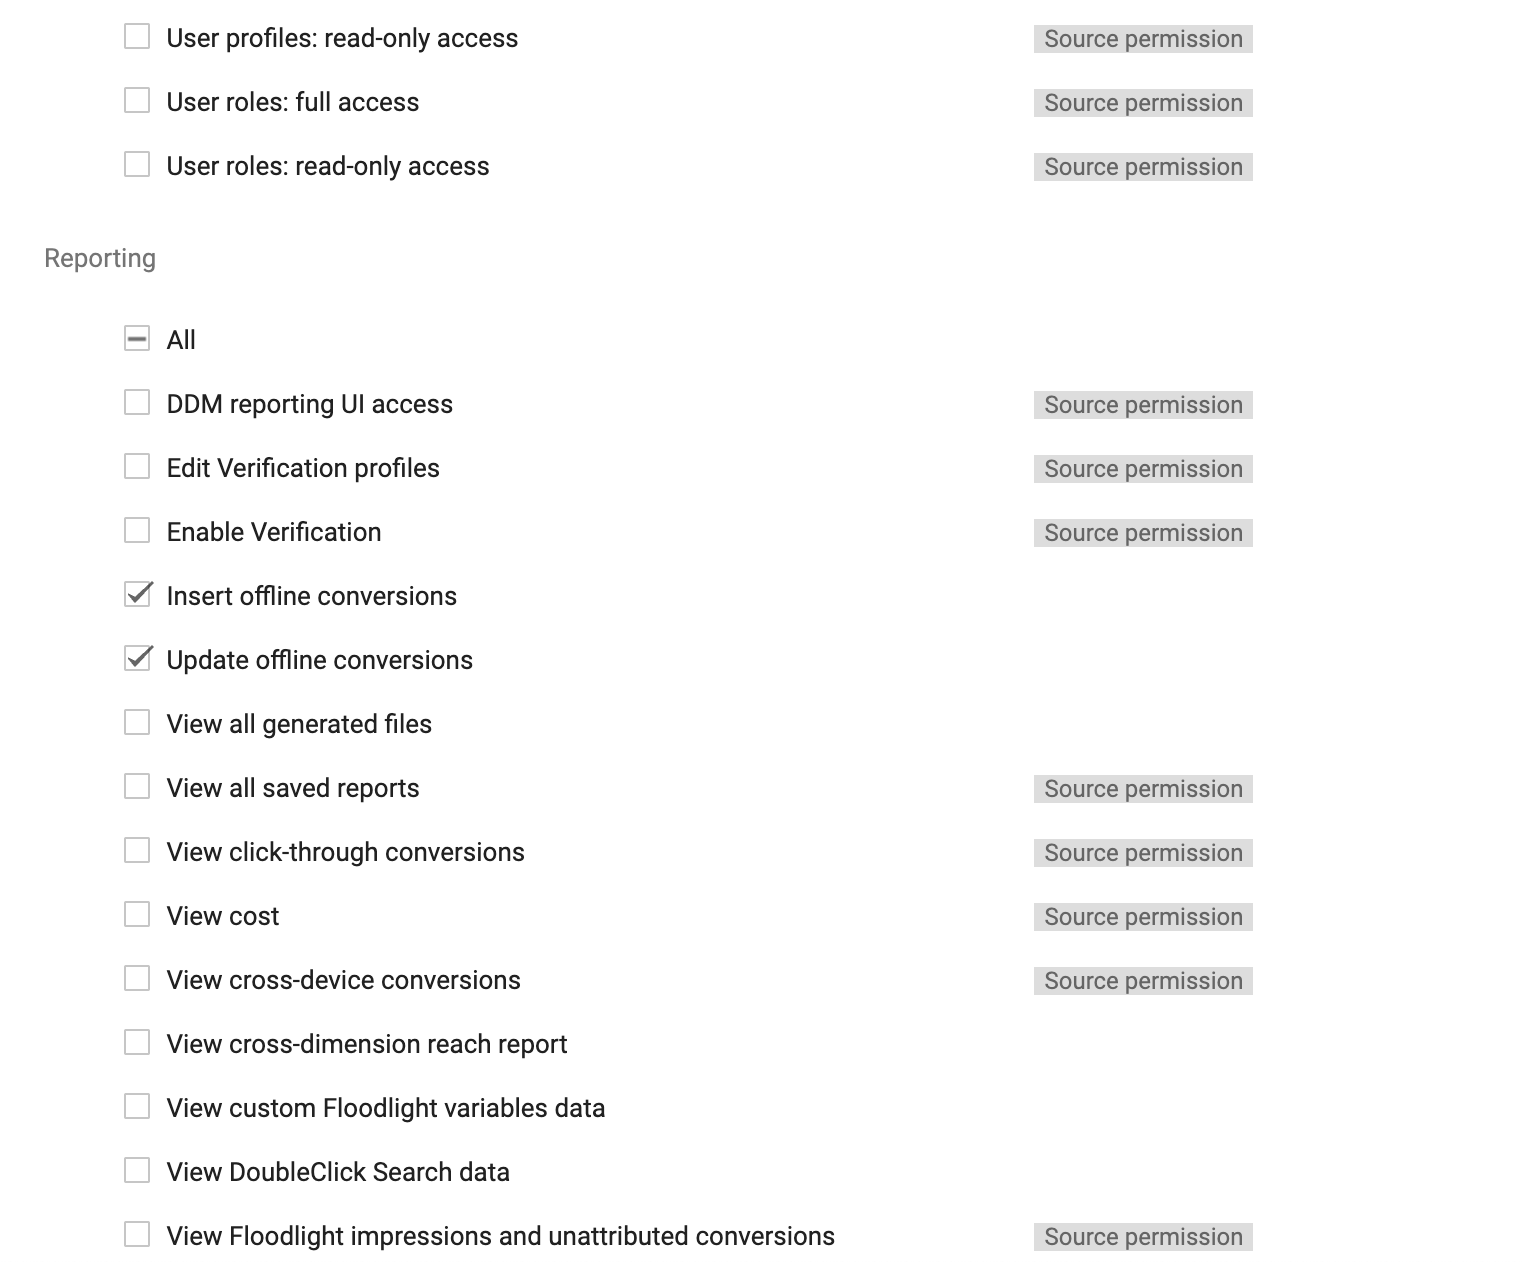
In the Reporting section, uncheck all check boxes and check the check boxes for “Insert offline conversions” and "Update offline conversions".
Click .
Create a new user profile:
From the navigation menu, select and then select .
From the User Profiles page, click .
Enter the following information:
Email: googleauth@liveramp.com
Profile name: LiveRampAPIAccess
Note
Google might add a number at the end of this name– this is okay.
User role: Offline API Access
Click .
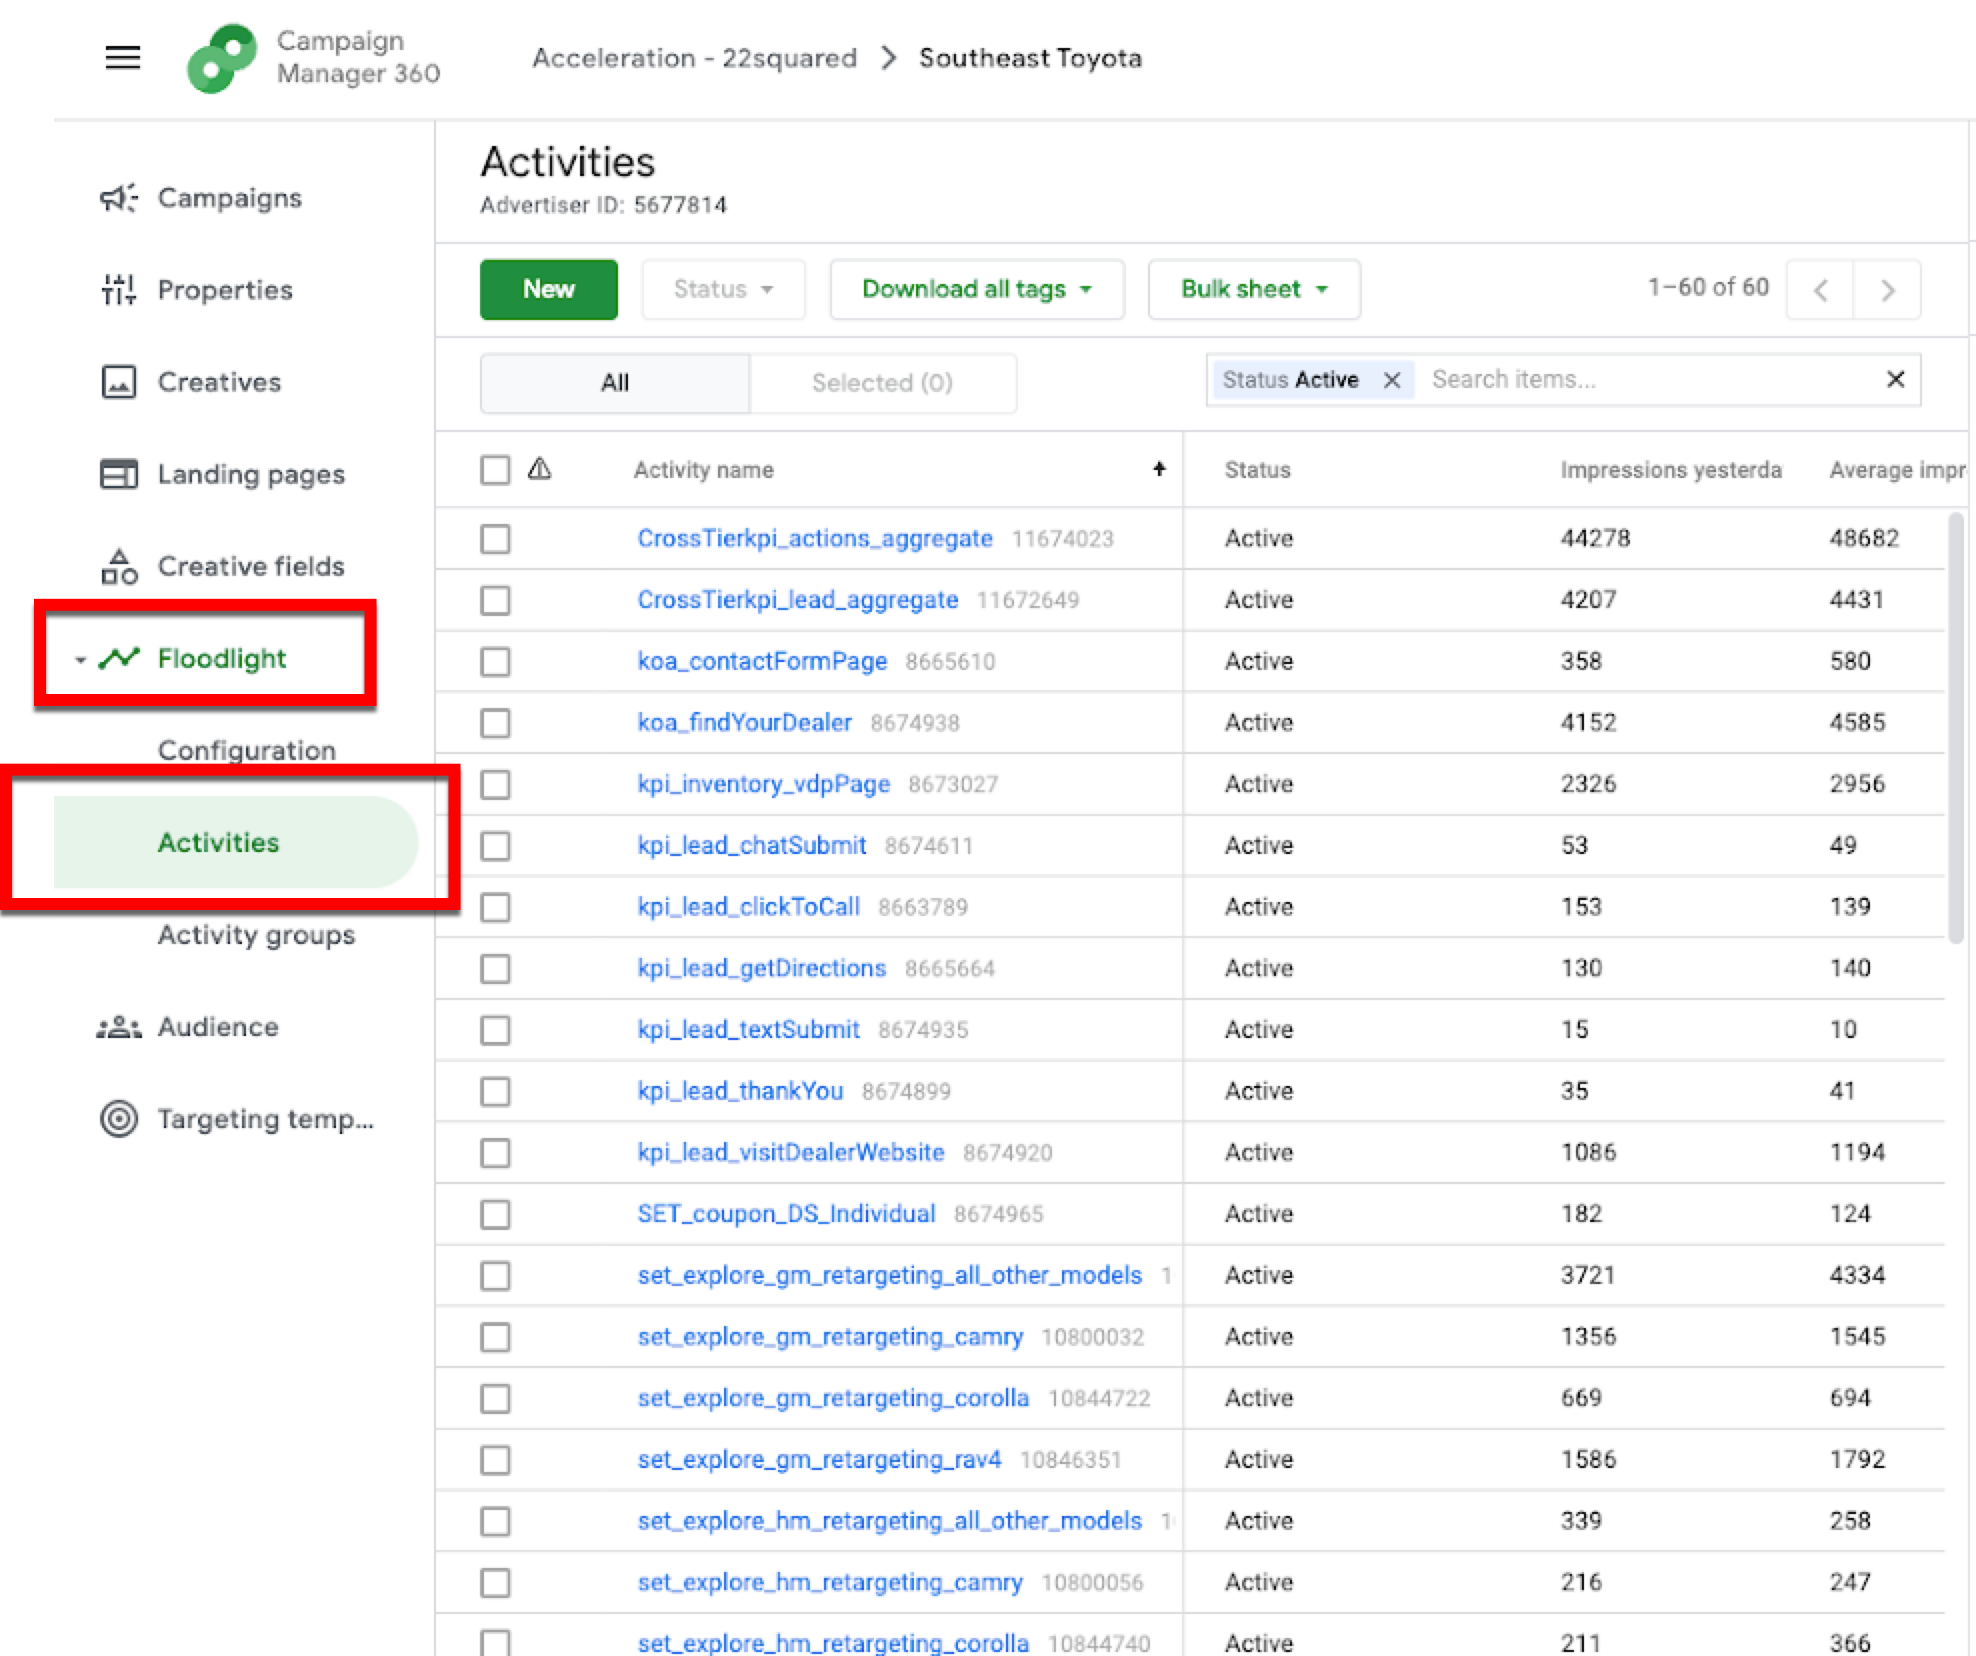
Set Up Floodlight Activities
Floodlight activities are used as conversion tags in DV360 to group conversions. For example, if you manage multiple brands, you might use a different Floodlight activity for each brand. This enables Campaign Manager 360 reporting to filter by advertising campaign conversions.
Note
You can use up to five Floodlight activities with your LiveRamp integration. Each Floodlight activity requires a corresponding LiveRamp audience. Follow the steps in the "Create Additional Audiences" section to create additional audiences if you use more than one Floodlight activity.
Since the universal file contains item-specific fields, you do not need to set up Floodlight variables to pass item-level data.
If you haven't set up Floodlight activities for a prior campaign, follow the steps below to create Floodlight activities.
To create a Floodlight activity in Campaign Manager 360:
From the navigation menu, select and click on the desired advertiser name.
Create a new Floodlight activity group:
From the navigation menu, select and then select .
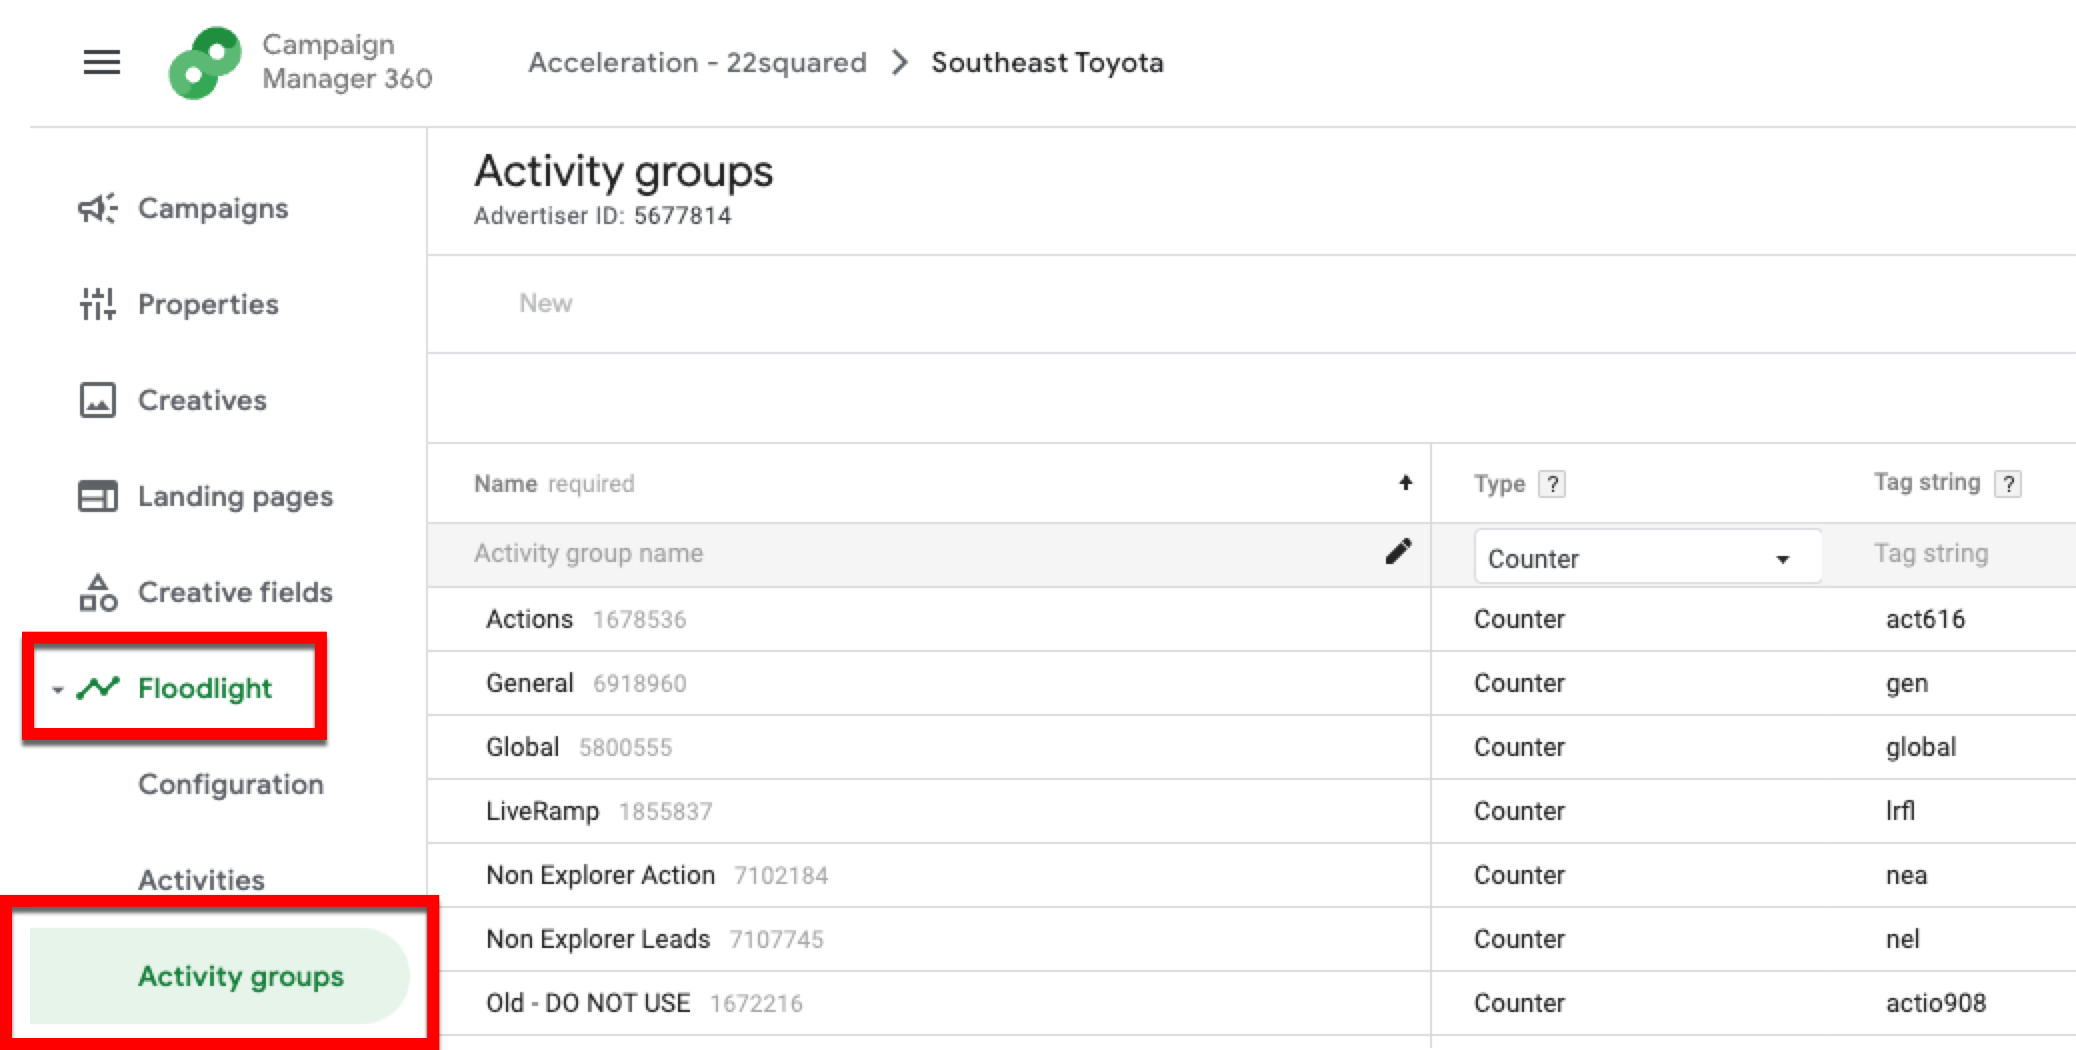
Click .
Fill out the required fields.
Click .
Create a new Floodlight activity:
From the navigation menu, select and then select .
Click .
Fill out the required fields and then click .

Note
To match transactions to impressions or clicks, make sure the Counting method of your Floodlight activity is set to "Counter activities".
Follow the same process (apart from selecting the advertiser name) to create additional Floodlight activities.
Note
Typically, a maximum of five Floodlight activities can be used with the LiveRamp integration. Contact LiveRamp to create additional audiences if you use more than one Floodlight activity. Talk to your LiveRamp representative if more than five Floodlight activities are needed for your situation.
Send IDs to LiveRamp
Once you’ve completed the steps above, send an email to your LiveRamp representative that includes the following information:
Confirmation that you have completed all steps above.
The LiveRamp Access Profile ID.
All cart items under your order.
Up to five Floodlight Activity IDs.
Format the File
This program utilizes the universal file format, which can be used across multiple Conversions API programs. For information on formatting guidelines, see "Using a Universal File for Multiple Conversions API Programs".
Using the Universal File Template
To make things easier for you, we've created a downloadable universal file template that you can use.
Note
The template contains formatting instructions in the second row of the file, along with info on whether a column is required and whether values are required, depending on which conversions programs you're using.
Download the file template by clicking here.
If desired, you can remove any non-required columns that aren't utilized by one of your conversions programs, but you can also leave those columns in the file and not populate them with values.
Transfer your data into the template.
After transferring your data into the file template, delete the second row with the formatting instructions.
Save the file in one of our allowed file types (.csv, .tsv, .psv, or .txt).
Upload the file to LiveRamp.
Once the file has been formatted correctly, upload the file to LiveRamp. See the “Upload the File” section below for more information.
Note
Once you set up the file format for an existing conversions program feed, try to keep the file format (such as the column headers or the column order) the same for all subsequent files. If you change the file format for an existing feed, create a support case before uploading the new file to ensure your existing feeds are not impacted. For more information, see "Changing the Format of an Existing File".
Send Conversion Data to LiveRamp
In order for LiveRamp to match offline conversion data against anonymous CM360/SA360/DV360 users targeted during your advertising campaigns, provide LiveRamp with sample conversion data that includes offline identifiers (usually PII).
Once your campaign has started, send conversion data to LiveRamp at your preferred cadence (daily, weekly, monthly, etc.). Google strongly recommends that you upload conversion files on a daily basis to provide the most up-to-date reporting and minimize any risks of data gaps. Do not send more than one file per day.
Tip
Most customers automate this process to send files on a regular cadence.
Caution
If there are transactions pertaining to different Floodlight activity IDs, separate the transactions into separate files based on Floodlight activity. Each file should be uploaded into the appropriate LiveRamp audience for that particular Floodlight activity on Connect.
Caution
Most platforms require that at least 1,000 unique transaction events be uploaded over a 28-day period.
Conversion Data Guidelines
Each conversion data record must include at least one PII identifier (name and postal address, email, or phone) and the required conversion data:
Transaction category
Transaction timestamp
Transaction amount
Quantity
Order ID (ordinal)
Merchant ID
Caution
The values in the “transaction category” column are for LiveRamp’s internal processing only and do not get passed on to Google. Do not use the “transaction category” column to categorize your transactions.
Make sure to also follow these additional guidelines:
Avoid sending duplicate transactions (transactions already sent to LiveRamp). If you send weekly or monthly files, only send transactions that occurred since the previous file was sent.
Do not include transactions that occurred more than 28 days ago. LiveRamp can only match transactions to events that occurred in the last 28 days.
Do not include conversions with a conversion date in the future.
Upload the File
To connect online conversion data, contact a LiveRamp representative to set up the Online CAPI connectors in Console and link them to your Connect account.
You can also have us pull files from an AWS S3 bucket or GCS bucket. See “Getting Your Data Into LiveRamp” for more information.
Caution
Files for Google Campaign Manager 360 cannot be uploaded via Connect. We recommend either uploading via our SFTP server or having us pull files from an S3 bucket.
To upload files using LiveRamp's SFTP: Use the credentials provided by your technical contact once the agreement has been signed and follow the instructions in “Upload a File via LiveRamp's SFTP”.
To upload files using your SFTP: Follow the instructions in “Upload a File via Your SFTP”.
Once the file is uploaded, information on file processing status can be viewed in Connect on the Files page.
Note
Upload transactions on a daily basis to provide the most up to date reporting and minimize any risks of data gaps.
Most customers automate this process to send files on a regular cadence. Use the same SFTP subdirectory or S3 bucket that you used to upload your sample conversion data. Google strongly recommends that you upload conversion files on a daily basis to provide the most up to date reporting and minimize any risks of data gaps.
FAQs
You may take the file you are working with for the Google Store Sales (GSS) program and perform the following actions in order to use it with Google Campaign Manager 360 Offline program (see “The Google Store Sales Conversions API Program for Offline Conversions” for more information):
Add the following fields:
quantity
order_id (ordinal)
Cart items under the ordinal, including product lists
Make sure that the modified file has the fields shown below in the order listed:
first_name
last_name
address_1
address_ 2
city
state
zip
email_1
email_2
email_3
email_4
transaction _category
transaction_timestamp
transaction_amount
phone_1
phone_2
quantity
order_id (ordinal)
All the order cart items listed under the ordinal
Google recommends that you use the Campaign Manager 360 Offline Conversions API.
Conversions uploaded with the Campaign Manager Offline Conversions API are available in Campaign Manager 360, Search Ads 360, and Display & Video 360.
Google recommends that you upload transactions on a daily basis to provide the most up-to-date reporting and minimize any risks of data gaps.
Include all traceable offline conversions in your delivery. Do not include online conversion data.
Avoid sending duplicate transactions (transactions already sent to LiveRamp). If you send weekly or monthly files, only send transactions that occurred since the previous file was sent.
Do not include transactions that occurred more than 28 days ago. LiveRamp can only match transactions to events that occurred in the last 28 days.
Do not include conversions with a conversion date in the future.
Each product should be its own record, with a "conversion quantity" of “1” and its granular item value in the “transaction_amount” field.
Use the “order_id” field to insert a unique ID that represents the transaction. This would be the same across all conversions in a transaction.
See the example below:
order_id | transaction_amount | product_id | quantity | product_price |
|---|---|---|---|---|
1234 | 19.99 | 835823 | 1 | 19.99 |
1234 | 22.50 | 38483 | 3 | 7.50 |
The total setup for the Campaign Manager 360 Offline Conversions API will take about a week. After the delivery is sent, it will take approximately 2-3 days before you may view the conversion data in CM360.
For any further questions, create a case in the LiveRamp Community portal.
Total Conversions is a metric you see within Google’s platform. Google defines Total Conversions as all conversions within a specific reporting period. It is the aggregate of the deduplicated transactions that were recognized as a conversion.
In order for any given conversion to count towards Total Conversions, the “quantity” field must contain a value of at least “1”. A deduplicated transaction with a quantity of “1” will count as 1 conversion in the Total Conversions metric. A transaction with a quantity greater than “1” will increase the Total Conversions bottom line.
Note
If your Total Conversions is higher than expected and the values in your “quantity” field are greater than 1, we recommend defaulting all “quantity” values to “1”.