Getting Started with Activation
At LiveRamp, "Activation" refers to the process of using LiveRamp to send your customer data to digital marketing applications and media platforms. Within LiveRamp, the typical Activation workflow involves uploading customer data, such as PII identifiers and segment data, which is then connected to device identifiers and activated at the desired destinations. See the sections in this article to understand how to activate your data with LiveRamp.
Note
Activation was formerly known as "Onboarding".
Another workflow you might use LiveRamp for is our Measurement Enablement workflow. In a Measurement Enablement workflow, you send LiveRamp a file and we replace the input identifiers (such as PII, cookies, mobile device IDs, CIDs, etc.) with their associated RampIDs. We then return the file to the location(s) you specify. See "Measurement Enablement Workflow" for more information.
To understand the common terms you'll encounter and get information on how Activation processes work, see the "Understanding Activation" section of this documentation site.
Activation Workflow Overview
The typical Activation workflow first involves uploading customer data (such as PII identifiers and segment data), which we then match to the pseudonymous, universal identifiers called RampIDs in our Identity Graph.
Once you decide which destination platforms you want to distribute your data to, we translate these RampIDs into the platform-specific identifiers (cookies, mobile device IDs, custom IDs, etc.) in our Identity Graph that are used by each platform, and then deliver the data. Once the data has been ingested at the platform, you use that platform’s UI to perform your marketing activities, such as targeting, personalization, ad suppression, etc.
Note
Want to watch? For a brief video overview of how Activation works at LiveRamp, see "Activation Intro Video Series."
Security and privacy: To stay at the forefront of privacy best practices, we employ a team of privacy experts and actively work with major self‑regulatory privacy organizations, including the IAB, DAA, and DMA. For more information on our security practices, see "LiveRamp Data Security Overview."
Overall Activation Steps
At a high level, Activation with LiveRamp involves the steps listed below:
Data upload: After you create files, you upload your customer data to LiveRamp (see the "Get Your Activation Data Into LiveRamp" section of this article).
Matching: LiveRamp matches any personally identifiable information (PII) in your data to the offline data in the AbiliTec Identity Graph to link each record to an AbiliTec ID.
Pseudonymization: We then convert this AbiliTec ID into a pseudonymous, universal identifier called a RampID. All RampIDs remain pseudonymous, private, and secure.
Segmentation: We organize your uploaded data into fields and segments that are available for you to manage and distribute in our Connect UI.
Distribution: You use Connect to distribute your fields and segments to any of LiveRamp's destination partners.
Activation: Through our online identity graph (powered by our Match Network), we translate all RampID s in the segments you distribute into the partner-specific cookies, mobile IDs, and other online IDs at your specified destinations.
Delivery: LiveRamp delivers the segments to your specified destinations, where you can then use those segments.
Along the way, there are a number of stats and reports that you can use.
Tip
Before you begin, you might want to add users to your account. Once you've configured your account, you're ready to get your data into LiveRamp.
Note
The LiveRamp advantage: We have more than 500 partners across the marketing ecosystem—the broadest set of integrations in the market. This variety gives you the flexibility to build your own marketing stack with your preferred technologies. We can also add new integrations on request.
Key Implementation Decisions
Work with your LiveRamp Implementation manager to determine your initial choices in these areas:
How you’ll send files to LiveRamp: There are many options to get your data into LiveRamp. For more information, see “Getting Your Data Into LiveRamp”.
Which field you’ll use for the audience key: The audience key field in your file is used to deduplicate the rows in your file, so the values for that field should be unique. A client customer ID, or something similar, is usually the best audience key. If you aren’t able to provide a client customer ID, you can also use an identifier field, such as email address, as an audience key. For more information, see “Audience Key”.
Whether any fields will be multi-value fields: By default, all fields are ingested as single-value fields, where each consumer record can only be a member of one segment in that field (such as "Favorite_Pet=Dog"). However, you might have fields that will continue multiple values per consumer record (such as "Pets_Owned=Dog, Cat, Hamster"). For more information, see "Multi-Value Fields".
Which precision level to use: Each audience uses a specific match precision level, which is usually “individual” or “household”. For more information, see “Precision Levels”.
Which audience update method to use: Each audience uses a particular update method to determine how we handle new data that is uploaded. For more information, see “Ways to Update an Existing Audience”.
Whether to remove or adjust the default import recency filter: By default, new audiences are configured with an import recency filter that deletes files automatically once they reach 360 days of age. For more information, see "Use a File Data Retention Period to Automatically Delete Older File Data".
Get Your Activation Data Into LiveRamp
To create fields and segments in your account (which you then send to destinations), you first need to create files and then send those files to LiveRamp. See the sections below for more information.
Note
If you are a client of a reseller of LiveRamp's services, these steps are somewhat different. See 'Activation Guide for Reseller Clients" for information.
Data restrictions: For privacy reasons, we do have some restrictions on the kinds of data we're able to activate.
To understand how LiveRamp processes your files to create and update segments in an audience, see the "How Records Are Assigned to Segments".
Create Files
A typical file for Activation is a column-based file that contains a number of elements:
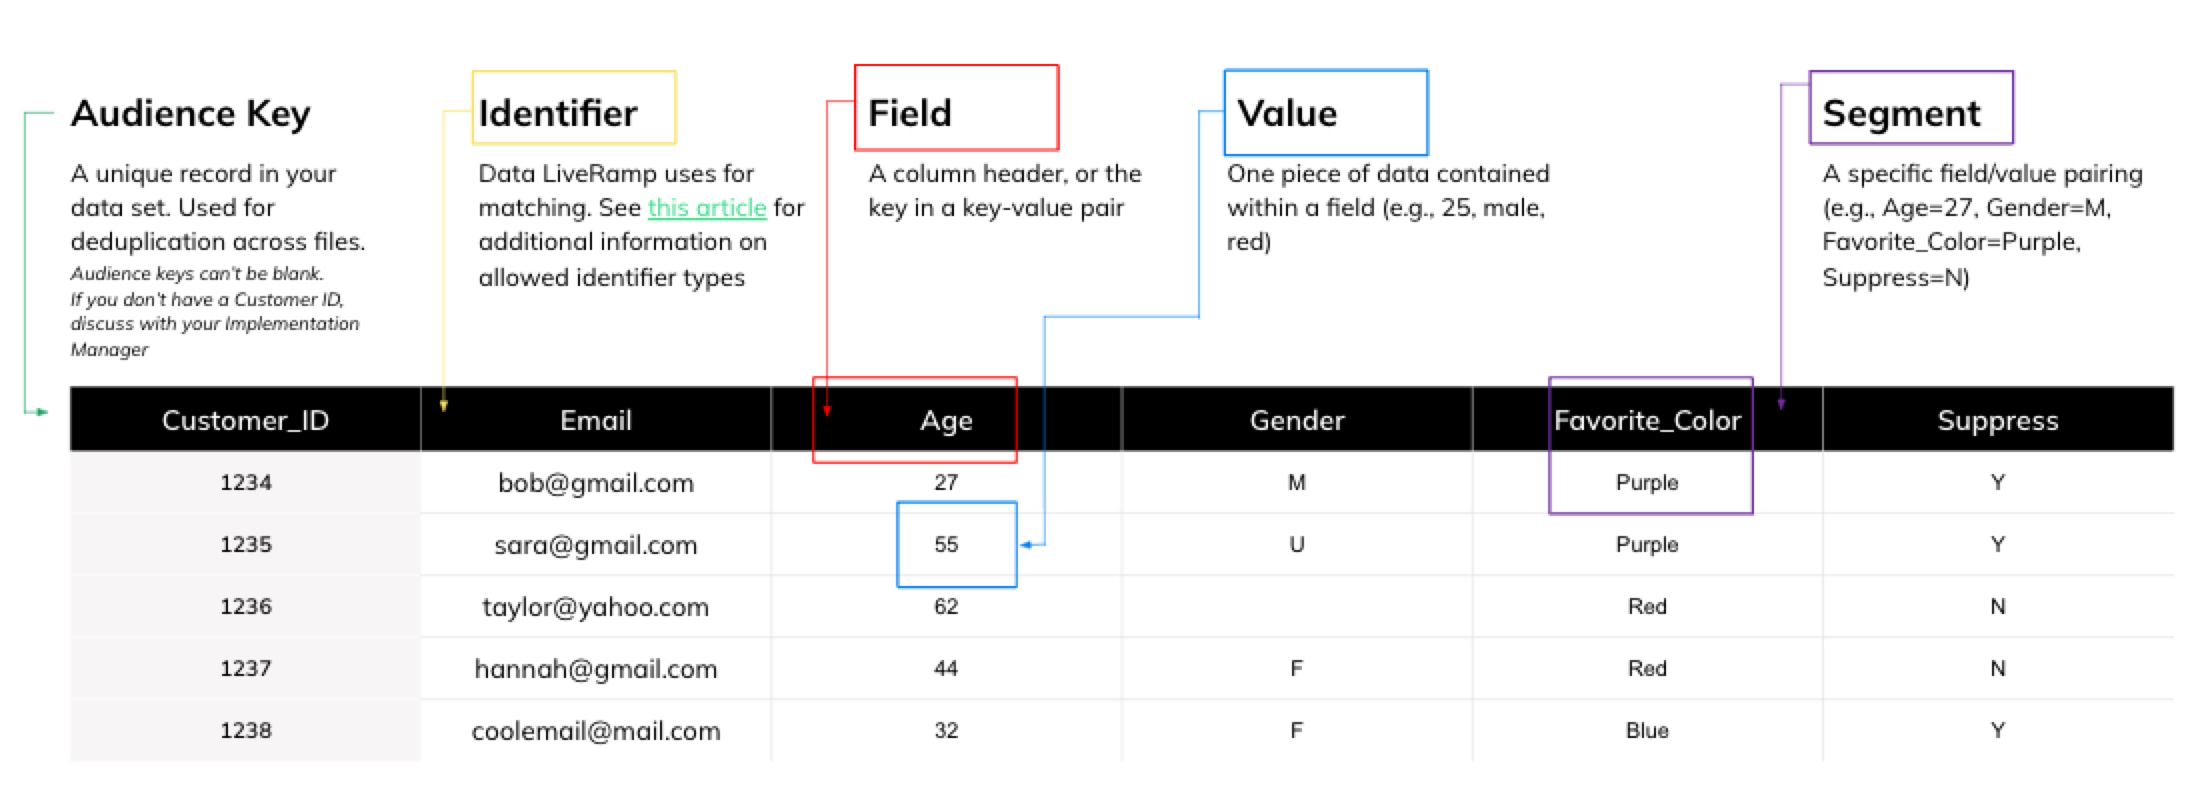
An audience key field: The audience key in your file is used to deduplicate the rows in your file, so the column values should be unique. A client customer ID, or something similar, is usually the best audience key. If you aren’t able to provide a client customer ID, you can also use an identifier field, such as email address, as an audience key.
Columns for identifiers: Identifiers are the data that LiveRamp uses to match the records in your file to RampIDs. For offline data, these are PII identifiers such as name, postal address, email address, and phone number. For online data, these might be mobile device IDs or cookies. The column header of an identifier field contains the identifier name (such as “EMAIL1”).
Columns for segment data fields: Each segment data field holds a category of data, such as “age” or “favorite color. The column header of a segment data field contains the category name.
Values: Each cell of data within a segment data field contains that record’s value for that field, such as “32” within an “Age” field. The pairings of field and segment values will create segments in your Connect account.
File Creation Guidelines
Make sure to properly format your files so that we can process them quickly. In addition to the guidelines in "Formatting File Data", it’s especially important to keep the following key guidelines in mind:
An audience key field: The audience key in your file is used to deduplicate the rows in your audience, so the column values should be unique. A client customer ID, or something similar, is usually the best audience key. If you aren’t able to provide a client customer ID, you can also use an identifier field, such as email address, as an audience key.
Columns for identifiers: Identifiers are the data that LiveRamp uses to match the records in your file to RampIDs. For offline data, these are PII identifiers such as name, postal address, email address, and phone number. For online data, these might be mobile device IDs or cookies. The column header of an identifier field contains the identifier name (such as “EMAIL1”).
A given field in a file can have no more than 250 distinct values. Most files uploaded to LiveRamp should not contain raw fields unless you have previously coordinated this with your LiveRamp account manager (see "Raw Field" for more information).
Columns for segment data fields: Each segment data field holds a category of data, such as “age” or “favorite color. The column header of a segment data field contains the category name.
Keep to LiveRamp's file limits and limits. Exceeding these product limits can result in slower or delayed ingestion and processing times, data inaccuracies within Connect, and manual intervention required to troubleshoot issues.
Once you decide on a format for your files and we've created an ingestion automation configuration for that audience, the audience key and the column headers for the identifier columns that we use for matching must stay exactly consistent across files. For more information, see "The Ingestion Automation Process for File Uploads".
Send Files to LiveRamp
Once you’ve decided on your distinct file formats, you can send your data to us in a number of ways. In general, we recommend that you either upload your data via SFTP or have us retrieve it from an AWS S3 or GCS bucket. Files 500MB and under can also be uploaded via Connect.
After you've uploaded your file or files, you'll need to wait 1-3 days for us to process the data before it's ready to be distributed to your destination platforms.
Manage Your Segments
LiveRamp creates segments directly from the data you've uploaded, but there are a number of additional ways you can manage segments in Connect:
You can create derived segments from your data. For instance, you could create a custom [SERIOUS WOMEN:Y] segment, to be applied to all users who are part of both the [GENDER:Female] and [SERIOUS BUYER:Y] segments.
You can also tag segments with labels, which allows you to easily organize, manage, and quickly distribute even large numbers of segments.
And if you're interested in A/B testing your downstream marketing efforts, Connect makes it simple to split your data into test and control groups.
Tip
How do you get there? From Data Management in the navigation menu, open the Audiences dropdown and then select the audience that contains the segments you want to manage.
Distribute Your Data
Now that your data are organized into segments and tagged, it's time to send them to your digital marketing destinations.
Start by activating destination accounts for your desired destinations.
Note
A destination account at LiveRamp is a set of configurations that allows you to distribute data to a particular seat at a destination.
Many destinations need little or no configuration to get started distributing data. Some will ask you for app-specific information, such as your account ID with their platform. See the "Platform-Specific Distribution Information" section of this help documentation for a quick look at what configuration information you'll need for your intended destination(s), if any.
Note
Don't see your destination? LiveRamp is integrated with more than 500 different marketing destinations, so it's likely we're already set up to send your data where it needs to go. If you need to send data to a destination that doesn't appear in Connect, contact your LiveRamp representative to see about getting a new integration implemented.
Once your destination accounts are activated, you distribute your data by going to each destination account to select the segments you want to distribute and clicking Add to Distribution.
From the navigation menu, select Data Out → Destination Accounts to navigate to the Destination Accounts page and then click MANAGE on the desired destination account tile to navigate to the Segment Distribution page for that destination account.
From the Segment Distribution page for that account, select the segments to distribute to this destination by checking the check boxes to the left of the segment name.
Click Add To Distribution to start the distribution of your selected segments.
Note
You can typically expect a destination to show your data as having been delivered within 3 days.
If at least 3 days have passed and your data is not available at the destination platform, follow the instructions in "Troubleshoot Distributions to Destination Accounts".
See "View Delivery Status" for more information on viewing delivery status, troubleshooting, and more.
See "How LiveRamp Refreshes Distributed Data" for more information on how your distributed data can be refreshed.
View Your Reports
The Connect dashboard shows a variety of stats to let you see how effectively the segments in each audience are being distributed.
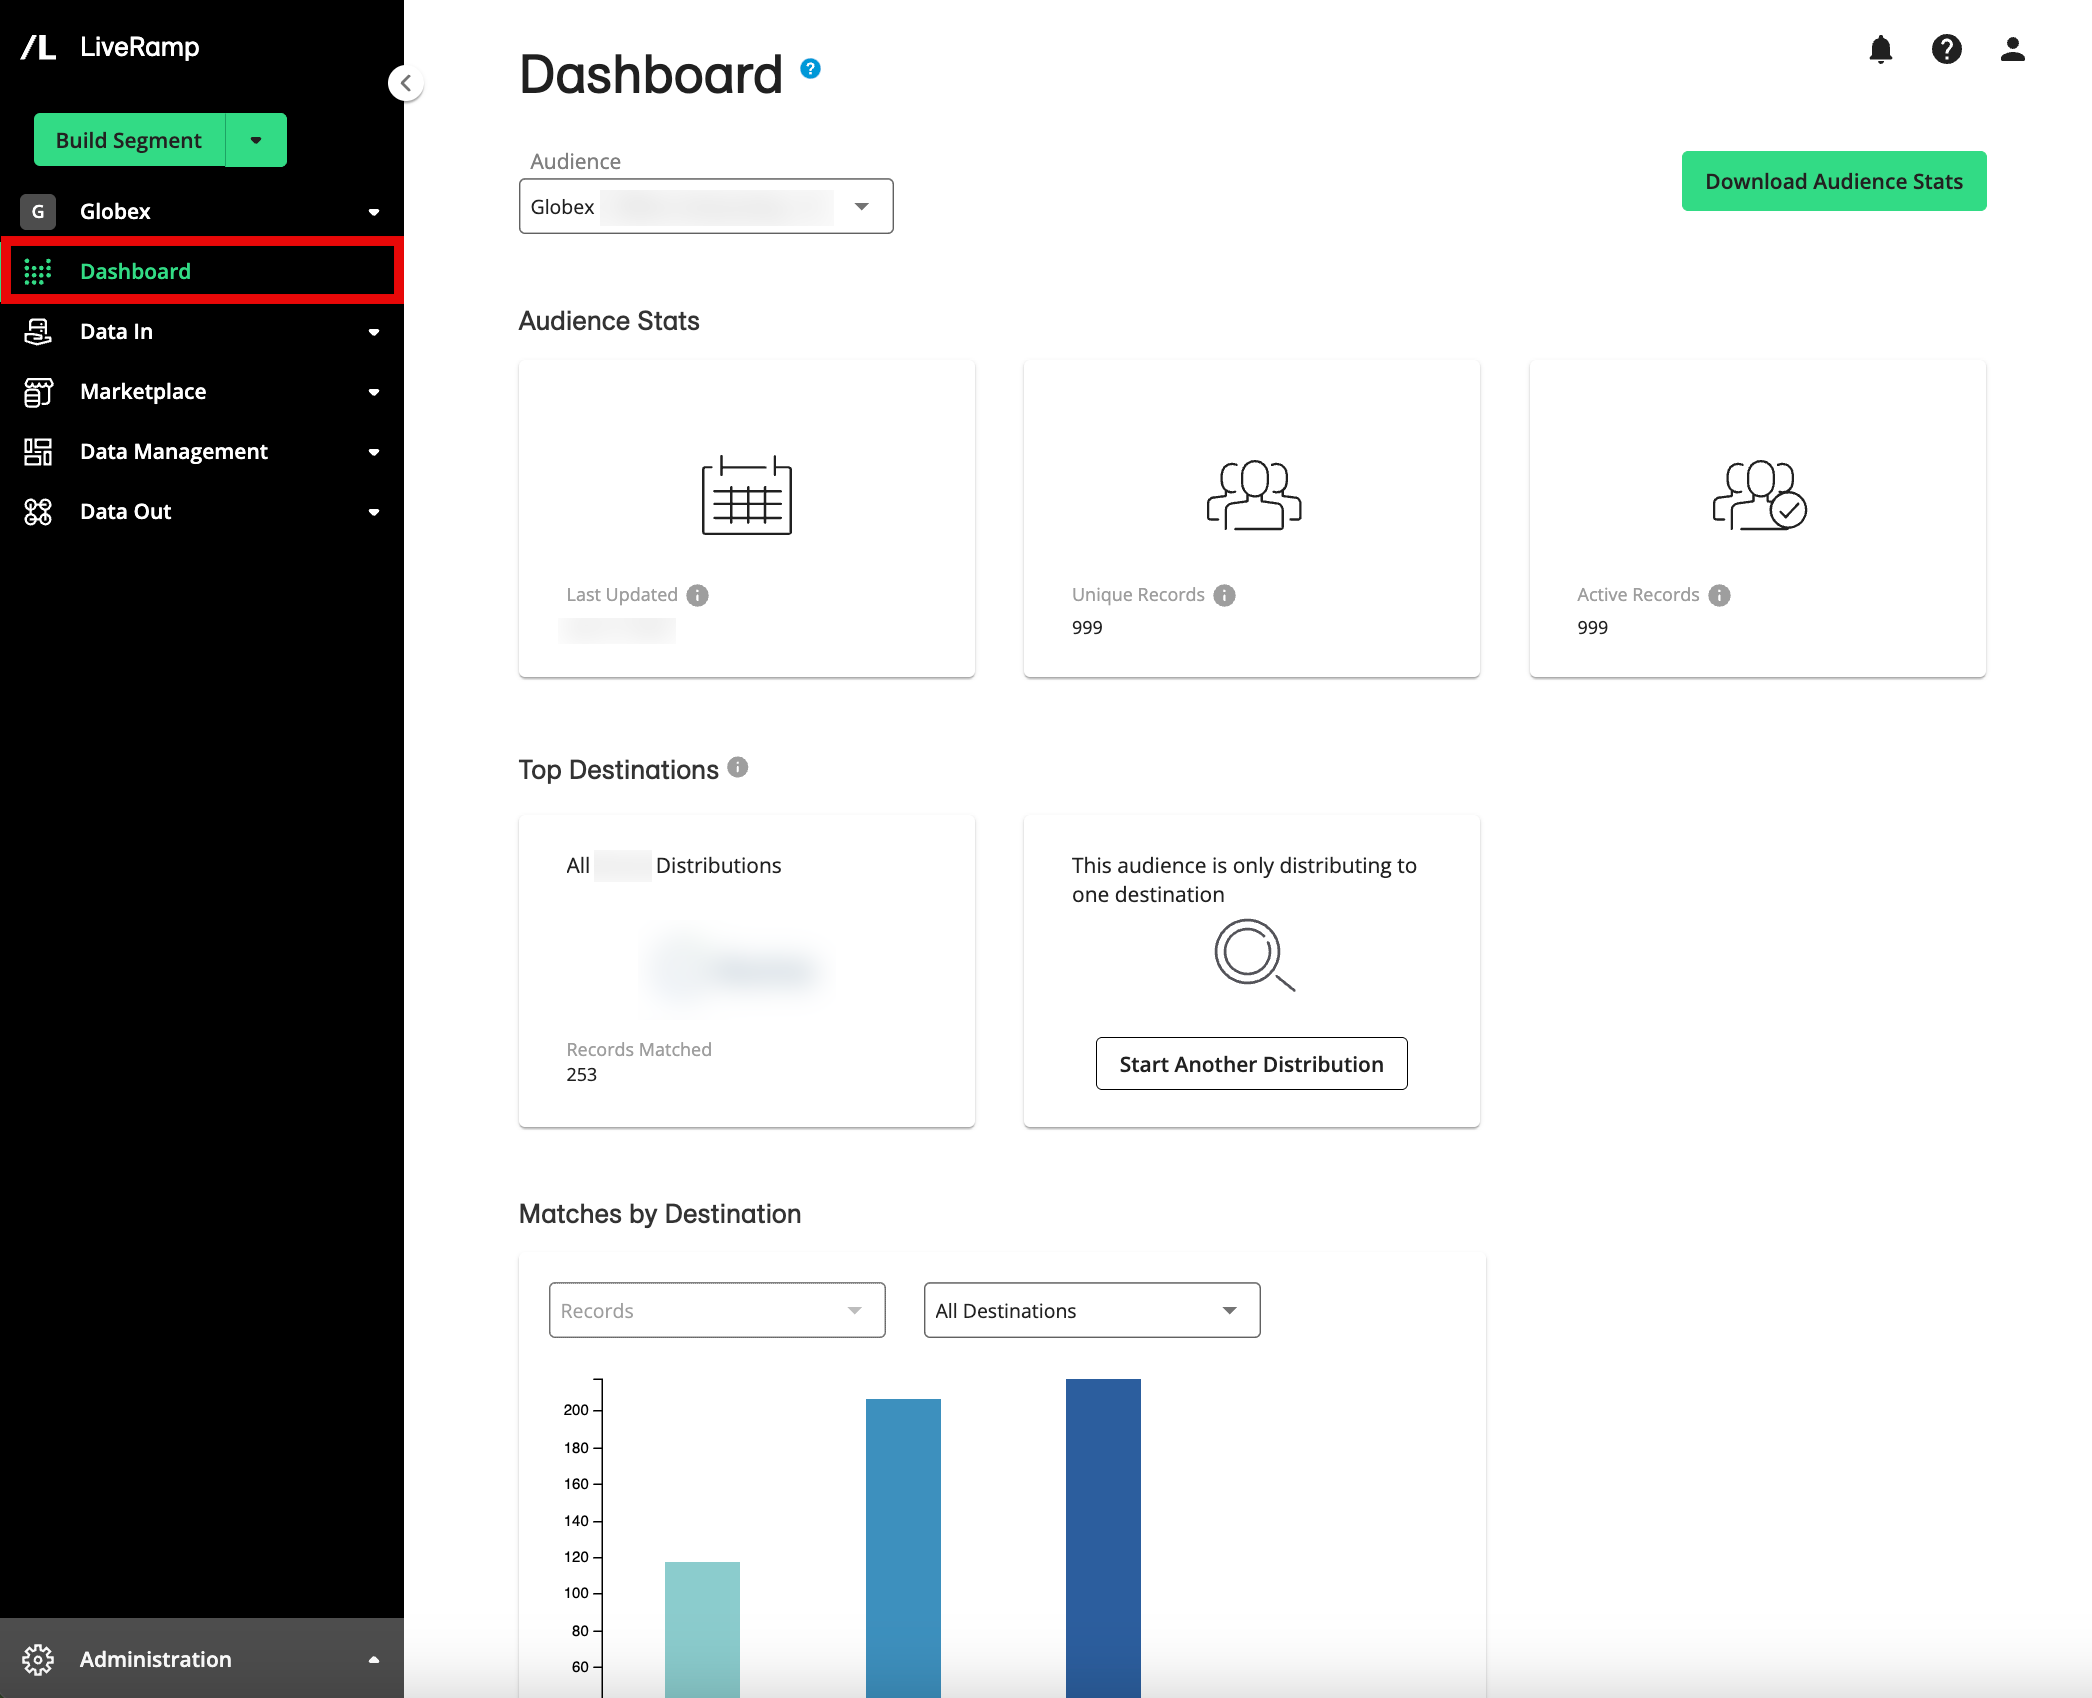
One important metric is match rate, the percentage of records in your raw data file that we were able to match to at least one online device or ID in our network.
Note
For complete information on the stats you can view in Connect, see “Viewing Stats”.
Want better match rates? See "Tips to Improve Your Match Rate" for more information on ways to improve your match rate.
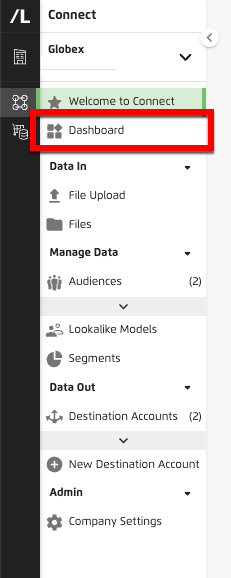
To access your dashboard:
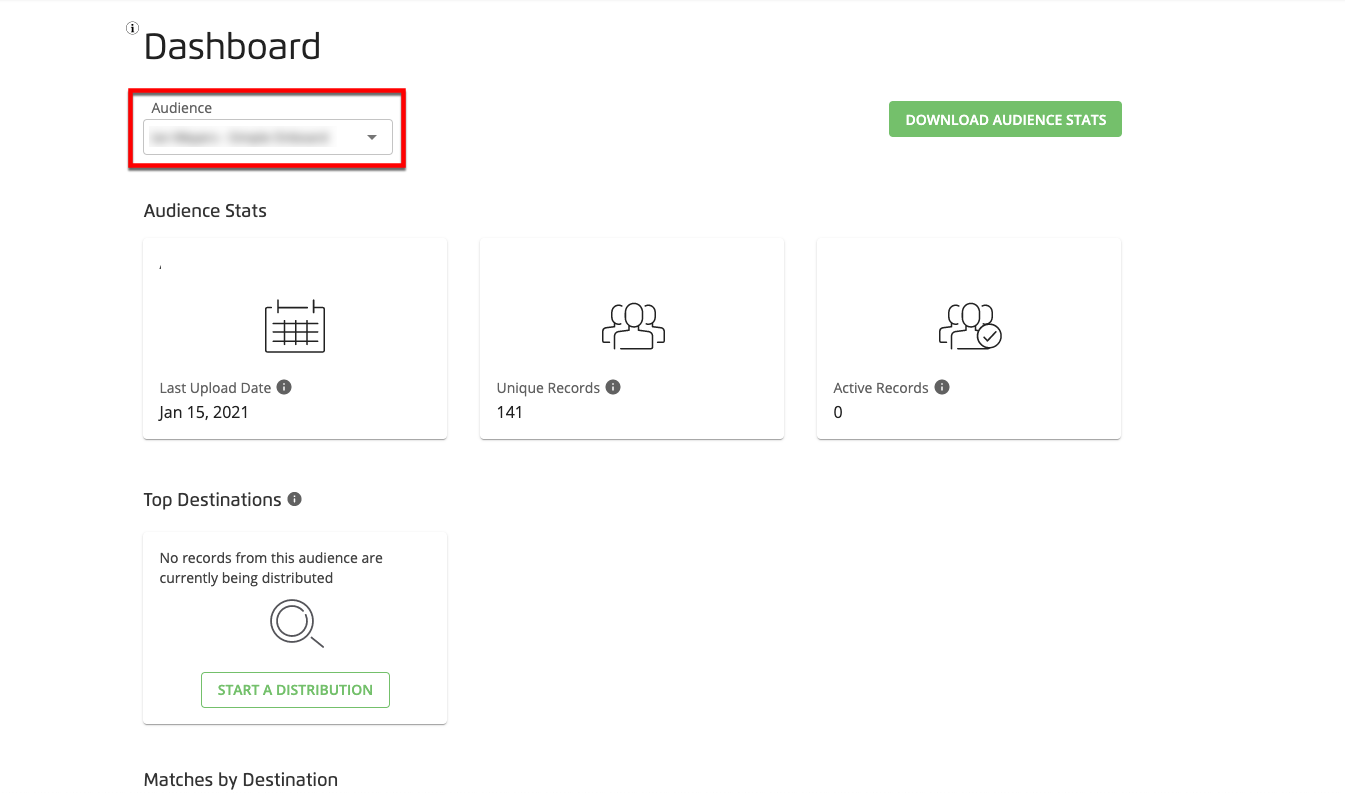
From the navigation menu, click Dashboard to navigate to the Dashboard page.
Select the desired audience from the Audience dropdown list in the upper left.
In addition to the stats you can view in Connect, we can provide a Match report, a PDF showing an estimate of the overall match percentage for a file for many of our most popular destinations. We also offer Matchbacks, which are reports that let you see exactly which records in a given file would be successfully delivered to a particular destination at the time of the request.