The Google Store Sales Conversions API Program for Offline Conversions
With LiveRamp’s Google Store Sales (GSS) integration with Google Ads, LiveRamp can import your offline conversion data directly into Google Ads (rather than you having to put a third-party tracking tag on your site). Google matches the customer information tied to your conversion data with Google user information to create conversion reports in Google Ads. These reports provide advertisers with aggregated and pseudonymized conversion data that allows them to understand the value of their Google Ads campaigns. Ad exposure data does not leave the Google platform.
Note
Google must approve program participants. Eligibility is based on vertical (currently only Retail and QSR) and general requirements (technical thresholds). Contact your LiveRamp or Google rep to confirm your eligibility and find out about getting approved for GSS.
If you want to upload SKU-level data and have access to the reporting, you must first reach out to your LiveRamp account manager.
This program supports the universal file, which can be used for multiple programs. For more information, see "Using a Universal File for Multiple Conversions API Programs".
The Google Store Sales Conversions API Program for Offline Conversions was formerly known as "the Google Store Sales Improvements Attribution Program".
This program also features the following additional capabilities:
Aligned Store Visit and Sales Measurement: Understand the relationship between store visits and store sales
Unlocked Smart Bidding Capabilities: Supports smart bidding for online conversions and store sales
Enhanced Reporting & Measurement: New features, like conversion lag reporting and data-driven attribution
Note
Future enhancements will include conversion label segmentation.
GSS is a Google-paid program with no additional cost for qualifying brands and advertisers.
How Google Store Sales Works
Users engage with your Google ads.
Google estimates the number of people who visit your store based on data from users who are signed in and opted-in to sharing their location history.
Google models visit to purchase rate, based on consumer surveys.
Google models average order value based on advertiser uploaded transaction data.
Google extrapolates the sample to the entire population.
You will see conversion data in Google ads, usually 3-5 days after LiveRamp has received your data.
Note
Google only reports data when our high privacy and confidence thresholds are passed. Only aggregated and pseudonymized data are reported back.
Overview of Steps Involved
The following steps need to be performed to enable the attribution analysis in Google:
You complete any necessary legal agreements with LiveRamp.
You grant LiveRamp access to deliver data to your Google Ads account by performing steps in the Google Ads UI.
LiveRamp creates a destination account in Connect in order for you to perform OAuth authorization prior to uploading your conversion data to Google.
You perform OAuth authorization using the new destination account.
You agree to the Custom data policies in the Google UI by performing the steps in step 3 of Google’s instructions, and then a conversion action is automatically created in your Google Ads account.
If desired, create a Custom Variable.
You upload a test file to LiveRamp so LiveRamp can confirm that Google will accept the file.
You upload continuous conversion data from the last 90 days or less to LiveRamp, as required by Google’s algorithms for the Store Sales program.
You activate the campaign.
LiveRamp processes the data and delivers your data to your Google Ads account.
You set up an automated data upload process so that new transaction data are uploaded every day.
LiveRamp normalizes and hashes your PII, and delivers the data to your Google Ads account.
You view the attribution analysis in Google Ads.
See the appropriate sections below for more information on performing these steps.
Provide LiveRamp with Setup Information
Provide the following setup information to your LiveRamp account manager by email:
Email address of Google Ads Admin User
Tip
To determine who the Google Ads Admin User is:
Navigate to the specific MCC (My Client Center) account being used for upload
Go to Tools > Setup > Account Access (the wrench icon in the upper right)
Confirm the email address for an Admin user
Note
In the future, if the admin changes, please notify the LiveRamp team as to who the new admin will be, as the new admin will need to complete the OAuth step again.
MCC ID associated with your account on Google Ads
Caution
Make sure that you are authenticating with the correct MCC-level Google Ads account number, and that you have “write” access to the account. LiveRamp will collect the MCC account number that the OAuth grantor is added to via the set-up form. The user who generates the token must be an admin user for the Google Ads account that owns the conversion action where uploads will be submitted. Partners require an access token to upload conversions into a CID or MCC on behalf of a given user.
Grant LiveRamp Access to Your Google Ads Account
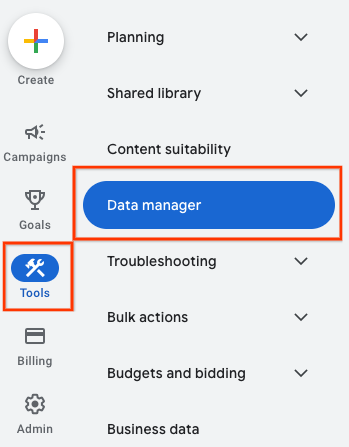
Before LiveRamp activates the Google destination account that will be used to distribute conversion data to Google, complete the self-service LiveRamp account linking process within the Google Ads UI to map the LiveRamp CMU account 637-789-1275 to your Google Ads advertiser account:
From Google Ads, select Tools → Data manager.
Search for “LiveRamp” and then click .
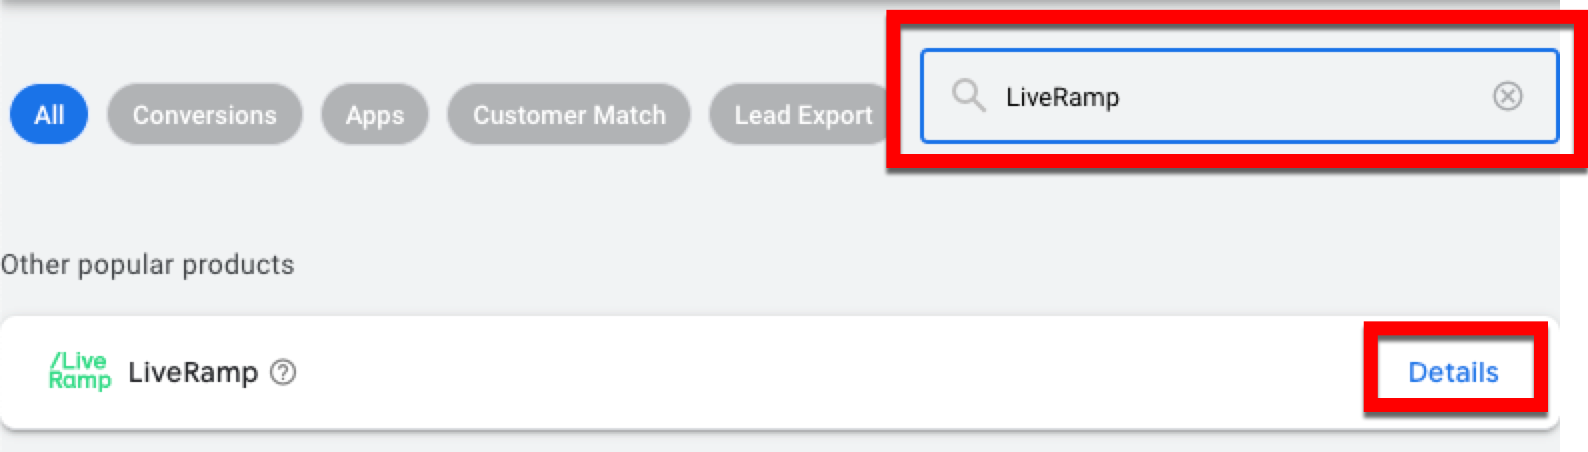
Note
If "LiveRamp" does not appear in the search results, contact your Google representative to have them manually link the Google Ads account where your Store sales uploads will be sent to LiveRamp’s Google Ads account ID (637-789-1275).
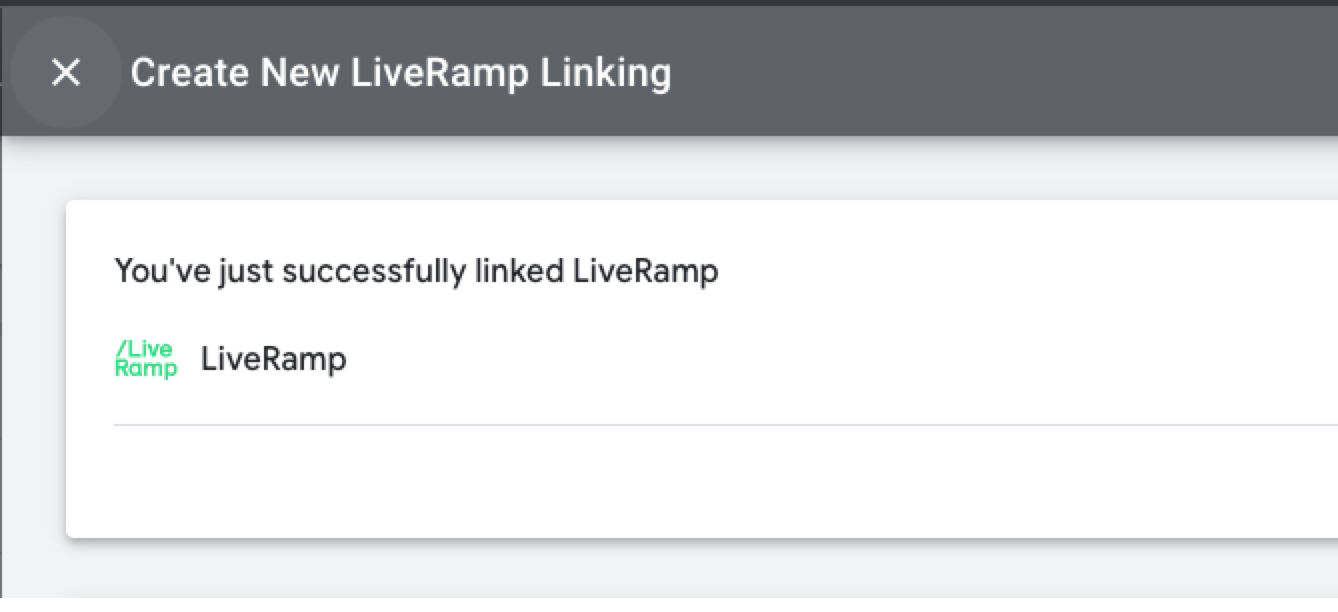
From the dialog that appears, click .

From the Create New LiveRamp Linking dialog, click .
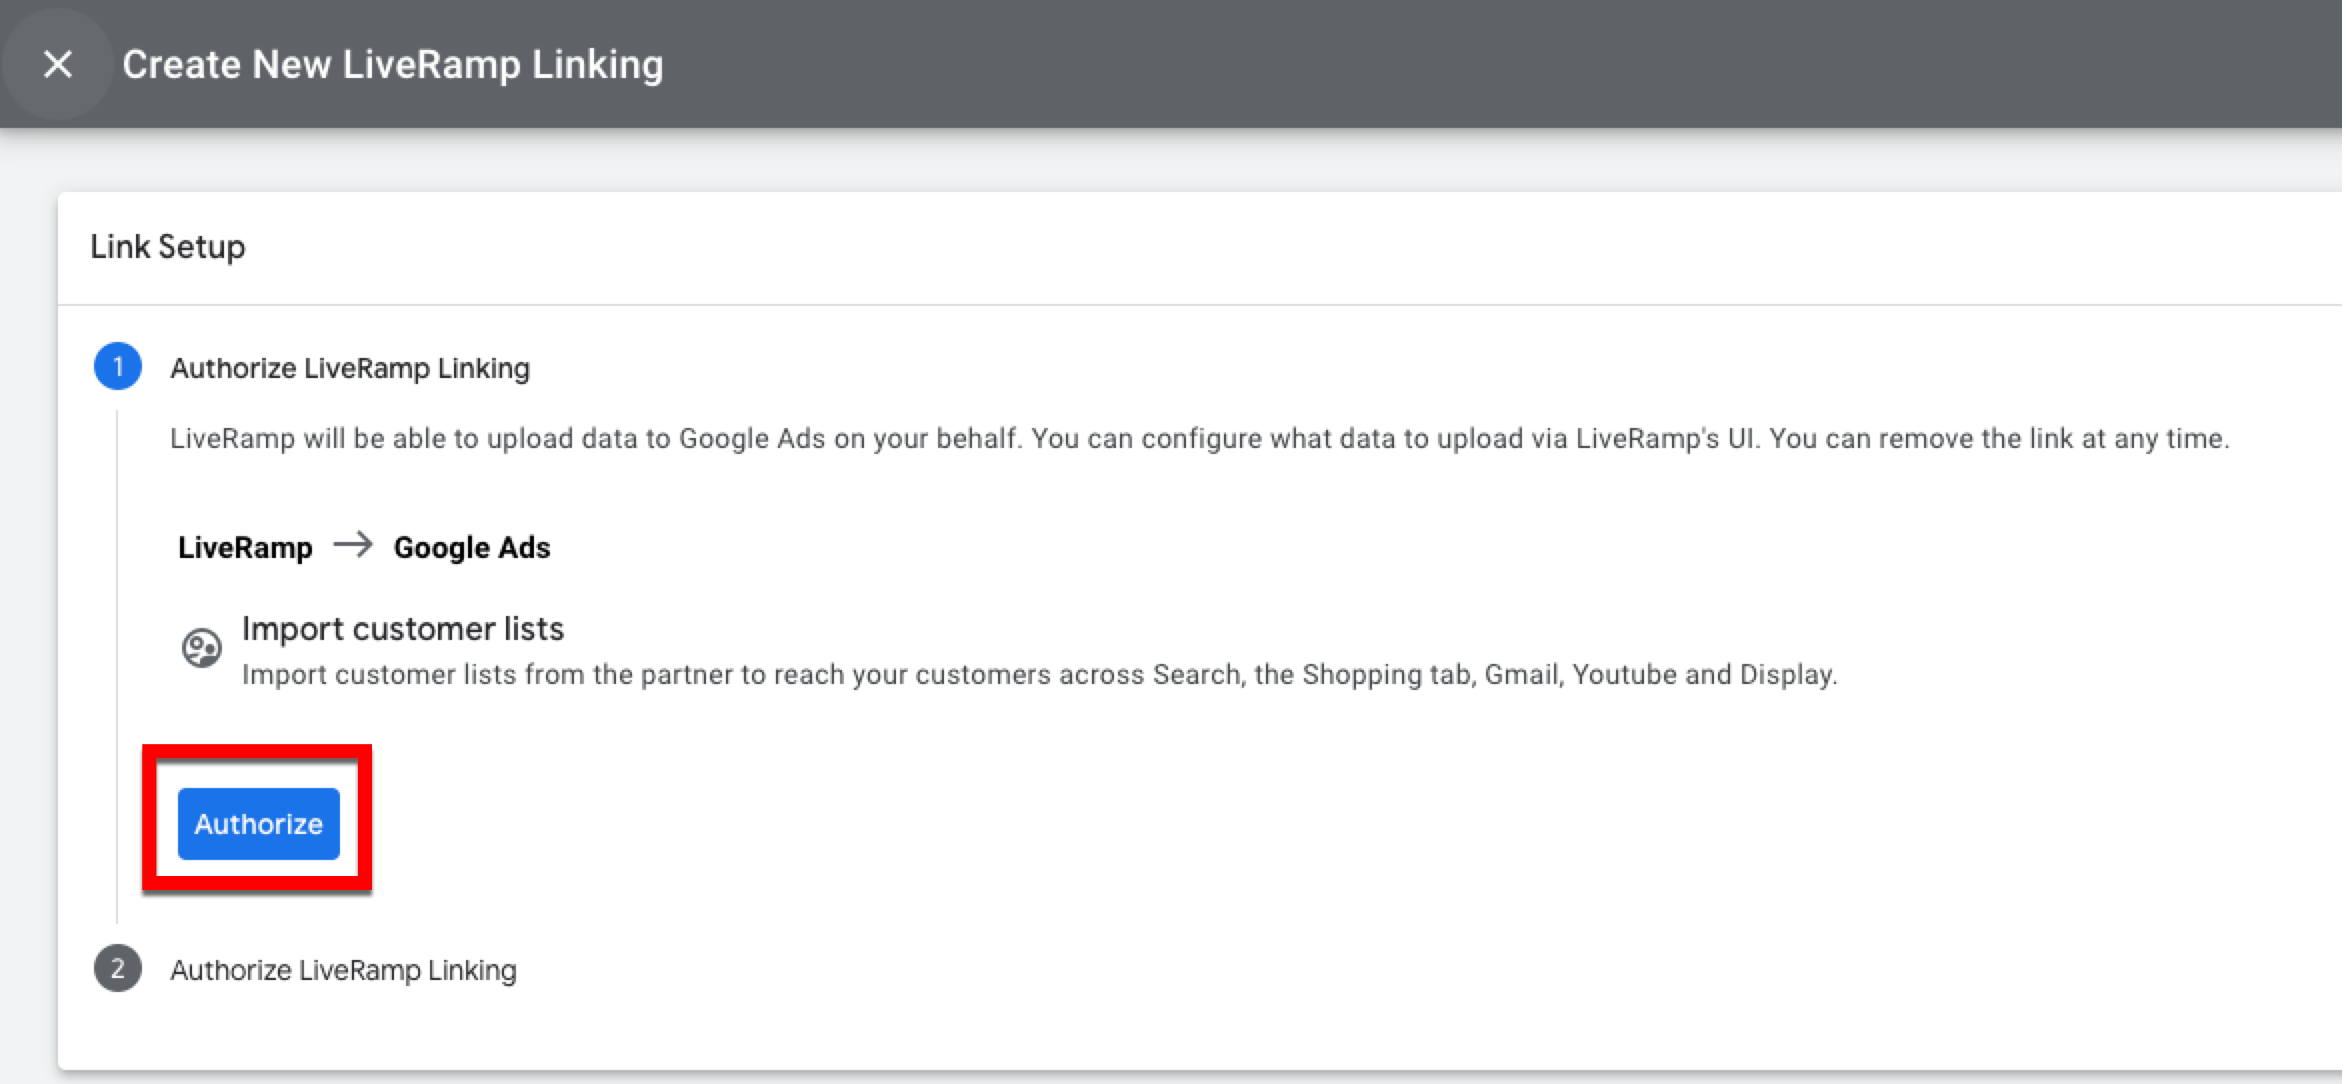
Click .
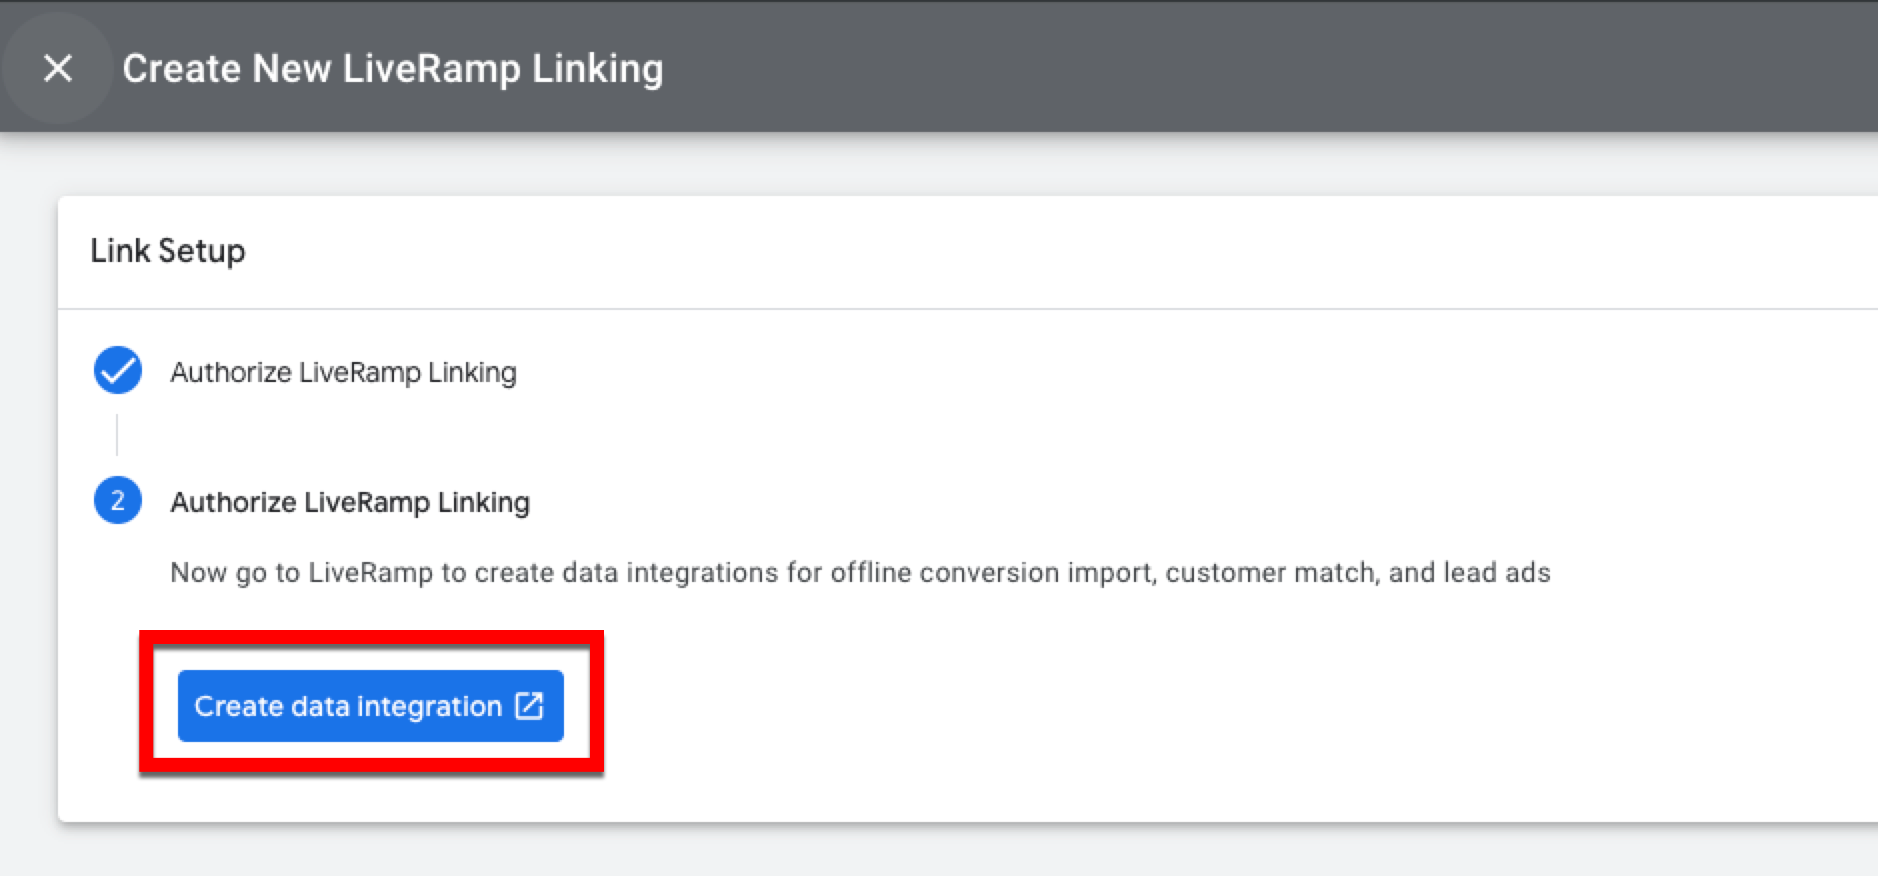
A success message appears:
Perform OAuth Authorization
Once we’ve performed actions on our end to create the required destination account tile, the Google Ads admin user needs to perform OAuth authorization in Connect to grant LiveRamp permission to upload offline conversion data into your Google Ads account.
Note
The Google Ads admin user must be an admin on the MCC account to which LiveRamp is uploading data.
Log in to Connect with the credentials received via email from LiveRamp.
If your company is operating multiple accounts with LiveRamp, verify that the correct account is selected (this is usually some variation on your company's name). You can change accounts by clicking anywhere in the account switcher area and then using the account dropdown list to select the desired account.
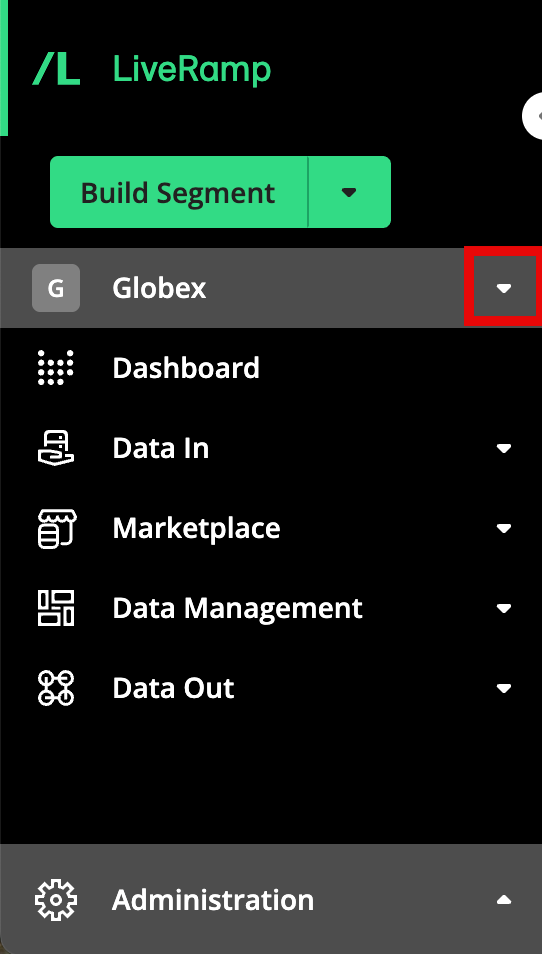
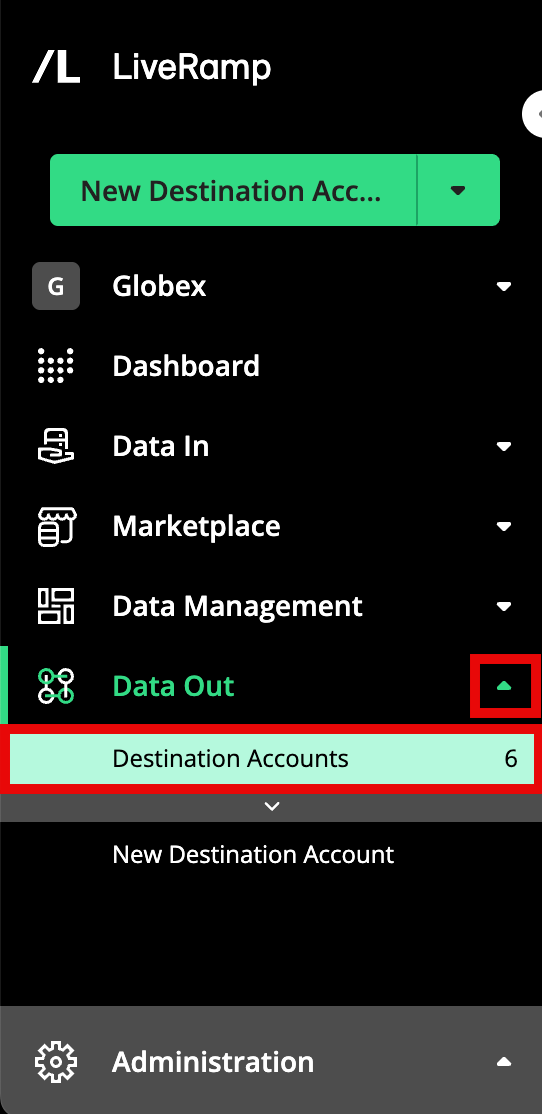
From the navigation menu, select Data Out → Destination Accounts or click the Distribute Data tile from the Welcome page.to navigate to the Destination Accounts page.
Note
By default, the list of destination accounts is initially filtered to show only active destination accounts. Adjust the filter setting to see only inactive or all destination accounts.
Locate the appropriate Google Store Sales destination account tile.
Note
You may have more than one tile if your company has additional data transactions with LiveRamp. For Google Store Sales, the tile name will be “[Your Company]” GA AW 2.0.
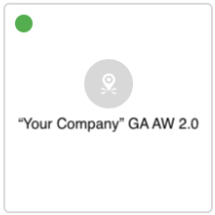
Click the More Options icon (the three dots) that appears when you hover over the lower-right corner of the tile, and then select .
In the Edit Account page, click .
From the OAuth dialog window that opens, enter the email associated with the Google Ads account.
Click .
In the Edit Account page, click .
Email googlestoresalesdirect@liveramp.com to confirm that you have completed the authentication process.
Create A Custom Variable
A Custom Variable can be created in your Google Ads account. See Google’s instructions on how to create or edit custom variables or contact your Google representative for assistance.
If you’ve created a Custom Variable and values, please provide them to your LiveRamp technical team.
Format the File
This program supports the following file formats:
Universal file (recommended) - for when you want one file to work across multiple Conversions API programs, or you're a retail media network needing granular product details. For instructions on universal file formatting, see "Using a Universal File for Multiple Conversions API Programs".
Program-specific file - for when you're only sending data to GSS and don't need the file to serve other programs. See "List of All File Columns" below for details.
Before sending your conversion data to LiveRamp, make sure to strictly follow the guidelines listed below:
Note
If any guidelines listed here conflict with the guidelines in our general file formatting instructions, follow these guidelines.
Caution
If an uploaded file does not meet these requirements, you will need to reformat the file until it is formatted correctly.
Headers must be included in the exact order as listed below.
Fields must not have leading or trailing white space.
This program uses our Measurement Enablement workflow. Make sure to follow our recommended file limits for Measurement Enablement workflow files (such as a maximum of 500,000,000 rows per file and a maximum uncompressed file size of 50 GB).
Your conversion data file must use one of our allowed delimiters (commas, tabs, or pipes), and be one of our allowed file types (.csv, .tsv, .psv, or .txt).
Include all of the required columns listed below.
Unless values are required for a field, fields can be left blank if there is no data for the given row (do not include “N/A” or “null”).
The file must be rectangular. That is, every row must have the same number of delimiters and columns of data.
Tip
To download an Excel file template that contains all possible columns and formatting instructions specific for this program, click here.
After transferring your data into the file template, be sure to delete the row with the formatting instructions and save the file in one of our allowed file types (.csv, .tsv, .psv, or .txt) before uploading.
Once the file has been formatted correctly, upload the file to LiveRamp. See the “Upload the File” section below for more information.
Note
Once you set up the file format for an existing conversions program feed, try to keep the file format (such as the column headers or the column order) the same for all subsequent files. If you change the file format for an existing feed, create a support case before uploading the new file to ensure your existing feeds are not impacted. For more information, see "Changing the Format of an Existing File".
List of All File Columns
The table below lists all possible columns you might include in your GSS-specific file, along with the following information:
Field Name | Column Required? | Values Required? | Notes |
|---|---|---|---|
first_name | Yes | Yes (if name and postal address (NAP) is used as an identifier) | |
last_name | Yes | Yes (if NAP is used as an identifier) | |
address_1 | Yes | Yes (if NAP is used as an identifier) | |
address_2 | Yes | No |
|
city | Yes | Yes (if NAP is used as an identifier) | |
state | Yes | Yes (if NAP is used as an identifier) |
|
zip | Yes | Yes (if NAP is used as an identifier) |
|
country | Yes | Yes (if NAP is used as an identifier) |
|
email_1 | Yes | Yes (if email address is used as an identifier) |
|
email_2 | Yes | No |
|
email_3 | Yes | No |
|
email_4 | Yes | No |
|
transaction_category | Yes | Yes |
|
transaction_timestamp | Yes | Yes |
|
transaction_amount | Yes | Yes |
|
phone_1 | Yes | Yes (if phone number is used as an identifier) |
|
phone_2 | Yes | No |
|
order_id | Yes (for item-level store sales reporting only) | Yes (if this column is included in the file) |
|
merchant_id | Yes (for item-level store sales reporting only) | Yes (from your Merchant Center account) |
|
merchantFeedLabel | No | Yes (if the column is included in the file) |
|
merchantFeedLanguage | No | Yes (if the column is included in the file) |
|
item_number | No | Yes (if this column is included in the file) |
|
quantity | Yes (for item-level store sales reporting only) | Yes (if this column is included in the file) |
|
product_id | Yes (for item-level store sales reporting only) | Yes (if this column is included in the file) |
|
store_id | No | Yes (if this column is included in the file) |
|
product_name | No | No |
|
promo_code | No | No |
|
product_category | No | No |
|
product_subcategory | No | No |
|
product_variant | No | No |
|
product_brand | No | No |
|
event_conversion_type | Yes (for Snapchat only and only if sending online data) | Yes (if this column is included in the file) |
|
is_new_customer | No | No |
|
product_price | Yes (for item-level store sales reporting only) | Yes (if the column is included in the file) |
|
GTIN | No | No |
|
department | No | No |
|
brand | No | No |
|
custom_[field_name] | No | Yes (if this column is included in the file) |
|
ad_user_data | Yes (for UK and EMEA data) | No |
|
ad_personalization | Yes (for UK and EMEA data) | No |
|
Header Row Example
first_name|last_name|address_1|address_2|city|state|zip|email_1|email_2|email_3|email_4|transaction_category|transaction_timestamp|transaction_amount|phone_1|phone_2|order_id
Conversion Data Examples
Alex|Chen|44 Main Street|#12|San Francisco|CA|94100|alex@gmail.com|ac@ymail.com||||In-store|2014-03-31|99.99|1234567890||52389
Julian|Roodiger|55 Mission Street||San Francisco|CA|94500|julian@gmail.com||||PhoneSales|2014-03-30|55.55|2223334444||98740
Send Conversion Data to LiveRamp
To set up the integration, first send LiveRamp a test file that follows the format outlined below. The test file should contain only about 20 rows of data.
Once we’ve confirmed that Google can accept your test file, send a file that contains the most recent 90 days of continuous conversion data. In other words, provide a backfill file containing at least one transaction every day for the previous 90-days.
Once your campaign has started, send conversion data to LiveRamp at your preferred cadence (daily or weekly). Google and LiveRamp strongly recommend that you upload conversion files on a daily basis to provide the most up to date reporting and minimize any risks of data gaps.
Tip
Most customers automate this process to send files on a regular cadence.
Caution
The Google Store Sales program requires that at least 6,000 unique transaction events be uploaded over a 28-day period.
Conversion Data Guidelines
Each conversion data record must include at least one PII identifier (name and postal address, email, or phone) and the required conversion data:
Transaction category
Transaction timestamp
Transaction amount
Note
If you're sending data on EMEA and/or UK consumers, you must also include the "ad_user_data" and "ad_personalization" columns listed in the "Format the File" section above. For all other regions, these columns are optional. For more info on Google's consent policy, see this Google article.
Retailers must include all cart items in an order with the following fields:
Order ID
Product ID
Quantity
Product price or transaction amount
(Optional) Product name
(Optional) Product category
(Optional) Product brand
(Optional) Product sub-category
Note
Retailers should upload SKU-level data for all items sold in their physical stores, even if the items aren’t uploaded to their Google Merchant Center (GMC).
Uploading SKU-level data for all items sold in the retailer’s physical location is how Google Ads will maintain accurate store sales dynamic Average Order Value (AOV). This is important to ensure all revenue generated in their physical locations is accounted for in their store sales reporting, even for items not added to their Google Merchant Center (GMC).
If you are able to provide these additional fields, it is highly recommended that you do for better tracking and reporting:
Order ID (optional but recommended)
Custom field
Make sure to also follow these additional guidelines:
Put your best email and phone in the first fields for those.
Avoid sending duplicate transactions (transactions already sent to LiveRamp). If you send weekly or monthly files, only send transactions that occurred since the previous file was sent.
Do not include conversions with a conversion date in the future.
Follow the instructions in the "Format the File" section for the sample file and all subsequent files.
Upload the File
To connect online conversion data, contact a LiveRamp representative to set up the Online CAPI connectors in Console and link them to your Connect account.
Once configured, LiveRamp will generate an 'Online Event Feed' table on the Tables and Views page. You can then continue with the CAPI feed distribution workflow while the Online CAPI connectors run in the background to supply the online event feed.
Caution
Files for Google Store Sales cannot be uploaded via Connect.
To upload files using LiveRamp's SFTP: Use the credentials provided by your technical contact once the agreement has been signed and follow the instructions in “Upload a File via LiveRamp's SFTP”.
To upload files using your SFTP: Follow the instructions in “Upload a File via Your SFTP”.
Once the file is uploaded, information on file processing status can be viewed in Connect (see "Check File Processing Status" below for more information).
Tip
Upload transactions on a daily basis to provide the most up to date reporting and minimize any risks of data gaps.
Most customers automate this process to send files on a regular cadence. Use the same SFTP subdirectory or S3 bucket that you used to upload your sample conversion data. Google strongly recommends that you upload conversion files on a daily basis to provide the most up to date reporting and minimize any risks of data gaps.
Check File Processing Status
You can check the status of the files you've uploaded on the Files page in Connect. See "Check the Status of an Uploaded File" for complete instructions.
Note
Once you've uploaded a file, it can take up to 20 minutes before the file appears associated with the appropriate audience(s) on the Files page. If the file does not appear after at least 20 minutes, create a support case.
Files for this program use our Measurement Enablement workflow, and so the column headings that display on the Files page will look different from the ones that display for files that use our Activation workflow.
FAQs
What is the best practice for file delivery cadence?
Upload transactions on a daily basis to provide the most up-to-date reporting and minimize any risks of data gaps.
How long until I see conversion data in Google Ads?
This typically takes 2-4 days after LiveRamp has received your data.
What is the lookback window?
The lookback window is 90 days. Do not upload transactions that occurred longer than 90 days ago.
Why do we need to sign an agreement?
The agreement enables you to:
Send transaction files that are not counted towards your Activation Agreement.
Participate in any of LiveRamp's "platform-paid offline attribution" programs, subject to mutual agreement between LiveRamp and the brand. These additional offline conversions programs include Google Campaign Manager Offline Conversions API, Pinterest, Bing, etc.
Why are there fees listed in the agreement?
Those fees only apply if there are significant changes to file formatting that cause a file to fail or if a file is dropped in the wrong location. However, our team will reach out and offer the opportunity to correct the issue (in which case, no fee would be applied). The pricing verbiage is standard language to remind participants to be mindful about file formatting and location drop.
Can brands have multiple MCC IDs?
Yes. Clients may have multiple MCC IDs because they have sub-brands with transaction data all coming over in one file feed.
Can there be multiple conversion actions within one MCC ID?
Yes. Brands can use multiple conversion actions (up to 10) to differentiate among transactions in a file feed (i.e., retail store versus outlet). This is common with data among sub-brands as well.
If a brand is approved, are its sub-brands also approved?
If a brand is broadly approved, whether they want to enroll certain sub-brands as a separate advertiser is up to them. For account eligibility requirements, click here. Contact your Google rep for more information.
What is the minimum number of transactions that will surface on Google Ads for reporting thresholds?
Our typical guidance is 6,000 transactions per month.
What prevents Google from using our data in combination with other Google data to re-identify customers or use it for non-client purposes?
Data files are exclusively used for store sales measurement and in combination with ad products used by you (such as Google Store Visits and Customer Match audiences).
Can I send data to YouTube as well?
If you are interested in enabling the YouTube measurement feature enhancement, contact your Google rep to confirm eligibility and determine your allow-listing status. In regards to the setup, if YouTube sits under the same MCC used for Store Sales, then it can be enabled easily. If it sits under a separate MCC ID, then the MCC will have to be set up for Store Sales and the implementation steps will need to be completed again.
What if we have already sent conversion data to LiveRamp for the Google Campaign Manager program?
You may take the file you are working with for the Google Campaign Manager program and perform the following actions in order to use it with Google Store Sales (see “The Google Campaign Manager 360 Offline Conversions API Program for Offline Conversions” for more information):
Add a “transaction_category” field in the order shown below. If desired, you can use one of your Floodlight custom variables (U variable) fields and rename the column to “transaction_category”.
Change the column heading for "ordinal" to "order_id."
Remove the following fields:
Conversion_Quantity
Floodlight custom variable IDs (“U1”, “U2”, etc.)
The modified file should have these fields in the order shown below:
first_name
last_name
address_1
address_ 2
city
state
zip
email_1
email_2
email_3
email_4
phone_1
phone_2
transaction_category
transaction_timestamp
transaction_amount
order_id
If I use basket-level custom variables, will uploading SKU-level sales data cause basket-level Custom Variable reporting to stop working?
No, uploading SKU/item-level transactions will not cause basket-level custom variables to stop working. You can continue to use your basket-level custom variables as usual in your store sales reporting. You simply need to copy the existing Custom Variable label for each SKU-level row corresponding to a shopper’s total basket.
For example, if a new customer purchased 12 items, you would copy your new customer’s Custom Variable label for each of the 12 SKU-level rows in this shopper’s total basket.
Will uploading SKU-level transactions impact my regular store sales reporting and bidding in non-Retail Media campaigns?
No, uploading SKU-level transactions will not impact regular store sales reporting or bidding in non-Retail Media campaigns. If you follow the recommendations in this article to:
Add item attributes (i.e., product ID, merchant ID, quantity, etc.)
Extend basket-level Custom Variable labels (if they exist) to each SKU-level row
You should not experience any disruptions or changes to the dynamic Average Order Values (AOVs), reporting, bidding or basket-level custom variables you rely on in non-RMN Google Ads campaigns.
How should I handle uploading SKU-level data for items my retailer sells in their physical locations but does not have uploaded to their Google Merchant Center (GMC)?
Retailers should still upload SKU-level data for all items sold in their physical stores, even if the items aren’t uploaded to their Google Merchant Center (GMC).
Uploading SKU-level data for all items sold in the retailer’s physical location is how Google will maintain accurate store sales dynamic AOVs. This is important to ensure all revenue generated in their physical locations is accounted for in their store sales reporting, even for items not added to their Google Merchant Center (GMC).
As a best practice with SKU-level API uploads, fill in:
Transaction attributes (i.e., name, email, phone number, conversion name, conversion time, conversion value, etc.) for every SKU that’s uploaded.
Item attributes (i.e., product ID, merchant ID, quantity, etc.) for the items the retailer intends to match to items in their Google Merchant Center (GMC) for RMN/CMN brand and SKU-level reporting.
If the item sold in a physical location is not in the retailer’s Google Merchant Center (GMC), can the retailer leave the item attributes fields for those SKUs blank while still providing all standard transaction attributes at the SKU level and maintain accurate store sales reporting and dynamic AOVs?
Yes, the retailer has the option to leave the Item Attributes fields blank for those SKUs. Store sales reporting and dynamic AOVs will remain accurate.