Activate Data From a Clean Room (Brand Self-Service Workflow)
If your contract allows, you can use a brand self-service workflow to activate the resulting data from a clean room's list question in LiveRamp Clean Room to any of LiveRamp's destination partners using LiveRamp Connect. In this workflow, the brand partner handles the activation of the data in LiveRamp Connect, rather than the retailer.
Note
Activating data from LiveRamp Clean Room using Connect is in limited availability. To see whether you can have this workflow enabled, contact your LiveRamp account team.
Data for this workflow must be US data keyed off of RampIDs.
If you're using a retailer-managed activation workflow, see "Activate Data From a Clean Room (Retailer-Managed Workflow)".
Activation workflows involve a combination of steps performed in LiveRamp Clean Room and in LiveRamp Connect.
Tip
You can use the interactive walkthrough demo below to go through the entire process (to go to a full-screen version, click here):
Prerequisites
Before performing the overall steps listed below, make sure all parties have already performed the required steps to set up clean rooms and run questions. For more information on performing those steps, see the following articles:
Overall Steps
Once all prerequisites are in place, activating data from a clean room involves the following overall steps in LiveRamp Clean Room:
The retailer configures the clean room for Marketplace activation.
The retailer enables segmentation for the desired list question.
The retailer or the brand partner schedules report runs for the list question.
After the necessary steps are performed in LiveRamp Clean Room, the following overall steps are performed in LiveRamp Connect:
The brand partner builds a segment from the resulting table.
The brand partner activates the desired destination accounts:
The brand partner distributes the built segment to the desired destinations.
Perform Steps in LiveRamp Clean Room
Perform the steps in the sections below and then perform the steps in LiveRamp Connect.
Configure the Clean Room for Marketplace Activation
Before the results of a list question can be sent to LiveRamp Connect for segmentation and activation, the retailer needs to configure the clean room for Marketplace activation of the data in LiveRamp Connect.
Tip
To view an interactive walkthrough demo of this process, click here.
If you are not already in the clean room, enter the clean room.
From the clean room navigation menu, click .
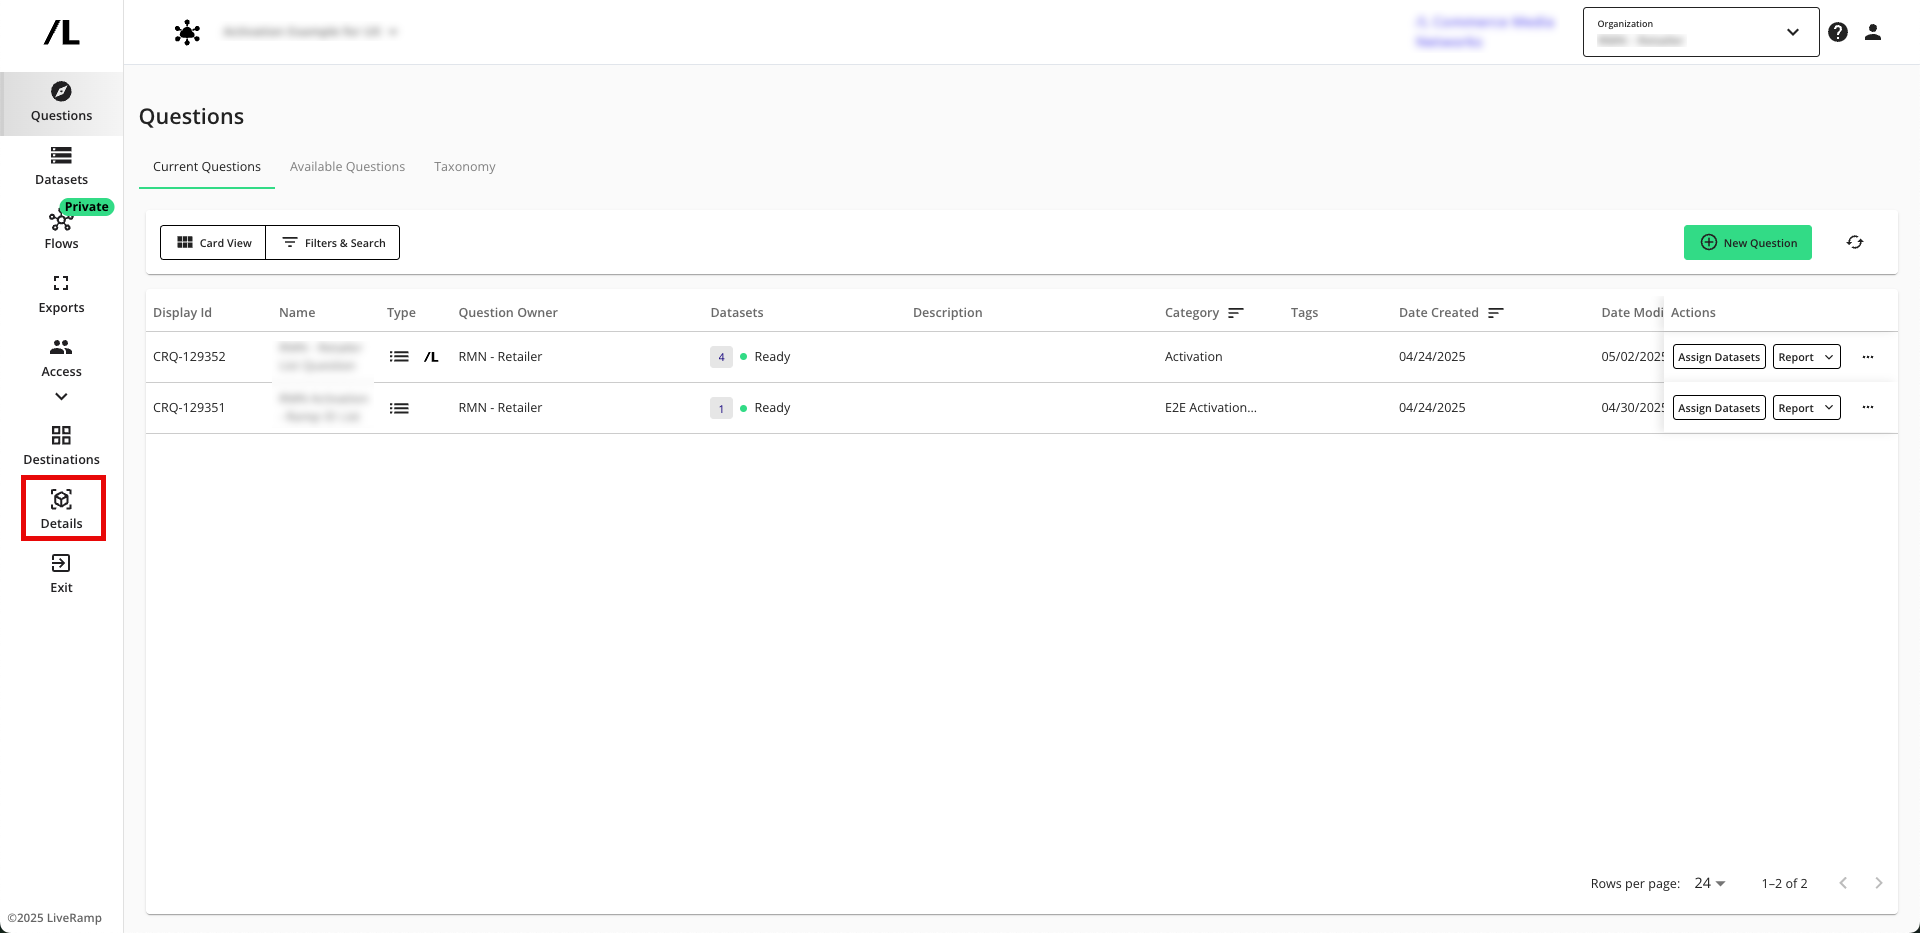
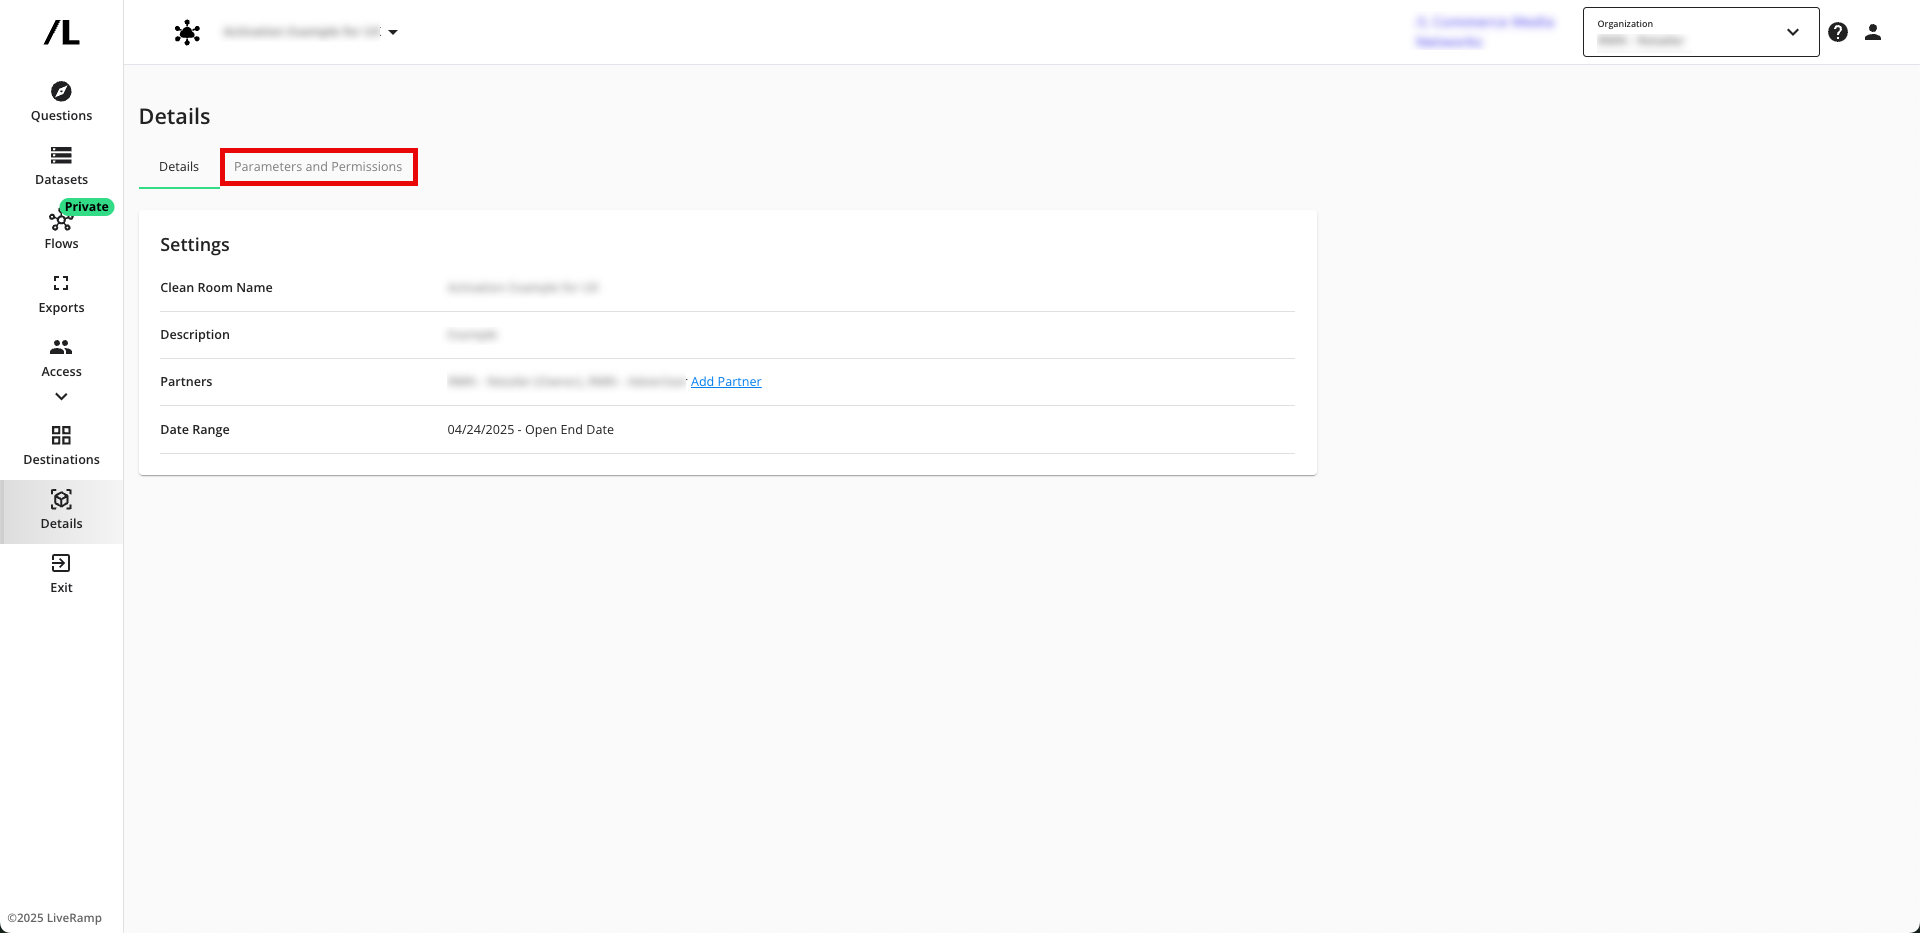
Select the Parameters and Permissions tab.
Scroll down to the Activation Permissions area, and then slide the "Enable Marketplace Activation for Partners" toggle to the right.
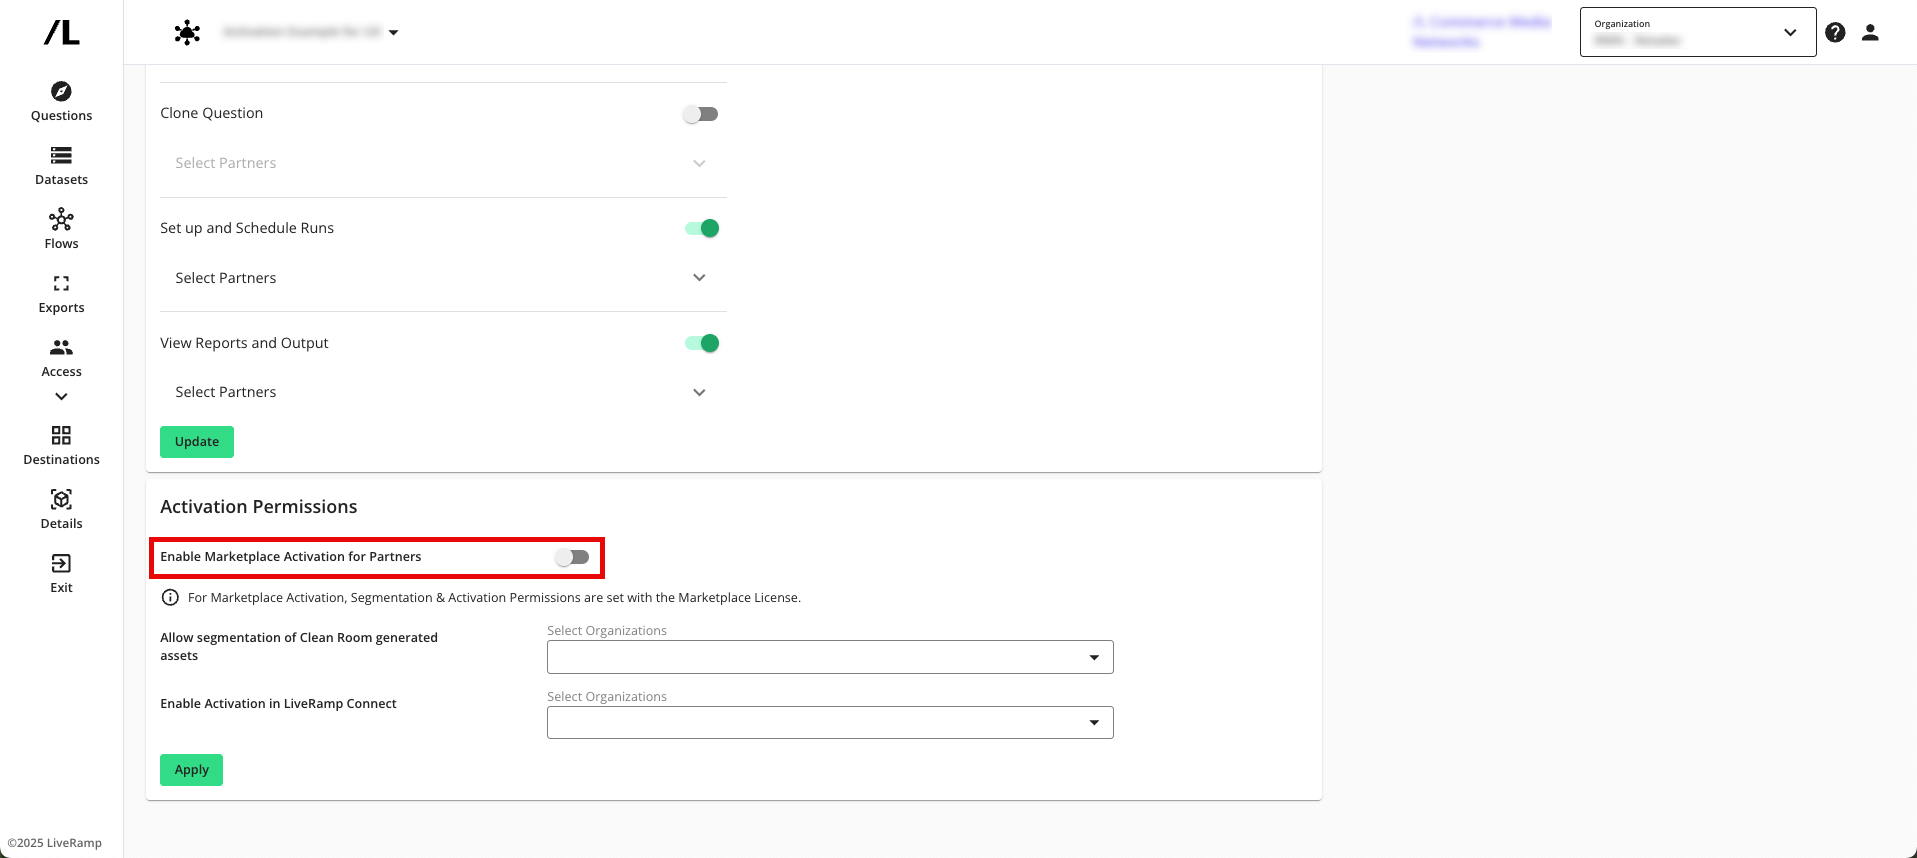
Click .
Enable Segmentation for the Question
Once the clean room has been configured for activation, the brand partner needs to enable the list question for segmentation (which allows the results of the question to be used to create segments in LiveRamp Connect):
Tip
To view an interactive walkthrough demo of this process, click here.
If you are not already in the clean room, enter the clean room.
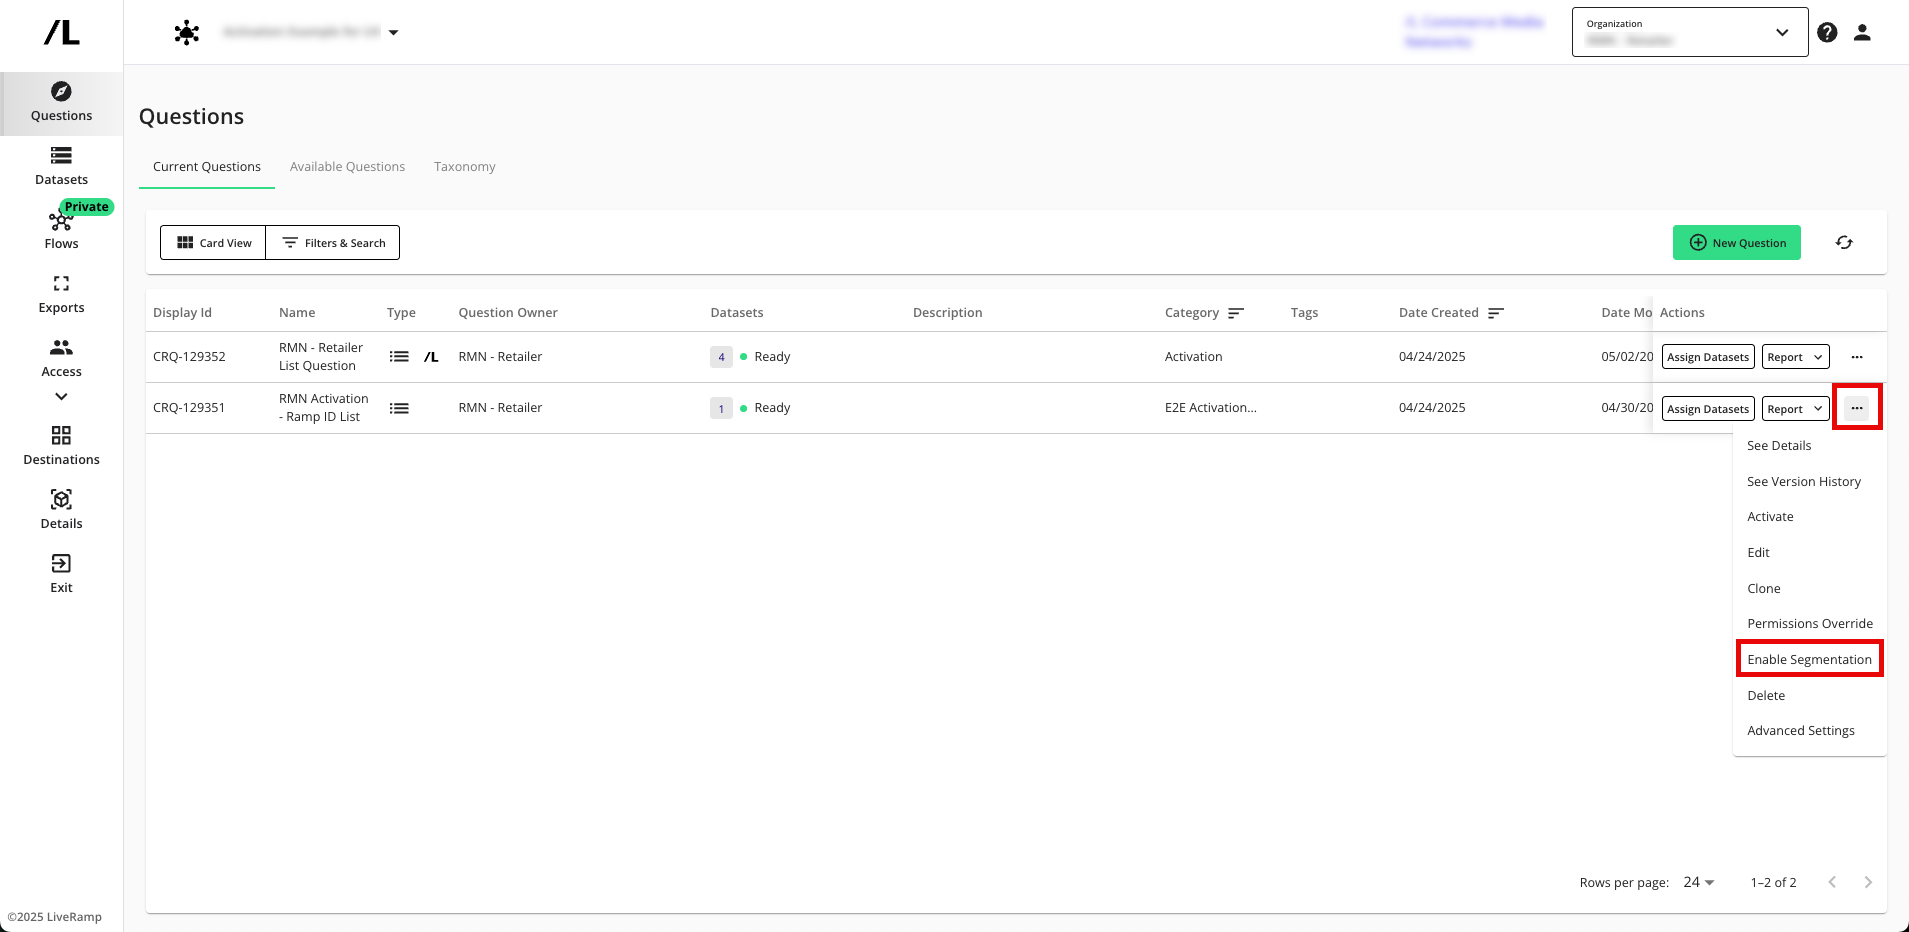
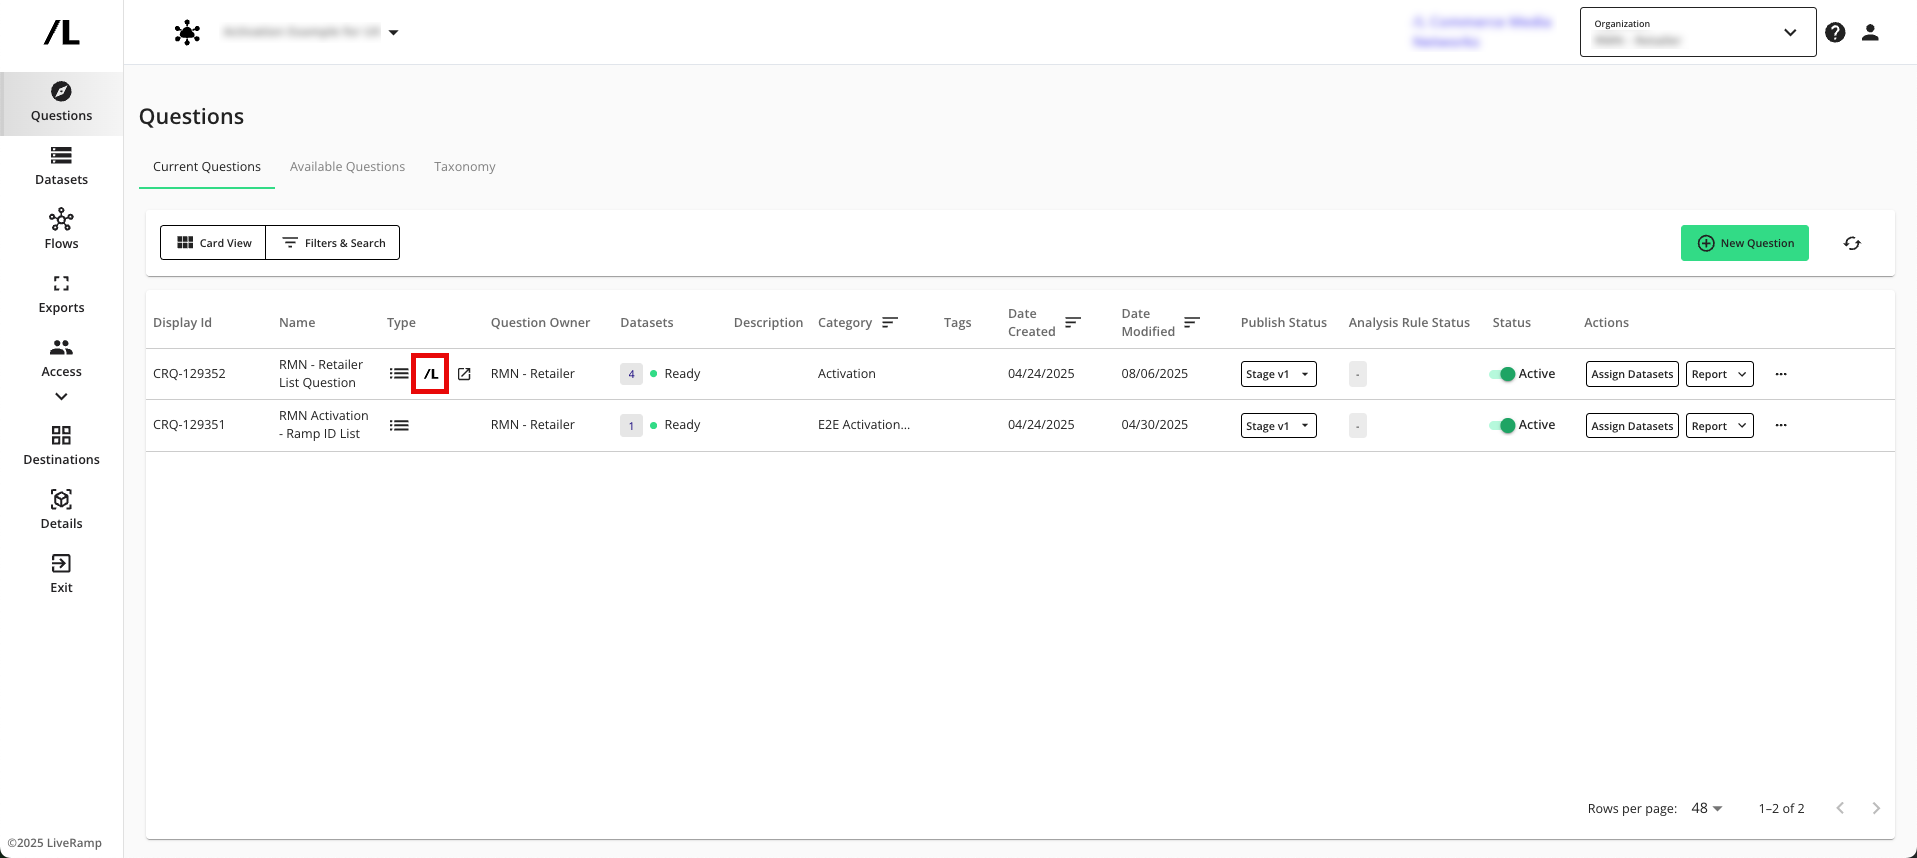
From the Questions page, in the row for the question you want to enable, click the More Options menu (the three dots) and then select Enable Segmentation.
From the dialog that appears, configure the table to be created for segmentation and then click :
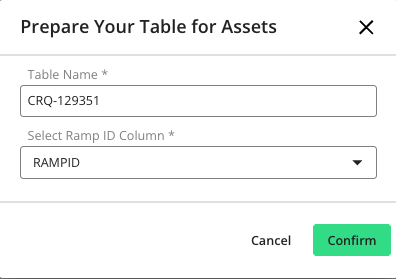
Table Name: Enter the name for the table (this name will appear on the Tables and Views page in Connect).
Select RampID Column: Select the field of your dataset that contains RampIDs.
RampID Domain Identifier: Enter the 4-digit domain encoding to use for the RampIDs in the list output.
Once the question has been enabled for segmentation, the LiveRamp logo appears in the question row and the question is ready to be run.
Schedule Report Runs for the List Question
Once the question has been enabled for segmentation, a new report needs to be run for the list question. Running the report initiates the process to create the table in LiveRamp Connect so that you can build segments from that table and activate those segments.
Note
Before running the report for the list question, make sure that all necessary datasets have been assigned.
The recommended method to run the report is by scheduling automated report runs at the frequency that makes sense for your situation. This way your data is periodically refreshed.
Depending on the clean room permissions, these steps might be performed by the brand or the retailer.
To schedule a report run for the list question:
Tip
To view an interactive walkthrough demo of this process, click here.
If you are not already in the clean room, enter the clean room.
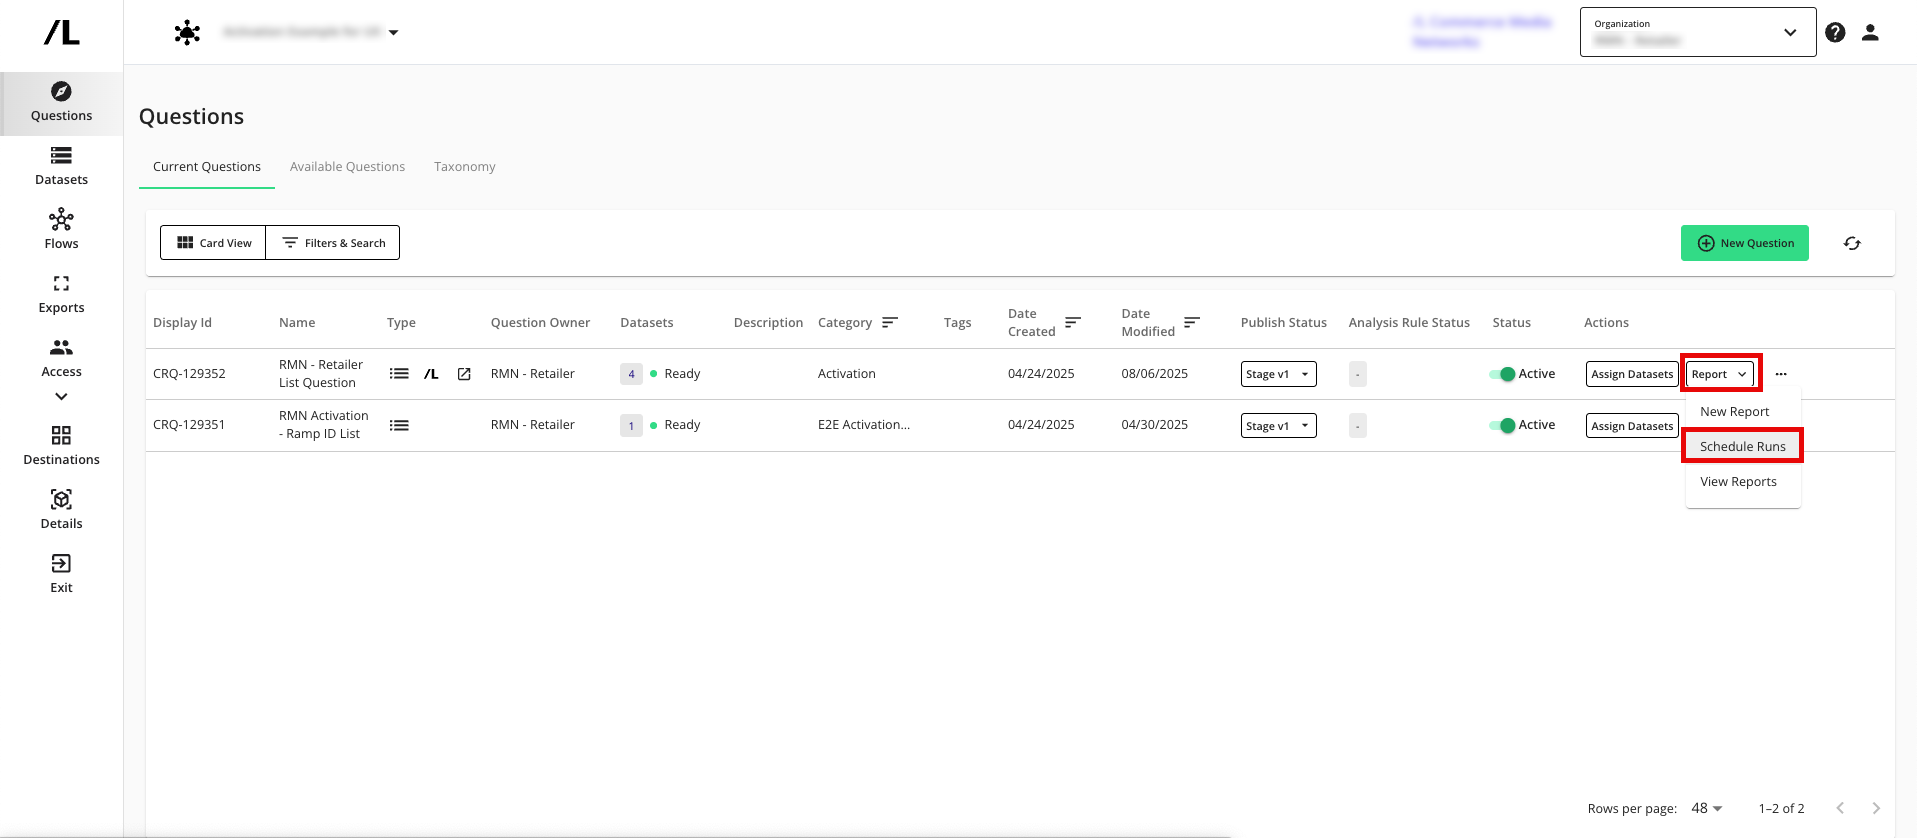
From the Questions page, in the row for the question you want to run, click the Report dropdown menu and then select Schedule Runs.
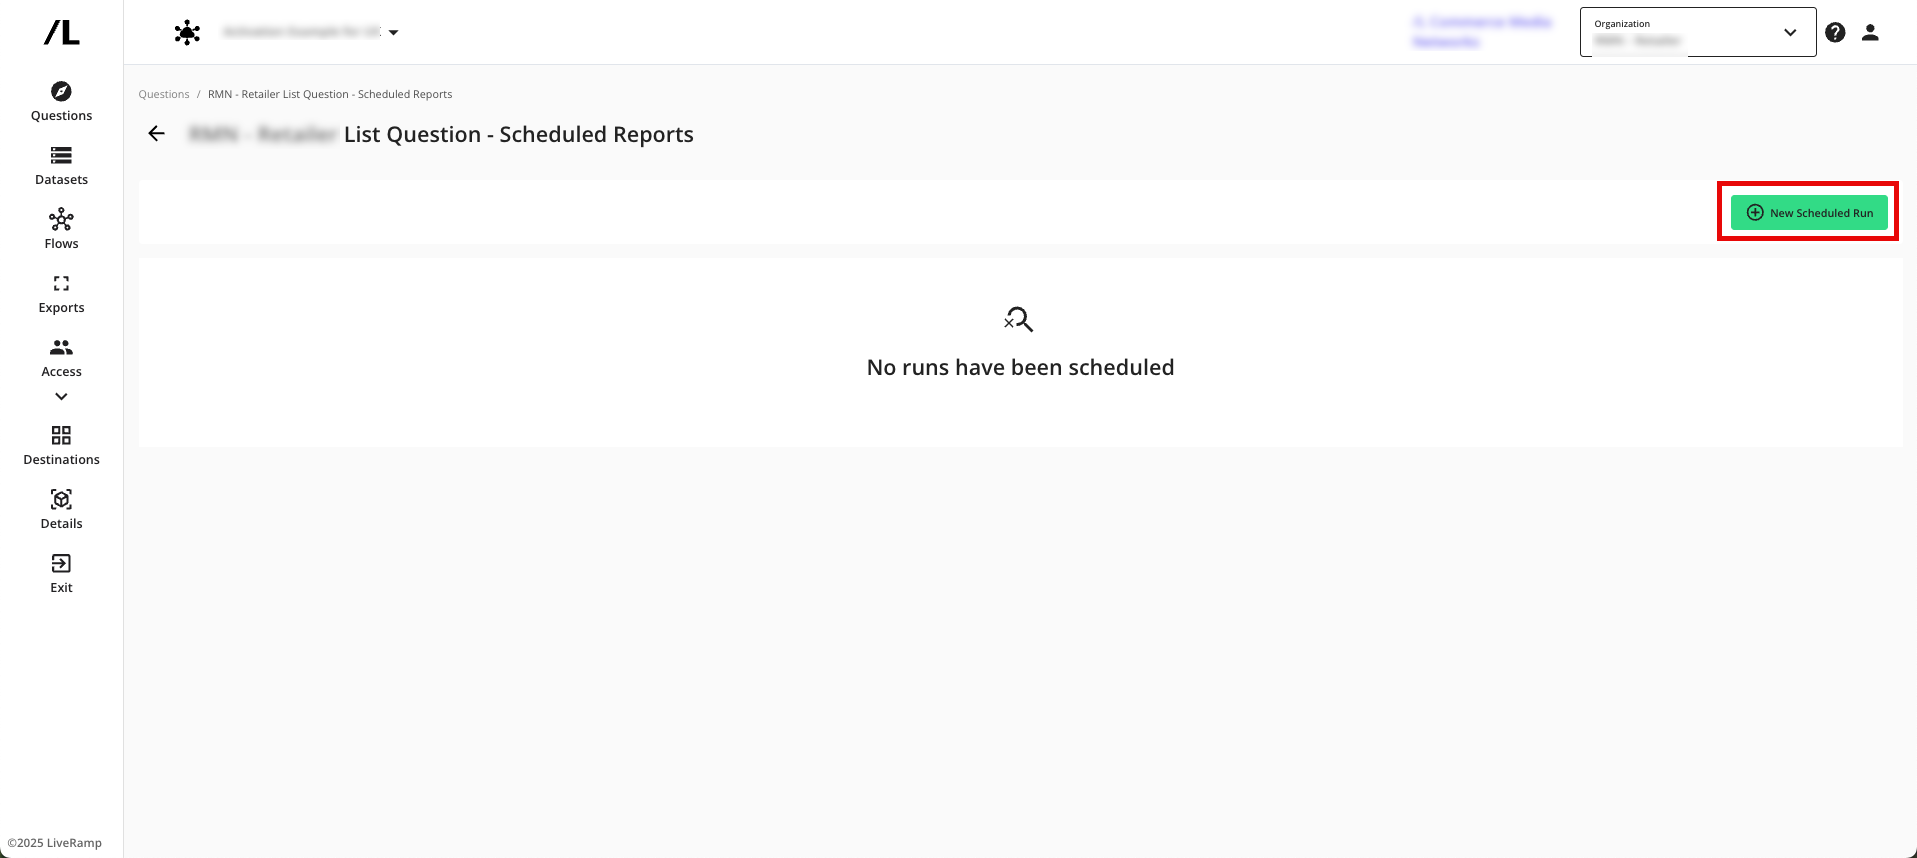
From the Scheduled Reports screen, click .
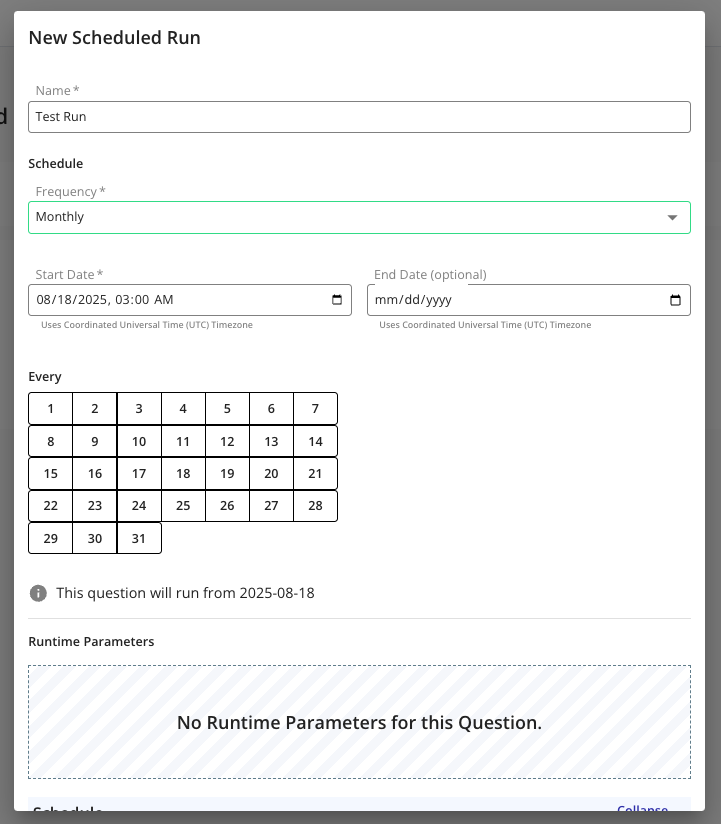
From the New Scheduled Run dialog, enter a name for the run.
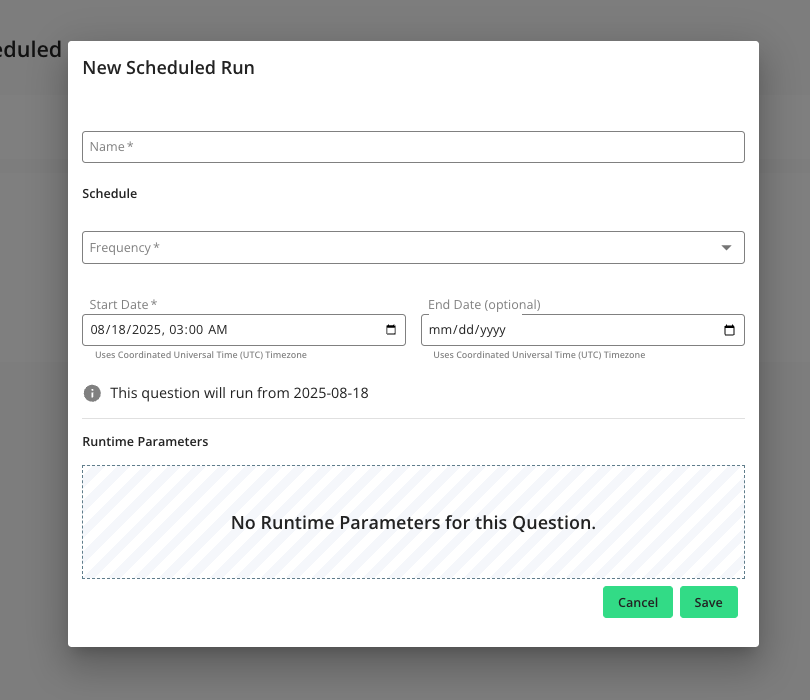
Select the frequency the reports should generate (Daily, Weekly, or Monthly):
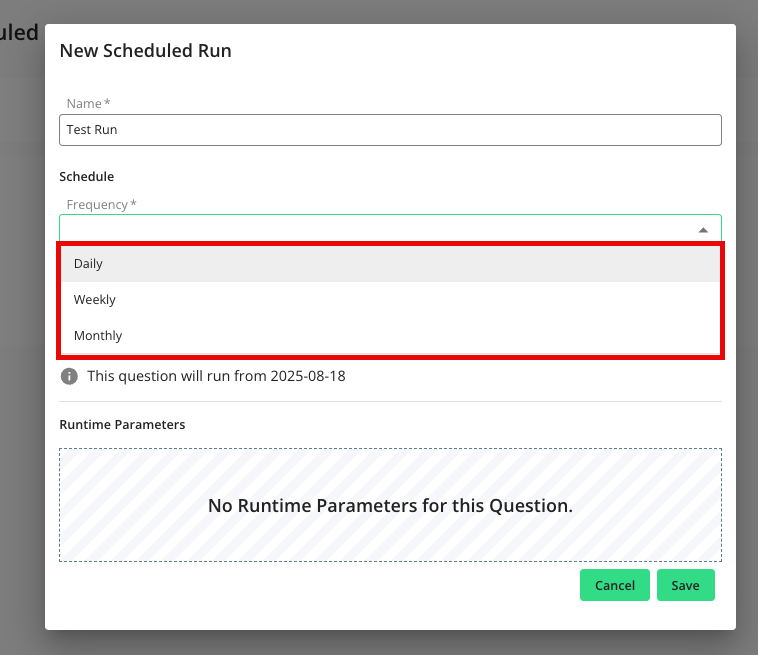
When you select “Weekly”, use the “Run Every” area to select which days of the week the report should run.
When you select “Monthly”, use the “Run Every” area to select the specific days the report should run each month.
Select a start date and time for the scheduled runs to begin generating.
Note
All times are based on Coordinated Universal Time (or “UTC”), so make sure to translate your desired time correctly.
If needed, select an end date. If no end date is selected, scheduled runs will continue generating indefinitely.
Tip
For example, if you want to run weekly automated reports throughout the last quarter of the year, select October 1 as the Schedule Start Date and December 31 as the Schedule End Date. This means reports will populate weekly on the specified days beginning on October 1 and will no longer automatically run after December 31.
In the "Runtime Parameters" area, select the interval type:
Days: Select the relative date (number of days prior to the run date) or a fixed date for the start and end date that the report output should reflect.
Tip
For example, when using relative dates, if you want to receive weekly automated reports on Sundays that populate data for the previous week (such as Monday through Saturday), the number of days before the run date should be 8 days for the start date and 1 day for the end date.
Months: Select the number of previous months each report output should reflect. In Question Builder, the query must have the @START_DATE and @END_DATE data parameters enabled in order to schedule runs by month.
If your question has additional runtime parameters, the name of each parameter will populate with an open field. Enter the runtime parameters applicable to your scheduled run.
At the bottom of the New Scheduled Run page, the run schedule will populate based on how you've configured the schedule. This shows you the exact dates when runs will occur. Click See Details to show the runtime parameters that will be applied on a given day's run, including the run dates that will be reflected in each run output.
Click Save.
The report runs based on the schedule and parameters you specified. You can view the status of the run by clicking the Report dropdown menu in the question’s row and then selecting View Reports to navigate to the Question Runs page.
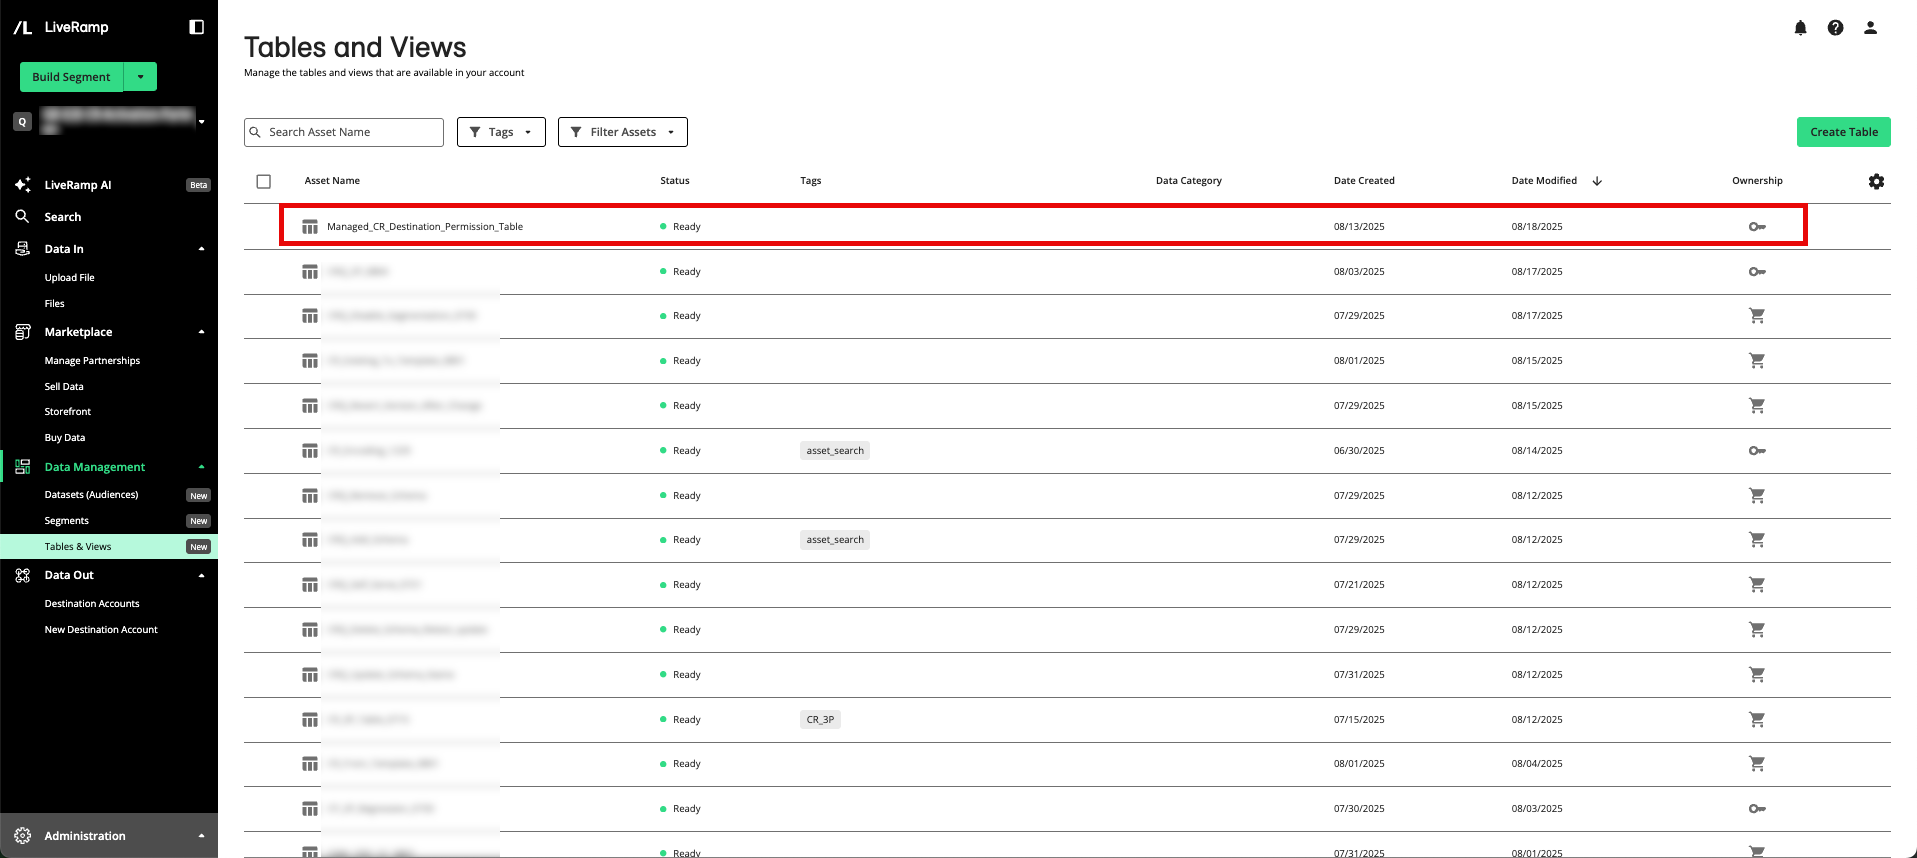
Once the status for the run is “Completed”, the resulting table should appear on the Tables and Views page in your Connect account. Once the table appears in Connect, perform the steps shown below in LiveRamp Connect.
Perform Steps in LiveRamp Connect
Once the necessary steps above have been performed in LiveRamp Clean Room, perform the steps in the sections below in LiveRamp Connect.
Build a Segment from the Table
After the report has been run, the list results appear on the Tables and Views page in Connect with the name you specified.
In a brand self-service workflow, the brand partner builds a segment from the table in Connect:
Tip
To view an interactive walkthrough demo of this process, click here.
From the Quick Actions dropdown list in the navigation pane, click to open the Segment Builder.
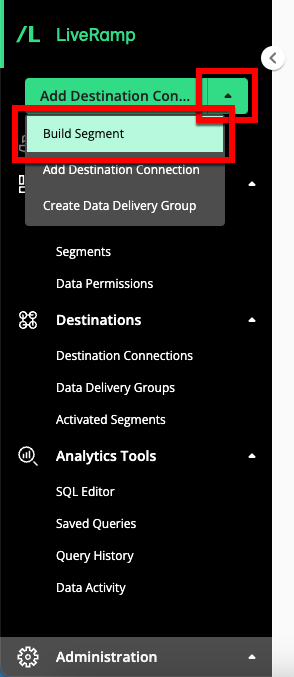
Tip
You can also open the Segment Builder from the Segments page by clicking or from the home page by clicking the "Build Segment" tile.
From the "Include all of the following rules:" area, click one of the following options:
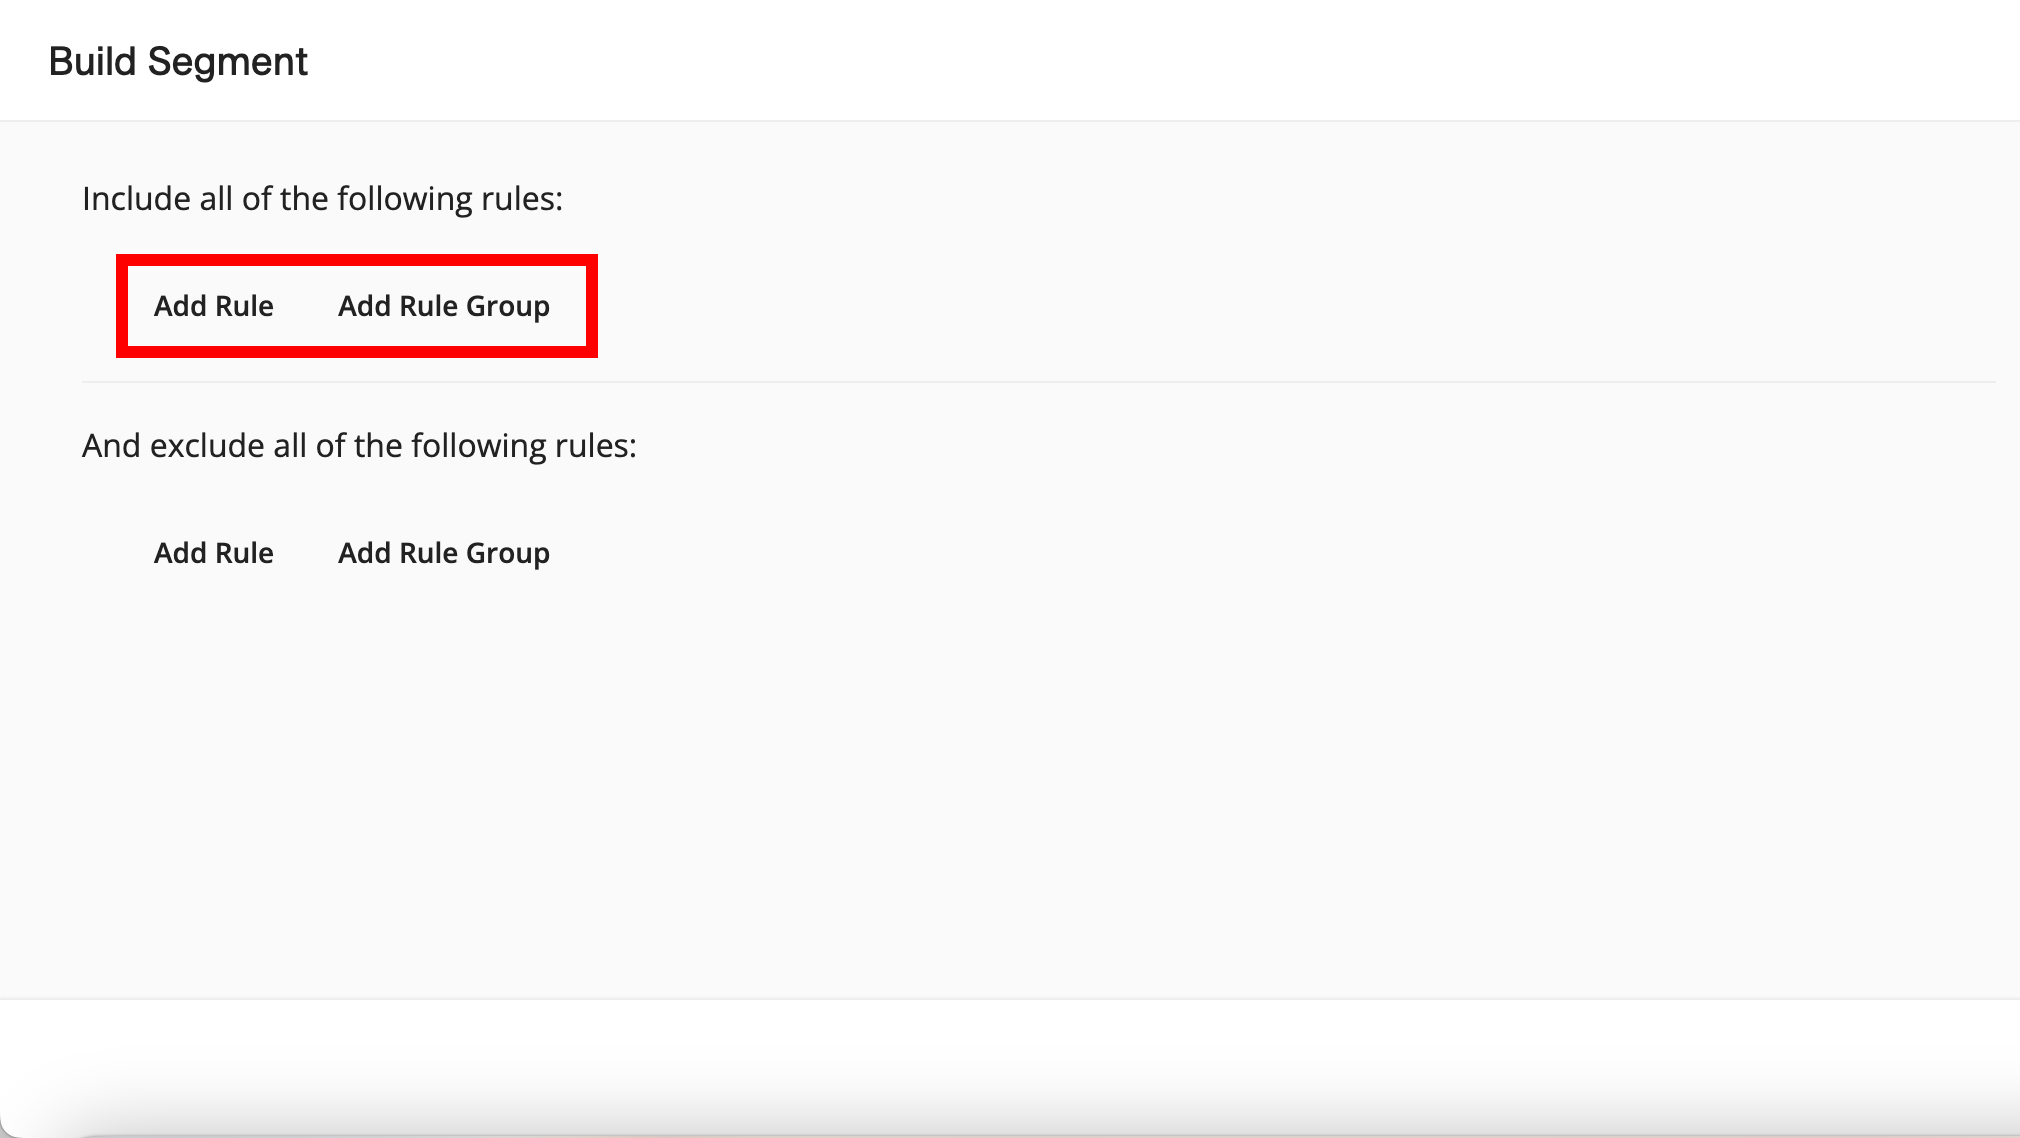
To create an individual filter rule, click . The Segment Builder displays a data asset dropdown with categories for datasets, built segments, and events.
To create a filter rule group out of multiple filter rules at the same level, where all rules will be joined by the same conjunction, click . The Segment Builder displays data asset selection fields for two filter rules joined with the conjunction "AND". If desired, you can change the conjunction to "OR".
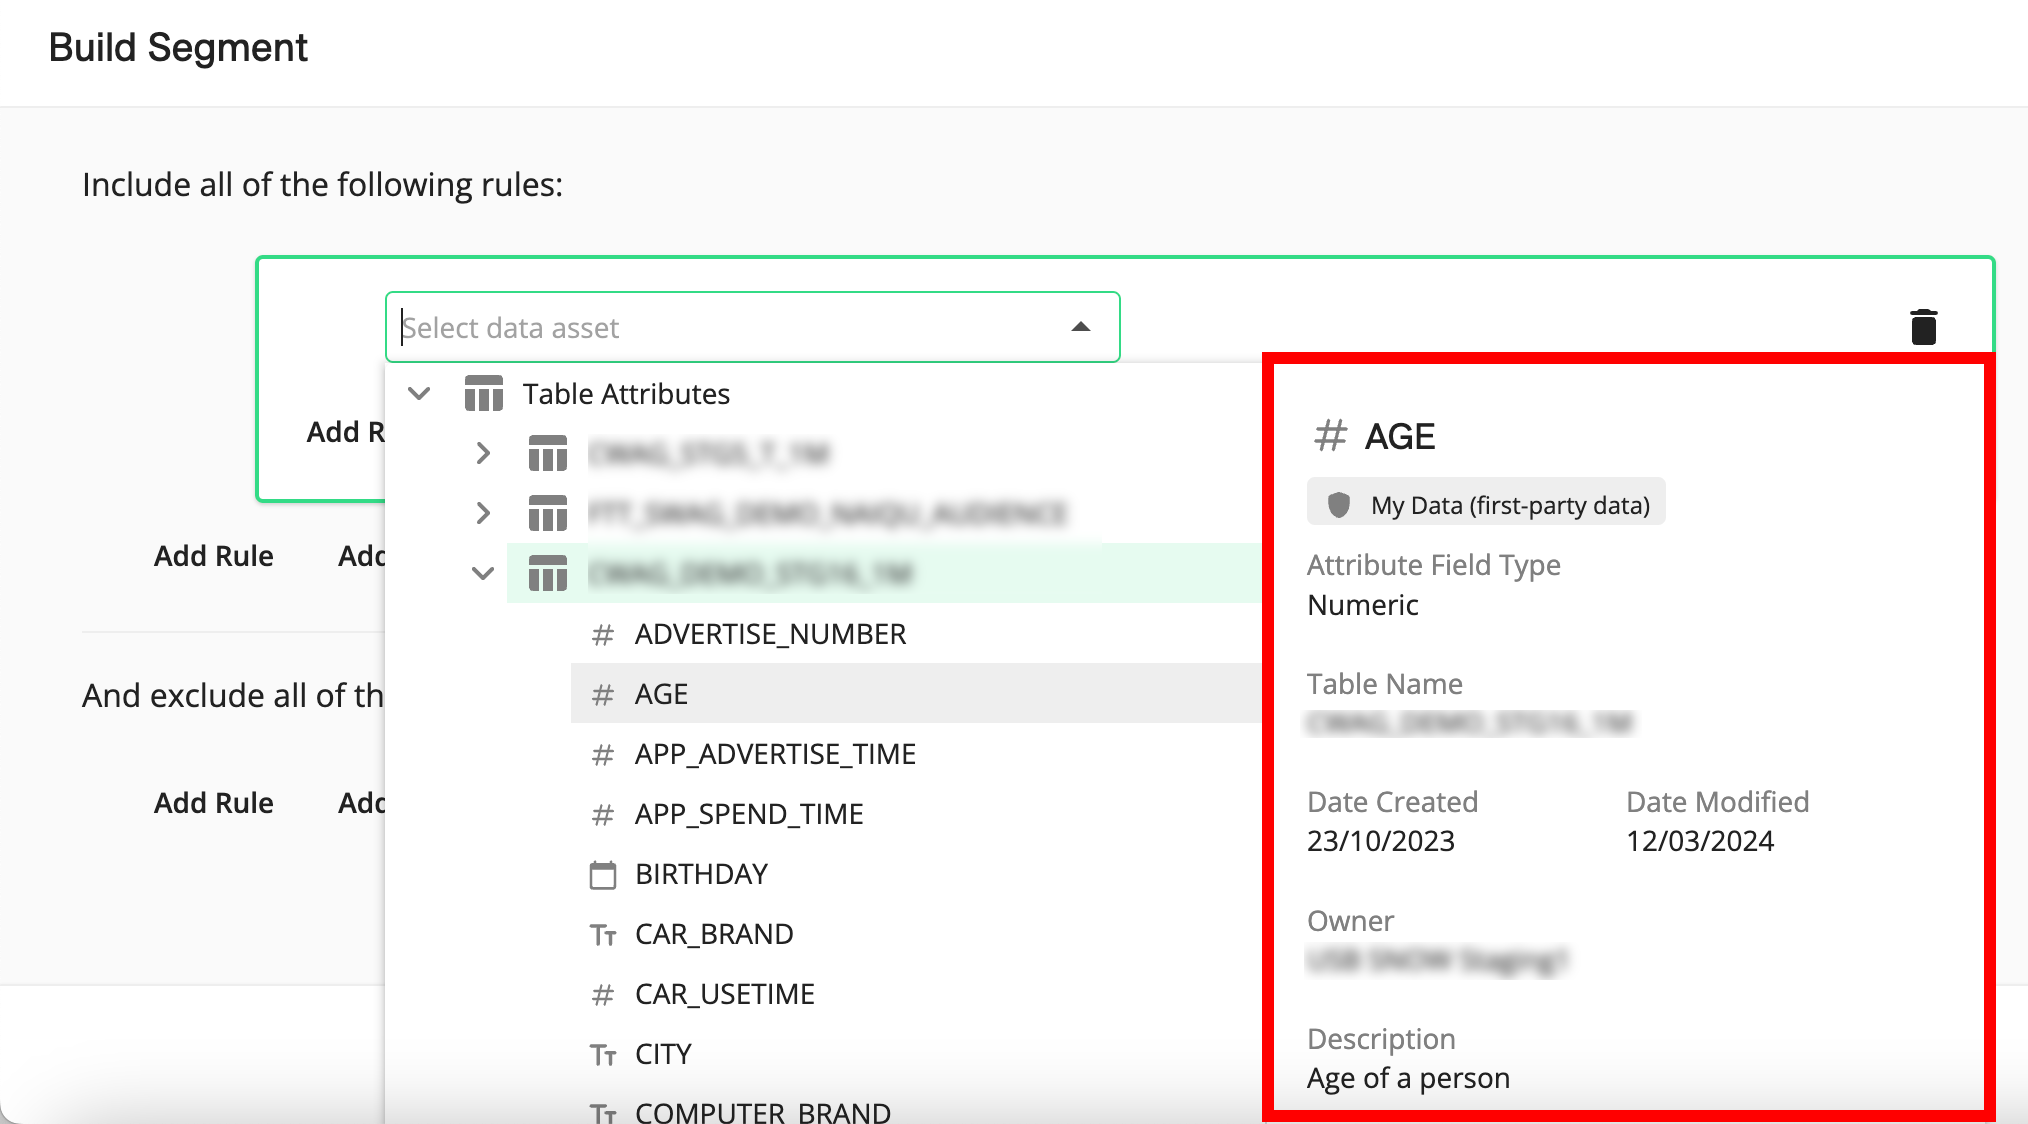
From the data asset dropdown, expand the list of datasets and select the desired table to use to build the segment from (table attribute example shown):
Note
When you expand a table, you will see options to select the individual table columns (attributes), but you can also select all members in the table by selecting the table itself.
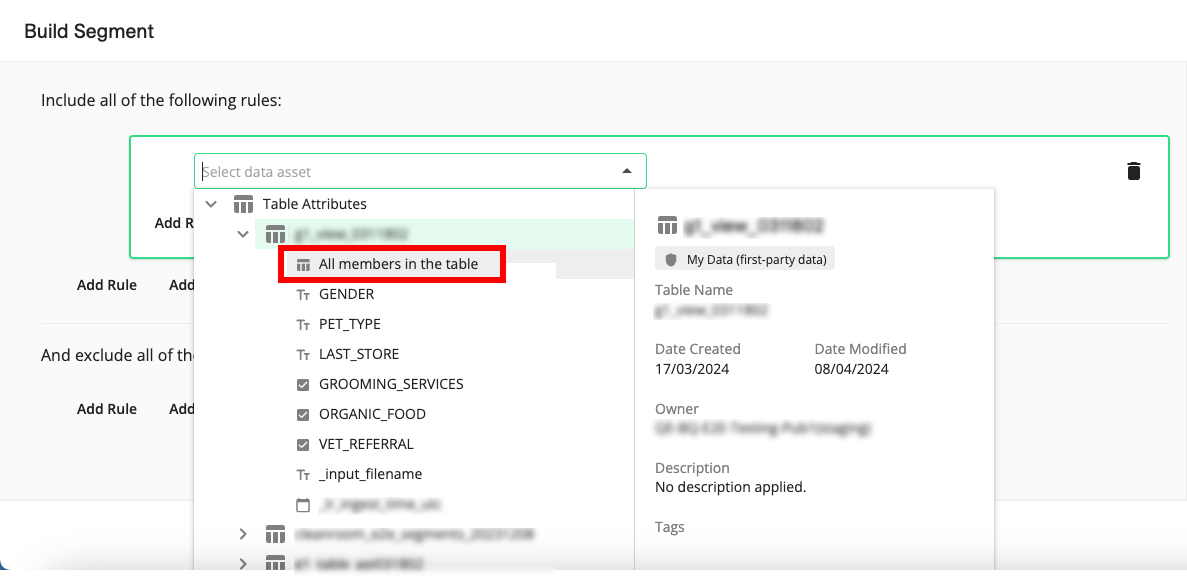
When you hover over an individual attribute column, a side panel appears with information about that attribute (such as date created, date modified, owner, and more).
When you select a table attribute, fields for the operator and value are displayed.

When you select the entire table, all members of the table are included in the filter rule (no fields for operator or value are displayed).
If you've selected a table attribute, complete the filter rule:
Note
If you selected a segment, an event, or all members of a table in the previous step, skip this step.
From the operator list, select the desired operator.
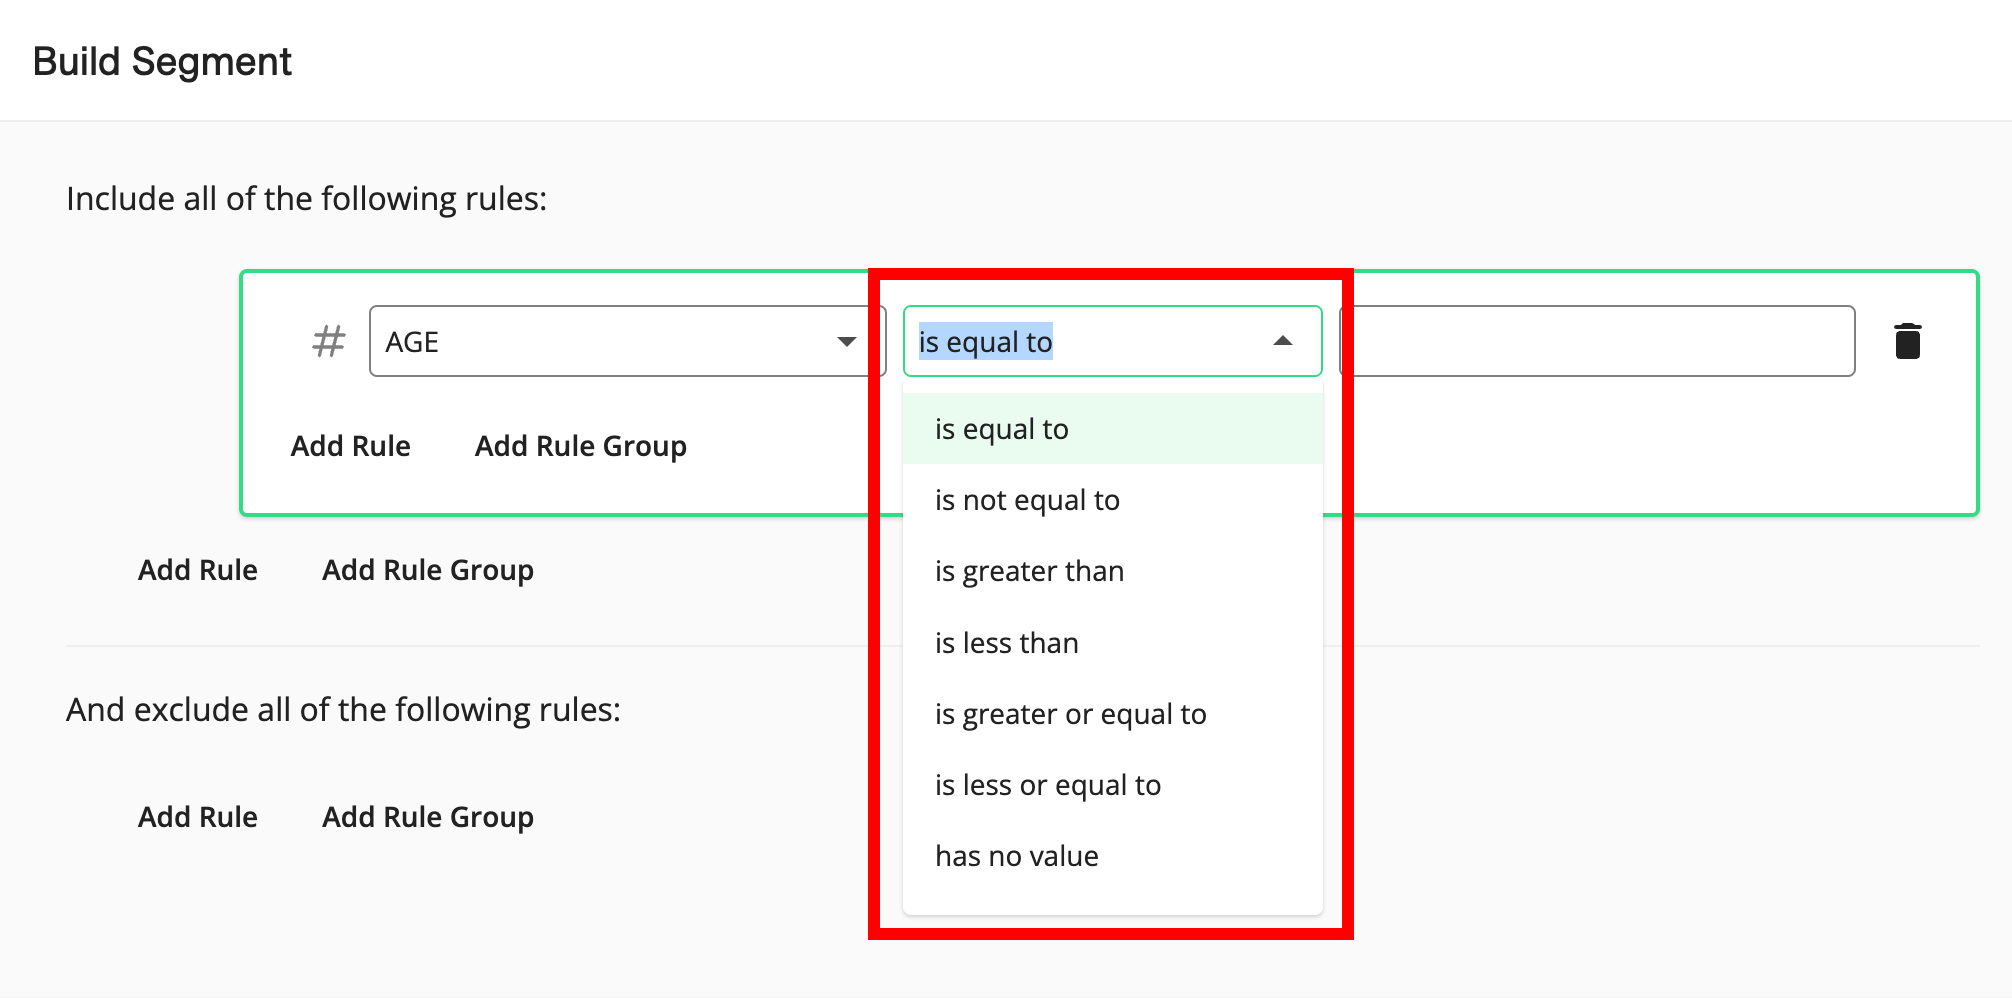
Note
The options available vary depending on the field type of the attribute you've selected. For more information, see "Available Filter Operators for the Segment Builder".
In the value field, enter or select the values to filter on (entered values can contain spaces).
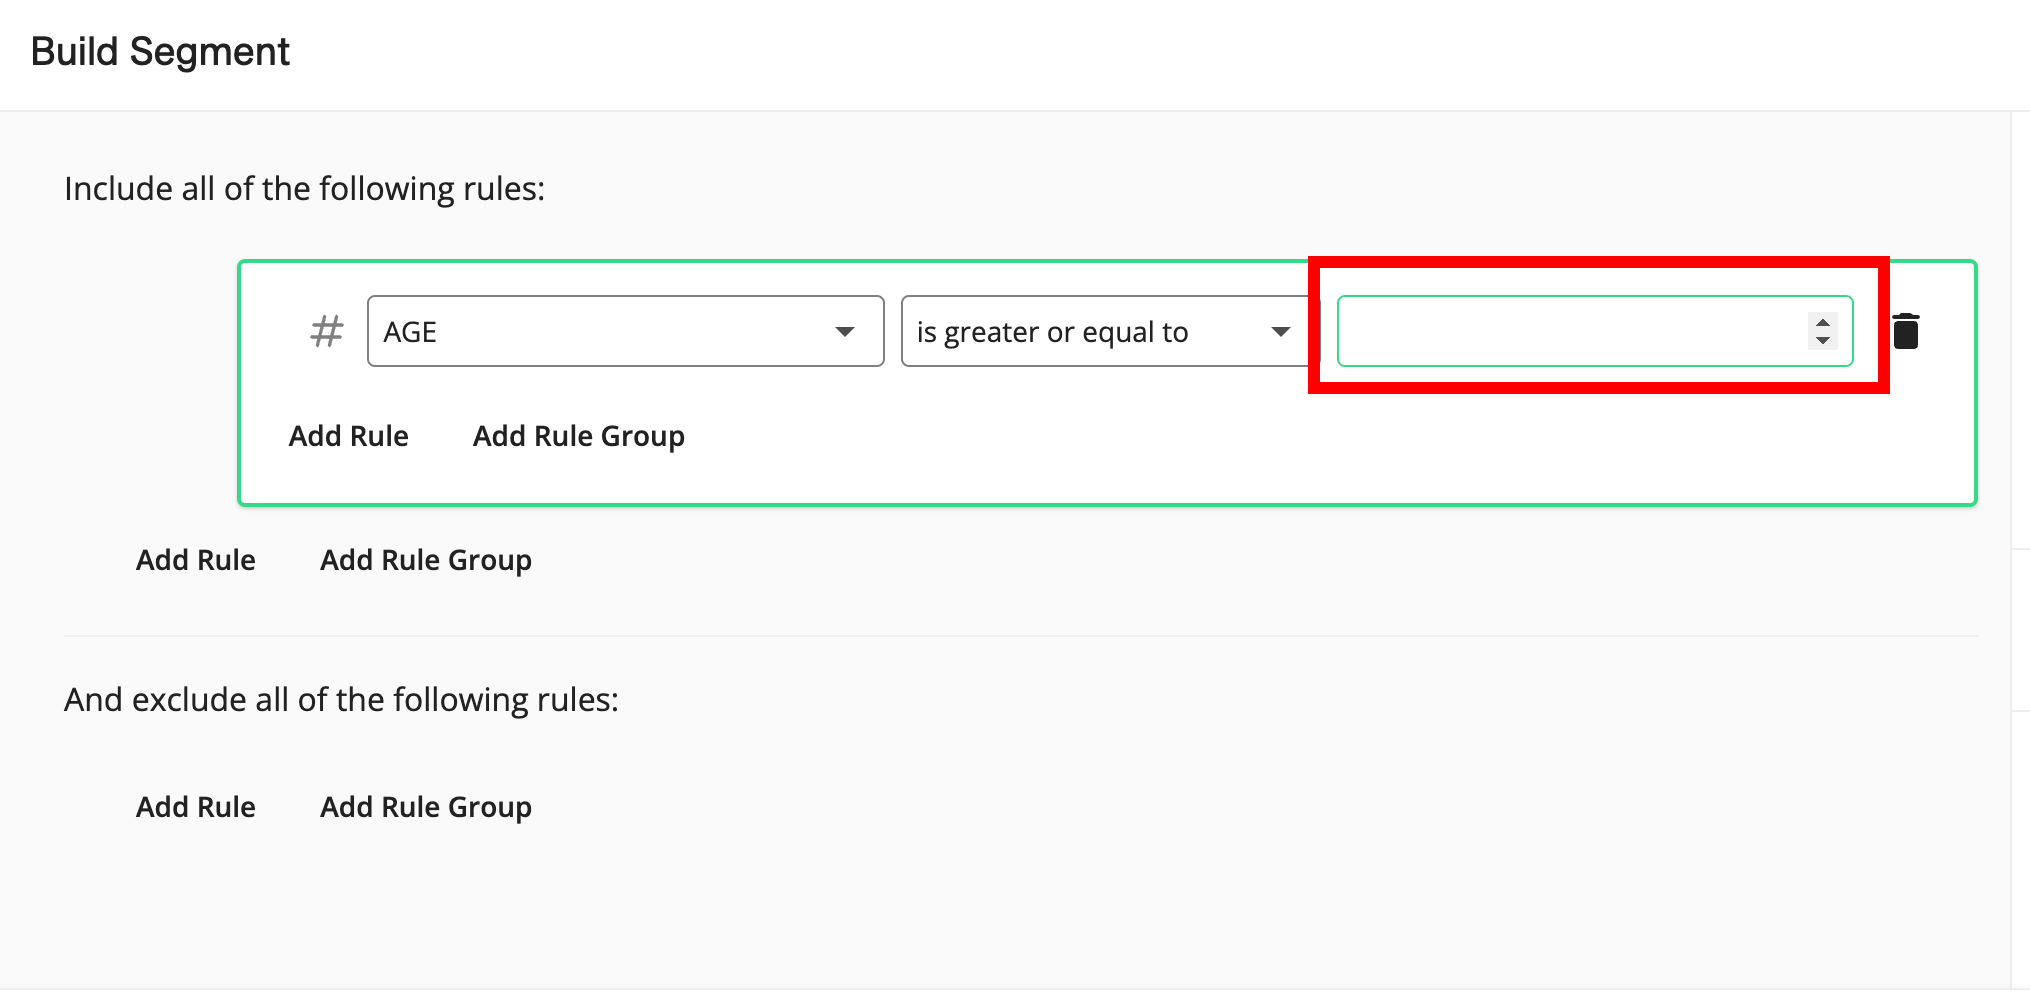
Note
For certain operators, such as "has a value", no value field will appear.
For string field types, when you select either the "is" or "is not" operator, the available attribute values appear as check boxes in the value field after a few seconds (a loader appears under the field while value loading is processing), and you can select multiple values.
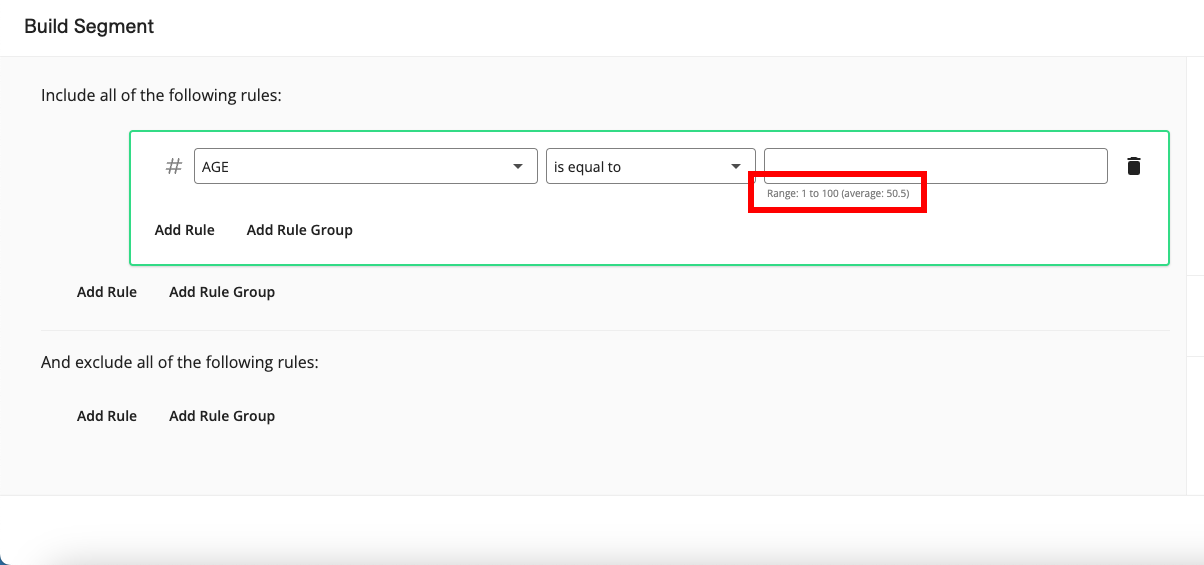
For the field types "numeric" and "integer", the range and average values for the field are displayed below the value field in the Segment Builder to give you insights into the values that the field contains (during the calculation process, you'll see a spinner and the text "Range being calculated").
To see the number of RampIDs in the current version of the segment, click the "Calculate" text.

Note
Any incomplete filter rules will be removed to perform the calculation.
Each time the filter rules are changed, you will have to click the "Calculate" text again to see the updated segment size.
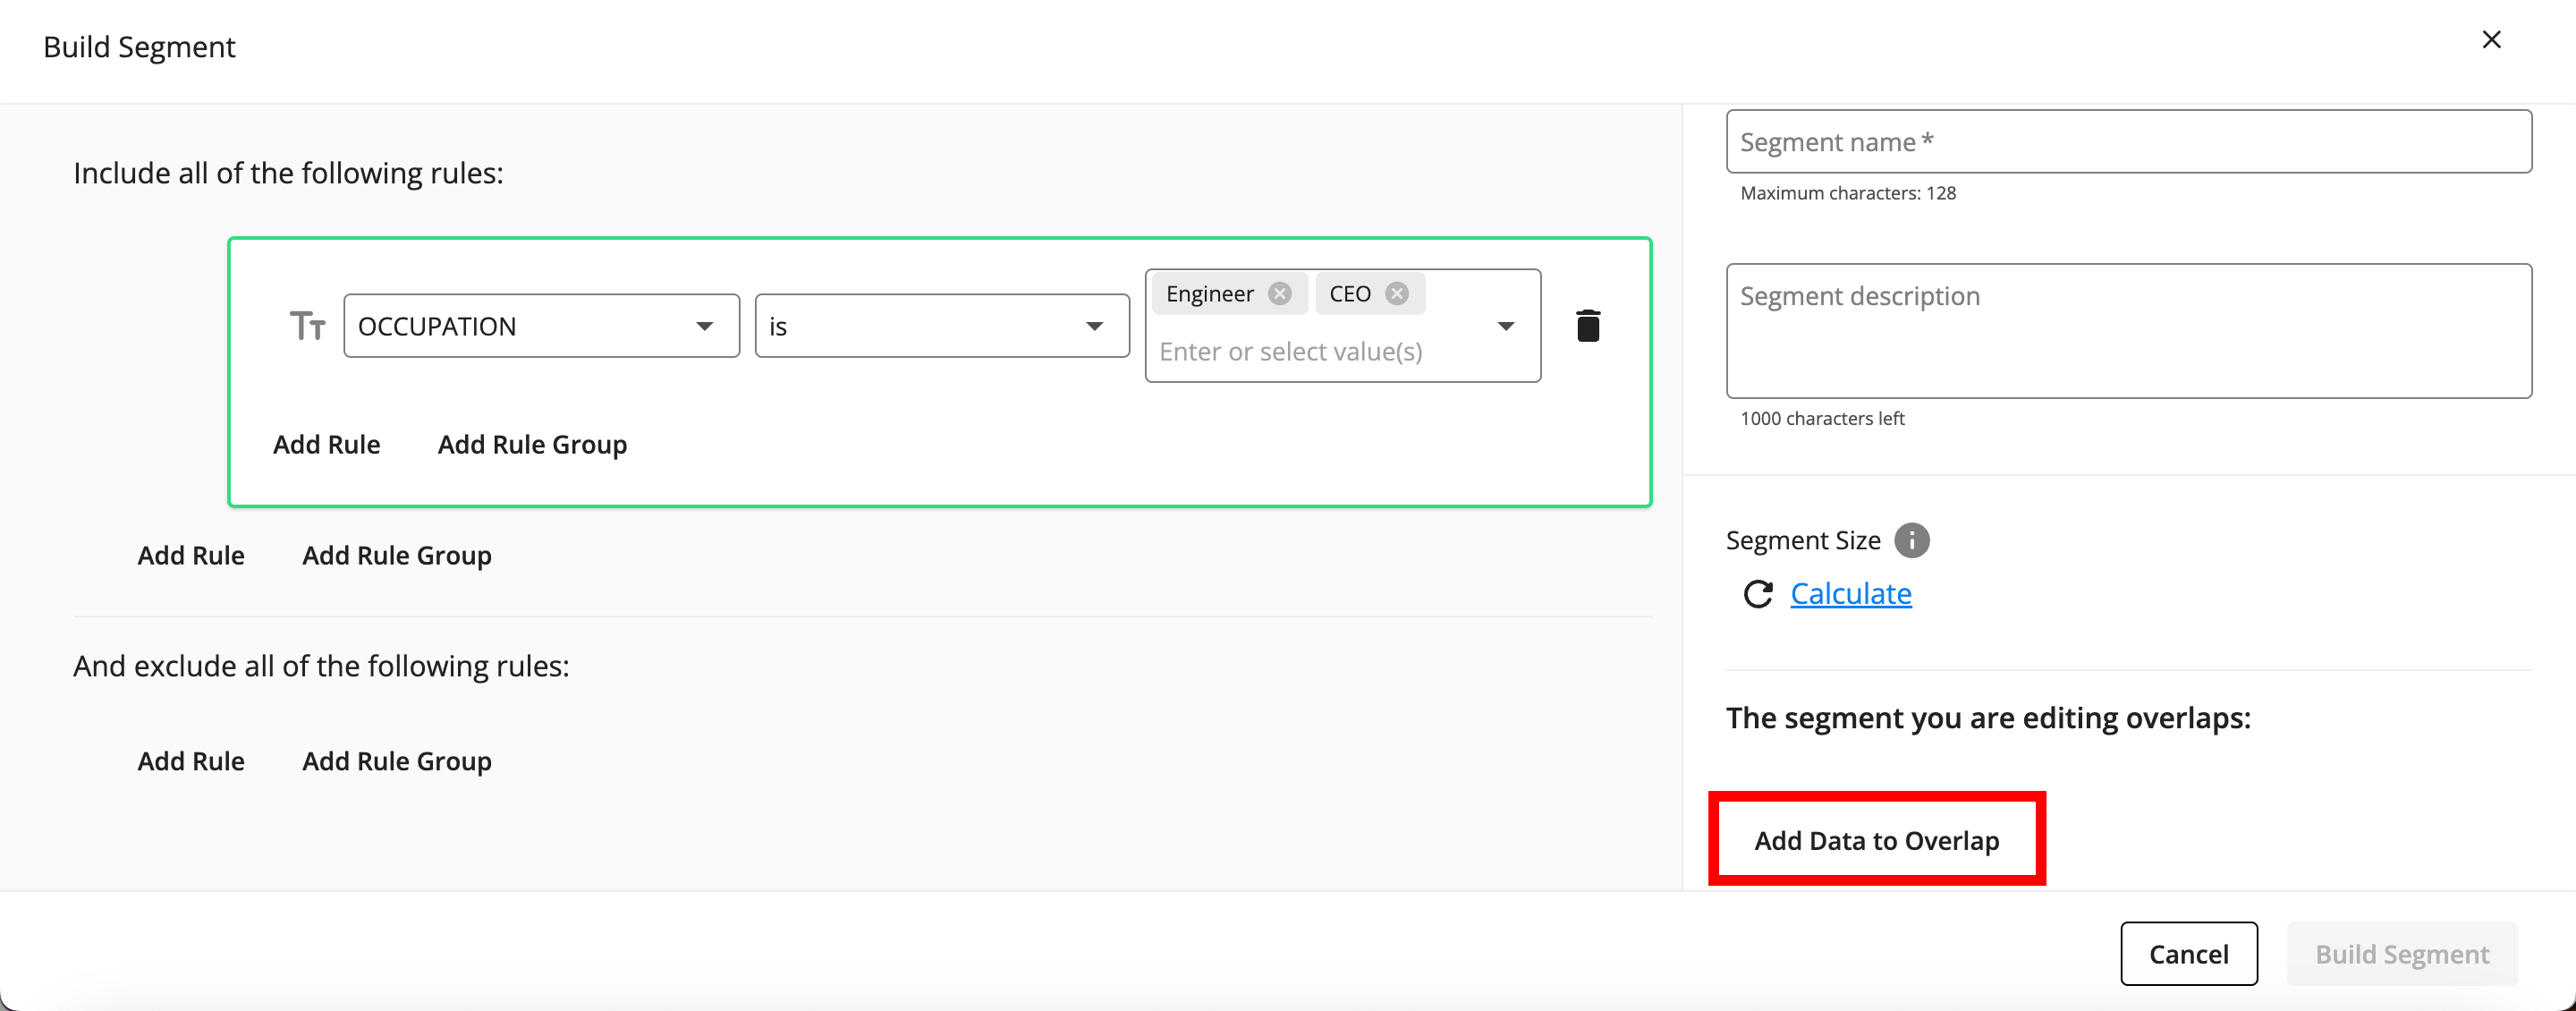
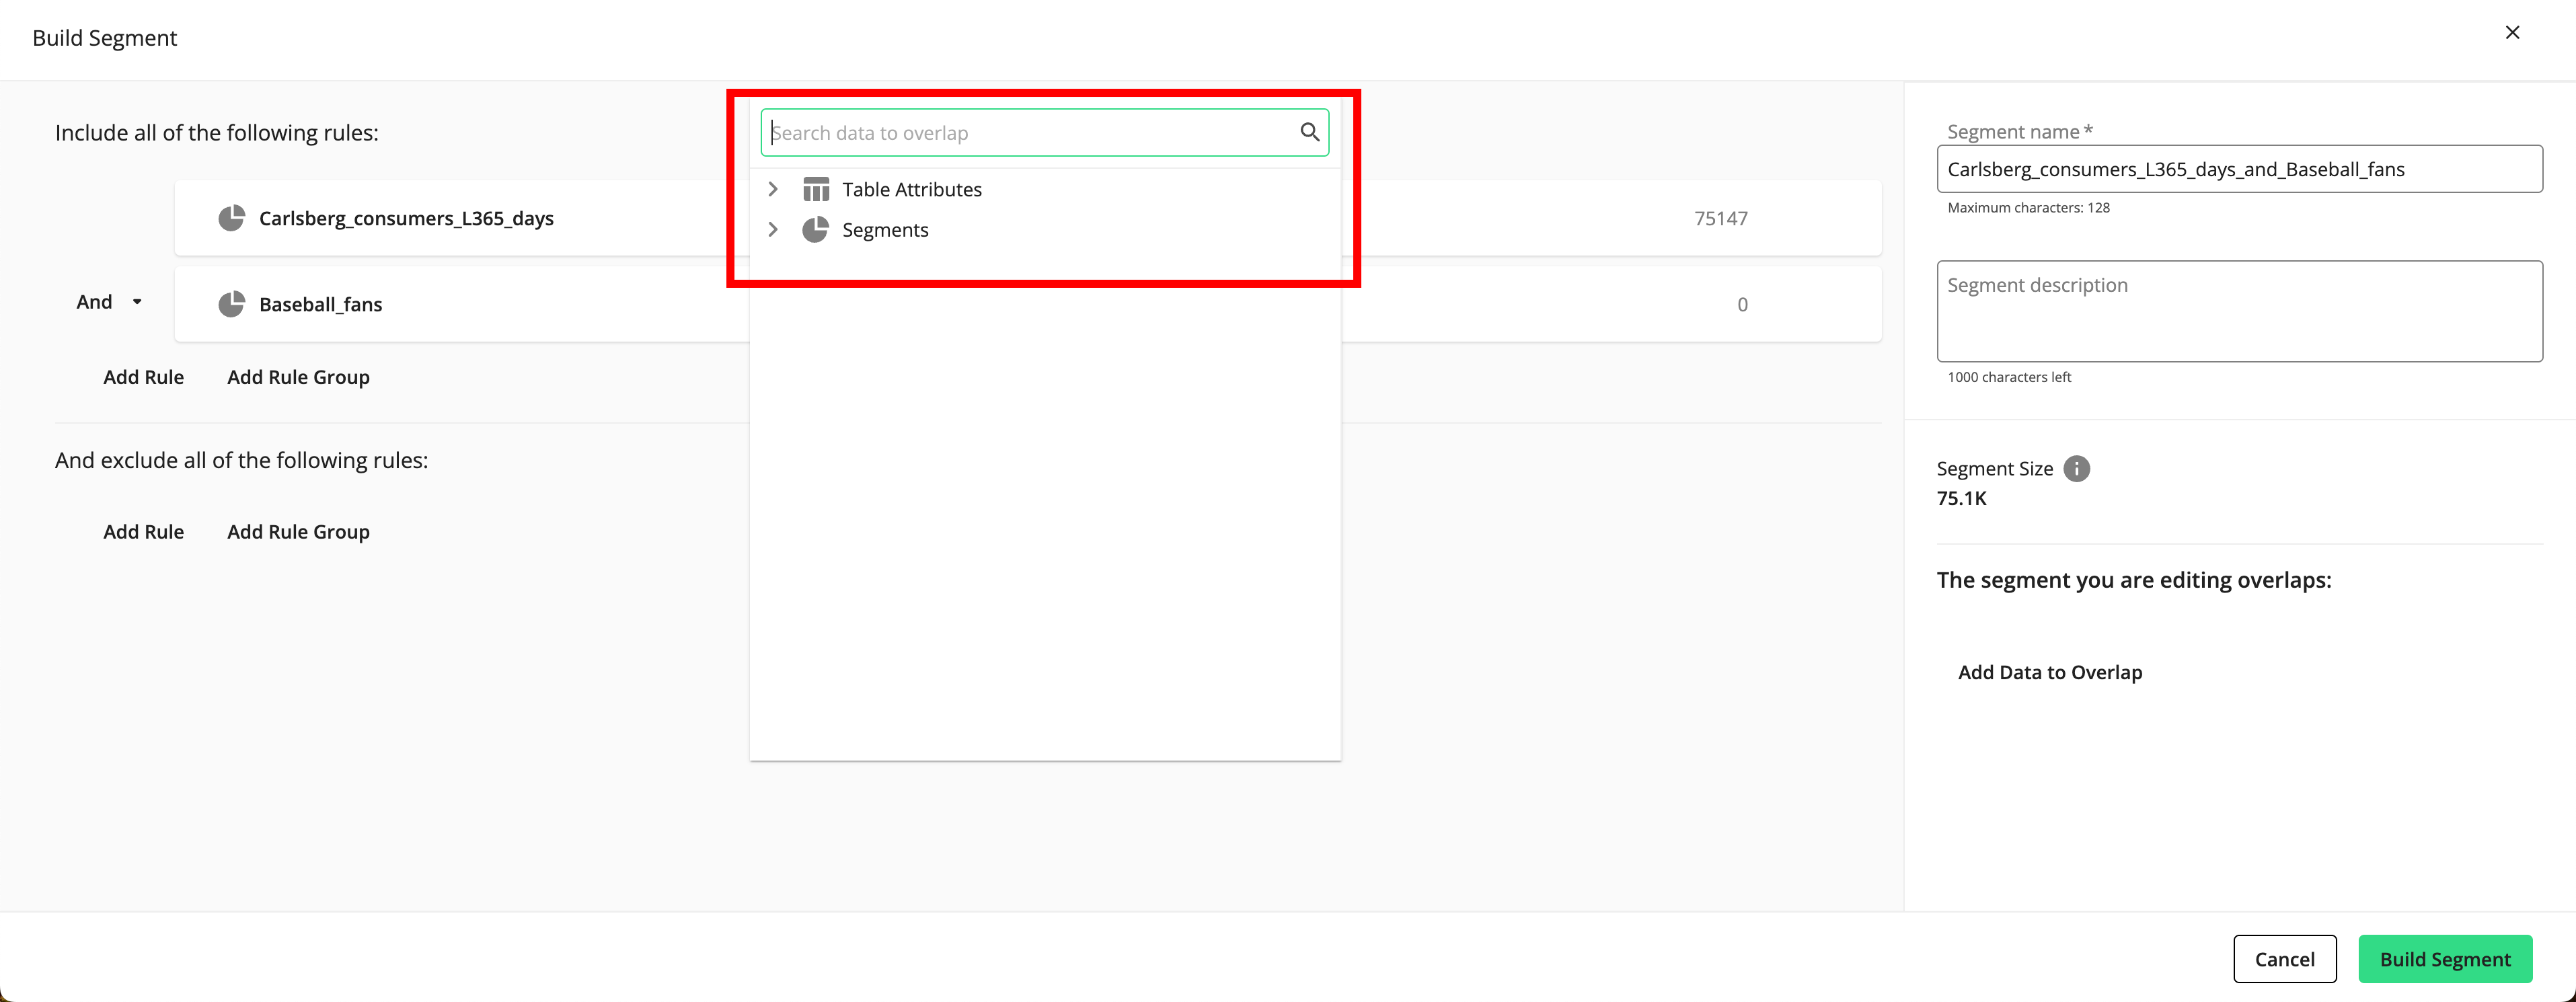
To view the overlap between the current segment and other data assets in your account that came from the same clean room, click and select the desired asset to overlap (for more information, see "Overlap Data Assets").
Note
You can only select your segments and tables that are not in an error or pending status. You cannot select a user-defined function or a segment or table that is an error or pending status to perform an overlap.
If you modify the current segment, you will need to click the "Calculate" text again to see the updated overlaps.
To include additional filter rules or rule groups, perform one of the steps below (in either the area to include or the area to exclude) and then populate the appropriate fields:
Note
If your first rule contained a Clean Room data asset or a data asset from an online dataset, you can only select additional assets that are contained in the same dataset as your initial selection.
You can use data assets from up to three first-party offline datasets.
If you initially added an individual filter rule, you can create a filter rule group using that first filter rule by clicking the More Options menu (the three dots) that appears to the right of the rule when you hover over the rule and then clicking Turn Into a Rule Group.
If you initially added a filter rule group, populate the additional filter rules.
To create an additional filter rule or rule group at the same level as the first filter rule, click either or outside of the first filter rule box.
To create a filter rule group nested within the first filter rule, click inside the first filter rule box.
Note
For more information on managing filters and filter rule groups, see "Managing Filters and Filter Rule Groups".
If necessary, click the caret next to a conjunction (an "And" or an "Or") to adjust that conjunction to create the desired segment statement.
Note
The conjunction you set at a particular level will be the same for all of the conjunctions at that level.
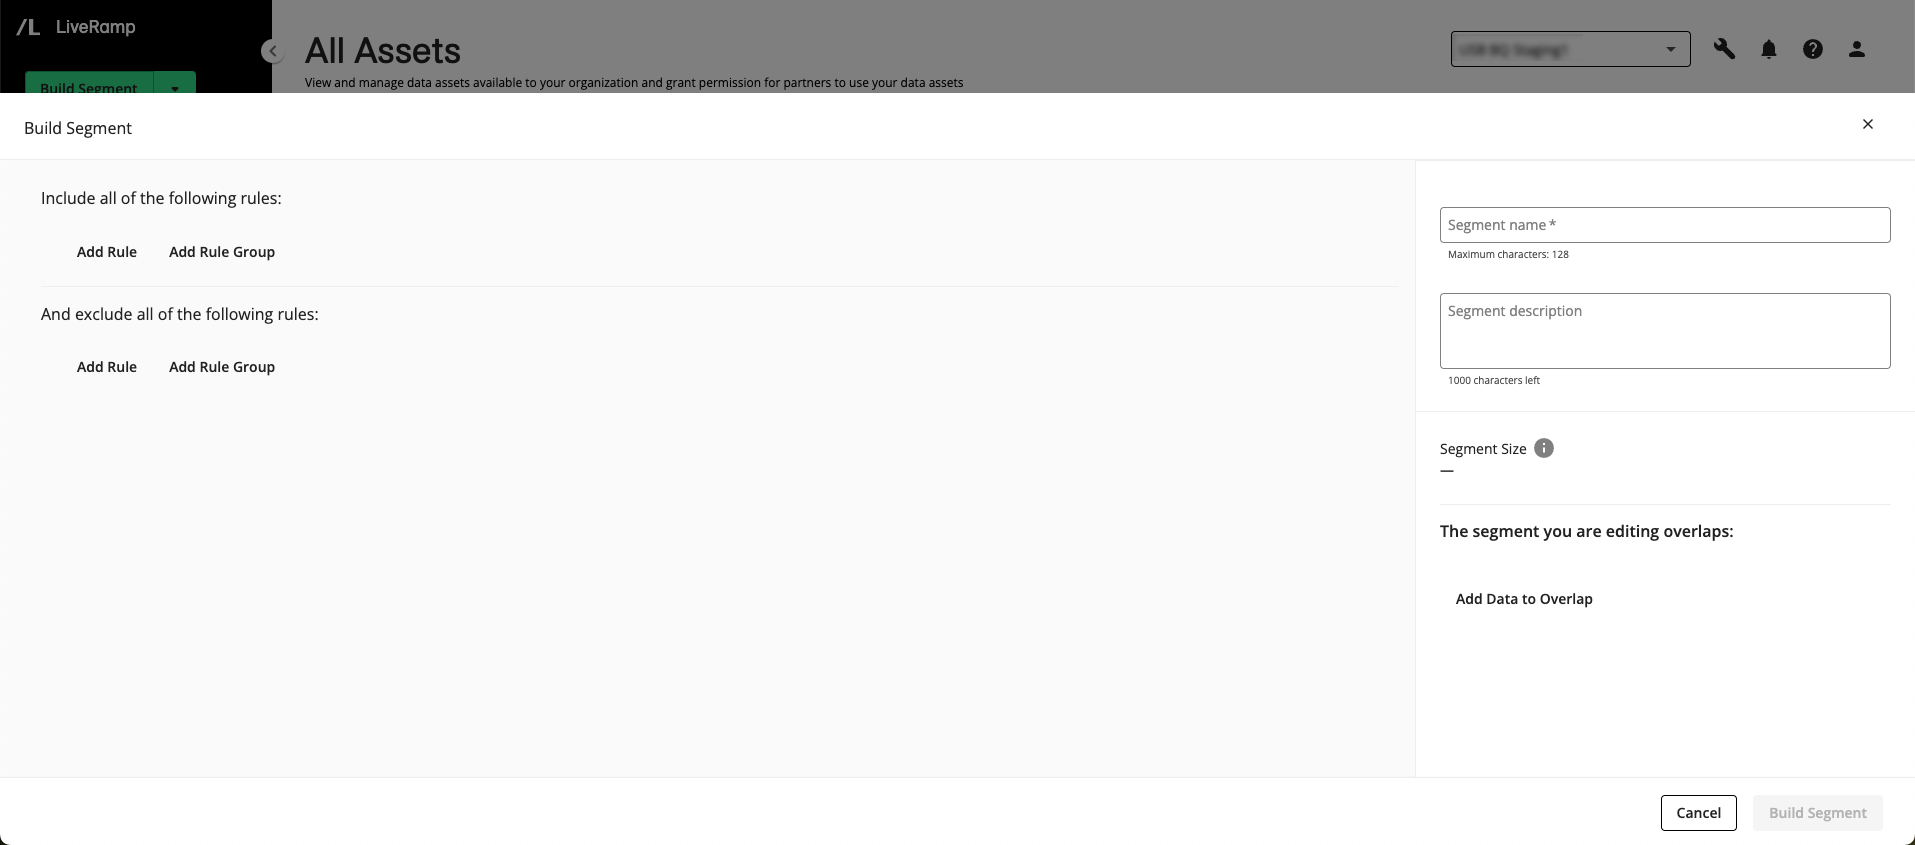
In the Segment Name field, enter a unique name for the segment.
Note
Segment names must start with a letter and can only contain letters, numbers, and underscores. Spaces or other special characters are not allowed.
Segment names cannot be longer than 128 characters.
If desired, enter a description in the Segment Description field.
When you're finished building the segment, click .
Note
If there are any incomplete filter rules (filter rules that were added but haven't been completed), a dialog will appear to confirm that you want to remove the incomplete filter rules before saving.
The segment appears on the Segments page with a status of "Queued".
Activate the Desired Destination Accounts
Segments are distributed to destinations by means of destination accounts. A destination account is a set of configurations that allow you to distribute data to a particular seat at a destination.
Destination accounts come in one of two categories:
First-party data destination accounts: Used for your first-party data and for non-monetized Clean Room segments (created in a retailer-managed workflow).
Data Marketplace destination accounts: Used for Data Marketplace data and for monetized Clean Room segments (created in a brand self-service workflow).
To use Connect to distribute your data to your desired destinations in a brand self-service workflow, the brand partner first needs to activate the appropriate first-party destination account for each destination.
Follow the instructions in "Activate a New Destination Account", making sure to use the Destination Type filter to filter on "Data Marketplace" integrations.
Tip
To view an interactive walkthrough demo of this process, click here.
Once you've activated the desired destination account(s) and the segment has the status of "Queued", the bramd partner can distribute the segment to the destination(s)
Distribute the Segment to Destinations
Once you've activated the appropriate destination account, the brand partner can add segments for distribution by going to the Data Marketplace Segment Distribution page for that destination account.
Note
These instructions are somewhat streamlined for this workflow. For the full instructions, see "Distribute Data to a Destination".
Tip
To view an interactive walkthrough demo of this process, click here.
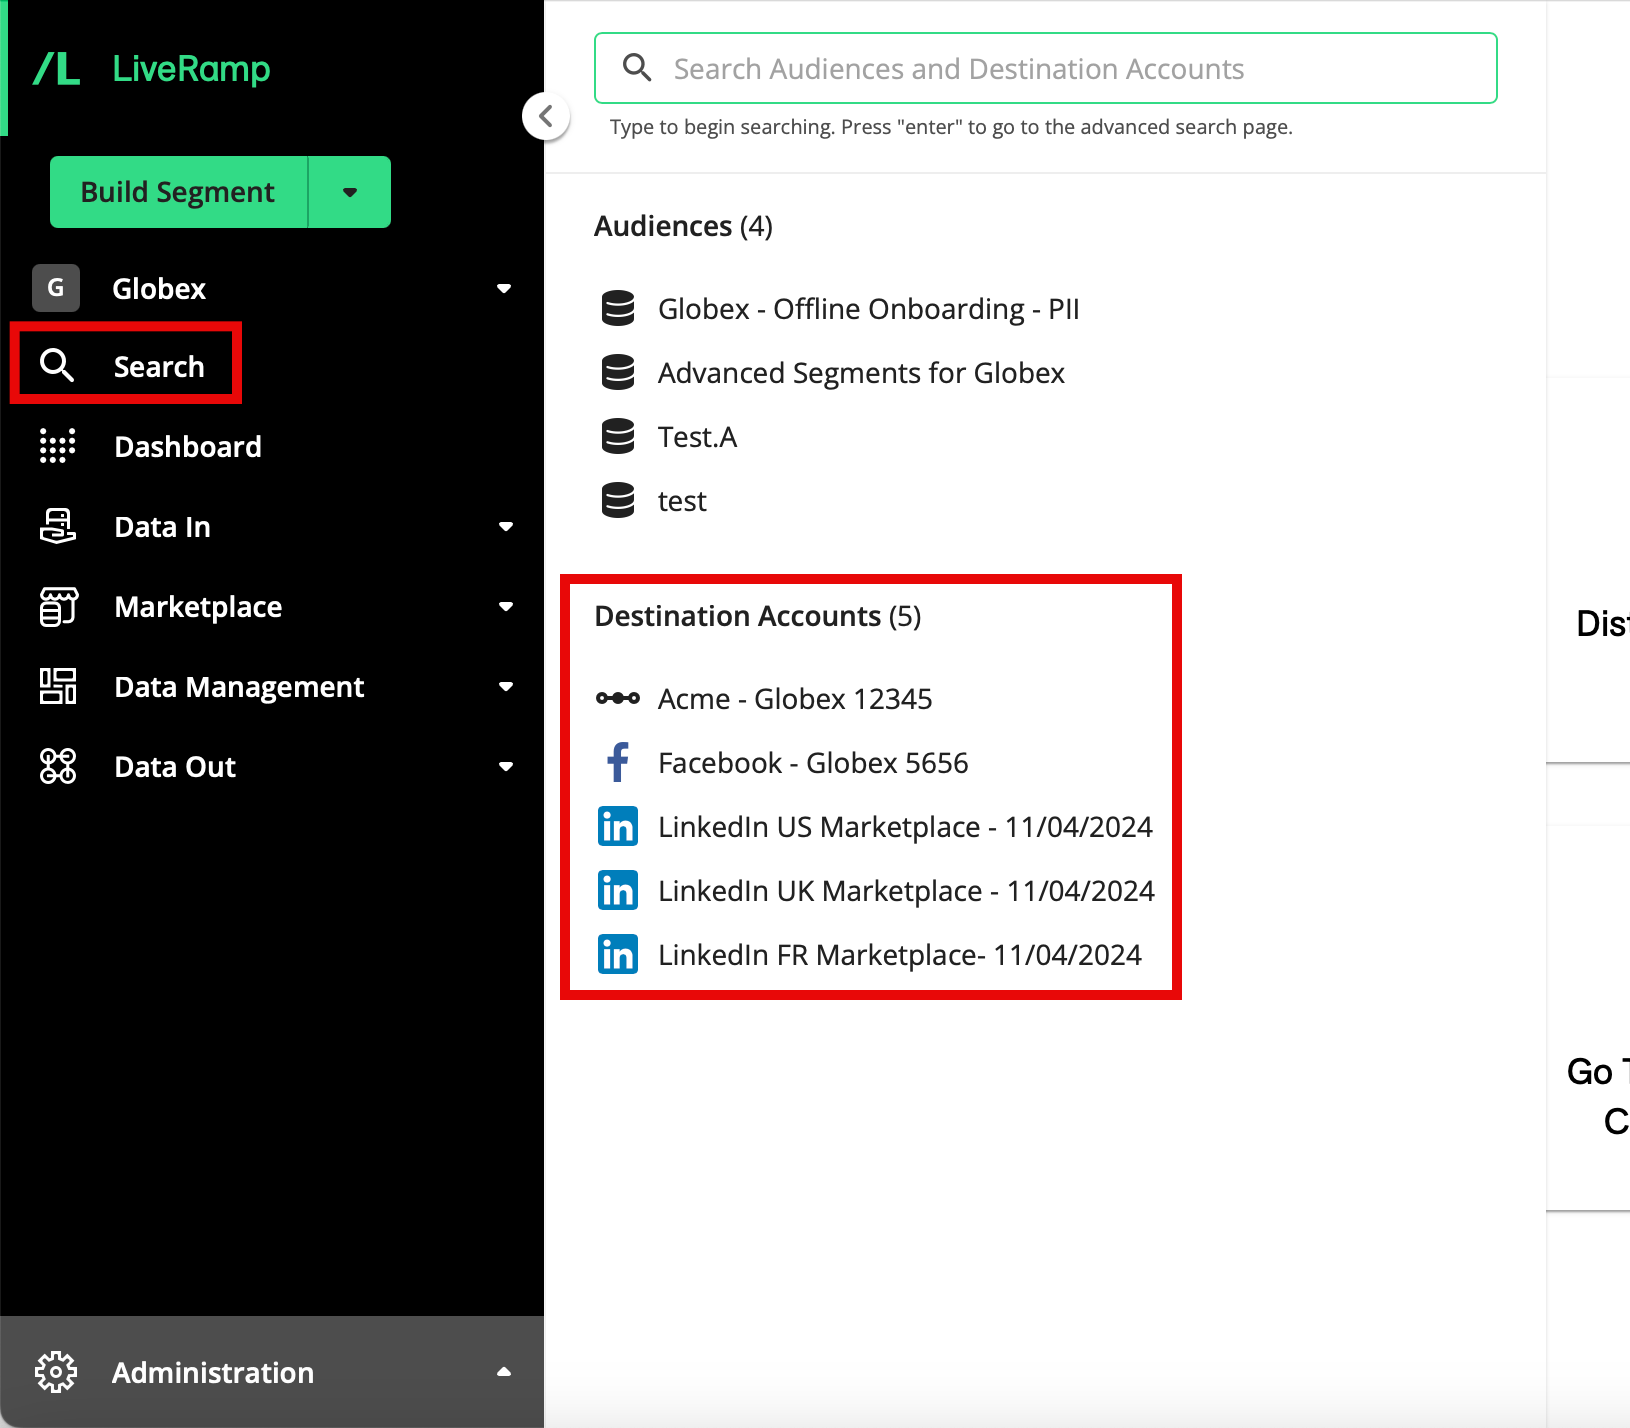
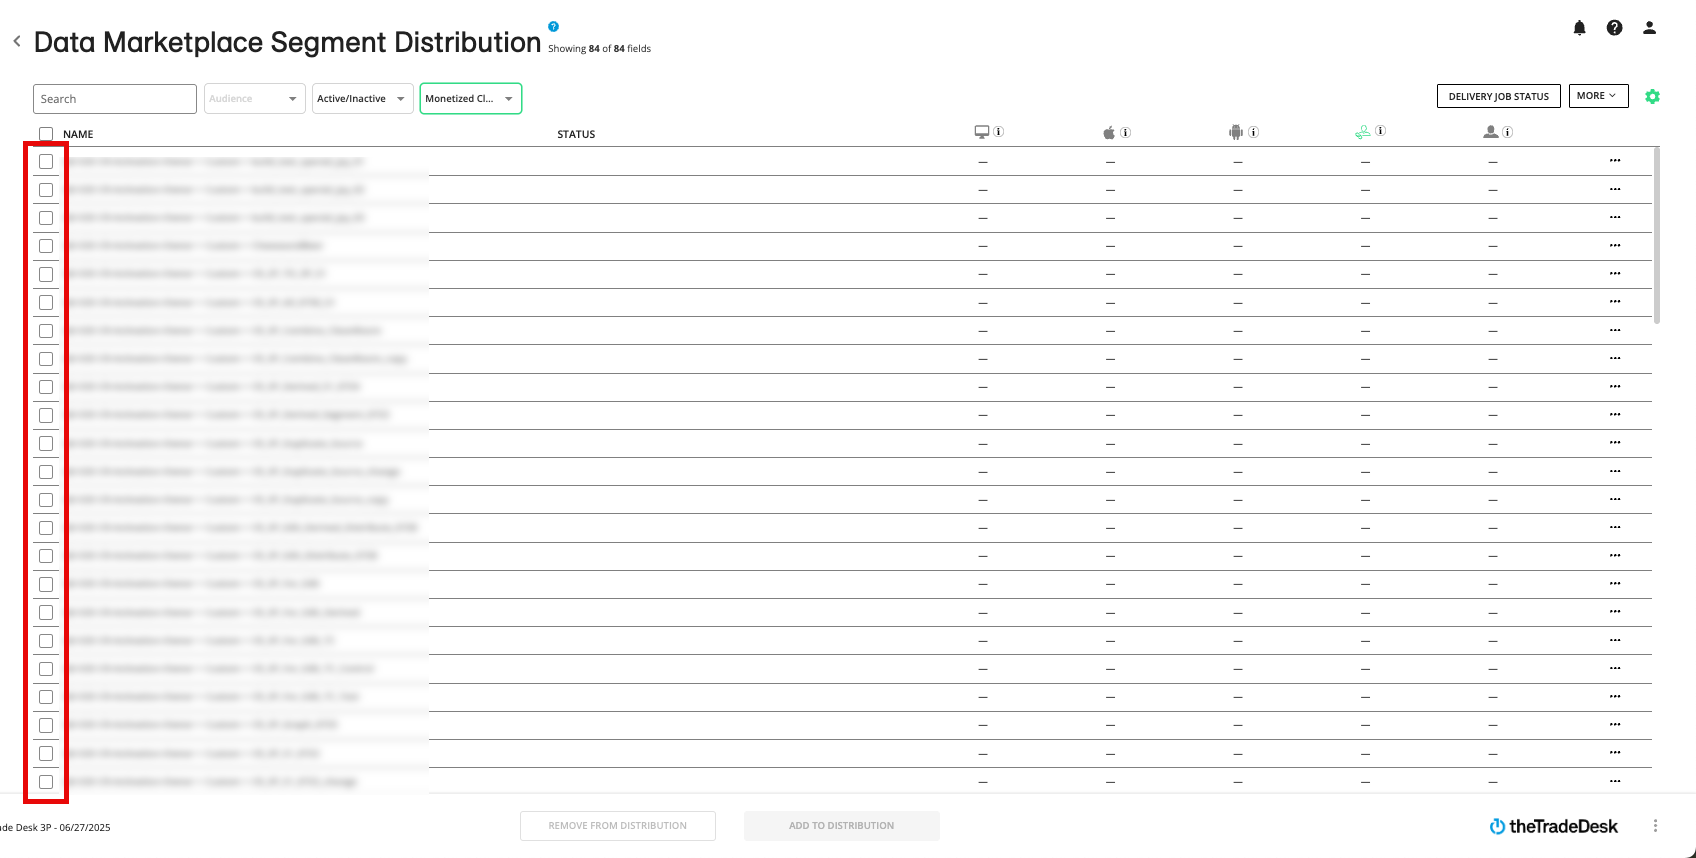
From the navigation menu, click Search to open the global search pane, and then select or search for the desired destination account to navigate to the Data Marketplace Segment Distribution page for that destination account.
Note
For other methods to navigate to the Segment Distribution page, see "The Segment Distribution Page".
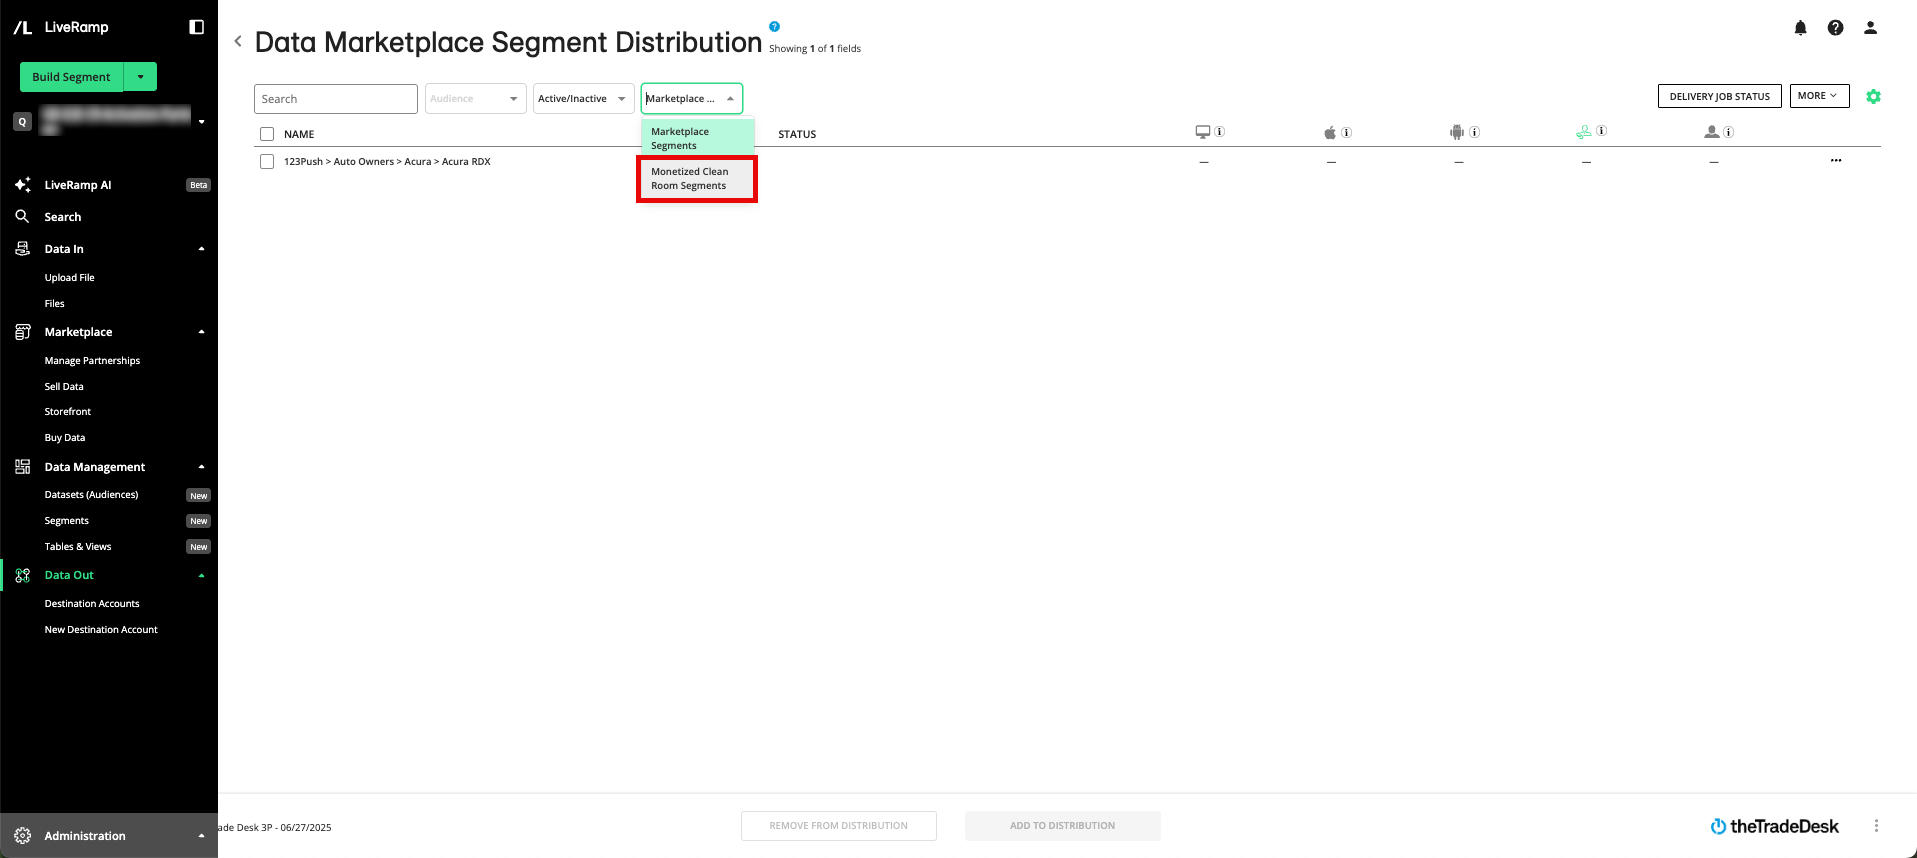
Filter on "Monetized Clean Room Segments" to display your Clean Room segments.
Select the segments to distribute to this destination by checking the check boxes to the left of the segment name.
Several options can be used:
Use the Search bar to narrow the list of segments by searching on keywords, phrases, or segment IDs.
Filter by inactive status: You can use the Active/Inactive dropdown list to view only segments that are not currently being distributed to this destination account ("inactive" segments).
Click Add To Distribution to start the distribution of your selected segments.

See "How LiveRamp Refreshes Distributed Data" for more information on how your distributed data can be refreshed.
Note
It typically takes another 1-3 days after the data appears in the destination platform for stats to calculate and populate within Connect.