The LinkedIn Conversions API for Offline Conversions with LiveRamp
The LinkedIn Conversions API allows customers to send offline conversion data, such as in-store purchases, phone calls, product demos, and more, to LinkedIn to be used to optimize advertising campaigns (including both the on-platform ads and LinkedIn Audience Network inventory). This allows marketers to understand how LinkedIn campaigns drive offline conversions and provides an additional piece of data to help optimize ad spend.
With the LinkedIn Conversions API, marketers can measure how LinkedIn ads lead to real-world outcomes, such as in-store interactions, phone calls, product demos, purchases, bookings, and more. To help understand the effectiveness of ad campaigns, LinkedIn matches offline events with metrics from people who saw or clicked on ads on LinkedIn, thanks to the integration with LiveRamp.
Use this integration to:
Track offline conversion activity and see how much of it can be attributed to ads on LinkedIn.
Measure the offline return on ad spend.
Optimize LinkedIn ads targeting based on offline conversion signals.
Refine audience strategy across LinkedIn properties based on above results.
Overview of Steps Involved
The following steps need to be performed to enable the attribution analysis on LinkedIn:
Send LiveRamp a sample conversion data file, and provide your LinkedIn Campaign Manager Account ID to your LiveRamp technical representative.
Grant LiveRamp the ability to deliver data to your LinkedIn Campaign Manager Account by creating a LinkedIn Conversions API destination account and by performing OAuth authorization in LiveRamp Connect.
A user with account manager level access creates campaign conversion rules in LinkedIn Ads Campaign Manager and associates these rules with the campaigns.
You share the list of conversion rule IDs with LiveRamp.
You upload conversion data into LiveRamp.
LiveRamp matches the data using our mapping of LinkedIn users.
LiveRamp passes your conversion data file through the LinkedIn Conversions API.
You view the results within LinkedIn Campaign Manager (results available within 24 hours).
See the appropriate sections below for more information on performing these steps.
Create a LinkedIn Conversions API Destination Account
To distribute offline conversions data, a LinkedIn user who has Account Manager-level access to your LinkedIn Campaign Manager Account will need to activate a LinkedIn Conversions API - Offline destination account in Connect.
LinkedIn Conversions API destination account tile
During destination account activation, you will need to perform OAuth authorization for that destination account, either by selecting an existing LinkedIn OAuth connection or by creating a new connection. This grants LiveRamp access to your LinkedIn-sponsored account in order to deliver data to your LinkedIn Campaign Manager account.
Note
If you plan to use an existing LinkedIn OAuth connection, you will first need to reauthenticate that connection (for instructions, see "Reauthenticate an OAuth Connection”).
Follow the general instructions in "Activate a New Destination Account”, performing these additional steps:
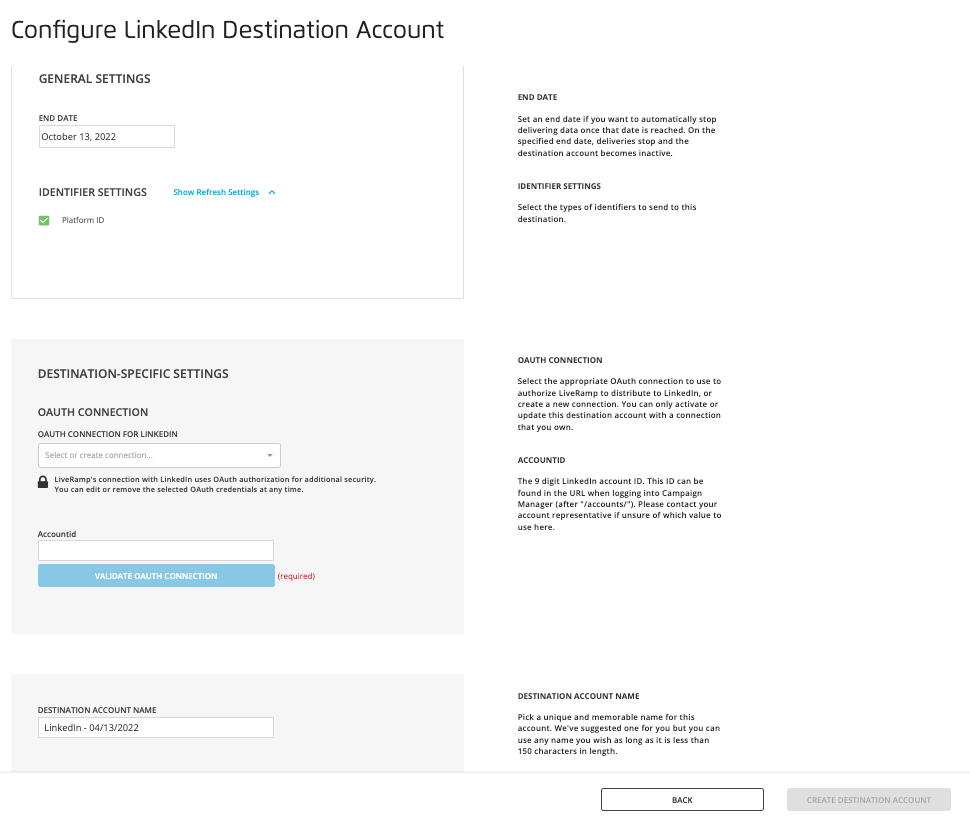
LinkedIn Conversions API destination account configuration
Remove the end date to leave the end date open ended.
Enter your 9-digit LinkedIn account ID in the Account ID field. This ID can be found in the URL when logging into Campaign Manager (after "/accounts/"). Contact your LinkedIn account representative if you’re unsure of which value to use here.
In the Destination Account Name field, pick a unique and memorable name for this account. We'll suggest one for you but you can use any name you wish as long as it is less than 50 characters in length.
To use one of your existing LinkedIn OAuth connections, select it from the OAuth Connection dropdown list and click .
Note
Make sure you have first reauthenticated the existing OAuth connection by performing the steps in “Reauthenticate an OAuth Connection”.
To create a new OAuth connection and validate that connection:
From the OAuth Connection dropdown list, select + New LinkedIn OAuth Connection.
From the new window that opens with LinkedIn's sign-in or login screen, enter your credentials and then click .
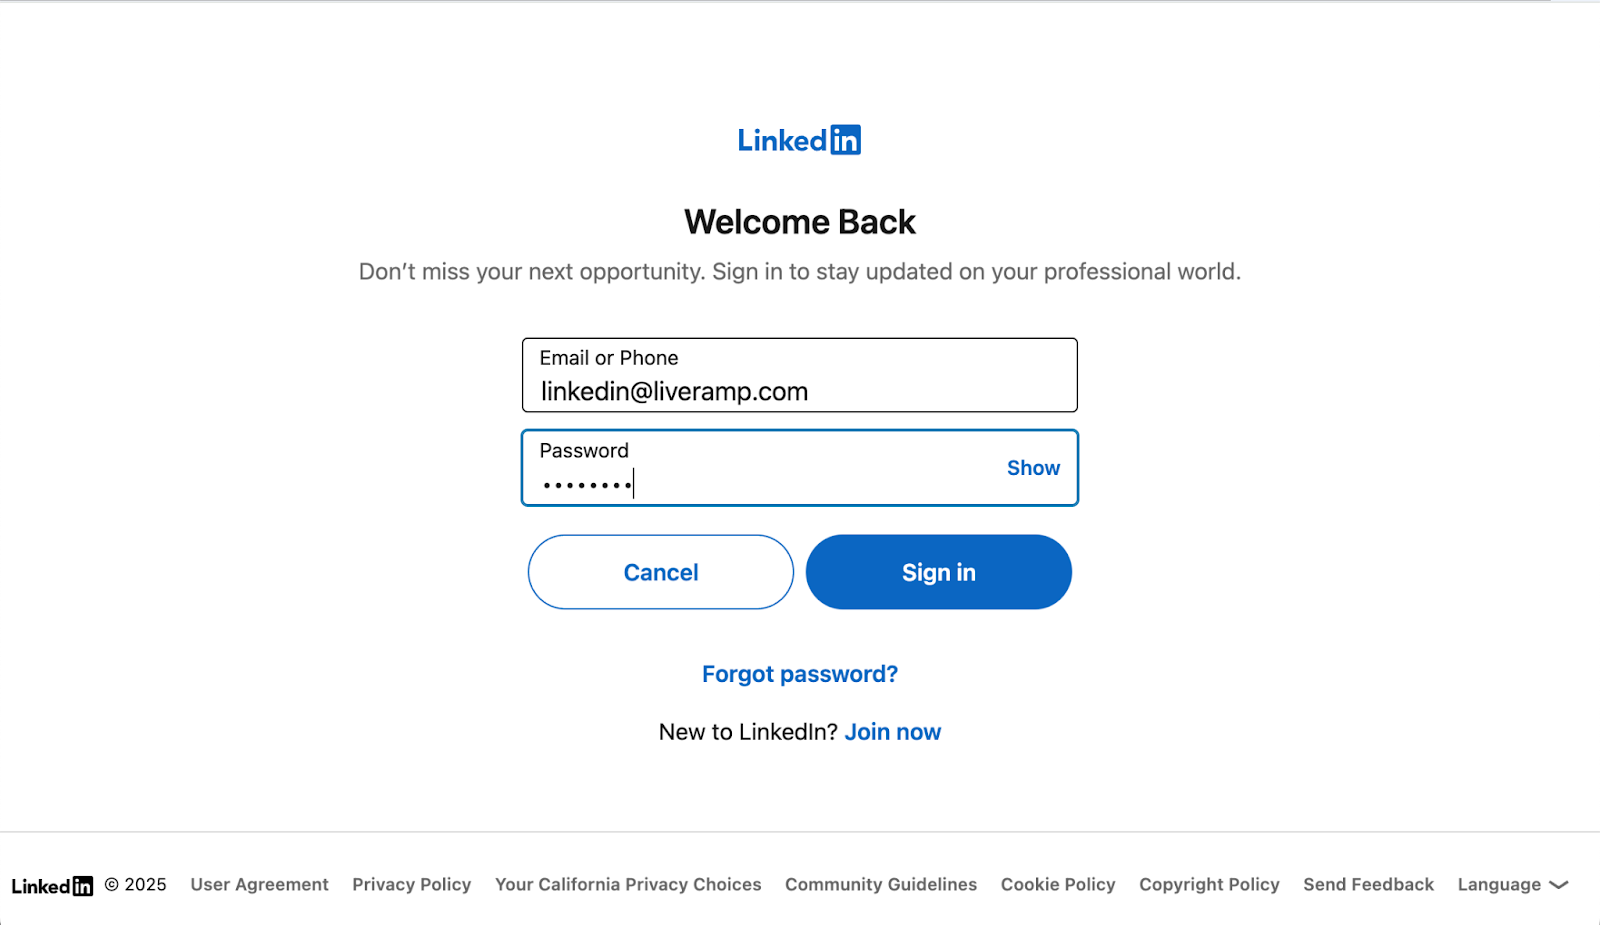
Click .
Perform Activities in LinkedIn Campaign Manager
For each conversion category that you want to track, you’ll need to create a conversion rule in LinkedIn Campaign Manager and associate the appropriate campaigns with the conversion rule:
From your LinkedIn Campaign Manager account, select Measurement → Conversion tracking.
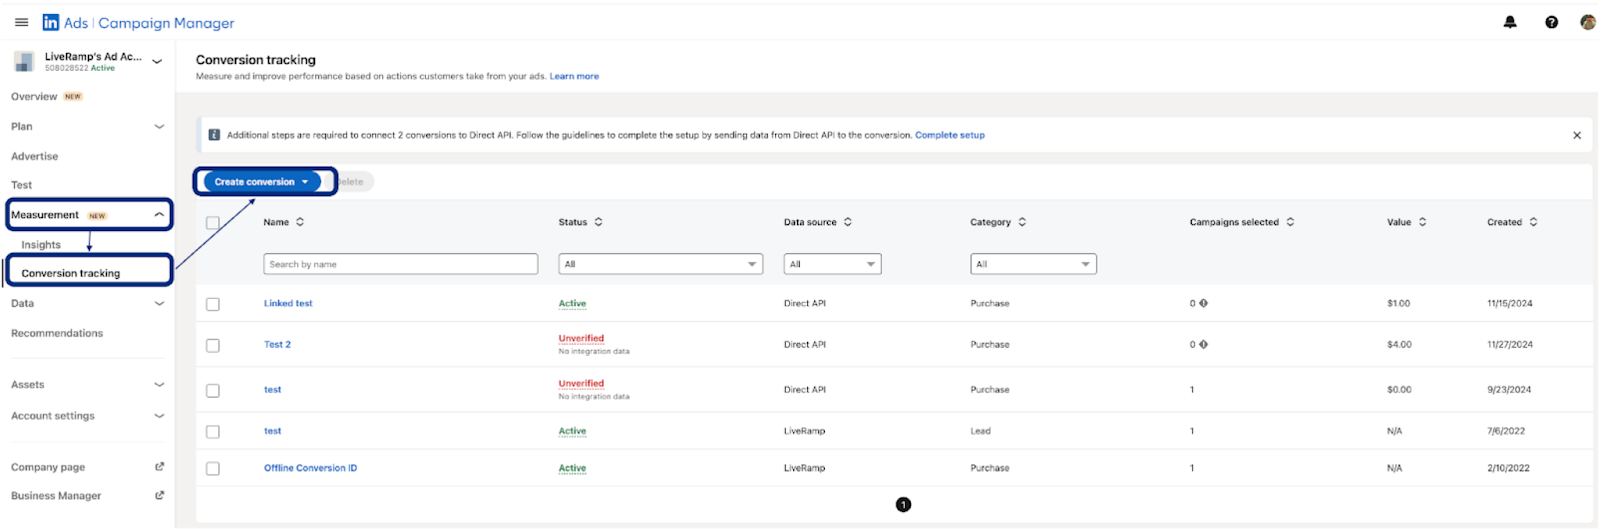
From the Create conversion dropdown, select "Conversion API".
From the Settings step, enter a name for the conversion rule and define the rules, using LinkedIn’s list of events for the conversion category.
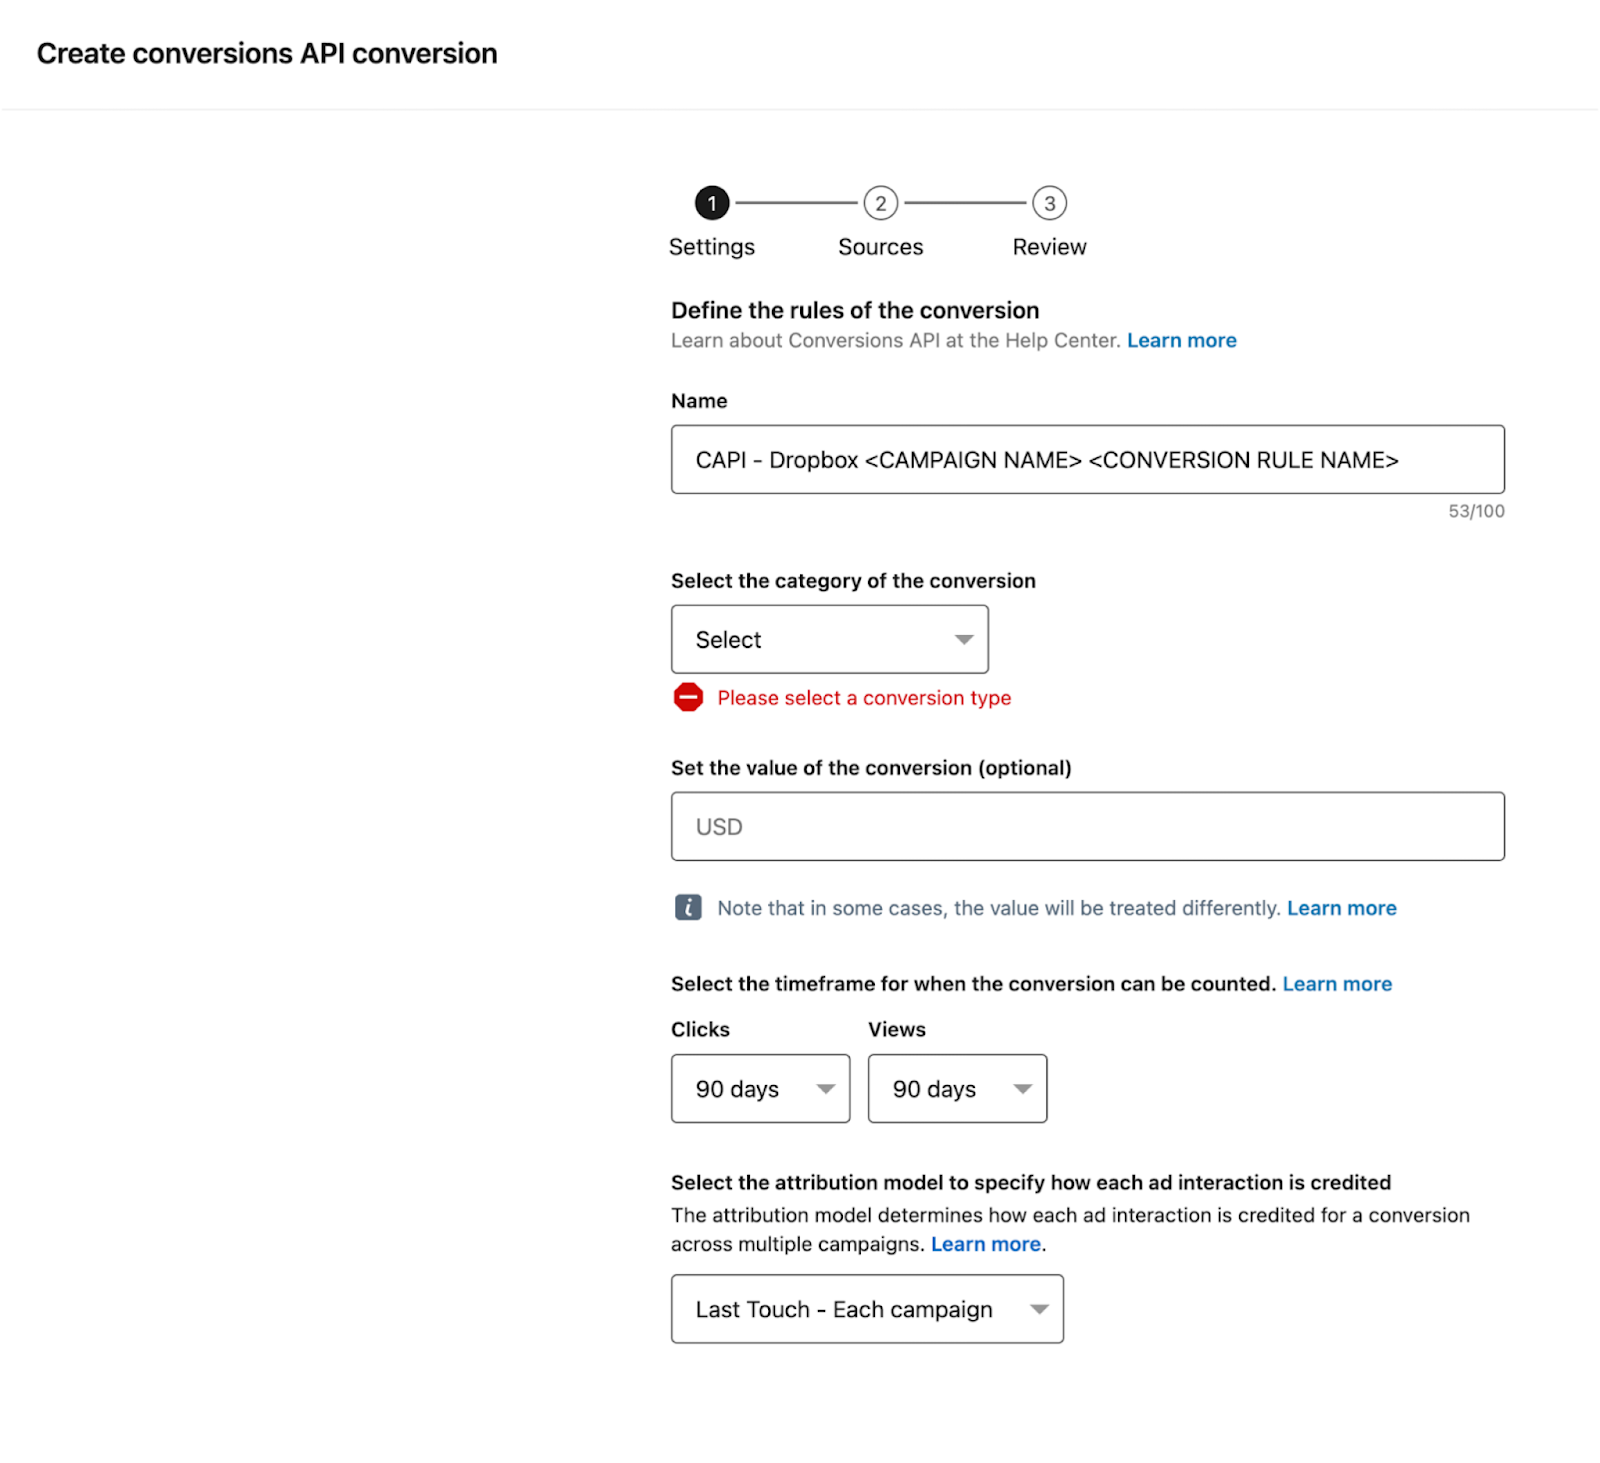
Note
You might want to prefix the name with "CAPI - " so it's easy to identify in the reporting UI. For example, “CAPI - Globex <CAMPAIGN NAME><CONVERSION RULE NAME>".
Click .
From the Sources step, select the "Direct API" integration.
Once you've reviewed the conversion details, click .
Associate your campaigns with the created conversion rules.
Note
The recommendation is to use the maximum lookback window, which is 90 days for most conversion types, unless you select "Lead", "Qualified Lead", "Purchase", or "Submit Application" as the conversion type, which allows for a 365-day lookback window.
Provide Conversion Categories and Conversion Rule IDs to LiveRamp
Once you’ve performed the activities in LinkedIn Campaign Manager, provide your LiveRamp Implementation Manager with a list of the conversion category(s) that were specified in the offline conversion rule(s).
Note
You can get the conversion rule ID by clicking on the conversion rule in Campaign Manager and finding the ID from the browser URL. For example, if the URL is "https://www.linkedin.com/campaignmanager/accounts/1234567/conversions/17633260?csv=false&imported=true&step=1", then the conversion ID for that rule is “17633260”.

Note that the values you provide in the “transaction_category” field in the files you upload are used to map to the conversion categories. If there is a mismatch between values in the “transaction_category” field and the conversion categories' names (such as when you’re repurposing conversion data files from another LiveRamp attribution program), you will need to provide LiveRamp with a mapping of transaction_category values to conversion categories' names. For a list of LinkedIn-supported conversion categories, click here.
Mapping example:
Transaction_category Value | LinkedIn Conversion Rule ID |
|---|---|
In Store | 56890 |
New Customer | 345789 |
Existing Customer | 908123 |
Note
Make sure to provide a corresponding conversion category for all values within the “transaction_category” field. Otherwise, these transaction records will not be distributed to LinkedIn for attribution.
Formatting your Conversion File Data
Before sending your conversion data to LiveRamp, make sure to strictly follow the guidelines listed below:
Note
If any guidelines listed here conflict with the guidelines in our general file formatting instructions, follow these guidelines.
If you're using multiple programs, you can often use one universal file for most or all of those programs. For more information and a universal file template, see "Using a Universal File for Multiple Conversions API Programs".
Caution
If an uploaded file does not meet these requirements, you will need to reformat the file until it is formatted correctly.
Headers must be included in the exact order as listed below and must match exactly.
Provide only plaintext values for all PII fields. Hashed values are not supported for this program.
This program uses our Measurement Enablement workflow. Make sure to follow our recommended file limits for Measurement Enablement workflow files (such as a maximum of 500,000,000 rows per file and a maximum uncompressed file size of 50 GB).
Your conversion data file must use one of our allowed delimiters (commas, tabs, or pipes), and be one of our allowed file types (.csv, .tsv, .psv, or .txt).
Include all of the required columns listed below.
Fields must not have leading or trailing white space.
Unless values are required for a field, fields can be left blank if there is no data for the given row (do not include “N/A” or “null”).
The file must be rectangular. That is, every row must have the same number of delimiters and columns of data.
Tip
To download an Excel file template that contains all possible columns and formatting instructions, click here.
After transferring your data into the file template, be sure to delete the row with the formatting instructions and save the file in one of our allowed file types (.csv, .tsv, .psv, or .txt) before uploading.
Once the file has been formatted correctly, upload the file to LiveRamp. See the “Upload the File” section below for more information.
Note
Once you set up the file format for an existing conversion program feed, try to keep the file format (such as the column headers or the column order) the same for all subsequent files. If you change the file format for an existing feed, create a support case before uploading the new file to ensure your existing feeds are not impacted. For more information, see "Changing the Format of an Existing File".
List of All File Columns
The table below lists all possible columns you might include in your universal file, along with the following information:
Field Name | Column Required? | Values Required? | Notes |
|---|---|---|---|
first_name | Yes | Yes (if Name and Postal is used as an identifier) |
|
last_name | Yes | Yes (if Name and Postal is used as an identifier) |
|
address_1 | Yes | Yes (if Name and Postal is used as an identifier) |
|
address_2 | Yes | No |
|
city | Yes | Yes (if Name and Postal is used as an identifier) |
|
state | Yes | Yes (if Name and Postal is used as an identifier) |
|
zip | Yes | Yes (if Name and Postal is used as an identifier) |
|
email_1 | Yes | Yes (if email is used as an identifier) |
|
email_2 | Yes | No |
|
email_3 | Yes | No |
|
email_4 | Yes | No |
|
phone_1 | Yes | Yes (if phone is used as an identifier) |
|
phone_2 | Yes | No |
|
transaction_category | Yes | Yes |
|
transaction_timestamp | Yes | Yes |
|
transaction_amount | Yes | Yes |
|
order_id | No | No |
|
Header Row Example
The headers shown below are all required.
email_1|transaction_category|transaction_timestamp|transaction_amount
Conversion Data Examples
alex@gmail.com|In Store|2014-03-31|99.99
julian@gmail.com|Offline|2014-03-30|55.55
Send Conversion Data to LiveRamp
To set up the integration, send us a sample conversion data file. This file should contain at least 25 rows, and each row should have values for the required fields (you can use placeholder data). Include all the possible values you plan on using in the “transaction_category” field and include only those values in subsequent files.
Once your campaign has started, send conversion data to LiveRamp at your preferred cadence. Files can be delivered at any cadence (daily, weekly, monthly, etc.), but do not send more than one file per day. LiveRamp’s preference is daily or weekly.
Conversion Data Guidelines
Each conversion data record must include at least one PII identifier (name and postal address, email, or phone) and the required conversion data:
Transaction category
Transaction timestamp
Transaction amount
Make sure to also follow these additional guidelines:
Avoid sending duplicate transactions (transactions already sent to LiveRamp). If you send weekly or monthly files, only send transactions that occurred since the previous file was sent.
Do not include transactions that exceed the lookback window.
Note
The lookback window will be based on the conversion rule you create in LinkedIn Campaign Manager. LinkedIn only allows a maximum lookback window of 90 days for an offline conversion rule. As a result, make sure the transactions in your file are not older than 90 days from the current day.
Do not include conversions with a conversion date in the future.
Upload the File
Upload conversion data files using LiveRamp’s SFTP server or your SFTP server.
Once configured, LiveRamp will generate an 'Online Event Feed' table on the Tables and Views page. You can then continue with the CAPI feed distribution workflow while the Online CAPI connectors run in the background to supply the online event feed.
Caution
Files for this program cannot be uploaded via Connect. We recommend either uploading via our SFTP server or having us pull files from an S3 bucket.
To upload files using LiveRamp's SFTP: Use the credentials provided by your technical contact once the agreement has been signed and follow the instructions in “Upload a File via LiveRamp's SFTP”.
To upload files using your SFTP: Follow the instructions in “Upload a File via Your SFTP”.
After uploading, email your LiveRamp technical account specialist to confirm that you have uploaded conversion data.
Once the file is uploaded, information on file processing status can be viewed in Connect (see "Check File Processing Status" below for more information).
Once the file has finished processing, the data will be viewable within LinkedIn Campaign Manager.
Check File Processing Status
You can check the status of the files you've uploaded on the Files page in Connect. See "Check the Status of an Uploaded File" for complete instructions.
Note
Once you've uploaded a file, it can take up to 20 minutes before the file appears associated with the appropriate audience(s) on the Files page. If the file does not appear after at least 20 minutes, create a support case.
Files for this program use our Measurement Enablement workflow, and so the column headings that display on the Files page will look different from the ones that display for files that use our Activation workflow.
FAQs
LinkedIn can attribute conversions that happen up to 365 days in the past:
90-Day Lookback Window: You can set a max lookback window of 90 days. For example, you can say, if this person saw an ad within 90 days of converting, count the conversion.
Converted 365 days ago: LinkedIn can track conversion events that happened up to 365 days ago for “Lead”, “Qualified Lead”, “Purchase”, or “Submit Application” conversion types, while other conversion types have a 90-day lookback window for attribution. For example, you upload your data that includes an offline purchase that occurred 89 days ago, and the buyer had engaged with a LinkedIn ad from the associated campaigns within 90 days before the purchase.
It can take up to 24 hours before you’ll see your conversion data within LinkedIn Campaign Manager.
Yes, you can. Create a support case and specify the conversion categories you would like to add. If not, these transactions will not be delivered to LinkedIn.