Build a Segment and Save It to a Destination
You can create a segment table in BigQuery and then save it to the following:
Audience Builder: You can save either a simple segment table or a regular segment table and save it to Audience Builder in Customer Profiles for Data Collaboration.
A destination platform: You can build a simple segment table in Analytics Environment and send it directly to a destination platform that has been implemented in your organization's Customer Profiles destinations. For information about destinations, see The Destinations Page.
Note
Sending a simple segment table is not supported for destinations created using the “+ Ad Hoc” or “+ "Set Up Analytics Environment” options.
You can use either of the following approaches for creating segment tables:
Simple segment tables: To save a segment that will not need to be continually updated, create a simple segment table that contains only one column for the members' IDs and no other columns.
Tip
If you want to distribute a segment table directly from Analytics Environment to a destination platform, create a simple segment table.
Regular segment tables: To save a segment that you want to be continually updated (Always On) and appear within the "My Data" folder inside the Audience Builder, create a regular segment table that contains a column of identifiers and one or more columns of segment data values. For example, if you want a particular demographics-based segment to always be available at your destinations, create a regular segment table.
If your segment table contains multiple segments (more than one column), these segments will appear as a dataset in Customer Profiles and will need to be added to the active taxonomy.
Tip
You can also create a table in BigQuery with a column of IDs and many attribute columns and save it to Audience Builder. For information, see "Build an Audience and Save It to Customer Profiles."
To create a simple segment table that will be used only once:
Create the table in the "_sg" dataset in BigQuery. Only tables created within the dataset ending in
_sgcan be sent to Audience Builder.The first column of the segment table should be labeled
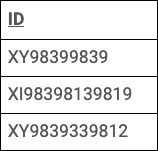
IDand contain the appropriate ID values (with noUNMATCHEDor other non-RampID values). Make sure that your organization uses the same IDs in Audience Builder. This is typically your client-encoded RampID or PPID. If you are unsure, create an Analytics Environment case in the LiveRamp Community portal.Specify a meaningful table name because it will be used as the parent node name that users will see in Audience Builder.
Example of a simple segment table:
Once you've created the segment table, follow the instructions in either of the following sections:
To create a regular segment table that will be continually updated and appear within the My Data folder inside the Audience Builder:
Create the table in the "_sg" dataset in BigQuery. Only tables created within the dataset ending in
_sgcan be saved to Customer Profiles.The first column of the segment table should be labeled "ID" and contain the appropriate ID values. Make sure that your organization uses the same IDs in Customer Profiles. This is typically your client-encoded RampID or PPID. If you are unsure, create a Safe Haven case in the LiveRamp Community portal.
Additional columns should contain the following Boolean segment values:
0: Indicates that the person is not a member of that segment1: Indicates that the person is a member of that segment
Saving a segment table with non-Boolean values will cause the process to fail.
The maximum number of columns is 1,000. If you need more columns, save multiple tables instead.
Set all segment data columns in the table to either string format or integer format. Other formats will cause the process to fail.
Specify meaningful table names and column headers because they will be used as the parent node names and segment names that campaign planners will see in Customer Profiles .
Example of a regular segment table with a single segment:

Example of a regular segment table with multiple segments:

Once you've created the segment table, follow the instructions in "Save the Segment Table to Customer Profiles."
With the desired table open in the BigQuery Query Editor, select the Details tab.
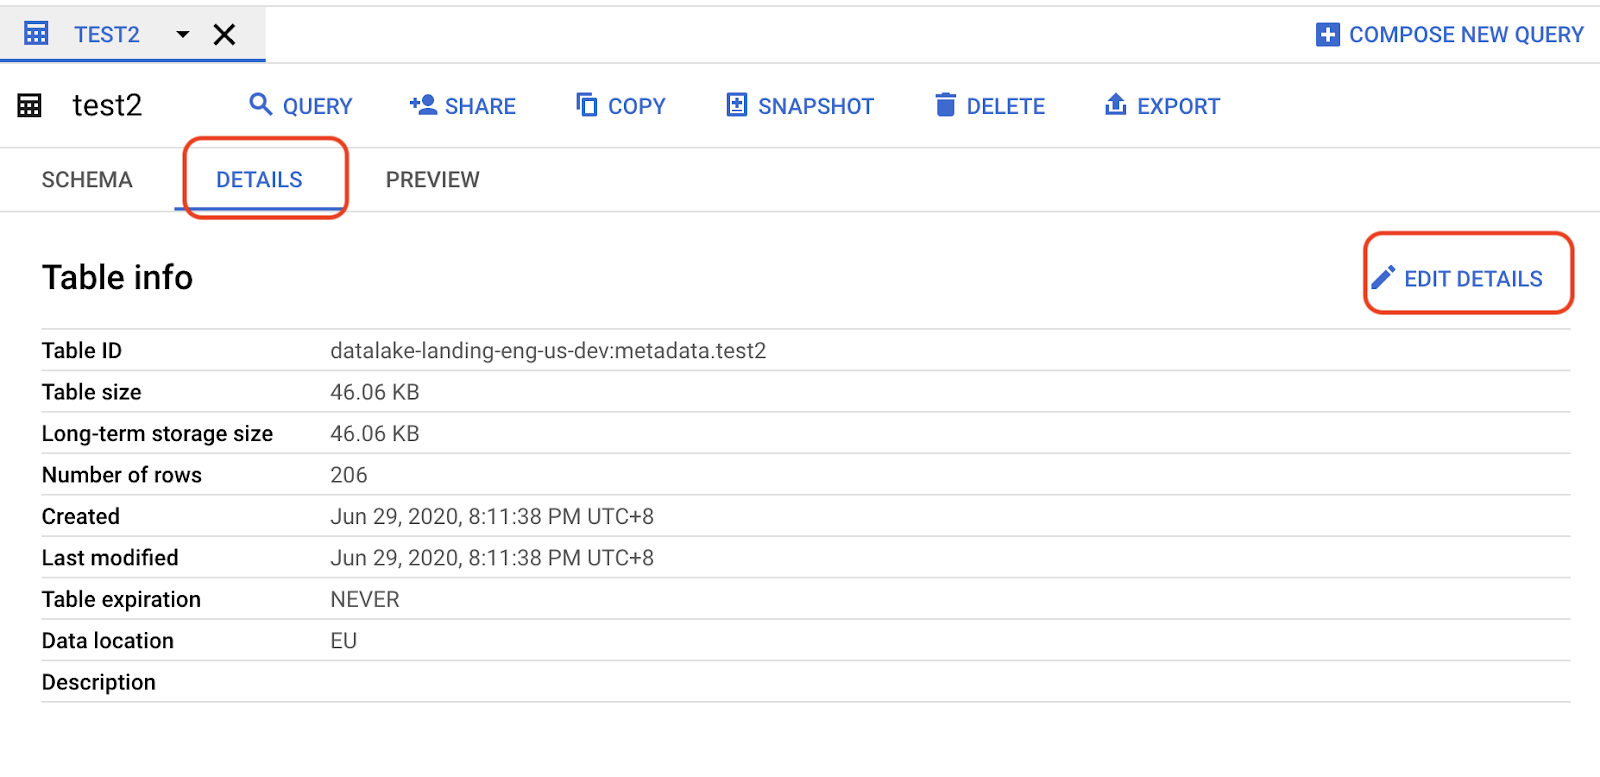
Click .
From the Edit detail dialog, click .
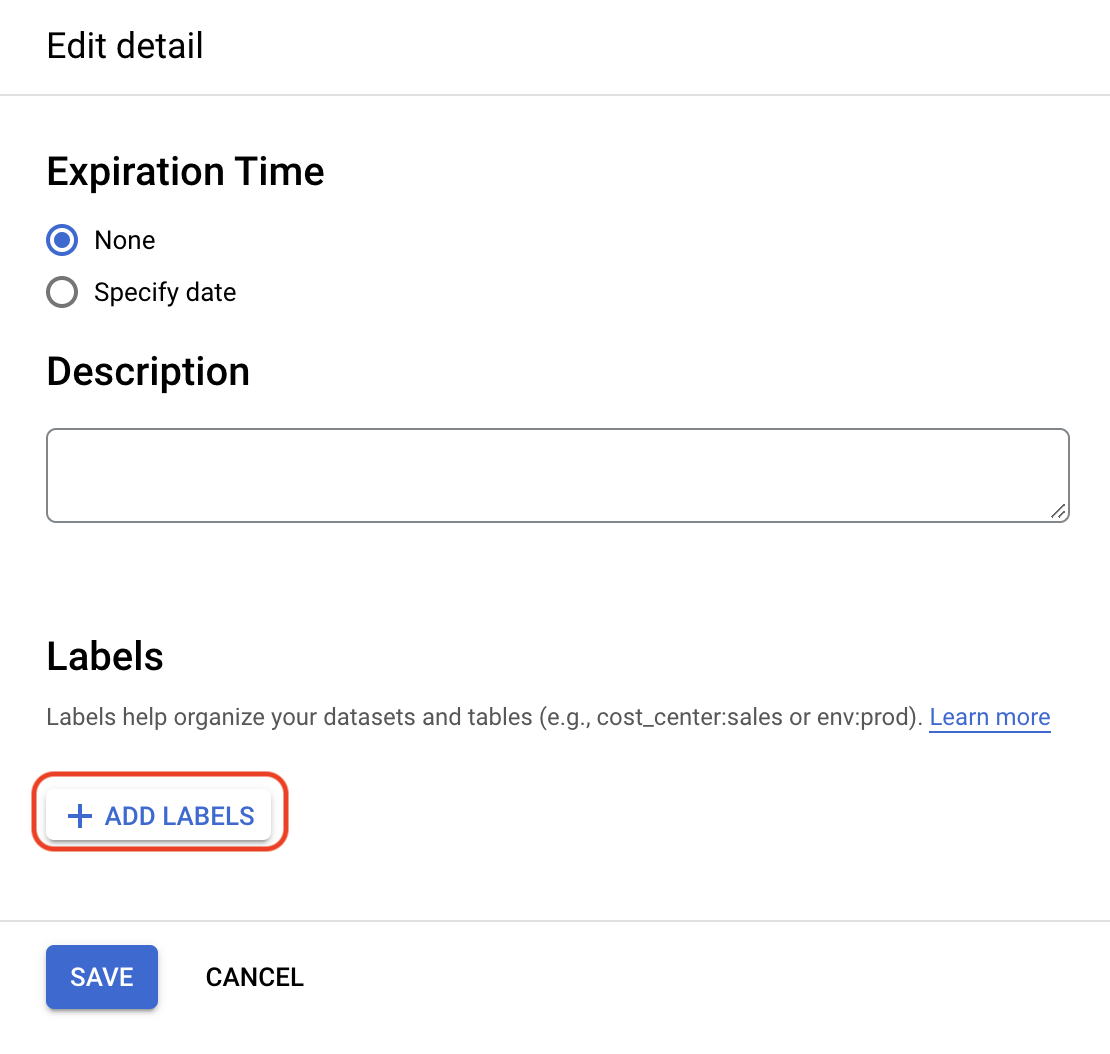
Enter the following values, and then click :
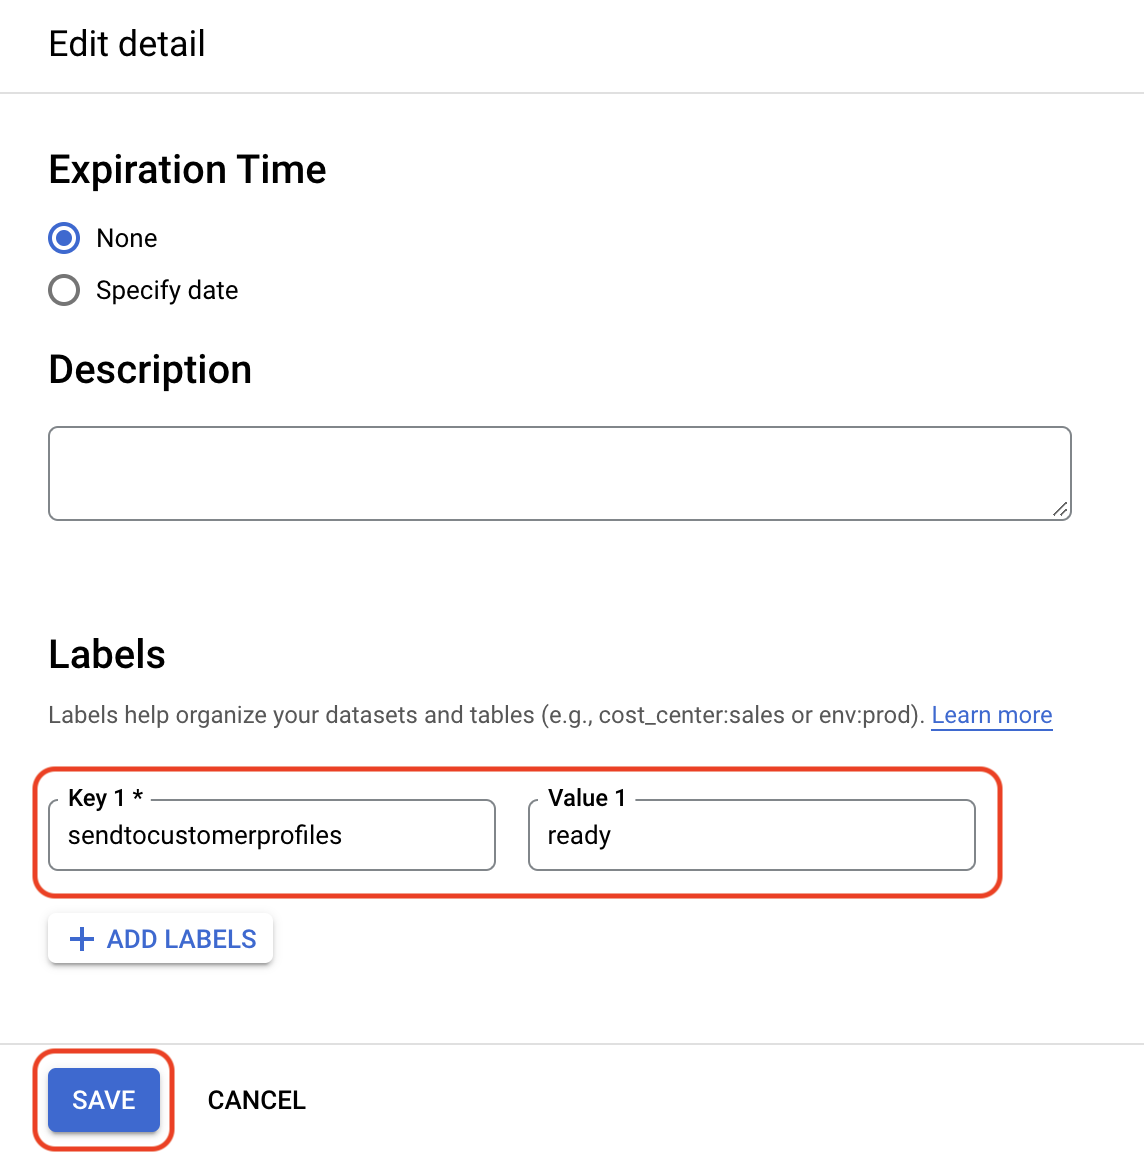
Key 1: "sendtocustomerprofiles"
Value 1: "ready"
To automatically send segments at regular intervals, click , and enter the following values:
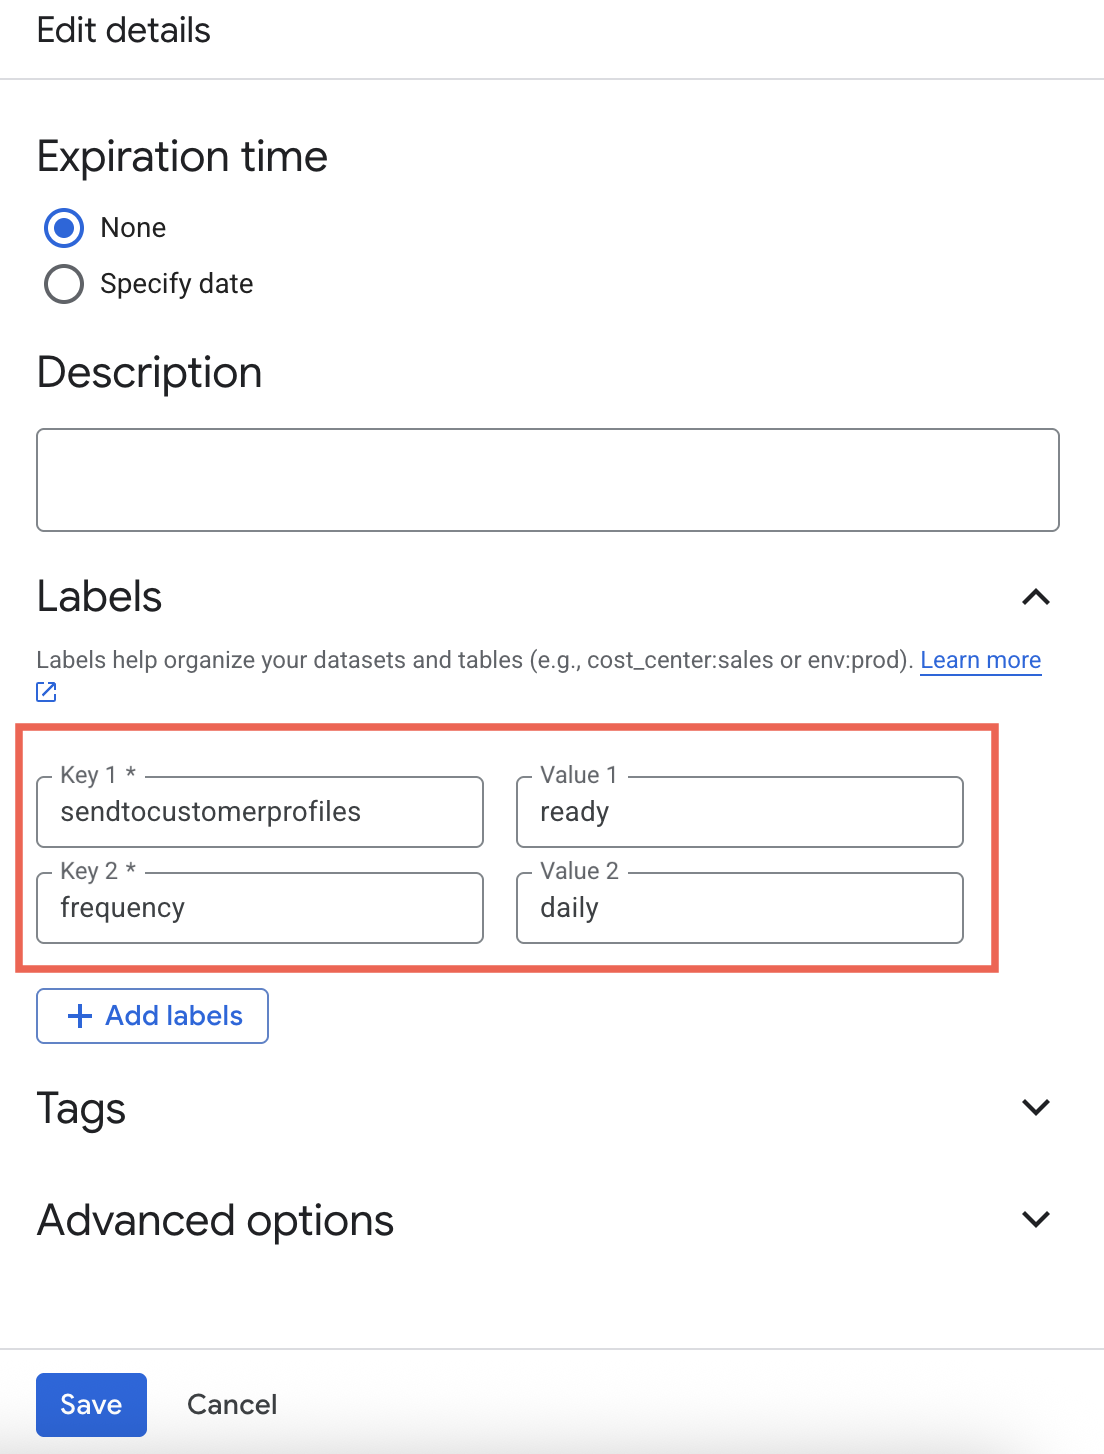
Key 2: "frequency"
Value 2: Enter one of the following:
daily: Send the segment every day.
weekly_
<day_of_week>: Send the segment every week on the specified day of the week. For example, "weekly_monday" indicates that the segment will be sent automatically every Monday.monthly_
<day_of_month>: Send the segment every month on the specified day of the month (expressed as an integer). For example, "monthly_31" indicates that the segment will be sent automatically every month on the last day of the month. If the specified integer exceeds the number of days in the month, the segment will be sent automatically on the last day of the month.
Click
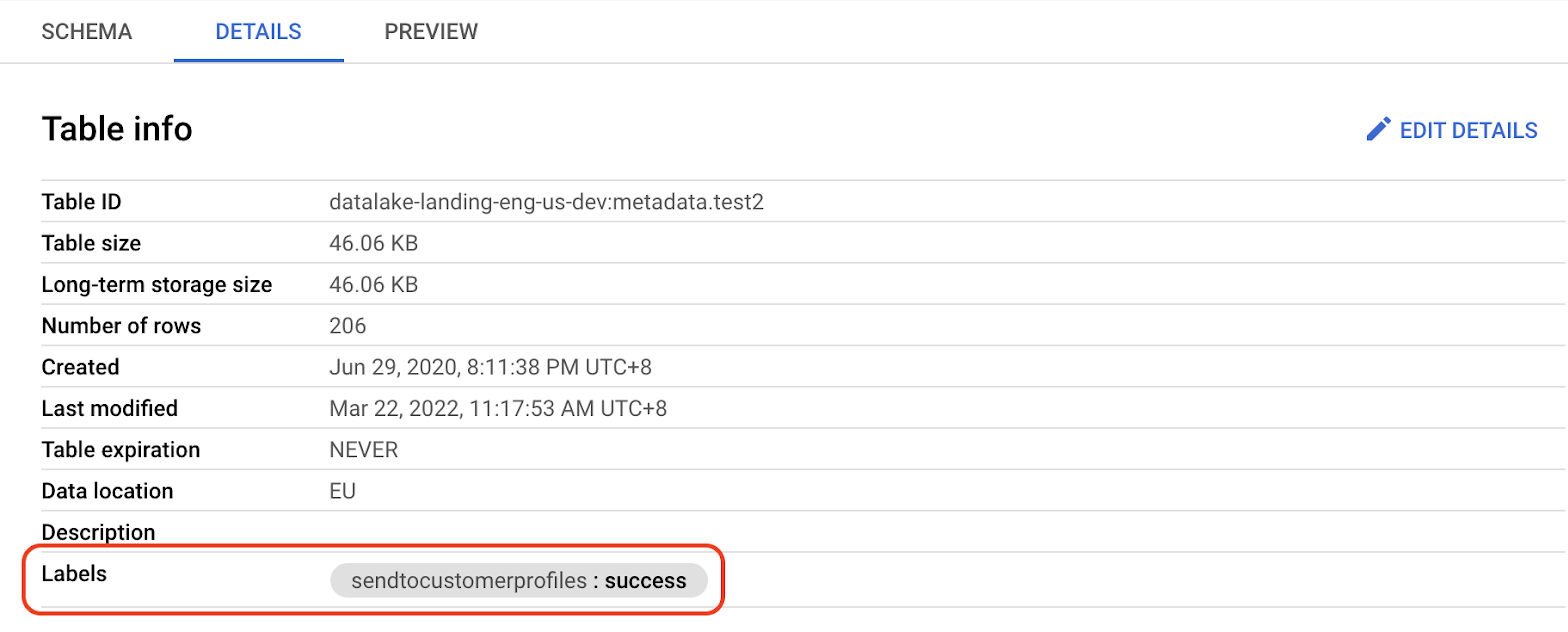
The table's Details tab should indicate that the label was added successfully.
For a simple segment table, a segment with the same name as the original segment table will appear in the "Manage Data/Datasets/Analytics Environment Data/AE Segments/" subfolder in Audience Builder. The segment should be available in Customer Profiles within an hour.
Note
Saving multiple simple segment tables concurrently to Customer Profiles can result in the segments being queued for processing, which may cause them to take several hours to become available.
For a regular segment table, a dataset with the same name as the original segment table will appear in the "Manage Data/Datasets/Analytics Environment Data/" subfolder in Audience Builder. The segment should be available in Customer Profiles within an hour.
Note
Saving multiple regular segment tables concurrently to Customer Profiles can result in the segments being queued for processing, which may cause them to take several hours to become available.
Once the dataset appears in Audience Builder, add it to the taxonomy. For information, see "Add a New Dataset to the Active Taxonomy."
Once the dataset has been added to the active taxonomy, the segment will appear under the "Analytics Environment Data" subfolder in Audience Builder.
You can build a simple segment table in Analytics Environment and send it directly to a destination platform that has been implemented in your organization's Customer Profiles destinations.
Note
This feature is not yet turned on for most accounts. If you would like access to these features, create a case in the LiveRamp Community portal.
Sending a simple segment table is not supported for destinations created using the “+ Ad Hoc” or “+ "Set Up Analytics Environment” options.
Saving a segment table directly to a destination platform does not currently support regular segment tables.
Once this feature is implemented for your Analytics Environment tenant, the da_reference table will be available in your _wh (warehouse) dataset in BigQuery. This table includes your allow list of destinations. Once your distribution is complete, you can query the syndicate_destination_result table if you want to know the status of your distribution. For information about the _wh dataset, see Destination Tables.
With the desired table open in the BigQuery Query Editor, select the Details tab.

Click .
From the Edit detail dialog, click .

Enter the following values and then click :
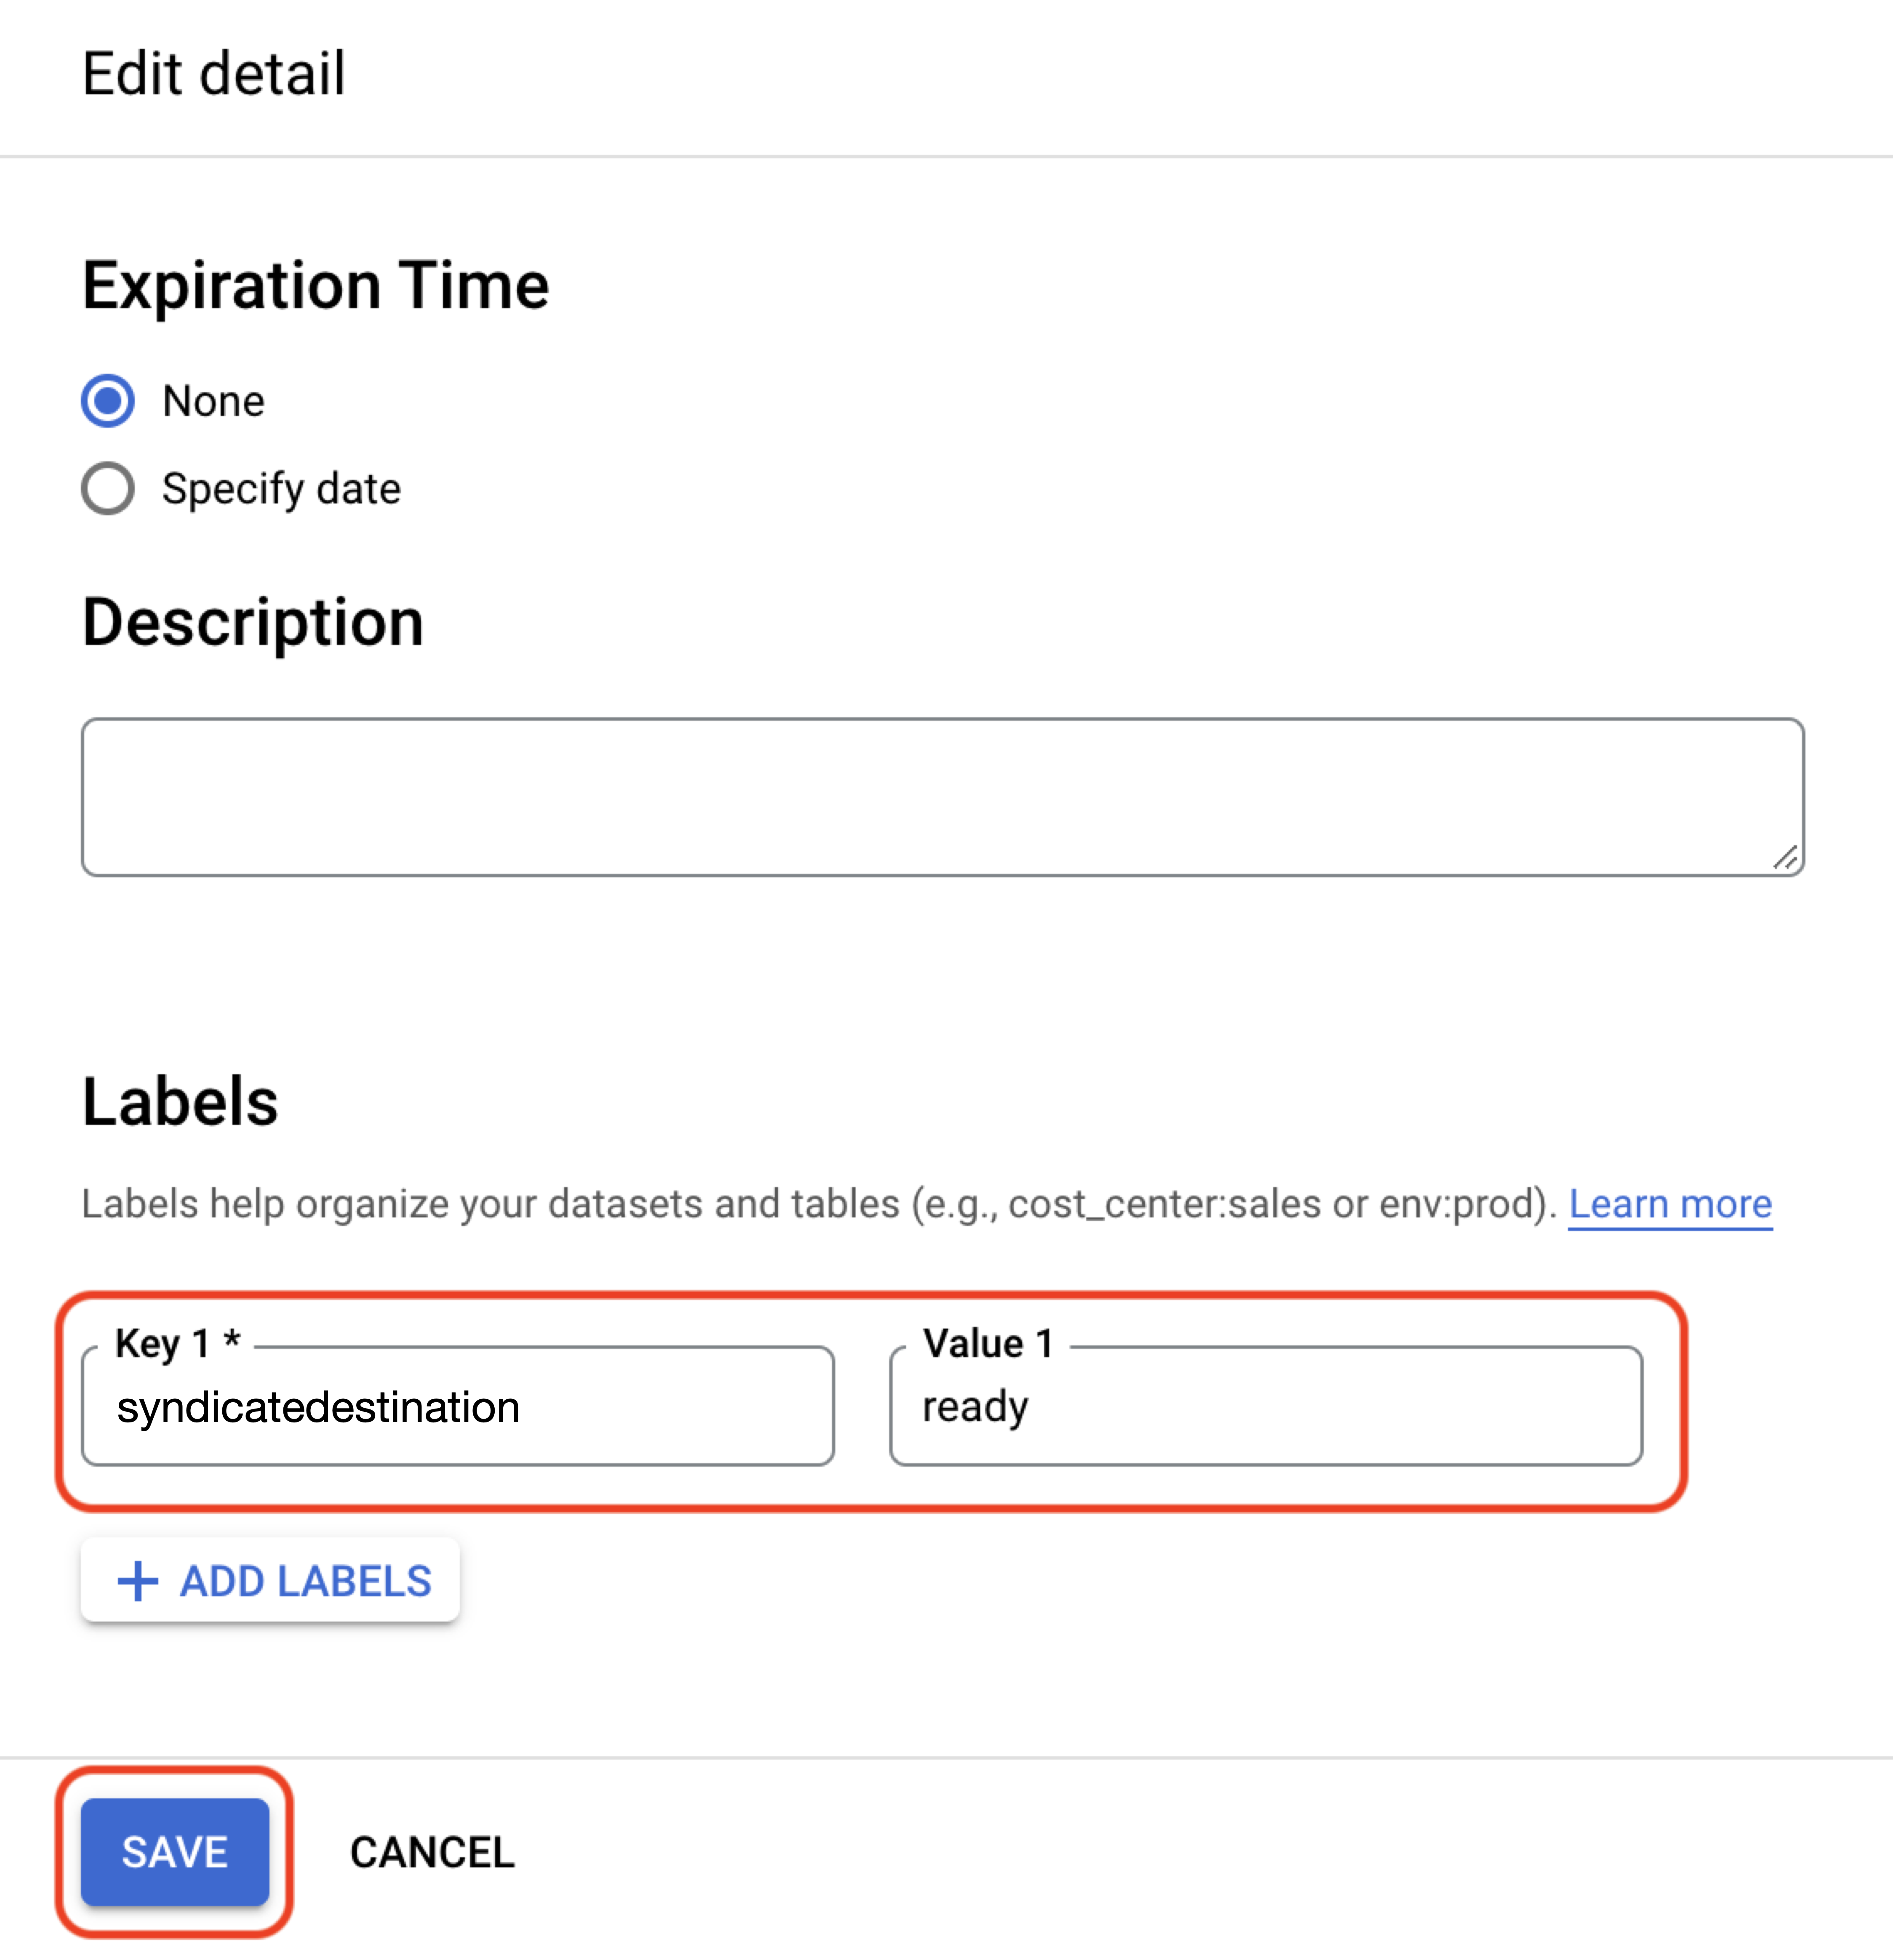
Key 1: syndicatedestination
Value 1: <destination_account_ID>
Where destination_ID is replaced by the target destination account ID, which you can find by querying the da_reference table in the _sg dataset. For example:
syndicatedestination: 1009998-1066555-2088977.If you want to send the segment to multiple destinations, you must create multiple labels because of the 63-character limit for BigQuery labels. The syntax for multiple labels is syndicatedestination-<number>: <destination_account_ID>. For example:
Label Key
Value
syndicatedestination-1
1009998-1066555-2088977
syndicatedestination-2
1003333-1064444-2055666
syndicatedestination-3
1004444-1063333-2055555
For information about the da_reference table, see "Destination Tables".
Click and enter the following values and then click :
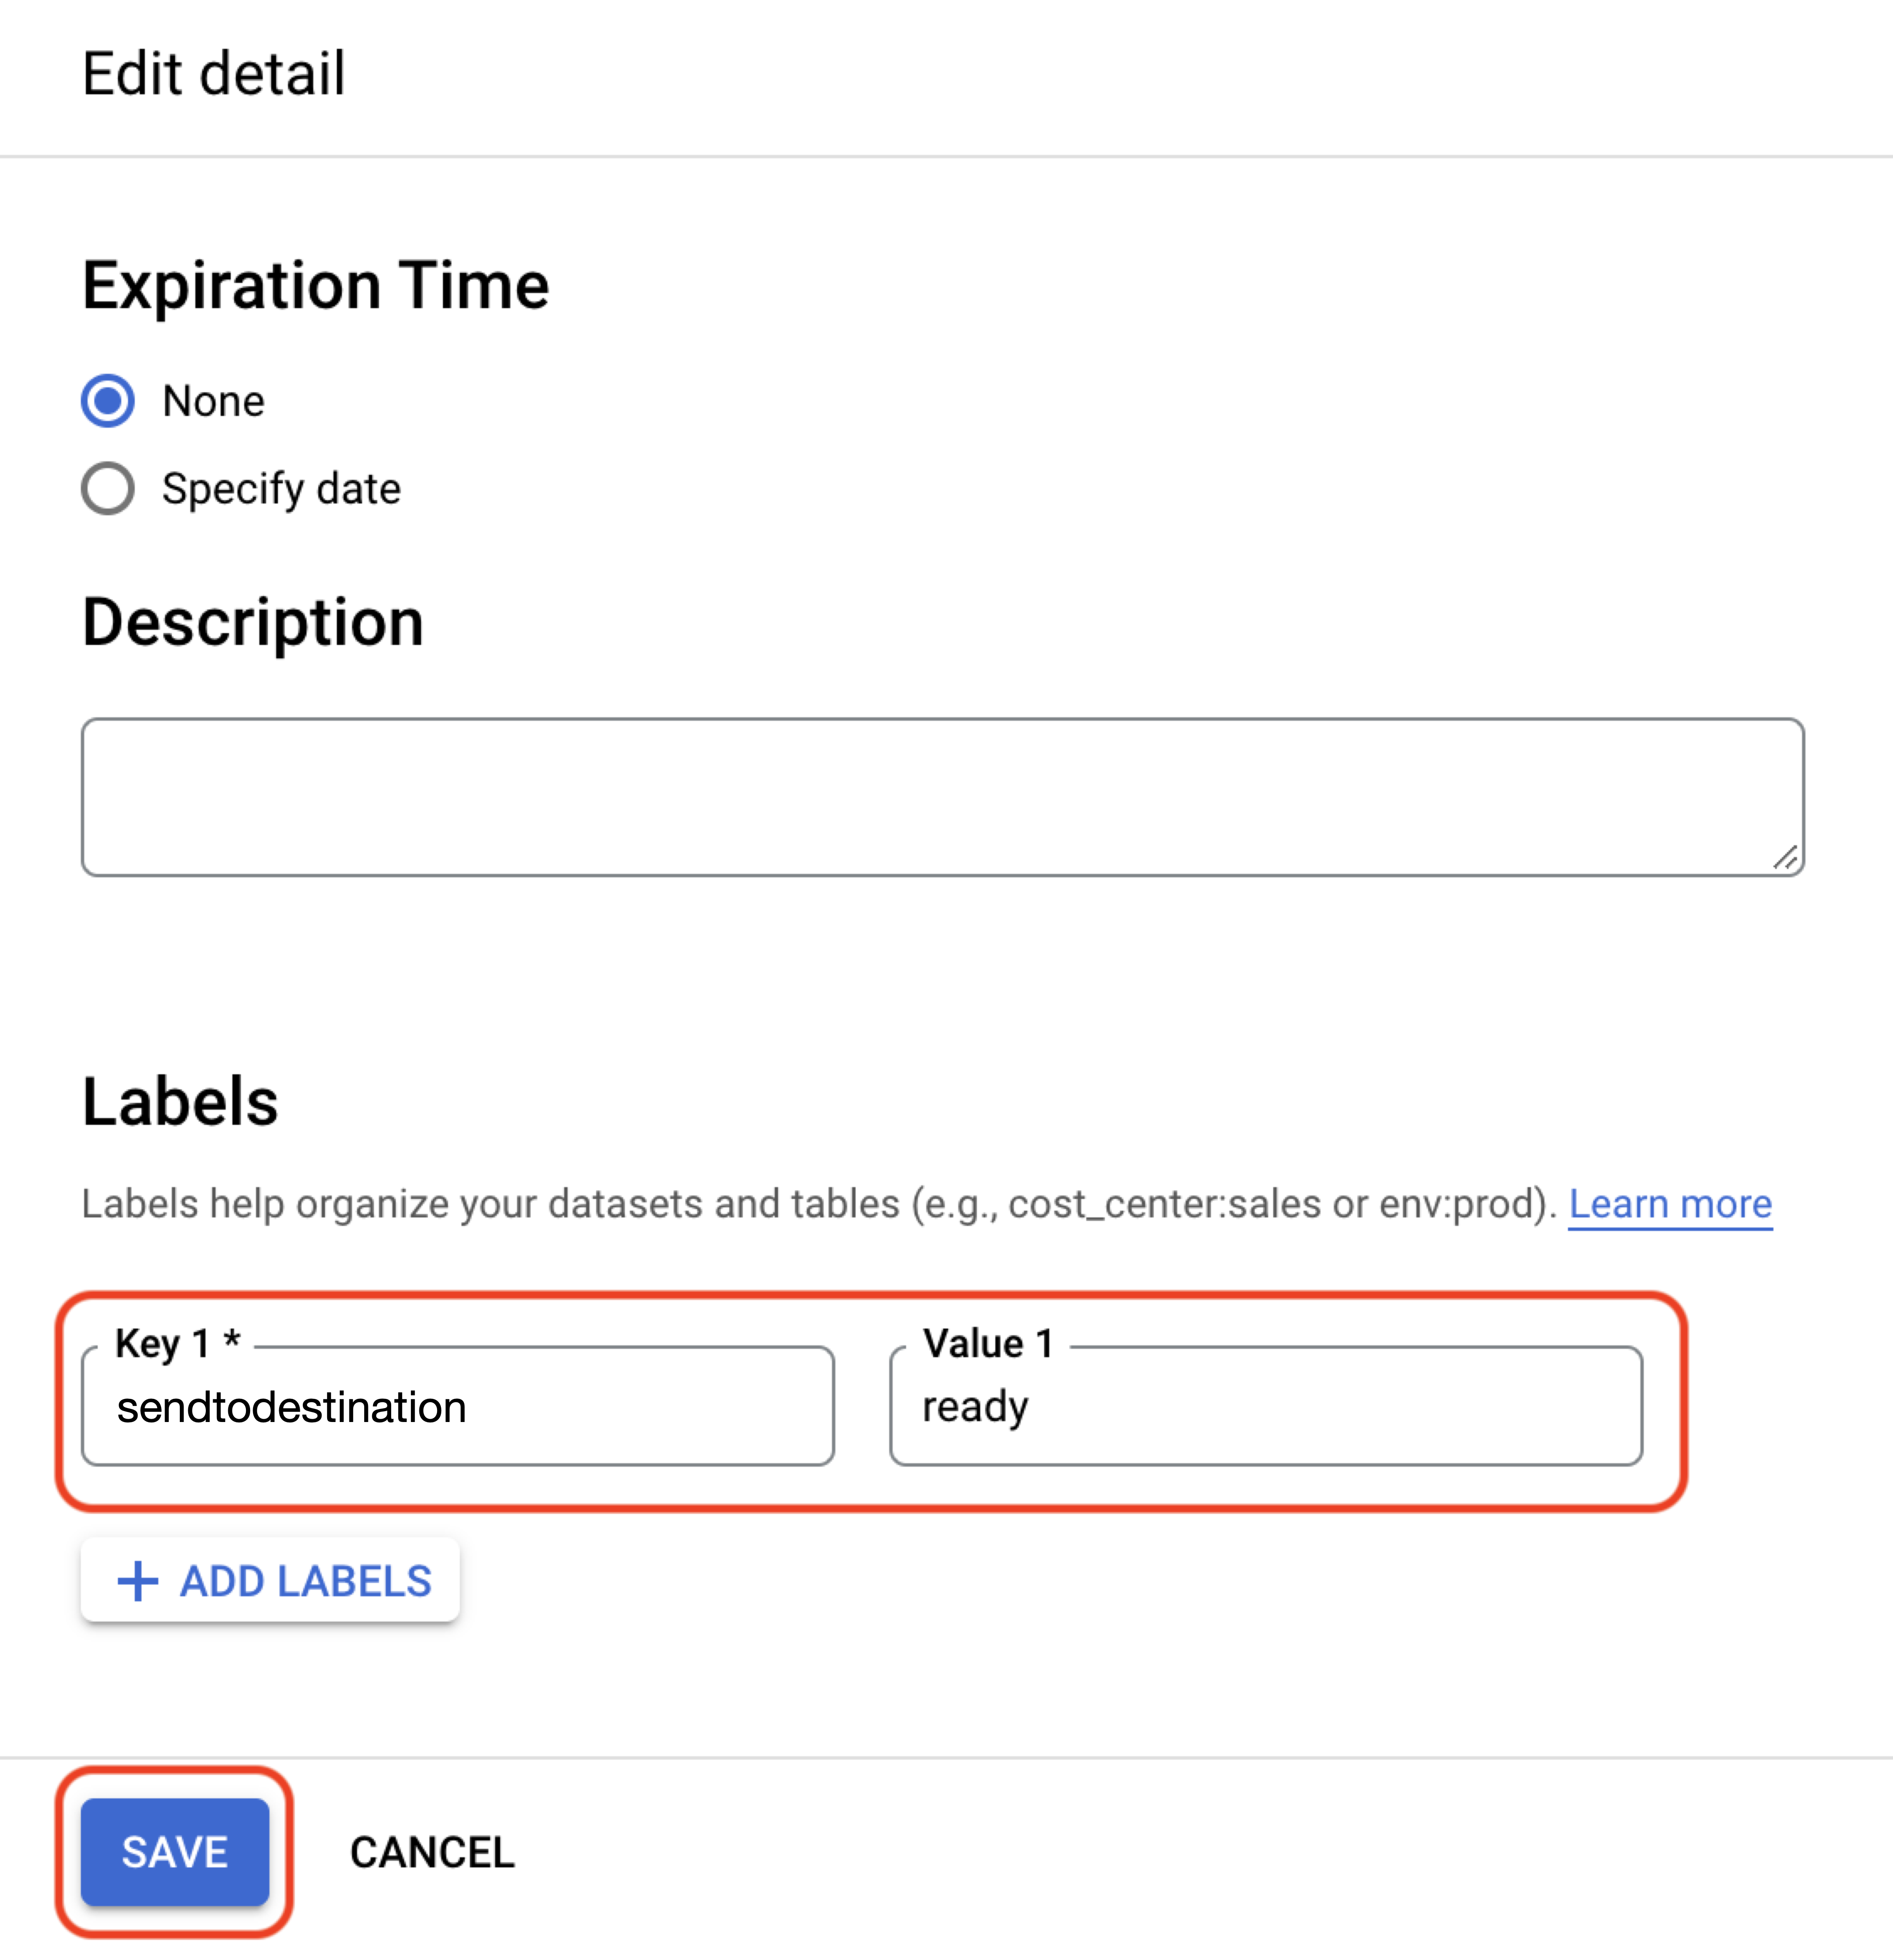
Key 1: sendtodestination
Value 1: "ready"
Caution
You must apply both the syndicatedestination and sendtodestination labels or your distribution will fail.
Click
The table's Details tab should indicate that the label was added successfully.
You can optionally use a script to create or replace tables and add the sendtocustomerprofiles and ready labels. The following BigQuery or Python examples can add labels and initiate the Save a Segment to Customer Profiles process. Other scripts might not work as intended.
Example BigQuery script for creating segment tables with labels:
create or replace table `project-id.dataset-name.table-name`
OPTIONS(labels=[("sendtocustomerprofiles","ready")])
as select * from `project-id.dataset-name.table-name-A`
Example BigQuery script for updating segment tables with labels:
alter table `project-id.dataset-name.table-name`
SET OPTIONS (labels=[("sendtocustomerprofiles", "ready")]);
Example Python script for updating segment tables with labels:
from google.cloud import bigquery
bq_client = bigquery.Client()
table = bq_client.get_table("project-id.dataset-name.table-name")
table.labels['sendtocustomerprofiles'] = 'ready'
bq_client.update_table(table, ['labels'])Once a table is labeled as "ready", a backend process will detect that the table is ready to be sent to Customer Profiles, and the table label value changes to "processing."
When the table is processed successfully and sent to Customer Profiles, the label value changes to "success."
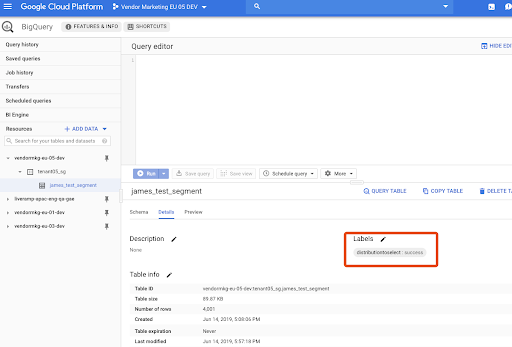
Note
If your segment table fails to be saved to Audience Builder, the label value changes to "fail." We will send you an email with details about the error and instructions on what to do to fix it.
If the guidelines for segment creation are not followed, the segment table will fail when being saved to Audience Builder. If your segment table fails to be sent, we will send you an email with details about the error and instructions on what to do to fix the error.
Example of error email for a segment table with too many columns:
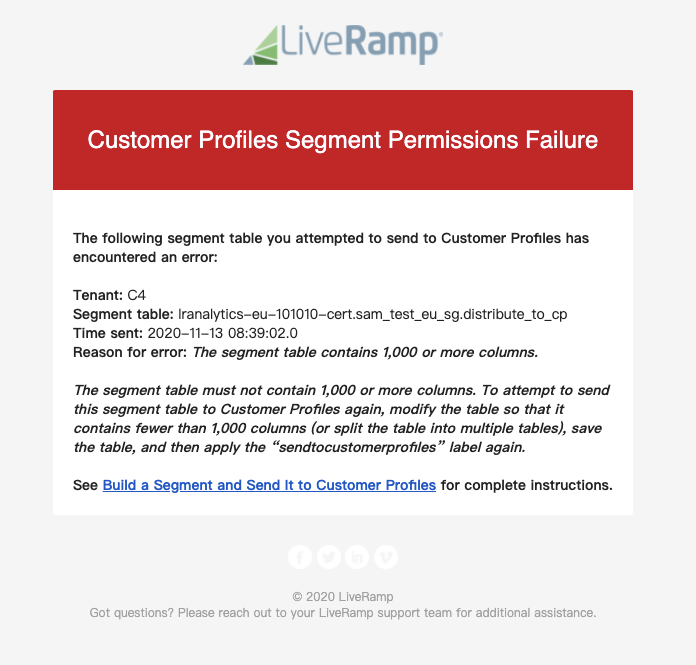
You will also see a value of “fail” for the label key in BigQuery.
A segment table might also fail due to a transient error. If an error occurs again after resubmitting the segment table and you are unable to diagnose it, create a Safe Haven case in the LiveRamp Community portal.
The email will include the following information:
The organization name
The segment table name
The time sent (the day and time the label was added to the table)
The reason for the message
Instructions on how to fix the error (if applicable)
See the information below for instructions on how to fix these errors.
Reason for the Error | Description | Suggested Actions |
|---|---|---|
The first column of the table does not contain RampIDs | The first column of the table must contain RampIDs. This error indicates we did not recognize the ID in the first column of the segment table as a RampID with your organization's expected encryption in string format. | Make sure that the first column of the table contains RampIDs, save the table, and then reapply the To ensure that there are no rows with a value of SELECT * FROM <table_name> WHERE ID NOT LIKE 'XY< If any rows contain invalid RampIDs, delete them from the table by running the following query: DELETE FROM <table_name> WHERE ID NOT LIKE 'XY< |
One or more segment data columns were not set to string format or integer format | Any segment data columns in the table must be set to either string format or integer format. | Modify the table so that all segment data columns are set to string format or integer format, save the table, and then reapply the |
The segment table contains 1,000 or more columns | The segment table must not contain 1,000 or more columns. | Modify the table so that it contains fewer than 1,000 columns (or split the table into multiple tables), save the table, and then reapply the |
Some segment values were not 0 or 1 | All segment values must be Boolean (either | Modify the table so that all segment data values are either |
The first column of the table does not contain PPIDs | If your Safe Haven account uses PPID identifiers, the first column of the table must contain PPIDs. This error indicates we did not recognize the ID in the first column of the segment table as a PPID column with string format. | Make sure that the first column of the table contains PPIDs, save the table, and then reapply the To validate a list of PPIDs, run this query against your BigQuery table and then remove any rows with invalid PPIDs: SELECT COUNT(*) AS COUNT FROM (SELECT SAFE_CAST(ID AS INT64) AS ID FROM '<platform_name>.<organization_name>_sg.<segment_name>') WHERE ID <= 0 or ID is null; |
There was a transient error | This error indicates there has been either a transient or an unidentified error. | Reapply the |
Records were removed | Certain RampIDs were marked for deletion to comply with CCPA and GDPR, so they were removed from the table before saving it to Audience Builder. | This message is informational. |
Different Segment Sizes in Analytics Environment than in Customer Profiles
If your table has the same RampID on multiple rows, queries you run in BigQuery might not meet your expectations if you query for values that are located on different rows.
If you send your data from Analytics Environment to Customer Profiles, subsequent processing in Customer Profiles will combine information that appears on multiple rows but is associated with a single RampID, which typically results in a larger segment size.
The size of a segment in Analytics Environment can be different than in Customer Profiles even if your query logic appears to be the same in both.
For example, suppose you query a table in BigQuery for individuals with brand = 'PersonalCareCompany' AND gender = 'male' but those values do not appear on the same row for the same RampID. Once the data is sent to Customer Profiles, the equivalent logic could result in a larger size than shown in the BigQuery results because Customer Profiles will query across rows for the same RampIDs.