Manage Partner Tenants
Note
If you and your partners agree that you should manage your partner's users, create a case in the LiveRamp Community portal to request a Primary Tenant persona.
Users with the Primary Tenant Admin persona can manage the following for partner tenants:
Partner Tenant account
Users
Personas
Applications
Data permissions
Primary Tenant Admin users can also access the Admin Center UI that partner tenant users can see if they have the Tenant Admin persona. See Manage a Partner Tenant.
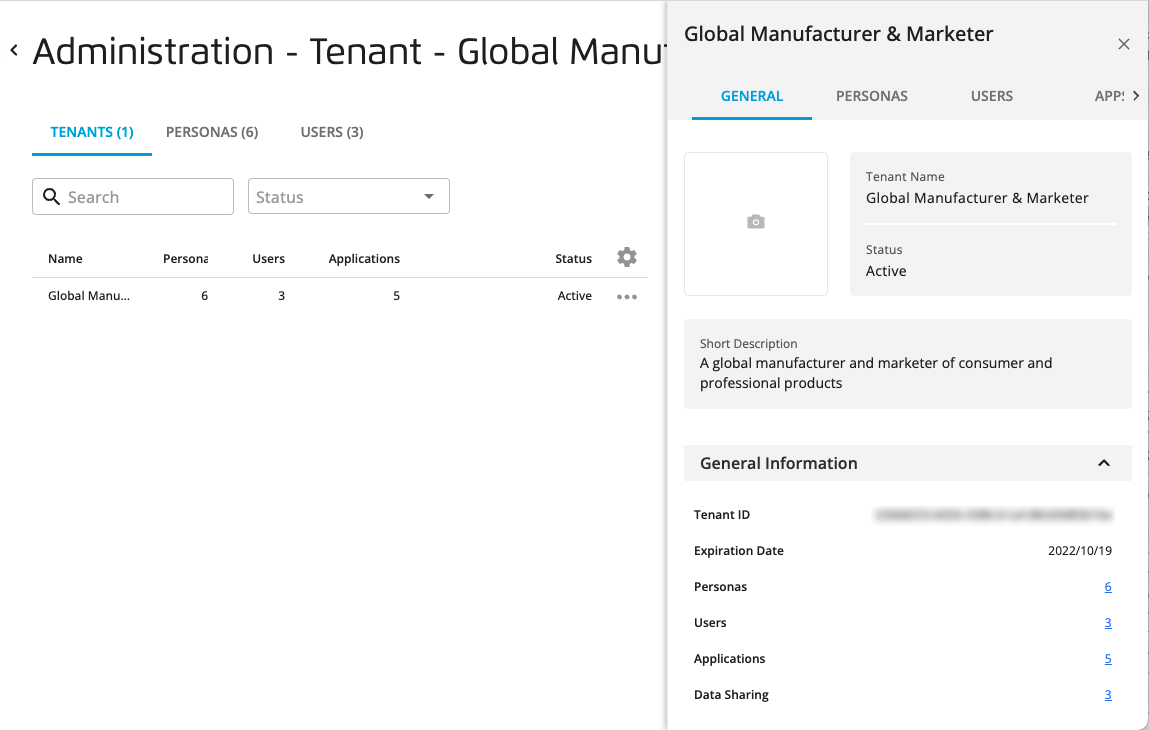
Users with the Primary Tenant Admin persona can view a list of high-level details about all partner tenants and then navigate to get more specific details.
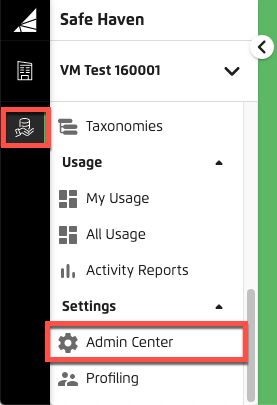
In the left navigation bar, click Admin Center.
Select the Partner Tenants tab. The list of partner tenants displays the number of users, personas, and applications in use by each partner and whether they are currently active.
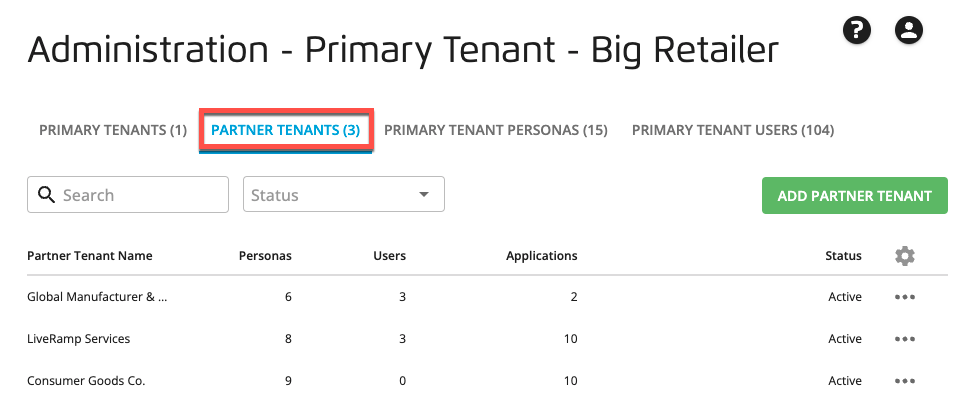
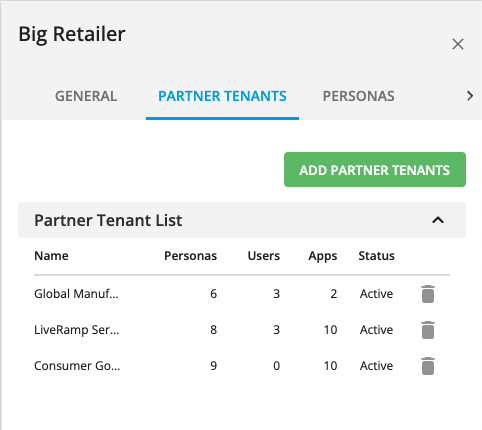
Click in the row of a specific partner tenant to display the side panel's General tab, which summarizes the partner's personas, users, apps, and data permissions. You can click any of the other tabs to see more details.

You can also view a summary of your partner tenants from your primary tenant side panel's Partner Tenants tab.
To view a partner tenant's usage metrics on the Usage Tracking page, you must have the LSH Admin or LSH CP Admin personas. See Viewing a Partner Tenant's Usage Metrics.
To view any data permissions granted to your partner tenant, go to the Permissions page.
Before you can create a partner tenant, you need their Partner Tenant ID. To request their Partner Tenant ID, create a Safe Haven case in the LiveRamp Community portal and include the name of the partners you want to add to your primary tenant account.
In the left navigation bar, click Admin Center.
Click the PARTNER TENANTS tab.
Click .
The Add Partner Tenant dialog appears.
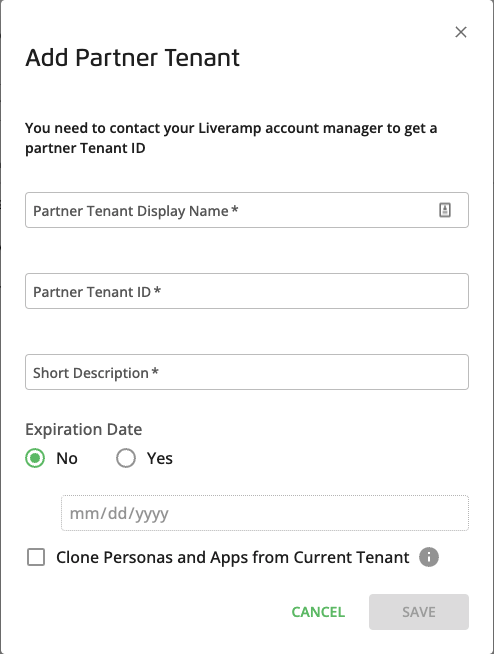
Enter the following details:
Partner Tenant Display Name: The name displayed in the Safe Haven user interface
Partner Tenant ID: The ID you received from LiveRamp for your partner
Short Description: A description of your partner for any Safe Haven users who are not familiar with their role
Expiration Date: You can set an expiration date for the partner's account so that you do not lose track of their active status. If you leave the default of No, you can deactivate the partner at any time.
Clone Personas and Apps from Current Tenant: Select this check box to populate the new partner tenant account with all the personas currently included in your primary tenant account. You can adjust the available personas if you do not want the partner to have access to all of them. The supported personas must be assigned to users before they have any effect.
Click .
Adjust the partner tenant's personas as needed.
You can edit the following partner tenant account information, such as their display name.
Display name
Short description
Expiration date
You cannot change their Partner Tenant ID, which is provided when LiveRamp creates the partner tenant's account.
In the left navigation bar, click Admin Center.
Click the PARTNER TENANTS tab.
Click in the row of a specific partner tenant to display the side panel's GENERAL tab.
In the Partner Tenant Name box, click the Edit icon
 .
.The Edit Partner Tenant dialog appears.
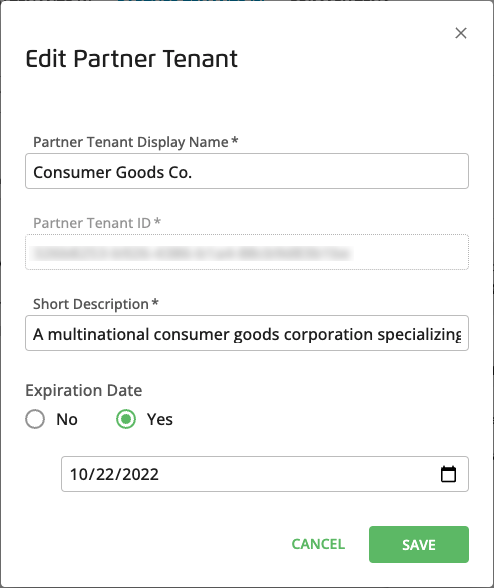
Make any needed changes and click .
You can grant or revoke a partner tenant's access to various applications by granting personas to its users. The personas must first be added to the partner tenant on the PERSONAS tab of their side panel in the Admin Center.
Once you add a persona to your partner tenant's account, you still need to grant the persona to your partner tenant's users as needed. For details, see Manage Users.
You can also remove your partner tenant's access to a persona on the PERSONAS tab.
In the left navigation bar, click Admin Center.
Click the PARTNER TENANTS tab.
Click in the row of a specific partner tenant to display the side panel.
Click the partner's PERSONAS tab.
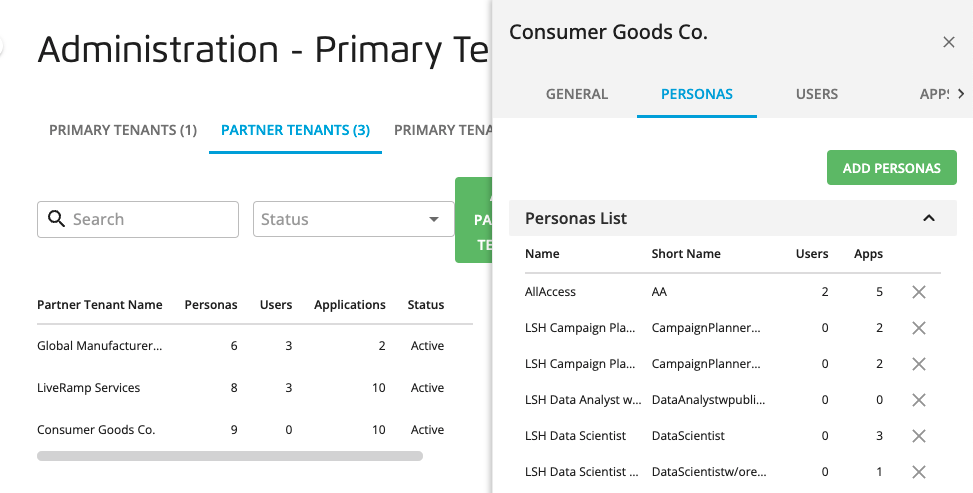
To delete a persona from your partner tenant, click the persona's icon.
To add one or more personas to your partner tenant, click .
In the Add Personas dialog, select the check boxes for the personas you want available to assign to your partner tenant's users and then click .
Users with the Primary Tenant Admin persona can enable data permissions for partner tenants. You can enable permissions for them to use your data and you can help your partner tenants to enable permissions between them and your other partner tenants.
Once you enable data permissions, data permissions are not automatically granted. Users with the LSH Admin or LSH CP Admin personas must then create permissions for individual data assets. See Permissions.
In the left navigation bar, click Admin Center.
Click the PARTNER TENANTS tab.
Click in the row of a specific partner tenant to display the side panel.
Click the DATA SHARING tab.
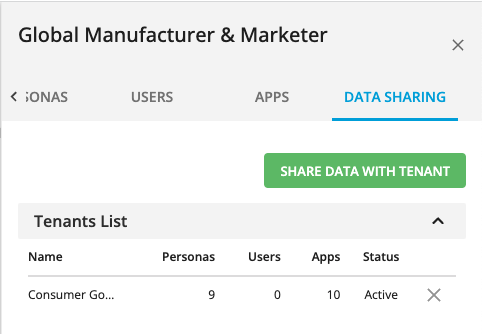
Click .
A dialog is displayed that allows you to specify partner tenants.
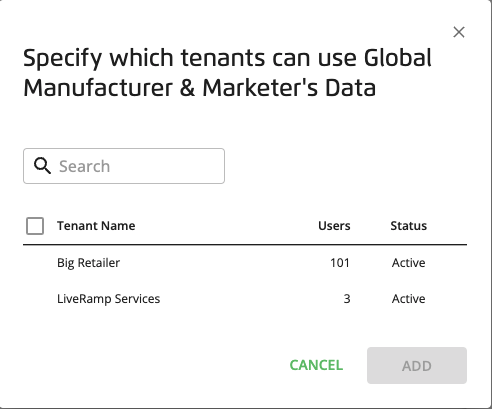
Select the check boxes of the partner tenants for which you want to enable data permissions and then click .
Primary Tenant Admin users can access the same Admin Center UI that partner tenant users see. This allows Primary Tenant Admin users to support their partner tenants by administering their accounts and helping troubleshoot any issues.
In the left navigation bar, click Admin Center.
Click the PARTNER TENANTS tab.
Click in the row of a specific partner tenant to display the side panel.
On the partner tenant's side panel, click .
The partner tenant's view of the Admin Center is displayed so that you can manage their personas and users. Partner tenant users with the Tenant Admin persona can use the same tabs and side panel to view details, manage users, and enable data permissions.

On The TENANTS tab, click the partner tenant's row.
The side panel displays the tenant's details, including tabs where you can manage their users and enable data permissions.
Use the side panel tabs to create and remove users, view personas, apps, and enable data permissions with their partners as needed.
Before deleting a partner tenant, consider deactivating them so that you can reactivate them at a later time. You can select the option from the partner's More Options menu ( ).
).
In the left navigation bar, click Admin Center.
Click the PARTNER TENANTS tab.
From the partner's More Options menu (
), select .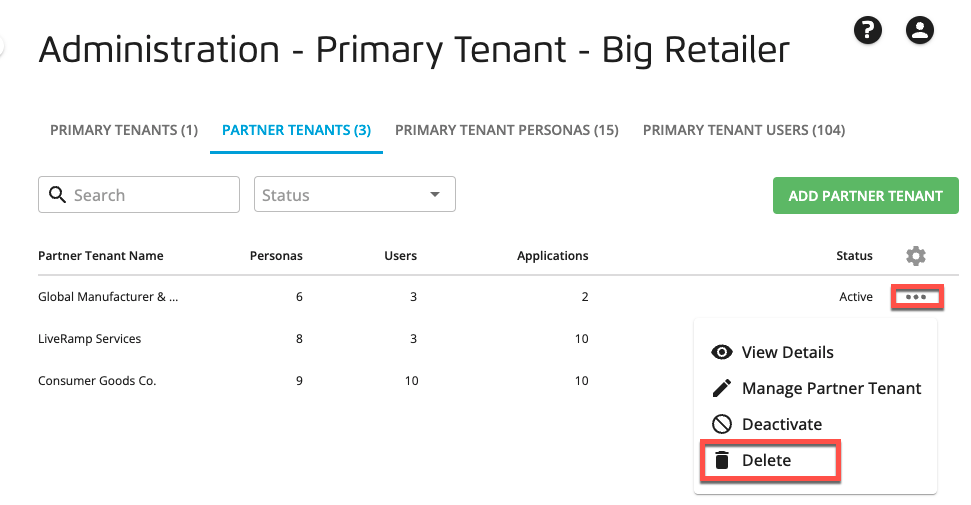
Click to confirm the permanent removal of the partner tenant.