The RFPs Page (OTT Hub)
Caution
This article is intended for users of the OTT Hub.
The RFPs page is where you manage the RFPs that have been built in your OTT Hub account.
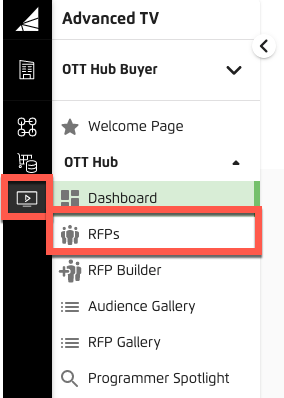
To access the RFPs page for OTT Hub, click RFPs in the OTT Hub section of the Advanced TV navigation menu.
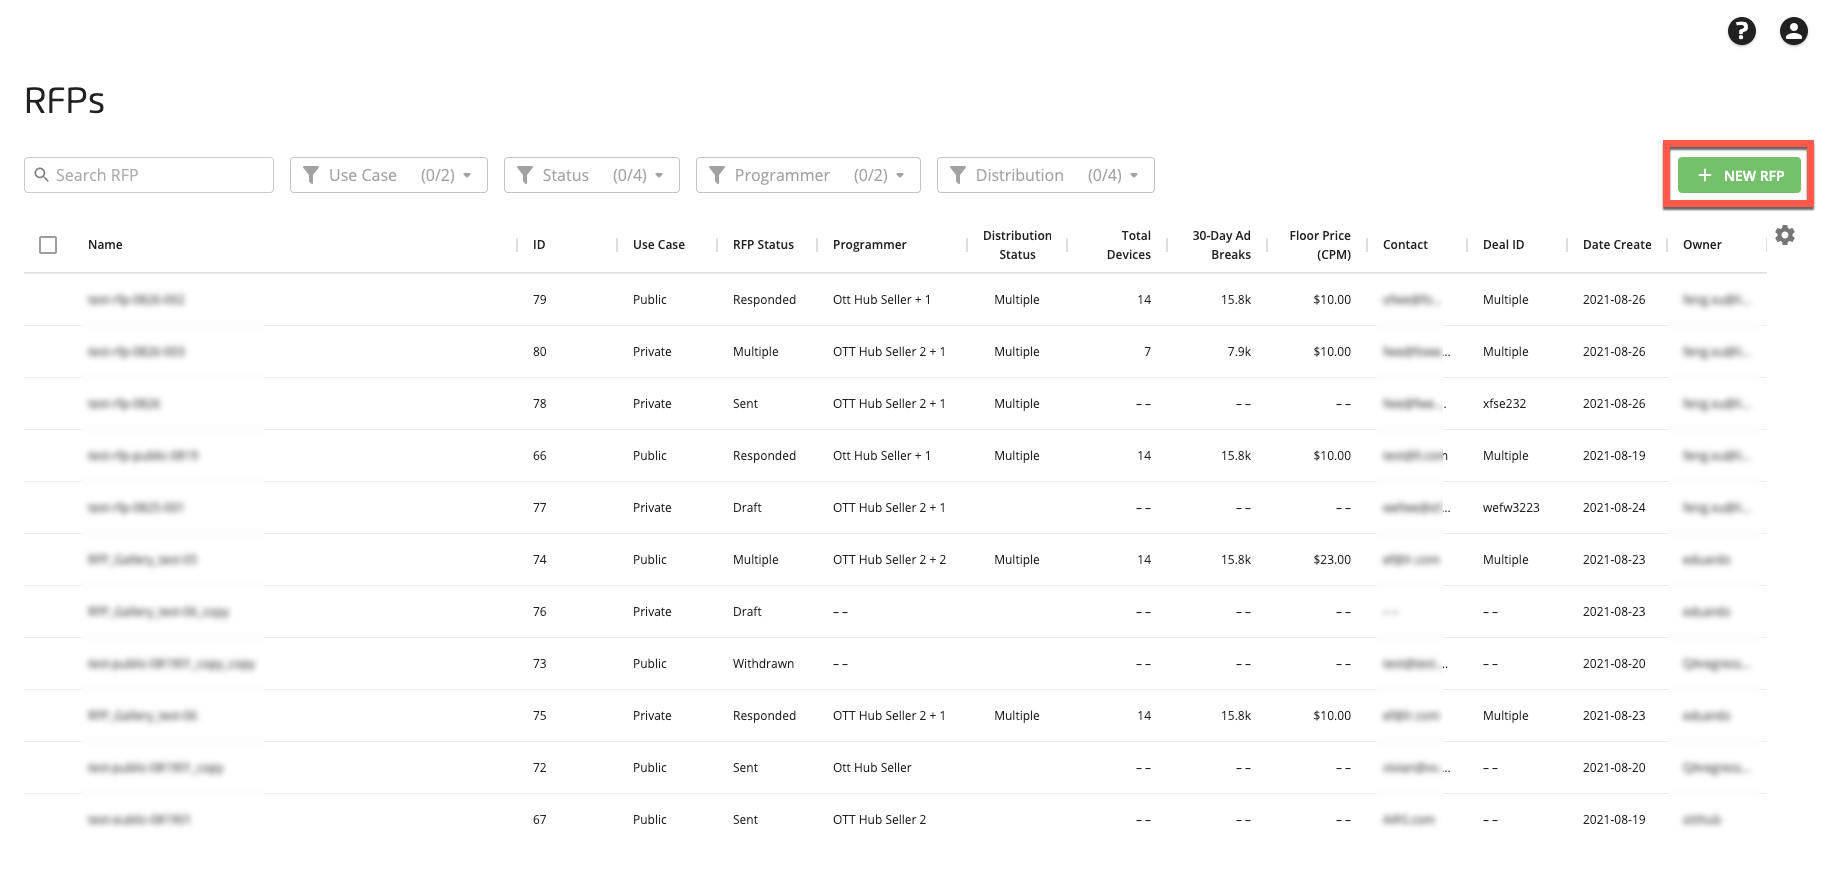
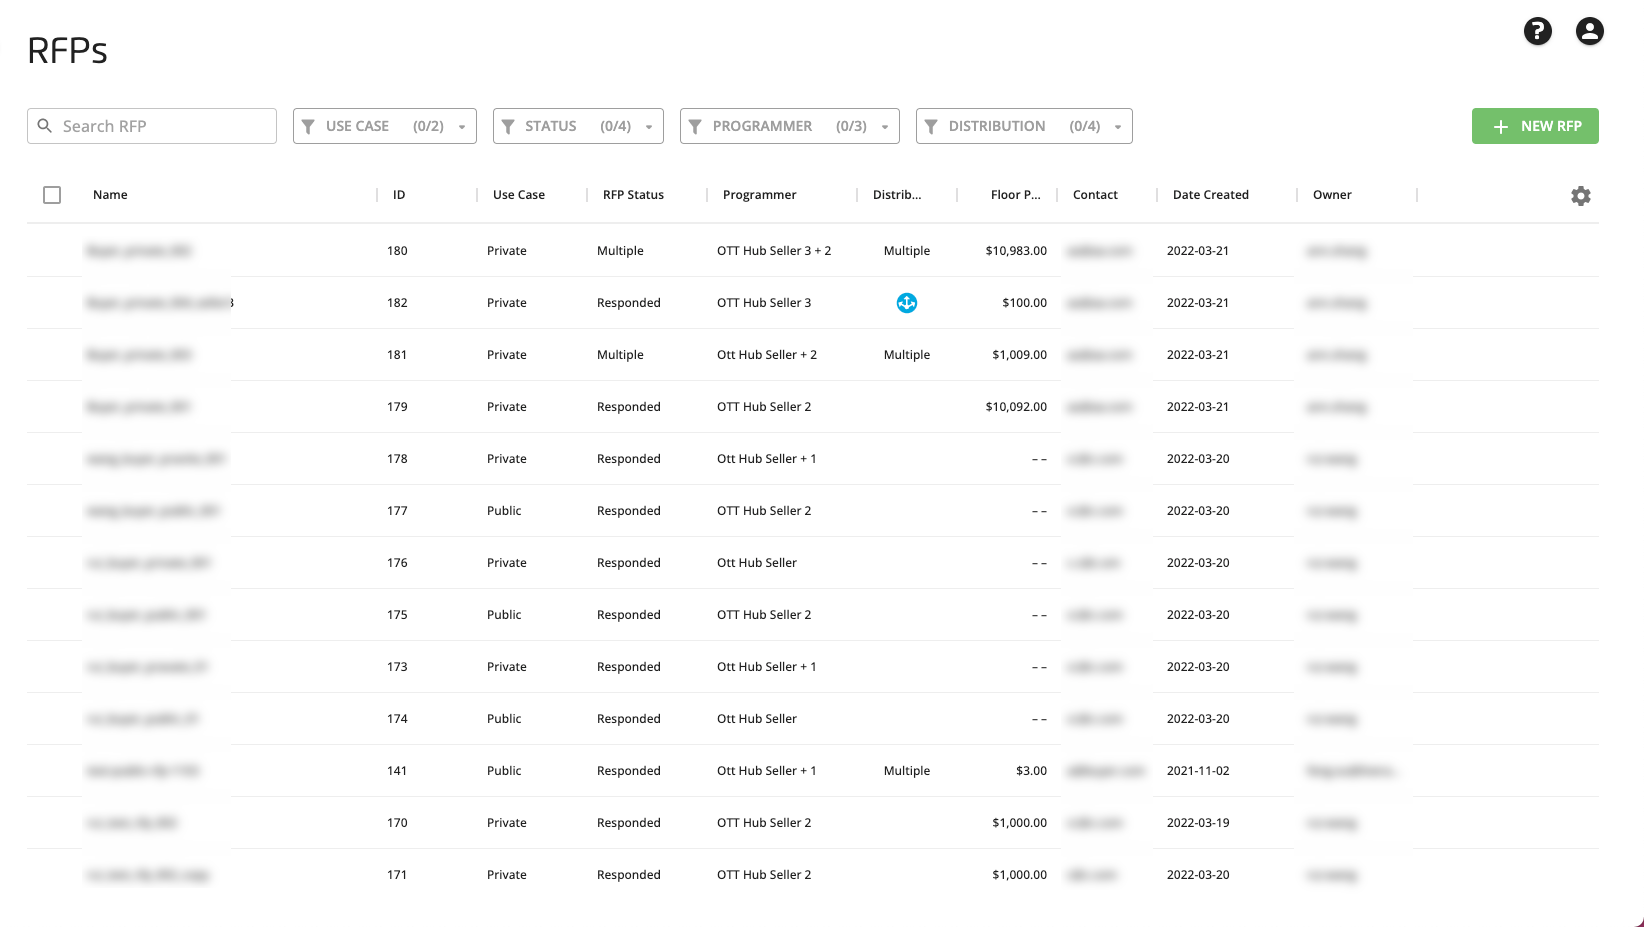
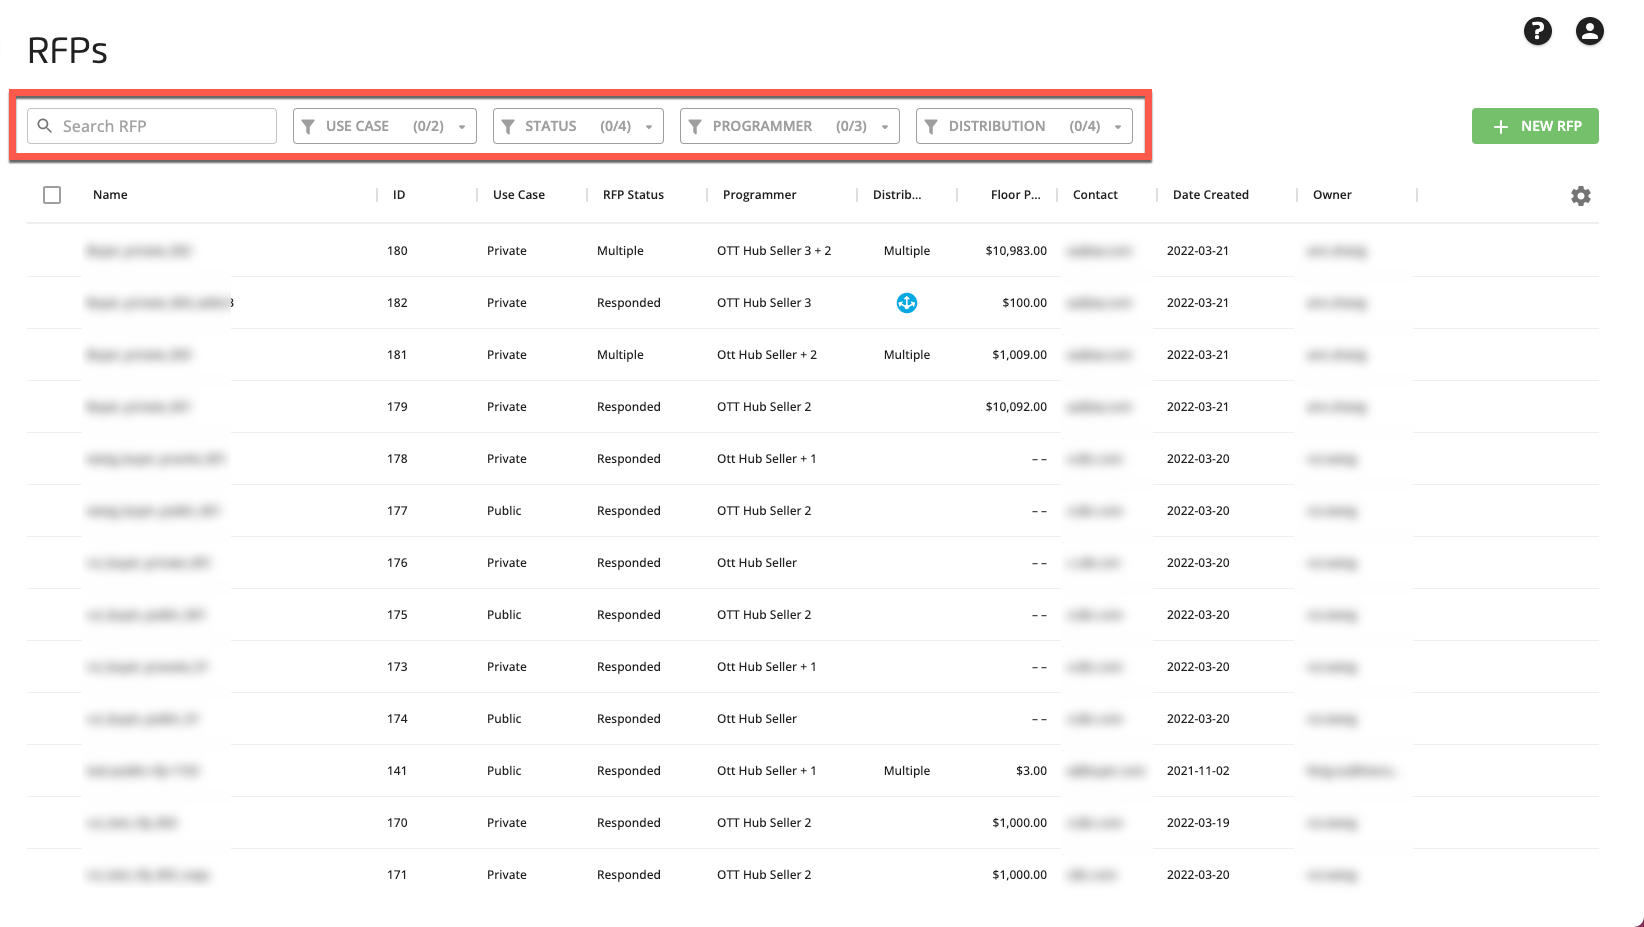
The RFPs are listed in reverse-chronological order (most recently created RFPs at the top of the list), with columns that provide additional information for each audience. You can also change the way the table is displayed (see "Changing the Table Display" for more information).
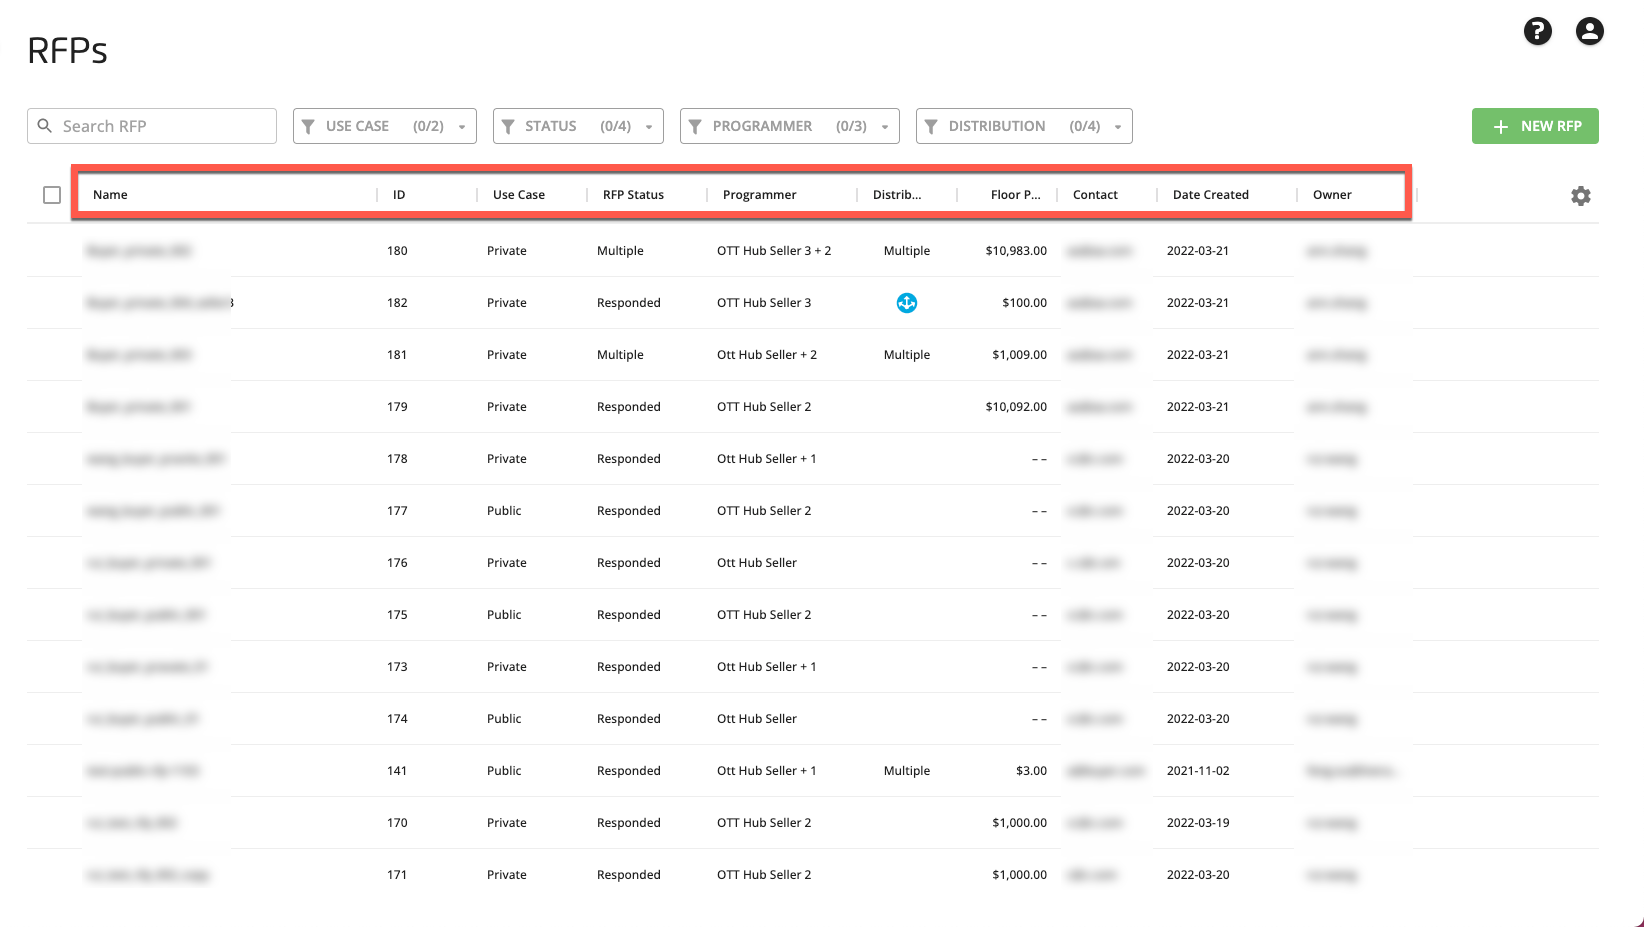
The RFPs page table contains the following columns when first opened:
Note
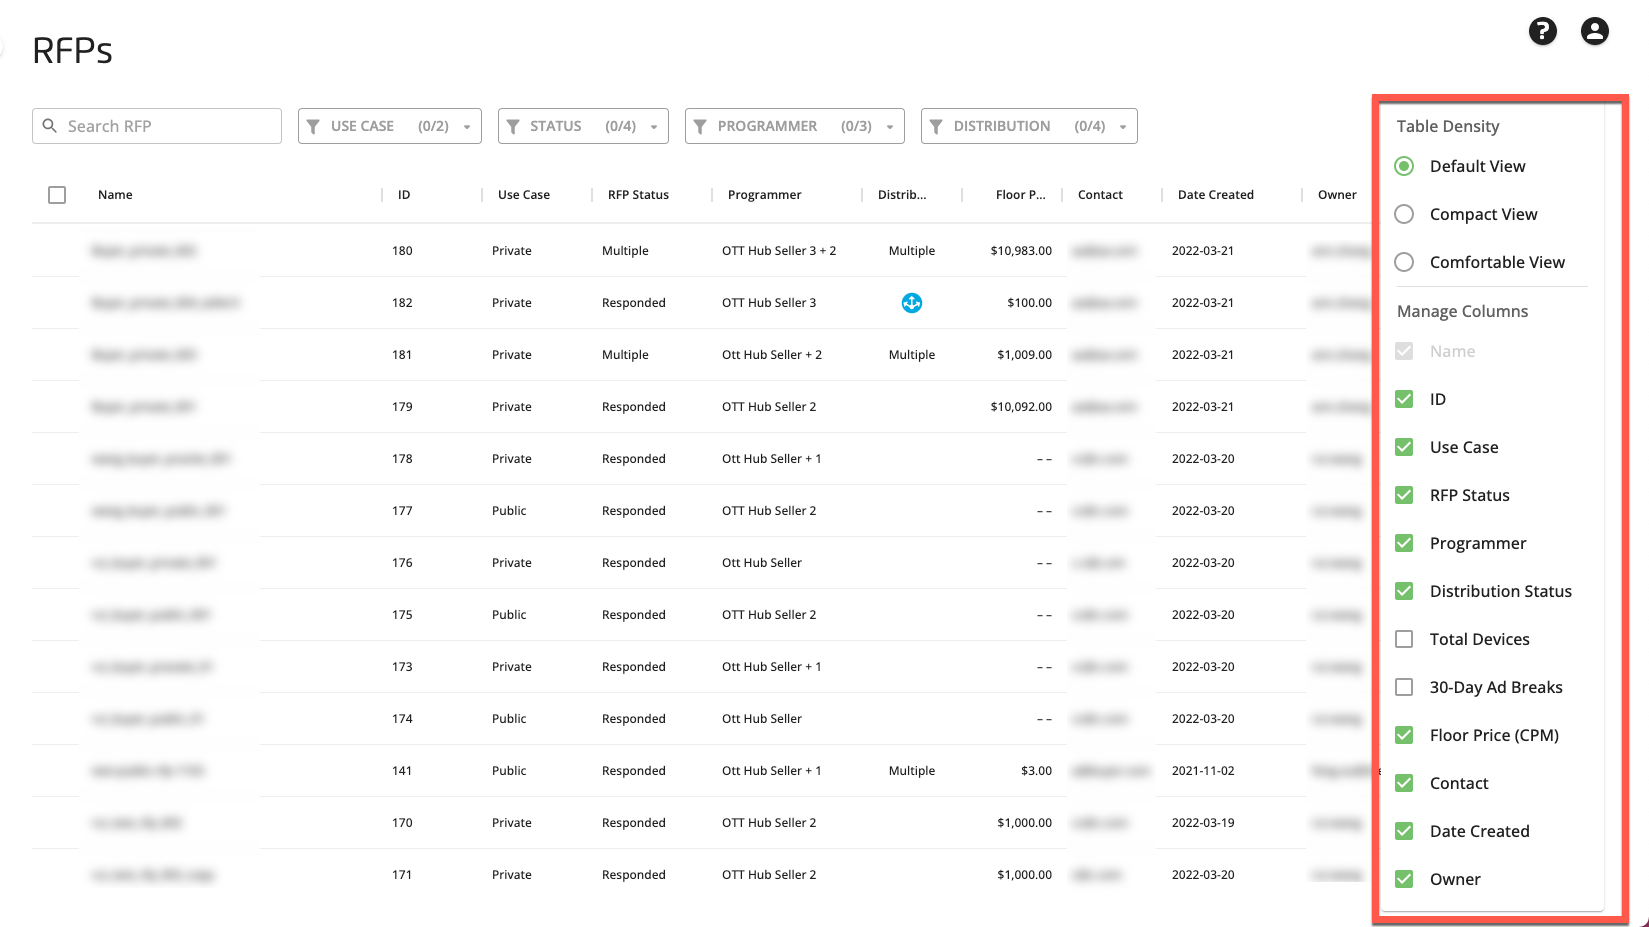
To change the height of the table rows (table density) or the columns that are displayed, click the gear icon on the right side of the page (see "Changing the Table Display" for more information).
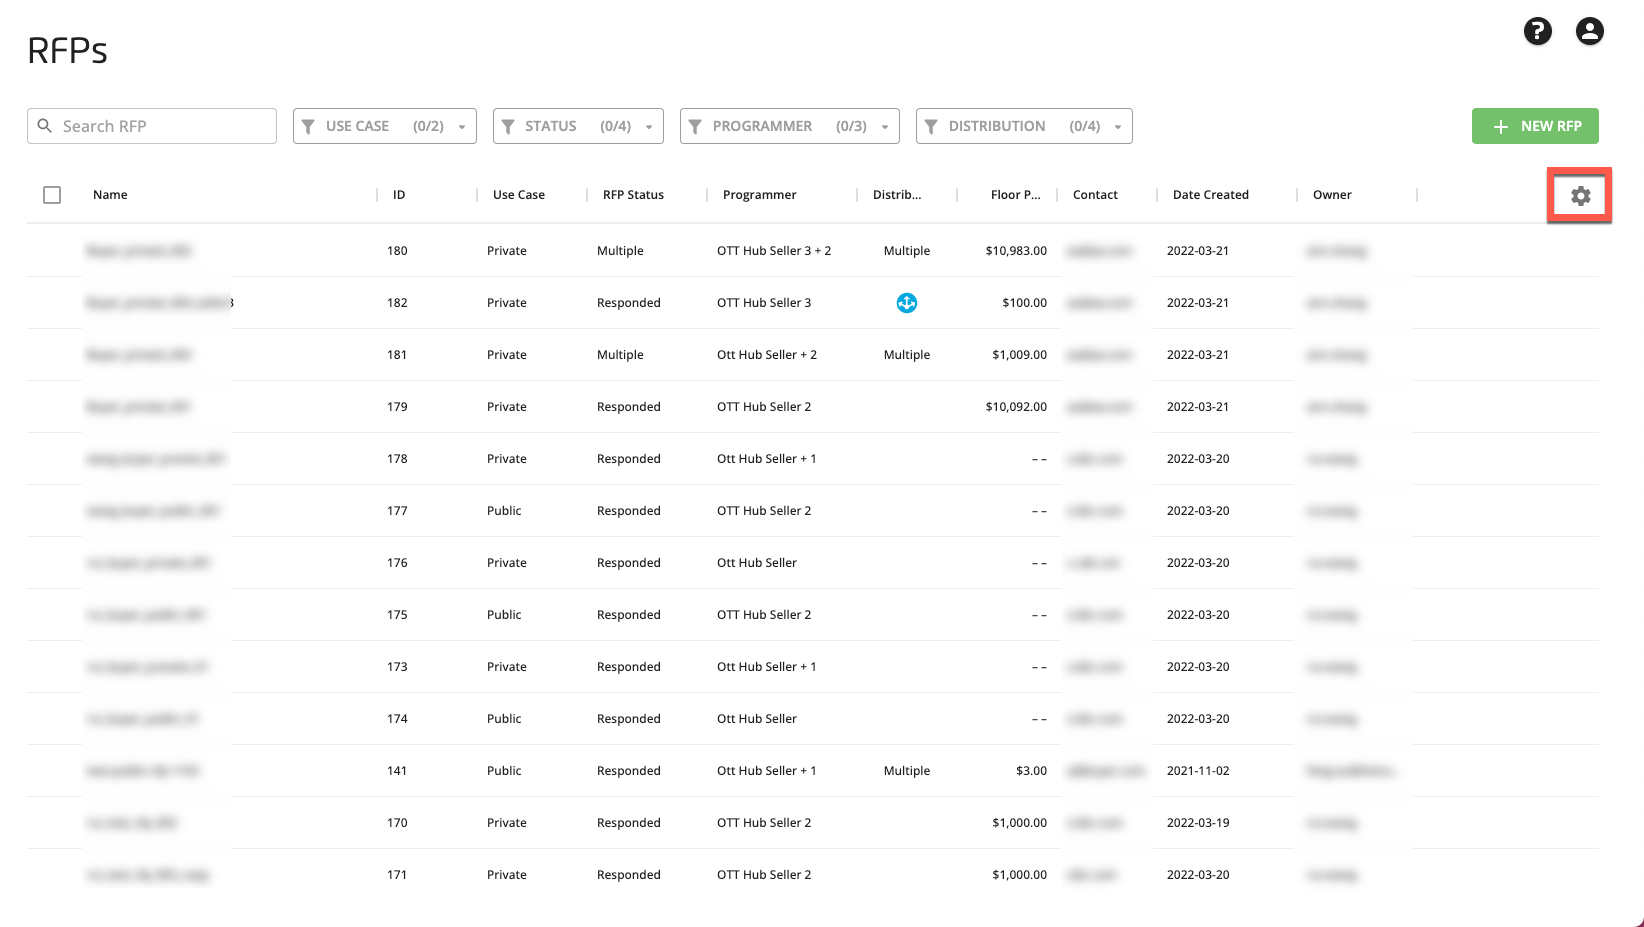
Name: The name of the RFP that was created when the audience was built.
Note
All names are editable until an RFP has been distributed.
ID: The ID of the RFP.
Note
RFP IDs are not editable.
Use Case:
Public: An RFP you built that can be published to the RFP Gallery
Private: An RFP you built that can be sent to selected programmers but cannot be published to the RFP Gallery
RFP Status:
Draft: The RFP has not been finalized.
Sent: The RFP has been sent to the one or more programmers.
Responded: All of the programmers have responded to the RFP.
Withdrawn: The RFP has been sent to order and so has been withdrawn.
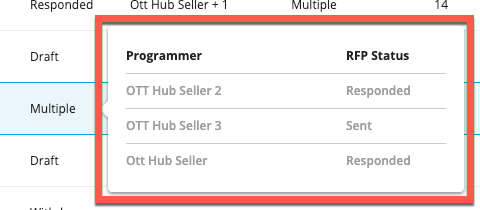
Multiple: Some, but not all, of the programmers have responded to the RFP. Hover over the entry to see a status breakdown by programmer:
Programmer: The names of the programmers the RFP has been sent to.
Distribution Status: The distribution status for the RFP:
 Requested: The RFP is pending approval by the universe owner and is not yet being distributed.
 Distributing: The RFP has been sent to order and is being distributed.
 Distribution Complete: The RFP has been sent to order and has distributed.
 Failed: There has been a transient failure. Contact your LiveRamp representative.
Campaign Completed: Activation has ended as the campaign date is in the past.
Total Devices: The number of devices matched to this RFP. (This column is not displayed by default.)
30-Day Ad Break: Our forecast of the number of potential ad impressions that might be shown for the devices in this RFP over 30 days. See "Forecasting" for more information. (This column is not displayed by default.)
Note
This does not mean that all bids will be filled.
Floor Price (CPM): The minimum ad price that can be executed (configured at the ad server).
Contact: The email address of the person who should be contacted about this RFP.
Date Created: The date the RFP was created.
Owner: The user that built the RFP.
Note
Only the user that owns an RFP can edit or delete that RFP.
To view details for an RFP, click on the row for that RFP to open the details panel.
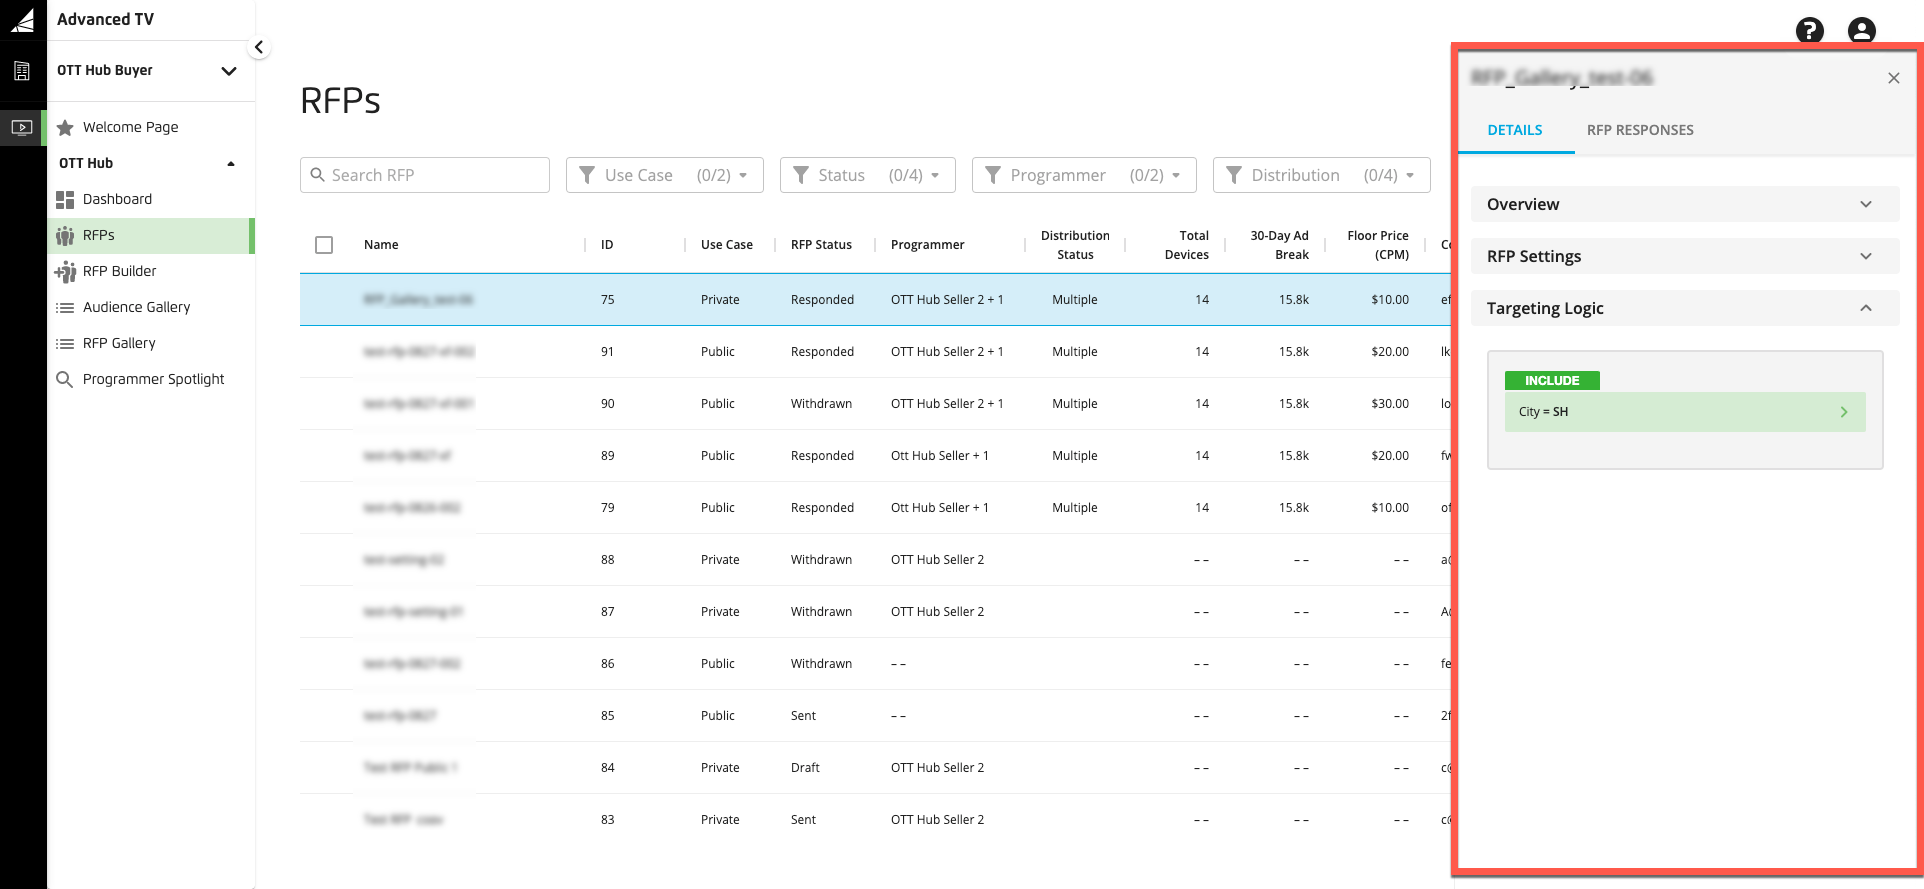
These details include:
RFP settings
Targeting logic
RFP responses from programmers
Note
RFP details are not editable when viewing. To edit RFP details, follow the instructions in "Edit an RFP."
Note
See the sections below for information on each tab area.
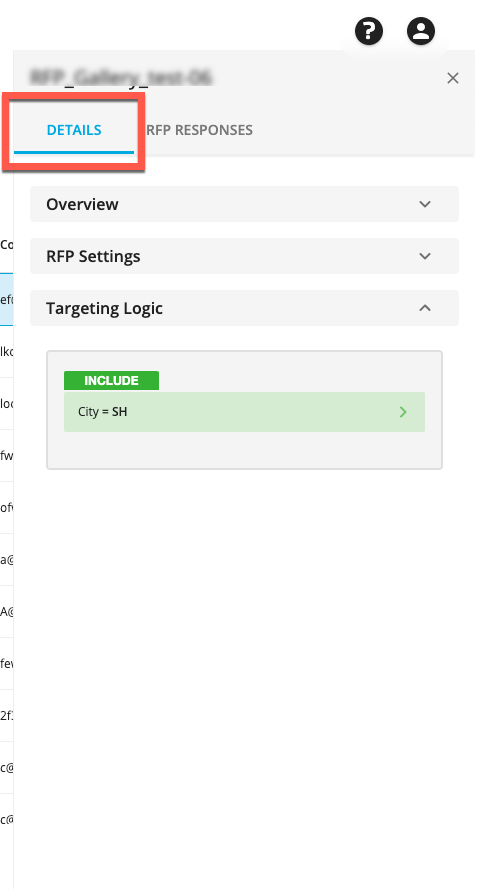
The DETAILS tab of the RFP Details panel contains the information listed below.
Note
Some sections are displayed collapsed when the panel first opens. Click the caret to the right of the section name to expand (or collapse) a particular section.
The Overview section contains the following information:
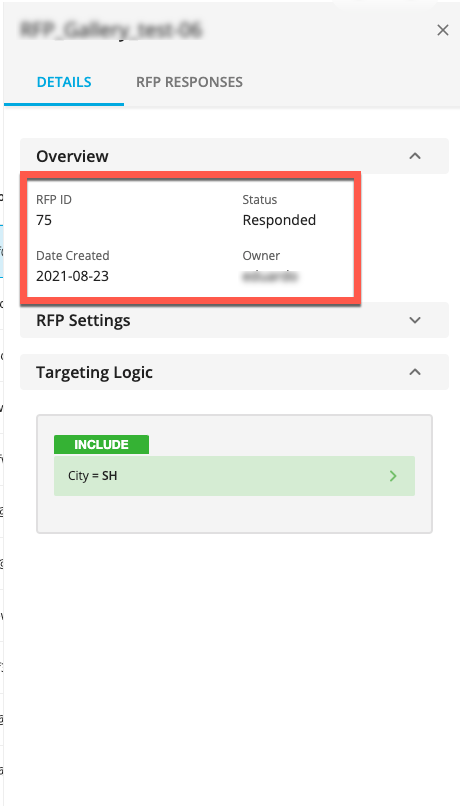
RFP ID
Date created
Status
Owner (the user who created the RFP)
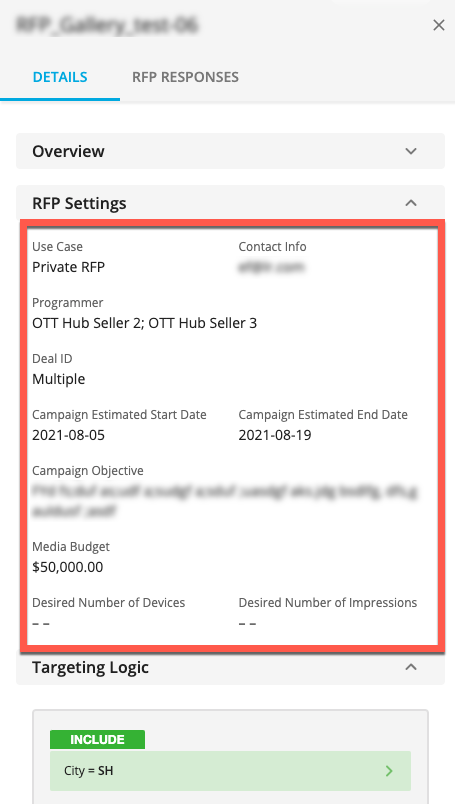
The RFP Settings section contains info on the settings for the RFP:
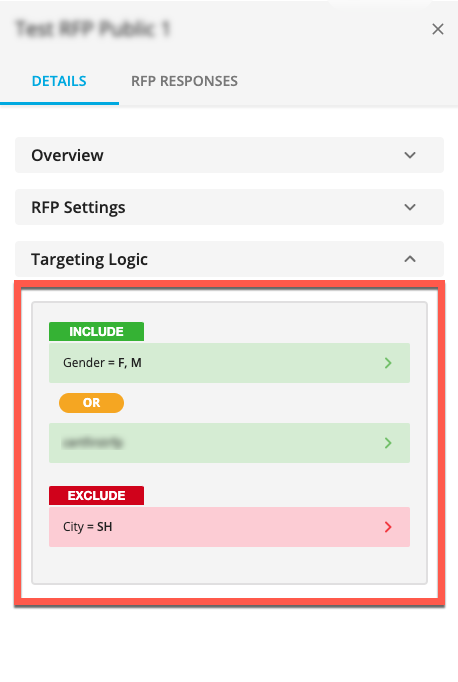
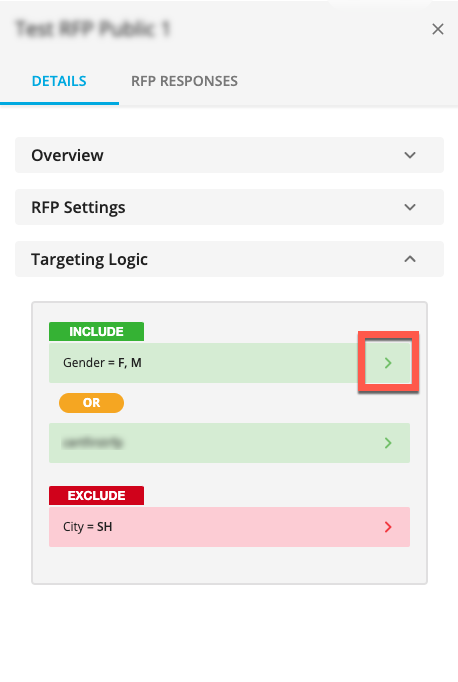
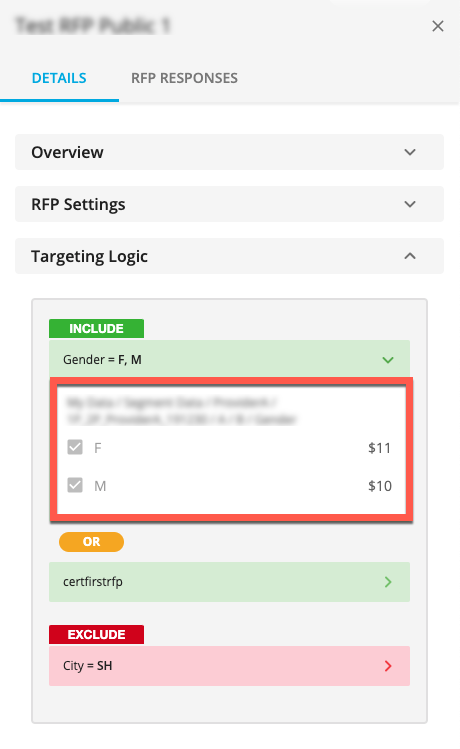
The Targeting Logic section displays segment names and Boolean logic operators for each segment in the RFP.
Note
You might have to scroll down to view all of the segments in the RFP.
To view the included attributes for an individual segment component, click the caret on the right side of the row for that segment component.
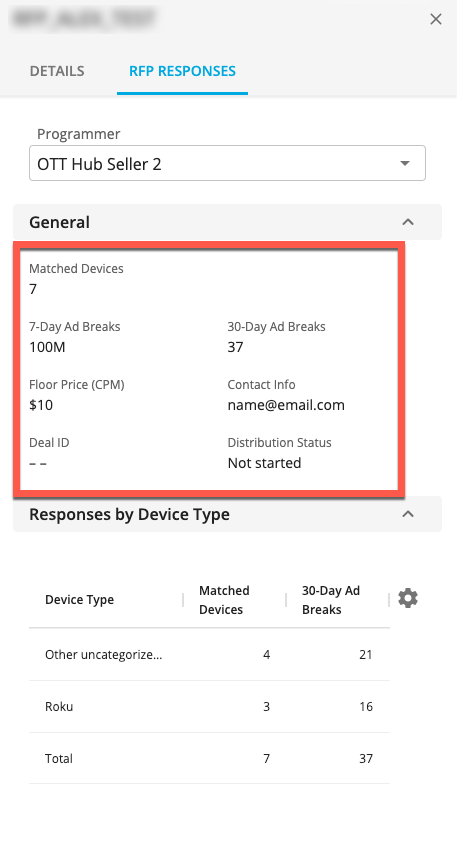
The RFP RESPONSES tab of the RFP Details panel contains the information listed below.
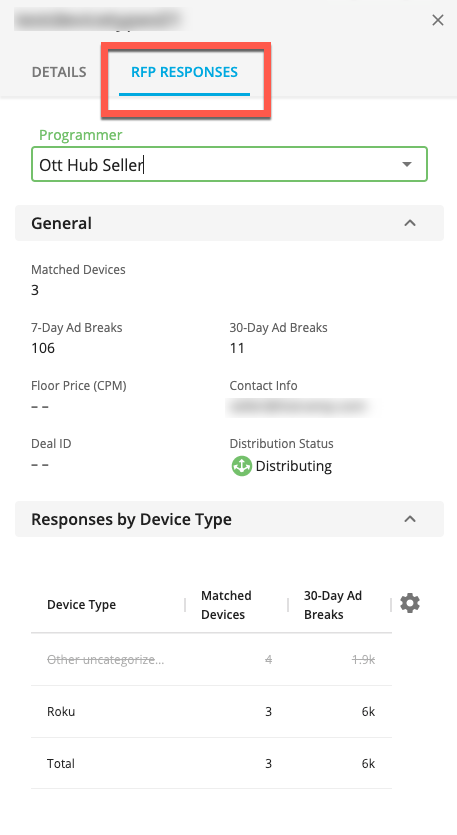
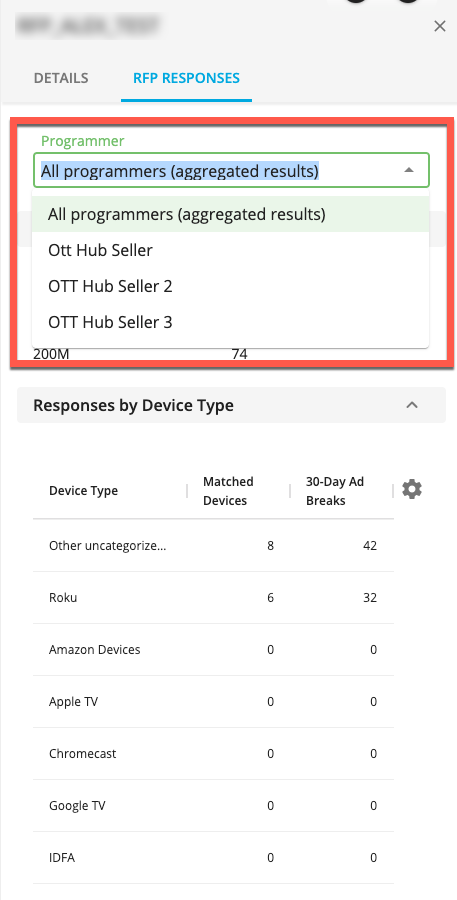
Use the Programmer dropdown to display either aggregated results from all programmers who've responded or results from a specific programmer:
The General section contains the following information when displaying aggregated results from all programmers who've responded:

Matched Devices
Floor Price (CPM)
7-day Ad Breaks
30-Day Ad Breaks
When displaying results from a specific programmer, the General section contains the following additional information:
Contact info
Distribution Status
Depending on the Deal ID Activation responses, one or both of the following sections might appear:
Publica Deal IDs
SpringServe Deal IDs
Each section contains the following information:
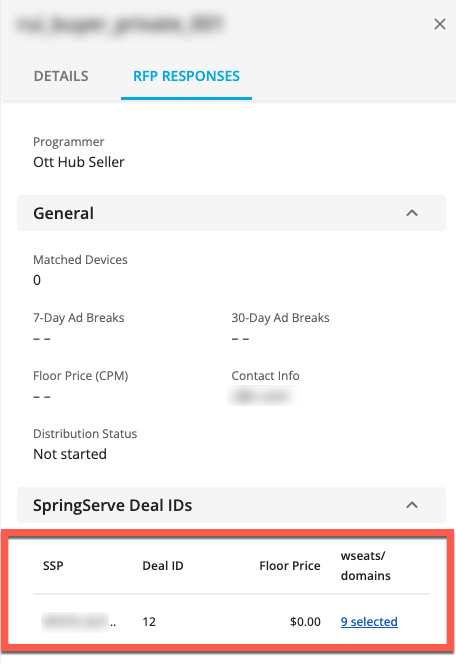
SSP
Deal ID
Floor Price
wseats/wadomains (if there's more than one entry in this field, click the link text to view the complete information)
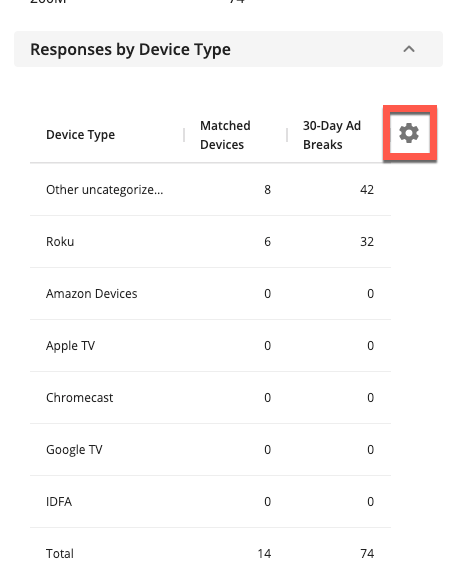
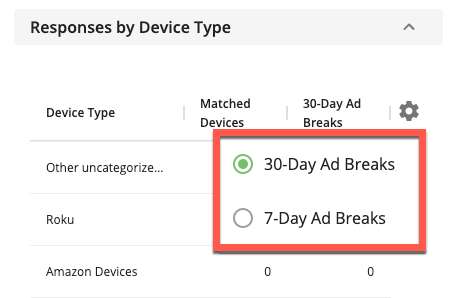
When displaying results from a selected programmer, the Responses by Device Type section contains info on the devices included in the RFP:
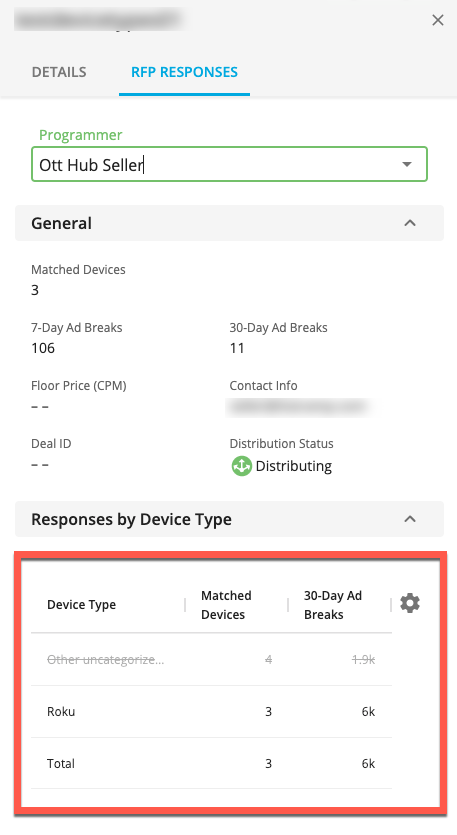
Device Type
Matched Devices
30-Day Ad Breaks
Floor Price (CPM)
Only one of the two ad breaks metrics will display. To switch between the two, click the gear icon and select the appropriate metric:
You can use the search bar and filters to filter the RFPs that are displayed:
Use the search bar to search by RFP name
Use the use case drop-down filter to filter by one or more RFP types: Public or Private
Use the Status drop-down filter to filter by one or more RFP statuses: Draft, Sent, Responded, or Withdrawn
Use the Programmer drop-down filter to filter by one or more programmers from the list of programmers you've sent RFPs to.
Use the Distribution Status drop-down filter to filter by one or more distribution statuses: Requested, Distributing, Distributed, or Failed.
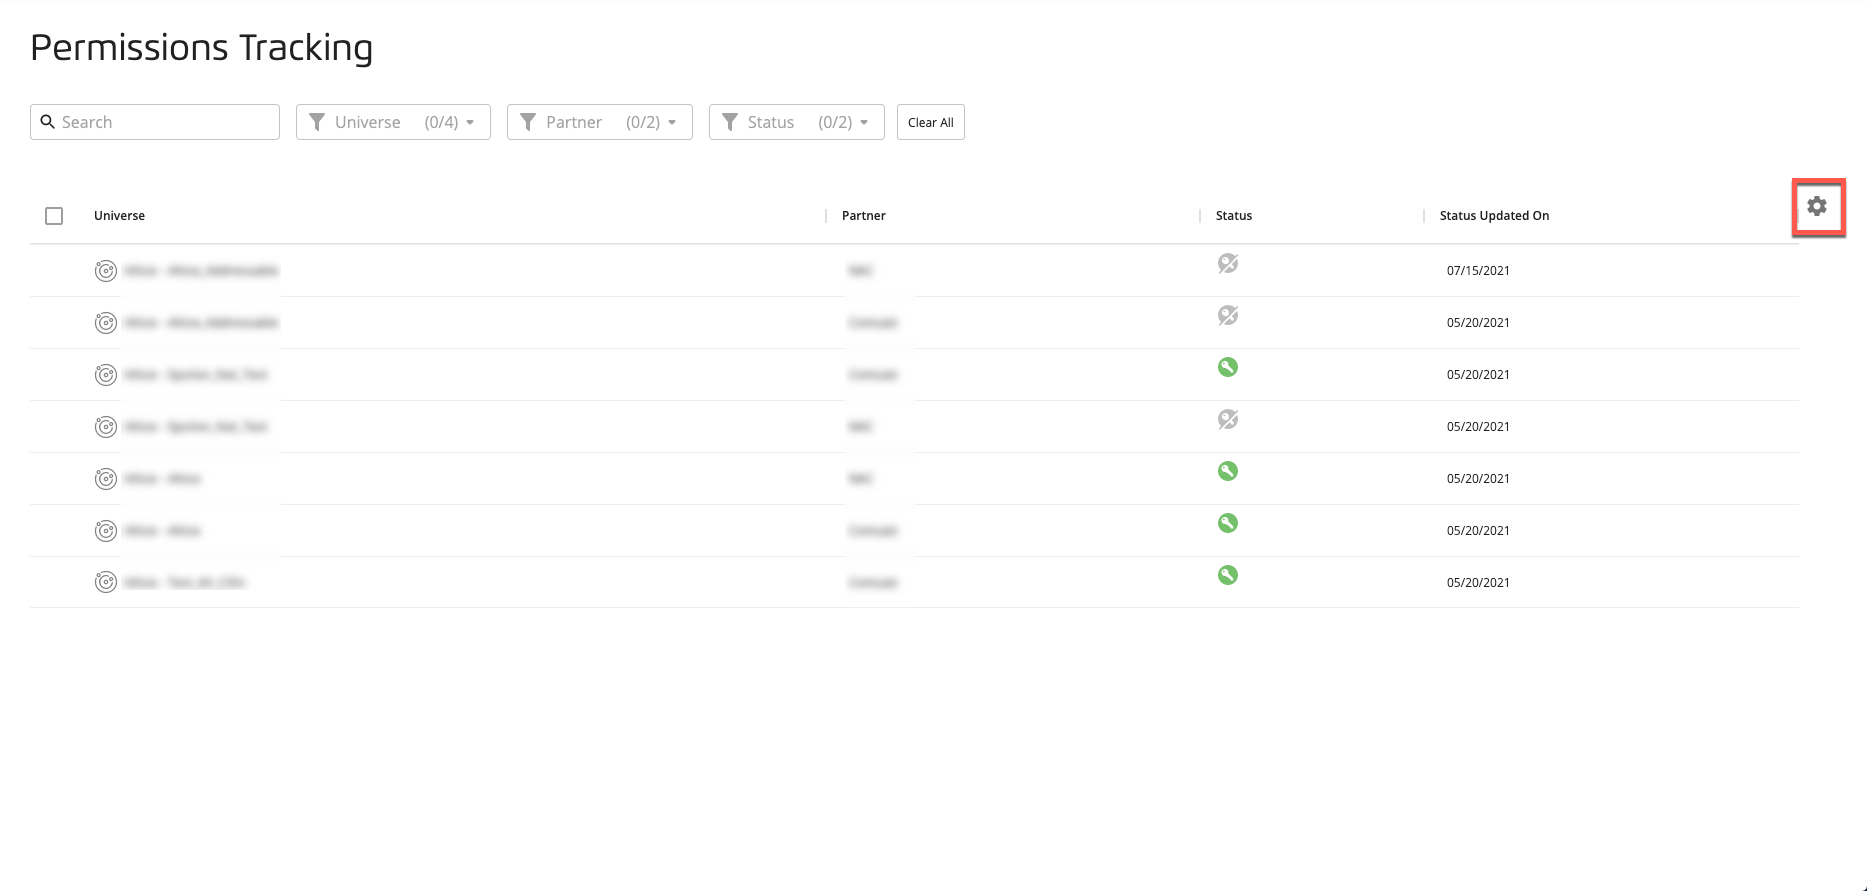
Changing the Table Display
For many tables in Advanced TV, you can change the way the table displays in some or all of the following areas:
The columns that are displayed
The order the columns are displayed in
The width of the columns
The sort order
The spacing of the table rows
Note
The images shown in this section are from the Permissions Tracking page, but the features are similar to other tables that allow you to change the way the table displays.
See the sections below for more information.
Changing the Columns that are Displayed
To change the columns that are displayed, click the table settings icon (the "gear" icon) on the right side of the table.
From the Manage Columns area of the panel that opens, check or uncheck the appropriate check boxes for the columns you want to display or hide.
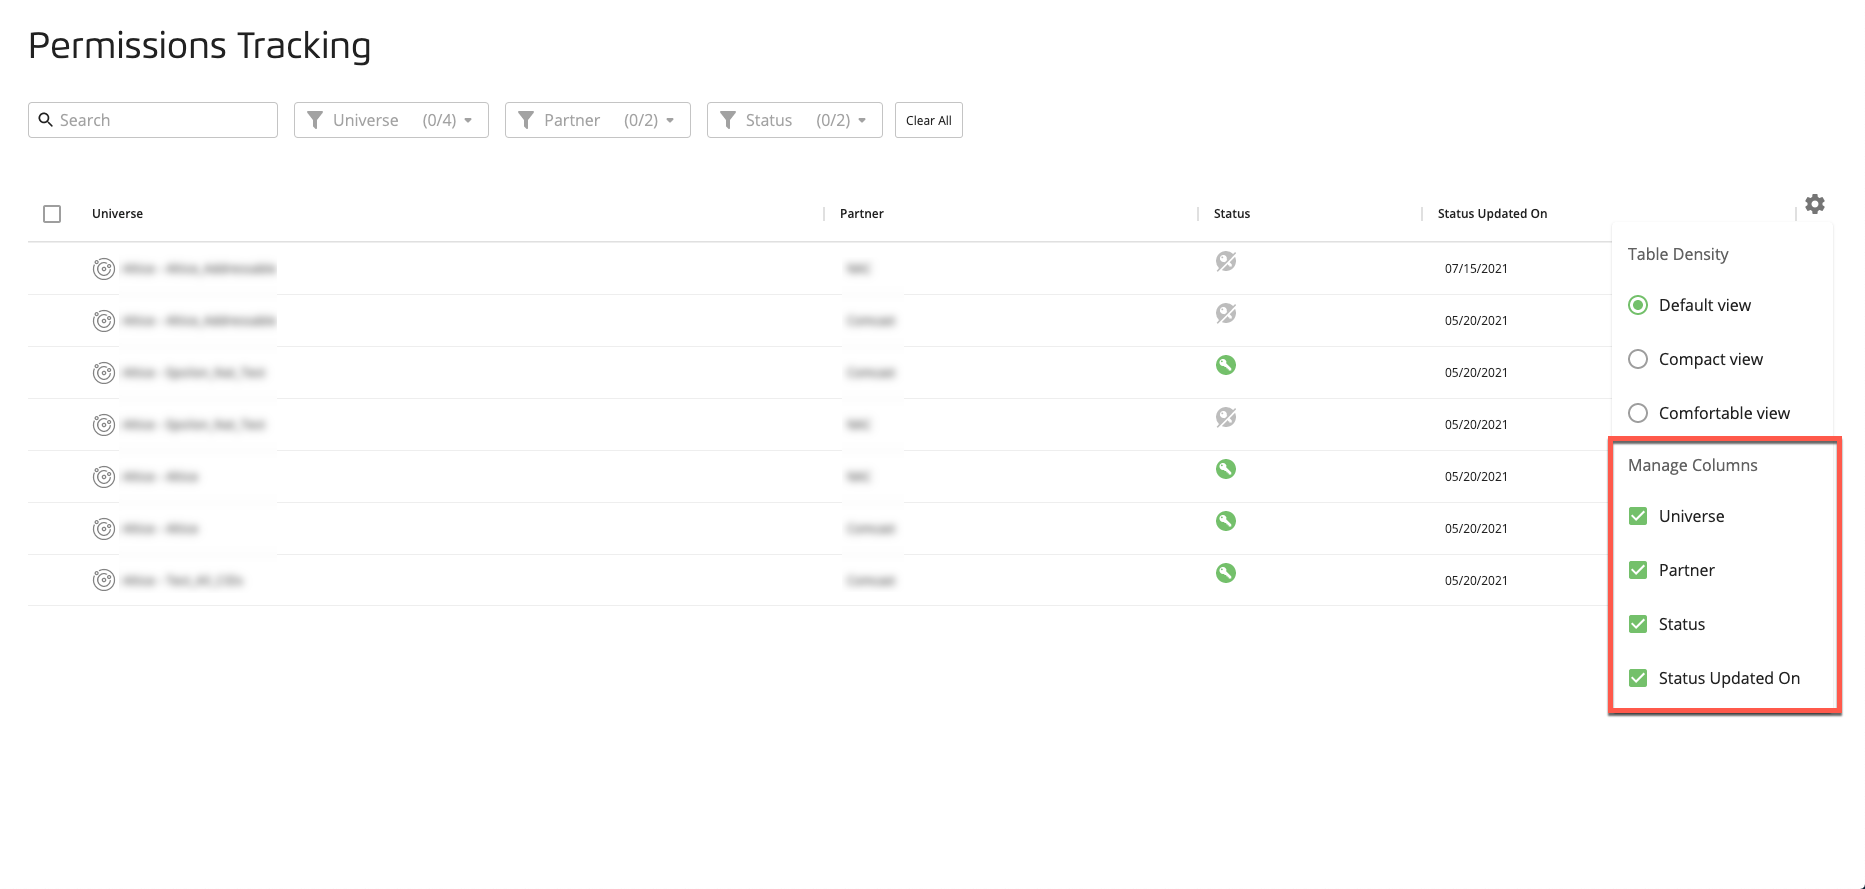
Note
Click anywhere outside of the panel to close it.
Changing the Column Order
To change the order of the table columns, click and drag each column heading into your desired location.
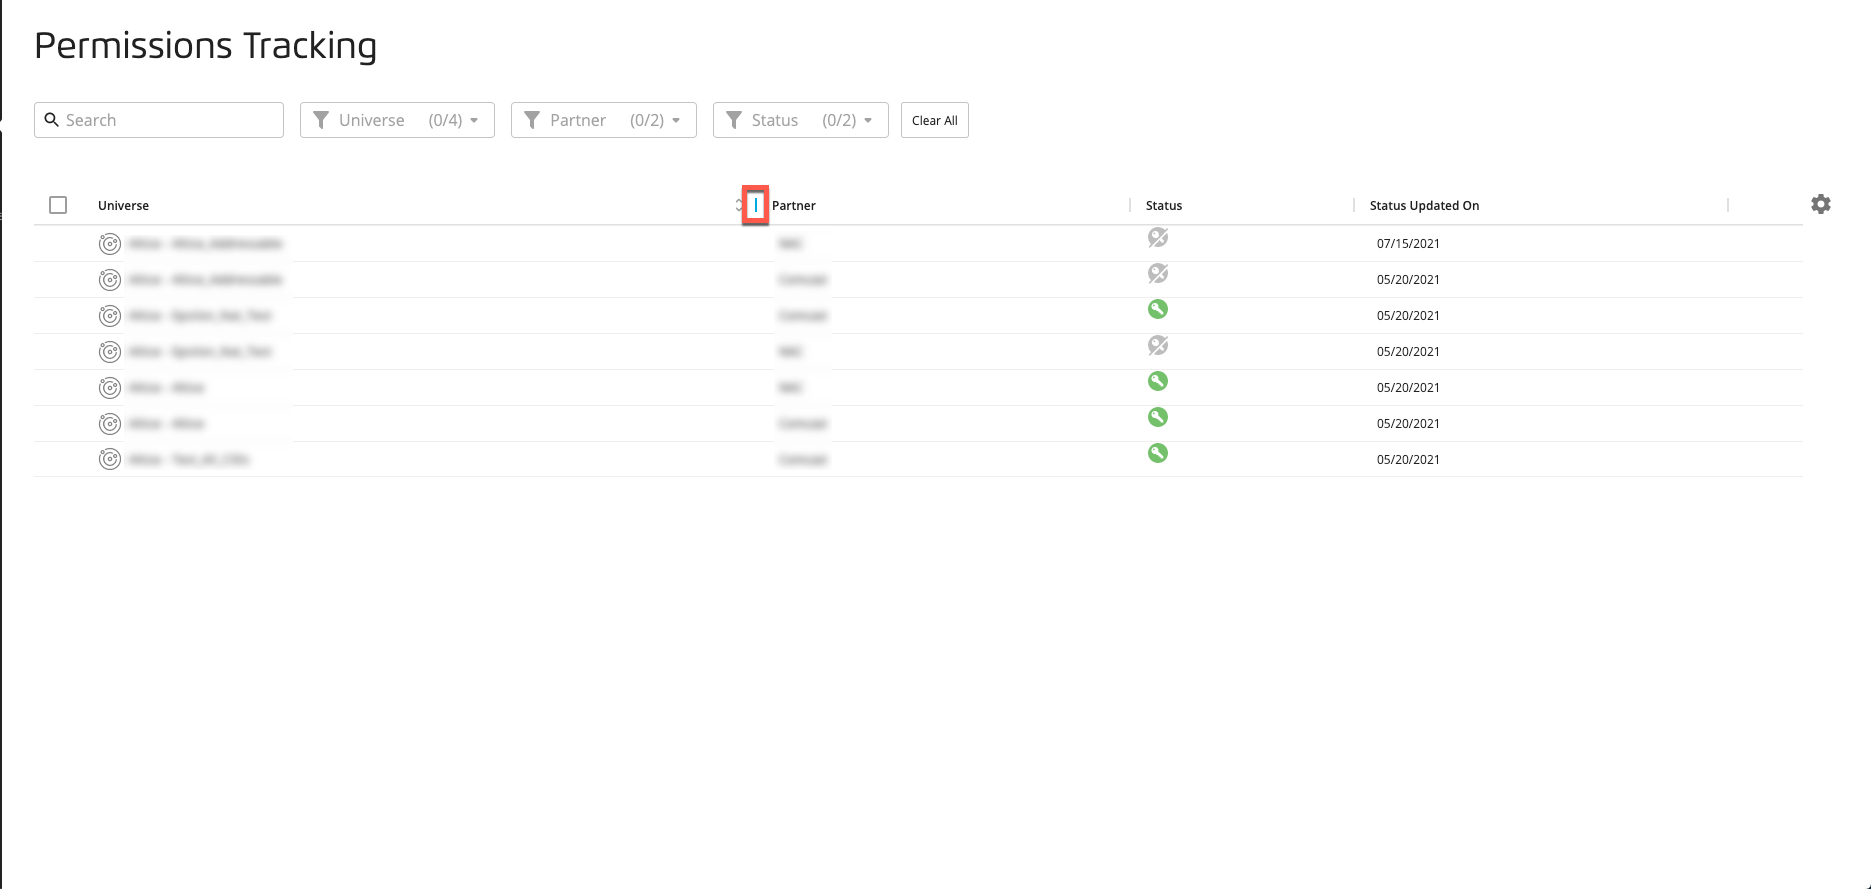
Changing the Column Width
To change the width of a particular column, click and drag the small vertical line at the right edge of that column heading.
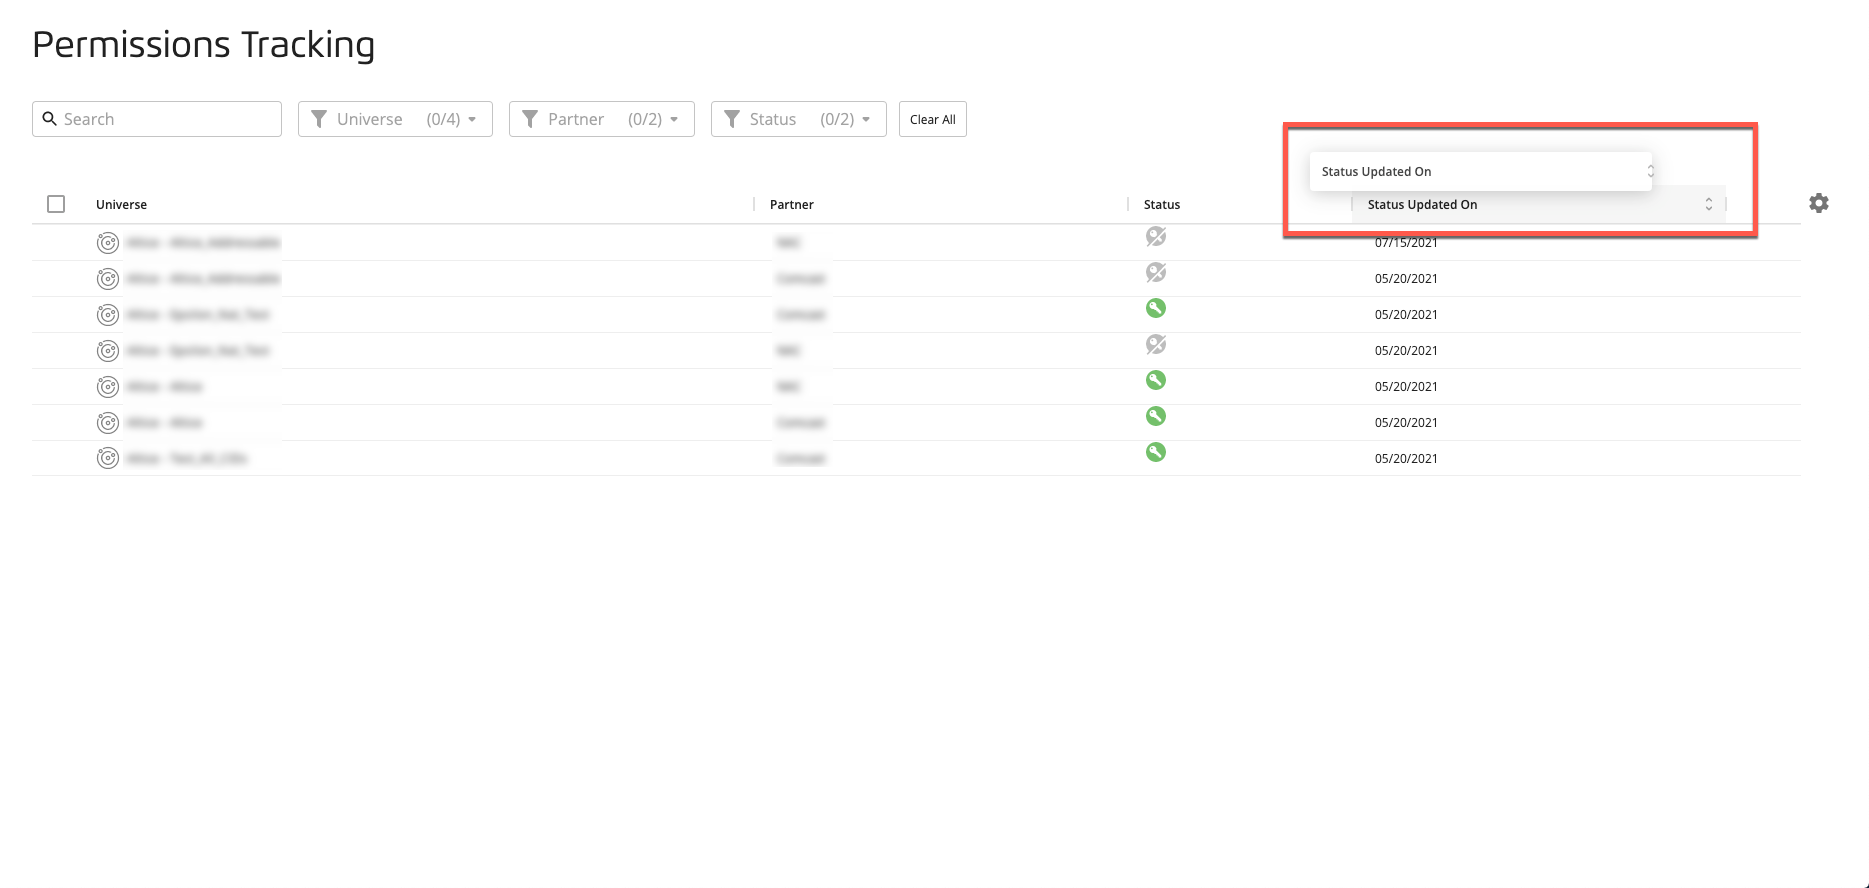
Changing the Table Sort Order
You can change the table sort order, including the column the table is sorted on and whether the sort is ascending or descending:
Note
When you first open the page, the table is sorted by the first column in an "ascending" sort by default.
To sort the table by a particular column, click the column heading.
Note
When you first click a column heading, the sort method defaults to "ascending" and an upward-pointing arrow appears on the right side of the column heading.
To change the sort method for the column the table is being sorted on from "ascending" to descending," click the column heading again. A downward-pointing arrow appears on the right side of the column heading.
Changing the Table Row Spacing
See the sections below for more information.
From the Table Density area, check the desired radio button:
Default view
Compact view spaces the rows more closely together than the default view
Comfortable view spaces the rows further apart than the default view
Note
Click anywhere outside of the panel to close it.
Filtering the Table
In addition to the search bar and any filters above the table, you might also be able to sort the table via the "more actions" menu in each column heading.
To filter the table:
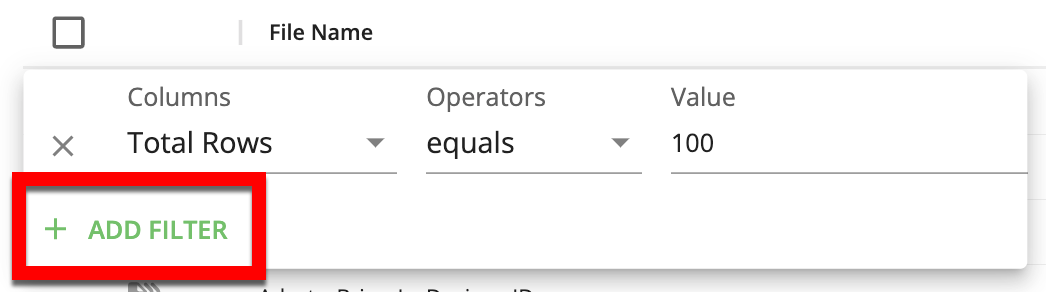
Click the "more actions" icon that appears when you hover over a column heading, and then select .


Note
If the "more actions" icon does not appear when you hover over the column heading, this type of filtering is not available for that particular table.
From the Columns dropdown in the filter box, select the column you want to use to filter.

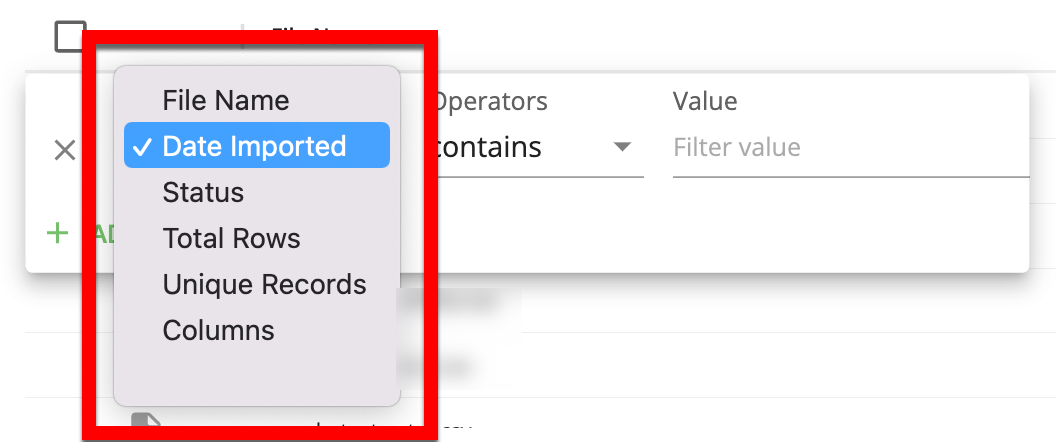
Note
By default, the column whose "more actions" menu you clicked on is selected.
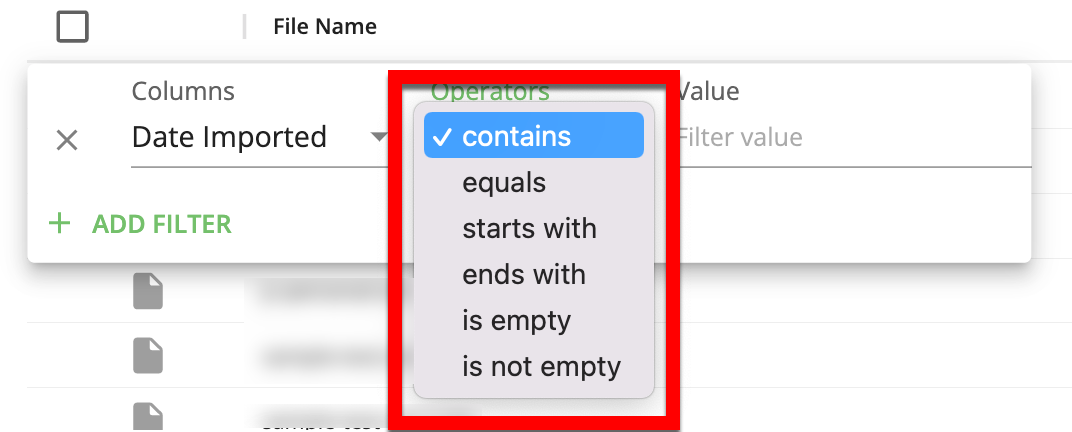
From the Operators dropdown, select the operator you want to use for the filter.

In the Value field, enter the value you want to use to filter that column with.

Note
If you have selected "is empty" or "is not empty" for the filter operator, the Value field will not appear.
To apply an additional filter, click , and then choose the operator you want to use to join the two filters ("And" to include only entries that match both filters or "Or" to include any entries that match one of the filters).
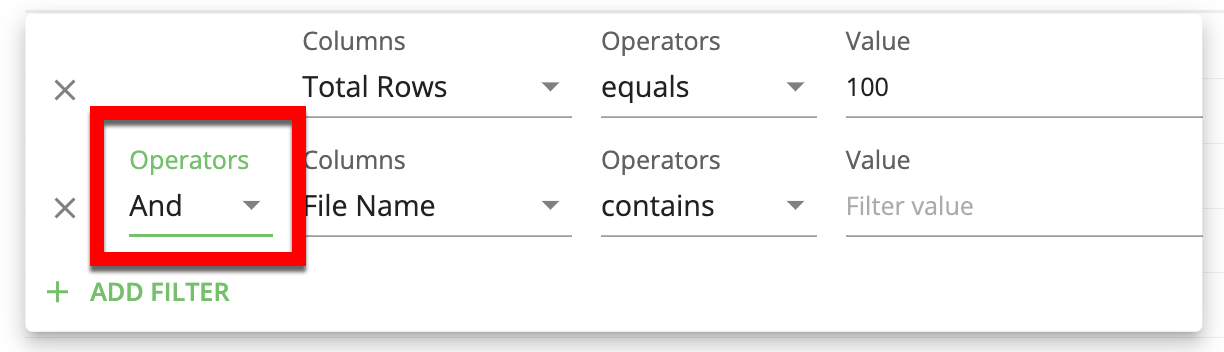
Repeat steps 2-4 for the additional filter.
To continue adding filters, repeat steps 5 and 6.
Note
To delete a filter row, click the "X" that appears on the left side of that filter row.
If you check the check box next to a particular RFP, icons appear at the bottom of the page for you to perform actions on that RFP.

The actions listed below can be performed on RFPs (some icons might be grayed out, and the available actions might vary, depending on the status of the RFP or whether someone other than you owns that RFP).
Duplicate an RFP by clicking the Duplicate icon (
 ) (so you can edit an RFP that you do not own or that has already been distributed)
Edit an existing RFP by clicking the Edit RFP icon (
 ) (if you own that audience and the audience hasn't been distributed)
Delete the RFP by clicking the Delete icon (
 ) (if you own that RFP and the RFP hasn't been distributed)
Send the RFP to the RFP Gallery (if the RFP is public) or send the RFP to selected programmers (if the RFP is private) by clicking the Send RFP icon (
 )
)Send an RFP to order by clicking the Send to Order icon (
 ) (if the RFP has been responded to but has not been sent to order)
In addition, you can start the process of building an RFP from this page by clicking .