Distribute Data to Twitter
See the sections below for information on distributing first-party data or Data Marketplace data to Twitter.
Twitter requires that an authorization using OAuth be performed by a user with the appropriate permission level before any distributions can be made to Twitter. For more information, see the
Within Connect, OAuth authorizations are performed by utilizing an OAuth "connection" and validating it with your destination-specific information. A connection can be created by any user with the appropriate permission level at Twitter and can be reused for multiple Twitter destination accounts. See "Managing OAuth Connections" for information on creating, viewing, and managing OAuth connections.
Caution
Data sellers that make distributions to Twitter on behalf of their end clients follow a different process. See "Data Sellers Distributing to Twitter" for more information.
This validation must be done when the destination account is activated, either by using an existing Twitter OAuth connection or by creating a new Twitter connection during the activation process. You can also create a Twitter OAuth connection outside of the destination account activation process. See the sections below for more information.
Whichever method you use, follow the instructions in "Perform OAuth Authorization for Twitter" below once the Twitter authorization dialog appears.
Note
Distributing data with Connect involves activating a destination account for the destination you’re distributing to and then adding segments to distribution for that destination account. See the articles below for instructions:
Overview of the Twitter Integration
LiveRamp's integration with Twitter follows the guidelines listed in the table below:
Caution
The information listed below was current at the time of publication and represents our best understanding of the integration based on the information available at the time, including information given to us by the destination platform. Any sections not filled out are areas we did not have information on at the time of publication. Use this as a general guide, but check with the platform to confirm any areas that are critical to your use case.
Category | Area | Info | Notes |
|---|---|---|---|
Delivery/Matching | Identifiers that can be delivered |
| |
Lookback window | No | ||
Time to live | |||
Enabled for Record Sync | No | ||
Accepts raw fields | No | For more information, see “Platforms that Do Not Accept Raw Fields”. | |
Duplicate segment names allowed | |||
Configuration | Account info needed |
| |
Requires OAuth authorization | Yes | ||
Additional data restrictions |
| For information on LiveRamp’s standard data restrictions, see “LiveRamp Data Restrictions” and “Data Marketplace Segment Review and Approval”. | |
Requires LiveRamp action to activate destination account |
| ||
Data Marketplace | Accepts Data Marketplace data | Yes | For more information, see the "Information for Data Sellers" section below. |
Data Marketplace pricing used | |||
Additional Data Marketplace limitations or guidelines | Yes | For more information, see the "Guidelines for Distributing Data Marketplace Data" section below. | |
Additional Information | Can display matched reach in Connect | Yes | |
Limit on number of audiences per seat ID in the platform | |||
Exposure logs available | |||
LiveRamp "Conversions API program" available | No |
|
Twitter Integration Options
When activating a Twitter destination account, the following integration options are available:
Use | Data Type | Who It’s For | Integration Name |
|---|---|---|---|
Distributing US first-party data to Twitter | Advertisers | Twitter First-Party Data US | |
Distributing Data Marketplace segments (third-party data) to Twitter through LiveRamp's Advertiser Direct program | Data Marketplace data | Data buyers | Twitter (US) Data Marketplace |
Distribute First-Party Data to Twitter
To distribute first-party data to Twitter, activate the “Twitter First-Party Data US” destination account tile by following the instructions in "Activate a New Destination Account".
Once you’ve activated the destination account, follow our instructions on distributing data to a destination.
Configure the Required Properties
When activating the destination account, the following fields are required:
Field | Description | Notes |
|---|---|---|
Account ID: | The Twitter advertiser account id (NOT the Twitter handle) of the account where you'd like to send data. | This ID is typically a lowercase alphanumeric string (e.g. 12a345bc) and can be found under 'Account settings' in the Twitter platform. |
Ttl in Days: | The number of days that users added to this audience will remain actionable on Twitter. | After the number of days specified in this field have passed, the users will be removed from the Twitter audience. The default and maximum allowed limit is 395 days (13 months). |
Destination Account Name | The name you want to give to this destination account. | Enter a unique and memorable name for this destination account, or accept the default suggested name. You can use any name you want as long as it is less than 150 characters in length. |
Enable and Validate an OAuth Connection
Follow the instructions in the "Performing OAuth Authorization for Twitter" section below to enable and validate an OAuth connection for the Twitter destination account.
Distribute Data Marketplace Data to Twitter
Data Marketplace data can be distributed to Twitter in the situations listed below:
Party Distributing | Distribution Type | Integration to Use | Notes |
|---|---|---|---|
Data buyers | Standard segments: Yes | Twitter (US) Data Marketplace | |
Custom segments: Yes | |||
Data sellers | Standard segments: No | ||
Custom segments: No |
To distribute Data Marketplace data to Twitter, activate the “Twitter (US) Data Marketplace” destination account tile listed in the table above by following the instructions in "Activate a New Destination Account".
Once you’ve activated the destination account, follow our instructions on distributing data to a destination.
Guidelines for Distributing Data Marketplace Data
Use the following guidelines when distributing Data Marketplace data:
Distributing Data Marketplace data to this platform goes through LiveRamp’s Advertiser Direct program, which requires a separate agreement and follows a different process from Data Marketplace distribution to other platforms. For more information, see “Implementing LiveRamp's Advertiser Direct Solution”.
The Advertiser Direct program requires that data sellers share their custom segments with the data buyer within Connect. See “Implementing LiveRamp’s Advertiser Direct Solution” for more details.
All Twitter usage reporting is performed automatically. You do not need to perform any usage reporting actions.
Configure the Required Properties
When activating the destination account, the following fields are required:
Field | Description | Notes |
|---|---|---|
Account ID: | The Twitter advertiser account id (NOT the Twitter handle) of the account where you'd like to send data. | This ID is typically a lowercase alphanumeric string (e.g. 12a345bc) and can be found under 'Account settings' in the Twitter platform. |
Data Usage Reporting Requirement | Enter "I Agree" to acknowledge that you will report the impressions and amount spent associated with this campaign to LiveRamp on a monthly basis. | See "Report Usage for Data Marketplace Distributions to Advertiser Direct Destinations". |
Payment Model | Enter "I Agree" to acknowledge that you will report the impressions and amount spent associated with this campaign to LiveRamp on a monthly basis. | |
Payment Requirement | Type "I Agree" in the text box to acknowledge that you will pay for the use of this data in accordance with the Consumer Social Amendment. | |
Reporting Contact Email | Enter "I Agree" to acknowledge that you will report the impressions and amount spent associated with this campaign to LiveRamp on a monthly basis. | |
Ttl in Days: | The number of days that users added to this audience will remain actionable on Twitter. | After the number of days specified in this field have passed, the users will be removed from the Twitter audience. The default and maximum allowed limit is 395 days (13 months). |
Destination Account Name | The name you want to give to this destination account. | Enter a unique and memorable name for this destination account, or accept the default suggested name. You can use any name you want as long as it is less than 150 characters in length. |
Enable and Validate an OAuth Connection
Follow the instructions in the "Performing OAuth Authorization for Twitter" section below to enable and validate an OAuth connection for the Twitter destination account.
Information for Data Sellers
For information on distributing you Data Marketplace segments to Twitter, review the guidelines below:
Pricing Information: Advertiser Direct.
Syndication allowed: No.
Data Sellers Distributing to Twitter
Data sellers that make distributions to Twitter through either a first-party data or Data Marketplace destination account on behalf of their end clients have been authorized to use Twitter's Audience Manager solution for OAuth, which allows LiveRamp to perform OAuth authorization for you. In these cases, the advertiser who owns the ads account that will be receiving the segment must add “@LiveRampDataSt1” as a user to their account with the permission level of "Partner Audience Manager."
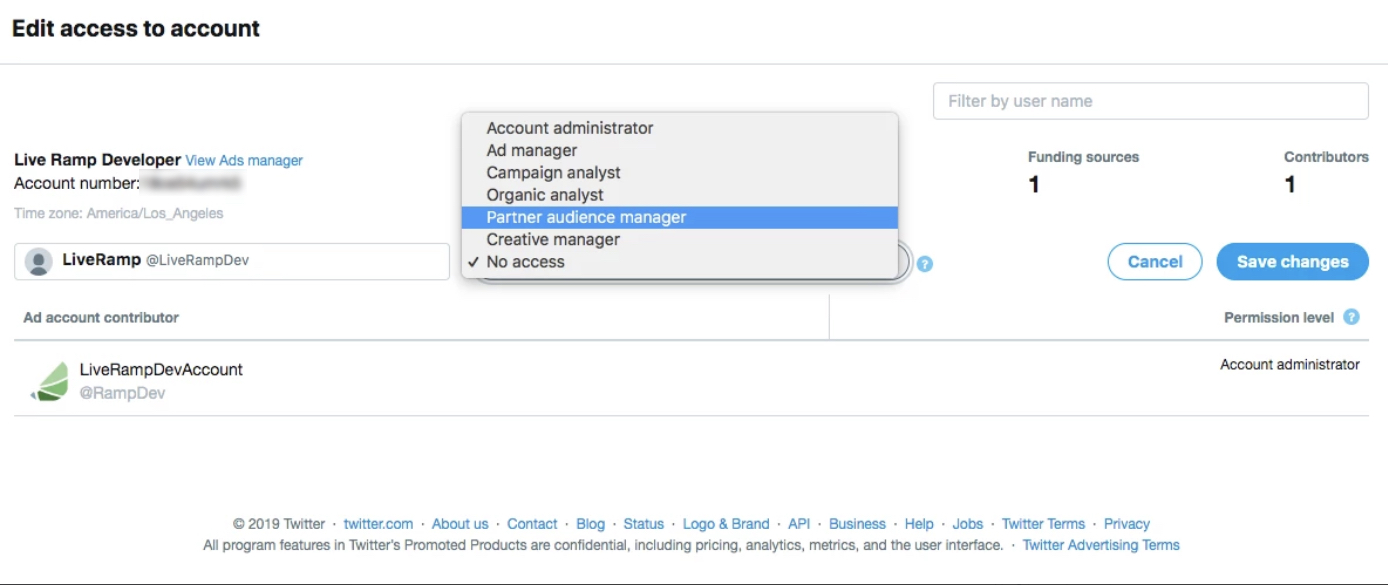
See the "Setting up multi-user login in your ads account" section of Twitter's documentation.
After the advertiser has set this up, you can activate a Twitter destination account (either first-party data or Data Marketplace) but LiveRamp will need to perform the OAuth authorization. Create a support case to have LiveRamp perform the OAuth authorization.
Once LiveRamp has performed the OAuth authorization, you'll see the LiveRamp individual who performed the OAuth authorization listed as the OAuth connection owner. If the OAuth connection needs to be reauthenticated, create a support ticket (the reauthentication does not need to be performed by the LiveRamp individual who performed the original OAuth authorization).
Performing OAuth Authorization for Twitter
Twitter requires that an authorization using OAuth be performed by a user with the appropriate permission level before any distributions can be made to Twitter.
Within Connect, OAuth authorizations are performed by utilizing an OAuth "connection" and validating it with your destination-specific information. A connection can be created by any user with the appropriate permission level at Twitter and can be reused for multiple Twitter destination accounts. See "Managing OAuth Connections" for information on creating, viewing, and managing OAuth connections.
This validation must be done when the destination account is activated, either by using an existing Twitter OAuth connection or by creating a new Twitter connection during the activation process. You can also create a Twitter OAuth connection outside of the destination account activation process. See "Activate a Destination Account for OAuth Destinations" for more information.
Whichever method you use, follow the instructions in "Perform OAuth Authorization for Twitter" below once the Twitter authorization dialog appears.
Perform OAuth Authorization for Twitter
OAuth expiration: None
Required destination account fields:
Account ID: Alphanumeric string of characters that indicate the ads account ID that the segments will be sent to.
Ttl In Days: Number of days that users added to a segment will be active in the segment. The default value is 180 days. This can be changed after the DA is created.
Caution
Data sellers that make distributions to Twitter on behalf of their end clients follow a different process. See "Data Sellers Distributing to Twitter" for more information.
Steps to perform OAuth for Twitter:
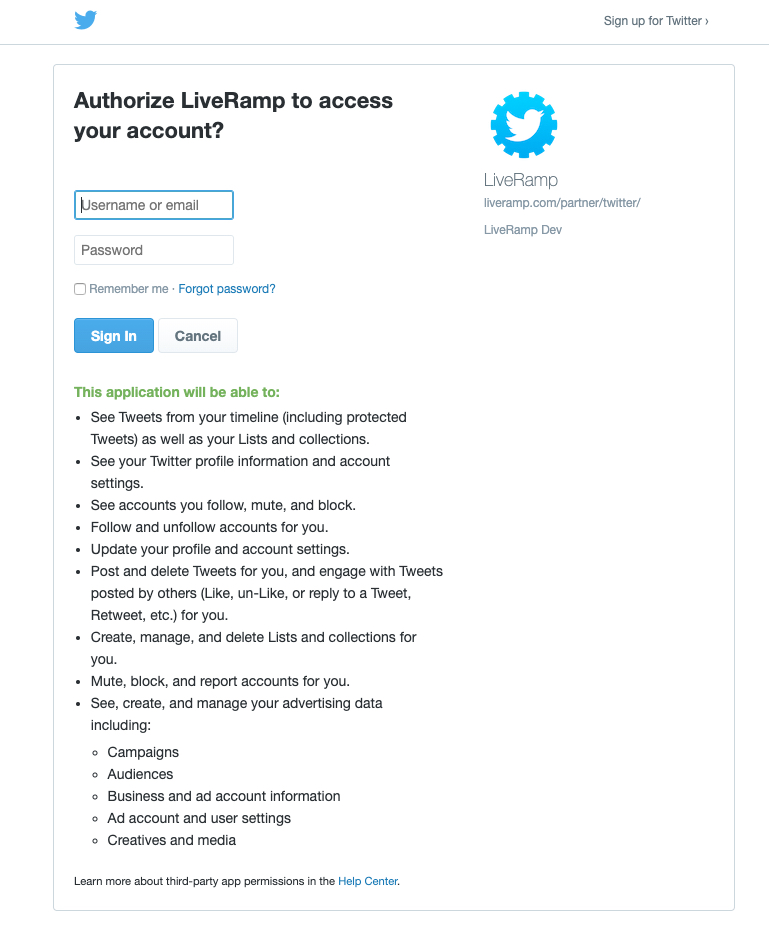
After the Twitter authorization dialog appears, enter your Twitter credentials and then click Sign In.
You’ll briefly see a redirect dialog.
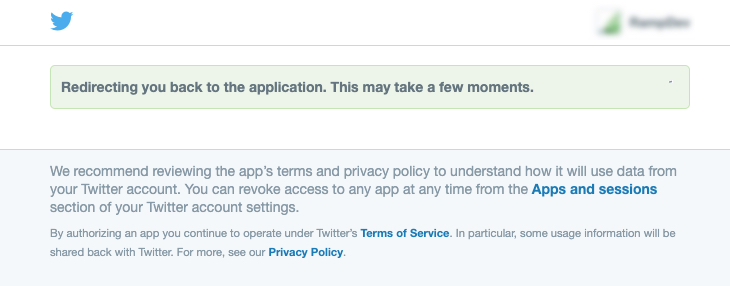
You’ll be directed back to the destination account screen and should see the blue success banner at the top of the screen.